1
CONTENT
1. Product features ……………………………………………………….1
2. Important safety instructions…..........................................................2
3. Battery and AC Power Adapter…………………………………………3
4. Package content………………………………………………………….3
5. Installation …………………………………………………………….…..4
6. Detailed features and controls ……………………..………….….……5
7. Answering a call..…………………………………………………………7
8. Making a call ………………………………………………………….…..7
9. Transferring a Call from Handset to Speakerphone………….……….7
10. Volume control (receiver and speakerphone)…………………….……7
11. Amplify key and receiver tone control……………………………..……7
12. Auto “Amplify” switch………………………………………………..……8
13. Ringer volume and tone setting…………………………………………8
14. Programming one-touch memories …………………………..………..8
15. Dialing from a one-touch memory …………………………..……..…..8
16. Phone book (add, edit, delete, delete all) …………………..…………8
17. Dial from phone book…………………………………………..………..9
18. Review outgoing call list ……………………………………….………10
19. Copy from outgoing call list to phone-book ………………………….10
20. Review incoming CID list……………………………………………….10
21. Copy from incoming CID list to phone-book …………………..……..10
22. Call Waiting …………………………………………………….….…….11
23. Redial……………………………………………………………………..11
24. Pause function…………………………………………………………..11
25. Set talking CID ………………………………………………………….11
26. Set talking keypad ……………………………………………………..12
27. Set language ……………………………………………………………12
28. Set LCD display contrast ………………………………………...……12
29. Set local area code …………………………………………………… 12
30. Set time / date ………………………………………………………….13
31. Set flash time (for activating call waiting) ……………………………13
32. Audio output jack………………………………………………………..13
33. Technical Information …………………………………………..………14
34. Trouble shooting…………………………………………………...……14
35. Warranty Service Information……………………………….…………15
36. FCC Registration Information………………………………………….17
PRODUCT FEATURES
1.
2.
3.
4.
5.
6.
7.
8.
9.
10.
11.
12.
13.
14.
15.
16.
17.
18.
19.
20.
21.
High Definition Sound Technology ensures crystal clear conversation
Up to 55 dB Of handset amplification
“AMPLIFY” key that remembers handset volume setting
Four (4) digital tone control settings
High performance speakerphone
Talking Caller ID
Talking keypad & controls
Large LCD display
Selectable talking & display language (English, French, & Spanish)
Six (6) one-touch memories
70 incoming CID memories
70 phone-book memories
25 outgoing call list
LCD and keypad backlight
Super loud ringer
Dual ring flasher (front and side)
Voice-mail indicator
Music-on-hold with indicator
Compatible with FSK CID (Type II) and voice mail signals
Lighted keypad
Battery back-up option on Base
1
Important Safety Instructions
Instructions pertaining to a risk of fire, electric shock or injury to persons.
Privacy of communications may not be ensured when using a cordless phone.
WARNING – When using electric appliances, basic precautions should always
be followed, including the following:
1. Read all the instructions before using the appliance.
2. This product uses rechargeable batteries. Do not use any
non-rechargeable battery as charging of this type can cause battery leakage.
3. Always disconnect phone cord to wall jack before changing or installing
batteries.
4. To reduce the risk of injury, close supervision is necessary when an
appliance is used near children.
5. Do not contact moving parts or any exposed metal surface.
6. Only use attachments recommended or sold by the manufacturer.
7. Do not use outdoors. Do not use near water.
8. To disconnect, turn all controls to the off position, then remove plug from
outlet.
9. Do not unplug by pulling on cord. To unplug, grasp the plug, not the cord.
10. Unplug from outlet when not in use and before servicing or cleaning.
11. Do not operate any appliance with a damaged cord or plug, or after the
appliance malfunctions or is dropped or damaged in any manner. Return
appliance to the nearest authorized service facility for examination, repair, or
electrical or mechanical adjustment.
12. To Reduce the Risk of Electric Shock, this appliance has a polarized plug
(one blade is wider than the other). This plug will fit in a polarized outlet only
one way. If the plug does not fit fully in the outlet, reverse the plug. If it still
does not fit, contact a qualified electrician to install the proper outlet. Do not
change the plug in any way.
13. Avoid using any telephone product during an electrical storm. There may
be a remote risk of electric shock from lightning.
14. Do not use the telephone to report a gas leak in the vicinity of the leak.
15. Specifications of this product are subjected to change without notice.
2
Battery and AC Power Adapter
Base: Accepts four (4) user provided AA size regular batteries for AC power
outage backup purpose. Installation of base batteries is optional.
Please care for the environment by disposing any used batteries through your
local community recycle center. Do not dispose any used battery in trash bin.
WARNING: For safety consideration, always disconnect phone cord to wall jack
before changing batteries
Disposal of Used Batteries and Safety Information
1. Do not dispose of the battery in a fire as it may explode. Please dispose
any used battery through your local community recycle center.
2. Do not open or mutilate the battery. Released electrolyte is highly corrosive
and may cause damage to the eyes and skin. It may be toxic if swallowed.
3. Exercise care in handling batteries in order not to short the battery with
conducting material such as rings, bracelets and keys. Shorting a battery
may overheat and cause burns.
AC Power Adapter
For your safety, please plug the provided AC power adapter into the nearest AC
outlet. Use only UL listed Class 2 power adapter, 9VDC, 300 MA.
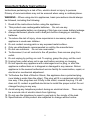
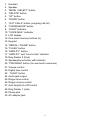
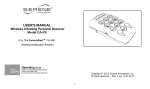
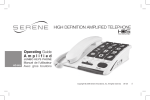
Package Content
MENU/
SE L ECT
M1
HOLD
Voice Mail
Hold
DELE T E
M2
DOWN OUT CALLS
UP
M3
PROG
M4
SPEAKER
Bass< 1234> treble
M5
FLASH
P HO NE
BOOK
Line cord
M6
REDIAL/P
AMPLIFY
HD-65
Hi- Definition Sound
Base Unit
Handset
Coil Cord
AC Adapter
User's Manual
Wall mount bracket
3
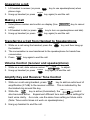
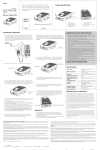
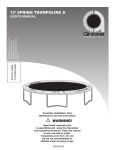
Installation
1. Connect AC adapter and phone cord to the base as shown.
2. Install optional batteries in base (for your safety, always disconnect phone
cord to wall before changing / installing batteries).
4
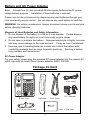
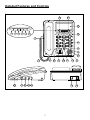
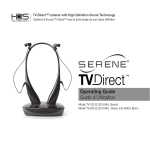
Detailed Features and Controls
9
10
11
ME N U/
SELECT
3
D EL E TE
4
UP
5
DOWN OUT C AL LS
6
7
PHONE
BO O K
8
Voi c e Mail
Hold
MENU/
S E LE C T
DE LE TE
M1
M2
UP
M3
PHONE
B O OK
DOWN OU T CALLS
M4
M5
2
HOLD
TONE
D
E
F
G
H
I
J
K
L
M
N
O
P
Q
RS
T
U
V
W
X
YZ
PROG
SPEAKER
12
M6
A
B
C
FLASH
13
REDIAL/ P
14
Bass< 1234> treble
15
VOL.
HD 65
23 22
1
AUTO
ON OFF
28
RINGER
LO MED HI
21
20 19
16
18 17
Class(Classe)2
9VDC 300mA
AUDIO
RINGTONE
LO HI OUTPUT
LINE
27 26 25 24
29
5
-
+
30
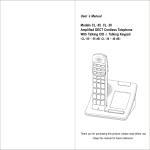
1. Handset
2. Speaker
3. “MENU / SELECT” button
4. “DELETE” button
5. “UP” button
6. “DOWN” button
7. “OUT CALLS” button (outgoing call list)
8. “PHONE-BOOK” button
9. “HOLD” indicator
10. “VOICE MAIL” indicator
11. LCD display
12. One-touch memory buttons (6)
13. Keypad
14. “REDIAL / PAUSE” button
15. “FLASH” button
16. “AMPLIFY” button
17. “AMPLIFY” and “Line-in-Use” indicator
18. Ring flasher 2 (front)
19. Speakerphone button with indicator
20. “PROGRAM” button (for one-touch memories)
21. Volume control
22. Digital tone control
23. “HOLD” button
24. Audio jack output
25. Ringer tone control
26. Ringer volume control
27. Auto Amplify On-Off control
28. Ring flasher 1 (side)
29. Phone jack
30. AC adapter jack
6
Answering a call
SPEAKER
1. Lift handset to answer (or press
key to use speakerphone) when
phone rings.
SPEAKER
2. Hang up handset (or press
key again) to end the call.
Making a Call
1. Enter phone number and confirm on display (Use DELETE key to cancel
entry).
SPEAKER
2. Lift handset to dial (or press
key to turn on speakerphone and dial).
SPEAKER
3. Hang up handset (or press
key again) to end the call.
Transferring a Call from Handset to Speakerphone
SPEAKER
1. While on a call using the handset, press the
key and then hang up
the handset.
2. The conversation is now transferred to the speakerphone for hands-free
conversation.
SPEAKER
3. Press
key again to end the call.
Volume Control (receiver and speakerphone)
VOL.
1. While on a call, slide volume control
to adjust.
SPEAKER
2. Hang up handset (or press
key again) to end the call.
Amplify Key and Receiver Tone Control
1. While on a call using handset, press
key to add an extra level of
amplification (37 dB) to the receiver volume. This is indicated by the
illuminated ring around the key.
TONE
2. While the
key is active (illuminated), the
control
also becomes active. Experiment different tone and volume settings for
best voice clarity. As a rule, use the same tone setting on future calls.
(Note: Tone control does not work on speakerphone).
3. Hang up handset to end the call.
Bass<1234> treble
7
Auto “Amplify” Switch
This switch is located on the side of the phone, and it determines the initial
condition of the AMPLIFY function. If this switch is set to ON, the
key
will be active (illuminated) each time you lift the handset off its cradle. When
this key is illuminated, an extra level of amplification is added to the receiver
volume and tone control also becomes active.
If this switch is set to OFF, the user must manually press the
order to activate the extra receiver volume.
key in
Ringer volume and tone setting
Both switches are located on the side of the phone. Three ringer volume
settings are provided (Hi – Med - Lo). Two ringer tone settings are provided
(Hi - Lo).
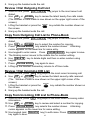
Programming One-Touch Memories
1. While off-line, press PROG key and then enter phone number.
2. Press a One-Touch memory key to save.
3. Repeat Steps 1 and 2 for other One-Touch memories.
Dialing from a One-Touch Memory
1. While off-line, press a one-touch memory key to select and to confirm on
the display. There will be audio confirmation if the “Talking Keypad”
feature is on.
SPEAKER
2. Lift the handset to go on-line and dial. (Or press
key to go on-line
and dial).
3. Hang up handset to end the call.
Phone Book (add, edit, delete, delete all)
ADD
1. While off-line, press PHONE BOOK key. Screen displays “SEARCH
ADD”.
2. Press UP key to highlight “ADD” by making it blinking.
3. Press PHONE BOOK key again to select “ADD”.
4. Use the keypad to enter a name on the blinking cursor line.
5. Press PHONE BOOK key again to save the name. The blinking
cursor is now no the middle line.
6. Use the keypad to enter the phone number on the blinking cursor line.
8
7. Press PHONE BOOK key again to save the contact.
displays “SEARCH ADD” again for the next entry.
8. Repeat steps 1 to 7 to add another contact.
9. Lift handset momentary to exit phone-book
Screen
Edit
1. While off-line, press PHONE BOOK key. Screen displays “SEARCH
ADD” with search blinking.
2. Press PHONE BOOK key again to select. Screen displays first
phone-book entry.
3. Use UP or DOWN key to search the list for editing.
4. Press PHONE BOOK key again to select. The blinking cursor is on
the name’s line.
5. Use the keypad, DELETE , UP and DOWN key to change the
name.
6. Press PHONE BOOK key again to save. The blinking cursor is now
on the number’s line.
7. Use the keypad, DELETE , UP and DOWN key to change the
number.
8. Press PHONE BOOK key again to save.
9. Lift handset momentary to exit phone-book.
Delete or Delete All
1. While off-line, press PHONE BOOK key. Screen displays “SEARCH
ADD” with search blinking.
2. Press PHONE BOOK key again to select. Screen displays first
phone-book entry.
3. Use UP or DOWN key to search the list for editing.
4. While a contact is shown on the screen, a quick press of the DELETE
key displays “DELETE ?” (A longer press will display “DELETE ALL ?).
5. Press DELETE key again to confirm.
6. Lift handset momentary to exit phone-book.
Dial from Phone-Book
1. While off-line, press PHONE BOOK key. Screen displays “SEARCH
ADD” with search blinking.
2. Press PHONE BOOK key again to select. Screen displays first
phone-book entry.
3. Use UP or DOWN key to search the list.
4. While a contact is shown on the screen, lifting the handset dials that
SPEAKER
contact’s number. (Or press
key to use speakerphone.)
9
5. Hang up the handset ends the call.
Review / Dial Outgoing Call List
1. While off-line, press OUT CALLS key jumps to the most recent call
dialed.
2. Use UP or DOWN key to review the latest twenty-five calls made.
(The number of calls made is now shown on the upper right corner of the
screen).
SPEAKER
3. Lifting the handset or press the
key redials the number shown on
the screen.
4. Hang up the handset ends the call.
Copy from Outgoing Call List to Phone-Book
1. While off-line, press OUT CALLS key jumps to the most recent call
dialed.
2. Use UP or DOWN key to select the number for copying.
3. Press PHONE BOOK key selects the number shown. A blinking
cursor appears on the lower line for name entry.
4. Use keypad to enter name. Press PHONE BOOK key again to save.
5. The blinking cursor moves to the middle line for number editing.
6. Use DELETE key to delete digits and then re-enter number using
keypad.
7. Press PHONE BOOK key again to save.
8. Lifting up the handset momentary returns to off-line mode.
Review / Dial Incoming CID List
5. While off-line, press UP key jumps to the most recent incoming call.
6. Use UP or DOWN key to review the latest seventy calls received.
(The number of calls is now shown on the upper right corner of the
screen).
SPEAKER
7. Lifting the handset or press the
key redials the number shown on
the screen.
8. Hang up the handset ends the call.
Copy from Incoming CID List to Phone-Book
9. While off-line, press UP key jumps to the most recent incoming caller
information.
10. Use UP or DOWN key to review and select a number for copying.
11. Press PHONE BOOK key selects the number shown. A blinking
cursor appears on the lower line for name editing.
12. Use keypad (and DELETE key) to edit name. Press PHONE BOOK
key again to save.
10
13. The blinking cursor moves to the middle line for number editing.
14. Use DELETE key to delete digits and then re-enter number using
keypad.
15. Press PHONE BOOK key again to save.
16. Lifting up the handset momentary returns to off-line mode.
Call Waiting
If you are on a call and there is a new call coming in, you will hear a short
beep tone in your receiver signifies a new call is waiting. The new caller’s
incoming CID information also appears on the display.
(Note: You must
subscribe to both CID and Call Waiting services from your local phone
company in order to enjoy this convenience.)
Answer a new call and place the first call on “HOLD”
1. Press FLASH key to answer this new call automatically places the first
call on HOLD.
2. Press FLASH key again to switch back to the first caller while placing
the second (new) caller on HOLD. This way you can toggle back and
forth between these two calls.
To end the first call but keep the second (new) call
1. While on the first call, tell the first caller to hang up.
2. Press FLASH key to jump back to the second (new) caller.
3. Hang up the handset to end the call.
Redial
1. Lift the handset to go on-line and then press REDIAL .
key to go on-line and then press REDIAL ).
2. Hang up the handset to end the call.
(Or press
SPEAKER
Pause Function
During pre-dialing or one-touch memory programming, press REDIAL / P
key inserts a 3-second pause into the dialing sequence. For example: 9 P
7 2 2 8 8 5 0. where “P” represents a 3-second pause. This pause is needed
to access an outside line on some business phone system.
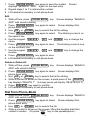
Set Talking CID
1. While off-line, press MENU / SELECT key for about a second to enter
menu setting mode. Screen displays “MENU”.
2. Press UP key once and screen displays “SET TALKING CID”.
3. Press MENU / SELECT key to select.
11
4. Press UP key to select the number (0 to 4) of CID announcement on
an incoming call.
5. Press MENU / SELECT key to confirm.
6. Lift handset momentary to exit menu setting mode.
Set Talking Keypad
1. While off-line, press MENU / SELECT key for about a second to enter
menu setting mode. Screen displays “MENU”.
2. Press UP key twice and screen displays “SET TALKING KEYPAD”.
3. Press MENU / SELECT key to select.
4. Press UP key to select either ON or OFF.
5. Press MENU / SELECT key to confirm.
6. Lift handset momentary to exit menu setting mode.
Set Language
1. While off-line, press MENU / SELECT key for about a second to enter
menu setting mode. Screen displays “MENU”.
2. Press UP key three times and screen displays “SET LANGUAGE”.
3. Press MENU / SELECT key to select.
4. Press UP key to select English, French, or Spanish.
5. Press MENU / SELECT key to confirm.
6. Lift handset momentary to exit menu setting mode.
Set LCD Display Contrast
1. While off-line, press MENU / SELECT key for about a second to enter
menu setting mode. Screen displays “MENU”.
2. Press UP key four times and screen displays “LCD CONTRAST”.
3. Press MENU / SELECT key to select.
4. Press UP key to select the best display contrast.
5. Press MENU / SELECT key to confirm.
6. Lift handset momentary to exit menu setting mode.
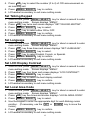
Set Local Area Code
1. While off-line, press MENU / SELECT key for about a second to enter
menu setting mode. Screen displays “MENU”.
2. Press UP key five times and screen displays “LOCAL AREA CODE”.
3. Press MENU / SELECT key to select.
4. Use the keypad to enter the appropriate digit for each blinking cursor
position. (If necessary, use the UP or DOWN key to move the
cursor).
5. Press MENU / SELECT key to confirm.
6. Lift handset momentary to exit menu setting mode.
12
Set Time / Date
1. While off-line, press MENU / SELECT key for about a second to enter
menu setting mode. Screen displays “MENU”.
2. Press UP key six times and screen displays “SET TIME / DATE”.
3. Press MENU / SELECT key to select. The hour and AM / PM positions
are blinking.
4. Press UP key repeatedly to change.
5. Press MENU / SELECT key to save. The minute position is now
blinking.
6. Press UP key repeatedly to change.
7. Press MENU / SELECT key to save. The month position is now
blinking.
8. Press UP key repeatedly to change.
9. Press MENU / SELECT key to save. The day position is now
blinking.
10. Press UP key repeatedly to change.
11. Press MENU / SELECT key to save.
12. Lift handset momentary to exit menu setting mode.
Set Flash Time
1. While off-line, press MENU / SELECT key for about a second to enter
menu setting mode. Screen displays “MENU”.
2. Press UP key seven times and screen displays “SET FLASH TIME”.
3. Press MENU / SELECT key to select. Screen displays current
setting (FLASH 600 MSEC)
4. Use the UP key to change the flash time (100, 300, 600 or 1000
msec).
5. Press MENU / SELECT key to confirm.
6. Lift handset momentary to exit menu setting mode.
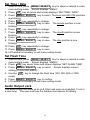
Audio Output Jack
This audio output can drive up to an 8 Ohm load such as a headset, T-coil or
a neck loop. The user must use the handset microphone for talking.
13
Technical Information
Amplified dB level (Amplify off): 0 to 18 dB
Amplified dB level (Amplify on):
37 to 55 dB
(measured at 2.8 Khz with Tone=4)
Tone control settings: 4 settings (T1 = lowest tone, T4 = highest tone)
Talking CID / Keypad voice: English, French, Spanish
Flash time: 100, 300, 600, or 1000 msec
LCD contrast levels: 5
Specifications are subjected to change without any notice.
Dimensions
Handset size: 7.0” x 2.1” x 1.2”
Base size: 6.7” x 3.1” x 5.0”
Weight
Handset weight: 5.7 oz.
Base weight: 16 oz.
Temperature range:
Operating:
0 to 30°C
Storage:
-10 to 40°C
Power requirements:
AC Adapter: UL listed 9 vdc, 300 ma
Base battery: Optional 4 x AA size non-rechargeable batteries (provided by
user).
Trouble Shooting
Q1:
Ans:
How come there is no dial tone?
Please verify both phone cord and the handset cord are plugged in
properly. Verify the AC adapter is also plugged in properly.
Q2:
Ans:
No CID announcement on an incoming call.
Make sure the Talking CID feature is turned on (set in menu).
Check your CID subscription with your phone company.
Q3:
Ans:
No keypad or LCD backlight.
Verify the AC adapter is connected to the power outlet.
Q4:
Ans:
Why do I need to put batteries in my phone?
Batteries are optional. They provide back up during a power
outage situation. If there are no batteries, the phone will act like a
simple phone and no amplification during power outage.
14
Q5:
Ans:
Static noise on the line.
Your phone may be located near a touch lamp, microwave, or other
appliance. If you have a DSL computer modem service, make
sure you have installed a DSL filter to block the DSL noise.
Warranty Service Information
Your HD Phone comes with a one-year limited warranty. We warrant during
this warranty period, from the date of purchase, to the original consumer, the
HD Phone to be free from defects in materials and workmanship under
intended home use. In the event that HD Phone fails to function properly
within one year of original purchase due to defects in materials or
workmanship, return the unit (freight prepaid) with proof of purchase (sales
receipt or packing slip, no exceptions) to Serene Innovations. Serene
Innovations will either repair or replace the unit (with a refurbished unit or unit
of equal condition) and return it to you (using UPS / USPS ground shipping)
at no cost to you if the unit is returned within 30 days of purchase. If the unit is
returned after 30 days of purchase but within the warranty period, there will
be a warranty handling charge of $9.95 for each return.
Incidental or Consequential Damages: Neither Serene Innovations, Inc. nor
retailer, dealer or selling distributor has any responsibility for any incidental or
consequential damages including without limitation, commercial loss of profit,
or for any incidental expense, loss of time, or inconvenience. Some states
do not allow exclusion or limitation of incidental or consequential damage, so
the above limitation or exclusion may not apply to you.
This warranty does not apply to any product that has been accidentally
damaged, abused, misused or negligent, used on electrical frequency or
voltage other than marked on product and/or described in manual. Defects or
errors caused by unauthorized alterations, repairs, and/or tampering are also
not covered by this warranty.
This Warranty gives you specific legal rights, and you may also have other
legal rights that vary from states to states.
If a defect covered by this warranty should occur, promptly contact a
Customer Care Representative by phone or log onto
www.sereneinnovations.com to obtain a Return Authorization Number (RAN)
and shipping instructions before shipping the product to us. Any shipment
without a RAN will not be accepted and will be returned to you at your
15
expense. Any authorized returned product must be accompanied with proof
of purchase and a brief explanation of the problem.
For out of warranty repaired and service, please contact our Customer Care
Department for directions.
This equipment complies with Part 68 of the FCC Rules. On the
equipment is a label that contains, among other information, the FCC
registration number and ringer equivalence number (REN) for this equipment.
If requested; this information must be provided to your telephone company.
This equipment uses the following Universal Service Order Codes ("USOC")
jacks: RJ-11. Connection to the telephone network should be made by
using standard modular telephone jack type RJ11.
The REN is useful to determine the quantity of devices you may connect to
your telephone line and still have all of those devices ring when your
telephone number is called.
In most, but not all areas, the sum of the
RENs of all devices connected to one line should not exceed five (5.0). To
be certain of the number of devices you may connect to your line, as
determined by the REN, you should contact your local telephone company to
determine the maximum REN for your calling area.
If your telephone equipment causes harm to the telephone network, the
telephone company may discontinue your service temporarily. If possible,
they will notify you in advance. But if advance notice is not practical, you will
be notified as soon as possible.
You will be informed of your right to file a
complaint with the FCC.
Your telephone company may make changes in its facilities, equipment,
operations or procedures that could affect the proper functioning of your
equipment. If they do, you will be notified in advance to give you an
opportunity to maintain uninterrupted telephone service.
In the event this equipment should fail to operate properly, disconnect the
unit from the telephone line. Try using another FCC approved telephone in
the same telephone jack. If the trouble persists, call the telephone company
repair service bureau.
If the trouble does not persist and appears to be with this unit, disconnect the
unit from the telephone line and discontinue use of the unit until it is repaired.
For repair or warranty information, please contact Serene Innovations, Inc.
at 562- 407 5400.
Please note that the telephone company may ask that
16
you disconnect this equipment from the telephone network until the problem
has been corrected or until you're sure that the equipment is not
malfunctioning.
There are no user serviceable parts in this equipment.
This equipment may not be used on coin service provided by the telephone
company. Connection to party lines is subject to state tariffs. Contact the
state public utility commission, public service commission for information.
If your home has specialty wired alarm equipment connected to the
telephone line, ensure the installation of this equipment does not disable your
alarm equipment.
If you have questions about what will disable alarm
equipment, consult your telephone company or a qualified installer.
Part 15 of FCC Rules Information
This device complies with Part 15 of the FCC rules. Operation is subject to
the following two conditions: (1) This device may not cause harmful
interference, and (2) this device must accept any interference received,
including interference that may caused undesired operation.
This equipment has been tested and found to comply with the limits of a
Class B digital device, pursuant to Part 15 of FCC rules. These limits are
designed to provide reasonable protection against harmful interference in
residential installation.
This equipment generates and can radiate radio frequency energy, if not
installed and used in accordance with the instructions, may cause harmful
interference to radio communications. However, there is no guarantee that
interference will not occur in a particular installation. If this equipment does
cause harmful interference to radio or television reception, which can be
determined by turning the equipment off and on, you may try one the
following suggestions to correct the interference:
1. Where it can be done safely, re-orient the receiving television or radio
antenna.
2. To the extend possible, relocate the television, radio, or other receiver
with respect to the cordless phone.
3. Connect the cordless phone AC adapter into a different electrical outlet.
4. Consult the dealer or an experienced radio/TV technician for help.
17
Modification: Any modification not expressly approved by the manufacturer
of this device could void the user’s authority to operate the device.
NOTICE: The Industry Canada label identifies certified equipment. This
certification means that the equipment meets telecommunications network
protective, operational and safety requirements as prescribed in the
appropriate Terminal Equipment Technical Requirements document(s).
The Department does not guarantee the equipment will operate to the user's
satisfaction.
Before installing this equipment, users should ensure that it is permissible to
be connected to the facilities of the local telecommunications company. The
equipment must also be installed using an acceptable method of connection.
The customer should be aware that compliance with the above conditions
may not prevent degradation of service in some situations.
Repairs to certified equipment should be coordinated by a representative
designated by the supplier. Any repairs or alterations made by the user to
this equipment, or equipment malfunctions, may give the telecommunications
company cause to request the user to disconnect the equipment. Users
should ensure for their own protection that the electrical ground connections
of the power utility, telephone lines and internal metallic water pipe system, if
present, are connected together. This precaution may be particularly
important in rural areas.
Caution: Users should not attempt to make such connections themselves, but
should contact the appropriate electric inspections authority, or electrician, as
appropriate. The REN for this amplified telephone as stated on the IC
regulatory label located on the bottom of the product.
NOTICE: The Ringer Equivalence Number (REN) assigned to each terminal
device provides an indication of the maximum number of terminals allowed to
be connected to a telephone interface. The termination on an interface may
consist of any combination of devices subject only to the requirement that the
sum of the Ringer Equivalence Numbers of all the devices does not exceed
5. This Class B digital device complies with Canadian ICES-003.
18
Serene Innovations, Inc.
14615 Carmenita Road
Norwalk, Ca. 90650
(866) 376-9271 (Toll Free)
(562) 407-5400 (P)
(562) 407-2087 (F)
www.sereneinnovations.com