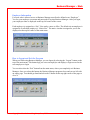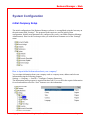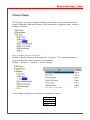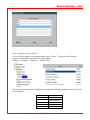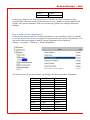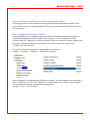
1
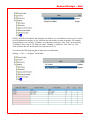
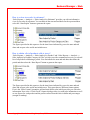
Business Manager – Web
Business Manager
Web
User’s Manual
Copyright: Atlantis Consulting Group Inc., 2003
Page: 1
Business Manager – Web
Introduction.......................................................................................................................................4
Main Menu....................................................................................................................................4
Navigation & Program Selection ...............................................................................................4
Favorites Menu ..........................................................................................................................5
Employee Information ...............................................................................................................6
How to Logout and Exit the Program ........................................................................................6
System Configuration........................................................................................................................7
Initial Company Setup.................................................................................................................7
How to input initial information about your company?.............................................................7
How to organize different access levels for employees? ...........................................................8
How to setup stores? ..................................................................................................................9
Product Setup .............................................................................................................................10
How to define product categories?...........................................................................................10
How to define product classes?................................................................................................11
How to define product departments? .......................................................................................12
What are product categories, classes and departments used for?.............................................13
How to configure the product tax table? ..................................................................................13
Employee Setup ..........................................................................................................................15
Who is a Cashier? ....................................................................................................................15
How to enter cashier information?...........................................................................................15
Who is a Salesman? .................................................................................................................16
How to enter salesman information?........................................................................................16
What is the difference between a Salesman and a Cashier? ....................................................17
Who is a Manager? ..................................................................................................................17
How to enter manager information? ........................................................................................18
Day to Day Operations ....................................................................................................................19
Product Entry & Maintenance Operations .............................................................................19
How to add new products?.......................................................................................................19
What is a template? ..................................................................................................................19
How is product information structured? ..................................................................................21
When is product information downloaded to cash registers? ..................................................22
When are sales departments downloaded to cash registers?....................................................22
Communication Operations ......................................................................................................24
How do cash registers communicate with Business Manager? ...............................................24
How often do the cash registers communicate with Business Manager? ................................24
Control & Verification Operations ..........................................................................................25
How to confirm that cash registers have communicated with Business Manager? .................25
How to obtain a summary of store activities?..........................................................................25
How to print a closing report of one or many stores? ..............................................................26
How to obtain a detail report of all funds collected at stores? .................................................26
Copyright: Atlantis Consulting Group Inc., 2003
Page: 2
Business Manager – Web
How to obtain a time and attendance report for payroll purposes?..........................................27
What are Invoices and Cash Receipts? ....................................................................................27
How to review sales transactions of a store? ...........................................................................28
How to monitor store operations real-time?.............................................................................28
Reports ........................................................................................................................................29
How is the “Sales Reports” menu structured? .........................................................................29
What format are sales reports generated in? ............................................................................29
How do all sales reports work? ................................................................................................30
How to print, save and email reports?......................................................................................31
How to transfer report information to Excel spreadsheet?.......................................................31
How to have a summary of store sales by hour?......................................................................31
How to review store sales by salesman? ..................................................................................32
How to obtain a list of products sold at stores? .......................................................................32
How to produce a sales summary by client?............................................................................33
How to produce a report outlining all inventory movement (in & out) at a store?..................33
How to produce salesmen commission reports? ......................................................................34
Purchasing Operations ..............................................................................................................35
How to enter vendor/supplier information? .............................................................................35
What is a template? ..................................................................................................................35
How is vendor information structured? ...................................................................................36
What is the difference between a Purchase Order and a Purchase?.........................................37
How to enter new purchase order for vendors? .......................................................................37
How to search, print and review existing purchase order information? ..................................38
How to delete an existing purchase order? ..............................................................................38
How to receive a purchase order? ............................................................................................39
How to produce a report of all purchase orders? .....................................................................39
How to enter a new purchase? .................................................................................................40
Copyright: Atlantis Consulting Group Inc., 2003
Page: 3
Business Manager – Web
Introduction
This document serves as the user guide for Business Manager Web software (BM-Web). It
describes the main menu, the principles of operation of the software and its user interface. This
manual begins by outlining the basic principles and characteristics of the program and then
proceeds to describe the day-to-day operation of the software and its features and functionality.
Main Menu
Navigation & Program Selection
Business Manager’s main menu resembles that of Windows. Programs are organized into different
menu levels on the left hand side of the screen. You can select the Plus “+” sign next to a menu
item to expand it and view the sub-menus within it. You can then select a sub-menu to view the
programs that are clustered in the selected sub-menu on the right hand side of the screen.
You can select a program by double clicking on its title. Once the selected program is displayed on
screen you can return back to the main menu by selecting the “Main Menu” button at the bottom
right corner of the screen.
Copyright: Atlantis Consulting Group Inc., 2003
Page: 4
Business Manager – Web
Favorites Menu
You can select a program and add it to your “Favorites” by first clicking on the program to
highlight it and then selecting the “Right Mouse Button”. A menu appears next to the selected
program where you can select the “Add to Favorites” entry to add the program to your favorites.
You can view and access programs that you have previously added to your favorite by selecting
the “Favorites” button on the top left hand corner of the main menu.
Copyright: Atlantis Consulting Group Inc., 2003
Page: 5
Business Manager – Web
Employee Information
Everyone who is allowed access to Business Manager must first be defined as an “Employee”.
You use your employee user name and password to log into Business Manager. After you login,
your employee name is displayed on the top left corner of the screen.
Each employee is assigned to a “Site”. Site can be a store or office. The default site an employee is
assigned to is called the employee’s “Native Site”. The native site that is assigned to you is also
displayed on the top left corner of the main menu.
How to Logout and Exit the Program
When you finish using Business Manager, you can logout by selecting the “Logout” button on the
top of the main menu. This button logs you out as an employee and displays a login screen for the
next employee to login.
You can also select the “Exit” button from the main menu, where you completely exit Business
Manager. Once you select this button, the Business Manager program closes and you are left with
an empty page. You should go ahead and select the X button on the top right corner of the page to
close it.
Copyright: Atlantis Consulting Group Inc., 2003
Page: 6
Business Manager – Web
System Configuration
Initial Company Setup
The initial configuration of the Business Manager software is accomplished using the last entry on
the main menu titled “Settings”. The programs in this main are used for initial system
configuration. Initially most parameters are configured for you by your BMA (Business Manager
Administrator). However this section provides you with the most common uses of the “Settings”
menu.
How to input initial information about your company?
You can input information about your company such as: company name, address and relevant
information using the following program:
Settings >> Company >> Overall >> Configure Company Parameters
The information in this program is organized in three tabs. You can fill in the required information
for each tab and then select the “Save” button to save the information.
Copyright: Atlantis Consulting Group Inc., 2003
Page: 7
Business Manager – Web
How to organize different access levels for employees?
Business Manager utilizes an extensive array of security and access control functions throughout
its various programs and screens. Teams are used throughout Business Manager for restricting
employee access by “Site”. A site can be an office, store, warehouse or distribution center. Teams
enable you to limit employee access to information by site. Next is an example to further clarify
this point.
If your organization consists of two major divisions: East Coast and the West Coast, then you can
organize employees accordingly into two separate teams (East and West) as to limit the
information they can input and access by region. Similarly teams can also be used to limit access
of users to one store only, or stores in a predefined region (characterized as “Zones”).
The following program can be used to define and configure teams in Business Manager:
Settings >> Company >> Employee >> Team.
Copyright: Atlantis Consulting Group Inc., 2003
Page: 8
Business Manager – Web
How to setup stores?
Stores, offices, warehouse and distribution centers are configured as “Sites”. To add new sites to
the system, you can use “Company >> Site >> Enter New Site”. This program enables you to fully
configure and outline the operating parameters of each and every store/site.
Copyright: Atlantis Consulting Group Inc., 2003
Page: 9
Business Manager – Web
Product Setup
The “Settings” menu houses programs that help you to prepare for entry and maintenance of
product information in Business Manager. All such programs are organized in the: “Settings >>
Products” sub-menu.
How to define product categories?
Products in Business Manager are organized into “Categories”. You can use the following
program to input the various categories for your products:
Settings >> Inventory >> Products >> Product Category
As an example, a liquor store can categorize its products as follows:
Category
Beer
Wine
Spirits
Copyright: Atlantis Consulting Group Inc., 2003
Page: 10
Business Manager – Web
How to define product classes?
You can further organize each product category into “Classes”. You can use the following
program to input the various classes for your products:
Settings >> Inventory >> Products >> Product Class
The liquor store in the previous example can configure the following product classes for each one
of its categories:
Category
Beer
Wine
Copyright: Atlantis Consulting Group Inc., 2003
Class
Alcoholic
Non-Alcoholic
Red
White
Rose
Page: 11
Business Manager – Web
Spirits
Vodka
Rum
Each category holds its own set of unique classes. Therefore if a class is common of many
categories then it has to be added several times once to every category to which it applies. Both
category and class are mandatory fields for each and every product you configure in Business
Manager.
How to define product departments?
Unlike product category and class; “Product Department” is not a mandatory field. It is available
in case you need it. You can use it to organize each product class into various “Departments”. You
can use the following program to input the various departments for your products:
Settings >> Inventory >> Products >> Product Department
The liquor store in the previous example can configure the following product departments:
Category
Beer
Class
Alcoholic
Non-Alcoholic
Wine
Red
White
Rose
Spirits
Vodka
Rum
Copyright: Atlantis Consulting Group Inc., 2003
Department
Domestic
German
Domestic
German
California
France
Merlot
Chardonnay
Dry
Sweet
Regular
Flavored
Regular
Spicy
Page: 12
Business Manager – Web
What are product categories, classes and departments used for?
All listings and sales reports in Business Manager present product information organized with
respect to their category, class and department. They provide an organized and clear structure for
all your products.
How to configure the product tax table?
Business Manager uses a straightforward yet powerful tax calculation mechanism. It begins by
categorizing products into various “Product Tax Categories”. A few examples of such tax
categories include: Clothing, Dry Goods and Liquor. Product tax categories organize products into
descriptive elements specifically for tax purposes. The most common tax categories are:
“Taxable” and “Non-Taxable”.
You can use the following program to input product tax categories:
Settings >> Inventory >> Products >> Product Tax Category
Once all products are organized into different tax categories, you must organize your sites (stores,
offices, warehouse, etc.) into “Tax Territories”. Examples include: New York, Texas, California.
You can input tax territories using the following program:
Settings >> Tax >> Tax Territory
Copyright: Atlantis Consulting Group Inc., 2003
Page: 13
Business Manager – Web
Finally, once all tax categories and territories are defined, you can indicate tax rates (up to 3 taxes)
for each product tax category as it is sold from one tax territory to same or another. For example,
when products in tax category “Clothing” are sold from tax territory “New York” to tax territory
“California” the tax rate is 7%. However when “Clothing” is sold from “New York” to “New
York (which is the case for all retail stores) the tax rate is 9%.
You can use the following program to input tax rate information:
Settings >> Tax >> Configure Tax Method.
Copyright: Atlantis Consulting Group Inc., 2003
Page: 14
Business Manager – Web
Employee Setup
Who is a Cashier?
Cashiers are employees of your company who are permitted to operate the cash register. Each
cashier is assigned a unique confidential number that identifies the cashier to Business Manager.
Cashier has to input his or her number in order to gain access to the cash register at the beginning
of the shift. Once the shift is over, the cashier must remember to logout so that the next cashier can
use the cash register.
Business Manager tracks and reports all cashier actions and operations to the central server.
Cashier information is used for control and monitoring operations.
How to enter cashier information?
Cashiers are employees of your company and hence they are configured as employees using
“Company >> Employee >> Enter New Employee” program. This program holds information
about an employee in multiple tabs. However for cashiers, you only need to complete the
information in the first tab “Characteristics”. After you fill-in the information in the first tab for a
new cashier, select the “Save” button to save the new cashier. When entering a new cashier the
following fields are of particular importance:
“Number”
This field indicates the number by which the cashier is identified. Cashier has to input this number
in order to gain access to the cash register. This number has to be unique to each cashier.
“Job”
This field must be set to “Cashier” in order to indicate the position of the new employee. Business
Manager only communicates cashier information with cash registers. Hence if this field is set
improperly, then the cashier information won’t be downloaded to the cash register.
Copyright: Atlantis Consulting Group Inc., 2003
Page: 15
Business Manager – Web
Who is a Salesman?
Salesmen are employees of your company who are involved in sales and commission activities.
Each salesman is assigned a unique number that identifies the salesman to Business Manager. A
salesman can be attributed to a sales transaction at the time of sale using his salesman number.
Business Manager provides extensive sales reports for salesmen as well as a powerful automated
commission structure which rewards salesmen according to their sales performance.
How to enter salesman information?
Salesmen are employees of your company and hence they are configured as employees using
“Company >> Employee >> Enter New Employee” program. This program holds information
about an employee in multiple tabs. However for salesmen, you only need to complete the
information in the first tab “Characteristics”. After you fill-in the information in the first tab for a
new salesman, select the “Save” button to save the new salesman. When entering a new salesman
the following fields are of particular importance:
Copyright: Atlantis Consulting Group Inc., 2003
Page: 16
Business Manager – Web
“Number”
This field indicates the number by which a salesman is identified. A Salesman can not operate the
cash register, however a sales transaction can be attributed to a salesman for sales and commission
calculations.
“Job”
This field must be set to “Salesman” in order to indicate the position of the new employee. If this
field is set improperly, then the salesman information is not downloaded to the cash register.
What is the difference between a Salesman and a Cashier?
Although both are employees of your company, the nature of their role is different. Sales
transactions are attributed to salesmen for commission and sales reports. However cashier
operations are recorded for monitoring and control purposes. Cashiers can operate the cash register
whereas salesmen can’t. Cashiers can be configured as salesmen if they also participate in
commission and sales reporting operations.
Who is a Manager?
A manager is an authority figure whose responsibility is to supervise and manage cashiers. You
can configure Business Manager to restrict selected operations at the cash register to managers
only. Such operations include: refunds, paid-outs, price changes, etc.
Managers provide an extra level of security and control for the head office. Business Manager not
only records the cashier and salesman who are involved with a transaction but also the manager
who authorized the transaction. This provides you with a complete and accurate account of each
and every transaction.
Copyright: Atlantis Consulting Group Inc., 2003
Page: 17
Business Manager – Web
How to enter manager information?
Manager information can be entered using “Retail Sales >> BM-POS >> Settings >> Manager
Definition” program.
You first select the desired store/site and then input the manager name and his authorization code
along with the functions the manager is allowed to authorize. Once all information is complete,
you can select the “Save” button to save all your entries.
A manager authorizes restricted transactions using his authorization code that is assigned to him in
this page. You can choose to regularly change this authorization code in order to ensure its
confidentiality.
Copyright: Atlantis Consulting Group Inc., 2003
Page: 18
Business Manager – Web
Day to Day Operations
Product Entry & Maintenance Operations
How to add new products?
You can add new products using “Inventory >> Inventory Management >> Enter New Product”
program. When you select this program, Business Manager presents you with a blank screen
where you can input information about the new product.
Once you finish entering all the information about the new product, you can select the “Save”
button to save the new product. When the product is saved, the screen is cleared so that you can
enter another product.
What is a template?
You can use templates to facilitate product entry operations. A template is a pre-defined set of
information that you can use to enter a new product.
Here is an example of a template. A convenient store can setup templates titled: grocery, dairy
products and fruits. Each template holds information about its specific segment. Templates
Copyright: Atlantis Consulting Group Inc., 2003
Page: 19
Business Manager – Web
populate data fields of a new product with predefined information so that you do not have to enter
the information every time.
After selecting the “Enter New Product” program, you can enter information that is common to a
set of products in the various fields (tax category, inventory general ledger, etc.) and then use the
“Save Template” button to save your settings as a template. Business Manager prompts you to
assign a name to the template. You can declare your template as a “Public” template so that other
users can access it or a “Private” one.
Once a template is saved, you can restore it for future use, using the “Restore Template” button.
Copyright: Atlantis Consulting Group Inc., 2003
Page: 20
Business Manager – Web
How is product information structured?
Product information is organized into the following tabs.
1. Express
The Express tab holds the fields from all other tabs that are important to the everyday operation of
your business. The Express tab is designed to provide you with a quick overview of the
information in all tabs. In most cases, you can enter information about a new product in the
Express tab without having to access any of the other tabs. In short the Express tab provides you
with an overview of a product.
2. Characteristic
The Characteristic tab contains the characteristic information about a product.
3. Purchasing
The Purchasing tab contains information regarding the purchasing operations associated with a
product. These include the vendors the product is purchased from and other related information.
4. Accounting
The Accounting tab holds accounting information about a product. You must pay particular
attention to the “Tax Category” field in this tab, since it defines the tax nature of the product
(taxable, non-taxable).
5. Trade Exchange
The Trade Exchange tab holds information for B2B (Business 2 Business), e-commerce and
public portal business activities of the product.
6. Stock
Up to this point, all of the previous tabs hold information that is common for all sites/stores.
However the preceding tabs hold information about the product however the information is site
dependent. Obviously, the stock information of the product is different from one site to another.
Hence the first line of this tab indicates the site for which information is displayed on screen.
Using the “Site” field you can select a site for which you wish to enter or view information. You
can also select a “Zone” (which is a section of sites) or “All Responsible Sites” (all the sites that
you are allowed access to).
Copyright: Atlantis Consulting Group Inc., 2003
Page: 21
Business Manager – Web
When is product information downloaded to cash registers?
New products or changes in existing products are only communicated to cash registers when you
instruct Business Manager to do so. You can authorize download of product information to cash
registers using “Retail Sales >> BM-POS >> Communication >> Download Information to
Terminals” program.
This feature enables you to download information to cash registers whenever desired. For
example, you may begin to enter price changes in Business Manager for a special which begins
next week. Hence you should communicate the new prices to cash registers the day the special is
scheduled to begin.
When are sales departments downloaded to cash registers?
Conventional sales departments are “Product Categories” in Business Manager. In the case of our
example discussed earlier, the following sales departments will be downloaded to cash registers:
Category
Beer
Wine
Spirits
Copyright: Atlantis Consulting Group Inc., 2003
Page: 22
Business Manager – Web
Sales departments are downloaded to cash registers along with product information. Hence
whenever you download product information to the cash registers, sales departments are
downloaded as well.
Copyright: Atlantis Consulting Group Inc., 2003
Page: 23
Business Manager – Web
Communication Operations
How do cash registers communicate with Business Manager?
Cash registers are configured to communicate information with Business Manager automatically
on a periodic basis. When a communication session begins the cash register first communicates its
information to the server. This information includes all sales, inventory and other store related
activities such as time and attendance, collections, etc. Once all information that resides on the
cash register is communicated to the Business Manager server, then any information that is queued
for download to the cash register is communicated from Business Manager to the cash register,
such information includes configuration changes, products, etc.
Therefore after a communication session you can rest assured that all cash register information is
collected and all information that you wanted to communicate to the cash register is
communicated.
How often do the cash registers communicate with Business Manager?
The communication interval for each cash register is configured by your BMA (Business Manager
Administrator). However you can initiate a manual communication session whenever desired
using the “Communicate” button at the cash register. Manual communications enable you to
implement changes to cash register configurations, download and upload information whenever
required.
Copyright: Atlantis Consulting Group Inc., 2003
Page: 24
Business Manager – Web
Control & Verification Operations
How to confirm that cash registers have communicated with Business Manager?
The simplest way to verify cash register communication with Business Manager server is to
produce a sales report by site/store. To do so, select “Sales Reports >> Analysis >> Sales by Site”
program. Indicate the “Start Date” for the report and then select the “Start Report” button.
This report provides you with sales of each and every store for a span of two weeks beginning at
the “Start Date” indicated by you.
How to obtain a summary of store activities?
There is a report specially designed to provide you with a summary of each and every stores
activities. This program is “Sales Reports >> Management >> Print Summary of Store Activities”.
This report forms the cornerstone of your daily control and audit activities and must be the first
report you produce everyday.
Copyright: Atlantis Consulting Group Inc., 2003
Page: 25
Business Manager – Web
How to print a closing report of one or many stores?
With Business Manager there is no need for store employees to fax or phone information to head
office. All store activities and information is reported to the central server and accessible to head
office personnel. You can produce a closing report for one store, a zone or all stores using “Sales
Reports >> Management >> Print Closing Report” program.
Closing report provides you with a summary of sales by department (product category) along with
the funds that were collected. Addition to verification of funds collected at stores, this report is
also useful for posting journal entries to third-party accounting packages.
How to obtain a detail report of all funds collected at stores?
In case of discrepancies the following program provides a detail account of all funds (cash, credit
cards, etc.) collected at one or all stores: “Sales Reports >> Management >> Print Tender
Collection Report”.
Copyright: Atlantis Consulting Group Inc., 2003
Page: 26
Business Manager – Web
How to obtain a time and attendance report for payroll purposes?
“Sales Reports >> Management >> Print Time & Attendance Report” provides you with a detail
store-by-store breakdown of all employee hours. You first have to indicate the start and end dates
for the time frame that you are interested in and then select the “Start Report” button.
What are Invoices and Cash Receipts?
Once a sales transaction is uploaded to Business Manager it is separated into two different
documents. The sales information is stored as an Invoice in the “Accounts Receivable >> Invoice”
submenu. The payment portion of the transaction is saved as a cash receipt in “Accounts
Receivable >> Cash Receipt” submenu.
For access to sales information you should refer to “Invoice” submenu as well as “Sales Reports”
menu and for payment information to “Cash Receipt” submenu. For example “Print Invoice
Listing” program provides you with a listing of your sales and “Print Cash Receipt Listing”
program provides you with a detail account of all funds collected.
Copyright: Atlantis Consulting Group Inc., 2003
Page: 27
Business Manager – Web
How to review sales transactions of a store?
You can review and examine each and every sales transaction of stores using “Accounts
Receivable >> Invoice >> View Invoice” program.
You can use the “Search” button to gain access to the search page. Using the tabs on top of this
page you can indicate the criteria by which you like to search invoices. Once you finish entering
the desired criteria (by number, by date, etc.) then select the “Refresh” button to display the
desired transactions on screen.
How to monitor store operations real-time?
There is a program specially designed for users whose stores are online with Business Manager
using high-speed Internet. This program is “Retail Sales >> BM-POS >> Operations >> Monitor
Store Operations”.
It enables you to review and monitor all stores activities such as: sales, collections, time and
attendance and control issues real-time. This program provides valuable up-to-date information
about each and every store and the underlying principles of their day-to-day operations.
Copyright: Atlantis Consulting Group Inc., 2003
Page: 28
Business Manager – Web
Reports
How is the “Sales Reports” menu structured?
The “Sales Reports” menu contains all sales and control reports in Business Manager. This menu
is segmented into three different submenus.
1. The “Analysis” submenu holds reports that help you analyze your sales and set an appropriate
course of action. Each report in this menu is designed to provide sales statistics by a different
criteria (salesman, client, hour, etc.).
2. The “Comparative” submenu contains reports that provide a comparative view of your sales
from one time period to another. These reports enable you to indicate the start and end dates for
the time periods that you are interested in. You can produce comparative annual, quarterly,
monthly or even weekly reports.
3. The “Management” submenu provides you with reports particularly designed for management
and control purposes. Such reports include cash register closing reports, time and attendance, etc.
Management reports are designed to facilitate your day-to-day management and control
responsibilities.
What format are sales reports generated in?
The printout of all documents and sales reports in Business Manager are generated and
downloaded to your browser (Internet Explorer) as a PDF (Printed Document Format) file. You
can view, print and save PDF files by installing the “Acrobat Reader” software in your computer.
Acrobat reader is a free software that you can download from www.adobe.com.
Copyright: Atlantis Consulting Group Inc., 2003
Page: 29
Business Manager – Web
How do all sales reports work?
Each report first provides you with a list of start and end parameters by which you can limit the
information that is to be presented on the report. If you do not wish to limit the information by any
of the parameters displayed on screen, then you simply select the “Start Report” button to generate
the desired report. Therefore it is important to remember that you do not have to indicate start and
end values for every parameter that is displayed on screen. By leaving a start and end parameters
blank, you indicate that the report should include all data regardless.
Once you select the “Start Report” button, the system generates the report based on the indicated
parameters as a PDF file and then downloads it to your browser (Internet Explorer).
Copyright: Atlantis Consulting Group Inc., 2003
Page: 30
Business Manager – Web
How to print, save and email reports?
Once a report is downloaded to your browser (Internet Explorer) as a PDF document, you can save
it on your local hard disk, print it or email it to a colleague. You can use the small icons on top of
your browser screen to do so.
How to transfer report information to Excel spreadsheet?
A number of reports in Business Manager can be generated in PDF format as well as Excel file
format. If the desired report does offer its information in Excel format, then there is an additional
button at the bottom of the page titled “Report to Excel”.
When you select this button, the report is generated, its information stored in an Excel spreadsheet
file and then downloaded to your local hard disk. You will be prompted to indicate the location to
save the Excel file on your hard drive.
How to have a summary of store sales by hour?
“Sales Reports >> Analysis >> Sales Analysis by Hour” provides you with a comprehensive
breakdown of your sales by hour. You can indicate the start and end dates for the report and then
select the “Start Report” button to generate the report.
The figures provided in this report are for the time frame indicated by you as the start and end
dates and are pure sales and do not include taxes.
Copyright: Atlantis Consulting Group Inc., 2003
Page: 31
Business Manager – Web
How to review store sales by salesman?
“Sales Reports >> Analysis >> Sales Analysis by Salesman” provides you with an informative
view of your sales by salesmen. You can indicate the start and end dates for the report and then
select the “Start Report” button to generate the report.
The figures provided in this report are for the time frame indicated by you as the start and end
dates and are pure sales and do not include taxes.
How to obtain a list of products sold at stores?
“Sales Reports >> Analysis >> Sales Analysis by Product” and “Sales Reports >> Analysis >>
Sales Analysis by Product Category & Class” provide you with a summarized overview or a detail
list of all products sold during a period. You can indicate the start and end dates that define the
period and then select the “Start Report” button to generate the report.
The figures provided in this report are for the time frame indicated by you as the start and end
dates and are pure sales and do not include taxes. This report has two different format options.
First is the “Sales Format” (quantities sold and total dollar value) which provides you with sales
information. Next is the “Cost & Profit” format which provides you with sales information as well
as cost figures for each product and the profits realized from the sales in dollar and percentages
(margin or markup).
Copyright: Atlantis Consulting Group Inc., 2003
Page: 32
Business Manager – Web
How to produce a sales summary by client?
There are a number of sales reports that provide you with valuable sales information by client.
They are:
“Sales Reports >> Analysis >> Sales Analysis by Client”
“Sales Reports >> Analysis >> Sales Analysis by Client Territory”
“Sales Reports >> Analysis >> Sales Analysis by Client Type”
“Sales Reports >> Analysis >> Sales Analysis by Client Group”
“Sales Reports >> Analysis >> Sales Analysis by Client and Product”
Each report provides you with sales information by client and other associated parameters. You
can indicate the start and end dates for the report and then select the “Start Report” button to
generate the report.
The figures provided in this report are for the time frame indicated by you as the start and end
dates and are pure sales and do not include taxes.
How to produce a report outlining all inventory movement (in & out) at a store?
“Sales Reports >> Analysis >> Print Inventory Transaction Report” provides you with a
comprehensive overview of all movements of inventory in a store. It provides all movement
associated with a product: Sales, transfers, purchases and adjustments. You can indicate the start
and end dates for the report and then select the “Start Report” button to generate the report.
This report provides a complete profile of all product ins and outs. Furthermore, this report can
provide you with your ending and starting inventory stock levels if you select the “End Date” of
the report to be today’s date (date of your terminal indicated at the bottom of the Business
Manager main menu screen).
Copyright: Atlantis Consulting Group Inc., 2003
Page: 33
Business Manager – Web
How to produce salesmen commission reports?
Business Manager has powerful commission structure calculation which enables you to reward
salesmen for their performance. There are two reports that provide you with commission
information about each and every salesman:
”Sales Reports >> Management >> Salesman Commission Report Based on Sales”
”Sales Reports >> Management >> Salesman Commission Report Based on Receipts”
Business Manager can reward commission to a salesman once the sale is completed (based on
sales) or once a payment is made for the sales transaction (based on receipts). Both options are at
your disposal.
Copyright: Atlantis Consulting Group Inc., 2003
Page: 34
Business Manager – Web
Purchasing Operations
How to enter vendor/supplier information?
Purchasing operations begin with the entry of vendor information in Business Manager. You can
enter, review and modify vendor information using the programs in “Accounts Payable >>
Vendor” submenu.
What is a template?
You can use templates to facilitate vendor entry operations. A template is a pre-defined set of
information that you can use to enter a new vendor.
Here is an example of a template. You can save templates titled: Regular Supplier and Foreign
Supplier. Each template holds information about its specific segment. Templates populate data
fields of a new vendor with predefined information so that you do not have to enter the
information every time.
Copyright: Atlantis Consulting Group Inc., 2003
Page: 35
Business Manager – Web
After selecting the “Enter New Vendor” program, you can enter information that is common to a
set of vendors in the various fields (Country, State, tax category, etc.) and then use the “Save
Template” button to save your settings as a template. Business Manager prompts you to assign a
name to the template. You can declare your template as a “Public” template so that other users can
access it or a “Private” one.
Once a template is saved, you can restore it for future use, using the “Restore Template” button.
How is vendor information structured?
Vendor information is organized into the following tabs.
1. Express
The Express tab holds the fields from all other tabs that are important to the everyday operation of
your business. The Express tab is designed to provide you with a quick overview of the
information in all tabs. In most cases, you can enter information about a new product in the
Express tab without having to access any of the other tabs. In short the Express tab provides you
with an overview of a vendor.
2. Characteristic
The Characteristic tab contains the characteristic information about a vendor such as his address,
phone, etc.
3. Accounting / Credit
This tab contains information regarding the accounting operations associated with a vendor. The
information in this tab is used for accounts payable operations.
Copyright: Atlantis Consulting Group Inc., 2003
Page: 36
Business Manager – Web
What is the difference between a Purchase Order and a Purchase?
The “Purchase” menu is divided into two distinct submenus: “Purchase Order” and “Purchase”.
The “Purchase Order” submenu holds programs relating to purchase orders. Purchase orders
signify outstanding orders that are placed with vendors and have not yet been received. When a
purchase order is received, its content is added to inventory and it is recorded as a “Purchase”.
Purchases indicate past purchases made and recorded in the system.
Hence the “Purchase Order” submenu provides you with information regarding products that are
on order with vendors and the “Purchase” submenu provides you with information about products
that you have purchased in the past.
How to enter new purchase order for vendors?
You can use “Purchase >> Purchase Order >> Enter New Purchase Order” program to enter new
purchase orders for products to be received at a later date.
You can also use “Purchase >> Purchase >> Enter New Purchase” to enter a new purchase for
products that are received already but there is no purchase order in the system for them.
Copyright: Atlantis Consulting Group Inc., 2003
Page: 37
Business Manager – Web
The combination of the two programs provides you with unmatched flexibility. It is important to
remember that once a shipment is received from a vendor, if there is already a purchase order in
the system, then you must receive the purchase order to add the merchandise to stock. However if
there is not a purchase order in the system then you can enter a purchase to add the merchandise to
system immediately. Being able to enter purchases saves you from having to enter a purchase
order first and then receive it.
How to search, print and review existing purchase order information?
You can use the programs in “Purchase >> Purchase Order” submenu to review and manipulate
purchase order information. You can modify purchase orders prior to their receipt. However once
a purchase order is received into inventory, you can no longer modify it. If corrections need to be
made, you can use the inventory adjustment module (“Inventory >> Inventory Adjustment”) or do
a reversing entry as a purchase (a purchase with a negative quantity).
How to delete an existing purchase order?
You can use “Purchase >> Purchase Order >> Delete Purchase Order” program to delete existing
purchase orders. You can delete outstanding purchase orders prior to their receipt. However once a
purchase order is received into inventory, it is then deleted automatically.
Copyright: Atlantis Consulting Group Inc., 2003
Page: 38
Business Manager – Web
How to receive a purchase order?
You can use “Purchase >> Purchase Order >> Delete Purchase Order” program to delete existing
purchase orders. You can delete outstanding purchase orders prior to their receipt. However once a
purchase order is received into inventory, it is then deleted automatically.
How to produce a report of all purchase orders?
You can produce purchase order reports in various formats using “Purchase >> Purchase Order >>
Print Purchase Order Listing” program. You begin by indicating the start and end parameters for
the report and then select the “Start Report” button.
This report has different formats. The “Product” format provides you with a summary of
outstanding purchase orders by product.
Copyright: Atlantis Consulting Group Inc., 2003
Page: 39
Business Manager – Web
How to enter a new purchase?
In the case where you receive merchandise and no purchase order was previously entered for the
purchase, you can use “Purchase >> Purchase >> Enter New Purchase” program to directly record
the purchase in one step. This program saves you the steps of having to enter a new purchase order
and then receiving the purchase order. Using this program you record a purchase in the system and
add merchandise to stock all in one step.
Copyright: Atlantis Consulting Group Inc., 2003
Page: 40