1
POWERBEE SOLAR PUMP KIT USER’S MANUAL
IMPORTANT READ THESE PRIOR TO
INSTALLATION
Sunspray 500 fountain
1.
2.
3.
OVERVIEW
1) The solar pump is designed for outdoor or indoor fountain use, and is powered by a solar module. In order to
make the pump work by solar energy, the solar module needs to be placed in the sunlight FACING THE SUN. The
performance is dependant on orientation and sunlight intensity, a south facing
orientation is required for this unit for all year operation.
2) The pump is supplied by the battery unit which is charged by the solar module.
3) The pump introduces the latest DC brushless motor technology, it has high efficiency
and long service life, and it has built-in function of dry-run protection. Two sensor
points are provided on the side of the housing for dry-run protection. The pump works
if these points are under water. If a point projects out of the water, the pump does not
work.
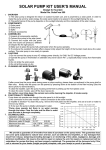
4) The pump flow rate can be adjusted by the means of the flow valve (referring to the right photo).
COMPONENTS
1) Solar panel 2) Pump 3) Battery back-up 4) Nozzle accessories 5) Foam disk
ASSEMBLING
1) Unpack all components carefully.
2) Connect the “INPUT” cable of the battery back-up to the solar module, and tighten the screw for protection. Screw
the ground spike tight at the back side of the solar module and insert the solar module at a sunny place, adjust
the angle let the solar module facing the sun.
3) Insert the pump plug to the “OUTPUT” socket of the battery backer-up, and also tighten the screw.
4) For a floating fountain (deep water), just assemble the nozzle and foam disk
to the pump according to the right photo, the nozzles can produce 4 different
jet shapes.
5) Make sure to place the pump fully underwater when the pump operates.
6) Turn the switch to the position “ON”. The bicolor LED illuminates GREEN. The
solar pump is starting to operate. The LED may illuminate RED while it
operates at first time, because the battery will lose energy slowly in
stock. It just needs to be charged for 2 to 3 hours in the sunlight,
then it will change to GREEN and the pump starts to work.
7) The pump will automatically stop running while the battery is discharged to its
lower limit voltage, and the LED illuminates RED in the meantime.
8) When the battery is recharged to its starting voltage, the LED will flash
RED-GREEN twice every 10 seconds, and it will last 30 minutes. Then the
pump will automatically operate and the LED illuminates GREEN again.
9) Adjust the regulator switch to get different
pump performance. The pump can operate
at the voltage range of 6V-9V.
10) Turn the timer switch to the position “ON”,
the pump works 15 minutes every hour. It
can save the battery energy in this operating
mode, especially for winter or cloudy day
use.
11) If you want to have long operating time in
the evening, then turn the switch to “OFF”
position during the day and turn it “ON”
whenever you need.
Note: The battery will be always charged
in the sunlight no matter whether the
switch turns to “ON” or “OFF”!
4.
5.
CAUTIONS
1) Do not connect the pump to any AC voltage power directly; it’s ONLY for DC Voltage power as supplied
2) Operate the pump in freshwater only (never above 40 degrees), especially keep it away from flammable liquids.
3) Do not strike the solar panel.
4) Do not alter or change the components of the product.
5) Do not leave the battery back-up in direct blazing sunlight or heavy rain; do not expose it to extremes of heat or
cold which can affect its service life.
CLEANING AND MAINTENANCE
If after some time the pump starts losing power or stops working, please clean up sediment in the pump shell or filter
cribs. Note the pump can be opened by pressing down on the bottom of the filter housing (See the above photo for
demonstration, a quick spray of WD40 is also recommended to improve performance), when placing the housing
back on ensure a flat flush fit to the casing, and take care.
6.
7.
To clear the impeller, open the pump housing at the front by sliding up the front plastic cover.
* Be careful, never drop down the ceramic axis while cleaning the impeller, it breaks easily.
* The solar module should only be cleaned with soft tissue or glass cleaning solution.
FUNCTIONALITY PROBLEMS
*Pump does not operate even though the solar
panel is in full sunlight.
1) The timer switch is at “ON” position.
2) In cloudy or rainy days, the battery cannot get
sufficient power supply during the daytime. The
LED indicating light will turn to red from green that
shows the battery is in low voltage condition, it
needs to be charged.
3) No connection—check the connections of the
solar module and the battery station.
4) Impeller is blocked — to clean the pump, remove
the front plate and the impeller, and use a small
brush or water to remove any debris.
5) The storage battery inside the box will begin to
lose efficiency after a year and a half and therefore
may need to be changed, please contact PowerBee
for replacement parts.
TECHNICAL DATA AND PUMP CURVE
Peak Power of Solar Panel
3.5 W
Operation Voltage
6-9 V
Rechargeable battery
6V, 3.2Ah
Maximum Water Lift Height
1.25m (4.1ft)
Maximum Flow Rate
330L/H (87.2GPH)
Cable Length
5 M (16.4FT)
All content copyright © 2011. All rights reserved. Registered in the UK. Company No 06486578.
www.powerbee.co.uk