1
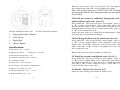
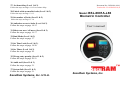
27. Set time delay (Level 1 & 2)
Follow the steps on Pages 11-12 to set time delay.
28.Unlock with an enrolled code (Level 1 & 2)
Follow the steps on Page 12-13.
29.Set number of locks (Level 1 & 2)
Document No.: BSL0601AL66
Version No.:V1.0020120518 (E)
Model: BSL-0601A-L66
Biometric Controller
follow the steps on Page 13- 14.
30.Authorize access to locks (Level 1 & 2)
Follow the steps on page 14-15.
User’s manual
31.Delete one user / all users (Level 1 & 2)
Follow the steps on page 16-17.
32.Dual Mode (Level 1 & 2)
Follow the steps on page 17.
33.Set Time Lock (Level 1 & 2)
Follow the steps on page 18-20.
34.See Timer (Level 1 & 2)
Follow the steps on page 20.
35.Wrong entry penalty (Level 1 & 2)
Follow the steps on page 20-21.
36.Audit trail (Level 1 & 2)
Follow the steps on page 21.
37.System Info (Level 1 & 2)
Follow the steps on page 21.
SecuRam Systems, Inc. U.S.A.
24
SecuRam Systems, Inc.
When the screen shows “ID 01 Code Saved”, the first fingerprint
and its bound code with ID No. 01 are enrolled successfully.
Note: The default password (1234567890) will be deleted
automatically after the first fingerprint and code are enrolled
successfully.
23.Enroll the second or additional fingerprints and its
bound code for quick start (Level 2)
0601A-L66Biometric Entry Pad
1.
2.
3.
4.
EL-0601 Electronic Actuator
Fingerprint Reader Window
LCD Screen
Digital Pad
“Reset” Button
Specifications:
➤Verification Time: < 1 second
➤Registration Capacity:
30 fingerprints + 30 codes
➤FRR (False Rejection Rate): <0.1%
➤FAR (False Acceptance Rate): <0.0001%
➤Code length: 10 digits
➤Static current: < 50μA (Typical)
➤Power supply: one standard 9V Alkaline battery
Press “Menu/OK”. The screen will show “Select Menu”. Press “▲”
or “▼” to select “System Menu”. Press “Menu/OK” again. Place
the first enrolled finger on the reader window and hold. After the
fingerprint and its bound code are verified successfully, press “▲”
or “▼” to select Enroll New User.
Follow the same steps as to enroll the first administrator’s fingerprint and code to complete the enrollment.
24.Set/Change the first code for quick start (Level 1)
Press “Menu/OK”. The screen will show “Select Menu”. Press “▲”
or “▼” to select “System Menu”. Press “Menu/OK” again. Enter
default code 1234567890. When the LCD screen shows “Select
Menu”, Press “▲” or “▼” to select “Set/Change User Code” ,Enter
the 10-digits new code .
Note: Follow the same steps to change any valid code.
25. Enroll the second or additional codes (Level 1 )
Press “Menu/OK”. The screen will show “Select Menu”. Press “▲”
or “▼” to select “System Menu”. Press “Menu/OK” again. Enter the
first enrolled code (ID No.1). After the code is verified successfully,
press “▲” or “▼” to select “Enroll New User” , Press “▲” or “▼”
to select ID No. ,and set new codes .
➤Battery Low Voltage: 5.4± 0.2V
➤Working Temperature: -10℃ ~ + 65℃
26. Disable / Enable User (Level 1 & 2)
Follow the steps on Page 10 to disable or enable a user.
➤Working Humidity: 10% ~ 80%
2
23
ATTENTIONS:
●
●
▪▪▪▪▪▪
●
Follow the same steps to set to Level 1.
22.Enroll the first fingerprint and its bound code for
quick start (Level 2)
Place your finger on the fingerprint reader window and hold.
●
first
fingerprint
with
an
ID
No.
01
is
enrolled.
Battery Low Voltage: 5.4 ± 0.2V. The display
will alert low battery when battery voltage reaches
5.4 ± 0.2V. PLEASE REPLACE THE BATTERY IMMEDIATELY.
Note: The voltage is checked during each time the
entry pad is verifying fingerprints. In the case of
low battery, when the LCD screen light is off, i.e.
the entry pad is not working; the battery voltage
Note:
After Security Level is changed, the number of locks will not be
changed.
When security level is changed, all fingerprints and codes will be
deleted. The first default code will be 1234567890.
The
For indoor use only.
Use one 9V alkaline battery. Manufacturer recommends to use DuracellTM or Energizer® Alkaline
batteries.
Always use an alkaline battery for high quality performance, otherwise controller might not work well.
will be a little higher than 5.4±0.2V. In this case,
the battery does not have enough power for operations other than fingerprint verification to
unlock.
When the display alerts low battery, BSL-0601AL66 Biometric Entry Pad can only be operated to
lock or unlock. Operations, such as enrolling, deleting or time-delay setting, are not permitted.
Enter a code (10 digits).
Enter the same code again.
22
3
Security level classification
Level 1: Entry pad can be operated by a code.
Level 2: Entry pad must be operated by a fingerprint
and its bound code. It is a higher security level.
Level 3: Entry pad must be operated by a fingerprint or
a code. Factory default security level is Level 3.
Note: Security Level 3 is not required by UL.
For safety and security, all codes will be automatically
deleted when security level is changed. ID No. 01 code
will be default code 1234567890.
Battery Replacement Instructions
1) In the back of Entry Pad you will see one 9 V alkaline battery. Take the battery out of the battery compartment. Gently pull on the battery until it drops
out.
2) Gently remove the connector by unsnapping it from
the two terminals on the top of the battery.
Never Pull on the Battery Leads.
3) Connect a new 9 V alkaline battery to the battery
clip.
4) Put the battery and the leads completely back into the
battery compartment.
Mounting and wiring refer to the installation instruction .
Note: Two more consecutive invalid codes will restart an additional
4 minutes delay period. An attempt to unlock by an enrolled fingerprint will not terminate the delay period.
19. Show Audit Trail (Level 3)
Press “Menu/OK”. The screen will show “Select Menu”. Press “▲”
or “▼” to select “System Menu”. Press “Menu/OK” again. Place an
enrolled administrator’s finger (ID No. 01 or 02) on the reader window and hold. After the fingerprint is verified successfully, press
“▲” or “▼” to select “Show Audit Trail”. Press “Menu/OK”. The
screen will show the last record of operation on the entrypad. Press
▲” or “▼” to view more records.
20. System Info. (Level 3)
Press “Menu/OK”. The screen will show “Select Menu”. Press “▲”
or “▼” to select “System INFO.” Press “Menu/OK” and the LCD
will show:
“Capacity:30 Users
Used : 00 User
V9.84120518-27
Audit :0500 “
It means that up to 30 users can be enrolled in the entrypad and there
is no users currently enrolled .
21. Set Security Level
Press “Menu/OK”. The screen will show “Select Menu”. Press “▲”
or “▼” to select “System Menu”. Press “Menu/OK” again, Place an
enrolled administrator’s finger (ID No. 01 or 02) on the reader window and hold. After the fingerprint is verified successfully, press
“▲” or “▼” to select the security level you want.
For example, if you set the level to Level 2, find and select Security
Level 2.
Press “Menu/OK”.
4
21
Contents
Press “▲” or “▼” to select “Y” (or “N”) and the holidays and
press “Menu/OK” to confirm.
If “Y” is selected, users cannot unlock the controller during the
specified holidays.
If “N” is selected, users can unlock during the holidays.
17.See Timer (Level 3)
Press “Menu/OK”. The screen will show “Select Menu”. Press
“▲” or “▼” to select “System Menu”. Press “Menu/OK” again.
Place an enrolled administrator’s finger (ID No. 01 or 02) on the
reader window and hold. After the fingerprint is verified successfully, When the LCD shows “Select Menu”, press “▲” or “▼” to
select “See Timer”. Press “Menu/OK”.
Then ,the LCD screen will show :
18. Wrong entry penalty (Level 3)
Four (4) consecutive invalid code entries initiates a 4-minute delay
period with the LCD showing:
The entrypad is shut down and no operation is permitted.
Then, the entrypad will start counting down with the LCD flashing
the remaining time every 15 seconds. e.g.
1. Enroll the first fingerprint for quick start (Level 3)………7
2. Enroll the second fingerprint (Level 3)……………… 7
3. Enroll additional fingerprints (Level 3)……………………8
4. Set/Change User Code (Level 3).………………………..….8
5. Enable User Code (Level 3)………………………………9
6. Disable User Code (Level 3) ………………………………9
7. Disable User (Level 3) …………………………………...…10
8. Enable User (Level 3) …………………………………...….10
9. Set time delay (Level 3) ………………………………..….11
10. Unlock with an enrolled fingerprint or code (Level 3)…12
11. Set number of locks (Level 3) ……………………….…...13
12. Authorize access to locks (Level 3) ……………..….14
13. Delete one user (Level 3) ………………………………......16
14. Delete all users (Level 3) ……………………………..….16
15. Dual Mode (Level 3) ……………………………….…….17
16. Set Time Lock (Level 3) ……………………………………18
16.1 Set Timer…………………………………………………18
16.2 Set Time Table……………………………………………18
16.3 Set Holidays………………………………………………19
17. See Timer (Level 3) ………………………………………20
18. Wrong entry penalty (Level 3) …………………………….20
19.Audit trail (Level 3) …………………………….….….21
20 .Sy ste m I nfo (L eve l 3 ) ………………………….… ... .21
21.Set Security Level .………………………..…………….…..21
22.Enroll the first fingerprint and its bound code for quick
sta rt (Level 2 ) …………………………………………….….22
23.Enroll the second or additional fingerprints and its bound
code for quick start (Level 2) …………………….…...23
24.Set/Change the first code for quick start (Level 1) ……..23
After the count down is finished, the entrypad is
ready to use again.
20
5
25.Enroll the second or additional codes (Level 1) .....23
26.Disable / Enable User (Level 1 & 2) ……………………....23
27.Set time delay (Level 1 & 2) ……………………………..….24
28.Unlock with an enrolled code (Level 1 & 2) ……….….….24
29.Set number of locks (Level 1 & 2) …………………….…...24
30.Authorize access to locks (Level 1 & 2) ………………24
31.Delete one user / all users (Level 1 & 2) ………….………24
32.Dual Mode (Level 1 & 2) ………………………….…….24
33.Set Time Lock (Level 1 & 2) …………………………………24
34.See Timer (Level 1 & 2) ………………………………………24
35.Wrong entry penalty (Level 1 & 2) …………………….24
36.Audit trail (Level 1 & 2) ………………………….….….24
37.System Info (Level 1 & 2) …………………………….…....24
Two (2) time tables can be preset. Press “▲” or “▼” to select
Time Table number and “Y” (yes) or “N” (No) and press “Menu/
OK”. If “Y” is selected, the Time Table (for sample: Time Table
01) is enabled. If “N” is selected, the Time Table is disabled.
Press “▲” or “▼” to select the week day, “Y” (or “N”) and the
time period and press “Menu/OK” to confirm.
If “Y” is selected, users can only unlock the controller during the
pre-set time period.
If “N” is selected, users cannot unlock on the specified week day.
Note:
If on one day, “Y” is selected and the starting time is set as same
as the end time, the controller can be unlocked all the day.
16.3 Set Holidays
Press “Menu/OK”. The screen will show “Select Menu”.
Press “▲” or “▼” to select “System Menu”. Press “Menu/OK”
again. Place an enrolled administrator’s finger (ID No. 01 or 02)
on the reader window and hold. After the fingerprint is verified
successfully, When the LCD shows “Select Menu”, press “▲” or
“▼” to select “Set Holidays”. Press “Menu/OK”.
Ten (10) holiday tables can be preset. Press “▲” or “▼” to select
Holiday Table number and press “Menu/OK”.
6
19
16.Set Time Lock (Level 3)
When ID No.01 is not set to Master ,ID No. 01-04 have the function of Time Lock Override .ID No.01—04 can unlock at anytime.
When ID No.01 is set to Master , ID 01-04 cannot unlock at anytime . User ID 01-30 will be confined by time lock .
16.1 Set Timer
Press “Menu/OK”. The screen will show “Select Menu”. Press
“▲” or “▼” to select “System Menu”. Press “Menu/OK” again.
Place an enrolled administrator’s finger (ID No. 01 or 02) on the
reader window and hold. After the fingerprint is verified successfully, When the LCD shows “Select Menu”, press “▲” or “▼” to
select “Set Timer”. Press “Menu/OK”.
When “Y” is flashing, press “▲” or “▼” to select “Y” (yes) or
“N” (No) and press “Menu/OK”.
If “Y” is selected, press “▲” or “▼” to select Month, Day, Year
and Time before which users cannot unlock the controller. For example, to set the controller to be unlocked by users after 9:00 on
July 4, 2010.
If “N” is selected, all users can unlock the controller at any time.
1.Enroll the first fingerprint for quick start (level 3)
In the back of entry pad, you’ll find a battery case. Install a brand
new 9V alkaline battery.
Place your finger on the fingerprint reader window , the LCD screen
will show” Start Enrolling First User”. After the screen shows
”Place Finger”, place your finger on the fingerprint reader window
and hold.
Hold your finger on the reader window until the above displays finish one by one.
The first fingerprint with an ID No. 01 is enrolled successfully.
2.Enroll the second fingerprint (Level 3)
Press “Menu/OK”. The screen will show “Select Menu”. Press “▲”
or “▼” to select “System Menu”. Press “Menu/OK” again. Place
the first enrolled finger on the reader window and hold. After the
fingerprint is verified successfully, press “▲” or “▼” to select “
Enroll New User”.
Press “Menu/OK” again.
16.2 Set Time Table
Press “Menu/OK”.The screen will show “Select Menu”. Press “▲”
or “▼” to select “System Menu”. Press “Menu/OK” again. Place
an enrolled administrator’s finger (ID No. 01 or 02) on the reader
window and hold. After the fingerprint is verified successfully,
When the LCD shows “Select Menu”, press “▲” or “▼” to select
“Set Time Table”. Press “Menu/OK”.
18
Place your finger (different from the first one) on
the fingerprint reader window and hold.
7
▪▪▪▪▪▪
The second fingerprint, with an ID No. 02, is enrolled successfully.
Note: ID No. 01 and ID No. 02 are administrators .
3.Enroll additional fingerprints (Level 3)
Press “Menu/OK”. The screen will show “Select Menu”. Press
“▲” or “▼” to select “System Menu”. Press “Menu/OK” again
Place an enrolled administrator’s finger (ID No. 01 or 02) on the
reader window and hold. After the fingerprint is verified successfully, the LCD screen shows: “Select Menu”. press “▲” or “▼” to
select “ Enroll New User”.
Follow the above steps to enroll additional fingerprints.
4.Set/Change User Code (Level 3)
Press “Menu/OK”. The screen will show “Select Menu”. Press
“▲” or “▼” to select “System Menu”. Press “Menu/OK” again.
Put the user’s finger on the fingerprint reader window and hold on,
after the fingerprint is verified successfully, press “▲” or “▼” to
select “Set/Change User code”, press “Menu/Ok”.
Enter a code (10 digits).
Enter the same code again.
Now the new code is set or changed successfully .
Note:
●
Administrators’ code can be set or changed directly.
●
Non-administrators’ code should be enabled by the administrator first, then, the user can set or change their codes.
8
Note: After deleting all users, all the enrolled fingerprints and
codes are deleted completely.
Note : If User ID 01 is set to Master, User ID 02 cannot delete all
users .
15. Dual Mode (Level 3)
Press “Menu/OK”. The screen will show “Select Menu”. Press
“▲” or “▼” to select “System Menu”. Press “Menu/OK” again.
Place an enrolled administrator’s finger (ID No. 01 or 02) on the
reader window and hold. After the fingerprint is verified successfully, When the LCD shows “Select Menu”, press “▲” or “▼” to
select “Enable Dual Mode”. Press “Menu/OK” . When the LCD
shows:
Dual Mode function is activated.
Note:
Dual Mode Override: In dual mode, administrator’s fingerprints
or codes (ID No. 01 or 02) can unlock the actuator by itself.
● Only administrators’ fingerprints or codes can be used to
change Dual Mode to single user mode.
● In order to open the lock in Dual Mode, the second code or
fingerprint must be entered within 60 seconds after the first code is
successfully verified.
● If all users are deleted, Dual Mode will be disabled automatically.
●
17
5.Enable User Code (Level 3)
13. Delete One User (Level 3)
Press “Menu/OK”. The screen will show “Select Menu”. Press
“▲” or “▼” to select “System Menu”. Press “Menu/OK” again,
Place an enrolled administrator’s finger (ID No. 01 or 02) on the
reader window and hold. After the fingerprint is verified successfully, press “▲” or “▼” to select “Delete One User”.
Press “Menu/OK”. Press “▲” or “▼” to select the ID No. to delete (e.g. ID 03).
Press “Menu/OK”.
Now No. 03 user is deleted.
Note : If User ID 01 is set to Master, User ID 02 cannot delete
User ID 01.
Press “Menu/OK”. The screen will show “Select Menu”. Press
“▲” or “▼” to select “System Menu”. Press “Menu/OK” again.
Place an enrolled administrator’s finger (ID No. 01 or 02) on the
reader window and hold. After the fingerprint is verified successfully, press “▲” or “▼” to select “Enable User Code”, press
“Menu/Ok”.
press “▲” or “▼” to select the ID No. need to be
enabled.
Press “Menu/Ok”
Now user code of ID No.3 is enabled. Then set the code of ID
No.3.
Press “Menu/Ok”, press “▲” or “▼” to select “System Menu”, get
into the system menu with the fingerprint of ID No.3 . Press “▲” or
“▼” to select “Set/Chang User Code”.
Enter a new code(10 digits).
14. Delete All Users (Level 3)
Press “Menu/OK”. The screen will show “Select Menu”. Press
“▲” or “▼” to select “System Menu”. Press “Menu/OK” again,
Place an enrolled administrator’s finger (ID No. 01 or 02) on the
reader window and hold. After the fingerprint is verified successfully, press “▲” or “▼” to select “Delete All Users”.
Enter the same code again.
When the LCD screen shows :ID:03 Code Saved , the code of
ID:03 has been set successfully .
6.Disable User Code (Level 3)
Press “Menu/OK” again.
The entry pad starts deleting users from ID No. 01 to ID No. 30.
16
Press “Menu/OK”. The screen will show “Select Menu”. Press
“▲” or “▼” to select “System Menu”. Press “Menu/OK” again.
Place an enrolled administrator’s finger (ID No. 01 or 02) on the
reader window and hold. After the fingerprint is verified successfully, press “▲” or “▼” to select “Disable User Code”, press
“Menu/Ok”.
9
Press “▲” or “▼” to select the user ID need to be disabled.
Press “Menu/Ok”
“Lock 1234” means the number for each lock. “Auth. oxxx”
shows whether the group has authorization for each specified
lock.
Now ID No.3’s code disabled.
Note: This function can only disable the user’s code, not the user,
the user can unlock the door by fingerprint.
Letter “o” means the group has authorization. Letter “x” means
the group does not.
7.Disable User (Level 3)
When one letter flashes, press “▲” or “▼” to set “o” or “x”.
Press “Menu/OK”, the right letter will flash and it can be set .
Press “Back”, the left letter will flash again and it can be set again
Press “Menu/OK”. The screen will show “Select Menu”. Press “▲”
or “▼” to select “System Menu”. Press “Menu/OK” again. Place an
enrolled administrator’s finger (ID No. 01 or 02) on the reader window and hold. After the fingerprint is verified successfully, Press
“▲” or “▼” to select “Disable User”. Press “▲” or “▼” to select
the ID No. to disable (e.g. ID 03).
For example: To authorize users with ID No. 03, 04 and 05 to
open Lock 2, when the LCD screen shows:
Press “Menu/OK”.
When the LCD screen shows :ID:03 disabled , The ID 03 is disabled successfully.
Note: Administrators cannot be disabled.
8. Enable User (Level 3)
Press “Menu/OK”. The screen will show “Select Menu”. Press “▲”
or “▼” to select “System Menu”. Press “Menu/OK” again, Place an
enrolled administrator’s finger (ID No. 01 or 02) on the reader window and hold. After the fingerprint is verified successfully, press
“▲” or “▼” to select “Enable User”.
The first letter “x” is flashing. Press “▲” or “▼” to set it to be
“x”. Press “Menu/OK”.
The second letter will flash. Press “▲” or “▼” to set “o”. Press
“Menu/OK”.
Press “Menu/OK” twice to confirm the condition of Lock 3 and
4.
Now the authorization is completed.
Press “Menu/OK”.
Press “▲” or “▼” to select the ID No. to enable (e.g. ID 03).
10
Note: Administrators can open all locks without authorization.
15
Note: The default number of locks is 01. The maximum number
of locks is 04. If the number of locks is more than one, press the
numbered button that corresponds with the lock to be opened.
Then, the lock will be unlocked automatically if verification is
successful.
12. Authorize access to locks (Level 3)
Press “Menu/OK”. The screen will show “Select Menu”. Press
“▲” or “▼” to select “System Menu”. Press “Menu/OK” again,
Place an enrolled administrator’s finger (ID No. 01 or 02) on the
reader window and hold. After the fingerprint is verified successfully, press “▲” or “▼” to select “Authorize Locks”.
Press “Menu/OK”.
Now the No. 03 user is enabled.
9. Set time delay (Level 3)
Press “Menu/OK”. The screen will show “Select Menu”. Press
“▲” or “▼” to select “System Menu”. Press “Menu/OK” again,
Place an enrolled administrator’s finger (ID No. 01 or 02) on the
reader window and hold. After the is verified successfully, press
“▲” or “▼” to select Set/Cancel Time Delay.
Press “Menu/OK”.
Press “Menu/OK”.
Press “▲” or “▼” to set the first ID in the group of users to be
authorized. Press “Menu/OK”.
Press “▲” or “▼” to set the last ID in the group of users to be
authorized. For example, to authorize users with ID No. from 03
to 05, press “Menu/OK”.
Press “▲” or “▼” to set time delay (00 to 99 min). Press “Menu/
OK”.
Press “▲” or “▼” to select Time Window (00 to 15 min).
Press “Menu/OK”. Now the time delay is set successfully.
User ID 03—30 will be confined by Time Delay .
Attentions on Time Delay operations:
● Time Delay Override: At anytime ,TDO User can unlock the
actuator without time delay.
.
14
11
During Time Delay period, after TDO User is verified successfully, the actuator will be unlocked without delay.
In the following 5 minutes, user can verify an enrolled fingerprint
again to unlock the entrypad with the LCD showing:
●During Time Delay period, user can operate the entrypad, such as
enrolling, deleting etc., but the actuator will not be unlocked.
●After
the original time delay has been changed successfully, the
time delay for the first time unlocking the entrypad by an enrolled
fingerprint is the same as the original one. The new time delay will
be effective afterwards.
●When
changing Time Delay, if the period is longer than the previous one, the new time delay will be effective during the next
unlocking.
Note:
ID No.01 and ID No. 02 can unlock the actuator without time delay. When the entrypad starts its Time Delay process, user can
operate the entrypad normally, but the actuator will not be
unlocked even if the verification is successful.
If no valid code or enrolled fingerprint are verified successfully
during Time Window period, the actuator will be locked until the
end ,and then , the LCD will show:
10.Unlock with an enrolled fingerprint or code (Level 3)
Verify an enrolled fingerprint . The LCD shows the ID No. followed
by Time Delay.
For example:
Time Delay is set 10 minutes and Time Window 5 minutes.
Place an enrolled finger (ID: 03) on the fingerprint reader window
and hold until the LCD shows:
11. Set number of locks (Level 3)
The entrypad will start counting up. The LCD screen flashes with the
past time every 15 seconds. When Time Delay finishes counting, two
beeps will sound and the LCD screen will show:
Press “Menu/OK”.
The entrypad will start counting down again. The LCD screen
flashes with remaining time every 15 seconds.
12
Press “Menu/OK”. The screen will show “Select Menu”. Press
“▲” or “▼” to select “System Menu”. Press “Menu/OK” again,
Place an enrolled administrator’s finger (ID No. 01 or 02) on the
reader window and hold. After the fingerprint is verified successfully, press “▲” or “▼” to select “Set number of locks”.
Enter Mfc. code.
Press “▲” or “▼” to set number of locks.
13