1
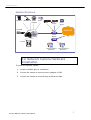
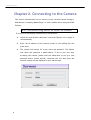
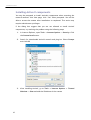
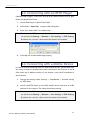
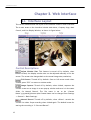
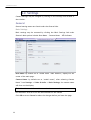
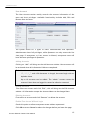
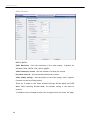
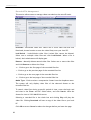
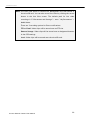
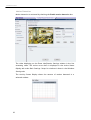
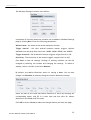
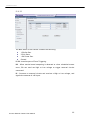
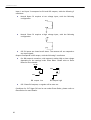
CAM2200/2400 Megapixel Box Network Camera User Manual Release 1.1 April, 2010 CAM2200/2400 All Rights Reserved © Surveon Technology 2010 Copyright Statement No part of this publication may be reproduced, transmitted, transcribed, stored in a retrieval system, or translated into any language or computer language, in any form or by any means, electronic, mechanical, magnetic, optical, chemical, manual or otherwise, without the prior written consent of Surveon Technology Inc. Disclaimer Surveon Technology makes no representations or warranties with respect to the contents hereof and specifically disclaim any implied warranties of merchantability or fitness for any particular purpose. Furthermore, Surveon Technology reserves the right to revise this publication and to make changes from time to time in the content hereof without obligation to notify any person of such revisions or changes. Product specifications are also subject to change without notice. Trademarks Surveon and Surveon logo are trademarks of Surveon Technology Inc. Other names prefixed with “NVR” are trademarks of Surveon Technology Inc. All other names, brands, products or services are trademarks or registered trademarks of their respective owners Surveon Network Camera User Manual 1 CAM2200/2400 Table of Contents Copyright Statement.......................................................................... 1 Table of Contents ............................................................................. 2 Chapter 1. Overview ........................................................................... 4 1.1. Network Camera Introduction .......................................................4 1.2. Network Camera Features............................................................4 1.3. Network Camera Specifications .....................................................5 System Structure ..........................................................................7 1.4. Network Camera Hardware Installation ...........................................7 Chapter 2. Connecting to the Camera ...................................................... 8 2.1. Connecting with a Web Browser ....................................................8 Changing your Password ..................................................................8 Changing your Password ..................................................................9 Installing Active X components........................................................ 10 2.2. Connecting with an RTSP Player .................................................. 11 2.3. Connecting with a Mobile Device ................................................. 11 Chapter 3. Web Interface..................................................................... 12 3.1. Interface Layout ...................................................................... 12 Control Descriptions .................................................................... 12 3.2. Settings ................................................................................. 14 General.................................................................................... 14 Basic Settings ....................................................................... 14 User Account ........................................................................ 15 Date & Time ......................................................................... 16 Network ................................................................................... 17 Network Configuration............................................................. 17 Port Settings......................................................................... 19 UPnP .................................................................................. 20 Video & Audio Settings ................................................................. 21 2 CAM2200/2400 Basic Settings ....................................................................... 21 Image Appearance.................................................................. 22 Video Streams....................................................................... 24 Audio Settings....................................................................... 25 PTZ......................................................................................... 26 Recording ................................................................................. 27 Recording Basic Settings .......................................................... 27 Recorded File Management ....................................................... 28 Event Notification ....................................................................... 30 Event Server......................................................................... 30 Motion Detection .................................................................. 32 Tampering Detection .............................................................. 34 DI & DO............................................................................... 35 Event Settings....................................................................... 37 System..................................................................................... 40 microSD Card Management ....................................................... 40 System Status ....................................................................... 41 System log ........................................................................... 42 Firmware Upgrade.................................................................. 43 Reset to Factory Default .......................................................... 44 Export/Import & Reboot .......................................................... 45 Surveon Network Camera User Manual 3 CAM2200/2400 Chapter 1. Overview 1.1. Network Camera Introduction CAM2200/2400 are professional IP network cameras which use Internet Protocol (IP) to transmit video streams and control signals over a network. Capable of operating both LANs and WANs, these network cameras provide a complete budget-conscious remote surveillance solution that is ultra clear and highly integrated. The cameras provide users an easy upgrade path from a traditional analog surveillance system to the new digital surveillance system in a virtual environment. CAM2200/2400 are user-friendly and easy to install. Utilizing a specialized Digital Signal Processor (DSP), the network cameras also provide Motion Detection and Tampering Detection. These powerful features make the CAM2200/2400 ideal for environments that require remote surveillance or video transmission, especially small residential or business premises. 1.2. Network Camera Features 4 Supports up to 10 simultaneous users Built-in web server to allow real-time remote surveillance and control using standard web browsers Built-in microSD card slot for local backup Supports dynamic IP, LAN, and the Internet (ADSL, Cable modem) Supports most network protocols including: HTTP, TCP/IP, SMTP, DDNS, DNS, DHCP, FTP, RTSP,CIFS, PPPoE Supports 2-way audio Automatically adapts image compression rate to available bandwidth Provides signal loss and motion-detection alerts (adjustable area and sensitivity level) Supports most PTZ camera protocols Supports image recording and still image capture Self-recovery feature automatically re-establishes broken network connections. CAM2200/2400 1.3. Network Camera Specifications Image sensor CAM2200 CAM2400 1/3” 1.3 megapixel progressive scan CMOS 1/3” 1.25 megapixel progressive scan SONY EXviewHAD CCD Lens Changeable (CS/C mount) Day/Night N/A Yes Min illumination 1 lux @ F1.0, 2856K Color: 0.5 lux; B/W: 0.05 lux @ F1.0, 2856K Iris control N/A DC drive Shutter time 1/5 ~ 1/15,000 s 1/50 ~ 1/10,000 s Video compression Resolution H.264 / MPEG-4 / MJPEG Up to 1280 x 1024 Up to 1280 x 960 Video control Auto Gain Control, Auto White Balance, Auto Electronic Shutter, Back Light Compensation, Image Adjustment Frame rate 15 fps at SXGA (1280 x 1024), 15 fps at SXGA (1280 x 960), 15 fps at HD720 (1280 x 720), 30 fps at HD720 (1280 x 720), 30 fps at VGA (640 x 480), 30 30 fps at VGA (640 x 480), 30 fps at QVGA (320 x 240) fps at QVGA (320 x 240) Video stream 2 simultaneous streams at H.264, MPEG-4, and MJPEG Bit rate 32K ~ 10Mbps, VBR, CBR, controller frame rate and quality Intelligent video Motion detection, tempering detection (blocked, redirected, defocused, or spray-painted) Built-in MIC Yes Audio compression 32KHz, ADPCM Audio input 3.5mm phone jack Audio output 3.5mm phone jack Alarm in 2, terminal block Alarm out 1, terminal block Supported protocols 2 second pre-alarm 30 second post-alarm Send snapshot or video clip by FTP or email, record to NAS, record to local storage, trigger DO IPv4, ARP, TCP, UDP, ICMP, DHCP, NTP, DDNS, SMTP, FTP, HTTP, CIFS, PPPoE, UPnP, RTP, RTSP, RTCP, 3GPP, Ethernet 10/100 Base-T / RJ45 Video buffer Event action Surveon Network Camera User Manual 5 CAM2200/2400 CAM2200 Local storage microSD / SDHC slot x 2 (Class 4/Class 6 only) RS-485 1 (2 pins on terminal block) SDK Surveon SDK 2.0 OS Microsoft Windows XP / Vista / 7 (32 bit) Browser Microsoft IE 6.0 or above Software Surveon VMS 2.0 Temperature Humidity Power Power consumption Dimension (WxHxD) Weight Certification 6 CAM2400 Operation: -10 ~ 50 ℃ (14~122℉) Storage: -30 ~ 70 ℃(22~158℉) 20 to 95% 12VDC PoE (IEEE 802.3af) with Class 3 Max. 5W without AUX Power Max. 7W without AUX Power 75mm x 58mm x 150mm (2.95" x 2.28' x 5.9") Net: 385g (0.88 lb) Gross 1035g (2.29 lb) Net: 450g (0.99 lb) Gross: 1085g (2.4 lb) FCC, CE, UL CAM2200/2400 System Structure Speaker Microphone Smoke Alarm Detector NAS microSD FTP Server Email Server Router Internet Router DC-Iris Remote Client 1 (Browser) Remote Client 2 (Browser) 1.4. Network Camera Hardware Installation To install the network camera : 1. Locate a suitable spot for installation. 2. Connect the camera to a power source (adapter or PoE). 3. Connect the camera to a switch using an Ethernet cable. Surveon Network Camera User Manual 7 CAM2200/2400 Chapter 2. Connecting to the Camera This section demonstrates how to connect to the network camera through a Web Browser, Streaming Media Player, or with a mobile device using the 3GPP Protocol. 2.1. Connecting with a Web Browser To connect to the Network Camera with a web browser: 4. Launch the web browser (Microsoft ® Internet Explorer 6.0 or higher is recommended). 5. Enter the IP address of the network camera in the address bar and press enter. 6. The camera will prompt for a user name and password. The default user name and password is admin/admin. If this is your first time accessing the camera, please read the subsections to set up a new password and/or install ActiveX, otherwise the live feed from the network camera will be displayed in your web browser. 8 CAM2200/2400 Changing your Password If this is the first time that the network camera is being accessed, the camera will prompt you to change the administrator password after your first login. Click Okay 1. Click OK when informed of the need to change your password. This will cause a Configure Admin Password popup to display. 2. In the Old password field, fill in the old password (default is admin) . 3. In the New password and Confirm new password field, fill in the new password. 4. Click OK to change the password. If at any time you lose this password, performing a hard reset of all camera settings will restore the password back to admin. Surveon Network Camera User Manual 9 CAM2200/2400 Installing Active X components You may be prompted to install ActiveX® components when accessing the network camera’s Live View page; click “Yes” when prompted. You will be able to access the camera after installation is completed. This action may require administrator privileges. If the dialog box suggest that you are not allowed to install ActiveX components, try resolving the problem using the following steps: 1. In Internet Explorer, open Tools -> Internet Options -> Security. Click the Custom level button. 2. Search for downloaded ActiveX controls and plug-ins. Select Prompt and click OK 3. After installing ActiveX, go to Tools -> Internet Options -> Trusted Websites -> Sites and add the IP Address of the camera 10 CAM2200/2400 2.2. Connecting with an RTSP Player CAM2200/2400 support connection through RTSP Media Players such as Real Player and QuickTime Player. 1. Launch Real Player or QuickTime Player; 2. Select File -> Open URL, to open a URL dialog box. 3. Enter the camera URL in the address bar. Note: The format for RTSP is: rtsp://<IP Address>/<Access>, where <Access> can be found at Settings -> Network -> Port Settings -> RTSP Setting. By default the <Access> value should be stream1 and stream2. 4. Click OK, the stream should begin playing. 2.3. Connecting with a Mobile Device In order to access streaming video on 3GPP mobile devices, please make sure the network camera is already online and connected to the Internet. In the IP field under the IP Address section of the window, enter the IPV4 address of the IP camera. 1. Change the settings under Settings -> Video&Audio -> Stream2 Setting to 3GPP Mode 2. Launch the RTSP Player on the 3GPP mobile device and enter the URL address for the camera. The video should start playing. Note: The format for RTSP is: rtsp://<IP Address>/<Access>, where <Access> can be found at Settings -> Network -> Port Settings -> RTSP Setting. By default the <Access> value should be stream1 and stream2. Surveon Network Camera User Manual 11 CAM2200/2400 Chapter 3. Web Interface 3.1. Interface Layout This section demonstrates the layout of the network camera’s main interface. The 4 main areas on the interface include: Main Menu, Company Logo, Main Control, and Live Display Window, as shown in figure below. Control Descriptions Adjust Window Size: This feature is turned off by default; when clicked, the display window size can be adjusted manually to fit the screen. The screen size changes back to the actual image size (resolution). Full-Screen: Turned off by default. Goes to full-screen mode when clicked; press “ESC” to return to window mode. Image Capture: Turned off by default; when clicked, captures the current screen as an image in a new pop-up window and save it in the same folder for Manual Record. The file name is set to be “Camera Name”+yyyymmdd_hhmmss (the Camera Name can be changed from Settings -> General -> Basic Settings). Manual Record: Turned off by default; when clicked,records the current live video. Stops recording when clicked again. The default locate for storing the recording is “C:\Surveon\Record”. 12 CAM2200/2400 Play Back: Turned off by default; goes to the Record File Management page when clicked. Audio-In: Turned off by default; allows audio to be transmitted to the camera side. Click again to stop audio transmission. Note: Note: Multiple users may access the live view page simultaneously and receive audio from the camera, but only one user is allowed to send audio to the camera side at once. • Mute: Turned off by default; turns off all audio when clicked, turns audio back on when clicked again. :Volume: Set to the current volume of the computer; drag to adjust volume. Language : Language Settings; default in English. Choose the preferred language by selecting from the drop-down menu (administrator only). Available languages include English, Simplified Chinese, and Traditional Chinese. Streams:Choose Stream. Plays Stream 1 on the live view window when Stream 1 is selected ,plays Stream 2 when Stream 2 is selected: Video Format: The compression format, available in H.264, MPEG4, and MJPEG. Will only apply to the current stream (administrator only) Image size (resolution): Sets the resolution of the image. 4 options are available: SXGA (1280 x 1024), HD720* (1280 x 720), VGA (640 x 480), QVGA (320 x 240). This setting will only apply to the current stream. Note: 1280 x 720 is not recommended as the sensor's vertical output will be cropped. Surveon recommends use of SXGA (1280 x 1024) instead. Digital Zoom: Digitally zoom in on the display when clicked.2 options are available when clicked: Zoom in Zoom out Digital Output: Turns on or off Digital Output; same as Settings -> Event Notification -> DI & DO Surveon Network Camera User Manual 13 CAM2200/2400 3.2. Settings Camera settings may be changed by clicking on the Settings link located in the title bar. General General setting menus are found under the General title. Basic Settings Basic settings may be accessed by clicking the Basic Settings link under General. Main options include: Host Name 、Camera Name 、LED Indicator Host Name: by default set to “model name + MAC address”; displays on the center of the main page. Camera Name: by default set to “model name”; after selecting Camera Name” from Settings -> Video & Audio -> Basic Settings, the camera name will show on the display. Note: Host Name and Camera Name can be letters or numbers. LED Indicator: turns on or off the LED indicator on the camera Click OK to save or Cancel to abort the changes before you leave the page. 14 CAM2200/2400 User Account The User Account section mainly controls the account information of the users and their privileges. Available functionality includes Add, Edit and Remove User Accounts. The system allows for 2 types of users: Administrators and Operators. Administrators have full privileges, while Operators can only access the live view page. If anonymous, or free, access is allowed, anonymous users will have the same privileges as Operators. Adding Accounts Clicking on “Add” will bring out the Add Account window. New accounts will be activated when all information fields are completed. Note: User Names and Passwords can be in combinations of letters, numbers, “:”, “-“, “_”, and 4-20 characters in length, but must begin with an alphabet letter Up to 10 accounts can be added. The “admin” account cannot be removed. Users that are logged-in cannot be edited or removed Editing Accounts First select an account and click “Edit”; this will bring out the Edit Account window. All information except the Account Name can be changed here. Deleting Accounts First select an account and click “Remove” to delete the account. Enable Free Access Without Login Check this option to allow anonymous access without a password. Click OK to save or Cancel to abort the changes before you leave the page. Surveon Network Camera User Manual 15 CAM2200/2400 Date & Time The three main parts of this section include Current Date & Time,Time Zone Settings, and Time Settings. Current Date & Time displays the current date and time of the camera. Time Zone Settings Time zone can be set using the dropdown menu (only selectable when synchronizing with an NTP server Time Settings There are 3 ways to set the time: Synchronized with NTP server - Synchronize with the NTP Server. Clicking on Update will synchronize the current time with the NTP Server. Select Periodically synchronize clock with internet servers to periodically synchronize with the server. Manual update - Update the time manually. Synchronize with computer time - Synchronizes the time with the computer’s internal clock. Click OK to save or Cancel to abort the changes before you leave the page. 16 CAM2200/2400 Network Network Configuration IP & DNS Settings Get IP address automatically - Automatically acquires IP address. If DHCP is supported and free IP is available, this option allows the camera to automatically acquire an IP address (both LAN and Internet) Use fixed IP address - Sets a fixed IP address. Manually fill in IP address, Subnet mask, Default gateway, Primary DNS, and Secondary DNS. The network camera can be connected to the network upon completion. PPPoE Settings Connecting using PPPoE requires a user name and password from your ISP. Select “Enable PPPoE” and fill in valid user name and password to connect the camera to the Internet. Surveon Network Camera User Manual 17 CAM2200/2400 DDNS Settings Connecting using Dynamic DNS requires registration on third-party websites for DDNS services. Select desired DDNS service website, check the “Enable DDNS” option, and fill in valid user name and password. You can then access the camera through the registered domain name. Click OK to save or Cancel to abort the changes before you leave the page. 18 CAM2200/2400 Port Settings This section includes HTTP Port Setting and RTSP Settings. HTTP Port Settings The port number is used to access the camera. RTSP Settings You may change the access name for stream 1, stream 2, the RTSP port number, the RTP port for video, the RTCP port for video, RTP port for audio, and RTCP port for audio. Note: The RTP port number must be an even number. After entering the RTP port number, the RTCP port number will automatically be set to the RTP port number + 1. Click OK to save or Cancel to abort the changes before you leave the page. Surveon Network Camera User Manual 19 CAM2200/2400 UPnP UPnP Settings as shown in Figure 5-6: Check the “Enable UPnP” box and enter a correct friendly name and click “OK”. Once activated, neighboring computers can see the camera and allow direct connection when double clicked. Click OK to save or Cancel to abort the changes before you leave the page. Note: If the computer does not support UPnP, you can change the setting by going to Start -> Control Panel -> Add or Remove Programs. In the Add or Remove Programs page, select Add/Remove Windows Components; select Networking Services and click Details. Select UPnP from the popup window. 20 CAM2200/2400 Video & Audio Settings Click on “Settings” on the top menu to access the Settings page; click on “Video & Audio” to access Video & Audio Settings page. This section includes Basic Settings, Image Appearance, Video Streams, Overlay Image, and Audio. Basic Settings Basic settings Flip and Mirror allow you to flip and mirror the video. Flip will flip the image vertically, while Mirror will flip the image horizontally. You may select both Flip and Mirror at the same time. Text Overlay Setting Toggles text messages displayed over the video. Include date will display the current date, Include time will display the current time, and Camera name will display the name of the camera. You can display multiple text messages at the same time (only camera name will show if the resolution is set to 160 x 120). Audio Setting Turns audio on or off. Click OK to save or Cancel to abort the changes before you leave the page. Surveon Network Camera User Manual 21 CAM2200/2400 Image Appearance Image Attribution All parameters under Image Attribution are values ranging from (0) to (100). Brightness - Adjusts the brightness of the image; drag the cursor to the right to brighten the image, and vice versa. Saturation - Adjusts the saturation of the image; drag the cursor to the right to decrease the saturation, and vice versa. Contrast - Adjusts the contrast of the image; drag the cursor to the right to decrease the contrast, and vice versa. 22 CAM2200/2400 Sensor Configuration The Sensor Configuration tabs provide the following options: Auto white balance - turns on and off the auto white balance feature. Auto electronic shutter - When the electronic shutter is turned on, you may adjust the Maximum Auto Shutter Speeds (Default/Fast/Normal/Slow/Slowest) and Slow Shutter (ON / OFF)/ When turned off, you may adjust Shutter Speeds: (1/60, 1/120, 1/250, 1/500, 1/1000, 1/2000, 1/5000, 1/10000). Backlight compensation - turns on and off the backlight compensation feature. Auto Gain Control - turn on and off to adjust the auto gain control. Advanced Settings The Advanced Settings allow you to make changes to the following settings: Flickerless - Reduces flickering caused by the difference in frequency of the system and the environment lighting. Options available in 50Hz, 60 Hz and Auto. Max exposure time - Sets the maximum exposure time from 1/100s, 1/50s, 1/25s, 1/12.5s, and Auto. Day/Night Mode - Settings including Auto, Day mode, Night mode, and Schedule for day mode. Under Auto mode, Night gain threshold must be set, with ranges from 0 to 255. The schedule mode requires a start and end time to be set. Click OK to save or Cancel to abort the changes before you leave the page. Surveon Network Camera User Manual 23 CAM2200/2400 Video Streams Video format - The compression format for the video options include: H.264, MJPEG, MPEG4. Video Resolution - Sets the resolution of the video output. 4 options are available: SXGA, HD720, VGA, QVGA, QQVGA. Video frames per second - Sets the number of frames per second. Key frame interval - Sets the period between key frames. Video quality settings - Sets the quality of the video image, with 2 options: Constant bit rate and Fixed quality. There are 2 modes in the Video stream2 Settings: Normal Mode and 3GPP Mode. When selecting Normal Mode, the default setting is the same as stream1. Click OK to save or Cancel to abort the changes before you leave the page. 24 CAM2200/2400 When selecting 3GPP Mode, the settings for video stream2 is shown below. None of the parameters can be changed. Audio Settings Mute Settings - Select On to turn on Mute or Off to turn off Mute Codec Settings - Select ADPCM bit rate of 8, 16, 32, 48, or 64 Kbps Click OK to save or Cancel to abort the changes before you leave the page. Note: Only Stream 1 supports audio. Surveon Network Camera User Manual 25 CAM2200/2400 PTZ The PTZ menu allows configuration of the RS-485 Control. Select Enable RS-485 control to activate the service. PTZ decoder address - The address (ID) of the PTZ decorder. PTZ protocol - The protocol used by the PTZ (Pelco-D or Pelco-P). Baud rate - Sets the baud rate of the PTZ: 2400, 4800, 9600, 19200, 11520. Click OK to save or Cancel to abort the changes before you leave the page. Note: If Enable RS-485 control is not checked, the PTZ control panel will not show on the live view interface. 26 CAM2200/2400 Recording The Recording menu deals with recording settings and managing recorded video files. Recording Basic Settings Memory card recording - When Memory card Recording is turned ON, video will automatically be recorded onto the microSD card if the network connection is lost. When a network connection is re-established, recording will switch back to the remote destination. If this feature is turned off, there will be no recording at all when if network connection is lost. Manual Record Setting - Defines the path for manual recording. Event Schedule Record Setting - Allows the user to set the destination for event schedule recording. Click OK to save or Cancel to abort the changes before you leave the page. Surveon Network Camera User Manual 27 CAM2200/2400 Recorded File Management This section allows users to manage videos recorded on the microSD cards. Download - Downloads video files. Select one or more video files and click Download; choose location to save the video file(s) onto your local PC. Lock/Unlock - Locks/Unlocks video files. Locked files cannot be deleted. Select one or multiple video files and click Lock/Unlock. When a file is locked, the Locked status will display yes. Remove - Manually deletes stored video files. Select one or more video files and click Remove to delete the file(s). << - Click to go to the first page of the recorded files list. < - Click to go to the previous page of the recorded files list. > - Click to go to the next page of the recorded files list. >> - Click to go to the last page of the recorded files list. Media Type - Click to select a compression format from the dropdown menu. The system will only display video files of the selected format on the recorded files list. To search video files during a specific period of time, enter the begin and end time in the From: and To: fields below, and click Search. Note the format for time is YYYY-MM-DD hh:mm:ss. Selecting a recorded file in the check box and clicking Play will play the video file. Clicking Download will save a copy of the video file to your local PC. Click OK to save or Cancel to abort the changes before you leave the page. 28 CAM2200/2400 Note: The video files shown in Record File Management are files stored in the microSD card. You can also record live video by clicking the record button in the Live View screen. The default path for live video recordings is "C:\Documents and Settings\" + user+ "\My Documents\" + Model Name. There are 3 recording options for Event notifications: FTP or Email: Video clips will be stored onto an FTP site Remote Storage: Video clips will be stored onto a designated location in the CIFS settings. Local: Video clips will be stored onto the microSD card. Surveon Network Camera User Manual 29 CAM2200/2400 Event Notification Event Notification includes the following: Event Server, Motion Detection, Tampering Detection, DI&DO and Event Settings. Event Server Email Settings Sender email Address - email address of the sender of notification emails. Recipient email address - email address of the receiver of notification emails. Only one email address can be entered. Server address - the address of the email server, can be an IP address. User Name - the user name of the email account. Password - the password of the email account. Server Port - the port of the email server. Test - Click this button to send a test email. Emails will only be sent if all parameters are entered correctly. 30 CAM2200/2400 FTP Settings Server Address - the address of the FTP server. Server Port - the port number of the FTP server; default is 21. User Name - the user name of the FTP account. Password - the password of the FTP account. FTP folder name - the name of the folder on the FTP site which video files will be stored in. NAS Settings Server Address - the address of the NAS server. User Name - the user name of the NAS account. Password - the password of the NAS account. Folder name - the name CIFS account folder on the server. Click OK to save or Cancel to abort the changes before you leave the page. Surveon Network Camera User Manual 31 CAM2200/2400 Motion Detection Motion detection is activated by checking the Enable motion detection box. The video displaying on the Event Notification Settings window is the live streaming video. The active curve chart is displayed in the Active Status Display tab under Basic Settings. Setup for windows is done in the Windows Settings tab. The Activity Status Display shows the amount of motion detected in a selected window: 32 CAM2200/2400 The Windows Settings interface is as follows: A maximum of 3 motion detection windows can be added in Windows Settings page by clicking New. Enter the following parameters: Window name - the name of the motion detection window. Trigger interval - the time interval between motion triggers. Options available from the drop down menu are: 200MS, 400MS, 800MS, and 1000MS. Trigger threshold - the threshold of motion triggers; ranges from 0 to 100. Sensitivity - The sensitivity of the motion triggers; ranges from 0 to 100. Click Save to save all settings. Settings of existing windows can also be changed by selecting the window and changing the settings. To delete a window, select a window in and click Remove. By default, the Motion Detection Active In: setting is Auto. You can also change it to Schedule to manualy change the motion detection settings. Select the days of the week that Motion Detection is active by checking the corresponding boxes, and fill in a start time and end time for motion detection in the From: and To: boxes. Click OK to save or Cancel to abort the changes before you leave the page. Surveon Network Camera User Manual 33 CAM2200/2400 Tampering Detection The Tempering Detection Parameters include: Tampering detection - turns on or off Tampering Detection. Trigger threshold - sets the trigger threshold of Tampering Detection; ranges from 0 to 100. Sensitivity - sets the sensitivity of Tampering Detection; ranges from 0 to 100. When Tampering Detection is turned on, associated settings can be changed under Event Settings. For example, if Record or Email is set for Tampering Detection, the system will automatically record or email when tampering is detected. Click OK to save or Cancel to abort the changes before you leave the page. 34 CAM2200/2400 DI & DO The Back Panel of the Camera contains the following: 1 DO Out Port 2 DI In Ports +12V Power Port Ground DI/DO is used as part of Event Triggering. DO - When motion/event/tampering is detected or when scheduled events occur, DO can send out High or Low voltage to trigger external circuits connected. DI - Connects to external circuits and receives a High or Low voltage, and signals the cameras of a DI input. Surveon Network Camera User Manual 35 CAM2200/2400 Input 1 and Input 2 correspond to DI1 and DI2 outputs, with the following 3 conditions: Normal Open: DI requires a Low voltage input, with the following configuration Normal Close: DI requires a High voltage input, with the following configuration Off: DI inputs are closed at all times. The camera will not respond to any input signals. Output corresponds to DO output, with the following 2 conditions: On: DO output is turned on; with outputs in either High or Low voltage depending on the settings under Event Rules. Please refer to Event Rules for more details. DO output low DO output high l l Off: Closes DO outputs; no signals will be sent out. Conditions for DI Trigger DO can be set under Event Rules; please refer to Event Rules for more details. 36 CAM2200/2400 Event Settings Event Settings include Event List and Schedule List. By clicking Add under Event List or Schedule List you can add new conditions for Event triggering. Choosing an event and clicking Edit will allow you to edit the conditions, while clicking Remove will delete the event. Surveon Network Camera User Manual 37 CAM2200/2400 General Name - Specifies the name of the Event. Minimum time interval between triggers - (Event List only) The time frame in which a subsequent trigger of the same event will be ignored (maximum 23:59:59). Set Time Interval - (Scheduled List only) The time when this event will be triggered. Respond to Trigger This specifies the frequency of trigger response. 3 options are available: Always - The default setting; triggers event when triggering conditions are met. Only during time frame - enables triggering only during specified time period. Select the days of the week that the trigger is active by checking the corresponding boxes, and fill in a start time and end time for motion detection in the From: and To: boxes. Never - will never trigger events under any condition. Triggered By Select the conditions that would trigger the Event; Multiple conditions can be set at once. Available options include: Motion Detection - trigger when motion is detected. On Boot - trigger when camera reboots. Video Lost - trigger when video signal is lost. Disk Full - trigger when disk is full. Tampering Detection - trigger when tampering is detected. IP Change - trigger when IP settings has been changed. DI Sensor - trigger when DI occurs. 38 CAM2200/2400 When Triggered This section specifies the actions to take when conditions in Triggered By are met; options are: Email - emails notifications to specified email address. If this is chosen, fill in the following Subject - the subject line of the email. Additional information - the content of the email. Snapshot/Video Clip - Choose to send a snapshot or video file 35 seconds in length (5 seconds before and 30 seconds after the trigger). Files are sent as attachments. FTP - uploads snapshot or video clip to specified FTP location. If this is chosen select either to send a snapshot or video file 35 seconds in length (5 seconds before and 30 seconds after the trigger). Record - Records video to the server CIFS setting or microSD card when triggered. The Video clip stored on both remote storage server and local storage is a video file 35 seconds in length (5 seconds before and 30 seconds after the trigger) Click OK to save or Cancel to abort the changes before you leave the page. Trigger DO - sends out DO when triggered. Note: Note: When editing or deleting a rule that is being used but not being triggered, the rule will not be in effect after edition/deletion. If the rule is being used and being triggered, the changes will be applied after the action is over. Surveon Network Camera User Manual 39 CAM2200/2400 System microSD Card Management Basic Settings Basic Settings shows the status of the current microSD card. Enter the administrator password and click Format to format the microSD card. MicroSD Card Management MicroSD Card Management calculates how much time for recording. Users may also set recycle storage settings here. Setting Recycle storage settings to On will clear the microSD card once it is full. You can also set the number of days which the system automatically clears the contents of the microSD card by setting the number of days in the Enable automatic disk cleanup Max duration for ___ days section. (Maximum of 100 days; locked files will not be cleared). 40 CAM2200/2400 System Status This Section displays the status of the system, including IP Address, MAC address, Subnet Mask, Default Router, microSD Card Capacity Status, Boot Loader and Firmware versions. Clicking on Email will send the system status information out as an email. Surveon Network Camera User Manual 41 CAM2200/2400 System log This section provides a log for all system-related entries. The log lists all visiting information, as well as changes to camera settings (both successful and unsuccessful). The information is very useful, as it provides all traces of any access to the system and the cameras, in order to provide evidence and information for analysis and diagnoses. Top 20 Log List Top 20 Log List shows the most recent 20 log entries; clicking Log all will display all logs; clicking Email will send the log out as an email; clicking Download will download the log to the local PC. Remote Log By enabling Enable log server, you can enter the IP address of an remote server and port number. Click “Ok” to save all settings. When the camera generates a log, a copy of the log will be sent to the remote server automatically. 42 CAM2200/2400 Firmware Upgrade There are 2 ways to upgrade the firmware: Upgrading through firmware stored locally on a PC Upgrading through firmware stored in a microSD card If upgrading through firmware stored locally, enter the path of the file in the provided field or click Browse to find the file. Select Keep customized configuration to keep current configuration settings, or Upgrade all configurations to clear all settings back to factory defaults. Click Upgrade to start the upgrade. Upon completion of firmware upgrade, the system will prompt to reboot. During the firmware upgrade, the LED indicator in front of the camera will show steady amber. When the LED indicator turns green, the firmware upgrade is complete. Click Cancel to exit without upgrading. Surveon Network Camera User Manual 43 CAM2200/2400 Reset to Factory Default There are 2 types of reset. You can either reset all settings and configurations, or you can choose to keep the Network configuration, and reset all other settings and configurations. Click OK after choosing a reset option to perform a reset. Alternately, you may press the “Reset” button on the bottom of the camera to perform a complete reset of the camera. To reset the camera by pressing the “Reset” button on the bottom of the camera, press and hold the “Reset” button for 3 seconds. During this time, the LED indicator in front of the camera will blink in red. 44 CAM2200/2400 Export/Import & Reboot This section allows you to restart the camera, as well as export and import camera configuration details. Restart the network camera - Reset the camera settings by clicking Apply. Export Configuration - Export the camera’s settings and configurations by clicking Export. Import Configuration - Imports previously exported camera settings. The field should contain the path for the camera configuration file. Click Browse: to browse your PC for the configuration file. Click Apply to import the settings. Surveon Network Camera User Manual 45


![[Product Name]](http://vs1.manualzilla.com/store/data/005815260_1-ef599fe6f64155e467bbb545a8fc0a5d-150x150.png)