1
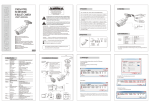
User Manual
Thank you for using our company's
products,please read the user manual
carefully before using this product. When
you start to use this equipment, we
believe that you have read the user
manual carefully.
Attentions:
Secure Startup: Avoid turning on
the equipment in the very dry or
humid environment, to prevent
damaging of the equipment;
Using qualified maintenance
services:Only qualified
maintenance personnel can repair
the equipment, Pleasedo not
dismantle the equipment by
yourself
Connected to other devices:
When connected to other
equipments, please read theuser
manual of the equipment to obtain
detailed safety instructions, do not
connect to other device that the
equipment not equipped with.
①Video/Photograph ②Laser Light On/Off
③Playback ④TV OUT ⑤Mini USB
⑥Mode Change Switch ⑦MIC/LED
Indicator Light ⑧Reset ⑨TF Slot
⑩DC Port
Backup Important data of this
equipment please do a back up, any
error o p er a ti o n a l m et h o ds
resulting in paper loss,t h e
c om p a n y s h al l n o t b e
responsible for.
Operation Instruction:
Note:The following operations are
required to operate in standby mode and
ensure that the identified T-Flash card
was inserted to the card slot properly。
Power On:When connect vehicle power
supply, the device will automatic turn on
and enters the standby state. If not
connect the vehicle power, press ①for
three seconds, the green light is on, it
indicates that the device is turned on and
has entered standby mode.
In tandby status, It is motion detection
mode if ⑥ in the “M” position;it is video
mode if ⑥ in the “V” position; it is
photograph mode if ⑥ in the “P” position
Host Interface:
Laser light: In tandby status,Press ② key,
laser light is on, loosen ② key, laser light
is off.
Motion Detection:In standby Status,
move ⑥ to ”M” position ,it indicates that
the equipment has entered the motion
detection mode, when the camera lens
detectes moving objects that start
recording, then blue light is on. It will
Automatic record video for ten minutes
and save the file when the moving
objects detected. If the moving object is
detected continuously,the device will
automatic record video continuously.
Video:In standby Status, move⑥ to
"V"position, short press ①once, blue
light is on, then entered to video mode. In
vide mode, short press ① once, two
seconds later the green light on, video
files saved automatically ,the device
automatic returns to standby mode; if
need video recording one more
time,please repeat the above operation.
The device default to save a video every
five minutes.
Photograph:In standby status, move⑥
to “P”position, short press ① key once,
the blue light flashes meas that the photo
shooting is completed and has been
automatic return to the standby mode, for
more photos,please repeat the above
operation.
TV OUT:Use the matching TV cable,
connect this device with the equipment
which supported by AV IN, press ③ enter
into TV OUT state. After that, press
③again then can view next file, when
viewing the video file, press ① key to
play the current video file. When playing
video files, short press ③once to stop the
play and change to reverse play status,
press ① to reverse play.
Power Off:No connect vehicle power,
press ① key for two seconds, all the lights
are off, means that equipment has been
power off. If you disconnect the vehicle
power, the device will automatic power off
after ten seconds.
Note: When the vehicle power connect
with this equipment,please do not turn off
by manual or Reset the equipment.
Time watermarks:Video files with time
watermarks. it can be modified, we did not
adjust the time of equipments when it
comes from factory, if you found it is not
accurate , it's easy to adjust by yourself,
just use the USB cable and connect the
equipment to the computer, After the
computer dispay that found the movable
disk(muse be insert identifiable TF card),
run the CD-ROM, and double clik the file
"Time.bat" to run, then the equipment
automatic change the time to the
display-time of computer. After that,pull
out equipment from computer, then
restart and power off once. The
modification of time is finished.
PC Camera:Press①key and hold it,
insert the computer USB, then enter the
PC Camera Mode.
Charging:In the course of using, if red
light twinkling constantly, means that the
electric volume of the host is low, this
device equipped with a DC5V car
charger for battery recharge,in the
course of charging,if the red light is
twinkling constantly, it means it is
charging. When red light stops twinkling
and then keeps on, it means the
recharging finished. please pull out the
machine from computer in time, to
prevent batteries being damaged.
FAQ:
Q: Why it does not have any response
after pressing the ①continuously.
A: Because all operation needs going
back to the standby mode, then we can
do the next step. The particular operation
is written in the manual.
Q: Why the time watermark is not
accurate enough after updating the
system time?
A: Because the battery support the
working of system time. Please do not
exhaust the battery and charge the
battery in time, or keep the battery full
and adjust the time before you use it.
Q: Why I can not find the mobile hard disk
after the equipment is connected to the
computer?
A: Please confirm your computer’s
operating system. It can identify and
install the correspond drivers
automatically in WINDOWS98SE/ME
/2000/X P/MAS OS/LINUX. WINDOWS
98 system need to install drivers which
is recorded in the CD-ROM.
Q: Why the picture is not so clear?
A: The equipment does not possess the
function of preventing free of shaking,
Please keep your hands and the object
do not shake.