1
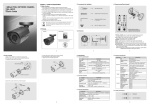
Precaution
Do not Keep the camera face to strong light directly
Power
Audio Out(yellow)
GND (Black)
Audio In(White)
Do not install the camera in extreme temperature conditions .
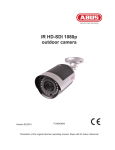
USER’S MANUAL
The lightning flash with an arrowhead symbol, within an equilateral triangle is
intended to alert the user to the presence of uninsulated “dangerous voltage”
within the product's enclosure that may be of sufficient magnitude to
constitute a risk of electric shock to persons.
The exclamation point within an equilateral triangle is intended to alert the user
to the presence of important operating and maintenance (servicing)
instructions in the literature accompanying the appliance.
■
■
■
■
■
■
■
■
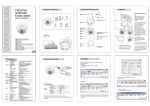
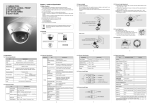
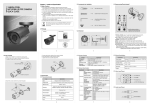
1. Interface
INFORMATION This equipment has been tested and found to comply with
limits for a Class A digital device, pursuant to part 15 of the FCC Rules.
These limits are designed to provide reasonable protection against harmful
interference when the equipment is operated in a commercial environment.
This equipment generates, uses, and can radiate radio frequency energy
and, if not installed and used in accordance with the instruction manual, may
cause harmful interference to radio communications.
Operation of this equipment in a residential area is likely to cause harmful
interference in which case the user will be required to correct the interference
at his own expense.
Sony 3Mega Pixel Image Sensor
Triple Codec (H.264/MPEG4/MJPEG)
Triple Stream
Support Onvif
Support POE
WARNING -
Do not disassemble the camera even if troubles happened
IR LED : 40 units 850nm Infrared LED, 20,000hrs
Night View Distance : Indoor 45 / Outdoor 30m
External Control : Focus/Zoom(Gear Type),
Reset/Factory Default(Joystick)
■ Sense-Up (x6)
■ True Day & Night(ICR)
■ Built-in Concealed Cable Bracket
■ Weatherproof (IP67)
LAN Cable
Sense In (Yellow)
GND (Black)
Alarm 12V Out (Red)
Alarm Out (White)
Do not drop the camera or subject them to physical shocks.
Do not expose the camera to rain or spill beverage on it.
Do not install the camera under unstable lighting conditions
RIGHT
(RESET)
LEFT
(FATORY
DEFAULT)
Do not install or use the camera in an environment where the
humidity is high
2. IP Initialization
Components
IP Address
Gateway
Subnet mask
ID
Password
Web Port
RTSP Port
Changes or modifications not expressly approved by the
manufacturer could void the user’s authority to operate the equipment.
CAUTION :
Service Video
To avoid malfunctions, never use the camera close to a gas
or oil leak
SUN SHIELD
SCREW
FOCUS/ZOOM
CONTROLLER
To prevent electric shock and risk of fire hazards:
Do NOT use power sources other than that specified.
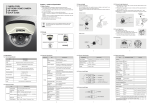
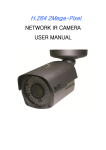
WDR/3D DNR IR BULLET CAMERA
HD NETWORK IR BULLET CAMERA
3 MEGA PIXEL
HD NETWORK
IR BULLET CAMERA
WDR / 3D DNR
IR BULLET CAMERA
USER’S MANUAL
Factory
Default
WDR/3D DNR
Zero Defect
High Resolution of 600 TV Lines
Sens Up(x512, DSS)
DIS(Digital Image Stabilization)
Polygonal Privacy Masking
D.Zoom(x1~x10)
Eclipse
High Sensitivity Day&Night
MANUAL
Do NOT expose this appliance to rain or moisture.
WALL MOUNT BRACKET
192.168.1.30
192.168.1.1
255.255.255.0
admin
admin
80
554
L-WRENCH
* You should change the ID and Password after purchasing.
* You will be responsible for all the damages unless you change the ID and
Password.
This installation should be made by a qualified service person
and should conform to all local codes.
IP3-002
Wall
System
Network
Video
NETWORK SECTION
OS
Interface
Protocol
Onvif
DDNS
Simultaneous Access
Compress Format
Resolution
Frame rate
Video Quality
Streaming
Audio
Event
Web
Browser
Compress Format
Streaming
Sensor In
Alarm Out
Manager
Viewer
Embedded Linux
RJ45 100/100 Base-T PoE
TCP/IP,UDP/IP,RTP,RTSP,RTCP,NTP,
HTTP,DHCP,FTP,SMTP,DNS,DDNS
ver2.0
iplinker.net
Max. 10 user
H.264/MPEG4/MJPEG
2048×1536/1600×1200/1920×1080/
1280×1024/1280×720/640×480
5fps ~ 15fps @ all resolution
H.264,MPEG4 : Bitrate Control
MJPEG : Quality Level Control
Triple Stream (Stream1,2,3)
RTP/RTSP, UnicastRTP, Multicast RTP
G.711 u-law
Two way
1 (Digital Input)
1 (Digital Outut, Open Collector)
IE, Firefox, Safari, Opera
IE only (Active-X)
Design and specifications are subject to change without notice.
FOCUS/ZOOM
Adjusting
FOCUS/ZOOM
Fixed
6)
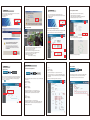
You can do all the settings about network by IP Manager.
1) Run IP Manager
2) Click Find
3) Choose the cameras you want to change
4) Click Change
Please use enclosed controller to
adjust the FOCUS / ZOOM.
And fix the back side of controller
after adjusted.
It is for the enhancement of fixed
and waterproof of lens focus.
2)
※CAUTION
It is composed with very sensitive
gear. The lens may become damaged,
so pleasedo not turn too much.
7)
3)
4)
8) Confirm if the changing values are correct.
9) Click Change
8)
5) Click Batch
unit :mm
2)
153.03
3)
4)
140
136
62
78
42
72.34
Ø70
Ø5
92
Sense Up
White Balance
Ext. Video
Lens
Focal Length
IR LEDs
IR LEDs
Night View Distance
Electrical
Power Supply
Current
Environmental Operating Temp.
Preservation Temp.
Humidity
Mechanical Weight
1/2.8” Sony Exmore 3MP Image Sensor
Progressive Scan
2144(H) x1588(V), 3.40 Mega Pixels
2048(H) x1536(V), 3.14 Mega Pixels
Auto/Day(Color)/Night(BW)
On/Off (6 Programmable Zone)
DWDR (1~5Step)
1~63
48 Zone (On/Off, 1~5Step)
Auto(1/15~1/10000),
Suppress Rolling, Manual
1~6 Step
Auto/Indoor/Outdoor/Fluorescent
VBS1.0Vp-p
2.8~10 Mega Lens
40 units
30m
DC12[V] ±10% / POE
Max 750mA
-10℃ ~ +50℃
-20℃ ~ +60℃
0% ~ 90%
Approx. 1,100 g
76
Function
CAMERA SECTION
Image Sensor
Scan System
Total Pixels
Effective Pixels
Day & Night
Privacy Area
WDR
DNR
Motion Detector
Elec. Shutter
72.34
IMAGE
5. IP Manager
4. Installation & Dimension
106
3. Specification
6) If you want to change many IP addresses, you can enter the starting
IP address and the ending IP address, and enter each increasing step.
7) Click Save
9)
10) Check the Status
11) Try again for the failed cameras
6. Web Viewer
7. Web Manager
You can connect the web server inside the camera and check the picture.
First enter the address on internet explorer.
1) Enter ID / Password
2) Click Viewer
1)
ID
2)
Password
5)
admin
Install Active-X
Web viewer functions
How to update the firmware
You can control all the functions through Web Manager log on.
When you use, you should change ID and Password and don’t open for secure use.
1) Enter ID / Password
2) Click Manager
1)
ID
2)
Password
Update is needed to improve the functions and quality.
1) Click the find and choose the update file.
2) Click Update start and wait until Wait Downloading appears.
* Don’t click any buttons when you are waiting.
admin
1)
Check the network setting and change
When it is working fine under LAN condition, but not working under WAN,
and the camera cannot receive the correct time from NTP server,
3)
2)
3)
4)
3) Wait until Update completed
* Don’t click any buttons when it is being updated.
1)
IP Address
2)
3)
Frame rate / Bit rate adjustment
Suppress rolling
If there is a rolling picture under lighting, you can use this Suppress rolling function.
If you choose “Strong” on Suppress Rolling function, electric shutter will be fixed at
1/15 ~ 1/120 sec. you should be careful when you use it under bright lighting.
Click Help (
) for more details.
192.168.1.30
255.255.255.0
192.168.1.1
4)
DNS
5)
1’st DNS
2’nd DNS
168.126.63.1
6)
4) After Update completed, click Restart
Refer to below bit rate and frame rate example for your easier understanding.
Current Status
Frame Rate : 30[fps]
Bit Rate : 4000[Kbps]
How to set WDR
Case 3
Frame Rate 15[fps]
Bit Rate 2000[Kbps]
The pictures transferred per 1 sec. is decreased from 30 to 15.
The date size transferred per 1 sec. is decreased from 4000[Kbps] to 2000.
Picture quality is same, network load will be decreased from 4000[Kbps] to
2000, by half.
Therefore you should change both frame rate and bit rate.
2)
1)
Shutter Speed
Case 1
Frame Rate 15[fps]
Bit Rate 4000[Kbps]
Auto
2)
Dynamic(DHCP)
Static
9. Web Manager
8. Web Viewer
3)
192.168.1.30
40:04:0C:01:00:AA
IP Address
Subnetmask
Gateway
1) Stream : Choosing stream, displaying the status of chosen stream
2) Viewer Size : Choose the size of window
3) Disconnect : Disconnect the camera
4) Save : Record the current moving picture in AVI file format.
5) Capture : Save the current still picture in BMP file format.
6) Path : Choose the directory to Save, Capture
7) Audio On : Turn On/Off Audio
Audio should be On at setting.
4)
Assigned IP
MAC
The pictures transferred per 1 sec. is decreased from 30 to 15.
The date size transferred per 1 sec. is maintained on 4000[Kbps]
Picture quality will be better, and network load will be same.
Suppress Rolling(60Hz)
strong
weak
User
Shutter Speed 1/60
AGC
(-)
(2)
(+)
If you want to watch the more clear image under back light condition,
you can do setting as below, and choose the step and click Save.
* You should check the pictures after click the Save button.
1)
1)
Image Mirror
WDR
Normal
3)
Resolution
Input 1
Input 2
2)
1280x1024
640x480
4)
Stream Setting
3)
Stream
Source
Codec
Case 2
Frame Rate 30[fps]
Bit Rate 2000[Kbps]
Stream 1
Input
H.264
Frame Rate(fps)
Key Frame
Bit Rate(Kbps)
30
30
4000
The pictures transferred per 1 sec. is maintained on 30.
The date size transferred per 1 sec. is decreased from 4000[Kbps] to 2000.
Picture quality will be worse and network load will be decreased from
4000[Kbps] to 2000, by half.
Rate Mode
VBR
Stream 2
None
MJPEG
Frame rate(fps)
Quality
5
50
None
MPEG4
Frame Rate(fps)
15
(1~15)
Key Frame
Bit Rate(Kbps)
Rate Mode
30
4000
VBR
(5~30)[15]
(64~12000)[8000]
4)
Stream 3
show / hide
Enable
Ligth Compensation
Back-light
WDR
Step 1
Step 2
Front-light
Step 3
Step 4
Step 5
5)
Save
(1~15)
(5~30)[15]
(64~12000)[8000]
(1~15)
(5~80)[50]
( ) : Value Range [ ] : Default Value
Save