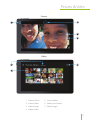
1
8” Windows Tablet
User’s Guide for Model TBQW895B-1184-01
2
Important Safety Instructions
•
•
•
•
•
•
•
•
•
•
•
•
•
Read these Instructions.
Keep these Instructions.
Heed all Warnings.
Follow all instructions.
Do not use this apparatus near water.
Clean only with a dry cloth.
Do not block any ventilation openings. Install in
accordance with the manufacturer’s instructions.
Do not install near any heat sources such as radiators, heat
registers, stoves, or other apparatus (including amplifiers)
that produce heat.
Do not defeat the safety purpose of the polarized or
grounding - type plug. A polarized plug has two blades
with one wider than the other. A grounding type plug has
two blades and a third grounding prong. The wide blade
or the third prong are provided for your safety. When the
provided plug does not fit into your outlet, consult an
electrician for replacement of the obsolete outlet.
Protect the power cord from being walked on or pinched
particularly at plugs, convenience receptacles, and the
point where they exit from the apparatus.
Only use attachments/accessories specified by the
manufacturer.
Unplug this apparatus during lightning storms or when
unused for long periods of time.
Refer all servicing to qualified service personnel. Servicing
is required when the apparatus has been damaged in any
way, such as power-supply cord or plug is damaged, liquid
has been spilled or objects have fallen into the apparatus,
the apparatus has been exposed to rain or moisture, does
not operate normally, or has been dropped.
FCC Warnings
Warning: Changes or modifications to this unit not expressly
approved by the party responsible for compliance could void
the user’s authority to operate the equipment.
NOTE: This equipment has been tested and found to comply
with the limits for a Class B digital device, pursuant to Part
15 of the FCC Rules. These limits are designed to provide
reasonable protection against harmful interference in a
residential installation. This equipment generates, uses,
and can radiate radio frequency energy and, if not installed
and used in accordance with the instructions, may cause
harmful interference to radio communications. However,
there is no guarantee that interference will not occur in a
particular installation. If this equipment does cause harmful
interference to radio or television reception, which can be
determined by turning the equipment off and on, the user is
encouraged to try to correct the interference by one or more
of the following measures:
• Reorient or relocate the receiving antenna.
• Increase the separation between the equipment and receiver.
• Connect the equipment into an outlet on a circuit different
from that to which the receiver is connected.
• Consult the dealer or an experienced radio/TV technician
for help.
Additional Warnings
• CAUTION: TO PREVENT ELECTRIC SHOCK, MATCH
WIDE BLADE OF PLUG TO WIDE SLOT, FULLY
INSERT.
Avis: AFIN DE PRÉVENIR LES CHOCS
ÉLÉCTRIQUES, FAITES CORRESPONDRE LA FICHE
BLANCHE DE LA PRISE À LA FENTE LARGE,
INSÉREZ TOTALEMENT.
• WARNING: To reduce the risk of fire or electric shock,
do not expose this apparatus to rain, moisture, dripping,
or splashing.
Avis: Pour réduire le risque d’incendie ou de choc
électrique, n’exposez pas cet appareil à la pluie ou
l’humidité ou aux éclaboussures.
• WARNING: Changes or modifications to this unit not
expressly approved by the party responsible for compliance
could void the user’s authority to operate the equipment.
AVIS: Des changements ou des modifications sur ce
produit non expressément approuvés par la partie
responsable de la conformité peut annuler le droit de
l’utilisateur d’utiliser cet équipement.
• WARNING: Lithium batteries, like all rechargeable
batteries, are recyclable and should be recycled or
disposed of in normal household waste. Contact your local
government for disposal or recycling practices in your
area. They should never be incinerated since they might
explode.
AVIS: Les piles Lithium ion, comme toutes les autres piles
rechargeables, sont recyclables et doivent être etées avec
vos déchets ménagers. Contactez votre municipalité pour
obtenir des conseils sur les moyens de disposition et de
recyclage dans votre région. N’incinérez pas vos piles, car
celles-ci peuvent exploser.
• Mains plug is used as disconnect device and it should
remain readily operable during intended use. In order to
disconnect the apparatus from the mains completely, the
mains plug should be disconnected form the mains socket
outlet completely.
La prise du secteur est utilisé pour déconnecter le
système. La prise du secteur ne doit pas être obstruée ou
doit être facilement accessible pendant son utilisation.
Pour être complètement déconnecté de l’alimentation
d’entrée, la prise doit être débranchée du secteur.
• Battery shall not be exposed to excessive heat such as
sunshine, fire or the like.
Les piles ne doivent pas être exposées à de forte chaleur,
tel qu’à la lumière du soleil, au feu ou autres choses de
semblable.
• Batteries should be recycled or disposed of as per state
and local guidelines.
Piles doivent être recyclées ou éliminées selon les
directives étatiques et locales.
3
Table of Contents
Specifications
Hardware & Features | 5
Includes | 5
Right Out of the Box
Charging the Battery | 6
Power Button | 7
Using Your Tablet
Gestures | 8
Orientation | 10
Start & Charms | 12
Apps & Tiles | 14
Apps & Windows Store | 15
Split Screen | 16
Desktop Mode | 17
Security & Personalization | 18
Screen Orientation | 19
Microsoft Account | 19
4
Wi-Fi & Internet
Wireless Connections & Internet Browser | 20
Tablet & Other Devices
Connecting to Other Devices | 22
File Handling & Storage
OneDrive & File Explorer | 23
Expanding Storage | 23
Pictures & Video
Camera | 24
Gallery | 24
Company Information
Customer Support | 26
International Support | 26
Green Initiative | 26
Specifications
Hardware & Features
»» 8” Full color, multi-touch,
TFT LCD display
»» G-Sensor for screen rotation
»» Windows 8.1
»» Front and rear facing cameras
»» Quad core 1.33 GHz processor
»» Built-in microphone
»» Built-in 1GB RAM
»» Micro-HDMI output (1080p)
»» 16GB installed flash memory
»» Micro-USB port
»» Expandable memory and
Micro-SD card reader
(up to 32 GB)
»» 3.5mm headphone jack
»» 1280 x 800 native resolution
»» Built-in dual speakers
»» Built-in 5000 mAH rechargeable battery
Battery life aprox. 5.5 hrs while playing video
»» Built in Wi-Fi
Includes
»» AC/DC power adapter
»» USB to Micro-USB cable
»» On-the-Go USB to Micro-USB adapter
»» Headphones
Specifications are subject to change without prior notice.
5
Right Out of the Box
Charging the battery
It is necessary to charge your tablet before it can be powered on. The initial charge time is
approximately 5 hrs.
When the Battery Indicator signals that the charge is running low, connect the tablet to
the AC power adapter (included). It is normal for the body of the tablet to become
warm during charging and after extended periods of use.
Charge the Battery Using the AC/DC Adapter
»» Insert the small plug of the AC/DC adapter into the DC power input on the
tablet, and plug the adapter into a standard wall outlet. A blue light near the power
button on the side of the tablet will indicate that the unit is charging.
Rear
AC/DC Adapter Plug
6
Right Out of the Box
Power button
The Power Button on your ZEKI Tablet performs a variety of functions. It will power
the tablet on, off, or put the tablet into Sleep Mode. Sleep is a power saving mode that
temporarily disables certain functions, namely the screen. Your tablet will still do things like
play music, and remains ready to use at a moments’ notice.
Rear
Power Your Tablet On
»» Press the power button on the side of the tablet and wait for the
screen to activate.
Put Your Tablet in Sleep Mode
»» Press the Power Button once to put the tablet to Sleep.
Power Your Tablet Off
»» Press and hold the Power Button to turn the tablet completely off.
7
Using Your Tablet
Gestures
The screen on your ZEKI tablet is capable of accepting up to five points of contact at once,
and is the main interface through which you will interact with your tablet.
Master these simple hand gestures to use the tablet to its fullest potential.
Swipe
Touch and drag your finger in any direction
on the screen.
Tap/Hold/Rotate
Briefly tap the screen to select an icon,
item, or app. Press and hold to bring up
menus or other options.
Hold and turn two fingers to rotate things
like pictures and games.
8
Using Your Tablet
Drag
Touch and hold any item on the screen,
such as an app, to move it.
Zoom In/Out
Touch the screen with two fingers and
pinch in or out. In some cases, you can also
zoom in and out by quickly tapping the
screen twice.
9
Using Your Tablet
Orientation
Front
2
1
3
4
5
1. 8” Screen
2. Power Button & Charging Indicator Light
3. Start Button
4. Volume Button
5. Front Facing Camera & Indicator Light
10
Using Your Tablet
Rear
11
10
9
8
1
2
3
4
5
6
7
1. DC Power Input
5. Micro USB Port
9. Volume
2. Microphone
6. Headphone Jack
10. Rear Facing Camera
3. Micro SD Card Slot
7. Power Button
11. Dual Speakers
4. HDMI Input
8. Start Button
11
Using Your Tablet
Start & Charms
The Start button functions like a “Home” button, and returns the tablet to the Start screen.
The Start screen is the main screen you will use to interact with your Windows tablet.
From Start you can access apps, mail, the internet, change settings and more. You can
configure Start to suit your tastes and preferrences by customizing options and apps.
Charms let you navigate the tablet’s primary functions like Search, Share, Settings and others.
Charms
»» To access Charms, swipe left from the right edge of the screen at any time.
Charm Functions
»» Search
Perform a search on the tablet, on the internet, or other locations/directories. You
may also press the Magnifying Glass to start a search.
»» Share
Allows you to share files and media across platforms and connected devices. Use
while running an app to share media from the app.
»» Start
Returns to the Start Screen.
»» Devices
Allows you to connect and send files to external devices.
»» Settings
Allows access to quick settings like screen brightness, volume, Wi-Fi, and others.
Press Change PC Settings to make more in depth changes to settings.
12
Using Your Tablet
2
1
4
3
1. App Tiles
2. Current User
3. Date/Time/Battery Charge/Wi-Fi Signal Strength
4. Charms
13
Using Your Tablet
Apps & Tiles
Use Tiles to access apps installed on your tablet. Tiles can be configured in a number
of different ways. Live Tiles, like Weather or News, will display live information, or other
streaming content, from the internet. To open an app, simply tap its tile.
App Bar
Command Bar
Opening the App Bar
»» From the left edge of the screen, drag right then back left again in a roughly
circular motion. The App bar will appear and displays all of your currently running
apps.
Command Bar & Customizing Tiles
»» Drag the Command Bar up from the bottom of the screen, select the Tile on the
screen you wish to modify, and choose from the available options.
Grouping and Moving Tiles
»» To arrange tiles into groups, open the Command Bar and tap the Customize icon.
Tap the Unnamed Group icon that appears above the tiles. When the keyboard
appears, type in the name.
»» To move tiles within the group or on the screen, simply drag and drop them into
any position you like. If moving to a location already occupied by a tile, the two will
switch places.
Closing Apps
»» In a running app, drag from the top of the screen to the bottom. When
removing an app from the Open Apps bar, drag an app out and down to
the bottom of the main screen.
14
Using Your Tablet
Apps & Windows Store
The Windows Store is your gateway to free or paid apps that will enhance your tablet
experience. Everything from games to music, movies and books can be found in the
Windows Store. You must have a Microsoft account to access and download media from
the Windows Store. Some apps cost money and need to be purchased before they can be
installed. Most of the pre-loaded apps that came with your tablet cannot be uninstalled.
Downloading Apps from the Windows Store
»» Tap the Store Tile.
»» Browse or search for an app, game, or other media.
»» Tap the one you want and then tap Install.
Deleting Apps from Your Tablet
»» From the Start Screen, swipe upwards to access the All Apps menu. Once there,
drag up from the bottom of the screen to access the Command Bar, then tap the
Customize icon, select the app you want to uninstall, and tap Uninstall.
Adding/Removing Tiles to Start
»» From the Start Screen, swipe upwards to access the All Apps menu. Once there,
drag up from the bottom of the screen to access the Command Bar, then tap the
Customize icon, select the app you want to add or remove to Start, and press Pin
to Start/Un-Pin from Start.
15
Using Your Tablet
Split Screen
Windows 8.1 allows you to use two apps at once via the split screen. View pictures, read the
news, watch videos and more all at the same time by using split screen.
App 2
App 1
Divider
(slide left or right)
To Enable Split Screen
»» Have at least two apps running, one in the background and one on the main screen.
»» Access the second app you wish to view by opening the Apps side bar.
»» Press, hold, and drag the app you want out from the bar and onto the main screen.
»» Wait for the tablet to initiate split screen mode (the divider will appear) and release
the app into the second window.
»» The divider can be moved to change the size of the screens running the apps, simply
press and drag the middle of the slider bar.
16
Using Your Tablet
Desktop Mode
For a more traditional Windows experience, you can switch to Desktop Mode. Installed apps
can be pinned to the Taskbar for easy access while using Desktop.
Folders and Files
Taskbar (with pinned apps)
Desktop Background
To Enable Desktop Mode
»» To enable Desktop Mode, find and tap the Desktop tile in the apps menu.
To Disable Desktop Mode
»» To disable Desktop Mode and switch back to tile view, press the Start button in
the lower left corner of the screen, in Charms, or on the side of the tablet.
17
Using Your Tablet
Security & Personalization
Security for your tablet is enabled via the Lock Screen. The Lock Screen must be deactivated
after powering the tablet on or waking it from Sleep. To deactivate the Lock Screen, simply
swipe upwards anywhere on the display. Security measures such as passwords or picture ID
may be used to make your tablet more secure.
Change the Lock Screen
»» Open Charms and select Change PC Settings > Personalize
Change the Security Settings
»» Open Charms and select Change PC Settings > Accounts > Sign-in
Options > Password.
18
Using Your Tablet
Screen Orientation
Your tablet will automatically adjust from portrait to landscape view as you rotate it.
You can disable this feature by opening Charms > Settings > Screen > and tapping the
Screen Rotation Icon above the screen brightness slider.
Portrait
Landscape
Microsoft Account
A Microsoft account is the email address and password that you will use to access Microsoft
services like Outlook Email, OneDrive, and others. Additionally, other email provider apps
can always be downloaded from the Windows Store, or accessed through the web browser.
Adding Other Accounts to the Tablet
»» Open Charms and select Settings > Change PC Settings > Accounts > Other
Accounts > Add Account
Changing Account Settings
»» Open Charms and select Settings > Change PC Settings > Accounts
19
Wi-Fi & Internet
Wireless Connections & Internet Browser
To access the internet or use other online services you must have your Wi-Fi enabled and
connected to a wireless network. It will be useful to have your router’s ID and password on hand
if you don’t already know them.
To begin browsing the internet, simply tap the Internet Explorer (IE) tile on the Start screen.
Connect to a Wi-Fi Network
»» Open Charms and tap the Networks/Wi-Fi icon towards the bottom.
»» Be sure the Wi-Fi switch is in the ON position.
»» Select the desired network from the list below, and tap Connect. If your network
is secured with a password, you will be prompted to enter it now.
Browsing the Internet
»» Tap the Internet Explorer icon.
»» Once the Browser is open, you can tap the search bar at the bottom of the screen
or on the web browser’s search page.
»» The keyboard will automatically appear. Simply start typing and tap Enter
to begin your search.
Browser Functions
Back/Forward will navigate back or forward to web pages that you
have visited during your browser session.
Refresh/Stop will reload or cancel loading the current page.
Tabs will bring up the Tabs bar and allow access to any open tabs in
your browser session.
New Tab will open a new browser tab.
Tab Options will re-open a closed tab, or open a private browsing tab.
Browser Options will display different viewing and other options for
the browser.
Favorites will open a list of all of your pinned webpages.
20
Wi-Fi & Internet
1
2
3
4
1. Browser Screen
2. Tabs
3. Search Bar and Navigation
4. Keyboard
21
Tablet & Other Devices
Connecting to Other Devices
Your tablet is able to connect to a variety of different devices that let you transfer files
by linking to a television, bluetooth, or other device. This can be a useful for making
presentations from the tablet, sharing pictures, videos, or other media.
Connecting to a TV, Monitor, or Projector using HDMI
»» Plug an HDMI cable into the tablet’s HDMI input and the HDMI input on the
desired TV, screen or other device. An adapter may be necessary depending on
the type of HDMI inputs available.
Configure the Connection Type
»» Open Charms > Devices > Project
»» Select from the available options
PC screen only:
Everything on the tablet will be displayed on the screen. Connecting to a wireless
projector, changes the option to Disconnect.
Duplicate:
Both screens will display the same thing.
Extend:
Everything on the tablet is spread over both screens, and items can be freely
dragged from one to the other.
Second screen only:
Everything on the tablet is displayed on the second screen only, and the tablet’s
screen will go dark.
Pair to a Bluetooth Device
»» Open Charms > Settings > Change PC Settings > PC and Devices > Bluetooth
»» Be sure the bluetooth device you wish to connect to is in pairing mode and wait
for the tablet to find the signal.
»» Follow the prompts and finish pairing your device. If the device requires a pairing
code, you’ll be prompted for it. Refer to the user’s manual for your specific device
for instructions on pairing and connecting Bluetooth devices.
22
File Handling & Storage
OneDrive & File Explorer
OneDrive is Microsoft’s cloud storage service that is included with your Microsoft account.
For Microsoft Office 365 subscribers, there are no storage space limits on your account.
Files and media from your tablet and apps can be saved directly to OneDrive, and from
there they are accessible from any mobile device or computer you may be using. To save a
file to OneDrive, select OneDrive as the storage destination after opening it (OneDrive may
be selected by default).
File Explorer is a more traditional Windows PC interface that uses windows and file
directories to organize and place files on the tablet. It is used when in Desktop Mode.
Additionally, you can also perform a search for any file, app, or media that maybe be on the
tablet by using the Search function.
Accessing Files with OneDrive App
»» Simply find and tap the OneDrive tile and begin browsing files on the tablet or on
your OneDrive account.
Accessing Files with File Explorer
»» To open File Explorer, locate and tap the Documents tile in the App Menu.
»» This will put the tablet in Desktop Mode, and you may begin browsing files on
your tablet.
Expanding Storage
The tablet has the capacity to have its memory storage expanded through the use of a
Micro SD card. The maximum size the tablet will accept is 32GB. A USB storage device may
also be connected to the tablet using an On-the-Go Micro-USB to USB adapter (included).
Windows 8.1 and USB Devices
!
»» It is important to note that the Windows 8.1operating system on your tablet
considers itself a desktop PC. As such, the USB drive does not support
connecting to another computer. Additionally, to prevent damage to the hardware,
power sharing/charging to or from other devices is not supported.
You should not charge the tablet through the USB port, use
only the included AC/DC power adapter and input.
Connecting and Removing a Micro SD card
»» Insert the Micro SD Card into the Micro SD Card Slot. The SD card will be
mounted automatically and ready to use. Removal of a Micro-SD card is the
reverse of the above operation.
23
Pictures & Video
Camera
Your tablet is equipped with 2.0 megapixel front and rear facing cameras. They can be used
to capture pictures and video, which are then stored in the tablet’s Gallery. The camera is
also used when running video chat software, such as Skype. Camera zoom is not currently
supported on this tablet.
Taking Snapshots
»» Tap the Camera icon from the apps menu or screen.
»» When you are ready, tap
to capture the image.
Taking Video
The camera is set to take still images by default, and must switch modes to take video.
»» While in camera mode, tap the Video icon on the right side of the screen.
»» When you are ready, tap
stop recording video.
to begin recording video, and tap once more to
Adjusting Camera Settings
The camera has different settings that may affect the outcome or quality of the pictures
and video you capture.
»» To access these settings, or to switch cameras, swipe up from the bottom edge of
the screen while using the Camera.
Gallery
Gallery is where all of your snapshots, videos, and downloaded images are saved. As the
gallery is populated with images and files, they will automatically be divided into Albums.
For example, “Screenshot” is an album that contains all of the screenshots you have taken.
You can access the Gallery by pressing the Photos tile on the Start screen.
Applying Effects to Pictures
The tablet has built in effects that can alter an image after it has been captured.
»» To access effects while in the Gallery, swipe up from the bottom edge of the screen.
24
Pictures & Video
Camera
2
1
3
4
Gallery
6
5
7
1. Camera (Front)
5. Current Gallery
2. Camera (Rear)
6. Gallery View Options
3. Capture Image
7. Gallery Images
4. Capture Video
25
Company Information
Customer Support
Contact Information
Warranty Information
Website: www.zekitablet.com
Email Support: [email protected]
Email Parts: [email protected]
Phone Support: 1-888-999-4215
For Warranty Information and the most
up-to-date version of this User’s Guide,
go to: www.zekitablet.com
International Support
To download this User’s Guide in English, Spanish, or French, or to get answers to frequently asked
questions, visit the support section at: www.zekitablet.com
Para descargar este Manual del Usuario en inglés, español y francés, o para obtener respuestas a
preguntas frecuentes, visite la sección de apoyo en: www.zekitablet.com
Pour télécharger ce guide de l’utilisateur en anglais, espagnol ou français, ou pour obtenir des réponses
à des questions fréquemment posées, consultez la rubrique d’assistance sur: www.zekitablet.com
Green Initiative
Our environmental commitment to ‘Protect for Today and Sustain
for Tomorrow’.
On a continual basis DPI, Inc. is making efforts to sustain the
environment and improve the recyclability of its products and
packaging.
Made
Green
Focusing on “protecting for today and sustaining for tomorrow”
DPI, Inc. has committed to reducing packaging size, increasing the
usage of recyclable plastics, and ensuring that packaging and manuals
Protect for Today
Sustain for Tomorrow
are made with up to 85% recycled material. In addition to material
consideration, DPI, Inc. has also focused on the finer details that
positively impact the environment such as employing the usage of soy-based inks.
DPI, Inc. Also ensures that the factories that produce the company’s wide variety of consumer
electronics adhere to environmentally friendly air and water restrictions. This is yet another example
that every step of the way DPI, Inc. is making efforts to lessen any impact on the environment.
DPI, Inc. Also engages in conversations with Energy Star in order to ensure that the consumer
electronics being produced meet high standards of energy efficiency. The ultimate goal is keeping
energy costs for consumers low while providing quality, feature-rich products.
26