1
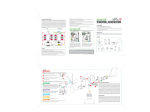
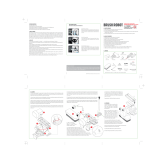
Build a better tomorrow through education & awareness. You will like the other great
Green Science kits:
00-03263 Dynamo Torch
Turn a simple toy motor into a generator that converts hand
motion into electrical energy and powers a light bulb. No
battery, no pollution, just amazement. The generator could be
used as an awesome emergency torch. Caution: High Voltage
Inspiration & Fun!
00-03266 Soda Can Robug
Millions of soda can are wasted everyday. Help save our
environment. Recycle one of them and turn it into a cool robotic
bug. Switch it on and watch it vibrate causing it to slide across
the floor. It even emits a “buzz” as it moves along - just like a
real bug. It’s an awesome robotic science kit.
00-03267 Windmill Generator
Build this amazing wind generator and learn about renewable
energy. Watch the LED glow as it is powered by free energy from
the wind. No batteries required!
To Parents: Please read through
these instructions before giving
gudiance to your children.
A. SAFETY MESSAGES
1. Please read all instructions before you start.
2. Adult assistance and supervision is recommended at all times.
3. This kit is intended for children aged over 8.
4. This kit and its finished product contain small parts which may cause a choking hazard if
misused. Not suitable for children under 3.
5. Do not use sewage water for the experiments. Sewage water contains bacteria and micro
organisms which will contaminate the kits. Follow the instructions to mix artificial “dirty
water”. This is sufficient to demonstrate the purifying effects of the kit.
6. This is only an experimental kit for demonstrating different methods of purifying water. The
kit is not intended as a filtering device for drinking water. Do not drink the water purified with
the kit. Some experiments involve hot water. Adult supervision is required.
B. CONTENTS
4 filter sections
41-03281/1 090403
00-03279 Weather Station
This ultra smart weather station has many functions. You can
keep track of weather changes, learn facts about the weather
and do experiments on the green house effect. When you have
done exploring you can recycle a plastic bottle and make your
very own mini green house.
Small
plastic cup
Soft wax
3 bags of
gravel
Round filter base
Transparent
tube
2 metal
washers
Funnel-shaped
collector
Black
plastic cup
2 transparent 4 filter plugs
caps
Fishing line
3 filter paper
3 bags of
sand
3 bags of
active carbon
Silver reflector card
Remarks: some materials from home are also required. Ask an adult before using these.
12
waterfilter_FL.indd 1-2
4/14/09 10:58:11 AM
C. EXPERIMENT 1 - FILTERING
Warning: The filter column is not intended as a filtering device
for drinking water. Do not drink the filtered water.
Gravels
In this experiment, you use the assembled filter column
from the kit to purify water. The various filters in the column
remove impurities from the water.
You will need: 4 x filter sections, 4 x filter plugs, filter base,
soft wax, bag of active carbon, bag of sand, bag of gravel,
filter paper. (Remarks: you need only one unit of those filters
for setting up the filter column. Leave the other two as spare
supplies for future experiments.)
Sand
Also needed from home (not included in kit): some soil from
a clean source (e.g. pot plant or flower-bed), cooking oil, a
glass (any size) and a glass (preferably transparent) whose
diameter is smaller than the round filter base.
Constructing the filter column
Active
carbon
Filter
paper
1. The filter plugs are specially designed for regulating the
speed of water flow inside the column. There are six arches
in the rim of each filter plug. Take two of the plugs and fill
four arches in each one with
a very small piece of wax,
leaving two open arches.
These two plugs will be used
Soft
Wax
in the filter sections which
contain sand and active
carbon. They will reduce the
X2
X2
speed of flow through the
sections, allowing the sand
and active carbon to achieve their best filtering effect.
2. Fit the filter plugs into the holes in the bottom of each
filter section. You may need to push the plugs into place with
a pen. You should have two sections with plugs with six open
arches and two sections with plugs with two open arches.
3. Clean the gravel, sand and active carbon separately before
filling in the filter sections. Simply place each of the materials
in a small container (don’t mix the materials). Rinse them
with clean water a few times. This will remove any dust
sticking to them.
4. Put the sand and active carbon into the filter sections with
filter plugs of two open arches, and the filter paper and gravel
into the sections with filter plugs of six open arches.
5. Put the filter base on a table. Put the filter sections onto
the base in the following order from the bottom: filter paper,
active carbon, sand, and finally gravel. Make sure each
section snaps into place on the one underneath.
6. Stand the completed filter column on top of the glass.
Preparing the artificial “dirty water”
Half fill a small glass of water. Add the soil and oil to it and
stir to make a brownish coloured mixture. This will be the
“dirty water” for the filtering experiment. (Always wash your
hands after handling soil or the dirty water.)
Oil
Mud
Artificial “dirty water”
Gravels
Sand
Active
carbon
Filter
paper
Doing the experiment
Pour some artificial “dirty water” mixture into the top of the
filter column VERY SLOWLY. The water will trickle slowly down
through the filters. For the best results, the water should be
moving between the filter sections drop by drop.
How clean is the water that runs into the glass?
2
waterfilter_FL.indd 3-4
3
4/14/09 10:58:15 AM
How it works
Each section of the filter column removes particles from the water, purifying it. The different
filters remove particles of different sizes. The grains of sand and gravel have small spaces
between them. These allow water to pass through, but trap particles in the water. The carbon
granules are made from a material called active carbon. Chemicals in the water cling to the
surface of the carbon and are removed from the water. This process is called adsorption. The
filter paper has tiny holes between its fibres. Water can trickle through the holes, but particles
larger than the holes are trapped. It is particularly effective in filtering oil. The filter column
demonstrates the principles used at water purification plants, which supply drinking water to
households. At a water purification plant the filtering process is more advanced and chemicals
are added to the water to ensure the water is safe for drinking.
Cleaning the filter material and filter column
Always clean the filtering materials and the filter sections when you finish with them, or
when you want to filter a new mixture. The sand, gravel and active carbon can all be cleaned
and reused. Simply place each material into small glass (don’t mix the materials). Fill the
glass with clean water, add a drop of detergent and stir gently. Let the material settle to the
bottom and then carefully pour away the water. Then rinse the material once or twice with
clean water. Also rinse out the filter sections with clean water. When the materials are clean,
pour them back into their filter sections (remember to put the sand and active carbon into the
sections with two open arches in their plugs). When your filter materials have been used a few
times, you may need to replace them with the spare supplies included in this kit. When you
run out of the spares, you can buy more in most aquarium shops. Fine sand from a beach and
gravels from a garden could also be used, but rinse them thoroughly before use. You could
use tissue paper instead of filter paper.
Where we use filters
• Filters have a huge range of uses at home and in industry. At home we use filter paper for
filtering coffee grains from coffee, and active carbon granules for filtering water, where they
remove chlorine and other chemicals from tap water. Filter paper and active carbon are used
in machines to clean water, fuel, oil and air before they are needed, and in gas masks to
remove dust and dangerous gases from air.
• Sand filters are used mainly for cleaning water before and after we drink it. The type of sand
filter in this kit is called a fast sand filter, as water trickles quickly through it. It removes solid
particles, such as grit, from water. Slow sand filters are deep layers of fine sand. As water
trickles through a slow sand filter, a layer of micro-organisms forms slime on the top. These
organisms use particles in the water as food, so cleaning the water.
Fun facts
• Sand filters clean the water in fish tanks and swimming pools, and water from sinks and
baths (called grey water) so that it can be used to water gardens.
• Active carbon is very porous - water flows easily through the granules because they are full
of holes.
• A one-gram piece of active carbon has a surface area of about 500 square metres - the same
as a basketball court.
• Active carbon is sometimes fed to people who have been poisoned because it traps the
poison in their stomachs.
• Filter paper is used in paper chromatography, which is a way of separating materials
dissolved in a liquid.
Trouble shooting
If you find the filtered water not clear or clean:
• Try re-filtering the water. The filter column is only small and may not clean the water
completely in one pass through, especially if your water is particularly “dirty” or “oily”.
• Check that the water is not running through the filter sections too quickly. If it is, try
pressing the filter sections together more tightly, and even sealing around the joins with sticky
tape. This will prevent air leaking into the filter sections, allowing the water to flow downwards
slower.
• Make sure you have put the sand and active carbon into the filter sections that contains the
plugs with two open arches. The “dirty water” needs to flow slower in these two sections.
• You may need to clean or replace the filter materials with the spare supplies included in
this kit (see above).
4
waterfilter_FL.indd 5-6
5
4/14/09 10:58:15 AM
D. EXPERIMENT 2 - DISTILLATION
Warning: This experiment requires hot water. Adult assistance and supervision is required when
handling hot water.
In this experiment you purify water by a process called distillation. The water evaporates,
leaving the impurities behind. Distillation is another common method of producing clean
water. The method is commonly used in desalination plants.
You will need: funnel-shaped collector, small plastic cup.
Also needed (but not included in the kit): a glass of hot water (hot enough to be steaming),
ice cubes, and some tea leaves.
Doing the experiment
1. Ask an adult to help you with this step. Prepare a glass steaming of hot water. Mix it with
the tea leaves.
2. Push the base of the collector into the cylinder in the centre of the cup. Place the collector
on top of the glass containing the tea.
3. Drop some ice cubes into the collector.
4. After a while, look at the underside of the collector. You should soon see condensation.
Eventually drops of clear water will run down and drop into the cup.
Ice cubes
Condensation
Tea
leaves
Hot tea
Hot water
Trouble shooting
If only a little clear water is collected, check that the water is hot enough. Only hot water with
steam rising from it will generate enough vapour to demonstrate distillation. Empty the water
in the set up and redo the experiment with hot water.
Where we use distillation
Distillation is used to clean drinking water and for making sterile water for medical use and for
cleaning contact lenses. It is also used in desalination plants, where fresh water for drinking
is made from sea water. In chemistry, distillation is used to remove water from a liquid without
losing the water. And in the oil industry, distillation is used to separate crude oil into different
products, such as butane gas, petroleum and fuel oil. In those distillation plants, the liquid to
be distilled will be heated to generate the vapour for completing the process.
Demonstrating the water cycle
You can use the same equipment to investigate the Earth’s water cycle.
For this you will also need a tall transparent glass whose diameter is
smaller than the collector (or ask an adult to cut the top third off a
small plastic bottle), some soil and a small plant, such as an ivy.
1. Put a few centimetres of soil into the base of the glass. Make
a hole in the soil, gently push in your plant and press the soil
around its roots. Pour a little water into the soil.
2. Put the collector and cup over the glass. (If you are using a
bottle base, make sure the rim of the bottle fits closely under
the collector, otherwise water vapour will escape through the
gap. You may need to seal the gap with sticky tape.)
3. Put the cup in a sunny place and wait a few hours. Look at
the underside of the collector. You should see condensation,
and water should eventually run into the small cup.
Condensation
Clear
Water
This experiment is a model of the water cycle. Water evaporates
from the soil and the plant, as it does in nature, because of heat
from the Sun. The condensation on the collector represents the
formation of clouds, and the dripping water represents rain.
Clear Water
Fun facts
1
2
3
4
How it works
Water evaporates from the surface of the hot tea. This means the liquid water turns to water
vapour (the gas form of water). However, neither the tea leaves nor the chemicals they release
into the water evaporate. The ice makes the collector cold. When the water vapour hits the
collector, it cools and condenses (turns back to liquid water). Then it drips into the cup. So
the process of evaporation and then condensation, which is known as distillation, removes
impurities (the tea leaves and chemicals in this experiment) from the water.
6
waterfilter_FL.indd 7-8
• The distillation equipment in this kit is known as a “still”.
• A solar still is powered by the Sun and used to purify water in hot countries. The Sun’s heat
makes the water evaporate, and cool air makes it condense again.
• The water cycle is the constant circulation of water between the oceans, the atmosphere and
the land. It makes clouds and rain form, and rivers flow.
7
4/14/09 10:58:18 AM
E. EXPERIMENT 3 - SOLAR PASTURIZATION
Warning: The solar-heated water could reach a temperature of 60 degrees Celsius (149 degrees
Fahrenheit) or more. Handle the heated water with care. Adult supervision is required.
In this experiment you purify water by a process called solar pasteurization. When water is
heated to 65 degrees Celsius (149 degrees Fahrenheit), dangerous micro-organisms in the
water are killed. Heat from the Sun is used to heat the water to pasteurize it. The experiment
involves the use of a simple device called a water pasteurization indicator (WAPI) to determine
if the water has been heated to the required temperature.
You will need: black plastic cup, silver card, the parts for making a Water Pasteurization
Indicator (WAPI), i.e. metal washers, fishing line, transparent tube, transparent caps
and wax.
Also needed from home (but not included in kit): a tall glass that will cover the whole of the
black plastic cup. A small piece of transparent plastic sheet (e.g. kitchen food wrap).
Assembling the water pasteurization indicator (WAPI)
You need to assemble the WAPI before the experiment:
1. Push the wax into one end of the transparent tube.
2. Push the transparent caps into the tube.
3. Tie a washer to one end of the fishing line.
4. Feed the other end of the line through the hole in one transparent cap and then through
the other transparent cap.
5. Pull some spare line through and tie a washer to the end.
3
5
4
4
1
2
2
Doing the experiment
1. Join the two pieces of card
together by gently pushing the tabs
in the large piece into the slots in the
smaller piece. Pull the sides together
Transparent
to make a three-sided shape and fix with
plastics sheet
sticky tape if necessary.
2. Stand the silver box on the ground in hot
sunshine so that the Sun’s rays shine into the corner.
Place a small piece of transparent plastics sheet in the
bottom (to prevent the condensed water drops damaging the cardboard). Put the black plastic
cup in the corner, on the plastic sheet.
3. Fill the cup with water
4. Examine the indicator. Pull the fishing line through the holes until one washer is next to
the end cap at the opposite end of the tube to the wax. This end will be the bottom end of
the indicator.
5. Put the indicator into the water, making sure that the wax is at the top of the tube. Hang
the spare fishing line over the edge of the cup.
6. Cover the whole cup with the transparent glass. The water will now start to be warmed by
the Sun’s heat. (You could put a weight (e.g. a stone) on top of the inverted glass so that its
rim is pressed firmly onto the plastic. This will prevent heat leaking away.)
7. Every half hour lift out the indicator and check the state of the wax. When the wax has
melted and run to the bottom of the tube, the water is hot enough
and has been pasteurized. You should be able to pasteurize the
cup of water in around two hours on a sunny day. You might
also see condensation inside the glass. The plastic
sheet will prevent the condensed water from
damaging the silver reflector cardboard.
Note: to use the WAPI again, simply slide
the transparent tube to the other end
of the fishing line.
65°C
Condensation
Soft
Wax
8
waterfilter_FL.indd 9-10
9
4/14/09 10:58:21 AM
How solar pasteurization works
The reflectors are angled to converge and concentrate solar energy. The black plastic cup absorbs
the energy, which heat up the water inside. The space in between the glass and cup works like
double-glazing. The trapped layer of air inside insulates the cup, preventing too much heat loss.
When water is heated to 65 degrees Celsius (149 degrees Fahrenheit) all the dangerous microorganisms in it are killed. Heating water to this temperature is called pasteurization. The wax in
the indicator melts at a few degrees higher than this. When it melts, it runs down the tube. So
when the wax moves down the tube, you know that the temperature for pasteurization has been
exceeded.
Where we use pasteurization
The experiment demonstrates an economical and effective way of pasteurizing water in remote
areas where there is no mains water (water supplied through pipes) and no electricity to heat it.
Here, pasteurization is used to make water from wells and rivers safe to drink. Using solar energy
to heat up the water is cheap and convenient. An indicator such as the one in this kit shows when
the process is complete.
Pasteurization is also important in the food industry. It is used to treat milk, fruit juices and many
other foods. It kills any micro-organisms in the foods and helps to keep them fresh for longer.
Trouble shooting
If the water does not heat up to desired temperature (where the wax in WAPI melts and falls to
the bottom):
• The sunshine may not be strong enough. Try again on a sunny day, around midday, when the Sun
is at its highest and its rays are strongest. Avoid doing the experiment in a windy day.
• Keep checking that the collector is facing the Sun (remember that the Sun moves across the sky
as the day passes).
• Check the glass is touching the plastic sheet all round. If not, add a weight (see step
6 above).
If you do not get a lot of strong sunshine where you live (or
it is winter), or you need to demonstrate the experiment at
a science fair, you could use a desk lamp with a 60-watt
incandescent bulb (not a fluorescent energy-saving bulb) to
act as he Sun. Shine it at the reflector from close by. You
should be able to achieve the pasteurization temperature, but
it will take longer than in sunlight, which is much stronger.
Warning: Adult supervision is required when using a desk lamp.
Fun Facts
• The pasteurization process was invented by and named after the French chemist Louis Pasteur.
• Pasteurization kills micro-organisms found in water that are harmful to people, including guardia,
cholera, salmonella, E. Coli and rotavirus.
• Pasteurization is not the same as sterilization, which kills all micro-organisms. Water can only
be sterilized by boiling it.
10
waterfilter_FL.indd 11-12
F. THE FUN IS UNLIMITED - FURTHER EXPERIMENTS
Warning: Adult assistance and supervision is required.
Use the kit to do further experiments.
1. Separate the filter sections. Do the filtering with only one type of filter used. Compare the
results and you will see the different functions of different filter materials.
2. With an adult’s permission and assistance, mix different liquids or materials from your
kitchen (such as coffee, soft drinks and cornflakes) to create different sorts of “dirty water”.
Remember that your filter column is only small and may not be able to clean some liquids
completely. However, it will demonstrate the principle of filtering. Also note that your filter
column will not remove materials dissolved in the water. For example, the dissolved sugar in
a soft drink will remain in the filtered liquid, even if the liquid looks clear. Clean the filter
column and the filters after completing each experiment as any organic materials left inside
the filters may decompose and become smelly.
3. Using the set-up in experiment 2, make a solar still. Put some salty water in the glass. You
don’t need ice cubes. Place the equipment on the silver reflector from experiment 3 and leave
it in the midday sun. You should collect some pure, unsalted water. Can you explain how this
solar still works?
4. In experiment 3, use a white plastic cup instead of the black one, or take away the glass
cover, or remove the silver reflector card. Can you still achieve the pasteurizing temperature
i.e 65 degrees Celsius (149 degrees Fahrenheit)? And why?
G. ALARMING WATER FACTS
• About fifth of world’s population does not have access to clean drinking water.
• Three-quarters of all illnesses and deaths in the developing world are caused by diseases
carried in water, such as cholera.
• Two million children die each year from drinking dirty water.
Help save the environment by preserving our clean water resources.
QUESTIONS & COMMENTS
We treasure you as a customer and your satisfaction with this product is important to us.
In case you have any comments or questions, or you find any parts of this kit missing or
defective, please do not hesitate to contact our distributor in your country, whose address
is printed on the package. You are also welcome to contact our marketing support team at
Email: [email protected], Fax (852) 25911566, Tel (852) 28936241, Web site:
WWW.4M-IND.COM
11
4/14/09 10:58:23 AM