1
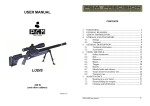
USER MANUAL
ABOUT SIGHTMARK®
Sightmark offers a wide range of products that include red dot scopes, reflex sights,
rangefinders, riflescopes, laser sights, night vision and award-winning flashlights and
boresights. Sightmark products are inspired by military and law enforcement applications.
All products are designed to be the most effective weapon accessories possible.
SIGHTMARK® - MAKE YOUR MARK®
To view this manual in other languages, or for more information
please visit www.sightmark.com
Designed in the U.S.A. and manufactured in Japan, the Pinnacle™ 1-6x24 Riflescope Series delivers unparalleled
optical superiority for every shooting application. Engineered with Sightmark’s Triple Duty™ concept, the 1-6x24TMD
features a Tactical Mil-Dash reticle for precision rangefinding and quick target acquisition in competition, tactical
or hunting scenarios. The 1-6x24AAC yields an advanced ballistically-matched CDC-300 reticle for subsonic and
supersonic 300 Blackout with holdovers from 100-800 yards. Both models have a first-focal plane reticle, which
remains in the same visual proportion to the target across the riflescope’s entire magnification range. The true 1x
provides both-eyes-open usage for increased situational awareness at close range, while the 6x optical system
hones in on far-away targets with ease. Precision-machined with high definition optics and premium Japanese
glass, the Pinnacle scopes offer crystal clear resolution from edge to edge, free from distortions at any magnification.
1
SM13028TMD
SM13028AAC
Reticle type
TMD
CDC-300
Reticle color
Red/green
Red/green
5
5
1-6x
1-6x
24mm
24mm
103-103mm
103-103mm
29.7-5.2
29.7-5.2
+3.5~-3.5
+3.5~-3.5
Reticle brightness settings
Magnification
Objective lens diameter
Eye relief
Field of view (m@100m)
Diopter adjustment
Parallax settings
Windage/elevation max.
MOA adjustment (1 click)
IP Standard
100yds
40 MRAD
144 MOA
.1 MRAD
1/2 MOA
IP67-submergible to 1m
IP67-submergible to 1m
Body material
aluminum-6061
aluminum-6061
Lens coatings
fully multi-coated AR green
fully multi-coated AR green
CR2032/50-900hrs
CR2032/50-900hrs
Battery type/life
Operating temperature
Dimensions
2
100yds
Weight
-20 to 160ºF
-20 to 160ºF
260x73.5x56mm
260x73.5x56mm
20.4oz
20.4oz
INCLUDED:
• 300 AAC Blackout 125gr
and 220gr BDC dials
*SM13028AAC only
• 5.56x45 55gr and
7.62x51 180gr BDC dials
*SM13028TMD only
• (2)Turret caps
• (2) Thread protectors
• CR2032 battery
DIAGRAM
1.
2.
3.
4.
5.
6.
7.
8.
9.
Diopter Adjustment
Magnification Adjustment Ring
Illumination Dial
Elevation Adjustment
Windage Adjustment
Objective Lens
Thread Protector
Turret Caps
BDC Dials
9
4
6
2
3
9
5
7
1
8
3
BATTERY INSTALLATION
WARNING: Always follow your firearm’s instruction manual and warnings. Follow safe firearm practices.
The Sightmark Pinnacle 1-6x24 is powered by a CR2032 battery. Should the reticle illumination grow dim or not
illuminate, the battery needs to be replaced. To install a new battery:
1. Unscrew the battery cap on the illumination dial (3) counterclockwise with a
coin or flathead screwdriver.
2. Insert the new battery with the positive (+) side facing up.
3. Screw the battery cap on the clockwise until firmly secure. Do not over tighten.
ILLUMINATION CONTROL
The Sightmark Pinnacle 1-6x24 uses an etched reticle. The
reticle can be used without illumination and will appear black. To activate the reticle
illumination in red or green:
1. Rotate the illumination dial (3) either clockwise or counterclockwise. The dial
is marked with “G” for green or “R” for red followed by the brightness setting
ranging from 0 (off ) to 5. Setting 5 is best for bright, outdoor environments.
Setting 1 is best for low light, indoor environments.
2. Set the dial so the setting indicating desired color and brightness faces the
shooter or the white indication mark.
3. To turn off, rotate the dial to the zero setting.
DIOPTER ADJUSTMENT
The Sightmark Pinnacle 1-6x24 eyepiece (1) is designed to rotate to adjust for diopter. The diopter is the measurement of the
eye’s curvature. People’s eyes are all curved differently. If the reticle does not appear clear, crisp, nor sharp, rotate the eyepiece
until the reticle becomes clear and sharp. This adjustment should stay the same unless the riflescope’s operator changes.
4
TURRET CAPS
The Sightmark Pinnacle 1-6x24 comes with pre-installed turret caps (8) to protect the windage and elevation adjustments
from impact. Also included are two low profile rings, thread protectors (7), that can be installed instead for an exposed turret style. Install the two thread protectors by screwing them onto the threading where the caps install, rotate until tight. A
small amount of blue Loctite® may be applied to the threads prior to install for a semi-permanent fixture and also prevent
loosening from vibration.
OPERATING THE WINDAGE AND ELEVATION ADJUSTMENTS
The Sightmark Pinnacle 1-6x24 has finger adjustable elevation and windage adjustments (4,5) with audible clicks. The
Sightmark Pinnacle 1-6x24TMD has 1/10th (.1) MRAD clicks meaning each click moves the point of impact .36” at 100 yards
or 1cm at 100 meters. 1 MRAD of movement would require 10 clicks. The Sightmark Pinnacle 1-6x24AAC has 1/2 MOA
clicks meaning each click moves the point of impact .5” at 100 yards. 1 MOA movement would require 2 clicks. In order to
make windage and elevation adjustments:
1. Unscrew the dial covers.
2. Turn the adjustments in the appropriate direction needed to change the point-of-impact as indicated by the “UP” and
“R” (right) arrows marked on the adjustments.
VARIABLE POWER ADJUSTMENT
To change magnification, turn the magnification ring (2) to
the desired level of power.
MOUNTING
WARNING: Always follow your firearm’s instruction manual and warnings. Follow safe firearm practices. Make sure
your weapon is unloaded before mounting the riflescope. The Sightmark Pinnacle 1-6x24 requires 30mm rings for
mounting. It is recommended a cantilever style mount be used for use on AR platforms. Mount the scope rings per the 5
manufacturer’s instructions. Do not perform a final tightening of the rings prior to checking eye relief and reticle alignment,
the riflescope should still be able to move fore and aft and rotate. To achieve maximum eye relief:
1. Set the riflescope to its highest magnification.
2. Set the riflescope as far forward in the rings and as slowly as you can move the riflescope closer to your eye. Stop moving
the riflescope once a full field of view is visible.
3. Next, rotate the riflescope to vertically align the crosshair. Use a reticle leveling tool if available.
4. Once alignment is complete, tighten the mounting ring’s screws per the manufacturer’s instructions. Do not overtighten.
BDC ADJUSTMENT DIALS
The Sightmark Pinnacle 1-6x24TMD includes two BDC dials (9) that are ballistic matched for 5.56x45 55gr and 7.62x51
180gr. Dials for 5.56x45 62gr and 7.62x51 175gr may be purchased separately. The Sightmark Pinnacle 1-6x24AAC includes
two BDC dials that are ballistic matched for 300 Blackout 125gr and 220gr. One of the BDC dials will come pre-installed.
Dials for 5.56x45 and 7.62x51 are designed for a 200 yard zero. The dial for the 300 Blackout 125gr is designed for a 100 yard
zero and the 220gr dial is designed for a 50 yard zero.
Prior to sighting in the riflescope it is recommended to install the desired BDC dial. To do this:
1. Use a 1.3mm hex wrench to loosen the 3 hex screws on the turret.
2. Once the 3 hex screws are loosened enough, carefully lift the turret cap
straight up and off of the turret.
3. Re-install the turret cap, so that the “0” mark is aligned with the line
indicator on the riflescope. Re-tighten all 3 hex screws. Do not over tighten.
6
BORESIGHTING & SIGHTING IN
Boresighting and test firing should be performed safely on a firing range. WARNING: Always follow your firearm’s instruction
manual and warnings. Follow safe firearm practices. Laser boresights are a quick and accurate method for sighting in.
Below is listed the traditional method of boresighting.
1. When mounting the riflescope on a bolt action rifle, remove the bolt; or when mounting to a semi-automatic rifle,
disassemble the rifle until there is a straight line of sight through the bore.
2. Use a target at least twenty yards to fifty yards away when sighting in the riflescope. Look through the bore of the
weapon and locate the bull’s-eye of the target.
3. Sight in the target through the bore and then make windage and elevation adjustments (see “Operating Windage and
Elevation Adjustments” for instructions) to the riflescope until the reticle is centered on the bull’s-eye.
To verify the riflescope is accurately sighted in, always fire a three-shot test group at 100 yards preferably using the same
ammo manufacturer, grain, and lot number.
4. After firing a group use the center of this grouping and make the necessary amount of adjustments to move your
firearm’s grouping to the center of the target.
5. Again fire a three-shot test group to confirm the adjustments. Use the center of the new group to determine final
adjustments.
Once 100 yard sight-in is complete, the turret can be reset to the “100” yard mark on your BDC elevation dial. The windage
adjustments should be reset to zero. To do this:
1. Hold the elevation turret firmly in place with your fingers in order to prevent rotation. Use a 1.3mm hex wrench to loosen
the hex screws on the turret.
2. Once the hex screws are loosened enough, carefully lift the turret cap straight up and off of the turret.
3. Re-install the elevation turret cap, so that the “100” mark is aligned with the line indicator on the riflescope. Re-tighten
all 3 hex screws. Do not over tighten. Repeat these steps for the windage adjustment, but align the “0” mark with the line
indicator on the riflescope.
7
The 200 yard zero should then be accurate, but should be confirmed by test firing on a 200 yard range because some fine
adjustments may be needed to elevation and windage.
USING THE TMD RETICLE
The Sightmark Pinnacle 1-6x24TMD is equipped with the TMD reticle.
The TMD reticle was designed for close range and long range shooting.
At 1x, the black subtensions will lead the shooter’s eye to the center
of the reticle. When illuminated the central oval will enhance quick
target acquisition as well. The vertical and horizontal mil scales can be
used for range finding and holdovers. At high magnification, the .3 mil
central aiming dot is precise for long range engagements.
The TMD is based on milliradian (mrad or mil) design. Milliradian is a
measurement of angle. A single mil is equal to 3.6” at 100 yards. The
adjustments in the Pinnacle 1-6x24TMD are .1mrad, meaning that
each click will move the reticle .36” at 100 yards or 1cm at 100 meters.
The TMD reticle is a first focal plane reticle. This style of reticle will grow
along with the image as magnification is increased. The advantage of a
first focal plane reticle is that the dimensions of the reticle will be true at
any magnification. Therefore, rangefinding and performing handovers
with the TMD can be done at any point in the magnification range.
出 図 No.
1.5 mil
1 mil
6
3.6 mil
4
1.6 mil
2 mil
0.2 mil
5.5 mil
2 mil
0.2 mil
1 mil
4
6
8
1.5 mil
φ0.3 mil
0.35 mil
R2.217
0.6 mil
0.2 mil
0.5 mil
0.2 mil
0.2 mil
20 mil
10 mil
Font:Verdana
指定
B級 C級
予備寸法区分 A級
16以下 ±0.1 ±0.2 ±0.3
16をこえ63以下 ±0.2 ±0.35±0.5
63をこえ250以下 ±0.3 ±0.55±0.8
250をこえ500以下 ±0.5 ±0.8 ±1.2
株式会社
4
3
2
1
承
2013.6.3 フォントをVerdanaに変更
記
事
図番変更
2013.5.28 作成
ラ
イ
ト
光
機
製
作
所
三
認 (検 図)
角
法
担当 (作図)
尺度
亀田
一般公差
8
8
0.6 mil
---
仕上
処理
材料
~
面取
品質:A級
製品名
1-6x24FF
部品名
スケールガラス
図
番
0-AG58121Z
RANGING WITH TMD RETICLE
The TMD reticle can be used to range targets at any magnification. To use any of the following formulas, the size of the
target must be known.
MIL RANGING FORMULAS
Target Size (yards) x 1000 = Range (yards)
Mils Read
Target Size (inches) x 27.8 = Range (yards)
Mils Read
Target Size (meters) x 1000 = Range (meters)
Mils Read
Target Size (cm) x10 = Range (meters)
Mils Read
Either the vertical or horizontal mil scale can be used to range for
your target. Try to read mils as accurately as possible. Reading mils
in 1/10 accuracy will provide a more accurate range to the target. For
example in the image below a silhouette target is 1.25 yards tall and
reads 3 mils tall.
1.25x1000 / 3mils = 417 yards
9
The central oval for the TMD reticle can be used as a quick reference to range a silhouette target for 50, 100, and 200 yards.
At 50 yards the head portion of a silhouette target will fill the full height of the central oval. At 100 yards half the height of
the central oval will be filled and at 200 yards a quarter of the central oval will be filled.
50 yards
100 yards
200 yards
ELEVATION HOLDOVERS
The vertical mil scale can be used for holdovers to compensate for bullet drop. First, find the range to the target by using
the mil scale or a laser rangefinder. Next the shooter must learn their caliber’s specific bullet drop numbers in mils rather
than MOA. The vertical mil scale is marked in 1 mil increments. Once the shooter knows the bullet drop, the correct
hashmark can be used for holdover.
10
In this example, a 600 yard holdover is used. No wind is present.
WINDAGE HOLDOVERS
To master windage holdover it is recommended to study your weapon’s ballistic performance under varying wind and
environmental conditions. It is also recommended to learn your caliber’s specific bullet drop and windage holdovers in
mils rather than MOA. Finally remember with windage holdovers to always hold the reticle into the wind.
The horizontal mils scale is marked in 1 mil increments. Prior to windage holdovers, bullet drop should be compensated by
adjusting the elevation dial so that the horizontal crosshair is used. Next, the correct amount of mil should be determined
for the present wind speed. For experienced and well-trained shooters, the horizontal scale can also be used for holdover
on moving targets.
USING THE CDC-300 RETICLE (SM13028AAC)
The Sightmark Pinnacle 1-6x24AAC is equipped with the CDC-300 reticle. The CDC-300 reticle was designed for both subsonic
and supersonic 300 Blackout for use at close and long range. At 1x, the 15 MOA outer circle of the circle dot chevron design is
easy to pick up when illuminated providig quick target aquisition similar to a red dot. At high magnification, the 1 MOA tip of
the chevron is precise for long range engagements. The remaining horizontal lines below provide holdover and rangefinding
capability from 100 to 800 yards.
The CDC-300 is based on MOA design. The CDC-300 reticle is a first
focal plane reticle. This style of reticle will grow along with the image as
magnification is increased. The advantage of a first focal plane reticle
is that the dimensions of the reticle will be true at any magnification.
Therefore, rangefinding and performing holdovers with the TMD
can be done at any point in the magnification range. The CDC-300 is
intended to use a 50 yard zero for 220 grain subsonic ammunition, and
a 100 yard zero for 125 grain supersonic ammunition.
出 図 No.
51.6MOA
51.6MOA
34.4MOA
34.4MOA
19.2MOA
19.2MOA
13.16MOA
22.2MOA
31.2MOA
6MOA
4.5MOA
12MOA
40.8MOA
14.7MOA
8.5MOA
2.5MOA
49.9MOA
41.9MOA
Font:Verdana
3.6MOA
54.2MOA
14.7MOA
6.8MOA
18MOA
31.9MOA
23.2MOA
3.6MOA
1.98MOA
3.32MOA
1.1MOA
2.89MOA
φ15MOA
5.54MOA
63.9MOA
59.3MOA
9MOA
3MOA
7.18MOA
2.57MOA
5.75MOA
5.14MOA
3.5MOA
2.5MOA
16MOA
B級 C級
予備寸法区分 A級
16以下 ±0.1 ±0.2 ±0.3
16をこえ63以下 ±0.2 ±0.35±0.5
63をこえ250以下 ±0.3 ±0.55±0.8
250をこえ500以下 ±0.5 ±0.8 ±1.2
株式会社
4
3
2
1
承
認 (検 図)
担当 (作図)
2013.6.20 寸法見直し
2013.6.7 イルミ部変更
記
事
2013.6.3 作成
ラ
11
16MOA
イ
ト
光
機
図番変更
製
作
所
三
角
法
尺度
亀田
指定
Font:Verdana
2.25MOA
4.5MOA
一般公差
2.5MOA
3.5MOA
(150)
(18)1/1
仕上
処理
材料
~
面取
品質:A級
製品名
1-6x24FFP
部品名 スケールガラス(300BLK)
図
番
0-AG58122ZB-00
RANGING WITH THE CDC-300 RETICLE
Ranging with the CDC-300 reticle is simple by matching a horizontal subtension to the shoulder width of a target. For
example, by matching the shoulder width of a silhouette target at the number “4” mark the target is approximately 400
yards away. Each single digit number correspond to its yardage mark, 4 - 400yds, 5 - 500yds, etc. Note that a 50 yard zero is
intended for 220 grain ammo and thus holdovers are designed in 50 yard increments out to 400 yards. The same horizontal
mark corresponds to the holdover reference for bullet drop compensation with 220 grain holdovers located on the left
side and 125 grain holdovers located on the right side of the reticle. For shot placement, aim with the intersection of the
verticle subtension and the target’s corresponding range mark.
50/100yds
100yd
150yd
200yd
250yd
600yd
300yd
700yd
350yd
400yd
12
300yd
400yd
500yd
800yd
200yd
Example: Silhouette target matches 200 yard mark. Aiming point is marked.
13
MAINTENANCE
Proper maintenance of the Sightmark Pinnacle 1-6x24 is recommended to ensure longevity. It is recommended that
when the sight becomes dirty that it is wiped down with a dry or slightly damp cloth. Blow dirt and debris off all
optics and then clean lenses with a lens cleaning cloth. To remove oils or dried water spots, apply a small amount
of denature alcohol to a lens cloth or cotton swab. Clean the surface of the lens and let dry. Finally use your breath
to clean the lens once more. No futher maintenance is required. Do not attempt to disassemble any components of
the scope.
STORAGE
Make sure that your Sightmark Pinnacle is securely attached to your rifle before storing, and be sure that the unit is
turned off. Remove the batteries if the unit will be stored for an extended period of time.
WARNING
Before handling the Sightmark Pinnacle 1-6x24, read and understand the contents of your firearm’s manual and the
Sightmark Pinnacle manual. Follow all standard safety precautions and procedures during firearm operation, even
when the riflescope is not in use.
• Avoid hitting or dropping the unit.
• ALWAYS check that the chamber of your weapon is clear before mounting or dismounting the riflescope sight.
• The reticle illumination should be tested during periods of non-use to make sure it is still operating properly. Failure
to follow standard firearm safety precautions and procedures, as well as the above warnings, is dangerous and may
result in serious injury, damage to property or death.
TROUBLESHOOTING
Never ship back a product without getting proper authorization beforehand. Doing so could result in losing the
14
product due to a multitude of reasons, i.e. sending it to the wrong address and other problems associated with
unexpected packages.
If the riflescope does not hold zero:
1. Verify the sight is mounted securely to the rifle. If the sight can be shifted in any direction, retighten the
hex nuts according to the mounting instructions but do not overtighten. The sight will need to be re-zeroed
afterwards.
2. Be sure to use factory-loaded ammunition of the same bullet type, weight and perferably lot number when
sighting in.
The reticle does not illuminate:
1. Check that the battery is working. Also, check the polarity of the battery.
2. Check that there is no residue, film, or corrosion on the battery contacts that may be preventing the reticle
from illuminating.
The reticle is blurry and not in focus:
1. Rotate the eyepiece to adjust the diopter adjustment until the reticle becomes clear and sharp
The reticle has a halo or is fuzzy:
1. Decrease the brightness level of the reticle. The halo or fuzzy appearance is caused by excess illumination
than is required for the current environment the sight is being used in.
The reticle illumination turns off while firing:
1. Tighten the battery cap with a coin or flathead screwdriver so the cap is fully seated.
SIGHTMARK LIMITED LIFETIME WARRANTY
Please vist www.sightmark.com for warranty details and information.
15
www.sightmark.com