1
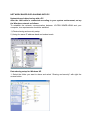
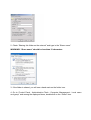
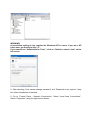
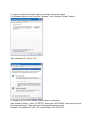
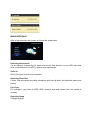
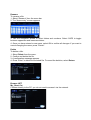
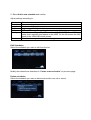
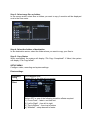
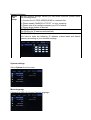
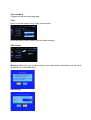
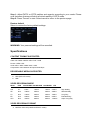
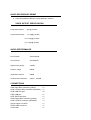
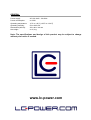
LC-PRO-35MPR-HDMI User manual Thank you for choosing LC-Power. LC-PRO-35MPR-HDMI is a home media center that can record and play media files (movie, audio and photo) on your TV, and when connected to a PC, it can also copy and play shared files via network. SAFETY AND OTHER INSTRUCTIONS Please use the LC-PRO-35MPR-HDMI with caution and read carefully the following instructions. ► Software, audio, video or any other intellectual properties are protected by copyright and international laws. It is the user’s responsibility to take care about these topics when he reproduces or distributes content(s) with his personal devices. ► This product may not support some media formats. Please check the available codec types. ► Please backup data stored in this product in a safe place. We are not responsible for any data loss or damage. ► Safe the LC-PRO-35MPR-HDMI from drops or shocks. This may damage it. ► Do not clean the product using chemical cleaners. This may damage the LC-PRO-35MPR-HDMI. ► Avoid any contact of the LC-PRO-35MPR-HDMI with water or other liquids. This may cause fire or an electric shock. If any conductive liquid enters, turn off the LC-PRO-35MPR-HDMI and disconnect the power adapter immediately. ► Do not place the LC-PRO-35MPR-HDMI near a magnetic field. This may cause a malfunction or damage stored data. ► Do not expose the LC-PRO-35MPR-HDMI to direct sunlight or near a heat keep it for long time in high temperature surroundings. This may source. Do not damage it. ► Do not use many electronic products with one single outlet. Insert the power plug firmly. Do not unplug it during a state of operation. REMOTE CONTROL Button Function POWER on or off. Switch between video output: NTSC Interlaced - NTSC Progressive - PAL Interlaced - PAL Progressive. Mute audio output. Record or resume when paused. Press repeatedly to set the recording length: 30mins / 60mins / 90mins / 120mins / 180mins / 240mins / Off. Browse music, photo and movie files Enter the timer menu Copy a file from one device to another View the guide menu Decrease the volume Increase the volume Press to confirm a setting Navigation buttons Return to previous list in menu mode Change settings Numeric buttons: to select a channel or for numeric input. Jump to a specific point SLOW button: play in slow motion. Available levels: 3/4, 1/2, 1/4, 1/8, 1/16x Select the option bar Begin a playback Stop a playback Pause the current playback Go to the previous title Skip to the next title Rewind playback. Press repeatedly to select the speed. Forward playback. Press repeatedly to select the speed. Activate subtitles Display media file information. In video and photo mode, press to view time, title or chapter. Select an audio track Zoom levels: Photo: 2x, 4x, 8x, 16x; Video: 2x, 3x, 4x, 8x Pause live TV and resume the program from the point you left. The program is recorded in available space. Time Shift mode remains active until you press “stop” button. Press to repeat title. Select file or folder to rename or to delete. Select to confirm. NET WORK BASED DATA SHARING WITH PC Network-based data sharing with a PC After the LAN cable is connected according to your system environment, set up the Windows network as follows. To establish the network communication between LC-PRO-35MPR-HDMI and your computer, two requirements should be satisfied: 1) Folder sharing and security setup 2) Using the same IP address band and subnet mask Data sharing setup for Windows XP 1. Select the folder you want to share and select “Sharing and security” with right the mouse button. 2. Check “Sharing this folder on the network” and type in the “Share name”. WARNING! “Share name” should be less than 12 characters. 3. If the folder is shared, you will see a hand mark on the folder icon. 4. Go to “Control Panel - Administrative Tools - Computer Management - Local users and group” and among the displayed items, doubleclick on the “Guest” item. WARNING! A permission setting is only required for Windows XP Pro users. If you are a XP home user, go directly to step “6”. If you cannot see “Administrative Tools”, click on “Switch to classic view” on the left corner. 5. After checking “User cannot change password” and “Password never expires”, keep the other checkboxes unchecked. 6. Go to “Control Panel - Network Connections”. Select “Local Area Connections”. Select “Properties” using the right mouse button. WARNING ! If you cannot see any “Network connections”, click on “Switch to classic view” on the upper left corner. If there are more than two “Local Area Connections”, select the LAN card which is connected to the LC-PRO-35MPR-HDMI. 7. Among the displayed items, doubleclick “Internet Protocol (TCP/IP)”. After checking “Specify an IP address”, enter your IP address and subnet mask. Example: IP address: 192.168.1.3 - Subnet mask: 255.255.255.0. WARNING! If your PC already has “Obtain IP address automatically” checked and has automatically assigned an IP from an internet router or DHCP server, you may not need this setup. If you want a manual IP setup, please obtain an available IP address and subnet mask from the router manufacturer or network administrator. If “Internet connection Firewall” option is checked, cancel this option. For Windows Service Pack 2 click on “Settings” in the “Window Firewall” section. After selecting “off”, click on “ok”. 8. Configure the LC-PRO-35MPR-HDMI network environment. After pressing “Setup”, select “IP SETUP” among the “NETWORK” setup items and set this to manual setup. Then enter your IP address and subnet mask. Example: IP address:192.168.1.10 - Subnet Mask: 255.255.255.0. MENU INTERFACE After a few seconds, the system will show the guide menu. Selecting the browser It’s an explorer: browse movie, photo and music files stored on your USB, hard disk drive (now referred to as HDD), network and card reader. Video In Select the input source to be recorded. Selecting Timer Rec Create, edit and delete recording schedules and view all about the schedule status and history. File Copy File manager: copy files on USB, HDD, network and card reader from one media to another. Selecting Setup Change settings. BROWSER MENU Browse and play music, photo and movie files stored on the HDD of your LCPRO-35MPR-HDMI or an external USB device, card reader, network or playlist. Browsing all Select All in menu. Select folder(s) containing all files (music, photo and movie). Select the file you want to view and it will be displayed. File Edit Menu Select the file or folder and click “Edit”. Return Select to go back to the main screen. Rename To rename a file: 1. Select “Rename” from the menu bar. 2. The “Name entry” screen appears. 3. Use the navigation arrows to select letters and numbers. Select CAPS to toggle between uppercase and lowercase letters. 4. Once you have entered a new name, select OK to confirm all changes. If you want to cancel changing the name, press “Return”. Delete To delete a title: 1. Select Delete from the menu. 2. Confirm and delete the file. 3. A confirmation message appears. 4. Press “Enter” to delete the selected file. To cancel the deletion, select Return. Browse: NET My_Short Cut Connect directly to the PC, you do not need to access it via the network. My Neighbors Connect directly to a PC’s shared folder. Browse Music Select the folder containing your audio files. A thumbnail strip will appear at the screen bottom, including song information. LC-PRO-35MPR-HDMI supports MP3, WMA, AAC and OGG format. Browse photos Select the folder containing photo files. Select the photo you want to view and it will be displayed in full screen mode. Note: 1. When the photo is displayed in full screen mode, the slide show starts automatically. 2. While listening to MP3 files, you can browse photos at the same time. Rotate a photo in any angle with the navigation arrows or zoom in or out the photo, three levels are available. LC-PRO-35MPR-HDMI supports High Definition photos (JPG, JPEG). Browse movies Select the folder(s) containing movie files. Select the movie you want to view and it will be displayed in full screen mode. RECORDING FUNCTION Video in Select to record directly from AV in. The system will create a “My Recordings” folder on the HDD or USB device. Your recorded file will be saved in this folder. The file name will be named according to the system time. Timer REC Plan recording schedules, view status and history. Create a new schedule 1. Select Edit from the menu. 2. Select Add a new schedule and confirm. Adjust settings according to: Source Start time Length Repeat Device Quality Preview Video Enter recording date and time. Enter recording length Program a recording schedule. USB or HDD support regarding the destination folder of your record. Select the recording quality. Choose from HQ, SLP, EP, LP and SP. High quality level requires more space on the HDD. On the left screen the free space of the HDD/USB will be shown. Show the currently selected channel program. Edit Schedules Select the schedule you want to edit from the list. Modify the schedule as described in “Create a new schedule” on previous page. Delete schedules Select the schedule you want to delete and confirm one, all or cancel. View schedule status The schedule list is displayed. Enable the timer according to your needs: by user or stand by. View the recording history View a complete history of all set recordings. FILE COPY MENU Copy files from the HDD, network, USB or card reader from one media to another. Select File Copy from the Guide menu or select COPY on the remote control. Step 1: Select the source device Select the device you want to copy from in the source sector. Step 2: Select the destination device Select the destination device on the right part of the screen. Step 3: Select copy files or folders In the source sector, select files or folders you want to copy. A mention will be displayed next to the filne name. Step 4: Select the folders of destination In the destination sector, select the folder where you want to copy your files to. Step 5: Copy Status When succeeded, the system will display “File Copy Completed!”. If failed, the system will display “File Copy failed!”. SETUP MENU Configure video, recording and system settings. Photo settings Slideshow timing Transition Effect Set slideshow time. Select OFF or the interval you require. Select OFF or one of the following transition effects required: 1) “Cross Fade” - fade in and fade out 2) “Left to Right” - from left to right 3) “Top to Bottom” - from top to bottom 4) “Waterfall” - steep descent of water 5) “Snake” – snake motion 6) “Dissolve” – dissolving 7) “Strip Left Down” – strip cover from left top to right bottom 8) “All Effect Shuffle” – shuffle all mentioned effects Play a music file in the same folder. Background music Select the background music position. Select “off” to close the function. Audio Settings Night mode: The sound level will be reduced, but it becomes clearer. Select from off / on / comfort and confirm. Digital output: Select from HDMI LPCM / HDMI RAW / SPDIF LPCM / SPDIF RAW and confirm. Video Settings Aspect Select from: Pan Scan 4:3 / Letter Box 4:3 / 16:9 and confirm. ratio Pan Scan 4:3: Display a wide picture on the entire screen. Letter Box 4:3: Display a wide picture with two black borders on top and bottom of the 4:3 screen. 16:9: Compressed image to convert the whole image. Brightness Set brightness levels. New setting is previewed on screen. Contrast TV system Set contrast levels. New setting is previewed on screen. Select to adjust the TV system, depending on your preferences. HDMI settings Change your TV set to HDMI output to be displayed on your TV screen. Record settings Quality Select to set the default recording quality setting. Permanent timeshift REC device The highest quality is HQ and requires more storage space. Other settings reduce the recording quality and require less storage space. Select to set the permanent timeshift feature on or off. Choose the device (HDD or USB) to record on. Network Settings Wired Set the network settings. Before you use these functions, please check Lan the following items: Setup 1) Connect the LC-PRO-35MPR-HDMI to a network first. 2) Please enable “NetBIOS of TCP/IP” on your computer. 3) Please turn off or configure properly your PC’s firewall. 4) Please share folders to browse. DHCP IP(AUTO) Set DNS server IP address automatically. FIX IP (MANUAL) You have to enter the following: IP address, subnet mask and default gateway according to your domestic settings. System settings Select System from the menu. Menu language Choose the OSD (On Screen Display) language. Text encoding Choose the text encoding language. Time Select to set the system time. Enter manual setup. Enter the system menu: select field and adjust settings. HDD format Warning: Make sure you made a backup of your data before formatting as it will erase all data on your hard disk drive. Partitioning Step 1: Adjust FAT32 or NTFS partition and capacity according to your needs. Please note that some features will show a limited usability in NTFS mode. Step 2: Press “Format” to start. Select cancel to return to the previous page. Restore default Select to restore the factory default settings. WARNING: Your personal settings will be cancelled. Specifications CONTENT FORMAT SUPPORTED Video: AVI / MPG / MPEG / MP4 / DAT / VOB Photos: JPEG / JPG Audio: MP3 / WAV / WMA / ACC / OGG Compression rate: between 32 kbps and 320 kbps RECORDABLE MEDIA SUPPORTED: HDD (DVD+VR mode) USB VIDEO RECORDING MODE Mode DVD 320 GB HDD 500 GB HDD 750 GBHDD 1TB HQ 1hr 64hrs 100hrs 150hrs 240hrs High Quality SP 2hrs 128hrs 200hrs 300hrs 480hrs Standard Play LP 3hrs 192hrs 300hrs 450hrs 720hrs Long Play EP 4hrs 256hrs 400hrs 600hrs 940hrs Extended Play SLP 6hrs 384hrs 600hrs 900hrs 1440hrs Super Long Play VIDEO RECORDING FORMAT MPEG2: DVD+VR (HQ/SP/LP/EP/SLP mode) AUDIO RECORDING FORMAT DVD+VR (HQ/SP/LP/EP/SLP mode): MPEG2 2-channel VIDEO OUTPUT SPECIFICATION Composite Output 1 Vpp @ 75 Ohm Components Output Y:1 Vpp@ 75 Ohm Pb:0.7 Vpp@ 75 Ohm Pr:0.7 Vpp@ 75 Ohm AUDIO PERFORMANCE DA converter: 24-bit/192kHZ AD converter: 24-bit/96kHZ Signal noise (1kHZ): ≥ 95dB Dynamic range: ≥90Db Separation channel: ≥95dB Total harmonic distortion: (1kHZ) ≤-85dB CONNECTIONS Video input RCA connector (yellow) Audio L/R input RCA connector (white/red) HUB: USB Hub port USB: USB port HDD: SATA connector Video output RCA connector (yellow) Audio L/R RCA connector (white/red) Optical: optical connector HDMI: HDMI connector Card reader: x1 x1 x2 x1 x1 x1 x1 x1 x1 x1 GENERAL Power supply: Power consumption: Operating temperature: Operating humidity: Dimensions (W/H/D): Net weight: AC 100~240V - 50~60Hz ca. 35W +5°C to +40°C (+36°F to +104°F) 5% to 80% RH 430 x 66 x 316 mm ca. 2,3 kg Note: The specifications and design of this product may be subject to change without prior notice if needed. www.lc-power.com