1
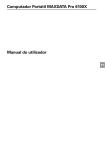
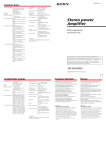
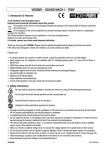
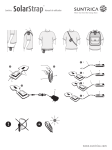
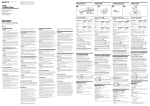
OWNER’S MANUAL
Model Two
™
Model Two
™
AM/FM Stereo Radio
Table of Content
English................................................................................................................ 4
Deutsch............................................................................................................ 13
Español............................................................................................................. 15
Français............................................................................................................ 17
Italiano.............................................................................................................. 19
Português......................................................................................................... 21
Declaration of Conformity................................................................................ 23
English
Important Safety Instructions
1. Read these instructions.
2. Keep these instructions.
3. Heed all warnings.
4. Follow all instructions.
5. WARNING – To reduce the risk of fire or electric shock, do not expose this apparatus to rain
or moisture.
6. Clean only with a dry cloth.
7. Do not block any ventilation openings. Install in accordance with the manufacturer’s instructions.
8. Do not install near any heat sources such as radiators, heat registers, stoves, or other apparatus
(including amplifiers) that produce heat.
9. Do not defeat the safety purpose of the polarized or grounding-type plug. A polarized plug has
two blades with one wider than the other. A grounding type plug has two blades and a third
grounding prong. The wide blade or the third prong is provided for your safety. If the provided
plug does not fit into your outlet, consult an electrician for replacement of the obsolete outlet.
10. Protect the power cord from being walked on or pinched particularly at plugs, convenience
receptacles, and the point where they exit from the apparatus.
11. Only use attachments/accessories specified by the manufacturer.
12. Use only with the cart, stand, tripod, bracket, or table specified by the
manufacturer, or sold with the apparatus. When a cart is used, use caution
when moving the cart/apparatus combination to avoid injury from tip-over.
13. Unplug this apparatus during lightning storms or when unused for long periods of time.
14. Refer all servicing to qualified service personnel. Servicing is required when the apparatus
has been damaged in any way, such as power-supply cord or plug is damaged, liquid has
been spilled or objects have fallen into the apparatus, the apparatus has been exposed to
rain or moisture, does not operate normally, or has been dropped.
4
English
15. For added protection for this product during a lightning storm, or when it is left unattended
and unused for long periods of time, unplug it from the wall outlet. This will prevent damage to
the product due to lightning and power-line surges.
16. Operate this product only from the type of power source indicated on the rear panel.
For products using an external power supply, use an exact replacement if lost or damaged.
For products operating from battery power, refer to the user manual.
17. If an outside antenna or cable system is connected to the product, be sure the antenna or cable
system is grounded so as to provide some protection against voltage surges and built-up
static changes. See figure A (below).
Figure A
18. An outside antenna system should not be located in the vicinity of overhead power lines or
other electric light or power circuits, or where it can fall into such power lines or circuits. When
installing an outside antenna system, extreme care should be taken to keep from touching
such power lines or circuits as contact with them might be fatal.
19. Unplug this product from the wall outlet and refer servicing to qualified service personnel
under the following conditions:
a.
When the power supply cord or plug is damaged.
b.
If liquid has been spilled or objects have fallen into the product.
c.
If the product has been exposed to water or rain.
d.
If the product does not operate normally by following the operating instructions.
e.
If the product has been dropped or damaged in any way.
f.
When the product exhibits a distinctive change in performance.
20. Keep this product a safe distance away from naked flame, such as a lit candle.
21. Apparatus shall not be exposed to dripping or splashing and no objects filled with liquids, such
as vases, shall be placed on the apparatus.
5
English
22. The recommended operating temperature range is 41˚ F to 104˚ F (5˚ C to 40˚ C).
23. The 12VDC input is suited for operating this product in a boat or camper using an optional
12VDC, 2A fused adapter.
24. WARNING – The mains are not disconnected in the off position, but the circuits are de-powered.
This product can be recycled. Products bearing this symbol must NOT be
thrown away with normal household waste. At the end of the product’s life,
take it to a collection point designated for recycling of electrical and electronic
devices. Find out more about return and collection points through your local
authority.
The European Waste Electrical and Electronic Equipment (WEEE) Directive was
implemented to dramatically reduce the amount of waste going to landfills,
thereby reducing the environmental impact on the planet and on human health.
Please act responsibly by recycling used products. If this product is still useable,
consider giving it away or selling it.
6
English
Model Two Instructions
Congratulations on your purchase of the Model Two table radio. We believe the Model Two to be
one of the finest stereo analog table radios on the market today.
We know you are eager to use your new radio, but please take a moment to read this owner’s
manual and Safety Instructions. If you have any questions, please do not hesitate to contact your
dealer or Tivoli Audio.
Please save the carton and original packing should you ever need to ship your radio, as
shipping damage is not covered by the factory warranty.
On behalf of all of us, thank you for choosing Tivoli Audio and enjoy your new Model Two!
About Tivoli Audio
Tivoli Audio was founded by Tom DeVesto with the mission of bringing simple to use, elegantly
designed, high quality audio products to consumers. As CEO and head of research and development
at his former company, Cambridge SoundWorks, Tom was responsible for the development of many
of the best selling home entertainment and multi-media products on the market. He also held senior
management positions in product development at both Advent and Kloss Video.
Henry Kloss (1929-2002) began his long love affair with audio back in the early 1950’s when, as
a student at M.I.T., he began building speaker enclosures for fellow students who wanted to exploit
the sound of live FM broadcasts of the Boston Symphony Orchestra. With encouragement from
Major Edwin Armstrong, inventor of FM, and M.I.T. lab staff, he co-founded Acoustic Research in
1952. At Acoustic Research, Henry co-invented the revolutionary AR1 acoustic suspension loudspeaker, which forever changed the way audio was reproduced. In 1957 he went on to co-found
KLH where he introduced audio enthusiasts to the Model Six loudspeaker, Model Eight FM table
radio, and the Model 11 portable phonograph. Ten years later at Advent, he designed one of the
first projection televisions (which earned him an Emmy Award), along with one of the first consumer
cassette decks utilizing Dolby B noise reduction**. After continuing projection television work at
Kloss Video, Henry co-founded Cambridge SoundWorks in 1988 along with Tom DeVesto. In 2000,
at the age of 70, Henry emerged from retirement to once again team-up with DeVesto to produce
the original, critically acclaimed Model One mono table radio.
*Cambridge SoundWorks is a registered trademark of Creative Labs, Singapore.
**Dolby is a registered trademark of Dolby Labs, Inc.
Packed with your Model Two you should find one each:
• One (1) External FM Antenna
• One (1) 9 Foot (2.7M) Power Cord
• One (1) Model Two main unit and self-adhesive rubber feet
• One (1) Right speaker with RCA cable and self-adhesive rubber feet
Please contact your dealer or Tivoli Audio if any of these items are missing.
7
English
Guide to Features (Front panel):
1. VOLUME: Turn the volume knob to the right to increase the volume or to the left to decrease
the volume of the Model Two’s speakers. This knob will also control the volume of headphones
when connected.
2. OFF/FM/AM/AUX: Turn the knob 1 click to the right to select the FM band, 2 clicks to the
right to select the AM band, or 3 clicks to the right to select the Aux input.
3. TUNING KNOB: Rotate the analog tuning dial to the right or to the left to adjust the FM (upper
half of dial) or AM (lower half of dial) frequency range.
4. POWER LIGHT: Glows when the unit is active.
5. TUNING INDICATOR: Brightest when best tuning has been achieved. Some listenable AM
stations will not light the tuning indicator and should be tuned by ear for the clearest signal.
This light may or may not remain lit when in the AUX position depending upon the position of
the AM dial.
8
English
Guide to Features (Rear panel):
1. BALANCE: Turn the balance knob upward to hear the main unit's speaker or downward to
hear the right speaker. The center detent provides equal balance between the two speakers.
2. R-SPR: Connect the RCA cable from the right speaker to this input.
3. 12VDC: Use this input to operate the Model Two from a DC power supply. Never use this DC
power input and the AC input at the same time.
4. ANTENNA SWITCH: Switch between internal and external FM antennae. This switch has no
affect on AM reception.
5. EXTERNAL FM CONNECTION: The Model Two has built-in AM and FM antennae. To improve
FM reception, slide the black plastic end of the FM antenna over this “F” connector and set
the switch to “EXTERNAL”. Adjust the wire for best reception. See section marked “Reception”
for more information.
6. HEADPHONE: Connect a headset (not Included) to this stereo output for private listening. The
headphone volume will be controlled by the Model Two’s volume knob. Connecting a pair of
headphones will mute the Model Two’s speakers. This jack accepts a 1/8" male stereo mini plug.
7. SUB OUT: Connect a powered subwoofer to this output for enhanced bass. This jack accepts
a 1/8" male stereo mini plug.
8. AUX IN: To hear the audio from another device (CD player, digital audio (mp3) player, etc.)
through the Model Two’s speakers, connect the device to this stereo input. This jack accepts
a 1/8" male stereo mini plug.
9. REC OUT: You may record from the Model Two by connecting a cassette deck or other recording
device to this fixed-level, stereo output. You may also use the Model Two as an AM/FM tuner
by connecting a receiver or integrated amplifier to this output. The Model Two’s speakers will
not be muted when using this output. This jack accepts a 1/8" male stereo mini plug.
9
English
10. MIX IN: Connect your computer’s audio output (or other device) to this stereo input to hear Its
audio mixed-in with either the tuner or Aux device if one is connected. The volume level of this
input must be adjusted at the source. This jack accepts a 1/8" male stereo mini plug.
11. AC INPUT: Connect the supplied power cord to this jack.
Reception:
The Model Two's internal FM and AM antennas will provide good reception. An optional outdoor
antenna will provide the best possible reception. Another alternative is to use the supplied indoor
external FM antenna or an optional FM dipole antenna with adapter. Locating the indoor antenna
near a window or outside wall will provide better reception than more interior locations. For AM,
rotate the radio for best reception. An optional external AM wireless antenna may provide improved
AM reception. Buildings made with concrete, steel, or aluminum siding will hinder reception.
Household appliances, electric blankets, computers, CD players, and other electronic devices
can also adversely affect reception or inject noise. If you experience this, move the Model Two
radio further from the offending device or plug it into an electrical outlet not shared by another
device. Metal surfaces may also hinder AM reception.
Additional Speakers:
The Model Two was designed to be used with the supplied right speaker. Do not connect any
other speaker to the Model Two. Doing so will void your warranty and possibly damage the radio
and/or the speaker.
Placement:
Place the unit on a flat, stable surface. Do not block the rear bass port. The Model Two radio and
stereo speaker can be positioned vertically as well as horizontally. Placement in a bookcase, cabinet,
or close to walls or corners may inflate the bass. The Model Two is magnetically shielded but it is
still advisable to keep speakers 3 inches away from a computer monitor or television set.
Cleaning:
Never use any harsh cleansers or solvents on your radio. Avoid spray-on waxes. Unplug the Model
Two radio prior to cleaning. The face may be cleaned with a slightly damp, soft cloth. Painting or
staining the wood cabinet will void your warranty.
Tivoli Audio cabinets use real wood veneers. Since normal wood varies greatly, it is not
possible to achieve an exact color / grain match between the main unit and stereo speaker
or between different models. You may also notice the wood darkens over time with exposure
to sunlight. Again, this is normal for real wood.
10
English
Limited Warranty:
Tivoli Audio manufactures its products to very high standards and we are confident our products will
perform well. Accordingly, we provide a limited warranty on this product against manufacturing
defects in material and workmanship to the original owner. This warranty is non-transferable.
Products purchased in the European Union and Norway have a minimum warranty term of two
years. For countries where minimum warranty terms are determined by statute, the warranty term
is the statutory period required. In all other locations, the warranty term is one year.
This Limited Warranty covers the functionality of the product for its normal, intended use as specified
in this Owner’s Manual. It does not cover a malfunction or damage that has resulted from improper
or unreasonable use or installation, using the charger to charge alkaline batteries, faulty ancillary
equipment, modifications, unauthorized repair, shipping damage or loss, abuse, accidents, use on
improper voltage/current, power surges, lightning or other acts of God, excess moisture, normal
wear and tear, commercial use, or purchase from unauthorized dealers. Proof of purchase as
evidence the unit was purchased from an authorized dealer may be required for warranty service.
Please contact the dealer of purchase or local distributor for warranty service or repair.
Please refrain from opening this product or taking it apart as doing so will void this Limited Warranty.
There are no user serviceable parts inside. Tivoli Audio will not pay for costs incurred due to correction
of reception problems, elimination of externally generated static/noise, loss of time, inconvenience,
loss of use of product, or damage caused by improper use of this product.
In the event the product is returned during the warranty term and is eligible for service under
this Limited Warranty, we will repair or replace any defective parts within a reasonable period
of time and free of charge.
THIS LIMITED WARRANTY GIVES YOU SPECIFIC LEGAL RIGHTS SUBJECT TO SPECIFIED
CONDITIONS. YOU MAY ALSO HAVE OTHER LEGAL RIGHTS WHICH APPLY TO THE PRODUCT
YOU HAVE ACQUIRED. THESE LEGAL RIGHTS VARY FROM COUNTRY TO COUNTRY. SOME
PLACES DO NOT ALLOW THE EXCLUSION, RESTRICTION, OR MODIFICATION OF CERTAIN
IMPLIED RIGHTS OR THEIR EFFECT. IN THOSE SITUATIONS THIS LIMITED WARRANTY WILL
ONLY APPLY TO THE EXTENT THAT THE APPLICABLE LAW ALLOWS.
The laws of your country may provide you with legal claims against the seller or manufacturer of
this product. This Limited Warranty does not affect those rights.
The provisions of the Limited Warranty are in lieu of any other warranties or conditions, except
those provided by law. This Limited Warranty does not affect any legal rights provided to you by
law and does not preclude any remedy you may have under law.
In countries where liability limits are not precluded by statute, the maximum liability of Tivoli Audio
shall not exceed the purchase price paid by you for the product. In countries where limitations of
liability are precluded by law, Tivoli Audio shall be liable for no more than the direct damages for
bodily injury, and/or real or personal property arising from the negligence of Tivoli Audio.
Where not prohibited by law, Tivoli Audio shall not be liable for special, incidental, consequential,
or indirect damages. Some places do not allow limitations on the exclusion or limitation of relief,
11
English
special, incidental, consequential or indirect damages, or the limitation of liability to specified
amounts, so the above limitations or exclusions may not apply to you.
This Limited Warranty is void if the label bearing the serial number has been removed or defaced.
If you purchased an extended service contract from your dealer and service is required after the
term of this Limited Warranty has expired, please contact your extended service contract provider
to obtain service.
For your convenience, you may register your product for warranty service online at our website
www.tivoliaudio.com. There is no legal obligation for you to provide personal information. However,
such information allows us to maintain a record of the Tivoli Audio products acquired by you and
better understand the purchasers of our products. The information collected will be used for marketing purposes by Tivoli Audio and, where permitted, to contact you in relation to the products
you have acquired or other products which might be of interest to you from Tivoli Audio or other
companies. The information that you provide may be processed in another country.
Please visit the Tivoli Audio FAQ section at www.tivoliaudio.com prior to any request for
warranty service as information available there may answer your questions or concerns.
You may email questions, in English, to us at [email protected]
Specifications:
Model:
Tivoli Audio™ Model Two™
Type:
AM/FM analog stereo table radio
Driver
Two 3" (76.2mm) full-range drivers
Dimensions:
212.7mm W x 114.3mm H x 133.35mm D
(8.375" W x 4.5" H x 5.25" D)
Weight:
4.1 kg (9lbs) Total
Specifications subject to change without notice.
Tivoli Audio reserves the right to make product changes without notice.
Tivoli Audio, the Tivoli Audio logo and Model Two are trademarks of Tivoli Audio, LLC.
12
Deutsch
Funktionen: Frontseite des Geräts
1. LAUTSTÄRKE: Drehen Sie den Lautstärkeregler zur Steigerung der Lautstärke nach rechts
und zur Reduzierung der Lautstärke nach links. Der Regler dient ebenfalls zur Einstellung der
Lautstärke eines evtl. angeschlossenen Kopfhörers (Sonderzubehör).
2. WAHLSCHALTER OFF / FM / AM / AUX: Drehen Sie diesen Wahlschalter aus der OFF-Stellung
auf die Position 1 zur Einstellung auf den Bandbereich FM und auf die Position 2 zur Einstellung
auf den Bandbereich AM oder auf die Position 3 zur Selektion des Hilfseingangs.
3. SENDERSUCHER: Drehen Sie diesen Regler nach links oder rechts, um in den Frequenzbereichen FM und AM nach Sendern zu suchen.
4. LED EIN /AUS: Diese grüne Kontrolleuchte leuchtet auf, wenn das Gerät eingeschaltet ist.
5. ABSTIMMUNGSAN ZEIGE: Bei optimaler Abstimmung leuchtet diese Kontrolleuchte hell auf.
Diese Anzeige könnte bei bestimmten AM-Stationen mit schwachem Signal nicht funktionieren,
so daß Sie die Abstimmung nach Gehör vornehmen müssen.
13
Deutsch
Funktionen: Rückseite des Geräts
1. BALANCE: Drehen Sie diesen Regler
nach rechts, um den rechten Kanal zu hören
und nach links, um den linken Kanal zu
hören. Stellen Sie den Regler zur optimalen
Balance zwischen beiden Kanälen in die
Mittelstellung.
2. EINGANG R-SPR: Zum Anschluß
einer externen Lautsprecherbox (rechter
Kanal) über RCA- (Cinch-) Kabel. Da das
Gerät nicht magnetisch abgeschirmt ist,
sollten Sie darauf achten ,daß die externe
Lautsprecherbox und die Haupteinheit
wenigstens einen Abstand von ca. 90 cm
(3") zu Computerbildschirmen oder
Fernsehern haben.
3. EINGANG 12V GLS: Benutzen Sie diesen Eingang zum Anschluß eines externen Gls-Netzteils.
4. ANTENNENUMSCHALTER: Zur Selektion zwischen der internen AM-Antenne und der externen
FM-Antenne. Die Stellung dieses Schalters ist bei AM-Empfang ohne Bedeutung.
5. EXTERNER FM-ANSCHLUSS: Das Gerät ist mit einer internen Antenne und einer externen
FM-Antenne ausgestattet. Um den FM-Empfang zu verbessern, können Sie das Ende der
zum Gerät gehörenden Wurfantenne an die Klemme „F“anschließen und den Schalter auf
„extern“ stellen. Legen Sie die Wurfantenne anschließend so aus, daß ein optimaler Empfang
gewährleistet ist. Weitere Angaben: siehe Abschnitt „Empfang“.
6. KOPFHÖRERAUSGANG: Stereoausgang zum Anschluß eines Kopfhörers. Die Lautstärke
des Kopfhörers wird über den Lautstärkeregler des Geräts (1) geregelt. Bei Anschluß eines
Kopfhörers werden die Lautsprecher des Geräts automatisch abgeschaltet. Der Ausgang ist
für 1/8"-Stereo-Ministecker ausgelegt.
7. AUSGANG SUB OUT: Zum Anschluß eines mit Verstärkerteil ausgestatteten Subwoofers
(Tieftöner) zwecks Verbesserung der Qualität im Baßbereich. Der Ausgang ist für 1/8"-StereoMinistecker ausgelegt.
8. HILFSEINGANG: Benutzen Sie diesen Eingang zum Anschluß externer Audiogeräte (CD-Player,
Fernseher, usw.) an die Lautsprecher des Geräts. Dieser Stereoeingang ist für 1/8"-StereoMinistecker ausgelegt.
9. GANG REC: Zur Stereoaufnahme (ohne Lautstärkereglung) über externe Kassettendecks oder
andere Aufnahmegeräte können Sie diesen Ausgang benutzen. Außerdem können Sie das Gerät
als AM-/FM-Tuner benutzen, indem Sie an diesen Ausgang einen Empfänger oder Verstärker
anschließen. Die Lautsprecher des Geräts werden bei Anschluß einer externen Einheit an diesen
Ausgang nicht abgeschaltet. Der Stereoausgang ist für 1/8"-Stereo-Ministecker ausgelegt.
10. STEREOEINGANG MIX IN: Zum Anschluß eines Audioausgangs von Computern (oder anderen
externen Einheiten). Die Lautstärke muß in diesem Fall am angeschlossenen Gerät geregelt
werden. Der Stereoeingang ist für 1/8"-Stereo-Ministecker ausgelegt.
11. AC INPUT: Zum Anschluß des zum Gerät gehörenden Netzsteckers.
14
Español
Guía de características: frente
1. VOLUMEN: Gire el botón del volumen a la derecha para aumentar el volumen o a la izquierda
para disminuir el volumen de los altavoces del Model Two. Este botón también controla el
volumen de los auriculares cuando están conectados.
2. OFF/FM/AM/AUX: Gire el botón de 1 click a la derecha para seleccionar la banda FM, de 2
clicks a la derecha para seleccionar la banda AM, o de 3 clicks a la derecha para seleccionar
la entrada Aux.
3. SINTONI ZACIÓN: Gire el cuadrante de sintonización a la derecha o la izquierda para cambiar
el rango de frecuencia.
4. LUZ DE ALIMENTACIÓN: Se enciende una luz verde cuando la unidad está funcionando.
5. INDICADOR DE SINTONI ZACIÓN: Se enciende una luz de color ámbar cuando se ha logrado
la mejor sintonización posible. En algunas estaciones de la AM el indicador de sintonización
no se enciende: tendrán que sintonizarse a oído para lograr la señal más clara.
15
Español
Guía de características: parte trasera
1. BALANCE: Gire el botón del balance
hacia arriba para escuchar el altavoz derecho, hacia abajo para escuchar el altavoz
izquierdo. El punto central representa el
balance entre ambos altavoces.
2. R-SPR: Conecte a esta entrada el
cable RCA del altavoz compañero derecho.
Al no estar el Model Two magnéticamente
protegido, mantenga el altavoz compañero
y la unidad principal a por lo menos 3
pulgadas (7,5 cm) de una pantalla de
ordenador o televisor.
3. 12VDC: Utilice esta entrada para
conectar el Model Two a una fuente de
energía de corriente continua.
4. CONMUTADOR DE ANTENA: Conmutador entre las antenas interna y externa FM. Este
conmutador no afecta a la recepción AM.
5. CONEXIÓN FM EXTERNA: El Model Two lleva incorporadas antenas AM y FM. Para mejorar
la recepción FM, inserte el extremo del cable de antena que se suministra en dotación en el
centro de este conector “F” y ponga el conmutador en la posición “EXTERNAL”. Ajuste el cable
hasta lograr la mejor recepción posible. Vea la sección “Recepción” para más información.
6. AURICULARES: Conecte a esta salida estéreo unos auriculares cuando desea escuchar en
privado. El volumen de los auriculares se regula con el botón de volumen del Model Two. Cuando
conecta los auriculares se desactivan los altavoces del Model Two. Esta conexión acepta un
mini enchufe estéreo macho de 1/8".
7. SUB OUT: Conecte a esta salida un subwoofer motorizado para aumentar los bajos. Esta
conexión acepta un mini enchufe estéreo macho de 1/8".
8. AUX IN: Para escuchar sonido de otro dispositivo (lector de CD’s, televisor, etc.) a través de
los altavoces del Model Two, conecte el dispositivo a esta entrada estéreo. Esta conexión
acepta un mini enchufe estéreo macho de 1/8". Puede grabar desde el Model Two conectando
una grabadora de
9. REC OUT: casetes u otro dispositivo de grabación a esta salida estéreo de nivel fijo. También
puede utilizar el Model Two como sintonizador AM/FM conectando a esta salida un receptor
o un amplificador integrado. Los altavoces del Model Two no se desactivarán cuando se utiliza
esta salida. Esta conexión acepta un mini enchufe estéreo macho de 1/8".
10. MIX IN: Conecte a esta entrada estéreo la salida de sonido de su ordenador (u otro dispositivo)
para escuchar audio mezclado, utilizando el sintonizador o el dispositivo Aux cuando uno de
los dos está conectado. El nivel de volumen de esta entrada puede regularse a la fuente. Esta
conexión acepta un mini enchufe estéreo macho de 1/8".
11. AC INPUT: Conecte aquí el cable eléctrico que se suministra en dotación.
16
Français
Guide des fonctions: Partie avant
1. VOLUME: Tourner le bouton du volume respectivement vers la droite ou vers la gauche pour
augmenter ou réduire le volume des haut-parleurs du Modèle Due. Ce bouton permet de
régler également le niveau du volume du casque lorsque celui-ci est branché.
2. OFF/FM/AM/AUX: Tourner le bouton d’un cran vers la droite pour sélectionner la bande FM,
de deux crans vers la droite pour sélectionner la bande AM, ou de trois crans vers la droite
pour sélectionner l’entrée Aux.
3. SYNTONIE: Tourner le disque de syntonie vers la droite ou vers la gauche pour varier la
fréquence.
4. VOYANT ALIMENTATION: Emet une lumière verte lorsque l’appareil est allumé.
5. INDICATEUR DE SYNTONIE: Emet une lumière couleur amber clair lorsque la syntonie est
excellente. Certaines stations AM qui ont un signal faible, mais perceptible, ne provoquent
pas l’allumage de l’indicateur de syntonie; il faut alors effectuer la syntonie «à l’oreille» pour
optimiser la qualité du signal.
17
Français
Guide des fonctions: Partie arrière
1. BALANCE: Tourner le bouton de
balance respectivement vers le haut ou
vers le bas pour augmenter l’intensité du
son émis par le haut-parleur de droite ou
de gauche. La dent d’arrêt centrale assure
une balance parfaite entre les deux hautparleurs.
2. R-SPR: Raccorder à cette entrée le
câble RCA du haut-parleur de droite. Etant
donné que le Modèle Due n’est pas blindé
contre les interférences magnétiques, garder
le haut-parleur et l’appareil à une distance
d’au moins 8 cm de l’écran monitor d’un
ordinateur ou d’un téléviseur.
3. 12V c.c.: Utiliser cette entrée pour
faire fonctionner le Modèle Due avec une alimentation en c.c.
4. SELECTEUR D’ANTENNE: Permet de sélectionner l’antenne FM interne ou l’antenne externe.
Ce sélecteur n’a aucun effet sur la réception en AM.
5. CONNEXION ANTENNE FM EXTERNE: le Modèle Due est muni d’antennes AM et FM
incorporées. Pour améliorer la réception de stations FM, insérer l’extrémité de l’antenne à fil
fournie avec l’appareil au centre de ce connecteur en “F” et mettre le sélecteur sur la position
“EXTERNAL”. Orienter judicieusement l’antenne à fil pour optimiser la réception.
6. CASQUE: Raccorder un casque à cette sortie stéréo pour une écoute discrète. Le volume
d’écoute avec casque peut être réglé en agissant sur le bouton du volume du Modèle Due.
Lorsque l’on branche un casque, les haut-parleurs du Modèle Due sont neutralisés. Cette
prise à jack est compatible avec une fiche stéréo mini de 1/8".
7. SUB OUT: Pour avoir des tons bas plus puissants, raccorder le caisson de grave amplifié à
cette sortie. Cette prise à jack est compatible avec une fiche stéréo mini de 1/8".
8. AUX IN: Pour écouter le signal audio provenant d’un autre dispositif (lecteur de CD, téléviseur,
etc.) avec les haut-parleurs du Modèle Due, raccorder l’appareil en question à cette entrée
stéréo. Cette prise à jack est compatible avec une fiche stéréo mini de 1/8".
9. REC OUT: Il est possible d’enregistrer à partir du Modèle Due en accordant un magnétophone
à cassettes ou un autre type de magnétophone à cette sortie stéréo (à niveau fixe). Il est
également possible d’utiliser le Modèle Due en tant que syntoniseur AM/FM en branchant à
cette sortie un récepteur ou un amplificateur intégré. Les haut-parleurs du Modèle Due ne sont
pas neutralisés lorsque l’on utilise cette sortie. Cette prise à jack est compatible avec une fiche
stéréo mini de 1/8".
10. MIX IN: Raccorder la sortie audio d’un ordinateur (ou d’un autre dispositif) à cette entrée stéréo
pour mixer le signal audio avec celui du syntoniseur, ou du dispositif Aux (s’il est raccordé).
Le volume audio de cette entrée doit être réglé à la source. Cette prise à jack est compatible
avec une fiche stéréo mini de 1/8".
11. AC INPUT: Raccorder le câble d’alimen-tation fourni avec l’appareil à cette prise à jack.
18
Italiano
Guida alle funzioni: parte anteriore
1. VOLUME: Ruotare la manopola del volume verso destra (rispett.: verso sinistra) per aumentare
(rispett.: diminuire) il volume degli altoparlanti del Modello Due. Questa manopola consente di
regolare anche il livello del volume della cuffia quando essa viene collegata.
2. OFF/FM/AM/AUX: Ruotare la manopola di uno scatto verso destra per selezionare la banda
FM, di due scatti verso destra per l’ingresso Aux.
3. SINTONIA: Ruotare il disco di sintonia verso destra o verso sinistra per variare la frequenza.
4. SPIA ALIMENTA ZIONE: emette una luce verde quando l’apparecchio è attivo.
5. INDICATORE DI SINTONIA: emette una luce color ambra chiaro quando la sintonia è ottimale.
Alcune stazioni AM dal segnale debole ma comunque percepibile non provocano l’accensione
dell’indicatore di sintonia; pertanto occorre effettuare la sintonia “a orecchio” per ottimizzare
la qualità del segnale
19
Italiano
Guida alle funzioni: parte posteriore
1. BILANCIAMENTO: Ruotare la manopola del bilanciamento verso l’alto (rispett.:
verso il basso) per aumentare l’intensità del
suono emesso dall’altoparlante di destra
(rispett.: di sinistra). Il dente di arresto centrale assicura un perfetto bilanciamento tra i
due altoparlanti.
2. R-SPR: Collegare a questo ingresso il
cavo RCA dell’altoparlante di destra. Poiché
il Modello Due non è schermato dalle interferenze magnetiche, tenere l’altoparlante e
l’apparecchio a una distanza di almeno 8
cm dal monitor di un computer o da un
televisore .
3. 12V C.C.: Utilizzare quest’ingresso per far funzionare il Modello Due con alimentazione in c.c.
4. SELETTORE ANTENNA: Consente di selezionare l’antenna FM interna o quella esterna.
Questo selettore non ha alcun effetto sulla ricezione in AM.
5. CONNESSIONE ANT. FM ESTERNA: Il Modello Due È dotato di antenne AM ed FM incorporate.
Per migliorare la ricezione di stazioni FM, inserire l’estremità dell’antenna a filo in dotazione nel
centro di questo connettore a “F” e portare il selettore nella posizione “EXTERNAL”. Orientare
opportunamente l’antenna a filo per ottimizzare la ricezione. Per ulteriori informazioni, vedere
il paragrafo intitolato “Ricezione”.
6. CUFFIA: collegare una cuffia a questa uscita stereo per un ascolto discreto. Il volume di ascolto
in cuffia può essere regolato agendo sulla manopola del volume del Modello Due. Quando si
collega una cuffia, gli altoparlanti del Modello Due vengono disattivati. Questa presa a jack è
compatibile con uno spinotto stereo mini da 1/8".
7. SUB OUT: per avere dei toni bassi più potenti, collegare il subwoofer amplificato a questa
uscita. Questa presa a jack è compatibile con uno spinotto stereo mini da 1/8".
8. AUX IN: per ascoltare il segnale audio proveniente da un altro dispositivo (riproduttore di CD,
televisore, ecc.) tramite gli altoparlanti del Modello Due, collegare l’apparecchio in questione a
questo ingresso stereo. Questa presa a jack è compatibile con uno spinotto stereo mini da 1/8".
9. REC OUT: È possibile registrare dal Modello Due collegando un registratore a cassette o un
altro tipo di registratore a questa uscita stereo (a livello fisso). È anche possibile utilizzare
il Modello Due come sintonizzatore AM/FM collegando a questa uscita un ricevitore o un
amplificatore integrato. Gli altoparlanti del Modello Due non vengono disattivati quando si
utilizza questa uscita. Questa presa a jack è compatibile con uno spinotto stereo mini da 1/8".
10. MIX IN: Collegare l’uscita audio di un computer (o di altro dispositivo) a questo ingresso stereo
per mixare il segnale audio con quello del sintonizzatore, o del dispositivo Aux (se collegato).
Il volume audio di questo ingresso dev’essere regolato alla sorgente. Questa presa a jack è
compatibile con uno spinotto stereo mini da 1/8".
11. AC INPUT: Collegare il cavo di aliment-azione in dotazione a questa presa a jack.
20
Português
Guia de características: Painel frontal
1. VOLUME: Gire o botão de volume para a direita para aumentar o volume ou para a esquerda
para baixar o volume. Este botão controlará também, o volume dos auscultadores quando
ligados.
2. OFF/FM/AM/AUX: Gire o botão 1 “click” para a direita seleccionado assim, a banda FM,
2 “clicks” para a direita para seleccionar a banda AM, ou 3 “clicks” na mesma direcção para
activar a entrada auxiliar do aparelho.
3. SINTONIA: Gire o botão de sintonia para a esquerda ou direita, seleccionando desta forma a
frequência pretendida.
4. ESTADO DO APARELHO: A luz brilhará de côr verde quando a unidade estiver ligada.
5. NDICADOR DE SINTONIA: A luz de côr âmbar brilhará quando a sintonia óptima de bandas
FM forem atingidas. A luz de côr âmbar não acenderá na sintonia de estações de fraco sinal
na banda AM. A sua sintonia deverá ser feita de uma forma puramente auditiva.
21
Português
Guia de características: Painel traseiro
1. BALANÇO: Gire o botão de balanço
para cima para ouvir o som pelo altifalante
direito. Gire-o desta vez para baixo se
preferir ouvir o som no altifalante esquerdo.
Mantenha o botão centrado para ouvir o
som balanceado pelos dois altifalantes.
2. ALTIFALANTE DIREITO: Ligue o
cabo RCA (fornecido) do altifalante direito
a esta entrada. Como o Model Two não
é um aparelho magneticamente isolado,
mantenha a unidade principal e o altifalante
direito distanciados de aparelhos como
por ex: um monitor de computador e/ou
televisão cerca de 7,62 cm.
3.
o Model Two a um tranformador de alimentação DC.
12VDC: Utilize esta entrada para ligar
4. COMUTADOR DE ANTENA: Comuta entre as antenas interna e externa FM. Este comutador
não terá influência sobre a recepção de sinal AM.
5. LIGAÇÃO FM EXTERNA: O Model Two vem com antenas FM/AM embutidas. Para melhorar
a recepção de sinal FM, insira uma das extremidades do fio de antena (fornecido) ao centro do
conector “F” e ajuste o comutador de antenas para “EXTERNAL”. Direccione o fio de antena
para uma melhor recepção. Ver secção “Recepção” para mais informações.
6. AUSCULTADORES: Ligue um par de auscultadores a esta saída estéreo para uma audição
privada. O volume de som dos auscultadores sera controlado pelo botão de volume de som
do aparelho. Ao ligar um par de auscultadores ao aparelho, desligará os altifalantes do mesmo.
Esta entrada aceita mini jack macho estéreo.
7. SAÍDA PARA SUBWOOFER: Ligue um subwoofer activo a esta saída para realce de graves.
Esta saída aceita mini jack macho estéreo.
8. ENTRADA AUXILIAR: Para ouvir audio de outra fonte (Leitor de CDs, televisão, etc.) através
dos altifalantes do Model Two, Ligue essa mesma fonte a esta entrada estéreo. Esta entrada
aceita mini jack macho estéreo.
9. SAÍDA PARA GRAVAÇÃO: Poderá gravar apartir desta saída estéreo de som de nível fixo,
ligando esta mesma a um deck de cassetes ou outro aparelho de gravação. Poderá utilizar o
Model Two como um sintonizador AM/FM ligando esta saída a um receptor ou um amplificador
integrado. Os altifalantes do Model Two não serão desligados quando estiver a usar esta saída.
Esta saída aceita mini jack macho estéreo.
10. MIX IN: Ligue a saída de audio de um computador (ou outro aparelho) a esta entrada estéreo
para ouvir o som misturado entre a fonte ligada, e a estação sintonizada no Model Two. O
volume de som desta entrada deverá ser ajustada na fonte. Esta entrada aceita mini jack
macho estéreo.
11. AC INPUT: Ligue o cabo de alimentação (fornecido) a esta entrada.
22
For warranty and information outside of USA please
contact your local distributor:
This manual was written by Peter Skiera and cannot be
reproduced in whole or in part without the permission of
Tivoli Audio. The information included within this owner’s
manual was accurate at the time of printing. Tivoli Audio
shall not be held liable for operational, technical, or editorial errors/omissions. Visit our website for the latest
version of the owner’s manual.
For more information about other exciting products
from Tivoli Audio, please visit our website or contact
us directly (in English):
Tivoli Audio, LLC
Seaport Center
70 Fargo Street, Suite 900
Boston, MA 02210 USA
1.877.297.9479
1.617.345.0066
www.tivoliaudio.com
[email protected]
M2CE0110