1
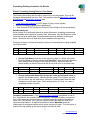
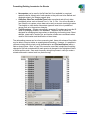
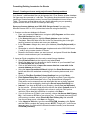
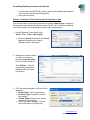
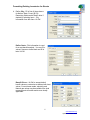
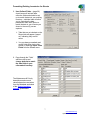
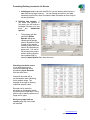
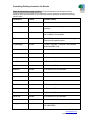
Formatting Existing Inventories for Streets Introduction The Formatting Existing Inventories for Streets Guide was designed to compliment the i-Tree Streets User’s Manual v5.x. This guide will assist users through the basic steps of preparing and importing an existing street tree inventory into i-Tree Streets. This method is one of the quickest and easiest ways for users with an existing street tree inventory to utilize the i-Tree assessment tools. This guide is broken down into (4) phases which can be completed in stages as time and resources permit. 1. Early decisions 2. Formatting an Existing Street Tree Inventory 3. Creating an Access ready project from an Excel spreadsheet 4. Creating an i-Tree Streets project & importing in data Online Resources This document also refers to additional reference materials which can be accessed on the i-Tree website under the Resources – Archives tab. See the section titled Streets Import Resources. Several reference materials will be referred to during various phases of this guide to assist users in understanding steps and available options. Phase 1: Early Decisions 1. Requirements - Total time needed could vary between a half day to a few days depending on the size and complexity of your existing inventory data and a user’s comfort level working with various software applications. Microsoft Office Excel & Access and i-Tree Streets are required to complete the import steps. System requirements for i-Tree are on page 4 of the Streets manual. 2. Considerations & limitations - Streets will provide a snap shot in time of your Street tree resource. Streets is an assessment tool which will provide estimates of benefits and values, which will enhance strategic planning and management. Streets is not designed to be dynamically or frequently updated to manage street trees or track work histories. Refer to the Streets manual and other reference documents under the Resources- Archives section of the i-Tree website to learn more about the methodology and limitations of the application. The Community Tree Guides are the best place to start further exploration of how the Streets model works. 3. Acquiring existing tree inventory records - There are multiple types of street tree inventories available including GIS based systems, simple spreadsheets & custom tree inventory and management systems. It is easiest to work with inventory data records in a spreadsheet format where you can easily edit data as required. Many inventory systems allow exporting records out as csv files or .xls files for use in Microsoft Excel. Always work with a copy of your original data. 4. Decide what data to import - A minimum of tree species and DBH are required for Streets to compute benefit values. Including additional information is optional and will allow for more detailed analysis of the resource. I would recommend including tree Condition if available as it will enhance reporting and analysis of data. Zones can also be useful for comparison of areas if your existing inventory has such data available. Data fields that will not be imported into Streets can be deleted from the working copy of the inventory spreadsheet. 1 www.itreetools.org Updated October 2013 Formatting Existing Inventories for Streets Phase2: Formatting Existing Data for i-Tree Streets The following documents and files will be referred to in the next phases. They can be accessed or downloaded from the i-Tree Tools website under the Resources – Manuals & Workbooks and Resources- Archives tabs. • • • i-Tree Street User’s Manual v5 (PDF) pages 25 (copy at end of guide) Streets Formatting Example (Excel spreadsheet) i-Tree Streets & STRATUM Species Codes by Climate Region (Excel spreadsheet) Data Requirements Refer to page 25 of the Streets manual for proper field names, formatting requirements and acceptable value ranges for inventory data. Remember, only data fields that will be imported need to be reformatted. Extra data fields should be deleted to avoid import errors. Streets will add in all data fields to your database after importing. Examples of steps to reformat an existing inventory are illustrated below using simplified raw inventory data. ID 345 346 House # 732 735 Street lapham st. lapham st. Common Name Ash Spp. Elm Spp. (Hybrid) Quadrant NE NW Diameter 6.8 5.1 Height Class 15'-30' 0'-15' Condition Poor Good 1. Change Field Names as shown in the manual on page 25. Notice in the table below that Zone is used for quadrant and OtherOne is used for height class data which was provided in ranges in the existing inventory. Data fields must be spelled exactly as listed in the manual but do not need to be in the same order. ID 345 346 StreetNumber 732 735 StreetName lapham st. lapham st. SpCode Ash Spp. Elm Spp. (Hybrid) Zone NE NW DBH 6.8 5.1 OtherOne 15'-30' 0'-15' CondWood Poor Good 2. Change species and data to Streets species codes and accepted values as shown in the Streets manual. Midwest species codes FR for Fraxinus spp. and ULS for Ulmus spp. are used below. Values for CondWood and OtherOne were changed to numeric data types. Other existing values (ID, Zone, etc.) were in acceptable formats for import. ID 345 346 Zone NE NW SpCode FR ULS DBH 6.8 5.1 CondWood 2 4 OtherOne 2 1 StreetName lapham st. lapham st. StreetNumber 732 735 Formatting considerations – The Streets formatting example spreadsheet, found on the i-Tree website, has several worksheets showing a complete inventory as exported from a GIS system and the same data in a different worksheet properly formatted for import into i-Tree Streets. This is only an example and all data does not need to be imported unless desired. An additional worksheet labeled Metadata shows the relationships of existing data with numeric values required for import. This information is helpful when later setting up the Streets project user defined fields. 2 www.itreetools.org Updated October 2013 Formatting Existing Inventories for Streets • • • New species can be used in the SpCode field if not available in a regional species code list. Keep track of new species as they will need to be defined and assigned values in the Streets program later. OtherOne, OtherTwo and OtherThree fields are optional and will only allow predefined values such as Hazard Tree 1= Yes, 2 = No. You will not be able to use OtherOne to capture unique data entries such as numeric tree height values. Tree heights or other similar unique data types will need to be in predefined ranges such as in the previous example. Tree ID numbers – Streets automatically generates ID numbers and uses the ID value for managing records in the database. Therefore, the ID field is not designed for managing tree tag numbers or identifying and locating trees. Street address, street name, location site, and location number are considered values used for field location and identification of street trees. The reformatting process can be a time consuming task. Users with advance Excel skills may be able to use pivot tables to expedite data reformatting. However, it is possible to reformat existing data by simply using the Sort option and Find and Replace within a field as shown below. Note - a copy of the common name field is duplicated for editing, changed to SpCode, sorted and then each species is changed in the highlighted field to a Streets species code. Save work frequently during this process in case you make a mistake and need to restore back to a previous copy. 3 www.itreetools.org Updated October 2013 Formatting Existing Inventories for Streets Phase 3: Creating an Access ready project from an Excel spreadsheet Only Access *.mdb formatted files can be imported into i-Tree Streets; all other database file types must be converted to *.mdb files. The following directions detail the process for importing a Streets-formatted inventory from an Excel spreadsheet into an Access Table. The process outlined below may vary slightly depending on your operating system and the version of Excel or Access you are using. Save your Access database as a 2002-2003 file type format if you are using Microsoft Access 2007 or 2010. (Instructions below are using Access2010) 1. Create a new Access database for Streets: • From your computer’s Start menu, navigate to (All) Programs and then select Microsoft Access from the list. • In the Access dialogue box, highlight Blank database under Available Templates. Select the folder icon next to the File Name dialog box in the right panel to browse to a location and name your database. • In the File name: dialogue box, name your database (YourCityProject.mdb) or similar. • Remember to select the Save as type: dropdown and select 2002-2003 format (*.mdb) if using a newer version of Access. • Browse to the location where you want to save it, and press OK and then Create button to create and save your new database. 2. Import an Excel spreadsheet into the newly created Access database: • Select External Data from the top menu and select Excel. • Specify the data source by browsing to the file location of your formatted Excel file YourCityData.xls, select the file. • Click on the radial button to Import the source data into a new table in the current database and hit okay • Using the Import Spreadsheet Wizard, highlight the Show Worksheets radial button and select the worksheet containing your inventory data records; click Next >. • Check the First Row Contains Column Headings box and click Next >. • Field Options Dialog Box: Verify that Field Names and Data Types follow the formatting conventions described in the i-Tree Streets Manual on page 25. Field names can be renamed here and data fields that are not being imported into Streets can be excluded by checking the Do not import field (skip) box. • Indexed: If you have an ID field in your inventory, choose Yes (no duplicates) for that column. All other fields should be left with the default Indexed choice of No. (Note- you will need to highlight each column to verify the Field options selection.) When data field verification is complete, click Next >. • If you do not have an ID field in your inventory, choose Let Access Add Primary Key. It will create an ID field as your primary key. If you already have an ID field with inventory numbers, select Choose My Own Primary Key and select ID from the pull-down menu; click Next > to continue. • In the Import to Table box, type the name STRATUM_Inventory; click Finish and then OK to complete the import process. NOTE: Though your *.mdb file can have any name, the table with the Streets-formatted inventory must be named STRATUM_Inventory. 4 www.itreetools.org Updated October 2013 Formatting Existing Inventories for Streets • • You can select the STRATUM_Inventory table in the available tables panel to verify that your data has imported properly. Save and Exit Access Phase 4: Creating an i-Tree Streets project & importing in data You will now need to go through the process of creating a New Project in Streets by following the project creation & definition steps in Phase 1 & 2 of the Streets Manual. You will then import your existing data into this newly created project. 1. Launch Streets & Create New Project Select →File →Open→New Project Click the “Specify” button and click Create New which launches the “Specify database location” dialog box. 2. Navigate to a location where you want to create your project and type the name in the File name dialog box. Then hit Save. (This will automatically populate the Database field in the New Project box) 3. Fill in the remaining fields in the New Project dialog box. Project Name: Type a project name Inventory Type: Complete is used for this example Climate Region: Choose your climate region from the dropdown. Click Finish when complete. (This will launch the Define City Dialog box) 5 www.itreetools.org Updated October 2013 Formatting Existing Inventories for Streets 4. Define City - Fill in first (4) drop downs for Nation, State, County & City. Remaining fields can be filled in later if desired by selecting Input – City information from the menu. Hit OK. Define Costs→This information is used for a cost-benefit analysis.. You can fill in values if known or leave blank and fill in later. Hit OK Benefit Prices→ Hit OK to accept default benefit values or customize as desired with local values. Current home resale, electricity and Natural gas values may be available from local resources and will make results more locally applicable. 6 www.itreetools.org Updated October 2013 Formatting Existing Inventories for Streets 5. User Defined Fields – (page 28) check boxes will activate data collection fields and should be set up to match the data in your existing inventory. Individual tabs will allow you to customize the data parameters within each option to match the data in your inventory as shown in the next (2) screen captures Tabs that are not checked on the Record tab will appear “grayed out” indicating they are not active. You can always comeback and modify fields after closing this screen by selecting Input→Data Fields from the Streets menu. 6. Page through the “Tabs” which are active and change defaults to match the data fields in your reformatted inventory. The Maintenance & Priority descriptions and numeric values shown here are taken from the Metadata worksheet of the Streets formatting example spreadsheet. 7 www.itreetools.org Updated October 2013 Formatting Existing Inventories for Streets Define optional Other1, 2 & 3 fields if they are being used in your inventory data. Note- predefined values correspond with inventory data to be imported. Hit OK when all user defined fields are completed and project will automatically save. 7. Once project is saved, select File- Import - Inventory data from the main menu. Select Browse in the dialog box and navigate to the Access database with the STRATUM_Inventory table created in the previous phase. Select the Access database file and hit Open. The Database File: field will be populated in the dialog box. Hit OK. You should then receive a message indicating that records have been imported successfully. Troubleshooting - If you receive an error, carefully check Field names for correct spelling, proper sequencing and correct data types in the Access database. These are the most common causes of errors during the import process. 8 www.itreetools.org Updated October 2013 Formatting Existing Inventories for Streets Isolating an error in data can be difficult if you are working with numerous data fields and a large inventory. You can attempt to import in your data eliminating one field at a time to isolate the data field where an error may be causing a problem. 8. Defining new species- if you have new species in your data, you will receive a message informing you that there are “unmatched species” The program will then launch the Define Species dialog box indicating that species need to be defined. Refer to page 41 for species matching steps which will need to be completed at some point. You can hit OK and save the project without defining species and complete later by selecting Input-Species from the main menu. Checking records for errors It is a good idea to check records for additional errors by selecting Input- Records from the main menu. Issues will be noted with a red exclamation mark indicating that a problem exists. The example at the right is showing undefined species codes. Records can be sorted by ascending or descending values by clicking on the field name. This is good a way to identify values out of range due to typos. Save your project and run reports (page 44) once issues are resolved. 9 www.itreetools.org Updated October 2013 Formatting Existing Inventories for Streets COPY OF Streets Manual page 25 Table 1. Required field names and formats as well as category options for final Streets Access database. It is only necessary to include the fields for which you have data. Remember to be extra careful with the spelling of the field names as they must be exact. Field name Format Possible values ID Number 0-4,000,000,000 StreetSeg Number 0-4,000,000,000 if sampling or 0 for complete inventory Zone Number or text 1-4,000,000,000 if number; up to 20 characters if text; or blank if not recorded SpCode Text Up to 10 characters; see www.itreetools.org > Resources for species codes CityManaged Number 1 if yes, 0 if private; 1 or blank if not recorded (assumes public tree) DBH Number 1-10 for categories or actual value LandUse Number 1-10; blank or 0 if not recorded SiteType Number 1-10; blank or 0 if not recorded LocSite Number 1-10; blank or 0 if not recorded LocNo Number 1-10; blank or 0 if not recorded MtncRec Number 1-10; blank or 0 if not recorded MtncTask Number 1-10; blank or 0 if not recorded SwDamg Number 1-10; blank or 0 if not recorded WireConflict Number 1-10; blank or 0 if not recorded CondWood Number 1-10; blank or 0 if not recorded CondLvs Number 1-10; blank or 0 if not recorded OtherOne Number 1-10; blank or 0 if not recorded OtherTwo Number 1-10; blank or 0 if not recorded OtherThree Number 1-10; blank or 0 if not recorded GPS_Lat Text Decimal degrees (0-90) with direction (35.34642345N) 10 www.itreetools.org Updated October 2013 Formatting Existing Inventories for Streets GPS_Lon Text Decimal degrees (0-180) with direction (98.34642345W) StreetName Text Up to 50 characters StreetNumber Text Up to 50 characters SurveyorId Text Up to 10 characters SurveyDate Date/Time Any allowable date/time format NoteThisTree Yes/No Yes or No Comments Text Up to 255 characters 11 www.itreetools.org Updated October 2013