1
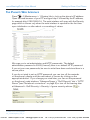
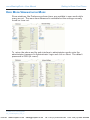
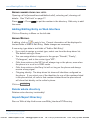
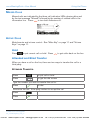
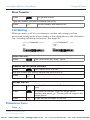
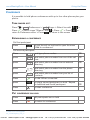
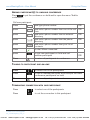
snom.com E N G LI S H User Manual MeetingPoint VoIPon www.voipon.co.uk [email protected] Tel: +44 (0)1245 808195 Fax: +44 (0)1245 808299 © 2009 snom technology AG www.snom.com man_snomMeetingPoint_v101_en VoIPon www.voipon.co.uk [email protected] Tel: +44 (0)1245 808195 Fax: +44 (0)1245 808299 Copyright, Trademarks, GPL, Legal Disclaimers snom, the names of snom products, and snom logos are trademarks owned by snom technology AG. All other product names and names of enterprises are the property of their respective owners. snom technology AG reserves the right to revise and change this document at any time, without being obliged to announce such revisions or changes beforehand or after the fact. Texts, images, and illustrations and their arrangement in this document are subject to the protection of copyrights and other legal rights worldwide. Their use, reproduction, and transmittal to third parties without express written permission may result in legal proceedings in the criminal courts as well as civil courts. When this document is made available on snom’s web page, snom technology AG gives its permission to download and print copies of its content for the intended purpose of using it as a manual. No parts of this document may be altered, modified or used for commercial purposes without the express written consent of snom technology AG. Although due care has been taken in the compilation and presentation of the information in this document, the data upon which it is based may have changed in the meantime. snom therefore disclaims all warranties and liability for the accurateness, completeness, and currentness of the information published, except in the case of intention or gross negligence on the part of snom or where liability arises due to binding legal provisions. Our firmware includes some source code that may be used and modified by anyone and everyone under the GNU Public License (GPL), provided they, in turn, make it available to everyone else with the same licensing agreement. Please go to http://www.snom.com/en/support/download/gpl-quellcode/ for the original GPL license and the source code of components licensed under GPL and used in snom products. snom technology AG © 2009 snom technology AG All Rights Reserved. © 2009 snom technology AG 3 man_snomMeetingPoint_v101_en VoIPon www.voipon.co.uk [email protected] Tel: +44 (0)1245 808195 Fax: +44 (0)1245 808299 snom MeetingPoint User Manual Important Information Important Information Please read the instructions on phone safety and disposal and on how to set up and use the phone before using the device and also give them to other users to read or inform those users of their contents. Save this manual and do not give the phone to third parties without it. Safety Instructions Follow the instructions in this manual and other applicable documentation of the phone. Use only the power adapter delivered with the phone. Other power adapters may damage or even destroy the phone. Avoid placing the phone’s power cable where people may trip over it. Avoid placing the phone’s power cable where it may be exposed to mechanical pressure as this may damage the cable. If the power supply cord or the plug is damaged, disconnect the phone and contact qualified service personnel. This device is for indoor use only! Do not install the phone in rooms with high humidity (for example, in bathrooms, laundry rooms, damp basements). Do not immerse the phone in water and do not spill or pour liquids of any kind onto or into the phone. Do not install the phone in surroundings at risk for explosions (paint shops, for example). Do not use the phone if you smell gas or other potentially explosive fumes. Do not use the phone during thunderstorms. Lightning striking the power grid may cause electric shocks. © 2009 snom technology AG 4 man_snomMeetingPoint_v101_en VoIPon www.voipon.co.uk [email protected] Tel: +44 (0)1245 808195 Fax: +44 (0)1245 808299 snom MeetingPoint User Manual Important Information This phone is CE and FCC-certified and meets European and US health, safety, and environmental standards. Unauthorized opening, changing, or modifying the phone will cause the warranty to lapse and may also result in the lapse of the CE and FCC certifications. In case of malfunction contact authorized service personnel, your seller, or snom. Disposal of the Phone This phone is subject to European Directive 2002/96/EC and may not be disposed of with general household garbage. The separate collection and proper disposal of electrical and electronic devices serve to protect human health and the environment as well as to use and reuse resources prudently and rationally. If you do not know where you may dispose of the device at the end of its lifespan, contact your municipality, your local waste management provider, or your seller. © 2009 snom technology AG 5 man_snomMeetingPoint_v101_en VoIPon www.voipon.co.uk [email protected] Tel: +44 (0)1245 808195 Fax: +44 (0)1245 808299 Notational conventions snom MeetingPoint User Manual Notational conventions Throughout this manual, you will see notations like the following: 1. > 1 Preferences > 1 Language > > > 2. Web interface > Advanced > Behavior > Phone Behavior > Number Guessing > The character > indicates the next step in a sequence of actions to change a setting or perform a function. Example 1 means that you should press the specified keys on the phone: Press the Menu key to open the main menu > 1 Preferences on the alphanumeric keyNext, press the key labelled pad to open the "Preferences" sub-menu > 1 Language Next, press the key labelled sub-menu > Next, press one of the function keys underneath the arrows to move down or up the list of available languages > > to show the "Languages" Next, press the confirm key to save a newly selected language Next, press the function key underneath ESC to return to the idle screen Example 2 means that you should open the phone's web interface and click on the specified items: Web interface Open the phone‘s web interface (see "The Phone’s Web Interface" on page 20 on how to do it) > Advanced Click on the item "Advanced" in the menu on the left side of the window > Behavior Next, click on the tab labelled "Behavior". The bold lettering of the title on a tab indicates that its contents are currently visible. > Phone Behavior Find the section titeled "Phone Behavior" > Number Guessing Find the item "Number Guessing" > © 2009 snom technology AG Click on the radio button "on" 6 man_snomMeetingPoint_v101_en VoIPon www.voipon.co.uk [email protected] Tel: +44 (0)1245 808195 Fax: +44 (0)1245 808299 snom MeetingPoint User Manual Setting up the Setting up the Phone Phone Delivery Content Please check whether the package contains the following parts: 1. Conference phone 2. Ethernet cable 3. Power supply 14 V DC with EU/US connector PLEASE NOTE: Using the wrong power supply may cause damage to the phone. Use only the power supply included with the phone. 4. Quick Start Guide Phone Installation and initialization snom phones are plug-and-play. Once you have connected the hardware and entered the data required by your provider, you are good to go. In most cases your phone will register and initialize automatically. Prerequisites To be able to use VoIP you or your company need to have: 1. A broadband internet connection. 2. Access to the internet via a router. This could be a separate device available in various versions from many different manufacturers or in the form of a router on a server or a PC. 3. Account information provided by your network administrator or a VoiP account with a VoIP provider who supports the VoIP SIP standard. With your snom MeetingPoint you can use up to 12 VoIP accounts with one or more VoIP providers. You need to obtain your access number (“phone number") and the necessary access data to register your phone and make phone calls; the requirements differ from provider to provider. They may include: a. A user name, if required; b. Your login name; c. The address of the server (registrar); d. Provider-specific settings, if required. © 2009 snom technology AG 7 man_snomMeetingPoint_v101_en VoIPon www.voipon.co.uk [email protected] Tel: +44 (0)1245 808195 Fax: +44 (0)1245 808299 Setting up the Phone snom MeetingPoint User Manual Installation Connect the phone to your network or your router and, if you are not using PoE (Power over Ethernet), to a wall outlet. Network cable port SD memory card port Expansion microphone port AUX port Security lock port Power supply port Expansion microphone port Initialization 1. The phone begins the initialization and registration process. 2. 3. 4. 5. Do not touch any keys while registration and initialization are taking place. The process usually takes a couple of minutes. You will be prompted in English to select a language. Next, you will be prompted in the language of your choice to select a timezone. Timezones shown depend on the language you have chosen; you can collapse and expand the list for quicker access. Next, you will be prompted to enter an account, normally the login name you received from your provider, and the registrar - see "Phone Installation and initialization" on page 7. To enter the period (.), change the input mode (see "Entering Letters, Numerals, and Special Characters" on page 13) to small or capital letters and press once. To enter the @ sign, change to letter mode and press three times. Your phone was successfully registered if the display shows a black phone symbol with the account (phone number) you entered. © 2009 snom technology AG 8 man_snomMeetingPoint_v101_en VoIPon www.voipon.co.uk [email protected] Tel: +44 (0)1245 808195 Fax: +44 (0)1245 808299 snom MeetingPoint User Manual Setting up the Phone 6. Don’t worry if time and date are wrong. See "Correcting the Clock" on page 9 on how to change them. 7. If you see the phone symbol and the account on the display but they are not highlighted and the phone does not work, the server may be down, either for servicing or due to a malfunction. The registration and initialization should be completed as soon as the server is up and running again. You may want to check with your administrator or your provider if nothing happens within a reasonable time. What to do if registration and initialization are unsuccessful Contact your network system administrator if the phone is operating or supposed to be operating within a network. If you are using a VoIP provider you may need to enter further data, as specified by your provider. Open the phone’s web interface - see "The Phone’s Web Interface" on page 20. Open Configuration Identity 1 and enter any additional login information you have received from your provider - see "Configuring New Identity/Account" on page 39. A number of IP telephony service providers and a number of SIP PBXs require settings that are different from snom’s standard factory settings. snom’s web page lists numerous providers and PBXs that have been tested for interoperability with our phones and specific settings that may be required. Do not change the standard configuration unless you know what you are doing. Expert help may be required. If your IP telephone system does not support automatic initialization, contact your administrator or see our web page www.snom.com/Wiki for manual phone initialization. Correcting the Clock If the time on the display is incorrect, you may need to set the correct timezone. 1. Changing the settings on the phone: See "Time Zone" on page 42. 2. Changing the settings on the phone‘s web interface: See "Time Zone" on page 42. If the time is still incorrect, there may be a problem with the time server. Contact your Administrator. © 2009 snom technology AG 9 man_snomMeetingPoint_v101_en VoIPon www.voipon.co.uk [email protected] Tel: +44 (0)1245 808195 Fax: +44 (0)1245 808299 Getting to Know Your Phone snom MeetingPoint User Manual Getting to Know Your Phone This manual describes the functions of the phone with the standard factory settings. If your phone was installed and/or set up by someone else, the standard settings may have been changed. Please check with that person or company if the phone does not react as described in this manual. Hardware Components Display screen Speaker Microphone Keypad LEDs Blue, slowly blinking Steady blue light Steady red light Incoming call Call in progress, missed call Mute, microphone turned off NOTE: Replace the Konftel logo, with this snom logo. Same silver, metallic looking colour. Keypad Function keys Activate function Context navigation Context navigation Answer incoming call Dial / Redial Hang up/end line End conference Menu key: Settings, call fwd, system info, user/ admin mode, reboot Mute Increase volume Start conference Decrease volume Alphanumerical keypad Start/end/back recording NOTE: © 2009 snom technology AG Print Color “on hook ”, „REC“ : Pantone 179 M 10 man_snomMeetingPoint_v101_en VoIPon www.voipon.co.uk [email protected] Tel: +44 (0)1245 808195 Fax: +44 (0)1245 808299 Getting to Know Your Phone snom MeetingPoint User Manual Context-sensitive function keys The current context-sensitive function of the key is indicated by a symbol in the function key line directly above the key. For the list of symbols, see "Symbols of the Function Key Line" on page 18. Context navigation keys Press to go up and down on-screen menus or lists Press to page through screens or to move left and right in function key line Green Handset key 1. When a call is coming in: Press once to accept. 2. When the phone is idle: Press twice to redial last number dialled. 3. When the phone is idle: Press screen. Select a number with 4. In some contexts, press settings. to call last 100 numbers dialled onand press to dial. to make selections or save changes to Red Handset key 1. Press to terminate the ongoing call. 2. Press to terminate the ongoing conference. 3. When changing settings: Press to break off and return to previous screen. Volume Keys Press to increase the volume, press to lower the volume: 1. of the ringer while phone is idle or ringing. 2. of the speaker/microphone while in a call. Mute Key • In a call press • In idle mode press © 2009 snom technology AG to turn the microphone on and off. to turn DND mode on and off. 11 man_snomMeetingPoint_v101_en VoIPon www.voipon.co.uk [email protected] Tel: +44 (0)1245 808195 Fax: +44 (0)1245 808299 snom MeetingPoint User Manual Getting to Know Your Phone Conference key With several calls on hold, press key to start the conference. See page 33 on how to set up and manage conferences. Record key Press key to record onto SD memory card. Press key again to end recording. Alphanumeric keypad See "Alphanumeric keypad" on page 13. Display Layout Status line Information line Function key line Currently selected identity for outgoing calls Active identity. Can be called, can be selected for outgoing calls £ Inactive identity. Cannot be called or selected for outgoing calls Message waiting on mailbox + phone number of mailbox. Select with . Mailbox currently selected Information line The date is shown on the right side. A text message on the left side indicates: © 2009 snom technology AG 12 man_snomMeetingPoint_v101_en VoIPon www.voipon.co.uk [email protected] Tel: +44 (0)1245 808195 Fax: +44 (0)1245 808299 Getting to Know Your Phone snom MeetingPoint User Manual Missed: 1 New missed call(s) + and their total number CFwd: 153 Call forwarding is on + phone number incoming calls will be forwarded to 1 new 0 old message Message(s) waiting on mailbox + the total number of new and old messages DND (do not disturb) mode is activated Function key line: The current context-sensitive function of the key is indicated by a symbol in the function key line directly above the key. For the list of symbols, see "Symbols of the Function Key Line" on page 18. Alphanumeric keypad Press any key on the alphanumeric keypad to open the edit screen. The current input mode is indicated by the symbol 123, abc, or ABC in the information line of the display. Press the function key underneath the symbol in the function key line to change it. • 123 in information line, in function key line: Current input mode is numbers; press function key to change to small letter mode. • abc in information line, in function key line: Current input mode is small letters; press function key to change to capital letter mode. • ABC in information line, in function key line: Current input mode is capital letters; press function key to change to number mode. Entering Letters, Numerals, and Special Characters Switch to appropriate input mode, if necessary. When in letter mode, press each respective key one to four times quickly to type the first through fourth letter printed on the key. • To enter the period (.), use letter modes upper or lower case and press . • To enter a space (V), use letter modes upper or lower case and press once. • To enter a hyphen (-), use letter modes upper or lower case and press twice. © 2009 snom technology AG 13 man_snomMeetingPoint_v101_en VoIPon www.voipon.co.uk [email protected] Tel: +44 (0)1245 808195 Fax: +44 (0)1245 808299 Getting to Know Your Phone snom MeetingPoint User Manual To enter the special characters listed in the following table, use input modes quickly as many times as indicated. upper or lower case and press 1x . 2x + 3x @ 4x 1 5x : 6x , 7x ? 8x ! 9x - 10x _ 11x / 12x ( 13x ) 14x ; 15x & 16x % 17x * 18x # 19x < 20x = 21x > 22x $ 23x [ 24x ] © 2009 snom technology AG 14 man_snomMeetingPoint_v101_en VoIPon www.voipon.co.uk [email protected] Tel: +44 (0)1245 808195 Fax: +44 (0)1245 808299 Getting to Know Your Phone snom MeetingPoint User Manual The Phone Menus Menu Key Press to open the top-level menu on the display. Press an item‘s number on the alphanumeric keypad to open the lower-level menu. Alternative: Use to go to desired item and press or . 1 Preferences 2 Call Features 3 Identity 4 Network 5 (4) Maintenance 1 Language 1 Call Forward 1 Outgoing Identity 1 IP Setting 1 System Info 2 Timezone 1 Forward all 2 Reregister 2 Webserver 2 User/Admin Mode 3 Tone Scheme 2 Forward on busy 3 Edit 1 Webserver Type 3 Reboot 4 Contrast 3 Fwd after timeout 4 Logoff 2 HTTP Admin Server 4 Reset Values 5 Backlight 2 Outgoing Calls 5 Logoff all HTTP Password 6 Ringer 1 Auto Dial 3 VLAN 7 Equalizer 2 Number Guessing 1 VLAN ID (0-4095) 3 Call Completion 2 VLAN Priority (0-7) 4 Hide own ID 3 Reset VLAN 3 Incoming Calls 1 Call Waiting 2 Reject anonymous 3 Auto Answer Indic. 4 Auto Answer Type © 2009 snom technology AG 3 The network menu cannot be accessed when the phone is running in user mode; the maintenance menu will move to no. 4 on the top-level menu. For more information on user/administrator mode, see page 22. 15 man_snomMeetingPoint_v101_en VoIPon www.voipon.co.uk [email protected] Tel: +44 (0)1245 808195 Fax: +44 (0)1245 808299 Getting to Know Your Phone snom MeetingPoint User Manual Example: Changing the setting for "call waiting“ Using function keys The faster method: Using keypad numbers Press The display shows this screen: Press The display shows this screen: Press The display shows this screen: Press The display shows this screen: Press The display shows this screen: Press The display shows this screen: Keep current setting: Press to break off changing the setting Press to return to idle screen Change setting: Press Press Press © 2009 snom technology AG or to select to save new setting, to return to idle screen 16 man_snomMeetingPoint_v101_en VoIPon www.voipon.co.uk [email protected] Tel: +44 (0)1245 808195 Fax: +44 (0)1245 808299 Getting to Know Your Phone snom MeetingPoint User Manual Function Key Line Factory default, idle screen: Conference Menu From idle screen pressing opens the conference menu. When in call or in conference pressing this key puts the call or conference on hold and opens the conference menu. Press a number key to open function or submenu. 1 Dial a number Opens the screen for dialing input 2 Call lists Opens phone‘s call lists 3 Ext. AddrBook Initiates a directory search in external data banks (OCS Edition, LDAP) if available in your network. Please talk to your administrator. 4 Int. AddrBook Opens the phone‘s internal directory - see page 23 5 Contact List Opens list of your contacts if available in your network. Please talk to your administrator. Call Lists Press function key dialled calls). Missed Press Received Press Dialled Press With a call selected: © 2009 snom technology AG to open the call list menu (missed, received, and to open the list of missed calls. Select a call: Press . Show call details: Page through details: Details: From To Time Missed (total to open the respective list. Select a call: Press . Show call details: Page through details: Details: From To Time Duration Costs Press no.) to dial. 17 man_snomMeetingPoint_v101_en VoIPon www.voipon.co.uk [email protected] Tel: +44 (0)1245 808195 Fax: +44 (0)1245 808299 Getting to Know Your Phone snom MeetingPoint User Manual With call details on screen: Press Press Press and to dial to save number to directory to delete this call DND (do not disturb) Press to turn on "Do not disturb" mode. The information line shows: All incoming calls will be forwarded to the number set in call forwarding (see "Call Forwarding" on page 36) or receive a busy signal if there is no setting for call forwarding. Press again to turn off DND mode. Symbols of the Function Key Line Different symbols will appear in the function key line, depending on the phone's current status (idle, incoming call ringing, in call, etc.). Press the function key underneath the symbol to perform the action or to open the menu or list it represents. Context navigation symbols On idle screen: Select outgoing identity In other contexts: Go up and down menus and lists Settings: Decrease/increase (volume, for example) Selections: Go back/forward (between yes and no, for example) Function key symbols On idle screen: Open conference menu with directories and call lists When in call: Place current call on hold When in conference: Put conference on hold Call lists (missed, received, dialled calls) Turn "do not disturb“ mode on and off Opens call lists Opens phone‘s directory © 2009 snom technology AG 18 man_snomMeetingPoint_v101_en VoIPon www.voipon.co.uk [email protected] Tel: +44 (0)1245 808195 Fax: +44 (0)1245 808299 snom MeetingPoint User Manual Getting to Know Your Phone Opens external directory when available Press to change input mode to capital letters Press to change input mode numbers Press change input mode to small letters Open selected (marked) menu item Return to previous display Add phone number to directory Delete character to the left of the cursor Reject incoming call. The caller hears the busy signal. Reject incoming call and place phone number on Deny list. Transfer call Retrieve new message from mailbox Edit phone book and call list entries Deletes entire currently open list Show call details Page through call details Return to idle screen Turn on call completion for this call when called number busy Adjust volume Add phone number of on-screen call to phone book Delete on-screen call from call list Terminate connection to marked conference participant Split marked participant from conference for one-on-one conversation Reduce list of timezones to entries relevant to phone language Expand list of timezones to show all entries © 2009 snom technology AG 19 man_snomMeetingPoint_v101_en VoIPon www.voipon.co.uk [email protected] Tel: +44 (0)1245 808195 Fax: +44 (0)1245 808299 snom MeetingPoint User Manual Getting to Know Your Phone The Phone’s Web Interface Press > 5 Maintenance > 1 System Info to look up the phone‘s IP address. Open the web browser of your PC and type http:// followed by the IP address, for example http://192.168.9.14. The web interface will open with the Security page which is shown only when the web interface is opened for the first time upon initialization or after reboot or a resetting of values: We urge you to set administrator and HTTP passwords. The default administrator password is 0000 (4 zeros); there is no default HTTP password. If you set your own passwords, be sure to write them down and store them in a secure place. If you do not wish to set an HTTP password, you can turn off the reminder on the phone’s display until the next reboot or forever by clicking on the appropriate button. If you change your mind later, you can set the password on the phone’s web interface, "Advanced"page > "QoS Security" tab > "HTTP Server" (see "Notational conventions" on page 6) or turn off the warning later > at Advanced > QoS Security > Security > Ignore security advices . © 2009 snom technology AG 20 man_snomMeetingPoint_v101_en VoIPon www.voipon.co.uk [email protected] Tel: +44 (0)1245 808195 Fax: +44 (0)1245 808299 snom MeetingPoint User Manual Getting to Know Your Phone How the Web Interface Works The vertical menu on the left side of the window is always the same, no matter which window happens to be open at the time. Available menu items depend on whether the phone is running in user or administrator mode. Click on a menu item to open that page. Some pages contain several documents. To make a document visible, click on its tab. The font weight of the characters on the active tab is bold. Only one tab can be active at a time. Web Settings Overriding Manual Phone Settings In some cases settings activated on the web interface override manual settings on the phone. If a setting you have made on the phone does not appear to take effect, look for a conflicting setting on the web interface. before clicking on a different menu item or Always click on closing the web interface if you wish to save the changes you have made. © 2009 snom technology AG 21 man_snomMeetingPoint_v101_en VoIPon www.voipon.co.uk [email protected] Tel: +44 (0)1245 808195 Fax: +44 (0)1245 808299 snom MeetingPoint User Manual Getting to Know Your Phone User Mode/Administrator Mode Some windows, like Preferences shown here, are available in user mode while many are not. The menu item Advanced is available but the settings normally found on it are not. To return the phone and its web interface to administrator mode, enter the administrator password in Administrator Login and click on Save. The default password is 0000 (4 x zero). © 2009 snom technology AG 22 man_snomMeetingPoint_v101_en VoIPon www.voipon.co.uk [email protected] Tel: +44 (0)1245 808195 Fax: +44 (0)1245 808299 snom MeetingPoint User Manual Directories Directories Phone Directory (internal phone book) The phone directory can hold 250 entries consisting of name and phone numbers. Entries can be added and edited on the phone and on the web interface. In addition to adding and editing entries, the web interface allows you to assign a contact type and an identity for outgoing calls to each entry. Any changes you make on the web interface will not take effect until you click on Save. Changes will be lost if you open another page of the web interface without first clicking on Save. Nickname The name entered in this text field is the name used in the "Name“ field of the phone book and the name under which the phone book entry will be stored. It is shown on your phone‘s display when you are calling the associated phone number. Contact Types • • VIP: Calls from numbers with this contact type will ring on your phone even when DND mode is active. You can assign a ringtone to this contact type as well. If your VIP is also assigned to a group (see below) and if that group also has a ringtone, the ringtone assigned to that group will be played. Deny List: Calls from phone numbers with this contact type will not ring on your phone. The caller hears the "Busy" signal. Identity for Outgoing Calls When an identity, with a specific VoIP provider, for example, is to be used for calls to certain phone numbers. You must dial the number from the directory, however. If you simply type it on the keypad, the current outgoing identity, as indicated on the display, will be used. Group Friends, Family, Colleagues: You can assign a distinct ringtone to each group. © 2009 snom technology AG 23 man_snomMeetingPoint_v101_en VoIPon www.voipon.co.uk [email protected] Tel: +44 (0)1245 808195 Fax: +44 (0)1245 808299 Directories snom MeetingPoint User Manual Assign Ringtones The phone has 10 built-in ringtones. It is also possible to download a custom melody. Playing ringtones back. On the phone: > 1 Preferences > 6 Ringer. The identities are shown on the display. Select one and press . The list of ringtones is shown. The tone currently set for the identity is at the top of the list and is played immediately. Press or to play other tones. Press twice and once to return to the idle screen. On the web interface (the ringtones will be played by the phone): Configuration Identity (1-12) > Login. Select a ringer from 1 to 10 in the drop-down menu of Ringtone and click on Play Ringer. Assigning ringtones to groups and/or contact type VIP: Preferences > Directory Ringtones. Select a ringtone from the respective drop-down menu. Click on . Adding/Editing Entries on the Phone Adding new entry. Press > 4 Int. AddrBook > Type name > Press > Type number > Press . editing existing entry Press Press > 4 Int. AddrBook. Move cursor to desired entry with . Delete letter to left of cursor with © 2009 snom technology AG > Make changes > Press . to save. 24 man_snomMeetingPoint_v101_en VoIPon www.voipon.co.uk [email protected] Tel: +44 (0)1245 808195 Fax: +44 (0)1245 808299 Directories snom MeetingPoint User Manual Adding number from call lists. Opening call list (missed/received/dialled calls), selecting call, showing call details: See "Call Lists" on page 17. Press the name. > Press to put the number in the directory. Edit entry to add Adding/Editing Entry on Web Interface Click on Directory in Menu on the left side. Adding/Editing. If editing, click on in entry’s line. Current information will be displayed in the text fields of Add or Edit Entry. Make changes as necessary. If new entry, type data in text fields of "Add or Edit Entry“. • If you wish to assign a contact type, select one from the drop-down list. The default setting is None. • You can assign distinct ringtones to the groups "Friends“, "Family“, "Colleagues“, and to the contact type "VIP“. • Calls from entries on the VIP list will always ring on the phone, even when the phone is in a call or in DND mode. • Calls from entries on the Deny list will not ring on the phone and always receive a busy signal. • Outgoing identity. The drop-down list shows all identities configured on the phone. If you select one of the identities for one of the numbers listed in the phone book, all calls to that number initiated from the phone book will show that identity on the callee’s phone. Click on . Delete whole directory Deletes entire directory irretrievably! Import/Export Directory See our Wiki at http://wiki.snom.com/Web_Interface/V7/Directory. © 2009 snom technology AG 25 man_snomMeetingPoint_v101_en VoIPon www.voipon.co.uk [email protected] Tel: +44 (0)1245 808195 Fax: +44 (0)1245 808299 Directories snom MeetingPoint User Manual External directories Provided by your network, your VoIP provider, or another external source. LDAP Enter the necessary data obtaintained from your administrator, VoIP provider or other external source in the text fields of the phone‘s web interface > Advanced > Network > LDAP. When available, press > 3 Ext. AddrBook to open. Enter first letter of name you are searching for. Typo? Press to delete character to the left of cursor. Type more letters if name shown isn‘t the right one, or press . Contacts Provided by your network, your VoIP provider, or another external source. Enter the contact list‘s URI in the text field of the phone‘s web interface > Configuration Identity # > SIP tab > Contact list URI. When available, press Selecting a contact: © 2009 snom technology AG > 5 Contacts to open. . 26 man_snomMeetingPoint_v101_en VoIPon www.voipon.co.uk [email protected] Tel: +44 (0)1245 808195 Fax: +44 (0)1245 808299 snom MeetingPoint User Manual Using Using the Phone Phone the This section describes the functions of the phone with the standard factory settings. If your phone was installed and/or set up by someone else, the standard settings may have been changed. Please check with that person or company if the phone does not react as described here. The caller information displayed on the screen is controlled by the setting on the phone‘s web interface > Preferences > General Information > Number Display Style > drop-down list. The default setting is "Name". Making Calls See "Entering Letters, Numerals, and Special Characters" on page 13 for input modes. See "Display Layout" on page 12 on identities available for outgoing calls. See "Identities/Accounts" on page 39 on how to configure identities. If more than one identity is shown on the display, the one with the black one is the outgoing identity for the call and the number/name that will show on the callee’s phone. Select a different identity with the up or down arrows. Note: See "Adding/Editing Entry on Web Interface" on page 25 on how to assign a fixed outgoing identity to calls being made to a certain number. The outgoing number will only be used automatically when the call is initiated from the phone book! Selecting Identity for Current Outgoing Call Use to select a different identity, if necessary. Using Auto Dial A timespan in seconds must be selected from the drop-down menu of Advanced > Behavior > Phone Behavior > Auto Dial. The phone will dial the number on the display when the specified number of seconds has passed. © 2009 snom technology AG 27 man_snomMeetingPoint_v101_en VoIPon www.voipon.co.uk [email protected] Tel: +44 (0)1245 808195 Fax: +44 (0)1245 808299 Using the Phone snom MeetingPoint User Manual Calling Number from Call List Press LIST and the down arrow, if necessary, to select missed, received, or dialled calls. Use the down arrow, if necessary, to select a phone number. to dial. Press Calling Number from Directory From Phone Directory Press > 4 Int. AddrBook > > or to dial. > or to dial. From LDAP Directories. Press > 3 Ext. AddrBook > Enter first letter of name you are searching for. Type more letters if name . shown isn‘t the right one, or press If you need to correct an error, use to backspace and space forward; press to delete the character to the left of cursor. Speed Dial See "Speed Dial" on page 46 on setting speed dial numbers. Enter the number (0-30) or the special character (#, *) assigned to a phone number and press . Emergency Numbers Can be dialled even when the keyboard is locked! See "Emergency Numbers" . on page 43 on how to set them. Enter the number and press Call Completion Depends on availability in your network. On snom phones call completion means that when a called number is busy, the phone will call you back as soon as the dialled number is no longer busy. The factory default setting is "off". © 2009 snom technology AG 28 man_snomMeetingPoint_v101_en VoIPon www.voipon.co.uk [email protected] Tel: +44 (0)1245 808195 Fax: +44 (0)1245 808299 Using the Phone snom MeetingPoint User Manual Changing the setting to turn it on: • • Press Press > 2 Call Features > 2 Outgoing Calls > 3 Call Completion. or to show "On" on display. • Press to save setting and to return to idle screen. Now, whenever a dialled number is busy, line. will appear in the function key Press to activate call completion. Press to return to idle screen without activating call completion. If you have activated call completion for this call: Press to end call completion for this call. Press to return to the idle screen, keeping call completion active for this call. You can now make other calls. When the number called is no longer busy, your phone will beep (three short beeps) and ask whether to dial or not. Redial From the idle screen: to show the last 100 dialled numbers on the display. Press Press to move up and down the list. © 2009 snom technology AG 29 man_snomMeetingPoint_v101_en VoIPon www.voipon.co.uk [email protected] Tel: +44 (0)1245 808195 Fax: +44 (0)1245 808299 Using the Phone snom MeetingPoint User Manual Show details of marked call: To From Costs To Time Duration Caution: Pressing this key will delete entire list of calls or Dial on-screen number Add number to phone‘s directory Delete this call Move function key line to the left/right Number Guessing (Auto Completion) To set this function, see "Number Guessing" on page 46 . When you dial and have typed the minimum number of digits, the phone offers numbers containing the typed string from its call lists and from the directory for selection. Example: The setting is 4 digits; when you have typed four digits the phone offers the first number containing that string, if any. Backspace Delete character to the left of the cursor Dial offered number Edit offered name and number Change input mode to small/capital letters/numbers Accepting Calls When a call is ringing, press © 2009 snom technology AG to accept it: 30 man_snomMeetingPoint_v101_en VoIPon www.voipon.co.uk [email protected] Tel: +44 (0)1245 808195 Fax: +44 (0)1245 808299 Using the Phone snom MeetingPoint User Manual Missed Calls Missed calls are indicated by the three call indication LEDs glowing blue and by the text message "Missed" followed by the number of missed calls in the information line. Press to turn both indicators off. Active Calls Mute/unmute and volume control: See "Mute Key" on page 11 and "Volume Keys" on page 11. Hold Press to put current call on hold. Press to get caller back on the line. Attended and Blind Transfer When you have a call on the line, there are two ways to transfer the call to a third party. Attended Transfer. Press to put call on hold Press to get the dial screen Type the number you wish to transfer the call to. Press to dial Announce the call. If the party wishes to accept the call Press Press © 2009 snom technology AG 31 man_snomMeetingPoint_v101_en VoIPon www.voipon.co.uk [email protected] Tel: +44 (0)1245 808195 Fax: +44 (0)1245 808299 Using the Phone snom MeetingPoint User Manual Blind Transfer Press to get dial screen Type the number you wish to transfer the call to to dial number and transfer call Press Call Waiting When you are in a call or in a conference, another call coming in will be announced visually by the phone number of the calling phone in the information line. Incoming call during conference: See page 35. Reject the call: Press The caller hears the "busy“ signal Transfer the call (blind transfer): Press You remain in the first call Dial the number you wish to transfer the second call to Press Accept the call: Press to accept the second call. The first call is put on hold Press to initiate call transfer, enter the target phone number, and press . The second call rings on the target phone. Press to get the first call back on the line Terminating Calls Press . © 2009 snom technology AG 32 man_snomMeetingPoint_v101_en VoIPon www.voipon.co.uk [email protected] Tel: +44 (0)1245 808195 Fax: +44 (0)1245 808299 snom MeetingPoint User Manual Using the Phone Conference It is possible to hold phone conferences with up to four other phones plus your phone. Turn ringer off: Press > Preferences > Ringer > Select line with > Select ringer "Silence“ with > Press > Press Press return to Preference menu > Press to return to idle screen > to Establishing a conference Call first participant Press to put the call on hold and to open the menu "Add to conference“ Call second participant: Press and type phone number OR press and select phone number from one of the call lists OR press and select phone number from an external directory OR press and select phone number from the phone directory OR press and select phone number from your list of contacts Press to dial. When connected press to place second participant on hold. Repeat to add third and fourth participant Press to start conference OR Put conference on hold Press All participants are on hold Press to return to conference © 2009 snom technology AG 33 man_snomMeetingPoint_v101_en VoIPon www.voipon.co.uk [email protected] Tel: +44 (0)1245 808195 Fax: +44 (0)1245 808299 snom MeetingPoint User Manual Using the Phone Adding participant(s) to ongoing conference Press to put the conference on hold and to open the menu "Add to conference“. Call new participant: Press and type phone number OR press and select phone number from one of the call OR lists press and select phone number from an external directory OR press and select phone number from the phone directory OR press and select phone number from your list of contacts Press to dial. When connected press to put new participant on hold and call another participant Press to return all participants to conference OR Talking to participant one-on-one Press to select one of the participants Press to talk to marked participant alone and put the other conference participants on hold Press to return all participants to conference Terminating connection with one participant Press to select one of the participants Press to cut the connection to this participant © 2009 snom technology AG 34 man_snomMeetingPoint_v101_en VoIPon www.voipon.co.uk [email protected] Tel: +44 (0)1245 808195 Fax: +44 (0)1245 808299 Using the Phone snom MeetingPoint User Manual Incoming call during conference You can: 1. Reject the call. Press 2. Transfer the call. Press . call to > Press . The caller hears the “busy" signal. > Dial the number you wish to transfer the 3. Accept the call. Press to put conference on hold and accept the call. You can then: a. press to unhold the conference and add the caller to it; OR b. press to end the call, press to unhold the conference. End conference Press Display prompt: Press to terminate the conference press to continue the conference OR Rejecting or Redirecting Incoming Calls This includes manual and automatic rejection and redirection and rejection of anonymous calls. Manually If you do not wish to pick up a ringing call, you can obviously let it ring, or reject or blindly transfer it: Reject Press © 2009 snom technology AG The caller hears the "busy“ signal 35 man_snomMeetingPoint_v101_en VoIPon www.voipon.co.uk [email protected] Tel: +44 (0)1245 808195 Fax: +44 (0)1245 808299 Using the Phone snom MeetingPoint User Manual Press The caller hears the busy signal and the number will be placed on the Deny list so that incoming calls from that number will always be rejected. This function is available only if set beforehand on the phone’s web interface, Advanced > Behavior >. Phone Behavior > Deny All Feature: "on" Redirect (blind transfer) Press > Dial the number you wish to transfer the call to > Press The incoming call will start to ring on the other phone. > Automatically These are your options when you want to have incoming calls rejected or forwarded automatically: • Deny List. See "Contact Types" on page 23. • DND (do not disturb mode). All incoming calls will be forwarded to the number set in call forwarding or receive a busy signal if there is no setting for call forwarding. Press • to activate, press again to turn DND off. Call Forwarding. See page 44. Reject anonymous calls Please note that calls from analog phone connections without caller ID will, most likely, be received as anonymous calls and rejected if you turn this function on. or > 2 Call Features > 3 Incoming Calls > 2 Reject anonymous > Press to show "On" on display > Press > Press . Call Forwarding Forward All: Forwarding all incoming calls to the number of the phone, extension, or mailbox specified as this function’s target. Forward when Busy: Calls ringing while phone is busy are forwarded to the number of the phone, extension, or mailbox specified as this function’s target. Forward after Timeout: When a call starts ringing, the phone will wait for © 2009 snom technology AG 36 man_snomMeetingPoint_v101_en VoIPon www.voipon.co.uk [email protected] Tel: +44 (0)1245 808195 Fax: +44 (0)1245 808299 Using the Phone snom MeetingPoint User Manual the number of seconds specified. If the call is not accepted by the end of this time period, it is forwarded to the number of the phone, extension, or mailbox specified as this function’s target. Making/changing settings on the phone Setting phone numbers incoming calls will be forwarded to: Forward all Forward when busy Forward after timeout Call Features Call Features Call Features Call Forwarding Call Forwarding Call Forwarding Forward all Forward when busy Forward after timeout Press Target when forwarding Target when forwarding Target when forwarding Type phone number phone number phone number Press Press Press Press Press Call forwarding time Type Press Press number of seconds to save new/changed setting(s), press to return to idle screen or press turn on call forwarding. to abort Enable Forwarding to Turning on call forwarding from the idle screen. If the phone number has not been set or needs to be changed, follow the instructions above and continue with step 6 below grayshaded area. Forward all Forward when busy Forward after timeout Press © 2009 snom technology AG 37 man_snomMeetingPoint_v101_en VoIPon www.voipon.co.uk [email protected] Tel: +44 (0)1245 808195 Fax: +44 (0)1245 808299 Using the Phone snom MeetingPoint User Manual Press Call Features Call Features Call Features Call Forwarding Call Forwarding Call Forwarding Forward all Forward when busy Forward after timeout Enable Forwarding Enable Forwarding Enable Forwarding Press Press Press Press Press Press to select "Yes' to select "Yes" to save new/changed setting, press to select "Yes" to abort to return to idle screen. The information line now contains "CallFwd“ and the target phone number Turning off call forwarding Forward all Forward when busy Forward after timeout Press Press Call Features Call Features Call Features Press Call Forwarding Call Forwarding Call Forwarding Forward all Forward when busy Forward after timeout Enable Forwarding Enable Forwarding Enable Forwarding Press Press Press Press to select "No" to save, press © 2009 snom technology AG to select "No" to select "No" to abort 38 man_snomMeetingPoint_v101_en VoIPon www.voipon.co.uk [email protected] Tel: +44 (0)1245 808195 Fax: +44 (0)1245 808299 snom MeetingPoint User Manual Customizing Phone Settings Customizing Phone Settings See "The Phone’s Web Interface" on page 20 on how to open the phone’s web interface, how the web interface works and how you change the settings, and what the difference between administrator and user mode is. If you have access to administrator mode, but do not consider yourself to be an expert on SIP and SIP phones, we recommend that you do not change any of the technical settings since this may adversely affect the phone’s performance or put it out of order altogether. If you want more information on a web interface setting, click on the radio button with the question mark that you see to the right of each item. It links to a page on snom’s Wiki with detailed information about that particular item. Any changes you make on the web interface will not take effect until you click . Changes will be lost if you open another page of the web interface on without first clicking on . Identities/Accounts The phone supports up to twelve accounts or "phone numbers" with one or more providers or within an office or organization network. On snom’s phones these accounts or phone numbers are called "identities". If your phone is part of an office network, you may need to contact your administrator to configure new or change existing identities, as this can only be done when the phone is running in administrator mode. See "Phone Installation and initialization" on page 7 for the information on required input data. Configuring New Identity/Account Web interface only! Click on an identity in the menu on the left. The configuration window for that identity will open; it contains four tabs, with the left one, Login, visible in the front. Enter the information received from your provider or your administrator in the appropriate fields. • The display name is optional and freely selectable. It will be sent to any parties you call unless you hide your identity (see "" on page 45). If you do © 2009 snom technology AG 39 man_snomMeetingPoint_v101_en VoIPon www.voipon.co.uk [email protected] Tel: +44 (0)1245 808195 Fax: +44 (0)1245 808299 snom MeetingPoint User Manual • • Customizing Phone Settings not enter a display name, the data in the "Account" text field will be shown on your display and sent to any parties you call unless you hide your identity. Any text you enter in "Display text for idle screen" will be shown - instead of your display name or account - on your display only. It will not be sent to any parties you call. You can choose one of 10 built-in ringtones or a custom melody, or turn off the ringer by selecting "Silence". Select a ringer from the ringtone drop-down list of Login > Ringtone and click on "Play Ringer". The tone will be played by your phone. If you have selected the custom melody, enter the URL to the data file in the text field underneath. It must be a file of the type PCM 8 kHz 16 bit/ sample (linear) mono WAV. Click on "Re-Register" and "Save". Please note: The ringer set for a contact type overrides the ringer for a particular identity; in case of a conflict the phone will use the contact type ringer. If your ringtones don’t seem to work as expected, contact your administrator. There may be an overriding setting on the PBX. Automatic acceptance of incoming calls 1. Setting: Identity # > SIP tab > Auto Answer > 2. Select audio device for automatic acceptance: Preferences > Auto Answer > Type of Answering > pull-down list > Save 3. If you wish to be alerted acoustically whenever the phone accepts a call automatically: Preferences > Auto Answer > Auto Answer Indication Contact List A contact list must be available on a server. Setting: • • • Identity # > SIP tab > Contact List > . Enter URI in text field and click on "Save". Identity # > SIP tab > Contact List URI > Enter URI in text field. Click on "Save" © 2009 snom technology AG 40 man_snomMeetingPoint_v101_en VoIPon www.voipon.co.uk [email protected] Tel: +44 (0)1245 808195 Fax: +44 (0)1245 808299 snom MeetingPoint User Manual Customizing Phone Settings Editing an Existing Identity/Account Can be done on the web interface and on the phone itself. On the web interface. Open the Configuration page of the identity and make the changes in the text fields. See "Configuring New Identity/Account" on page 39. If you have changed the account or the registrar, click on "Re-Register". If you have made other changes, clicking on "Save" suffices. On the phone. > 3 Identity > 3 Edit User > Select identity with > Edit number, if necessary > Press or with necessary > Press or to return to idle screen. > Open edit mode > Edit name, if Language Settings of Phone and Web Interface The language used on the phone can be changed on the phone as well as on the web interface. The language used on the web interface can be changed on the web interface only. Phone Language Setting on the phone. > 1 Preferences > 1 Language > Select language with > Press to save or to return to "Preferences" menu without saving > Press to return to idle screen. Setting on the web interface. Preferences > General Information > Language > Select from drop-down list > Click on Save. Web Interface Language Preferences > General Information > Webinterface language > Select from drop-down list > Save. © 2009 snom technology AG 41 man_snomMeetingPoint_v101_en VoIPon www.voipon.co.uk [email protected] Tel: +44 (0)1245 808195 Fax: +44 (0)1245 808299 snom MeetingPoint User Manual Customizing Phone Settings Dial Tones Different dial tones for different countries! Select yours on the phone or on the web interface. On the Phone > 1 Preferences > 3 Tone Scheme > Select country with > Press to save or to return to Preferences menu without saving > Press to return to idle screen. On the Web Interface Preferences > General Information > Tone Scheme > Select country from drop-down list > Save. Time Zone The list is arranged by the difference in hours (+/-/0) to the UTC and, within each time zone, alphabetically by selected locations. The setting can be changed on the phone and on the web interface (administrator mode only). On the Phone > 1 Preferences > 2 Time Zone > Select location with > press to save or to return to Preferences menu without saving > to return to idle screen. • Press to collapse the open list to show only language-relevant time zones. • Press to expand the open list to show all time zones. On the Web Interface Available in administrator mode only. Advanced > Network tab > Time > Timezone > Select your location in the the drop-down list > Save. © 2009 snom technology AG 42 man_snomMeetingPoint_v101_en VoIPon www.voipon.co.uk [email protected] Tel: +44 (0)1245 808195 Fax: +44 (0)1245 808299 snom MeetingPoint User Manual Customizing Phone Settings Date and time Formats Can be set and changed on the web interface only. Date Preferences > General Information > US Date Format Formats: m/d (example: 5/6 means May 5) mm/dd (example: 10/12 means October 12) Formats: d.m (example: 6.5 means May 5) dd.mm (example: 12.10 means October 12) Time The time setting applies to phones and/or firmware versions with a digital clock only. If the phone has a clock face, changing the setting will not affect it. Web interface > Preferences > General Information > 24 Hour Clock The time on the phone’s display will be shown in 24-hour format, 00:01 to 24:00 The time on the phone’s display will be shown in AM/PM format, 0:01 AM to 12:00 PM. Emergency Numbers These are numbers that can be dialled even when the keyboard is locked. They must be set beforehand on the web interface. • Click on Preferences > Lock Keyboard > Emergency Numbers (space separated). • Enter the emergency numbers in the text field. Type each number without spaces between the digits, separate the individual numbers with one empty space between them. Example: If you want to set the emergency phone number 911 and the phone numbers of your doctor (986543) and a friend (234578), the entry would look this: 911 986543 234578. • Click on © 2009 snom technology AG . 43 man_snomMeetingPoint_v101_en VoIPon www.voipon.co.uk [email protected] Tel: +44 (0)1245 808195 Fax: +44 (0)1245 808299 snom MeetingPoint User Manual Customizing Phone Settings Call Forwarding This feature automatically redirects all or certain incoming calls to another phone or a mailbox. It is possible to configure the settings on the phone and on the web interface. Always. All incoming calls are forwarded to the number of the phone, extension, or mailbox specified as this function’s target. Busy. Calls ringing while phone is busy are forwarded to the number of the phone, extension, or mailbox specified as this function’s target. Timeout. When a call starts ringing, the phone will wait for the number of seconds specified. If the call is not accepted by the end of this time period, it is forwarded to the number of the phone, extension, or mailbox specified as this function’s target. On the Phone See "Making/changing settings on the phone" on page 37 and "Turning on call forwarding" on page 38. On the Webpage If your Internet Telephony provider or your PBX uses codes to turn functions on and off, refer to their manuals for the codes to enter in On Code/Off Code text fields or ask your administrator. Setting forwarding numbers • • • Always (all incoming calls): Preferences > Call Forwarding > Always. . Type number in Target text field. Busy: Preferences > Call Forwarding > Busy. Type number in Target text field. . Timeout: Preferences > Call Forwarding > Timeout. Type number in Target text field; type number of seconds in the Timeout (sec) text field. . Turning call forwarding on Click on the radio-button "on" of the call forwarding event and click on © 2009 snom technology AG . 44 man_snomMeetingPoint_v101_en VoIPon www.voipon.co.uk [email protected] Tel: +44 (0)1245 808195 Fax: +44 (0)1245 808299 snom MeetingPoint User Manual Customizing Phone Settings Call completion See also "Call Completion" on page 28. The factory default setting is "off". Changing the setting to turn it on: On the phone Press > 2 Call Features > 2 Outgoing Calls > 3 Call Completion > Press or to show "On" on display > Press to save setting > Press to return to the idle screen. On the web interface Open the phone's web interface > Advanced > Behavior > Phone Behavior > . Call completion > Ringtones You can choose one of 10 built-in ringtones or a custom melody, or turn off the ringer. • A ringtone can be assigned to an identity so that incoming calls for different identities will be announced by different ringtones. See "Configuring New Identity/Account" on page 39. • A ringtone can also be assigned to contact types so that incoming calls from phone numbers of that type will be announced by the selected ringtone. See "Contact Types" on page 23. • When using a headset, choose whether the ringtone will sound in the headset or on the loudspeaker: Preferences > Ringtone Defaults > Save. Note: The ringer set for a contact type overrides the ringer for a particular identity; in case of a conflict the phone will the contact type ringer. If your ringtones don’t seem to work as expected, contact your administrator. There may be an overriding setting on the PBX. © 2009 snom technology AG 45 man_snomMeetingPoint_v101_en VoIPon www.voipon.co.uk [email protected] Tel: +44 (0)1245 808195 Fax: +44 (0)1245 808299 snom MeetingPoint User Manual Customizing Phone Settings Hide own Identity With this setting your phone number will not be transmitted to any phones you call. Please note that your call may not be accepted if the other phone is set to reject anonymous calls (see next item). Web interface > Preferences > Privacy Settings > Call Line Identification . Presentation (CLIP) > radio button "Hide" > Reject anonymous Calls With this setting you will not receive calls from phones whose number is not shown on your display. Anonymous callers will hear the busy signal. Please note that calls from analog phone connections will, most likely, be received as anonymous calls. Web interface > Preferences > Privacy Settings > Call Line Identification . Restriction (CLIR) > radio button "Reject" > Number Guessing When you have typed the minimum number of characters you have specified for this function, the phone will look for numbers containing that string of characters in its call lists and directories and, if it finds matches, show the number(s) on the display. Advanced > Behavior tab > Phone Behavior. Number Guessing Minimum Length: Type number of digits in text field. Number Guessing: Click on radio button "on". . Speed Dial You can use the numbers from 0 to 30 and the special characters # and * to dial without having to enter the complete phone number. Open the phone’s web interface > Speed Dial. Enter one phone number with any required prefixes in the text field for each respective number or special character. Examples: © 2009 snom technology AG 46 man_snomMeetingPoint_v101_en VoIPon www.voipon.co.uk [email protected] Tel: +44 (0)1245 808195 Fax: +44 (0)1245 808299 Customizing Phone Settings snom MeetingPoint User Manual Speed dial Type of number number Conventional notation Entry in speed dial table 0 Emergency number 911 911 1 Local number 555-1234 5551234 2 Number with area code (916) 555-1234 9165551234 3 Number in foreign country, dialling "00" before phone number required +49 30 398330 004930398330 Do not add a name or other data before or after the number! © 2009 snom technology AG 47 man_snomMeetingPoint_v101_en VoIPon www.voipon.co.uk [email protected] Tel: +44 (0)1245 808195 Fax: +44 (0)1245 808299 Software Update snom MeetingPoint User Manual Software Update Manual Update 1. 2. 3. 4. 5. 6. 7. 8. 9. Open snom’s web page at www.snom.com. Click on Support > Download > Firmware. Click on the phone to be updated. Click on the firmware version currently running on your phone. Click on the firmware version you want to update to. Right-click on the version’s link and copy it. Open the phone’s web interface > Software Update. Paste the link into the text field behind Firmware. Click on "Load". The phone begins to reboot. 10.If the phone asks “Reboot?", press or . Do not disconnect the power while the phone is rebooting! Auto Provisioning See our web page http://wiki.snom.com/Features/Mass_Deployment for information. Open the phone’s web interface > Advanced > Update tab. behind each line and read the Click on the question mark instructions carefully before attempting auto provisioning! © 2009 snom technology AG 48 man_snomMeetingPoint_v101_en VoIPon www.voipon.co.uk [email protected] Tel: +44 (0)1245 808195 Fax: +44 (0)1245 808299 snom MeetingPoint User Manual Troubleshooting Troubleshooting Reboot Required when asked for on display, for example when a setting is changed that requires a reboot to take effect. 1. Press the Menu key. 2. Press 5 Maintenance. 3. Press 3 Reboot. 4. Press . 5. Wait for idle screen to reappear. Hard Reboot NEVER EVER PULL THE POWER PLUG WHILE THE PHONE IS DOWNLOADING FIRMWARE! 1. Pull the power plug of the phone. 2. Reconnect the phone’s power after a few seconds. 3. Wait for idle screen to reappear. Reset to Factory Values Please note that any customized settings will be overwritten. 1. Press the Menu key. 2. Press 5 Maintenance. 3. Press 4 Reset Values. 4. Enter administrator password. 5. Press . 6. See "Initialization" on page 8 to continue. Contact snom Support Open snom’s web page at www.snom.com. Click on the Support tab to open the Support window. Click on the link to the contact form. Complete the contact form and add the required attachments in text format before submitting it. See the following paragraphs on how to prepare and enclose the attachments. © 2009 snom technology AG 49 man_snomMeetingPoint_v101_en VoIPon www.voipon.co.uk [email protected] Tel: +44 (0)1245 808195 Fax: +44 (0)1245 808299 snom MeetingPoint User Manual Troubleshooting System and settings information must always be attached. Creating and enclosing attachments 1. 2. 3. 4. 5. Open the phone’s web interface > Status > System information. Open a text editor, for example, Microsoft’s Windows Editor. Copy the text in the gray field into the text editor. Under Status in menu on left, click on Settings. Copy the text in the main area of the window into the text editor underneath the systems information. 6. Save the file. 7. Click on the Browse button and place the saved file’s path in the text field to the left of it. SIP Trace and PCAP Trace snom Support may need you to do a SIP Trace and/or a PCAP Trace to help them analyze your problem. Performing a SIP Trace 1. Click on SIP Trace under Status in the menu on the left. Click on Clear to clear the page. 2. Recreate the error to be documented in the trace. Click on Reload. 3. See above for creating and attaching a text file to the support form. Performing a PCAP Trace 1. Click on PCAP Trace under Status in the menu on the left. Click on Start to begin recording network traffic. 2. Cick on Stop to end recording. 3. Click on link “here" to open file download window. Save the file. 4. See above for creating and attaching a text file to the support form. 5. Click on Send. Manual Initialization When automatic initialization via DHCP fails, enter the values for netmask, IP gateway, and DNS server manually after each prompt on the display. © 2009 snom technology AG 50 man_snomMeetingPoint_v101_en VoIPon www.voipon.co.uk [email protected] Tel: +44 (0)1245 808195 Fax: +44 (0)1245 808299 Standard Conformance Name and address of manufacturer: snom technology AG Charlottenstr. 68-71 10117 Berlin Germany snom technology AG assures that the product Type: VoIP phone Model: snomMeetingPoint conforms with the following standards: Product Standard EN 60950-1:2006 FCC Part 15, Subpart B (2008) Class B Berlin, 1 May 2009 Dr. Christian Stredicke Vorstand (MD) © 2009 snom technology AG 51 man_snomMeetingPoint_v101_en VoIPon www.voipon.co.uk [email protected] Tel: +44 (0)1245 808195 Fax: +44 (0)1245 808299