1
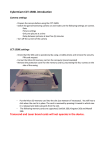
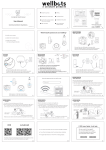
User Manual EN
Action Camera
Wi-Fi - Waterproof - Ultra HD
THE BASICS
Power/Mode
Button
Shutter/Select
Button
Charging
Status
Light
Up/Playback Button
Speaker
Down/Wi-Fi Button
Lens
Microphone
Camera
Status Light
MicroSD
Slot
Micro USB
port
Micro HDMI
port
Screen
Battery Door Latch
Battery Door
WATERPROOF HOUSING
Select/Shutter
Button
Power/Mode
Button
Latch
ACCESSORIES
Waterproof Handle Bar/
Housing
Pole Mount
Mount 1
Mount 2
Mount 3
Mount 4
Mount 5
Mount 6
Mount 7
Clip 1
Clip 2
Helmet
Mounts
Bandages
Battery
Lens Cloth
Tethers
Protective
Backdoor
USB Cable
Charger
MOUNTING YOUR CAMERA
Attach your camera to helmets, gear and equipment.
+
=
+
+
+
=
+
+
+
+
+
=
=
=
+
=
HELMET MOUNTING
+
+
+ +
+
+
=
+
=
+ +
=
++
HANDLE BAR /
POLE MOUNTING
=
+ +
+
+
+
+
=
=
+
=
+ +
=
GETTING STARTED
Congratulations on your new camera! This user
manual will help you learn the basics of capturing
life’s most incredible moments!
To power ON:
Press the Power/Mode Button.
To power OFF:
Press and hold the Power/Mode Button.
OVERVIEW
Turn camera ON and repeatedly press the Power/
Mode Button to cycle through camera modes and
settings. The modes will appear in following order:
Video
Photo
Burst Photo
Time Lapse
Settings
Video
Record Video
Photo
Capture a single photo.
Burst Photo
Capture photo bursts.
Time Lapse
Shoot a series of photos
at set time intervals.
Settings
Adjust camera settings,
resolution and more.
SETTINGS
Press the Shutter/Select Button in Settings-mode to
enter the settings menu. Repeatedly press the
Power/Mode Button to cycle through options and
press the Shutter/Select Button to select desired option. Or use the Up/Playback or Down/Wi-Fi Button to
cycle through the various options.
Video resolution: 4K 10 fps, 2.7K 15 fps,
1080p 60/30 fps, 720p 120/60 fps
MicroSD Card
4K10 / 1080p60
1080p30
720p60
32 GB
120 mins
240 mins
320 mins
16 GB
60 mins
120 mins
160 mins
Looping video:
Off / On (4K & 2.7K not supported)
Time Stamp:
Off / Date / Date&Time
Exposure:
± 2.0 / ± 1.7 / ± 1.3 / ± 1.0 / ± 0.7 / ± 0.3 / 0
Photo Resolution:
12 M / 8 M / 5 M / 2 M
Burst Photo:
3 Photos
Time Lapse:
2s / 3s / 5s / 10s / 20s / 30s / 60s
Continuous Lapse:
Off / On
Power Frequency:
50 Hz / 60 Hz / Auto
Language:
Englanti / Perinteinen Kiina / Italia / Espanja /
Portugali / Saksa / Hollanti / Ranska / Tsekki /
Puola / Turkki / Venäjä / Japani / Korea / Thai
Date&Time:
MM/DD/YY, DD/MM/YY, YY/MM/DD
Sound Indicator:
Shutter On/Off, Start Up 1/2/3 None, Beep On/Off,
Volume 0/1/2/3
Upside Down:
On / Off
Screen Saver:
Off / 1 min / 3 min / 5 min
Power Saver:
Off / 1 min / 3 min / 5 min
Format:
No / Yes
Reset:
No / Yes
Version
VIDEO MODE
Video
To record Video, verify the camera is in Video mode.
If the Video icon on your camera’s LCD screen is not
showing, press the Power/Mode Button repeatedly
until it appears.
To start recording:
Press the Shutter/Select Button. The camera will emit
one beep and the Camera Status Lights will flash
while recording.
To stop recording:
Press the Shutter/Select Button. The Camera Status
Lights stop flashing and the camera emits one beep
to indicate recording has stopped.
This camera automatically stops recording when the
battery is out of power. Your Video will be saved before
the camera powers OFF.
PHOTO MODE
Photo
To capture a Photo, verify the camera is in Photo
mode. If the Photo icon on your camera’s LCD
screen is not showing, press the Power/Mode Button
repeatedly until it appears.
To take a photo:
Press the Shutter/Select Button. The camera will emit
the camera shutter sound.
BURST PHOTO MODE
Burst Photo
To capture a Burst Photo series, verify the camera
is in Burst Photo mode. If the Burst Photo icon on
your camera’s LCD screen is not showing, press the
Power/Mode Button repeatedly until it appears. In
Burst Photo mode, your camera takes 3 photos in 1.5
seconds.
To take a Burst Photo series:
Press the Shutter/Select Button. The camera will emit
camera shutton sounds.
TIME LAPSE MODE
Time Lapse
To capture a Time Lapse series, verify the Continuous
Lapse (Settings) is ON and camera is in Time Lapse
mode. If the Time Lapse icon on your camera’s LCD
screen is not showing, press the Power/Mode Button
repeatedly until it appears. In Time Lapse mode, your
camera captures a series of photos at 2, 3, 5, 10, 20,
30 or 60 second intervals.
To take Time Lapse:
Press the Shutter/Select Button. The camera initiates
countdown and emits the camera shutter sound
each time a Photo is taken.
PLAYBACK
Playing Back Videos and Photos.
To enter the Playback menu:
1. Verify the camera is in Camera modes.
2. Press the Up/Playback Button to enter the
Playback menu.
3. Repeatedly press the Power/Mode Button to
cycle through Video and Photo.
4. Press the Shutter/Select Button to select desired
option.
5. Use Up/Playback Button or Down/Wi-Fi Button
to cycle through the various options.
6. Press the Shutter/Select Button to play the
video.
7. To return to the Playback menu, press the
Power/Mode Button.
8. To exit, hold down the Up/Playback Button for
two seconds.
STORAGE / MICROSD CARDS
This camera is compatible with 32 GB & 64 GB capacity microSD, microSDHC and microSDXC memory
cards. You must use a MicroSD card with a Class 10
speed rating. We recommend using brand name
memory cards for maximum reliability in high-vibration
activities.
BATTERY
Charging the Battery
To charge the battery:
1. Connect the camera to a computer or USB
power supply.
2. The Charging Status Light remains ON while the
battery is charging.
3. The Charging Status Light will turn OFF when
the battery is fully charged.
*Charging Time 3. hours
CAMERA APP
Connecting to the Ez iCam App
(4K & 2.7K not supported)
The Ez iCam App lets you control your camera remotely using a smartphone or tablet. Features include
full camera control, live preview, photo playback and
sharing of select content and more.
1. Download the Ez iCam App to your smartphone
or tablet at the Google Play or Apple App
Store.
2. Press the Power/Mode Button to power camera
ON.
3. Make sure the camera is in Camera modes.
4. Press the Down/Wi-Fi Button to turn on Wi-Fi*.
5. In your smartphone or tablet’s Wi-Fi settings,
connect to the network called “ICAM-H9”, followed by a series of numbers.
6. Enter the password “1234567890”.
7. Open the Ez iCam App on your smartphone
or tablet.
*Press and hold the Down/Wi-Fi Button for three
seconds to turn OFF Wi-Fi.
The Ez iCam App is compatible with smartphones
and tablets listed below.
For Apple iOS
• iPhone 5, 5S, 6 & 6 Plus (iOS 8)
• iPad Air & Mini (iOS 8)
For Android
• Android 4X Quad-core devices
iOS / Android
App Download
COMPATIBILITY
*Compatibility varies by device. Content playback,
sharing and access to the camera’s memory card
might be not available on some devices.