1
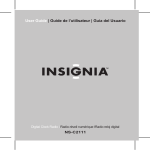
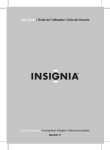
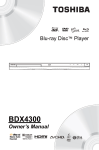
User Guide
Safety tips
To prevent damage to your F&V product or injury to yourself or to others.Be sure to
read the following safety precautions in their entirety before using this equipment.
Keep these safety instructions where all those who use the product will read them.
Warning
This mark indicates warning, before operating the unit.
Please read this manual thoroughly ,and retain it for future reference.
Notes
1. Do not let any solid object or liquid fall onto or into this equipment, to prevent
fire or shock hazard.
2. Please avoid heavy impact on the screen.
3. Please use the adapter attached in the accessory.
4. Do not expose this product to direct sunlight when monitor is working, to keep
long life and quality of the screen.
5. Never block the ventilation grille by covering it as that may damage monitor.
6. Any smoke or unusual smell coming from the equipment, please cut off and
take it to service center.
7. Please be noticed that it hasn’t inner adjust modules. Do not attempt to modify
or fix this unit. Contact qualified service personnel when any service is needed.
This equipment should never be opened for any reasons by no-professional.
8. Do not leave the equipment on while it is resting on or against something ;it
may cause a fire or damage the equipment.
9. Do not expose equipment to direct sunlight, heat or humid conditions.
10. Avoid placing the equipment near combustible or volatile solvents such as
alcohol or benzine.
11. Keep out of reach of children. Failure to observe this precaution could result in
injury.
Trademark Information
HDMI,High-definition Multimedia Interface aretrademarks or
registered trademarks of HDMI Licensing LLC.
-1-
Observe(Optional) proper precautions when handling batteries
Batteries may leak or explode if improperly handled.Observe the following
precautions when handling batteries for use in this product.
Use only batteries approved for use in this equipment.
Do not short or disassemble the battery.
Be sure the product power is off before replacing the battery.
Do not expose the battery to flame or to excessive heat.
Do not immerse in or expose to water.
Observe proper precautions when handling the battery charger
Keep dry. Failure to observe this precaution could result in fire or electric shock.
Dust on or near the metal parts of the plug should be removed with a dry cloth.
Continued use could result in fire.
Do not handle the power cable or near the charger during thunderstorms. Failure
to observe this precaution could result in electric shock.
Do not damage, modify,or forcibly tug or bend the power cable. Do not place it
under heavy objects or expose it to heat or flame. Should the insulation be
damaged and the wires become exposed. Take the power cable to a F&V service
representative for inspection. Failure to observe this precaution could result in fire
or electric shock.
Do not handle the plug or charger with wet hands, Failuer to observe this
precaution could result in electric shock.
Cleaning Your LCD Monitor
Use a dry soft cloth to clean the housing.You can wash the unit with a cloth and
mild detergent to remove difficult stains,followed with a soft cloth to dry.
Do not use strong cleaning agents, such as thinner, gasoline or alcohol, as these
solvents may damage the surface of the protective layer
Specifications
Screen size
7.0 inch(Diagonal)
Display area
154.08(W)×85.92(H)mm
Aspect Ratio
16:9/4:3 Selectable
Pixels
800×3(RGB)×480
Viewing angle 70°(L)×70°(R)×70°(T)×50°(B) (CR≥10)
Brightness
250cd/㎡
500:1
Contrast ratio
Dot Pitch
0.0642(W)×0.1790(H) mm
Color Depth 24-bit(16,777,216 Colors)
Design and specifications subject to change without notice.
-2-
Parts Diagram:
1
3
2
4
1
TFT LCD Screen
2
Infrared Window
3
Selection Keys
4
1/4”-20 Female Mount
Selection Key Identification
Power ON/OFF
AV1/AV2/HD-SDI/HDMI or DVI input selections
Down-key:Contrast adjustment,menu list selection
Up-key:Brightness adjustment,menu list selection
Menu:Acticvates OSD menu selections
Exit:Color/B&W selectionmodes
Aspect Ratio Select:16:9 or 4:3
-3-
10
11
5
12
AV1 IN
AV1 OUT
AV2 IN
AV2 OUT
AUDIO IN
AUDIO OUT
HDSDI IN
HDSDI OUT
13
LCD monitor
DC 5.8~16.8V
Power Consumption:
0.5Amp(Max)@12V DC (6W Max)
Audio Power:1W Max
Operating Temperature:
-20 ℃ to 70 ℃
Storage Temperature:
-30 ℃ to 80 ℃
6-949773-390342
14
480i/p, 576i/p, 720i/p, 1080i/p
Video Input/Output:
Supports NTSC/PAL
15
6 949773 390342
6-949773-390342
16
17
6
18
19
5
Audio Output
6
1/4”-20 Female Mount
20
7
3.5mm SYNC Jack(mono)
8
5.8-16V DC Main Inlet +
9
HDMI
10
AV1 Input Jack
7
11
AV1 Output Jack
12
AV2 Input Jack
8
13
AV2 Output Jack
14
Audio Input Jack
18
1/4”-20 Swivel Shoe Mount
15
Audio Output Jack
19
Upper Locking Ring
16
HD-SDI Input Jack
20
Swivel SHoe Mount Lock Knob
17
HD-SDI Output Jack
21
Lower Locking Ring
9
-
or DVI Input Jack(stereo audio)
-4-
21
Remote controller:
Power ON/OFF
AV1/AV2/HD-SDI/HDMI or DVI input selections
Left-key:Brightness adjustment,menu list selection
Right-key:Brightness adjustment,menu list selection
Menu:Acticvates OSD menu selections
Exit:Color/B&W selectionmodes
Setup
The easiest way to ues the 7” LCD Monitor is to mount it directly to a camcorder or
DSLR camera.A 1/4”-20 swivel shoe mount is provided for installation and features a
lock knob to set the monitor at the desired viewing angle.The supplied battery adapter
(For Sony “L” series batteries) includes a bracket that can be mounted to the monitor
prior to installing the swivel mount. The battery adapter can also be mounted directly
to the back of the monitor by using the supplied 1/4” mounting stud,or to a light stand
by using the built in hook-and-loop fastener on the back of the adapter.Use the
supplied 90°cable to make the power connection between the monitor and the
battery adapter.
Operation
Connect Li-ion battery to the battery adapter,making sure cable ends are properly
connected.If using an external power supply (no included) ,insert the power plug (5.816.8V) into the DC main inlet located on the side of the light unit.Note:The ues of any
other rated external power supply could damage your light unit and void warranty.
Connect the appropriate input cable to the monitor and camera.An HDMI to Mini HDMI
cable ia included.The
(Power ON/OFF) key emits a solid red color (indicating the
power is on and is in standby mode) .Press the key and the red indicator light will turn
off,which puts the unit into working mode. If there is no signal detected the key will blink
red and a ”No Signal” message will temporarily appear on screen (as shown below) .A
blue background will also appear if the menu Function is set to “Blue Screen” .
*DVI input fit for Canon 5D Ⅱ only
-5-
Menu Operation:
Press
key to access the relevant OSD (on screen display) menu operation,
press
/
to select the icons,Color,Adjust,ODS,Function or Sound,and confirm
the selection by pressing
key.
Main menu
Color
Adjust
ODS
Icon
Function
Sound
Submenu
Signal data
Color
Menu interface
Press the
key to access the relevant OSD (on screen display) menu operation.
Press the
key again to confirm the Color selection, You should now be in the
Color submenu as shown below.
Use the
/
keys to select one the following submenu items:
Brightness:0—100
Contrast:0—100
Saturation:0—100
sharpness:0—100
Color Temp:9300K、6500、3200K、User(R,G,B 0-255)
-6-
OSD
Press the
key to access the relevant OSD (on screen display) menu operation.
Use the
/
keys to select the OSD icon.Press the
key again to confirm
the OSD selection, You should now be in the OSD submenu as shown below.
Use the
/
keys to select one the following submenu items:
Language:简体中文/English
H Position:0—100
V Position:0—100
OSD Timeout:OFF,5—60 Seconds
Transparent:OFF,1—7
-7-
Function
Press the
key to access the relevant OSD (on screen display) menu operation.
Use the
/
keys to select the Function icon.Press the
key again to confirm
the Function selection, You should now be in the OSD submenu as shown below.
Use the
/
keys to select one the following submenu items:
Reset
Display Ratio:16:9/4:3/Auto
Blue Screen:ON/OFF
Flip Horizontal:ON/OFF
Flip Vertical:ON/OFF
-8-
Function
Press the
key to access the relevant OSD (on screen display) menu operation.
Use the
/
keys to select the Sound icon.Press the
key again to confirm
the Sound selection, You should now be in the OSD submenu as shown below.
Use the
/
keys to select one the following submenu items:
Volume:0—100
Mute:ON/OFF
-9-
Troubleshooting
The 7” LCD Monitor comes with a sun hood (not shown) that helps prevent glare
while viewing in certain lighting conditions.To attach the sun hood to the monitor,
start by carefully unfolding the sun hood,then align the cable access cut out over
the cable ports on the side of the monitor.Peel off the film from the hook-and -loop
adhesive tab that is directly under the cut out,and firmly press the adhesive tab to
the monitor.Repeat this procedure for the remaining adhesive tabs being careful
in keeping the hood aligned to the edges of the monitor. the sun hood can be
removed at any time to store for later use.
Troubleshooting
1.The unit Only displays a black and white image.
A、Make sure that the color level settings are properly set for saturation,
brightness and contrast.
B、Select the “Exit” key to switch between Color/B&W selection modes.
2.No image displayed after connecting to power.
A、Make sure the Power ON/OFF key is depressed to the “ON” position.
B、Make sure battery is fully charged and that the cables are properly connected.
3.Image on sccreen is distorted
A、Select the same aspect ratio for the monitor (16:9 or 4:3) as set by your camera.
B、Make sure cables are securely connected.Broken or loose cables can produce
bad signals which can effect the images on screen.
-10-