1
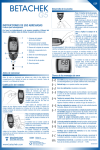
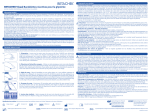
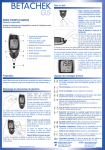
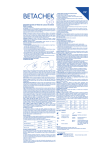
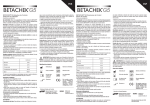
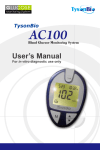
Getting started
Before using your meter for the first time, pull the plastic tab out of the
battery compartment as shown on User’s Guide page 3
Coding your meter
Each pack of test strips comes with
a memory card that must be inserted
into the meter before any tests are
performed.
In addition to recording your result,
the memory card programs the meter
to read the test strips accurately.
POCKET TESTING GUIDE
Please read the User’s Manual carefully and completely before
performing the first measurement.
1
4
2
6
7
5
3
1. Battery cover (on underside)
2. Finger slot for removing
memory card (on under side)
3. Measurement optics
4. Memory card slot
5. Test strip guide
6. Power button
7. Memory recall button
Each memory card has a three-digit
number printed on it called a code
number. The code number is also printed on the test strip container. Before you
insert the memory card the meter will display three bars and flash the word
CODE.
Step 1: Insert memory card
Take the memory card from the pack
of test strips and insert it into the
meter.
The meter will sound a chime when
the card is correctly inserted and the
coding is completed
Step 2: Check the code number
The meter will then display a threedigit code number. Check that the number displayed matches the number
printed on the container of the test strips and memory card.
Getting started
Before using your meter for the first time, pull the plastic tab out of
the battery compartment as shown on User’s Guide page 3
Coding your meter
POCKET TESTING GUIDE
Please read the User’s Manual carefully and completely before
performing the first measurement.
1
4
2
6
7
5
3
1. Battery cover (on underside)
2. Finger slot for removing
memory card (on under side)
3. Measurement optics
4. Memory card slot
5. Test strip guide
6. Power button
7. Memory recall button
Each pack of test strips comes with
a memory card that must be inserted
into the meter before any tests are
performed.
In addition to recording your result,
the memory card programs the meter
to read the test strips accurately.
Each memory card has a three-digit
number printed on it called a code
number. The code number is also printed on the test strip container. Before you
insert the memory card the meter will display three bars and flash the word
CODE.
Step 1: Insert memory card
Take the memory card from the pack
of test strips and insert it into the
meter.
The meter will sound a chime when
the card is correctly inserted and the
coding is completed
Step 2: Check the code number
The meter will then display a threedigit code number. Check that the number displayed matches the number
printed on the container of the test strips and memory card.
Key to error messages
Performing a test
A test strip may be inserted either
before or after turning the meter on.
Note: Hold the strip close to the
middle AS SHOWN.
Caution: Insert the strip as far as it
will go into the meter.
DO NOT bend or kink the strip as
this will damage it.
Apply blood with strip in the meter.
Apply a drop of blood to the
centre of the square mesh area.
It is OK to touch the mesh. A
small drop(1- 2µl) is all that is
needed to quickly cover the test
zone. The test zone must be
completely covered, otherwise
you may obtain a false reading.
When a blood drop has been applied, the meter will give a beep and
commence measuring. Do not move the test strip as this will lead to an
incorrect result. The meter will display the result with time and date. The
result will automatically be saved to the meter and card memory.
The G5 meter measures blood
glucose between 0.5 – 25.5mmol/L
(9-460mg/dL). Values outside this
range are reported as ‘Lo’ or ‘Hi’.
www.betachek.com
EMC error (electromagnetic field) move away from possible
source e.g. mobile phone, microwave.
Flat battery, no test may be performed.
Calibration error, return to supplier.
Check test strip. Damaged or used test strip or strip not fully
inserted or the measurement optics are dirty.
Memory card full, replace with a new memory card from a
fresh pack of test strips.
Too much light or strip removed during test. Move out
of direct sunlight.
Strip inserted incorrectly. Review test instructions or, try
inserting the strip BEFORE turning the meter on.
OR Blood applied too early, repeat the test and wait for the
blood drop icon.
Test strip removed during testing, repeat the test and leave
test strip in the meter until the test is completed.
Faulty test strip. Check that you have stored and handled the
test strips as instructed in the package insert.
Check memory card. Not properly inserted or has a fault.
Memory card failure. Remove your card and reinsert. If the
problem persists, do not use the card or test strips.
Incorrect temperature. Tests cannot be performed outside
permitted limits 5-45˚C (41 - 113˚F)
National Diagnostic Products
Sydney, NSW, 2065
Australia
Welkang Ltd
29 Harley St. London, UK