1
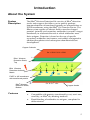
iBlot® Western Detection Kit For chemiluminescent and chromogenic detection of proteins on PVDF or nitrocellulose membranes Catalog nos. IB7110-01, IB7110-02, IB7210-01, IB7210-02, IB7310-01, IB7310-02, IB7410-01, IB7410-02, IB7010-01, IB7010-02 Rev. Date: 18 June 2010 Part no. 100009812 MAN0002735 Corporate Headquarters 5791 Van Allen Way Carlsbad, CA 92008 T: 1 760 603 7200 F: 1 760 602 6500 E: [email protected] For country-specific contact information visit our web site at www.invitrogen.com User Manual Contents Kit Contents and Storage ............................................................................. 3 Introduction .............................................................................................5 About the System.......................................................................................... 5 Experimental Overview............................................................................... 6 Methods....................................................................................................7 General Guidelines ....................................................................................... 7 Preparing Solutions ...................................................................................... 8 Western Detection using the iBlot® Dry Transfer System ..................... 12 Using Assay Spacers................................................................................... 20 Troubleshooting.......................................................................................... 22 Appendix ................................................................................................25 Accessory Products .................................................................................... 25 Technical Support....................................................................................... 26 Purchaser Notification ............................................................................... 27 1 2 Kit Contents and Storage This manual is supplied with the following products: Types of Kits Product Cat. no. ® iBlot Western Detection Chemiluminescent Kit (anti-Mouse) - Regular, 10 Pak iBlot® Western Detection Chemiluminescent Kit (anti-Mouse) - Mini, 10 Pak iBlot® Western Detection Chemiluminescent Kit (anti-Rabbit) - Regular, 10 Pak iBlot® Western Detection Chemiluminescent Kit (anti- Rabbit) - Mini, 10 Pak iBlot® Western Detection Chromogenic Kit (anti-Mouse) - Regular, 10 Pak iBlot® Western Detection Chromogenic Kit (anti-Mouse) - Mini, 10 Pak iBlot® Western Detection Chromogenic Kit (anti-Rabbit) - Regular, 10 Pak iBlot® Western Detection Chromogenic Kit (anti- Rabbit) - Mini, 10 Pak IB7110-01 IB7110-02 IB7210-01 IB7210-02 IB7310-01 IB7310-02 IB7410-01 IB7410-02 iBlot® Western Detection Stacks (Regular), 10 Pak IB7010-01 ® iBlot Western Detection Stacks (Mini), 10 Pak Intended Use Shipping and Storage IB7010-02 For research use only. Not intended for human or animal diagnostic or therapeutic uses. The iBlot® Western Detection Kit is shipped as two boxes. The iBlot® Western Detection Kit Stack Box is shipped and stored at room temperature. The iBlot® Western Detection Kit Reagent Box is shipped on blue ice, and stored at 4C. Continued on next page 3 Kit Contents and Storage, Continued Stack Box Components The iBlot® Western Detection Kit Stack Box contains enough transfer stacks for 10 mini-sized blots (8 cm × 8 cm) (Mini) or 10 regular sized blots (13.5 cm × 8 cm) (Regular). Stack Box Components iBlot® Western Detection Stack, Bottom Mini 10 Regular 10 iBlot® Western Detection Stack, Top 10 10 iBlot® Disposable Sponge 10 10 iBlot® Western Detection Antibody Matrix 30 30 iBlot® Western Detection Transparent Sheet 40 40 iBlot® Western Detection Assay Spacer 2 4 Catalog no. CB7110-01 CB7110-02 CB7210-01 CB7210-02 CB7310-01 CB7310-02 CB7410-01 CB7410-02 Reagent Box Components Wash Solution (16X), 100 ml 2 1 2 1 2 1 2 1 Antibody Diluent Solution, 70 ml 3 2 3 2 3 2 3 2 Diluent Additive, 45 ml 2 1 2 1 2 1 2 1 Chemiluminescent Substrate, 30 ml — 1 — 1 — — — — Chemiluminescent Substrate, 60 ml 1 — 1 — — — — — Chemiluminescent Enhancer, 1.5 ml — 1 — 1 — — — — Chemiluminescent Enhancer, 2.5 ml 1 — 1 — — — — — Chromogen, 100 ml — — — — — 1 — 1 Chromogen, 250 ml — — — — 1 — 1 — Anti-Mouse 2 Antibody (pre-diluted 1:10), 500 μl 2 1 — — 2 1 — — Anti-Rabbit 2 Antibody (pre-diluted 1:10), 500 μl — — 2 1 — — 2 1 Grid Dish Tray 2 2 2 2 2 2 2 2 Component 4 Introduction About the System The iBlot® Western Detection Kit consists of iBlot® detection stacks and reagents that allow you to quickly perform immunodetection of transferred proteins on nitrocellulose or PVDF membranes using the iBlot® Gel Transfer Device. The iBlot® system applies an electric field to transfer charged proteins (primary and secondary antibodies) towards a target membrane, to accelerate the rate at which antibodies meet their antigens. Detection is based on the use of specific secondary antibodies (anti-mouse, anti-rabbit) conjugated to alkaline phosphatase and subsequent chemiluminescent development. System Description Copper Cathode – 2e- + 2H20 H2 + 20H ® iBlot Western Detection Stack, Top ® iBlot Western Detection Antibody Matrix PVDF or NC membrane with transferred protein 2+ ® iBlot Western Detection Stack, Bottom Features Cu Cu +2eCopper Anode Compatible with proteins transferred by wet, semi-wet, semi-dry, or iBlot® dry blotting methods Rapid binding of antibodies to antigens, completed in three minutes 5 Experimental Overview Workflow Western detection can be performed on one regular-sized membrane (13.5 cm × 8 cm), 1–2 mini-sized membranes (8 cm × 8 cm), or multiple membrane strips (using supplied spacers to prevent cross-contamination). Before Starting 1. Transfer proteins from gel to membrane. 2. Wash the membrane in deionized water. 3. Prepare wash and antibody solutions. Blocking Step 4. Apply the Antbody Diluent Mix to a matrix. 5. Set the iBlot® device to program P9 (consists of 3 steps for a total of 8 minutes), and assemble the Western Detection Stack (Bottom Stack, membrane, antibody matrix with Antbody Diluent Mix, Top Stack). 6. Block the membrane (program P9, step 1) for 2 minutes. Primary Antibody Step 7. Apply the primary antibody solution on a new matrix. 8. Remove and discard used blocking solution matrix. 9. Reassemble the Western Detection Stack with primary antibody matrix and perform the primary antibody step (program P9, step 2) for 3 minutes. Secondary Antibody Step 10. Apply the secondary antibody solution on a new matrix. 11. Remove and discard used primary antibody matrix. 12. Reassemble the Western Detection Stack with secondary antibody matrix and perform the secondary antibody step (program P9, step 3) for 3 minutes. 13. Disassemble the stack and rinse the membrane in Wash Solution. 14. Wash the membrane in Wash Solution three times. 15. Prepare detection reagents. 16. Add the appropriate detection substrate. 17. Develop and visualize the blotted membrane. 6 Methods General Guidelines Firmware Requirements Firmware version 2.9.5 or higher with program P9 is required to use the iBlot® Western Detection Stacks. The iBlot® firmware version is displayed on the screen upon powering the device on. For users of the iBlot® Device with older firmware versions lacking program P9, download new iBlot® firmware with program P9 (version 2.9.5 or higher) at www.invitrogen.com/iblot. Do not use iBlot® Western Detection Stacks if you cannot run program P9. Note: Program P9 is a 3-step program for the iBlot® Western Detection protocol consisting of a blocking step (20V for 2 minutes), a primary antibody step (5V for 3 minutes), and a secondary antibody step (5V for 3 minutes). The overall time of the program is 8 minutes, and cannot be modified. General Guidelines Membranes should not exceed 8 cm × 8 cm for minisized iBlot® Western Detection Stacks, or 8 cm × 13 cm for regular-sized iBlot® Western Detection Stacks. Use twice the concentration of primary antibody required for a standard immunodetection. Use a single, clean dish for each blot. The container must be large enough to allow the membrane to be fully covered by solutions at all times. Note: Western Detection Stacks are supplied with two minisized Grid Dish Trays. Avoid touching the surface of the membrane. Wear clean gloves and handle the blot only with clean forceps. Work quickly to ensure membranes remain wet. MEND ION AT RECOM Do not expose the substrate working solutions to intense light. Short-term exposure to laboratory light is not harmful to the substrates. Do not use Western Detection Stacks for protein transfer. To increase the rate of success on the first trial, we recommend running replicates of your sample on a single gel, and preparing multiple strips for simultaneous detection (see Using Assay Spacers, page 20) using different secondary antibody concentrations on a single stack (see page 10). 7 Preparing Solutions Important Preparing Wash Solution Use water, free from alkaline phosphatase activity for making wash buffer and rinsing membranes. Fresh ultrafiltered water is preferred. Autoclave or ultra-filter stored water to remove alkaline phosphatase activity. Prepare 96 mL of 1X Wash Solution for each mini-sized membrane to be probed. Reagent Volume Wash Solution (16X) Deionized water 6 mL 90 mL For regular-sized membranes, prepare enough 1X Wash Solution for at least four washes. Adjust the volume of 1X Wash Solution according to the size of the dish used for washing the membrane. Preparing Antibody Diluent Mix Prepare an amount of Antibody Diluent Mix appropriate for the size of the membrane to be probed immediately before use. Scale the volumes accordingly if performing immunodetection on multiple membranes. Reagent Mini Regular Antibody Diluent Additive* Antibody Diluent Solution Total volume 4.5 mL 10.5 mL 15 mL 9 mL 21 mL 30 mL * The same Antibody Diluent Additive is used for preparing solutions for PVDF and nitrocellulose membranes. Continued on next page 8 MEND ION AT RECOM Preparing Solutions, Continued Since protein immunodetection with iBlot® Western Detection Kits are performed over a short period of time, we recommend that you prepare dilutions of primary and secondary antibodies immediately before the procedure is started. The concentration of the primary antibody can affect detection sensitivity and background. Antibody solutions that are too dilute result in weak or no signal, whereas overly concentrated solutions cause high background or non-specific binding. Primary Antibody Concentration We recommend using twice the concentration of primary antibody required for a standard immunodetection (e.g., if you usually dilute a primary antibody 1:5,000, use a dilution of 1:2,500 for the iBlot® Western Detection protocol). Note: The total amount of primary antibody used is similar to that of a standard immunodetection protocol, since only half as much volume is applied in the iBlot® Western Detection protocol. Preparing Primary Antibody Solutions 1. 2. Prepare the Primary Antibody Solution in a clean tube just prior to starting the immunodetection protocol as described below: Reagent Mini Regular Antibody Diluent Mix 3.5–5 mL 7–10 mL Primary Antibody See Primary Antibody Concentration, above Mix the solution well. Continued on next page 9 Preparing Solutions, Continued Secondary Antibody Concentration Unless the optimal secondary antibody concentration is already determined, perform initial trials to find the optimal antibody concentration for your experiment. Dilute the Secondary Antibody from the kit according to the directions below as a starting point. For details on testing different antibody concentrations on multiple strips by using Assay Spacers, refer to page 20. Note: The antibody supplied in the kit is pre-diluted 1:10, so that performing a 1:500 dilution as directed in the table below results in a final antibody concentration that is equivalent to a 1:5,000 dilution. Secondary Antibody Concentration for Chemiluminescent Detection Dilute two aliquots of the secondary antibody according to the type of membrane you are using to determine the optimal concentration. Nitrocellulose Membrane 1:250 1:500 PVDF Membrane 1:500 1:1,000 If necessary, modify the concentration for a second trial based on the initial results, as follows: Initial Result Low Signal High background with strong signal Nitrocellulose Membrane 1:100 1:1,000 PVDF Membrane 1:250 — Note: Increasing the secondary antibody concentration may result in increased background. Secondary Antibody Concentration for Chromogenic Detection Dilute two aliquots of the secondary antibody according to the type of membrane you are using. Nitrocellulose Membrane 1:100 1:250 PVDF Membrane 1:100 1:250 Continued on next page 10 Preparing Solutions, Continued Preparing Secondary Antibody Solutions 1. 2. Prepare the Secondary Antibody Solution in a clean tube as described below. Use the secondary antibody supplied in the kit. Do not use antibodies from a different kit or other supplier. Reagent Mini Regular Antibody Diluent Mix 3.5–5 mL 7–10 mL Secondary Antibody See Secondary Antibody Concentration, page 10 Mix the solution well. 11 Western Detection using the iBlot® Dry Transfer System Before Starting Transferring Proteins Ensure that the iBlot® Device is set to program P9 (see page 7) for the western detection protocol. Prepare solutions before starting the protocol (see page 8). Wet membranes if they are dry (see below). Blot proteins onto nitrocellulose or PVDF stacks with the iBlot® Device, or by standard wet, semi-wet, or semi-dry transfer methods appropriate for the protein to be detected. After transfer, rinse the membrane with water to remove any gel and transfer buffer components. After transfer and rinsing, membranes can be dried and stored for immunodetection at a later time. Do not perform immunodetection on dry membranes. Verify that membranes are wet before performing detection. PVDF membranes dry quickly and, must be reactivated with methanol prior to starting the protocol. Important If starting the protocol with dried membranes, re-wet the membranes using the following steps: Preparing Membranes Materials Required Membrane Procedure Nitrocellulose Wet the nitrocellulose membrane with distilled water for 1 minute. PVDF Reactivate the PVDF membrane in 100% methanol for 15 seconds, and rinse twice with water. Blotted membrane with antigen of interest Purified water free of alkaline phosphatase activity Clean tubes for preparing solutions Clean forceps for manipulating blotted membrane Orbital shaker capable of rotating at 1 revolution/second 1X Wash buffer (see page 8) Primary antibody diluted in Antibody Diluent (see page 8) Continued on next page 12 Western Detection using the iBlot® Dry Transfer System, Continued 1. Open the lid of the iBlot® Gel Transfer Device. Ensure the blotting surface is clean. 2. Place the green antibody matrix on a Transparent Sheet. 3. Apply Antibody Diluent Solution with Diluent Additive (described on page 8) evenly on the matrix with a clean pipette for the blocking step. Mini Regular 3.5–5 mL 7–10 mL 1 3 4. Remove the sealing from the iBlot® Western Detection Bottom Stack. Leave the stack in the transparent plastic tray. 4 5. Place the plastic tray containing the Bottom Stack directly on the blotting surface. Align the tray with the gel barrier on the right. 5 6. Use forceps to place the pre-wetted membrane on the Bottom Stack with the protein side facing up. Remove any bubbles using the Blotting Roller. 6 Note: The Blotting Roller is used several times throughout this protocol, and should be washed between each step. Continued on next page 13 Western Detection using the iBlot® Dry Transfer System, Continued 7. Use forceps to place the matrix soaked with Antibody Diluent Mix (Step 3 ) onto the membrane. 7 8. Remove any bubbles using the Blotting Roller. 8 9. Remove the sealing from the iBlot® Western Detection Top Stack. Keep the red plastic tray for Step 16. 9 10. Remove the Top Stack from the tray, and place it over the green matrix with the electrode side facing up. Remove any bubbles with the Blotting Roller. 10 11. Position the iBlot® Disposable Sponge so the metal contact is at the upper right corner of the lid. 11 Continued on next page 14 Western Detection using the iBlot® Dry Transfer System, Continued 12. Close the lid and secure the latch. The red light is on indicating a closed circuit. 12 13. Select program P9. This program is a 3-step program for the iBlot® Western Detection protocol. The complete program runs for 8 minutes, and cannot be modified. Press the Start/Stop button. The red light changes to green. A horizontal bar is displayed between the program number and the time in the display. Do not turn off the iBlot® Device, or change programs at any step during program P9. 14. While the iBlot® Device runs, apply the primary antibody solution (described on page 9) onto a new matrix. Mini Regular 3.5–5 mL 7–10 mL Light 13 Bar appears here 14 15. The first (blocking) step ends after 2 minutes, and is indicated by beeping, and a flashing green light. Open the lid, leaving the Sponge in place. Two flashing horizontal bars appear between the program number and the time in the display. 16. Remove the Top Stack and set it aside in the red tray for re-use in the next step. Discard the used blocking soloution matrix. 17. Use forceps to place the new matrix with the primary antibody onto the membrane. Remove any bubbles with the Blotting Roller. 18 18. Return the Top Stack to its position over the matrix. Remove any air bubbles with the Blotting Roller. Continued on next page 15 Western Detection using the iBlot® Dry Transfer System, Continued 19. Close the lid and secure the latch. 19 20. Press the Start/Stop button to start the second (1antibody) step. The two horizontal bars stop flashing. 21. While the iBlot® Device runs, apply the secondary antibody solution (described on page 11) onto a new matrix. Mini Regular 3.5–5 mL 7–10 mL 22. After 3 minutes, the device stops. The end of the 1antibody step is indicated by beeping, and a flashing green light. Open the lid, leaving the Sponge in place. Three flashing horizontal bars appear in the display between the program number and the time in the display 21 22 23. Remove the Top Stack and set it aside in the red tray for re-use in the next step. Discard the used primary antibody matrix. 24. Use forceps to place the new matrix with the secondary antibody onto the membrane. Remove any bubbles with the Blotting Roller. 25 25. Return the Top Stack to its position over the matrix. Remove any air bubbles with the Blotting Roller. 26. Close the lid and secure the latch. 27. Press the Start/Stop button to start the third (2antibody) step. The three horizontal bars stop flashing. 28. After 3 minutes, the device stops. The end of the run is indicated by beeping, and a flashing red light. Continued on next page 16 Western Detection using the iBlot® Dry Transfer System, Continued Disassembling the Stack Washing the Membrane 1. At the end of the transfer procedure, open the lid and discard the sponge. 2. Disassemble the sandwich and discard the used matrix, Top Stack, and Bottom Stack. 3. Turn off the iBlot® Device 4. Proceed to Washing the Membrane. Wash volumes are described below for mini-sized membranes. For regular-sized membranes, adjust volumes according to the size of the container being used for the wash. 1. Place the membrane into a dish (a mini-sized dish is provided in the kit) containing 20 mL of 1X Wash Solution (page 8). 2. Rinse the membrane briefly and then discard the solution. 3. Wash the membrane for 5 minutes with 20 mL of 1X Wash Solution, and discard the solution. Repeat this wash step two more times. 4. Rinse the membrane with 20 mL of deionized water, and then decant. Repeat this wash step once. 5. Proceed to the Chemiluminescent Detection or Chromogenic Detection step. 17 Western Detection using the iBlot® Dry Transfer System, Continued Chemiluminescent Detection 1. Prepare the following amount of Chemiluminescent Substrate per membrane: Nitrocellulose Membrane Mini Regular Chemiluminescent Substrate Chemiluminescent Enhancer 3 mL 0.125 mL 6 mL 0.25 mL PVDF Membrane Mini Regular Chemiluminescent Substrate 3 mL 6 mL Mix well. Do not add Chemiluminescent Enhancer for PVDF membranes. 18 2. Place the membrane with protein-side facing up on a sheet of Transparency plastic (iBlot® Western Detection Transparent Sheet, supplied in the kit). Do not allow the membrane to dry out. 3. Cover the membrane with 3 mL of Chemiluminescent Substrate in an even application. Do not touch the membrane surface while adding the substrate. Make sure the membrane is covered for the duration of the reaction. 4. Allow the reaction to develop for 5 minutes. 5. Blot any excess Chemiluminescent Substrate solution from the membrane by placing the membrane on filter paper with protein-side facing up. Do not allow the membrane to dry out. 6. Cover the membrane with plastic wrap to prepare a membrane sandwich for luminography. 7. Expose an X-ray film to the membrane sandwich for 1 second to several minutes, or image with an appropriate CCD camera. Western Detection using the iBlot® Dry Transfer System, Continued Chromogenic Detection Perform chromogenic development with the supplied Chromogen. Color development is complete in 1–60 minutes. 1. Place the membrane with protein-side facing up in a plastic tray (supplied in the kit for mini-sized membranes). Do not allow the membrane to dry out. 2. Cover the blot with Chromogenic Substrate as follows: Reagent Mini Regular Chromogen 5 ml 10 ml Note: If yellow precipitate forms after 3 minutes, decant the solution, wash briefly in deionized water, and restart from step 1. 3. Incubate with shaking until the desired purple band intensity is achieved on the membrane. Do not incubate for more than 1 hour. Decant solution. 4. Stop the reaction by rinsing membrane briefly with 20 ml of distilled water for 2 minutes and decanting the wash. Repeat 2 minute water rinse twice. Note: Stop the reaction with reagent grade water, do not use tap water, buffer, or acid. Buffer or tap water can cause fading, and acid turns the bands yellow. 5. Air dry the membrane on a clean piece of filter paper and record an image of the blot. Store membrane protected from light to prevent band fading. Bands remain visible for years when protected from light. 19 Using Assay Spacers Guidelines for Using Assay Spacers Detection can be performed on multiple membrane strips in a single stack. Stack assembly proceeds as described in the standard protocol (page 13), with the following changes: Placing Membranes and Assay Spacers Using Assay Spacers for Secondary Antibody Optimization Assay spacers can be placed vertically (see picture below), horizontally, or as a combination of both. Divide transferred membranes into multiple strips equal to, or less in surface area than the type of stack being used for western detection. To prevent cross-contamination (e.g., when using different antibodies for each strip), use the supplied Assay Spacers to create a barrier between the strips. Membrane strips may need trimming to accommodate multiple strips and spacers in the same transfer stack. Place the cut membrane strips over the surface of the Bottom Stack (see page 13, Step 6). Place the Assay Spacer between membrane strips using forceps or a gloved hand. Leave a boundary region around membrane. Do not overlap Spacers on the plastic rim of the tray, or on other Spacers. Uncut matrices can be used when membrane strips are treated under identical conditions (e.g., performing the blocking step, and using identical primary antibody conditions). When using an uncut matrix, place the membrane strips on the Bottom Stack with enough room between them to accommodate spacers in later steps. Use cut matrices (see page 21), and add spacers to the stack after the primary antibody step (see page 16, Step 22) when testing different secondary antibody conditions. Continued on next page 20 Using Assay Spacers, Continued Preparing the Antibody Matrix Using the Blotting Roller Cut the antibody matrix using sharp, clean scissors so that the pieces completely cover the membrane surface without overlapping other matrices or the Spacers. Apply blocking and antibody solutions in a volume that will completely wet but not soak the matrix (see page 13, Step 3, page 15, Step 14, and page 16 Step 21). For all rolling steps, do not roll over the spacer with the hand-held Blotting Roller. Assay Spacers are reusable. Rinse with water after each use. 21 Troubleshooting Introduction Review the information below to troubleshoot your experiments using the iBlot® Gel Transfer Device and iBlot® Gel Transfer Stacks. Observation Cause Solution High background Nitrocellulose membrane not completely wetted Follow instructions for pre-wetting the membrane. Membrane is contaminated Use only clean, new membranes. Wear clean gloves at all times and use forceps when handling membranes. Incorrect ratio between Diluent Additive and Antibody Diluent Solution Make sure the proper amount of Diluent Additive is used for preparation of Antibody Diluent Mix (see page 8). Blot is overdeveloped Follow recommended developing time or remove blot from substrate when signal-to-noise ratio is acceptable. Incorrect program was used Use only program P9 for the iBlot® Western Detection protocol. Higher intrinsic background with PVDF membranes Switch to nitrocellulose membranes. Enhancer added to substrate when using PVDF membrane Make sure Enhancer is not added to Chemiluminescent Substrate for PVDF membranes. Insufficient washing Follow recommended number of washes. In some cases, it may be necessary to increase the number or duration of washes. Concentrated secondary antibody used Make sure the secondary antibody is diluted as described on page 11. If the background remains high, but with strong band intensity, decrease the concentration of the secondary antibody. Concentrated primary antibody used Decrease the concentration of the primary antibody. Continued on next page 22 Troubleshooting, Continued Observation Cause Solution Weak or No Signal Poor or incomplete transfer Check transfer conditions, and repeat blot. Use positive control and/or molecular weight marker. Enhancer not added to substrate when using nitrocellulose membrane Add Enhancer to Chemiluminescent Substrate for nitrocellulose membranes. Nitrocellulose membrane not completely wetted, or PVDF membrane not completely reactivated Follow instructions for pre-wetting or reactivating the membrane described on page 12. Secondary antibody concentration too low Use the secondary antibody concentrations described on page 10. Primary antibody concentration too low Use twice the concentration of primary antibody required for a standard immunodetection. If the signal is still low and the background is not high, increase the concentration. Inactive primary antibody Determine activity by performing a dot-blot or other methods. Low Affinity of primary antibody to antigen Obtain a higher affinity primary antibody. Sample improperly prepared; antigenicity weakened, or destroyed SDS and reducing agents may interfere with some antibody/antigen affinities. Sample too dilute Load a higher concentration or amount of protein onto the gel. Blots are too old Protein may have broken down over time. Use freshly prepared blots. Incorrect ratio between Diluent Additive and Antibody Diluent Solution Make sure the proper amount of Diluent Additive is used for preparation of Antibody Diluent Mix (see page 8). Protein of interest ran off the gel Match gel separation range to size of protein being transferred. Poor retention of proteins Match gel separation range to size of protein being transferred. Use a molecular weight marker with relevant size proteins. Larger proteins require more transfer time, smaller proteins less. Use membrane with the appropriate binding capacity. Continued on next page 23 Troubleshooting, Continued Observation Cause Solution Non-Specific Binding Membrane contaminated by fingerprints or keratin proteins Wear clean gloves at all times and use forceps when handling membranes. Always handle membranes around the edges. Concentrated secondary antibody used Make sure the secondary antibody is diluted as described on page 11. If the background remains high, but with strong band intensity, decrease the concentration of the secondary antibody. Concentrated Primary antibody used Decrease the concentration of the primary antibody. Affinity of the primary antibody for the protein standards Check with the protein standard manufacturer for homologies with primary antibody. Short circuit or current exceeding limits of device Open the lid for 15 seconds to allow the system to cool down. Close the lid and resume the run by pressing the Start/Stop button. If problem persists, contact Technical Support (see page 26) Antibody Diluent Additive in the Antibody Diluent Mix exceeds 30% causing increased current and heat Make sure the Antibody Diluent Mix is prepared as described on page 8. “Error 2” Message Displayed 24 Appendix Accessory Products Additional Products The following additional products, including a variety of reagents for western blotting, and western detection, are available from Invitrogen for use with the iBlot® Gel Transfer Device. For more details on these products, visit our website at www.invitrogen.com, or contact Technical Support (see page 26). Product ® Quantity Catalog no. iBlot Gel Transfer Device 1 unit IB1001 iBlot® Western Detection Stacks, Regular 10-pak IB6010-01 iBlot® Western Detection Stacks, Mini 10-pak IB6010-02 iBlot® Gel Transfer Stack, Nitrocellulose, Regular 10-pak IB3010-01 ® 10-pak IB4010-01 ® 10-pak IB3010-02 ® 10-pak IB4010-02 1 LC2100 iBlot Gel Transfer Stack, PVDF, Regular iBlot Gel Transfer Stack, Nitrocellulose, Mini iBlot Gel Transfer Stack, PVDF, Mini Blotting Roller A variety of antibodies are available from Invitrogen. For more details, visit www.invitrogen.com/antibodies. 25 Technical Support Web Resources Visit the Invitrogen website at www.invitrogen.com for: Contact Us Technical resources including manuals, vector maps and sequences, application notes, MSDSs, etc. Complete technical support contact information. Access to the Invitrogen Online Catalog. Additional product information and special offers For more information or technical assistance, call, write, fax, or email. Additional international offices are listed on our website (www.invitrogen.com). Corporate Headquarters 5791 Van Allen Way Carlsbad, CA 92008 USA Tel: 1 760 603 7200 Tel (Toll Free): 1 800 955 6288 Fax: 1 760 602 6500 E-mail: [email protected] Japanese Headquarters LOOP-X Bldg. 6F 3-9-15, Kaigan Minato-ku, Tokyo 108-0022 Tel: 81 3 5730 6509 Fax: 81 3 5730 6519 E-mail: [email protected] European Headquarters Inchinnan Business Park 3 Fountain Drive Paisley PA4 9RF, UK Tel: +44 (0) 141 814 6100 Tech Fax: +44 (0) 141 814 6117 E-mail: [email protected] SDS Safety Data Sheets (SDSs) are available at www.invitrogen.com/sds. Certificate of Analysis The Certificate of Analysis provides detailed quality control and product qualification information for each product. Certificates of Analysis are available on our website. Go to www.invitrogen.com/support and search for the Certificate of Analysis by product lot number, which is printed on the box. 26 Purchaser Notification Limited Warranty Invitrogen (a part of Life Technologies Corporation) is committed to providing our customers with high-quality goods and services. Our goal is to ensure that every customer is 100% satisfied with our products and our service. If you should have any questions or concerns about an Invitrogen product or service, contact our Technical Support Representatives. All Invitrogen products are warranted to perform according to specifications stated on the certificate of analysis. The Company will replace, free of charge, any product that does not meet those specifications. This warranty limits the Company’s liability to only the price of the product. No warranty is granted for products beyond their listed expiration date. No warranty is applicable unless all product components are stored in accordance with instructions. The Company reserves the right to select the method(s) used to analyze a product unless the Company agrees to a specified method in writing prior to acceptance of the order. Invitrogen makes every effort to ensure the accuracy of its publications, but realizes that the occasional typographical or other error is inevitable. Therefore the Company makes no warranty of any kind regarding the contents of any publications or documentation. If you discover an error in any of our publications, please report it to our Technical Support Representatives. Life Technologies Corporation shall have no responsibility or liability for any special, incidental, indirect or consequential loss or damage whatsoever. The above limited warranty is sole and exclusive. No other warranty is made, whether expressed or implied, including any warranty of merchantability or fitness for a particular purpose. Continued on next page 27 Purchaser Notification, Continued Limited Use Label License No. 5: Invitrogen Technology The purchase of this product conveys to the buyer the nontransferable right to use the purchased amount of the product and components of the product in research conducted by the buyer (whether the buyer is an academic or for-profit entity). The buyer cannot sell or otherwise transfer (a) this product (b) its components or (c) materials made using this product or its components to a third party or otherwise use this product or its components or materials made using this product or its components for Commercial Purposes. The buyer may transfer information or materials made through the use of this product to a scientific collaborator, provided that such transfer is not for any Commercial Purpose, and that such collaborator agrees in writing (a) not to transfer such materials to any third party, and (b) to use such transferred materials and/or information solely for research and not for Commercial Purposes. Commercial Purposes means any activity by a party for consideration and may include, but is not limited to: (1) use of the product or its components in manufacturing; (2) use of the product or its components to provide a service, information, or data; (3) use of the product or its components for therapeutic, diagnostic or prophylactic purposes; or (4) resale of the product or its components, whether or not such product or its components are resold for use in research. Invitrogen Corporation will not assert a claim against the buyer of infringement of patents owned or controlled by Invitrogen Corporation which cover this product based upon the manufacture, use or sale of a therapeutic, clinical diagnostic, vaccine or prophylactic product developed in research by the buyer in which this product or its components was employed, provided that neither this product nor any of its components was used in the manufacture of such product. If the purchaser is not willing to accept the limitations of this limited use statement, Invitrogen is willing to accept return of the product with a full refund. For information on purchasing a license to this product for purposes other than research, contact Licensing Department, Life Technologies Corporation, 5791 Van Allen Way, Carlsbad, California 92008. Phone (760) 603-7200. Fax (760) 602-6500. Email: [email protected]. ©2010 Life Technologies Corporation. All rights reserved. The trademarks mentioned herein are the property of Life Technologies Corporation or their respective owners. 28 Corporate Headquarters 5791 Van Allen Way Carlsbad, CA 92008 T: 1 760 603 7200 F: 1 760 602 6500 E: [email protected] For country-specific contact information visit our web site at www.invitrogen.com User Manual