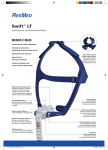
1
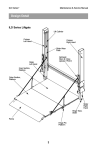
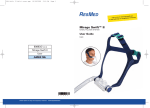
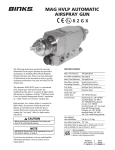
ed.com
www.myresm
treatment.
Log on now to
ur
yo
g
in
tips on manag
ul
ef
us
d
fin
to
Mirage Vista™ Nasal Mask
USER GUIDE
English
Manufacturer:
ResMed Ltd 1 Elizabeth Macarthur Drive Bella Vista NSW 2153 Australia
Distributed by:
ResMed Corp 14040 Danielson Street Poway CA 92064-6857 USA
ResMed (UK) Ltd 96 Milton Park Abingdon Oxfordshire OX14 4RY UK
See www.resmed.com for other ResMed locations worldwide.
Mirage Vista Nasal Mask
Protected by patents: AU 710733, AU 712236, AU 724360, AU 775051, AU 777033, AU 2007100084, AU 2007100086, AU
2007100138, AU 2007100203, AU 2007100205, AU 2007100207, AU 2007100208, AU 2007100209, AU 2007100622, CA 2261790,
DE 20321472.2, DE 20321469.2, DE 20321468.4, DE 20321470.6, DE 20321471.4, EP 0956069, EP 0968022, EP 1187649, EP 1187650,
EP 136097, EP 1479406, EP 1640034, JP 3687981, JP 4188883, NZ 536545, NZ 550675, NZ 553756, NZ 553757, NZ 553822, NZ
553823, NZ 553824, NZ 553825, NZ 562417, NZ 562418, NZ 562419, US 6112746, US 6357441, US 6439230, US 6561190, US
6561191, US 6581602, US 6634358, US 6907882, US 7047972, US 7069933, US 7207335, US 7341060. Other patents pending.
Protected by design registrations: AU 155372, AU 158411, AU 308717, AU 308720, AU 308721, AU 308722, AU 308723, AU 308724,
AU 308725, AU 308726, AU 308727, CN 200300302716.1, CN 200300340332.5, CN 200530016878.6, CN 200430007893.X, CN
200430003839.8, CN 200430003840.0, CN 200430113940.9, CN 200530148214.5, CN 200530148215.X, CN 200530148216.4, DE
40300897, FR 03 0845, GB 3010608, GB 3014182, GB 3014183, GB 3014184, GB 3014185, GB 3014186, GB 3014187, GB 3014188,
GB 3014189, JP 1200870, JP 1201246, JP 1212622, JP 1212623, JP 1212703, JP 1249260, JP 1257058, JP 1275666, JP 1293842, NZ
403295, SE 77095, US D485905, US D507348, US D540941, US D552731, D581041. Others pending.
Mirage and Vista are trademarks of ResMed Ltd and are registered in U.S. Patent and Trademark Office.
60845-Eng/3 09 01
6
4
5
www.resmed.com
Angle Selector Tab / Sélecteur d'angle /
Selector de ángulo / Selector de ângulo
© 2009 ResMed Ltd.
Lower strap / Sangle inférieure /
Correa inferior / Correia inferior
Vent flow rate / Débit à l’orfice de ventilation / Caudal de
flujo por la ventilación / Taxa de fluxo de ventilação (L/min)
A
6
8
10
12
14
16
18
Headgear clip / Clip du harnais / Broche
del arnés para la cabeza / Clipe do arnês
Strap loop / Boucle de la
sangle / Bucle de la correa /
Presilha da correia
© 2009 ResMed Ltd.
8
4
Global leaders in sleep and respiratory medicine
0
Mask Pressure / Pression dans le masque / Presión en la mascarilla / Pressão na máscara (cmH2O)
© 2009 ResMed Ltd. Side vertical strap / Sangle latérale verticale
/ Correa lateral vertical / Correia lateral
vertical
20
0
Rear strap / Sangle arrière / Correa
posterior / Correia inferior
Crossover buckle / Boucle de
croisement / Hebilla del cruce /
Fivela em cruz
10
20
Crossover / Croisement / Cruce / Cruz
30
Swivel / Pièce pivotante / Pieza giratoria /
Peça giratória
40
50
Short air tubing / Tuyau à air court / Tubo de aire
corto / Tubo de ar curto
60
Cuff / Manchon / Mango / Manga
Pressure–Flow Curve / Courbe Pression-Débit / Curva
de Presión-Flujo / Curva de Pressão-Fluxo
Ports cap / Bouchon d'entrée / Tapa de los
puertos / Tampa das portas
Mask frame / Entourage rigide /
Armazón de la mascarilla /
Armação da máscara
Mask cushion / Bulle du
masque / Almohadilla de la
mascarilla / Almofada da
máscara
Note: For complete instructions, read the text section in conjunction with the illustrations on this sheet.
/ Remarque : pour les instructions complètes, veuillez vous référer au texte et aux illustrations de cette
fiche. / Nota: Para instrucciones detalladas, sírvase leer el texto en conjunto con las ilustraciones de esta
hoja. / Nota: Para obter informações completas, leia a secção de texto juntamente com as ilustrações
que se encontram neste folheto.
B
Exhaust vent / Orifice de
ventilation / Ventilación /
Porta de exalação
Vent cover / Cache des orifices de ventilation /
Cubierta de la ventilación / Tampa do orifício de
ventilação
Mask elbow / Coude du masque / Codo de la
mascarilla / Cotovelo da máscara
Mask Parts / Composants du masque / Piezas de la
mascarilla / Peças da máscara
ed.com
www.myresm
tment.
Log on now to
ing your trea
tips on manag
to find useful
Mirage Vista™ Nasal Mask
USER GUIDE
English
•
Français
•
Español
•
Português
Manufacturer:
ResMed Ltd 1 Elizabeth Macarthur Drive Bella Vista NSW 2153 Australia
Distributed by:
ResMed Corp 14040 Danielson Street Poway CA 92064-6857 USA
ResMed (UK) Ltd 96 Milton Park Abingdon Oxfordshire OX14 4RY UK
See www.resmed.com for other ResMed locations worldwide.
Mirage Vista Nasal Mask
Protected by patents: AU 710733, AU 712236, AU 724360, AU 775051, AU 777033, AU 2007100084, AU 2007100086, AU
2007100138, AU 2007100203, AU 2007100205, AU 2007100207, AU 2007100208, AU 2007100209, AU 2007100622, CA 2261790,
DE 20321472.2, DE 20321469.2, DE 20321468.4, DE 20321470.6, DE 20321471.4, EP 0956069, EP 0968022, EP 1187649, EP 1187650,
EP 136097, EP 1479406, EP 1640034, JP 3687981, JP 4188883, NZ 536545, NZ 550675, NZ 553756, NZ 553757, NZ 553822, NZ
553823, NZ 553824, NZ 553825, NZ 562417, NZ 562418, NZ 562419, US 6112746, US 6357441, US 6439230, US 6561190, US
6561191, US 6581602, US 6634358, US 6907882, US 7047972, US 7069933, US 7207335, US 7341060. Other patents pending.
Protected by design registrations: AU 155372, AU 158411, AU 308717, AU 308720, AU 308721, AU 308722, AU 308723, AU 308724,
AU 308725, AU 308726, AU 308727, CN 200300302716.1, CN 200300340332.5, CN 200530016878.6, CN 200430007893.X, CN
200430003839.8, CN 200430003840.0, CN 200430113940.9, CN 200530148214.5, CN 200530148215.X, CN 200530148216.4, DE
40300897, FR 03 0845, GB 3010608, GB 3014182, GB 3014183, GB 3014184, GB 3014185, GB 3014186, GB 3014187, GB 3014188,
GB 3014189, JP 1200870, JP 1201246, JP 1212622, JP 1212623, JP 1212703, JP 1249260, JP 1257058, JP 1275666, JP 1293842, NZ
403295, SE 77095, US D485905, US D507348, US D540941, US D552731, D581041. Others pending.
Mirage and Vista are trademarks of ResMed Ltd and are registered in U.S. Patent and Trademark Office.
60845/3 09 01
0
8
4
5
Vent flow rate / Débit à l’orfice de ventilation / Caudal de
flujo por la ventilación / Taxa de fluxo de ventilação (L/min)
12
14
16
18
© 2009 ResMed Ltd. 6
10
Angle Selector Tab / Sélecteur d'angle /
Selector de ángulo / Selector de ângulo
Headgear clip / Clip du harnais / Broche
del arnés para la cabeza / Clipe do arnês
Strap loop / Boucle de la
sangle / Bucle de la correa /
Presilha da correia
© 2009 ResMed Ltd.
www.resmed.com
8
Global leaders in sleep and respiratory medicine
6
© 2009 ResMed Ltd.
Lower strap / Sangle inférieure /
Correa inferior / Correia inferior
Mask Pressure / Pression dans le masque / Presión en la mascarilla / Pressão na máscara (cmH2O)
4
Side vertical strap / Sangle latérale verticale
/ Correa lateral vertical / Correia lateral
vertical
20
0
Rear strap / Sangle arrière / Correa
posterior / Correia inferior
Crossover buckle / Boucle de
croisement / Hebilla del cruce /
Fivela em cruz
10
20
Crossover / Croisement / Cruce / Cruz
30
Swivel / Pièce pivotante / Pieza giratoria /
Peça giratória
40
50
Short air tubing / Tuyau à air court / Tubo de aire
corto / Tubo de ar curto
60
Cuff / Manchon / Mango / Manga
Pressure–Flow Curve / Courbe Pression-Débit / Curva
de Presión-Flujo / Curva de Pressão-Fluxo
A
Exhaust vent / Orifice de
ventilation / Ventilación /
Porta de exalação
Ports cap / Bouchon d'entrée / Tapa de los
puertos / Tampa das portas
Mask frame / Entourage rigide /
Armazón de la mascarilla /
Armação da máscara
Vent cover / Cache des orifices de ventilation /
Cubierta de la ventilación / Tampa do orifício de
ventilação
Mask elbow / Coude du masque / Codo de la
mascarilla / Cotovelo da máscara
Mask cushion / Bulle du
masque / Almohadilla de la
mascarilla / Almofada da
máscara
B
Note: For complete instructions, read the text section in conjunction with the illustrations on this sheet.
/ Remarque : pour les instructions complètes, veuillez vous référer au texte et aux illustrations de cette
fiche. / Nota: Para instrucciones detalladas, sírvase leer el texto en conjunto con las ilustraciones de esta
hoja. / Nota: Para obter informações completas, leia a secção de texto juntamente com as ilustrações
que se encontram neste folheto.
Mask Parts / Composants du masque / Piezas de la
mascarilla / Peças da máscara
C
Fitting / Mise en place / Colocación / Ajuste
Crossover as far forward as possible / Croisement aussi près que possible du front /
Coloque el cruce lo más hacia delante posible / A fivela em cruz encontra-se tão
próxima da frente quanto possível
C-1
a
C-2
Side strap is vertical / La sangle latérale
est à la verticale / La correa lateral es
vertical / A correia lateral encontra-se
na vertical
Lower strap sits below ear / La sangle
inférieure repose sous l'oreille / La
correa inferior se apoya detrás de la
oreja / A correia inferior encontra-se
abaixo da orelha
b
Headgear clip aligned with nose / Clip du harnais aligné avec le nez /
Broche del arnés para la cabeza alineado con la nariz / O clipe do arnês
encontra-se alinhado com o nariz
a
C-3
C-4
Straps fit securely at base of head / Les sangles reposent à la base du
crâne / Las correas se ajustan en la base de la cabeza / As correias são
assentes com segurança na base da cabeça
Angle Selector Tab / Languette de sélection
d'angle / Lengüeta selectora de ángulo / Patilha de
selecção de ângulo
a
C-5
C-6
Settings / Positions / Posiciones / Posições
© 2009 ResMed Ltd.
D
E
Disassembling / Démontage / Desmontaje / Desmontar
Reassembling / Remontage / Montaje / Voltar a montar
D-1
D-2
E-1
E-2
D-3
D-4
E-3
E-4
© 2009 ResMed Ltd.
© 2009 ResMed Ltd.
Note: The headgear does not need to be disassembled for cleaning. Headgear reassembly instructions are provided here as additional information. / Remarque : Il n’est pas nécessaire de démonter le harnais
pour le nettoyage. Les instructions de remontage sont fournies à titre indicatif. / Nota: El arnés no necesita ser desmontado para su limpieza. Las instrucciones para volver a montar el arnés se proporcionan aquí
únicamente como información adicional. / Nota: Não necessita de desmontar o arnês antes de proceder à limpeza. As instruções de remontagem do arnês são oferecidas como informações adicionais.
B
F-1
A
D
F-4
F-3
F-2
C
A
BR
A
BR
BL
A
B
B
D
D
D
© 2009 ResMed Ltd.
BR
C
BL
A
D
BL
BR
F-5
ENGLISH
Mirage Vista™ Nasal Mask
Rx Only
The Mirage Vista™ Nasal Mask is an
accessory to a non-continuous ventilator
(respirator) intended for multipatient use
for adult patients prescribed continuous
positive airway pressure (CPAP) or bilevel
therapy in hospital, clinic, and/or home
environments.
CAUTION
In the USA, federal law restricts this
device to sale by, or on the order of, a
physician.
MEDICAL INFORMATION
Note: The mask system does not contain
latex, PVC or DEHP materials. If you have
ANY reaction to any part of the mask
system, discontinue use and consult your
sleep therapist.
WARNINGS AND CAUTIONS
•
This mask should be used only with
CPAP or bilevel systems
recommended by your physician or
respiratory therapist. A mask should
not be used unless the CPAP or bilevel
system is turned on and operating
properly. The exhaust vent should
never be blocked.
Explanation of the Warning: CPAP
and bilevel systems are intended to be
used with special masks with
connectors which may have vent holes
or separate exhaust vents to allow
continuous flow of air out of the mask.
When the CPAP or bilevel device is
turned on and functioning properly,
new air from the flow generator flushes
the exhaled air out through the
attached mask exhaust vent. However,
when the CPAP or bilevel device is not
operating, enough fresh air will not be
provided through the mask, and
exhaled air may be rebreathed.
Rebreathing of exhaled air for longer
than several minutes can in some
circumstances lead to suffocation. This
warning applies to most models of
CPAP or bilevel systems.
• At low CPAP pressures, the flow
through the exhaust vent may be
inadequate to clear all exhaled gas from
the tubing. Some rebreathing may
occur.
Explanation of the Warning: The
exhaust vent flow is lower at lower
mask pressures (see Pressure/Flow
curve - Figure A). To avoid rebreathing
it is recommended that a mask
pressure of 4 cm H2O or more be
used.
• The Mirage Vista features an elbow that
can be easily removed while the mask
is fitted. The mask should not be used
with the elbow attached unless the
ENGLISH
CPAP or bilevel system is turned on and
operating properly.
• If oxygen is used with the CPAP or
bilevel device, the oxygen flow must be
turned off when the flow generator is
not operating.
Explanation of the Warning: When the
CPAP or bilevel device is not in
operation, and the oxygen flow is left
on, oxygen delivered into the ventilator
tubing may accumulate within the flow
generator enclosure. Oxygen
accumulated in the CPAP or bilevel
device enclosure will create a risk of fire.
This warning applies to most types of
CPAP or bilevel flow generators.
• Please refrain from smoking while
oxygen is in use.
Note: At a fixed rate of supplemental
oxygen flow, the inhaled oxygen
concentration will vary, depending on the
pressure settings, patient breathing pattern,
mask selection, and leak rate.
3
4
5
6
7
8
PARTS OF THE MASK
See Figure B.
FITTING THE MASK
See Figure C.
Note: Before fitting the mask, refer to the
section “Cleaning the Mask in the Home”.
1 Place the headgear on the head. Adjust
the side vertical straps so that the lower
strap sits just below the ear (not
touching it) and at the base of the head
(Fig. C-1).
2 The headgear clip should be parallel
with the nose and not in the line of
vision. Check that the crossover is as far
forward as possible (Fig. C-2).
To adjust the crossover to a forward
position, slide the crossover buckle
along one strap (Fig. C-2a) and then
9
along the other strap (Fig. C-2b).
Alternate the movement on each side
until the crossover is as far forward as
possible.
Ensure that the crossover and the rear
straps lie flat against the head.
Place the mask on the nose (Fig. C-3).
Clip the mask to the headgear.
Adjust the lower straps by pulling firmly
(Fig. C-4) so that the rear straps fit
securely around the base of the head
(Fig. C-4a).
Connect one end of the main air tubing
to your flow generator and the other
end to the swivel.
Note: The swivel, short air tubing, and
mask elbow are supplied assembled.
Turn your flow generator on.
Connect the mask elbow to the mask
frame. To do this, hold the sides of the
mask elbow (Fig. C-5) and firmly push
the elbow onto the mask frame until it
clicks into place.
Check that you have connected the
mask elbow correctly by rotating it. Be
careful not to squeeze the sides of the
elbow. If the mask elbow is fitted
correctly, it should rotate freely and not
separate from the mask frame.
Adjust the angle of the mask by selecting
the setting that provides a comfortable
fit with minimum or no leak.
To test each setting, hold down the
Angle Selector Tab (Fig. C-6) and move
the headgear clip up or down
(Fig. C-6a) as required. You may need
to raise the headgear clip when moving
it from one setting to the next.
The mask can be tilted at five different
positions. If you feel excessive pressure
on the middle of the nose, tilt the mask
down. Alternatively, if you feel excessive
Notes:
If you are unable to resolve any leaks you
may need to try another cushion size.
• Excess headgear length may be trimmed
to a suitable length if required. Leave at
least 30 mm free length on the straps.
• Select "Standard" as the mask option when
using the Mirage Vista with ResMed flow
generators that have mask setting options.
For a full list of compatible devices for this
mask, see the Mask/Device Compatibility
List on www.resmed.com on the Products
page under Service & Support. If you do
not have internet access, please contact
your ResMed representative.
DISASSEMBLING FOR CLEANING
See Figure D.
1 Detach the mask elbow. To do this,
squeeze the sides of the mask elbow at
the finger grips while pulling it away from
the mask frame (Fig. D-1).
2 Disconnect and separate the main air
tubing, short air tubing, mask elbow, and
vent cover (Fig. D-2).
Notes:
•
REMOVING THE MASK
To remove the Mirage Vista, squeeze one
of the headgear clips. This releases one side
of the headgear from the mask. Pull the
mask and headgear away from your head.
Notes:
Do not pull the headgear off your head
without releasing the headgear clips first.
• You can detach the elbow from the mask
frame while wearing the mask. This is
useful when therapy needs to be stopped
for a short time; for example if you need to
go to the bathroom.
• Check that you can remove the headgear
clip, the quick release swivel, or the
headgear unaided.
•
To prevent damage to the short air
tubing, disconnect it by holding it at the
cuff.
• The swivel does not need to be
disconnected from the short air tubing.
3 Detach the headgear from the mask
frame by squeezing and releasing both
headgear clips.
4 Remove the ports cap from the mask
frame (Fig. D-3).
5 Firmly pull the mask cushion away from
the mask frame (Fig. D-4).
•
CLEANING THE MASK IN THE
HOME
Notes:
Wash the headgear before first time use,
as the dye may run. It is important to
always handwash the headgear.
• The headgear may be washed without
being disassembled.
•
WEEKLY
Handwash the headgear in warm, soapy
water. Use pure soap (see first caution
below). Rinse well and allow it to air dry out
of direct sunlight.
DAILY/AFTER EACH USE
Handwash the mask components in
lukewarm, soapy water. Use pure soap (see
first caution below). Rinse the components
ENGLISH
pressure on your upper lip, tilt the mask
up.
10 If you feel air leaks around the cushion,
reposition the mask on your face to
achieve a better seal.
Take time to adjust all straps and the
position of the mask so that you can
achieve a secure and comfortable fit.
ENGLISH
well and allow them to air dry out of direct
sunlight.
CAUTIONS
Do not use solutions containing
bleach, chlorine, alcohol, aromatics,
moisturizers, antibacterial agents, or
scented oils to clean any part of the
mask system or air tubing. These
solutions may cause damage and
reduce the life of the product.
• Do not expose any part of the mask
system or tubing to direct sunlight as
it may deteriorate.
• If any visible deterioration of a mask
component is apparent (cracking,
crazing, tears etc), the mask
component should be discarded and
replaced.
• Flexible PVC contains elements that
can be detrimental to the materials of
the mask. If flexible PVC tubing is used
continuously, the attachment port
should be inspected for cracking.
Replace any parts that are damaged.
•
REPROCESSING THE MASK
BETWEEN PATIENTS
The mask should be reprocessed when
used between patients.
Cleaning, disinfection and sterilization
instructions are available from the ResMed
website, www.resmed.com/masks/
sterilization/americas.
If you do not have internet access, please
contact your ResMed representative.
To clean the headgear between patients,
use the method described in the previous
section “Cleaning the Mask in the Home”.
REASSEMBLING THE MASK
See Figure E.
1 Insert the mask cushion into the groove
of the mask frame (Fig. E-1). Fit the top
section first and then work your way
around, pushing the mask cushion into
the mask frame.
Note: The diamond markers on the mask
frame and on the mask cushion (one on
top, two at the bottom) must line up.
2 Push the ports cap onto the mask ports
(Fig. E-2).
3 Attach the vent cover to the mask
elbow. To do this, insert the elbow into
the ring of the vent cover (Fig. E-3).
Push the ring to the top so that the vent
cover is over the back of the elbow.
Then, press the lip of the vent cover to
ensure that it is securely seated in the
groove of the elbow.
4 Connect the short air tubing to the mask
elbow.
5 Connect the swivel to the main air
tubing, ready for next use (Fig. E-4).
ADDITIONAL INFORMATION
REASSEMBLING THE HEADGEAR
Note: You do not need to disassemble the
headgear for cleaning. However, if you choose
to do so, the reassembly procedure is
explained in this section.
When disassembled, the headgear has four
parts:
A: Left strap, B: Middle strap,
C: Crossover buckle, D: Right strap
1 Lay out the four parts of the headgear as
shown in Figure F-1.
2 Following Figure F-2 thread the straps
BR and BL through the crossover buckle
(Part C).
3 Thread strap BR through the buckle on
Part A. Thread strap BL through the
buckle on Part D (Fig. F-3).
Part No.
Item
61025
Headgear clip - blue (2 pk.)
61026
Headgear clip - blue (10 pk.)
60919
Crossover buckle - blue
60920
Crossover buckle - blue
(10 pk.)
60924
Mask Frame
60925
Elbow Assembly
60926
Inlet Tube and Swivel Assembly
60927
Inlet Tube and Swivel Assembly
(10 pk.)
See Figure A.
Note: The mask contains passive venting to
protect against rebreathing. As a result of
manufacturing variations, the vent flow rate
may vary.
60014
Swivel Assembly (10 pk.)
DEAD SPACE INFORMATION
TECHNICAL SPECIFICATIONS
PRESSURE–FLOW CURVE
Dead space is the empty volume of the
mask up to the swivel.
The dead space of the mask for all cushion
sizes is 80 mL.
SYMBOLS
Caution, consult accompanying
documents; LOT Lot number; REF Part
number;
Temperature limitation;
Humidity limitation;
Does not
contain latex;
Manufacturer;
Indicates a Warning or Caution and alerts
you to a possible injury or explains special
measures for the safe and effective use of
the device.
REPLACEMENT PARTS
Part No.
Item
60918
Headgear Assembly, Standard
61020
Headgear Assembly, Small
60013
Cushion, Small
60921
Cushion, Standard
60922
Cushion, Deep
16570
Ports cap (2 pk.)
16571
Ports cap (10 pk.)
60001
Mask System, Deep Cushion
- Standard Headgear
60000
Mask System, Standard Cushion
- Standard Headgear
LIMITED WARRANTY
ResMed warrants that your ResMed mask
system, including its components: mask
frame, cushion, headgear, tubing and other
accessories (“Product”) shall be free from
defects in material and workmanship for a
period of ninety (90) days from the date of
purchase by the initial consumer.
For further details refer to the Warranty.
ENGLISH
4 Thread the straps of Part A and Part D
through the buckles on Part B (Fig. F-4).
5 With the headgear clip facing down, fit
the headgear clip onto the hole on the
headgear. While pressing the headgear
tab down, rotate the headgear clip away
from the tab to lock it into place
(Fig. F-5). Repeat this with the other
headgear clip.