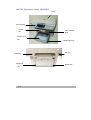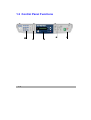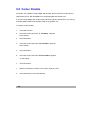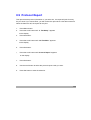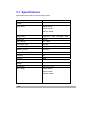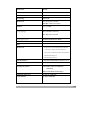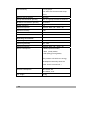
1
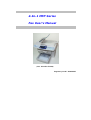
4-In-1 MFP Series Fax User’s Manual (P/N: 250-0502-E V400) Regulatory model: 200400003 Trademarks The brands and product names herein are trademarks or registered trademarks of their respective holders. ENERGY STAR® is a U.S. registered mark. Copyright © 2001 Avision Inc. All rights reserved. No part of this publication may be reproduced, transmitted, transcribed, stored in a retrieval system, or translated into any language or computer language, in any form or by any means, electronic, mechanical, magnetic, optical, chemical, manual, or otherwise, without the prior written permission of the manufacturer. Warranty The information contained in this document(s) is subject to change without notice. The manufacturer makes no warranty of any kind with regard to this material, including, but not limited to, the implied warranties of fitness for a particular purpose. The manufacturer shall not be liable for errors contained herein or for incidental or consequential damages in connection with the furnishing, performance, or use of this material. ii FCC Radio Frequency Interference Statement This product has been tested and found to comply with the limits for a class B digital device, pursuant to Part 15 of the FCC rules. Operation is subject to the following two conditions: (1) this device may not cause harmful interference, and (2) this device must accept any interference received, including interference that may cause undesired operation. The FCC Class B limits are designed to provide reasonable protection against harmful interference in a residential installation. This equipment generates, uses, and can radiate radio frequency energy and, if not installed and used in accordance with the instructions, may cause harmful interference to radio communications. However, there is no guarantee that interference will not occur in a particular installation. If this equipment does cause harmful interference to radio or television reception, which can be determined by turning the equipment off and on, the user is encouraged to try to correct the interference by one or more of the following measures: Reorient or relocate the receiving antenna. Increase the separation between the equipment and receiver. Connect the equipment into an outlet on a circuit different from that to which the receiver is connected. Consult your point of purchase or service representative for additional suggestions. CE This product satisfies the Class B limits of EN55022, EN55024 and safety requirements of EN 60950. iii As an ENNERGY STAR Partner, Avision Inc. has determined that this product meets the ENNERGY STAR guidelines for energy efficiency. LASER SAFETY INSTRUCTION This printer is a page printer which is operated by means of a laser. There is no possibility of danger from the laser, provided the printer is operated according to the instructions in this manual. Since radiation emitted by the laser is completely confined within protective housings and external covers, the laser beams cannot escape from the machine during any phase of user operation. • Do not place a coffee cup, vase, or other liquid-filled container on the machine. Spillage can damage the machine’s electrical parts and insulation. Take care not to drop paper clips, staples, or any other metal objects into the machine. Avoid watching the lamp during operation with the Document cover in the open position. Should you need to copy for a long period with the Document cover open, it is advisable to arrange a shield for your eyes or to wear sunglasses. When clearing paper jams, refer to the instructions in this manual. Before disconnecting the plug, turn the machine off. Make sure your hands are dry. Hold the plug itself, not its cord, when disconnecting it from the receptacle. Never attempt to open any fixed cover. Do not attempt to alter the machine or its parts. Under normal conditions the small quantities of ozone gas produced by the machine are harmless. However, if the machine is used for an extended period or within a small room, you should make sure that the area is adequately ventilated. Also ventilate the room if you notice the machine smalls after a period of frequent or extended use. Do not modify this product, as a fire, electrical shock, or breakdown could result. If the product employs a laser, the laser beam source could cause blindness. Do not attempt to remove the covers and panels which have been fixed to the product. Some products have a high-voltage part or a laser beam source inside that could cause an electrical shock or blindness. If this product becomes inordinately hot or emits smoke, or unusual odor or noise, • • • • • • • • • • iv • • • immediately turn OFF the power switch, unplug the power cord from the power outlet, and then call your authorized service representative. If you keep on using it as is, a fire or electrical shock could result. If this product has been dropped or its cover damaged, immediately turn OFF the power switch, unplug the power cord from the power outlet, and then call your authorized service representative. If you keep on using it as is, a fire or electrical shock could result. The inside of this product has areas subject to high temperature, which may cause burns. When checking the inside of the unit for malfunctions such as paper mis-feed, do not touch the locations (around the fusing unit, etc.) which are indicated by a “Caution! Hot Surface” caution label. Do not store the machine’s consumables in any of these locations: − Where the temperature or humidity may be excessively high. − Where flammable items or liquids are stored. − In direct sunlight. − In dusty conditions. CAUTION ! Use of the controls, adjustments, or performance of procedures other than those specified in this manual may result in hazardous radiation exposure. This machine is certified as a Class 1 laser product. This means that the machine does not produce hazardous laser radiation. v Disposal of Waste Equipment This symbol on the product or on its packaging indicates that the product can not be disposed of with your other household waste. Instead it should be sent to appropriate facilities for recovery and recycling in an effort to protect human health and the environment. Fore more information about where you can drop off your waste equipment for recycling, please contact your local city office, your household waste disposal service or the shop where you purchased the product. vi Table of Contents 1 GETTING TO KNOW YOUR PRODUCT.......................................................................1-1 1.1 1.2 2 FAX & REPORT MENU SETTINGS...............................................................................2-1 2.1 2.2 2.3 2.4 3 IDENTIFYING YOUR HARDWARE COMPONENTS .....................................................1-1 CONTROL PANEL FUNCTIONS ...............................................................................1-4 ADJUSTING FAX OPTIONS .....................................................................................2-1 ACCESSING THE FAX SETTINGS ...........................................................................2-2 MENU TABLE FOR FAX ...........................................................................................2-1 MENU TABLE FOR REPORT ...................................................................................2-5 SENDING & RECEIVING FAXES..................................................................................3-1 3.1 3.2 3.3 3.4 SENDING A FAX .....................................................................................................3-1 IMPROVING FAXED IMAGES ...................................................................................3-5 RECEIVING FAXES .................................................................................................3-7 OPERATION FROM EXTENSION TELEPHONES......................................................3-10 4 PRINTING REPORTS ......................................................................................................4-1 5 INITIAL FAX SETUP.......................................................................................................5-1 5.1 5.2 5.3 5.4 5.5 5.6 5.7 5.8 5.9 5.10 5.11 5.12 5.13 5.14 5.15 5.16 5.17 5.18 6 USING THE DIAL PAD TO ENTER CHARACTERS.....................................................5-1 CHANGING NUMBERS OR NAMES .........................................................................5-1 INSERTING A PAUSE ..............................................................................................5-1 SETTING THE DATE AND TIME...............................................................................5-2 SETTING THE FAX HEADER ...................................................................................5-3 SELECTING TONE OR PULSE DIALING MODE .........................................................5-4 SETTING THE RING TO ANSWER ...........................................................................5-5 ENABLING THE FAX HEADER.................................................................................5-6 UPDATING THE DEFAULT FAX RESOLUTION ..........................................................5-7 SETTING THE FAX BRIGHTNESS ...........................................................................5-8 CHANGING THE RING VOLUME OF THE FAX ...........................................................5-9 TRANSMISSION VERIFICATION REPORT..............................................................5-10 CHANGING REDIAL COUNT ..................................................................................5-11 SETTING REDIAL INTERVAL..................................................................................5-12 ENABLING THE FAX FOOTER...............................................................................5-13 CHANGING THE DETECT DIAL TONE SETTING ......................................................5-14 REDUCING RECEIVED FAXES ...............................................................................5-15 SECURING RECEIVED FAXES ...............................................................................5-16 SPEED DIALING & PHONE BOOK ...............................................................................6-1 6.1 6.2 STORING ONE-TOUCH DIAL NUMBERS .................................................................6-1 STORING & USING SPEED-DIAL NUMBERS ...........................................................6-3 vii 6.3 6.4 7 SETTING UP GROUPS DIAL ...................................................................................6-7 USING QLINK TO MANAGE FAX DATA .................................................................6-11 SPECIAL FAX ..................................................................................................................7-1 7.1 7.2 7.3 7.4 8 DELAYED FAX ........................................................................................................7-1 BROADCASTING .....................................................................................................7-2 POLLING ................................................................................................................7-4 MEMORY MANAGEMENT FOR DELAYED FAX/ BROADCASTING/POLLING .............7-5 TROUBLE SHOOTING FOR FAX..................................................................................8-1 8.1 8.2 8.3 8.4 8.5 8.6 8.7 8.8 8.9 8.10 8.11 8.12 8.13 9 FAX MAINTENANCE MENU .....................................................................................8-1 CONNECT TIME ......................................................................................................8-1 TX LEVEL ..............................................................................................................8-3 ECM......................................................................................................................8-4 TX SPEED .............................................................................................................8-5 RX SPEED .............................................................................................................8-6 SPEED DISPLAY .....................................................................................................8-7 CODEC DISABLE ....................................................................................................8-8 PROTOCOL REPORT..............................................................................................8-9 FILE CLEAR .........................................................................................................8-10 INSTALL LOCATION ..............................................................................................8-11 ERROR CODE ......................................................................................................8-12 TROUBLESHOOTING ............................................................................................8-14 TECHNICAL SUPPORT ..................................................................................................9-1 9.1 viii SPECIFICATIONS....................................................................................................9-2 1 Getting to know your product 1.1 Identifying your hardware components AM3130/AM3230 (Regulatory model: 200400003) ADF lid ADF input tray Paper stopper Control panel Priority input tray Media input tray USB port Telephone port ADF port Power jack 1-1 AM3130L (Regulatory model: 200400003) Cover Control panel Output tray Print cartridge door Priority input tray USB port Telephone port 1-2 Media input tray ADF port Power jack Identifying the 4-In-1 product package contents drum & toner printer output tray paper stop ADF input tray not for not for AM3130L(Regulatory model: AM3130L(Regulatory model: 200400003) 200400003) Fax Use’s Guide & CD USB cable printer paper tray Power cable Telephone cord 1-3 1.2 Control Panel Functions \ 1-4 [ Z Y X X Allows you to save on toner by using less toner to print a document. Stops an operation at any time. clears the fax or copy options Starts a job. 1-5 Y Selects the document concentration mode for the current copy job. Sets the product to automatically collate multiple copies into sets. 1-6 Y Prints 1,2, or 4 original images reduced to fit onto one sheet of paper. Prints 1~4 pages reduced to fit onto one sheet of paper. Prints 1~2 pages reduced to fit onto one sheet of paper. Selects the number of copies. (Pressing the button one time increases one page.) Adjusts the brightness of the documents for the current copy job. Makes a copy smaller or larger than the original. 1-7 Z Lets you access Scan mode. Lets you access Copy mode. Lets you access Fax mode. Turns on when paper jam happens. Turns on when the toner cartridge is empty. 1-8 Displays messages on the screen to help you set up and use this product. Enters Menu Mode and scrolls through the menus available. Z Scrolls through the options available for the selected menu item. Confirms the selection on the display. Scans your original to a designated software. Deletes entered data or lets you exit the menu by pressing repeatedly. [ Dial pad Dial a number or enter alphabetical characters. 1-9 \ One-Touch keys These 6 keys give you instant access to 12 previously stored dial numbers. But only the first 6 stored keys can be applied to Group Dial function. Lets you dial stored numbers. It also lets you look up numbers that are stored in the dialing memory. Redials the last number you called. It also inserts a pause in auto dial numbers. To access memory locations 7 through 12 in the One-Touch keys, hold down the Shift key together with a One-Touch key. Sets the resolution type when you send a fax. Adjusts the brightness of the documents for the current fax job. Press before dialing if you want to make sure a fax machine will answer. 1-10 2 Fax & Report Menu Settings Your product is designed to be easy to use with LCD on-screen programming using the navigation keys. User-friendly programming helps you take full advantage of all the menu selections your product has to offer. Since your programming is done on the LCD, we have created step-by-step on-screen instructions to help you program your product. All you need to do is follow the instructions as they guide you through the menu selections and programming options. 2.1 Adjusting Fax Options You can probably adjust your fax options without the User’s Guide. But to help you understand the whole picture of fax menu selections and options that are found in the fax product programs, refer to the Menu table for fax, depicted on the next page. If you want to understand the other menu selections and options (Common Setup and Copy Setup) except fax, refer to AM3000 series user’s manual. 2-1 2.2 Accessing the Fax Settings The navigation keys for the LCD on-screen programming is depicted as below: cancel the setting or return to previous menu level Access the menu Go to the next menu level Accept an option Exit the menu by pressing repeatedly Go back to the previous menu level Scroll through the current menu level Exit the menu 2-2 Follow this procedure to change fax settings in the menu table : You can access the menu mode by pressing Menu menu, the LCD scrolls. . When you enter the Press the arrow keys for Common Setup menu, Copy Setup menu, Report menu, Fax Setup menu, Phone Book menu or Special Fax menu. OR You can scroll more quickly through each menu level by pressing the arrow for the direction you want. Then set an option by pressing Set when that option appears on the LCD. The LCD will then show the next menu level. Press the arrow to scroll to your next menu selection. Press Set. When you finish setting an option, the LCD shows “Setting OK” on the bottom line. 2-3 2.3 Menu table for fax Each layer level and option of the Menu table for fax will be explained respectively in Chapter 4 “Initial Fax Setup”, Chapter 5 “Speed dialing & Phone Book”, Chapter 6 “Special Fax”, and Chapter 7 “Troubleshooting for Fax. Layer1 Layer2 Layer3 4. Fax 41 Date/Time Setup Layer4 Ten key entry Description Reset the correct date Ref. Page 5-2 and time 42 Fax Header 421 Name Ten key entry Setting the Fax Header 5-3 422 Fax Num Ten key entry 43 Tone/Pulse 44 No. of Rings Tone, Pulse Select tone or pulse 10PPS, (Pulse 20PPS: dialing mode Japan/China only) 1,2,3,4, Manual Setting the Ring to 5-4 5-5 Answer 45 Header On, Off Enabling the fax 5-6 Header 46 Def. Res. STD, FINE, S-FINE, Photo Updating the fax resolution 5-7 47 Def. Bright Normal Dark, Light 5-8 Setting the fax Brightness 48 Line Monitor Off, Low, Mid, High Change the ring 5-9 volume of the fax 2-1 Layer1 Layer2 Layer3 4. Fax 49 Tx Report Setup Layer4 On, Off, Error Description Use the transmission Ref. Page 5-10 report 410 Redial Count 0,1,2,3,4,5,6 411 Redial Int. 10s, 30s, 1min., 2min., 3 Setting redial interval min On, Off Enabling the Fax Footer 5-12 On, Off 5-14 412 Footer 413 DialTone Det Change redial count Use the detect dial tone 5-11 5-13 setting 414 Fax Main. Connect 60,70,80,90 Time secs TX Level 0,-1,-2,,,,,,-15 dBm (default: Country dependent) ECM On, Off Change connect time Adjust transmission 8-2 8-3 level Use Error Correction 8-4 Mode TX Speed RX Speed 2-2 33.6, 31.2, 28.8,26.4, 24.0, 21.6, 19.2, 16.8, 14.4, 12, 9.6, 7.2, 4.8 2.4 33.6, 31.2, 28.8,26.4, 24.0, 21.6, 19.2, 16.8, 14.4, 12, 9.6, 7.2, 4.8 2.4 Adjust transmission 8-5 level Adjust MODEM signal reception speed 8-6 Layer1 Layer2 4. Fax Setup Layer3 Speed Display Layer4 On, Off Description Show Speed Ref. Page 8-7 8-8 Disable OFF,MMR,M Disable Fax Codec R mode Protocol On, Off, Error Print the protocol 8-9 Codec Report information File Clear Erase files in memory Install Location 415 Reduction RX 8-10 USA/Canada Set up your country , China, options Taiwan 8-11 On, Off 5-15 Reducing received faxes 416 Security RX On, Off Securing received 5-16 faxes 5.Phone 51 One-Touch Book Store One-Touch 6-1 Dial numbers 52 Speed dial Store Speed-Dial 6-2 numbers 53 Group Dial Add, Delete, Delete All Set up Groups Dial 6-7 2-3 Layer1 Layer2 5.Phone 6.Special Fax Book Layer3 61 Timer Tx Layer4 Time entry 62 Broadcast Description Set up delayed time Send to more than Ref. Page 7-1 7-2 one fax 63 Polling Rx Retrieve faxes from another fax machine 64 Mem Manage. Mem. Job Report memory job List list Mem. Clear 2-4 Delete memory job 7-3 7-4 7-5 2.4 Menu table for Report There are five types of reports available. Only the last two reports, Fax Act. Rept and PhoneBook, are involved in fax mode. Fax Act. Rept contains all fax activities on the product, and PhoneBook reports all stored item information in the PhoneBook settings. 3. Report 31 Configuration 32 Menu Map 33 Usage Report 34 Fax Act. Rept 35 PhoneBook 2-5 3 Sending & Receiving Faxes 3.1 Sending a Fax To load originals onto the flatbed glass 1. Before sending a fax, make sure that press is illuminated in green. If it is not, to enter fax mode. The default setting is Copy mode. 2. Lift the ADF cover. 3. Place the original document face down on the flatbed glass and align its center to the arrow mark on the glass. the arrow mark on the glass 4. Gently close the ADF cover. 5. Customize the fax settings using the control panel buttons. See Chapter 5 “Initial Fax Setup”, Chapter 6 “Speed dialing & phone book”, or Chapter 7 “Special Fax”. To clear settings, use Stop/Clear button. 3-1 6. Enter the fax number by using the ten keys on dial pad, One-Touch key, or Speed Dial/Search key. 7. Press Start to begin scanning the document. 8. After scanning, the LCD shows: Next Scan : START Scan End : # 9. Press the Pound key, “#”, to send a fax if you have no more documents to fax. Place another document on the flatbed glass and Repeat step 6~8 if you have more documents to fax. 3-2 To load originals into the ADF input tray 1. Before sending a fax, make sure that press is illuminated in green. If it is not, to enter fax mode. The default setting is Copy mode. 2. Make sure the flatbed scanner is free of media. 3. Roll the paper and place it in the tray. 4. Put the top end of the original media stack into the ADF input tray, with the media stack face up and the first page to be faxed on top of the stack. 5. Adjust the media guides to the document size. 3-3 6. Customize the fax settings using the control panel buttons. See Chapter 5 “Initial Fax Setup”, Chapter 6 “Speed dialing & phone book”, or Chapter 7 “Special Fax”. To clear settings, use Stop/Clear button. 7. Enter the fax number by using the ten keys on dial pad, One-Touch key, or Speed Dial/Search key. 8. Press Start to begin faxing. 3-4 3.2 Improving Faxed Images There are several settings that allow you to improve the quality and brightness of faxed documents. Adjusting the Image Quality When you have an original in the ADF or on the scanner glass, you can use the Quality key to change the fax resolution setting. To adjust the quality, 1. Press Quality key. The default setting appears on the bottom line of the display. 2. Press Quality key repeatedly to find the quality setting you want. resolution value Normal Fine The quality settings are depicted as follows: STD.: Suitable for most typed originals. Fine: Good for small print. S.Fine: Good for small print or artwork and transmits slower than Fine resolution. Photo: Use when the original has varying shades of gray. This has the slowest transmission time. 3-5 Adjusting the Image Brightness If your original is very light or very dark, you may want to set the brightness. To adjust the brightness, 1. Press Brightness key. 2. Press Brightness key repeatedly to find the brightness setting you want. Brightness value Light STD. The brightness settings are depicted as follows: Use Light to make the fax lighter. Use Dark to make the fax darker. 3-6 3.3 Receiving Faxes When there is a fax being sent to the product, it will ring first, and then receive and print the fax automatically. If you want to stop receiving a fax before reception is completed, simply press Stop/Clear button. Using “ON HOOK” or an external phone to send a fax Using the “ON HOOK” button or an external phone to send a fax lets you hear the dialing, ringing and fax-receiving tones while sending a fax. 1. If it is not illuminated in green, press (Fax). Place the original face up in the ADF, or face down on the scanner glass. 2. Press On Hook and listen for a dial tone. Or Pick up the external phone connected to the product’s EXT. jack and listen for a dial tone. 3. Dial the fax number. 4. When you hear the fax tone, press Start. 5. Press the number key ,1, on a dialing pad to send a fax. Press the 1. Send number key,1 2. Receive 3-7 Using “ON HOOK” to receive a fax Using the “ON HOOK” button to receive a fax lets you hear the ringing and fax-receiving tones while receiving a fax. At the end of a conversation, you can send a fax to the other party before you both hang up. 1. Use the external phone connected to the product’s EXT. jack to contact the other party first. 2. If it is not illuminated in green, press (Fax). 3. Press On Hook and listen for a dial tone. 4. Ask the other party to send a fax by the external phone. 5. Press Start. 6. Press the number key ,2, on a dialing pad to receive a fax. 7. Press the 1. Send number key, 2 2. Receive Hang up the external phone connected to the product’s EXT. jack. 3-8 Manually receiving Faxes If you want to receive faxes manually, first set up the following steps: 1. Press Menu button. 2. Press the scroll button until “ 4. Fax Setup ” appears on the display. 3. Press Set button. 4. Press the scroll button until “44. No. of Rings” appears on the display. 5. Press Set button. 6. Press the scroll button until “Manual” appears on the display. 7. Press Set button to save the selection. When there is a fax being sent to the product, it will ring until you press Start button, and then receive and print the fax automatically. 3-9 3.4 Operation from extension telephones To send a fax when the product’s fax number is an extension phone number from your telephone exchange : Dial the representative outside connection number of your telephone exchange, the '-' code, and then the other party’s fax number. Example: 0-5777017 To send a fax to the other party’s fax machine connected to an extension phone jack: Dial the representative number of the other party’s telephone exchange, the '-' code, and then the other party’s extension number. For international dial sequence: country code + area code + representative number + the '-' code + extension number example: 88635782388-xxxx For domestic dial sequence: area code + representative number + the '-' code + extension number example: 035782388-xxxx 【Note】 1. To display the '-' code, press Redial/Pause button. 2. Each '-' code causes a 2-second delay. 3. The delay caused by the other party’s telephone exchange depends on how long it takes for the other party’s telephone exchange to transfer the call. 3-10 4 Printing Reports To print a report 1. Press Menu button. 2. Press the scroll button until “ 3. Report ” appears on the display. 3. Press Set button. 4. Press the scroll button to select the report item you want. 5. Press Set button to print the report. 4-1 5 Initial Fax Setup 5.1 Using the dial pad to Enter Characters As you perform various tasks, you may need to enter names and numbers. For example, when you set up the product, you enter your name or your company's name and telephone number. When you store one or two digit speed dial or group dial numbers, you may also need to enter the corresponding names. When prompted to enter a letter, press the appropriate button in the number key pad on the control panel until the correct letter appears on the LCD display. For example, to enter the letter d, press 3. Each time you press 3, the LCD display shows a different letter, d, e, f ,D, E, and F. Press 1 to enter a space, or press # to enter special characters. 5.2 Changing Numbers or Names If you make a mistake while entering a number or name, press the left arrow button to delete the last digit or character. Then enter the correct number or character. 5.3 Inserting a Pause For some telephone systems, it is necessary to dial an access code and listen for a second dial tone. A pause must be entered in order for the access code to function. For example, enter an access code and then press Redial/Pause button before entering the telephone number. A "–" appears on the display to indicate when a pause is entered. 5-1 5.4 Setting the Date and Time The date and time are printed on all faxes. It may be necessary to reset the correct date and time if loss of power to the product occurs. 1. Press Menu button. 2. Press the scroll button until “ 4. Fax Setup ” appears on the display. 3. Press Set button. 4. Press the scroll button until “41. Date/Time ” appears on the display. 5. Press Set button. 6. Enter the correct date and time using the number key pad. 7. Press Set button to save the selection. 5-2 5.5 Setting the Fax Header You can set up three items for your fax header, which includes a name, a fax number, and a telephone number. 1. Press Menu button. 2. Press the scroll button until “ 4. Fax Setup ” appears on the display. 3. Press Set button. 4. Press the scroll button until “42. Fax Header ” appears on the display. 5. Press Set button. 6. Enter a name for your fax header, and then press Set button. Enter a name for your header 7. Name : John Enter a fax number for your fax header, and then press Set button. Enter a number for your header Fax:1234567 5-3 5.6 Selecting tone or pulse dialing mode Use this procedure to set the product to tone- or pulse-dialing mode. The default is set to tone. There are three types of dialing mode: Tone, Pulse 10PPS, and Pulse 20PPS. Leave this as tone unless you know your phone line is incapable of tone dialing. 1. Press Menu button. 2. Press the scroll button until “ 4. Fax Setup ” appears on the display. 3. Press Set button. 4. Press the scroll button until “43. Dial mode ” appears on the display. 5. Press Set button. 6. Use the scroll button to select your dialing mode. 7. Press Set button to save the selection. 5-4 5.7 Setting the Ring to Answer The No. of Rings sets the number of times the product rings before it answers in Fax. 1. Press Menu button. 2. Press the scroll button until “ 4. Fax Setup ” appears on the display. 3. Press Set button. 4. Press the scroll button until “44. No. of Rings” appears on the display. 5. Press Set button. 6. Select how many times the line rings before the product answers. 7. Press Set button to save the selection. 5-5 5.8 Enabling the Fax Header Your fax header includes a name, a fax number, and a telephone number. If you disable this function, the fax header will not be sent. 1. Press Menu button. 2. Press the scroll button until “ 4. Fax Setup ” appears on the display. 3. Press Set button. 4. Press the scroll button until “45. Header” appears on the display. 5. Press Set button. 6. Use the scroll button to select On or Off to enable or disable this function. 7. Press Set button to save the selection. 5-6 5.9 Updating the default fax resolution You can use the Quality key on the control panel to update the resolution setting temporarily (for this fax only). There are four types of resolution mode that you can select, as depicted below: STD.: Suitable for most typed originals. Fine: Good for small print and transmits a little slower than STD mode. S-Fine: Good for small print or artwork and transmits slower than Fine mode. Photo: Use when the original has varying shades of gray This has the slowest transmission time. However, you can change the default resolution setting as follows: 1. Press Menu button. 2. Press the scroll button until “ 4. Fax Setup ” appears on the display. 3. Press Set button. 4. Press the scroll button until “46. Def. Res.” appears on the display. 5. Press Set button. 6. Use the scroll button to select the resolution mode you want. 7. Press Set button to save the selection. 5-7 5.10 Setting the Fax Brightness You can use the Brightness key on the control panel to adjust the density setting temporarily (for this fax only). However, you can change the default density setting as follows: 1. Press Menu button. 2. Press the scroll button until “ 4. Fax Setup ” appears on the display. 3. Press Set button. 4. Press the scroll button until “47. Def. Bright” appears on the display. 5. Press Set button. 6. Use the scroll button to select the brightness mode you want. 7. Press Set button to save the selection. 5-8 5.11 Changing the ring volume of the fax The fax ring volume is heard when the device is initially sending or receiving a call. 1. Press Menu button. 2. Press the scroll button until “ 4. Fax Setup ” appears on the display. 3. Press Set button. 4. Press the scroll button until “48. Line Monitor” appears on the display. 5. Press Set button. 6. Use the scroll button to select the ring volume you want. 7. Press Set button to save the selection. 5-9 5.12 Transmission Verification Report You can use the transmission report as proof that you sent a fax. This report lists the time and date of transmission and whether the transmission was successful (OK). If you select On , the report will print for every fax you send. If you choose Error, you will receive the report when a fax fails to transmit. When the feature is Off, the report will not print. 1. Press Menu button. 2. Press the scroll button until “ 4. Fax Setup ” appears on the display. 3. Press Set button. 4. Press the scroll button until “49. TX Report” appears on the display. 5. Press Set button. 6. Use the scroll button to select the transmission report mode you want. 7. Press Set button to save the selection. 5-10 5.13 Changing redial count If the product was unable to send a fax because the receiving fax machine did not answer or was busy, the product will attempt to redial based on the redial count you set. 1. Press Menu button. 2. Press the scroll button until “ 4. Fax Setup ” appears on the display. 3. Press Set button. 4. Press the scroll button until “410. Redial Count” appears on the display. 5. Press Set button. 6. Use the scroll button to select the redial count you want. (Note: The redial count for Taiwan is 2 only.) 7. Press Set button to save the selection. 5-11 5.14 Setting redial interval When you are sending a fax, the product will scan the originals into the memory before sending. Then, if the phone line is busy, the product will start redialing and sending based on the redial term or period you set. 1. Press Menu button. 2. Press the scroll button until “ 4. Fax Setup ” appears on the display. 3. Press Set button. 4. Press the scroll button until “411. Redial Int.” appears on the display. 5. Press Set button. 6. Use the scroll button to select the redial interval you want. 7. Press Set button to save the selection. 5-12 5.15 Enabling the Fax Footer Your fax footer includes a job ID, date/time, remote station ID/local ID, and page number. If you disable this function, the fax footer will not be sent. 1. Press Menu button. 2. Press the scroll button until “ 4. Fax Setup ” appears on the display. 3. Press Set button. 4. Press the scroll button until “412. Footer” appears on the display. 5. Press Set button. 6. Use the scroll button to select On or Off to enable or disable this function. 7. Press Set button to save the selection. 5-13 5.16 Changing the detect dial tone setting Normally the product waits for a dial tone before attempting to a dial a fax number. If you are using the product on the same line as your phone, turn on the detect dial tone setting. This will prevent the product from sending a fax while someone is on the phone. 1. Press Menu button. 2. Press the scroll button until “ 4. Fax Setup ” appears on the display. 3. Press Set button. 4. Press the scroll button until “413. DialTone Det” appears on the display. 5. Press Set button. 6. Use the scroll button to select On or Off to enable or disable this function. 7. Press Set button to save the selection. 5-14 5.17 Reducing received faxes Enabling this function allows you to receive a fax that is reduced to fit the specified paper size. 1. Press Menu button. 2. Press the scroll button until “ 4. Fax Setup ” appears on the display. 3. Press Set button. 4. Press the scroll button until “415. Reduction RX” appears on the display. 5. Press Set button. 6. Use the scroll button to select On or Off to enable or disable this function. 7. Press Set button to save the selection. 5-15 5.18 Securing received faxes Enabling this function prevents the product from printing the received faxes. 1. Press Menu button. 2. Press the scroll button until “ 4. Fax Setup ” appears on the display. 3. Press Set button. 4. Press the scroll button until “416. Security RX” appears on the display. 5. Press Set button. 6. Use the scroll button to select On or Off to enable or disable this function. 7. Press Set button to save the selection. 5-16 6 Speed dialing & Phone book 6.1 Storing One-Touch Dial numbers The product has 6 One-Touch keys where you can store 12 fax or phone numbers for automatic dialing. To access numbers 7 to 12, hold down Shift as you press the One-Touch key. When you press a One-Touch key, the LCD shows the name and the number, if you stored them. One-Touch keys are the 6 keys (numbers 01–12) located on the left side of the control panel. 1. Press Menu button. 2. Press the scroll button until “ 5. PhoneBook ” appears on the display. 3. Press Set button. 4. Press the scroll button until “51. One-Touch” appears on the display. 5. Press Set button. 6. Press the One-Touch key where you want to store a number. AM3230 Fax User’s Guide 6-1 7. 8. Enter a name for your fax, and then press Set button. Enter a name 1-Touch: # / Name for your fax Tom Enter a fax number for your fax, and then press Set button. Enter a fax 1-Touch: # / Num number for 1234567 your fax 6-2 6.2 Storing & Using Speed-Dial numbers You can store Speed-Dial numbers, so that when you dial you will only have to press a few keys (Speed Dial/ Search, the two-digit number, and Start). Storing Speed-Dial numbers 1. Press Menu button. 2. Press the scroll button until “ 5. PhoneBook ” appears on the display. 3. Press Set button. 4. Press the scroll button until “52. Speed Dial” appears on the display. 5. Press Set button. 6. Set up your Speed-Dial number by entering a two-digit number. Enter a Select Speed: two-digit #12 number AM3230 Fax User’s Guide 6-3 7. 8. Enter a name for your fax, and then press Set button. Enter a name #12:Name for your fax Mary Enter a fax number for your fax, and then press Set button. Enter a fax #12:Number number for 1234567 your fax 6-4 Using Speed-Dial numbers 1. Press Speed Dial/Search button. 2. When the LCD screen shows “Speed Dial”, enter your two-digit Speed-Dial number, Enter your #12 two-digit Speed Dial number and then a corresponding name appears. A corresponding #12 name appears Mary (Now, you can simply press Start button to send your fax .) Or 1. Press Speed Dial/Search button two times. 2. When the LCD screen shows “Search”, enter your first character of fax name to get the speed dial data, Enter your first M character of fax Search Press the scroll button until your desired speed dial fax name appears on the display. AM3230 Fax User’s Guide 6-5 Speed dial fax Mary name appears 1234567 (Now, you can simply press Start button to send your fax .) 6-6 6.3 Setting up Groups Dial If you send information to the same group of people on a regular basis, you can program a group-dial code to simplify the task. Group-dial codes using numbers 1 through 6 are also associated with the corresponding one-touch key on the control panel. Any individual can be added to a group. All group members must have programmed speed-dial codes assigned to them before being added to the group-dial code. Adding Groups 1. Press Menu button. 2. Press the scroll button until “ 5. PhoneBook ” appears on the display. 3. Press Set button. 4. Press the scroll button until “53. Group Dial” appears on the display. 5. Press Set button. 6. Press a One-Touch key to select a group to add, and then press Set button. When the message appears, press a One-Touch key 7. Select Group: Use the Dial pad to directly enter the first letter of your desired speed dial name. AM3230 Fax User’s Guide 6-7 When the message appears, enter the first letter of your desired speed dial name. 8. 9. 6-8 Group #: Add Press the scroll button to select your full speed dial name. Select your full Group #: Add speed dial name Mary Press Set button to accept the selected item for this group. Deleting groups 1. Press Menu button. 2. Press the scroll button until “ 5. PhoneBook ” appears on the display. 3. Press Set button. 4. Press the scroll button until “53. Group Dial” appears on the display. 5. Press Set button. 6. Press a One-Touch key to select a group to delete. 7. Press the scroll button until “Group # :Delete” appears. (# means the group number.) 8. Press Set button. 9. Press the scroll button to select one of the speed dial names. 10. Select the speed dial Group #: Delete names to be deleted Mary Press Set button to delete the selected item for this group. AM3230 Fax User’s Guide 6-9 Deleting all items in a group 1. Press Menu button. 2. Press the scroll button until “ 5. PhoneBook ” appears on the display. 3. Press Set button. 4. Press the scroll button until “53. Group Dial” appears on the display. 5. Press Set button. 6. Press a One-Touch key to select a group. 7. Press the scroll button until “Group # :Del All” appears 8. Press Set button to delete all selected item for this group. 6-10 6.4 Using QLINK to manage fax data Double-click the QLINK icon, , on the computer screen, and the QLINK for fax appears, as shown below (QLINK requires the product to be connected to a computer) : AM3230 Fax User’s Guide 6-11 Click the Fax PhoneBook icon, PhoneBook screen, as shown below: 6-12 , to enter the Fax Fax PhoneBook Click the Download Button to enter the Fax PhoneBook screen, as shown below: AM3230 Fax User’s Guide 6-13 Add or edit a fax information on the One-Touch active area: Click the “One-Touch” tab to enter the One-Touch active area, as shown below: The numbers(1~12) listed on the left represent the 12 One-Touch keys respectively. 1. Left-click any One-Touch number, and then double-click it to launch the “Edit 1-Touch” screen, as shown below: 6-14 2. On the “Edit 1-Touch” screen, add a fax name in the Name field, and a fax number in the Phone Number field. 3. Click the “OK” button. Add or edit a fax information on the Speed Dial active area: Click the “Speed Dial” tab to enter the Speed Dial active area, as shown below: The numbers(0~99) listed on the left represent the 100 Speed Dial numbers respectively. AM3230 Fax User’s Guide 6-15 1. Left-click any Speed Dial number, and then double-click it to launch the “Edit Speed Dial” screen, as shown below: 2. On the “Edit Speed Dial” screen, add a fax name in the Name field, and a fax number in the Phone Number field. 3. Click the “OK” button. 6-16 Add or edit a fax information on the Group Dial active area: Click the “Group Dial” tab to enter the Group Dial active area, as shown below: The “Select Group” includes 1~6 Group Dial numbers, which respectively corresponds to the first 6 One Touch keys. 1. From “Select Group”, Select a number, corresponding to one of the first 6 One Touch keys. AM3230 Fax User’s Guide 6-17 2. Right-click any empty space under column “Speed key\1-Touch”, and then select and right-click “Edit” to launch the “Add Speed Dial to Group Dial” screen, as shown below: 3. On the “Add Speed Dial to Group Dial” screen, the two columns, “Speed key\1-Touch” and “Name”, shows all fax data respectively on “One-Touch”, “Speed Dial”, and “Group Dial” active areas. [note] The symbol definition shown on the column “Speed key\1-Touch”: “S” represents “Speed Dial”. “O” represents “One-Touch”. The number following “S” represents a Speed Dial number. The number following “O” represents an One-Touch key number. 4. Left-click a data item under column “Speed key\1-Touch”, and then select and click “Edit”. 5. The Group Dial active area returns, and shows the selected data item from the step 4. 6. Repeat step 1~5 to add another data item to a favor individual group. 6-18 Upload fax data After setting up desired fax data on the “One-Touch”, “Speed Dial”, or “Group Dial” active area, click the “Upload” button on the Fax PhoneBook screen to transfer the fax data to the product memory from the Fax PhoneBook screen . Download fax data Click the “Download” button on the Fax PhoneBook screen to transfer the fax data back to the Fax PhoneBook screen from the product memory. AM3230 Fax User’s Guide 6-19 Fax Info To save all sending or received faxes, click the Fax Info tab, and the Fax Info screen is shown as below: To set up the path for saving a fax, select your desired path by clicking the Browse button of the Fax Folder. If you check the Fax prompt message box, you will be able to receive a message box showing your fax image file has been saved to your designated path after sending or receiving a fax. 6-20 7 Special Fax 7.1 Delayed Fax You can store faxes in the memory to be sent in the future. These faxes will be sent at the time of day you enter. 1. Press Menu button. 2. Press the scroll button until “ 6. Special Fax” appears on the display. 3. Press Set button. 4. Press the scroll button until “61. Timer Tx” appears on the display. 5. Press Set button. 6. Enter the time you want the fax to be sent (in 24-hour format). Timer TX Enter the time you 10:55 want the fax to be sent 7. Press Set button. 8. Enter the fax number by using the ten keys on dial pad, One-Touch, or Speed Dial. 9. Press Start button. AM3230 Fax User’s Guide 7-1 7.2 Broadcasting Broadcasting is when the same fax message is automatically sent to more than one fax number. 1. Press Menu button. 2. Press the scroll button until “ 6. Special Fax” appears on the display. 3. Press Set button. 4. Press the scroll button until “62. Broadcast” appears on the display. 5. Press Set button. 6. Enter the first fax number by using the ten keys on dial pad, One-Touch, or Speed Dial. When the message Broadcast appears, enter the Enter fax number fax number 7-2 7. Press Set button. 8. Enter the next fax number by using the ten keys on dial pad, One-Touch, or Speed Dial. (If you want to enter more fax numbers, repeat step 7~8. To start sending your fax, go to the step 9.) 9. Press Start button. AM3230 Fax User’s Guide 7-3 7.3 Polling Polling is the process of retrieving faxes from another fax machine. You can use the product to poll other machines. 1. Press Menu button. 2. Press the scroll button until “ 6. Special Fax” appears on the display. 3. Press Set button. 4. Press the scroll button until “63. Polling RX” appears on the display. 5. Press Set button. 6. Enter the fax number to be polled by using the ten keys on dial pad, One-Touch, or Speed Dial. Polling RX Enter fax number When the message appears, enter the target fax number 7. Press Start button. 7-4 7.4 Memory management for Delayed Fax/ Broadcasting/Polling If you use up the memory from Delayed Fax/ Broadcasting/Polling, you can not send or receive your faxes. However, the available memory will vary depending on the types of jobs in the memory. The memory management function can print a report to tell you how many jobs occupy the memory. If the memory is full, you can delete your jobs in the memory to release space. Reporting memory job list 1. Press Menu button. 2. Press the scroll button until “ 6. Special Fax” appears on the display. 3. Press Set button. 4. Press the scroll button until “64. Mem Manage.” appears on the display. 5. Press Set button. 6. Press the scroll button until “641. Mem. Job List” appears on the display. 7. Press Set button to print the memory job report. AM3230 Fax User’s Guide 7-5 Deleting memory job 1. Press Menu button. 2. Press the scroll button until “ 6. Special Fax” appears on the display. 3. Press Set button. 4. Press the scroll button until “64. Mem Manage.” appears on the display. 5. Press Set button. 6. Press the scroll button until “642. Mem. Clear” appears on the display. 7. Press Set button, 8. Enter the job number to be deleted, and then press Set button, 9. Press Set button to release memory. 7-6 8 Trouble Shooting for Fax 8.1 Fax Maintenance menu You don’t have to change or should not change settings in Fax Maintenance menu. These items are to be changed only when you have frequent trouble in fax communication. 8.2 Connect time This is wait time for fax signal from remote receiver. If a receiver uses normal telephone and implements Fax/Telephone auto switch, sometimes fax signal sending timing is delayed. In such a case, you may need to extend this time value. 8-1 To change connect time, 1. Press Menu button. 2. Press the scroll button until “ 4. Fax Setup ” appears on the display. 3. Press Set button. 4. Press the scroll button until “414. Fax Main.” appears on the display. 5. Press Set button. 6. Press the scroll button until “Connect Time” appears on the display. 7. Press Set button. 8. Use the scroll button to select the connect time you want. (Note: The connect time for China reaches 30 seconds at most.) 9. Press Set button to save the selection. 8-2 8.3 TX Level This is signal transmission level of fax signal. Normal communication should not cause any problem with default level, but when you are sending a fax overseas or to a special destination, sometimes fax communication would fail and you need adjustment of TX level. To change TX level, 1. Press Menu button. 2. Press the scroll button until “ 4. Fax Setup ” appears on the display. 3. Press Set button. 4. Press the scroll button until “414. Fax Main.” appears on the display. 5. Press Set button. 6. Press the scroll button until “TX Level” appears on the display. 7. Press Set button. 8. Use the scroll button to select a TX level you want. 9. Press Set button to save the selection. 8-3 8.4 ECM ECM is “Error Correction Mode” which resends fax signal when data error happens during communication. With some old fax which is capable only up to 14.400bps communication, protocol implementation is not adequate and may cause compatibility problem. In such a case, you need to change ECM to Off. It will not affect communication of V34. To change ECM, 1. Press Menu button. 2. Press the scroll button until “ 4. Fax Setup ” appears on the display. 3. Press Set button. 4. Press the scroll button until “414. Fax Main.” appears on the display. 5. Press Set button. 6. Press the scroll button until “ECM” appears on the display. 7. Press Set button. 8. Use the scroll button to turn this function on or off. 9. Press Set button to save the selection. 8-4 8.5 TX Speed TX Speed is fax MODEM signal transmission speed. Maximum speed is 33,600BPS at V34. Some fax support only up to 14,400BPS or even up to 9,600BPS. When Fax transmission often fails regardless of remote destination, telephone line quality you are connected may not be good enough to support V34. In this case, TX speed must be limited to 14,400BPS. Please note that all setting is shown in kbps unit, for example 33,600BPS is shown as 33.6. To change TX Speed, 1. Press Menu button. 2. Press the scroll button until “ 4. Fax Setup ” appears on the display. 3. Press Set button. 4. Press the scroll button until “414. Fax Main.” appears on the display. 5. Press Set button. 6. Press the scroll button until “TX Speed” appears on the display. 7. Press Set button. 8. Use the scroll button to select a TX speed level you want. 9. Press Set button to save the selection. 8-5 8.6 RX Speed RX Speed is fax MODEM signal reception speed. Maximum speed is 33,600BPS at V34. Some fax support only up to 14,400BPS or even up to 9,600BPS. When Fax reception often fails regardless of remote destination, telephone line quality you are connected may not be good enough to support V34. In this case, TX speed must be limited to 14,400BPS.Please note that all setting is shown in kbps unit, for example 33,600BPS is shown as 33.6. To change RX Speed, 1. Press Menu button. 2. Press the scroll button until “ 4. Fax Setup ” appears on the display. 3. Press Set button. 4. Press the scroll button until “414. Fax Main.” appears on the display. 5. Press Set button. 6. Press the scroll button until “RX Speed” appears on the display. 7. Press Set button. 8. Use the scroll button to select a RX speed level you want. 9. Press Set button to save the selection. 8-6 8.7 Speed display During fax communication LCD shows remote terminal ID and page information. If you want to display fax communication speed, it can be displayed by this setting. To change Speed display, 1. Press Menu button. 2. Press the scroll button until “ 4. Fax Setup ” appears on the display. 3. Press Set button. 4. Press the scroll button until “414. Fax Main.” appears on the display. 5. Press Set button. 6. Press the scroll button until “Speed Display” appears on the display. 7. Press Set button. 8. Use the scroll button to turn this function on or off. 9. Press Set button to save the selection. 8-7 8.8 Codec Disable Fax Codec has 3 different mode, MMR, MR and MH. MH is most basic codec which is supported by all fax. MR and MMR is more sophisticated and efficient one. If you have compatibility with certain remote fax during picture transmission, you may try to disable MMR or MR to see whether it will fix the problem not. To change Codec Disable, , 1. Press Menu button. 2. Press the scroll button until “ 4. Fax Setup ” appears on the display. 3. Press Set button. 4. Press the scroll button until “414. Fax Main.” appears on the display. 5. Press Set button. 6. Press the scroll button until “Codec Disable” appears on the display. 7. Press Set button. 8. Use the scroll button to select a Fax Codec mode you want. 9. Press Set button to save the selection. 8-8 8.9 Protocol Report This report lists the protocol information. If you select On , the report will print for every fax you send. If you choose Error, you will receive the report when a fax fails to transmit. When the feature is Off, the report will not print. 1. Press Menu button. 2. Press the scroll button until “ 4. Fax Setup ” appears on the display. 3. Press Set button. 4. Press the scroll button until “414. Fax Main.” appears on the display. 5. Press Set button. 6. Press the scroll button until “Protocol Report” appears on the display. 7. Press Set button. 8. Use the scroll button to select the protocol report mode you want. 9. Press Set button to save the selection. 8-9 8.10 File Clear You can store different fax files into memory. Except transmission with Off-Hook condition, all fax transmission goes from memory. Also fax reception in case of no paper will be stored into memory. These files are automatically erased after job is completed. But if you want, you can erase fax files by this fax maintenance menu. To change File Clear, 1. Press Menu button. 2. Press the scroll button until “ 4. Fax Setup ” appears on the display. 3. Press Set button. 4. Press the scroll button until “414. Fax Main.” appears on the display. 5. Press Set button. 6. Press the scroll button until “File Clear” appears on the display. 7. Press Set button. 8. Press Set button to enable this function. 8-10 8.11 Install Location “Install Location” allows you to set up your country options, including USA/Canada, China, and Taiwan。 1. Press Menu button. 2. Press the scroll button until “ 4. Fax Setup ” appears on the display. 3. Press Set button. 4. Press the scroll button until “414. Fax Main.” appears on the display. 5. Press Set button. 6. Press the scroll button until “Install Location” appears on the display. 7. Use the scroll button to select the country mode you want. 8. Press Set button to save the selection. 8-11 8.12 Error Code As with any sophisticated office information product, errors may occur. If this happens, the product identifies the problem and displays an error message. The error code consists of 6 digits. Error code 1xxx11 1xxx12 1xxx13 2xxx14 1xxxx18 1xxxx19 xxxx15 xxxx16 xxxx17 xxxx31 xxxx32 xxxx40 xxxx41 xxxx42 xxxx43 xxxx44 xxxx45 xxxx46 xxxx50 xxxx51 xxxx52 xxxx60 xxxx61 8-12 Solution Open the ADF, and remove jammed paper. Make sure the ADF cover is completely closed. Check whether power cable is completely connected and power fails. Memory is full and the product can not receive any fax. Add paper to paper tray to print the faxes stored in memory. Fax transmission fails. Resend the fax. Fax transmission fails. Resend the fax. Check whether the telephone cable is completely connected and the telephone cable is broken. No Dial Tone causes redial failure. Check whether the telephone cable is completely connected and the telephone cable is broken. Busy line causes redial failure. Make sure the external telephone transmitter is completely hanged and the other party’s phone is busy. Contact our dealer or agent. Contact our dealer or agent. Contact our dealer or agent. Contact our dealer or agent. Contact our dealer or agent. Contact our dealer or agent. Contact our dealer or agent. Contact our dealer or agent. Contact our dealer or agent. Contact our dealer or agent. Contact our dealer or agent. Contact our dealer or agent. Contact our dealer or agent. Contact our dealer or agent. xxxx62 xxxx63 xxxx64 xxxx65 xxxx66 xxxx70 Contact our dealer or agent. Contact our dealer or agent. Contact our dealer or agent. Contact our dealer or agent. Contact our dealer or agent. Contact our dealer or agent. 8-13 8.13 Troubleshooting When you have problem with fax communication, please refer to the following. These error codes are temporarily unavailable. The temporary xxx code is only for draft version of user manual. Can not send Fax As default, TX report is printed when fax transmission fails. Check TX report’s result column which ash 3 digits error code. Error Code: xxx No Dial Tone detected Press Hook key to confirm whether you can hear the dial tone or not. If you can not hear the dial tone, telephone Line cord is not correctly connected. There are two connectors, one for external telephone and one for telephone line. Connector indicated as LINE should be correctly connected to telephone line. Error Code xxx: No Answer This code indicates that fax signal is not received after dialing. Confirm that remote fax number is correct. If number is correct, then try to extend “Connect time” in Fax maintenance menu. Error Code xxx: Fax Transmission Error This code indicates that fax transmission was started but could not completed correctly. First try to resend the error pages again. Sometimes telephone line quality becomes bad and resend works fine. If this problem happens frequently, you may need to adjust setting in Fax maintenance. 8-14 Error Code xxx-xxx: Error in V34 mode If error often happens only with these error code, your telephone line quality is not good enough to operate with V34 mode. Try to change TX speed from 33,600BPS to 14,400BPS and see the result. Error Code xxx-xxx Error in V17/V29 mode If error often happens only with these error code, remote fax is old fax and may have some compatibility problem. Try to disable MR codec in Fax maintenance and see the results. If still problem is not fixed, then try to turn off ECM. Transmission error code shows both V23 and V17/V29 mode, try to adjust TX level. First increase level by 2-3dBm and see the results. If you still have problem then try to reduce 2-3dBm from default. Can not receive Fax Print activity report and see the error code in result column. Error Code xxx-xxx: Error in V34 mode If error often happens only with these error code, your telephone line quality is not good enough to operate with V34 mode. Try to change RX speed from 33,600BPS to 14,400BPS and see the result. Error Code xxx-xxx Error in V17/V29 mode If error often happens only with these error code, remote fax is old fax and may have some compatibility problem. Try to disable MR codec in Fax maintenance and see the results. If still problem is not fixed, then try to turn off ECM. 8-15 Can not poll Fax Print activity report and see the error code in result column. Error Code xxx: Remote can not Polled This error code shows that you tried to polling but remote machine does not have polling document. Please check with fax number. If it is correct, please check remote operator that polling document is ready to be polled. Error Code: xxx No Dial Tone detected Press Hook key to confirm whether you can hear the dial tone or not. If you can not hear the dial tone, telephone Line cord is not correctly connected. There are two connectors, one for external telephone and one for telephone line. Connector indicated as LINE should be correctly connected to telephone line. Error Code xxx: No Answer This code indicates that fax signal is not received after dialing. Confirm that remote fax number is correct. If number is correct, then try to extend “Connect time” in Fax maintenance menu. Error Code xxx:-xxx: Fax Reception Error. 8-16 9 Technical Support If your problem still exists after trying the above solution, please prepare the following information and then contact the technical support of Avision. Headquarter Avision Inc. No. 20, Creation Road I, Science Park, Hsinchu 300, Taiwan, ROC TEL: +886 (3) 578-2388 FAX: +886 (3) 577-7017 E-MAIL: [email protected] Web Site: http://www.avision.com US and Canada Avision Labs., Inc. 6815 Mowry Ave., Newark CA 94560, USA TEL: +1 (510) 739-2369 FAX: +1 (510) 739-6060 EMAIL: [email protected] Web Site: http://www.avision.com 9-1 9.1 Specifications Specifications are subject to change without notice. Model Number 200400003 Copier Copy speed AM3230:20PPM AM3130:16PPM AM3130L:16PPM Margin Shift Top Bottom:4mm Left Right:4mm Resolution 600 dpi Zoom Range 25% ~ 400% Continuous copy 99 pages ADF 50 pages Media input tray 250 sheets Manual feeder yes collation yes memory 48MB Printer technology Mono laser printing Print speed AM3230:20PPM AM3130:16PPM AM3130L:16PPM 9-2 Resolution 600 dpi Scanner technology Color CCD Resolution 1200 dpi optical resolution 9600 dpi enhanced resolution flatbed 8.5” x 11.69” ADF input size Min: 4.5 inch X 5.5 inch Max: 8.5 inch X 14 inch ADF input capacity 50 sheets (20lb/Xerox 4024) Fax Resolution V: 3.85 line/mm x 8 dot/mm(98lines/inch)-Standard 7.7 line/mmx 8 dot/mm(196 lines/inch)-Fine, 15.4 line/mm x 8 dot/mm(396 lines/inch)-Superfine PHOTO Dither(64 level) H: 8 dots/mm(203 pixel/inch) Fax Modulation V.34,V.33,V.29,V.27ter,V.25,V.21,V.17 fax speed 14.4 Kbps Telephone system PSTN (Public Switch Telephone Network) PBX (Private Branch eXchange) maximum scan area 8.5 inch X 11.69 inch compatibility ITU Super G3(ECM) 9-3 One-touch key 6 or 12 groups (6 of them are the same with Group Dial’s) Memory size for dialing 100 units Group dial/Broadcast quantity Each of 6 groups includes 50 numbers Broadcast transmission quantity 50 stations Redial frequency 0~6 Operation systems Windows 98SE / ME / 2000 / XP paperless memory 4 MB interface USB 2.0 HS Operating environment Operating temperature 10oC ~ 35oC Operating humidity 15% ~ 85% Operation systems Windows 98SE / ME / 2000 / XP Power Consumption < 900W (operation mode) < 80W (ready mode) < 15W (Energy-saving mode) (The product will fulfill zero energy consumption state only when the power switch is turned off.) Current Consumption 100~127Vac, 8A 220~240Vac, 4.5A net weight 9-4 14.2Kg