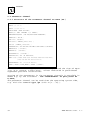
1
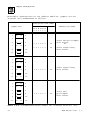
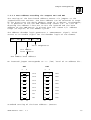
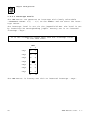
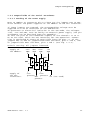
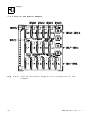
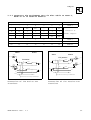
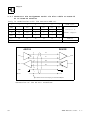
VME - ASIO16
16 serial Interfaces
VME-ASIO16 Rev. 1.7
N O T E
The information in this document has been carefully checked and is
believed to be entirely reliable. esd makes no warranty of any kind
with regard to the material in this document, and assumes no responsibility for any errors that may appear in this document. esd reserves the right to make changes without notice to this, or any of its
products, to improve reliability, performance or design.
esd assumes no responsibility for the use of any circuitry other
than circuitry which is part of a product of esd gmbh.
esd does not convey to the purchaser of the product described herein
any license under the patent rights of esd gmbh nor the rights of
others.
esd electronic system design gmbh
Vahrenwalder Str. 207
D-30165 Hannover
Germany
Phone: +49-511-37298-0
FAX:
+49-511-37298-68
This document shall not be duplicated, nor its contents used
for any purpose, unless express permission has been granted.
Copyright by esd
VME-ASIO16 Rev. 1.7
Manual file: ...\MANUALS\VME\asio1617.en6
Described
PCB version
Described
firmware version
14.11.97
ASIO16 1.1
ASIO4.0
Changes in the chapters
The changes in the user’s manual listed below affect changes in the
firmware, as well as changes in the description of the facts only.
Chapter
Alternations versus rev. 1.6
1.4.3.1
Correction of P2’s pin assignment in fig. 1.4.2
Further technical data are subject to change without notice.
VME-ASIO16 Rev. 1.7
VME-ASIO16 Rev. 1.7
User’s Manual VME-ASIO16
Content
Page
1. Hardware . . . . . . . . . . . . . . . . . . . . . . . . . .
5
. . . . . . . . . . . . . . . . . . . .
5
1.1 Block Diagram
1.2 Technical Data . . . . . . . . . . .
1.2.1 Overview . . . . . . . . . .
1.2.2 Real-time Software . . . . .
1.2.3 Summary of the Technical Data
1.2.4 Order Information . . . . . .
.
.
.
.
.
.
.
.
.
.
6
6
6
7
9
1.3 Address Selection on the VME-ASIO16
. . . . . . . . .
11
1.4 Configuration Jumpers . . . . . . . . . . . . . . . .
1.4.1 Default Setting . . . . . . . . . . . . . . . .
13
14
1.4.2 VMEbus Interface Jumpers . . . . . . . . . . .
1.4.2.1 The Address Modifier (AM) and DS1 at BR3
1.4.2.2 Base Address Decoding via Jumpers BR1
and BR2 . . . . . . . . . . . . . . . .
1.4.2.3 Interrupt Levels . . . . . . . . . . . .
15
15
1.4.3 Jumperfields of the Serial Interfaces . . . . .
1.4.3.1 Feeding of the Power Supply . . . . . .
1.4.3.2 Selection between RS-232 and TTY
Interfaces . . . . . . . . . . . . . . .
1.4.3.3 Control Signals of the Serial Interfaces
21
21
.
.
.
.
.
.
.
.
.
.
.
.
.
.
.
.
.
.
.
.
.
.
.
.
.
.
.
.
.
.
.
.
.
.
.
.
.
.
.
.
.
.
.
.
.
19
20
23
26
29
29
30
30
1.6 Interrupt Processing . . . . . . . . . . . . . . . . .
31
2. RTOS-UH Software Support . . . . . . . . . . . . . . . . . .
33
2.1 Survey Channel Structure . . . . . . . . . . . . . . .
33
2.2 Parameter Channel . . . . . . . . . . . . . . . . . .
2.2.1 Structure of the Parameter Channel Ix.PARA
(Px.) . . . . . . . . . . . . . . . . . . . . .
2.2.2 Description of the Parameters in Particular . .
34
VME-ASIO16 Rev. 1.7
. . . . . .
Interfaces
. . . . . .
. . . . . .
.
.
.
.
.
.
.
.
.
1.5 Serial
1.5.1
1.5.2
1.5.3
Interfaces . . . . . .
Circuitry of the Serial
The RS-232 Interface .
The TTY Interface . . .
.
.
.
.
.
34
35
1
Content
Page
3. Appendix . . . . . . . . . . . . . . . . . . . . . . . . . .
39
3.1 Connector Pin Assignments . . . . . . . . . . .
3.1.1 VMEbus P1 . . . . . . . . . . . . . . . .
3.1.2 I/O Connector P2
(at Internal Supply of the TTY Interface)
3.1.3 I/O Connector P2
(at External Supply of the TTY Interface)
3.1.4 I/O-Connector P2 (if ASIO RS422 Add On is
. . .
. . .
39
39
. . .
40
. . .
used)
41
42
3.2 ASIO16 Adaptor (VME-ASIO-ADAPT) . . . . . . . . . . .
3.2.1 General . . . . . . . . . . . . . . . . . . . .
3.2.2 View of the ASIO16 Adaptor . . . . . . . . . .
43
43
44
3.2.3 Jumpers of the ASIO16 Adaptor . . . . . . . . .
3.2.3.1 Power Supply Selection via BR21 to BR25
3.2.3.2 Fixing of the Connector Pin Assignment
via BR1 to BR16 . . . . . . . . . . . .
45
45
3.2.4 Covering of the 14 pole Connector Plug on the
ASIO16 P2 Adapter . . . . . . . . . . . . . . .
3.2.5 Connector Pin Assignment RS-232 via Flat Cable
to DSUB-15 or to DSUB-25 Females . . . . . . .
3.2.6 Connector Pin Assignment TTY via Flat Cable to
DSUB-9, DSUB-15 or to DSUB-25 Females . . . . .
3.2.7 Connector Pin Assignment RS422 via Flat Cable
to DSUB-15 or to DSUB-25 Females . . . . . . .
49
50
51
52
3.3 Add-On ’ASIO-422’ . . . . . . . . . . . . . . . . . .
3.3.1 General . . . . . . . . . . . . . . . . . . . .
3.3.2 View of the ASIO422-Add-Ons . . . . . . . . . .
53
53
53
3.3.3 Jumpers of the ASIO422 Add-On . . . . . . . . .
3.3.3.1 Selection of the Power Supply via the
Jumpers J1 to J3 . . . . . . . . . . . .
54
54
. . . . . . . . . . . . . . . . . . . . .
55
3.5 Circuit Diagrams . . . . . . . . . . . . . . . . . . .
57
. . . . . . . . . . . . . . . . . . . . .
59
3.4 Front Panel
3.6 Data Sheets
2
47
VME-ASIO16 Rev. 1.7
User’s Manual VME-ASIO16
Contents of Figures
Block Diagram of the VME-ASIO16 . . . . . .
Position of the Jumpers on the ASIO16 . . .
Wiring of the External TTY Interfaces Power
Block Diagram of the Interfaces . . . . . .
Circuitry of the Serial Interfaces
(Example: Channel 1) . . . . . . . . . . .
Fig. 3.2.1: View of the ASIO16 Adapter with Designation
Jumpers . . . . . . . . . . . . . . . . . .
Fig. 3.3.1: Top Overlay Placement of the RS-422 Add-Ons
Marking of the Jumpers . . . . . . . . . .
Fig.
Fig.
Fig.
Fig.
Fig.
1.1.1:
1.4.1:
1.4.2:
1.4.3:
1.5.1:
Page
. . . .
. . . .
Supply
. . . .
5
13
22
23
. . . .
of the
. . . .
with
. . . .
29
44
53
Contents of Tables
Table
Table
Table
Table
Table
Table
1.2.1:
1.2.2:
1.3.1:
1.4.1:
1.4.2:
1.4.3:
Table 1.4.4:
Table 1.4.5:
Table 1.4.6:
Table 2.1.1:
General Data of the VME-ASIO16 . . . . . . . .
Order Information . . . . . . . . . . . . . .
Address Model of the VME-ASIO16 . . . . . . .
Default Jumper Setting . . . . . . . . . . . .
AM Configuration of the VME-ASIO16 . . . . . .
Recommended Access Modes for Standard Accesses
(A24) . . . . . . . . . . . . . . . . . . . .
Recommended Access Modes for Standard Accesses
(A16) . . . . . . . . . . . . . . . . . . . .
Channel Assignment to the Jumpers BR33 to BR40
Functions of the DUART68681 Ports . . . . . .
Data Station Designation
. . . . . . . . . .
VME-ASIO16 Rev. 1.7
.
.
.
.
.
.
.
.
.
.
8
9
11
14
15
. .
17
.
.
.
.
18
26
26
33
.
.
.
.
3
4
VME-ASIO16 Rev. 1.7
Overview
1. Hardware
1.1 Block Diagram
Fig. 1.1.1: Block Diagram of the VME-ASIO16
VME-ASIO16 Rev. 1.7
5
Overview
1.2 Technical Data
1.2.1 Overview
The VME-ASIO16 is an input/output board for asynchronous serial data
transfer via 16 channels. Each channel can be operated as a RS-232
interface or as a 20 mA current loop. The operation mode can be
selected for each channel separately by jumpers. All signal and
supply lines are fed via the P2 connector.
The current loop interfaces are provided with electrical isolation
via optocouplers. For operation as current loop interfaces ±12 V
power can be supplied either externally via P2 or internally via the
VMEbus. The current sources for transmission and reception signals
are located on the board (active current source). At operation as
RS-232C interface the data lines and handshakes are available even
in the base version.
An interrupt logic with priority control generates a common interrupt on the VMEbus for each two channels. The interrupt level is
selectable from 1 to 7 by jumpers. An interrupt is also generated at
a line break of the 20 mA current loop.
Alternatively (Add-on-Board) the board can be equipped with up to 12
channels of RS-422 (optoisolated) and 4 channels of RS-232.
The channel handling is performed by up to 8 DUART 68681, depending
on the equipment of the board.
1.2.2 Real-time Software
Driver packages for the VME-ASIO16 are available for operating
systems such as VxWorks, OS-9 and others.
6
VME-ASIO16 Rev. 1.7
Overview
1.2.3 Summary of the Technical Data
VMEbus specification
VMEbus
interface
IEEE P1014/D1.2
(Rev. C)
data transfer
options
SADO24 - slave with A24/D16 access
SD16
- slave with A16/D16 access
address modifier
(AM)
complete evaluation of AM0 to AM5,
additionally with don’t care mode
base address
selectable via jumpers over the whole
address range of 16 Mbytes.
The board covers 256 bytes.
serial interfaces
controller
three to eight DUART68681 for each two
channels
standard
interfaces
up to 16 serial asynchronous
interfaces RS-232C or TTY
selectable via jumpers
programmable
interface
parameters
Baud rate : 75 baud - 38.4 kbaud,
(max. 9600 baud at TTY)
characters: 5, 6, 7, 8
parity
: NONE, ODD, EVEN, FORCE
PARITY ODD, FORCE PARITY
EVEN
stop bits: 0.563 to 2.000 programmable
in steps of 1/16
options
ADD-ON for 12 x RS-422 and 4 x RS-232
VME-ASIO16 Rev. 1.7
7
Overview
General Data
temperature range
0...70° C
humidity
max. 90%, non-condensing
connector types
P1 - DIN 41612-C96
P2 - DIN 41612-C64
board size
160 mm x 233 mm
VME dimensions
6 U height/ 1 slot width
front panel with pc board ejectors
weight
460g at insertion of 16 channels of
RS-232/TTY
(without add-on and adapters)
power consumption
VMEbus
VMEbus
P1:
5V ±5% / max. 1A
P2: +12V ±5% / 200mA *1)
-12V ±5% / 200mA *1)
*1) At external supply of the TTY interfaces
Table 1.2.1: General Data of the VME-ASIO16
8
VME-ASIO16 Rev. 1.7
Overview
1.2.4 Order Information
Name
Description
Order no.
VME-ASIO16-6
6 channels RS-232 or
20 mA current loop (active) *)
V.1401.06
VME-ASIO16-8
8 channels RS-232 or
20 mA current loop (active) *)
V.1401.08
VME-ASIO16-12
12 channels RS-232 or
20 mA current loop (active) *)
V.1401.12
VME-ASIO16-16
16 channels RS-232 or
20 mA current loop (active) *)
V.1401.16
VME-ASIO-422
add-on for VME-ASIO16, for
max. 12x RS-422 + 4x RS-232
V.1401.00
adapter module with connector
plugs for connection of
DSUB females to P2
V.1401.02
VME-ASIO16-ISO
Special version of the
VME-ASIO16 ’TTY passive’
V.1401.30
VME-ASIO16-C
C driver for OS-9 as
source code
P.1401.50
VME-ASIO16-MD
user’s manual in German
M.1401.20
VME-ASIO16-ME
user’s manual in English
M.1401.21
VME-ASIO16-ADAPT
*) A user’s manual (available in German and in English) is contained in
the extent of delivery.
Table 1.2.2: Order Information
VME-ASIO16 Rev. 1.7
9
10
VME-ASIO16 Rev. 1.7
Address Covering
1.3 Address Selection on the VME-ASIO16
The setting of the base board address ensues via jumpers of the
jumperfields BR1 and BR2. The base address can be selected over the
whole address range of 16 Mbytes in steps of 256 bytes.
Additionally it is possible to use the VME addressing mode ’SHORT I/O’. At this addressing the address lines A16 to A23 are ignored
and the base address of the VME-ASIO16 is placed into the ’SHORT
I/O’ address range (64 kbytes) of the VMEbus system.
The peripheral components DUART 68681 are provided with an 8 bits
wide data bus and with 4 address lines (A1 to A4). The addresses A5
to A7 select the desired DUART on the VME-ASIO16.
address
(HEX)
DUART
68681
xxxx00-1F
xxxx20-3F
xxxx40-5F
xxxx60-7F
xxxx80-9F
xxxxA0-BF
xxxxC0-DF
xxxxE0-FF
1
2
3
4
5
6
7
8
component
J26
J25
J24
J23
J22
J21
J20
J19
xxxx.....base address of the ASIO16
Table 1.3.1: Address Model of the VME-ASIO16
For reduced versions of the VME-ASIO16 with less than 16 channels
only a part of the DUARTs will be inserted: starting at the end with
DUART no. 8, e.g. when the board is equipped with 4 channels, the
DUARTs 8 and 7 will be inserted, for 10 channels the DUARTs 8, 7, 6,
5 and 4 will be inserted.
The register model and the meaning of the single bits can be obtained from the data sheet of the DUART 68681 in the appendix.
VME-ASIO16 Rev. 1.7
11
12
VME-ASIO16 Rev. 1.7
Jumpers Configuration
1.4 Configuration Jumpers
Fig. 1.4.1: Position of the Jumpers on the ASIO16
VME-ASIO16 Rev. 1.7
13
Jumpers Configuration
1.4.1 Default Setting
The factory-set (see following table) configuration of the boards is
indicated.
The jumpers location can be obtained from the insertion diagram
(Fig.1.4.1). In the following the jumpers are displayed from the
view of the user, when the board is located in front of him with the
VMEbus connectors to the right (and components on top).
An inserted jumper corresponds to the ’0’(low) level of a signal.
Default jumper setting BR1 to BR50 :
jumper
function
setting
BR1
addresses A8...A15
base board address
BR2
addresses A16...A23
ASIO16:
BR3
address modifier AM
AM2=don’t care, i.e.
access in the supervisory
or user mode (A24)
BR4
VMEbus interrupt
level
interrupt level IRQ4
inserted
BR5-BR8
selection of the
power supply of
the TTY interface
inserted, i.e. the TTY
interfaces are supplied
via the VMEbus
BR33...BR40
handshake mode
’DTR handshake’
BR43...BR50
DTR, TXD - to
RS-232 or TTY
all channels to RS-232
operation
BR53...BR56
CTS, RXD - to
RS-232 or TTY
all channels to RS-232
operation
$800000
Table 1.4.1: Default Jumper Setting
14
VME-ASIO16 Rev. 1.7
Jumpers Configuration
1.4.2 VMEbus Interface Jumpers
1.4.2.1 The Address Modifier (AM) and DS1 at BR3
The address modifier setting ensues at jumperfield BR3. The address
modifiers AM0 to AM5 are completely evaluated. Factory-set is ’Standard Supervisory and Nonprivileged Data Access’ (A24 mode):
1
2
DS1
o
o
AM0
o
o
AM1
o
o
AM2
o
o
AM4
o
o
AM2 don’t care
o
o
BR3
11
12
The ’AM’ configurations permissible for the VME-ASIO16 are:
CODE
AM_5
AM_4
AM_3
AM_2
AM_1
AM_0
$3E
1
1
1
1
1
0
standard
supervisory
program access
$3D
1
1
1
1
0
1
standard
supervisory
data access
$3A
1
1
1
0
1
0
standard
nonprivileged
program access
$39
1
1
1
0
0
1
standard
nonprivileged
data access
$2D
1
0
1
1
0
1
short
supervisory
I/O access
$29
1
0
1
0
0
1
short
nonprivileged
I/O access
0 = (LOW) jumper inserted,
function
1 = (HIGH) jumper not inserted
Table 1.4.2: AM Configuration of the VME-ASIO16
VME-ASIO16 Rev. 1.7
15
Jumpers Configuration
Only the configurations listed above are meaningful for the addressing of the board. The evaluation of the address modifiers AM3 and
AM5 cannot be changed by the user. It is fixed to ’H’ by the hardware.
For the evaluation of the address modifiers also the signal ’LWORD’
is used. It is fixed to ’H’, because the VME-ASIO16 is not addressed
for 32 bit ’LONGWORD’.
If the addressing mode ’SHORT SUPERV. I/O ACCESS’ or ’SHORT NONPRIV.
I/O ACCESS’ is selected, the jumperfield BR2, which fixes the addresses A16-A23, is not evaluated when the board is addressed. The
setting of the base address in the 16 Mbyte address range is ineffectual.
As an additional option for the addressing of the VME-ASIO16 the
address modifier AM2 can be set to ’don’t care’ by inserting the
corresponding jumper. As a consequence a ’SUPERVISORY’ access as
well as a ’NONPRIVILEGED’ access will address the board.
ATTENTION !
The address modifier configuration $3F or $3B respectively, corresponding to ’STANDARD SUPERV. ASCENDING
ACCESS’ or ’STANDARD NON-PRIV. ASCENDING ACCESS’
respectively, are possible, but not meaningful because the VME-ASIO16 does not support these addressing
modes.
The jumperfield BR3 is shown with the meaningful combinations of the
AM signals as follows in the table.
16
VME-ASIO16 Rev. 1.7
Jumpers Configuration
Meaningful combinations of the address modifier jumpers for A24
accesses are recommended as follows:
permissible AM codes
Jumper BR4
A A A A A A
M M M M M M
5 4 3 2 1 0
1
o
o
2
3
o
o
4
5
o
o
6
7
o
o
8
9
o
o
10
11
o
o
12
1
o
o
2
3
o
o
4
5
o
o
6
7
o
o
8
9
o
o
10
11
o
o
12
1
o
o
2
3
o
o
4
5
o
o
6
7
o
o
8
9
o
o
10
11
o
o
12
HEX
addressing mode
standard nonprivileged
data access
or
standard supervisory
data access
1 1 1 0 0 1
39
1 1 1 1 0 1
3D
1 1 1 1 0 1
3D
standard supervisory
data access
1 1 1 0 0 1
39
standard nonprivileged
data access
Table 1.4.3: Recommended Access Modes for Standard Accesses (A24)
VME-ASIO16 Rev. 1.7
17
Jumpers Configuration
Meaningful combinations of the address modifier jumpers for A16
accesses are recommended as follows:
permissible AM codes
jumper BR4
A A A A A A
M M M M M M
5 4 3 2 1 0
1
o
o
2
3
o
o
4
5
o
o
6
7
o
o
8
9
o
o
10
11
o
o
12
1
o
o
2
3
o
o
4
5
o
o
6
7
o
o
8
9
o
o
10
11
o
o
12
1
o
o
2
3
o
o
4
5
o
o
6
7
o
o
8
9
o
o
10
11
o
o
12
HEX
addressing mode
short non-privileged
data access
or
1 0 1 0 0 1
29
1 0 1 1 0 1
2D
short supervisory
data access
1 0 1 1 0 1
2D
short supervisory
data access
1 0 1 0 0 1
29
short nonprivileged
data access
Table 1.4.4: Recommended Access Modes for Standard Accesses (A16)
18
VME-ASIO16 Rev. 1.7
Jumpers Configuration
1.4.2.2 Base Address Decoding via Jumpers BR1 and BR2
The setting of the base board address ensues via jumpers at the
jumperfields BR1 and BR2. The base address can be selected in steps
of 256 bytes over the whole address range of 16 Mbytes. Furthermore,
it is possible to use the VME addressing ’SHORT I/O’. At this addressing the address lines A16 to A23 are ignored and the base
address of the VME-ASIO16 is placed into the ’SHORT I/O’ address
range (64 kbytes) of the VMEbus system.
The address decoder logic generates a ’CARDSELECT’ signal, which
serves as an enable signal for the decoder logic of the DUARTs.
A23...A16 A15...A8 A7...A1
local components
A16 VMEbus
base address
A24 VMEbus base address
An inserted jumper corresponds to ’0’ (low) level of an address bit.
BR1
BR2
1
2
1
2
o
o
A15
o
o
A23
o
o
A14
o
o
A22
o
o
A13
o
o
A21
o
o
A12
o
o
A20
o
o
A11
o
o
A19
o
o
A10
o
o
A18
o
o
A9
o
o
A17
o
o
A8
o
o
A16
15
16
15
16
Standard setting of the base address: $800000
VME-ASIO16 Rev. 1.7
19
Jumpers Configuration
1.4.2.3 Interrupt Levels
The VME-ASIO16 can generate an interrupt with freely selectable
’INTERRUPT LEVEL’ I(1) - I(7) on the VMEbus and can serve the interrupt vector.
The interrupt level is set via the jumperfield BR4. The level is set
by inserting the corresponding jumper. Factory-set is an inserted
interrupt ’IRQ4’.
It is not allowed to insert more than one interrupt level
at the same time!
BR4
1
2
IRQ7
o
o
IRQ6
o
o
IRQ5
o
o
IRQ4
o
o
IRQ3
o
o
IRQ2
o
o
IRQ1
o
o
13
14
The VME-ASIO16 is factory-set with an inserted interrupt ’IRQ4’.
20
VME-ASIO16 Rev. 1.7
Jumpers Configuration
1.4.3 Jumperfields of the Serial Interfaces
1.4.3.1 Feeding of the Power Supply
Near to VMEbus P1 connector pin 32 there are the jumpers BR5 to BR8,
which connect the power supplies of the VMEbus to the TTY interface.
If these jumpers are removed, the corresponding voltage must be
supplied via the P2 connector of the VME-ASIO16.
To guarantee an electrical isolation in the TTY mode, the voltages
+12V, -12V and GND, must be fed by an external power supply (the pin
assignment can be obtained from the appendix).
To this the pins of the handshake signals of the channels 13 to 16
on P2 are used, which are not necessary for TTY operation. Connection is performed by means of wrap wires from the pins ’2’ of the
jumpers BR5 to BR8 to jumperfields BR43 and BR44, pins 2 and 8, and
to jumperfields BR53 and BR54, pins 3 and 6 (see fig. 1.4.2).
Default setting: All jumpers inserted.
Supply of
the VMEbus:
-12V
VME
GND
VME
+12V
VME
+5V
VME
BR7
1
o
2
o
1
o
BR5
o
o
o
1
o
2
BR8
o
2
BR6
Supply of
the TTY
interfaces:
-12V
process
VME-ASIO16 Rev. 1.7
+12V
process
GND
process
+5V (not used)
21
Jumpers Configuration
External power supply:
Fig. 1.4.2: Wiring of the External TTY Interfaces Power Supply
22
VME-ASIO16 Rev. 1.7
Jumpers Configuration
1.4.3.2 Selection between RS-232 and TTY Interfaces
The jumpers BR43 to BR50 convert the signals DTRx and TXDx from RS232 operation to TTY operation. The jumpers BR53 to BR56 convert the
signals CTSx and RXDx from RS-232 operation to TTY operation.
TxD
TxD
V.24
Interface
current interface
R xD
P2
R xD
current interface
P2-V.24 - interface
TxD
TxD
V.24
Interface
current interface
R xD
P2
R xD
current interface
P2-TTY - interface
Fig. 1.4.3: Block Diagram of the Interfaces
Factory-set for all channels is RS-232 operation.
If the board shall be operated in the current loop mode (TTY), the
jumpers of the corresponding TXDx at BR43-BR50 must be reinserted to
the right.
o
o
o
Current loop (TTY) TXDx
The jumpers for RXDx on the right side of the board (BR50-BR56) must
be reinserted to the left.
Current loop (TTY) RXDx
o
o
o
The following figures display the jumperfields for the interface
setting on the ASIO16 according to their geometric arrangement on
the board (VMEbus connectors P1, P2 at the right; view to component
side; the altitude misalignment between right and left jumperfield
was not considered in this view).
VME-ASIO16 Rev. 1.7
23
Jumpers Configuration
The position of the jumpers for the handshake signals (DTRx, CTSx)
can remain unchanged, because the TTY interfaces run without ’hardware handshake’. Besides, the function of the handshake signals can
be varied via the jumpers BR33 to BR40 (see also chapter 1.4.3.3).
A survey of the combination of the several jumpers is
displayed in figure 1.5.1 ’Circuitry of the Serial Interfaces’
For a better orientation jumpers of different colours are factoryinserted for data and handshake signals.
jumper
jumper
left
right
RS232
TTY
1
2
3
o
o
o
o
BR43
o
o
o
left
right
TTY
RS232
1
2
3
DTR16(*)
o
o
o
CTS15(*)
o
TXD16
o
o
CTS16(*)
o
DTR15(*)
o
BR53
o
o
o
RXD15
o
o
TXD15
o
o
o
RXD16
10
11
12
10
11
12
1
2
3
1
2
3
o
o
o
DTR14(*)
o
o
o
CTS14(*)
o
BR44
o
o
o
TXD14
o
o
o
CTS13(*)
o
DTR13(*)
o
o
o
CTS12
o
o
o
TXD13
o
o
CTS11
10
11
12
o
BR54
o
o
o
RXD14
o
o
o
RXD12
1
2
3
o
o
o
RXD11
o
o
o
DTR12
o
o
o
RXD13
o
BR45
o
o
o
TXD12
22
23
24
o
DTR11
o
o
o
TXD11
10
11
12
o
o
o
Default insertion:
All channels at RS-232 operation
The signals marked with a (*) are necessary for the voltage feeding at the connection
of external power supplies (see chapter 1.4.3.1).
24
VME-ASIO16 Rev. 1.7
Jumpers Configuration
1
2
3
1
2
3
o
o
o
DTR10
o
o
o
CTS10
o
BR46
o
o
o
TXD10
o
o
o
CTS9
o
DTR9
o
o
o
CTS8
o
o
o
TXD9
o
o
CTS7
10
11
12
o
BR55
o
o
o
RXD10
1
2
3
o
o
o
RXD8
o
o
o
DTR8
o
o
o
RXD7
o
BR47
o
o
o
TXD8
o
o
o
RXD9
o
DTR7
22
23
24
o
o
o
TXD7
1
2
3
10
11
12
o
o
o
CTS6
1
2
3
o
o
o
CTS5
o
o
o
DTR6
o
o
o
CTS4
o
BR48
o
o
o
TXD6
o
o
o
CTS3
o
DTR5
o
o
o
RXD6
o
o
o
TXD5
o
o
RXD4
10
11
12
o
BR56
o
o
o
RXD3
1
2
3
o
o
o
RXD5
o
o
o
DTR4
o
o
o
CTS2
o
BR49
o
o
o
TXD4
o
o
o
CTS1
o
DTR3
o
o
o
RXD2
o
o
o
TXD3
o
o
o
RXD1
10
11
12
34
35
36
1
2
3
o
o
o
DTR2
o
BR50
o
o
o
TXD2
o
DTR1
o
o
o
TXD1
10
11
12
o
o
o
o
o
VME-ASIO16 Rev. 1.7
Default insertion:
All channels at RS-232 operation
25
Jumpers Configuration
1.4.3.3 Control Signals of the Serial Interfaces
The jumpers BR33 to BR40 cover the lines DTR1 to DTR16 with the
control lines RTS or DTR, if the jumpers BR43 to BR50 are set correspondingly. A switch-over between these signals ensues only in
combination with the firmware!
A survey of the combination of the several jumpers is
displayed in figure 1.5.1 ’Circuitry of the Serial Interfaces’
The jumpers assignment to the channels is as follows:
channel
jumper
signals at P2
1+2
BR40
DTR1, DTR2
3+4
BR39
DTR3, DTR4
5+6
BR38
DTR5, DTR6
7+8
BR37
DTR7, DTR8
9+10
BR36
DTR9, DTR10
11+12
BR35
DTR11, DTR12
13+14
BR34
DTR13, DTR14
15+16
BR33
DTR15, DTR16
Table 1.4.5: Channel Assignment to the Jumpers BR33 to BR40
The jumpers set the ports OP4 and OP5, or OP0 and OP1 respectively,
of the DUART68681 (via drivers) to the local signal lines ’RTS/DTR’.
These lines are connected to the I/O connector P2 via the jumpers
BR43 to BR50 and BR53 to BR56.
Following functions are assigned to the ports by firmware:
port
signal
remark
OP0, OP1
RTS
’Request To Send’:
announcement of a transmit
process
(e.g. for modem operation)
OP4, OP5
default
setting
DTR
’Data Terminate Ready’:
handshake control for
receiver input
Table 1.4.6: Functions of the DUART68681 Ports
26
VME-ASIO16 Rev. 1.7
Jumpers Configuration
Display example: control lines of channel 1+2 to jumper BR40
(the default setting is displayed)
Port of the DUART
68681 (here J25)
OP4
1
o
OP0
o
OP5
o
o
OP1
o
o
6
BR40
local control
lines
VME-ASIO16 Rev. 1.7
RTS/DTR1
RTS/DTR2
(via BR50 and BR56 to P2)
27
28
VME-ASIO16 Rev. 1.7
Serial Interfaces
1.5 Serial Interfaces
1.5.1 Circuitry of the Serial Interfaces
One DUART68681 operates two serial interfaces at a time on the
ASIO16. The interfaces can be operated as RS-232 interfaces or as
TTY interfaces corresponding to the jumpers position.
For reduced version of the VME-ASIO16 with less than 16 channels
only a part of the DUARTs will be inserted, beginning at the end
with DUART no. 8, e.g. at a 4 channel insertion the DUARTs 8 and 7
will be inserted, at 10 channels the DUARTs 8, 7, 6, 5 and 4 will be
inserted.
The displayed jumper positions correspond to the factory-setting of the board (RS-232
operation, DTR handshake).
The power supplies of the electrically isolated components (+12V process, -12V
process) can be supplied externally or be connected to the local (VMEbus) power
supplies.
Fig. 1.5.1: Circuitry of the Serial Interfaces (Example: Channel 1)
VME-ASIO16 Rev. 1.7
29
Serial Interfaces
1.5.2 The RS-232 Interface
The interface controller DUART 68681 processes tranmsit and receive
signals of TTL level. The interface to V24 or RS-232-C respectively,
is realized by integrated level transformers MC1488 (transmitter)
and MC1489 (receiver). Both components are located on the board
below the corresponding DUART.
1.5.3 The TTY Interface
The current loop interface is located behind the V.24 voltage interface, i.e. the V.24 level is transformed into 20 mA current level to
be transmitted. Current loop receive signals are transformed vice
versa. The current loop signals are electrically isolated from the
VMEbus to fulfill the requirements of process automation. (When
’using’ the electrical isolation the power supply of the TTY interface must be supplied externally.)
The current loop transmitter consists of a switched constant current
source. Beside a constant current source the receiver contains a
Schmitt-Trigger for the signal preparation and for noise suppression.
The VME-ASIO16 current loop interface is designated as "non isolated", because all necessary current sources are located on the
board; thus the process section must not be equipped with current
sources!
30
VME-ASIO16 Rev. 1.7
Interrupt Processing
1.6 Interrupt Processing
A circuitry on the VME-ASIO16 connects the interrupt requests of all
DUARTs with a common IRQ and coordinates the arbitration. At this,
priorities are assigned to the single DUARTs, so that simultaneously
occurring interrupts are processed with respect to their priority.
Each interrupt request of DUARTs is indicated by LEDs (green). So at
a failure the user can recognize, at which IRQ no service ensues via
the VMEbus.
The VMEbus interrupt level can be selected via jumper BR4. Factoryset at the VME-ASIO16 is ’IRQ4’.
The LED ’IRQ’ at the front panel indicates, that at least one of the
interrupt outputs of the DUARTs is active.
The LEDs 1/2, 3/4, 5/6, and so on indicate the active condition of
the interrupt signal of the single DUARTs 68681.
(see also chapter ’Front Panel’)
VME-ASIO16 Rev. 1.7
31
32
VME-ASIO16 Rev. 1.7
Software
2. RTOS-UH Software Support
2.1 Survey Channel Structure
For PEARL/RTOS-UH users an integrated driver with complete interrupt
support is contained in the extent of delivery of the VME-ASIO16
(EPROM resident). Parameters such as baudrate, bits/character,
parity among other things, can be configured for each channel in
clear.
To each serial ASIO16 channel a data station designation and a RTOSUH-LDN are assigned. Basically a serial channel consists of an input
and an output channel, furthermore a parameter channel is available.
In the following table the data station designations for two completely equipped VME-ASIO16 in one system are listed. Please consider, that the ASIO software channel 1 is fed to the hardware interface of the DUART no. 8 of the first board, and the ASIO software
channel 17 is fed to the hardware interface of the DUART no. 8 of
the second board.
RTOS desig. PEARL desig.
I1/
O1/
P1/
...
I32/
O32/
P32/
I1.
O1.
P1.
...
I32.
O32.
P32.
LDN
11/00
12/00
11/06
...
4F/00
50/00
4F/06
description
Input ASIO channel 1
Output ASIO channel 1
Param. ASIO channel 1
Input ASIO chann. 32
Output ASIO chann. 32
Param. ASIO chann. 32
Table 2.1.1: Data Station Designation Survey
For future implementations of the ASIO driver under PEARL/RTOS-UH
the parameter channel Px. should not be used any more, but instead
of this it should be represented as Ix.PARA (input channel with file
name), however the set of parameters of the channel Ix.PARA remains
identcal to the parameter channel Px described in the following.
In the PEARL SYSTEM section e.g. the statement
para_channel_x: Px.PARA <->; can subsequently easily be changed to
para_channel_x: Ix.PARA <->;
For the data channels following format is valid:
input_channel : Ix.input
output_channel: Ox.output
VME-ASIO16 Rev. 1.7
33
Software
2.2 Parameter Channel
2.2.1 Structure of the Parameter Channel Ix.PARA (Px.)
STATUS: OK
(ASIO-Kanal-No.)
BITS=8 ( 5 6 7 8 )
STOP=1 ( 0.5 1 1.5 2 )
PARITY=NONE ( NONE ODD EVEN )
MODE=I/O ( USER
TERMINAL
I/O
BINARY )
HANDSHAKE=XON/XOFF ( DSR XON/XOFF MODEM XON&MODEM )
BREAK=OFF ( OFF ON )
TFU= 128 ( variable )
TO1=30000 ( TIMEOUT_(first char) )
TO2=300 ( TIMEOUT_(char/char) )
TELEGRAM=OFF ( OFF BDE SAE8 TWG ZM400 SEAB SINEC 3964R MDROP)
HUNTBYTE=00
ENDBYTE=00
( variable )
( variable )
BLOCKCHECK=00
( variable )
RECEIVER=OFF ( OFF
ON
MULTIDROP )
BAUD= 9600 ( 38400 19200 9600 7200 4800 2400 2000 1800 1200 )
( 1050 600 300 200 150 135 110 75 )
BUFFERLENGTH = 256 ( 16 32 64 128 256 )
CLEAR / RESET / FORCE_BREAK / STATUS ( command )
The actual mode setting is listed directly behind the sign of equality (e.g. BITS=8: 8 data bits). Values indicated in parentheses
represent possible alternatives.
Setting of the parameters in the parameter channels is possible in
PEARL e.g. by the statement : PUT ’MODE=BINARY’ TO para_kanal BY
A,SKIP;
The parameter channel can be read from the operating system side,
e.g. with the command type /px (with x=[1...32]).
34
VME-ASIO16 Rev. 1.7
Software
2.2.2 Description of the Parameters in Particular
STATUS
-
feedbacks of the parameter handing-over (’STATUS’ is of type ’read only’):
’OK’.................... parameter was handed over correctly.
’Invalid Codeword’...... the command could not be identified.
’Invalid Parameter’..... the parameter inserted by the user has
been inserted incorrectly or is not
implemented.
’End of Record Missing’. the command was not completed by a
<RETURN> or <;> (semicolon).
’Wrong Baudrate’........ the baudrate was inserted incorrectly.
’Telegramm-Link Missing’ the telegram mode was selected, but
the parameters ’HUNTBYTE’ and/or ’ENDBYTE’ were not handed over or were
handed over incorrectly.
’User-Link Missing’..... the telegram mode was selected, but
the user-specific procedures at IRQ
level are missing or are indicated incorrectly.
BITS
number of data bits
possible values: 5, 6, 7, 8
STOP
number of stop bits
possible values: (0.5), 1, (1.5), 2
values in () are not to be supported any more
PARITY
type
-
MODE
setting mode of the serial interface
USER
the interface accepts the connection
of a RTOS-UH user (log in possible via
Ctrl-A etc.)
TERMINAL as USER, but without possibility of
log in
I/O
ASCII (7 bits) without support of
cursor characters and without Ctrl-A
BINARY
all characters allowed, no end identification
VME-ASIO16 Rev. 1.7
of parity
NONE
ODD
EVEN
bit
no parity bit
odd parity
even parity
35
Software
HANDSHAKE
setting mode of the serial interface data handshake
XON/XOFF software handshake mode with Xon/Xoff
(Ctrl-S/Ctrl-Q)
DSR
hardware handshake
MODEM
with RTS for mode control
XON&MODEM as MODEM, additionally with software
handshake
BREAK
-
TFU
dynamically variable number of characters in the internal communication elements buffer (CE), important
for instance for end recognition at BINARY protocol
in the MODE parameter
default value: 128
TO1
time-out of GET... to the first character, in [ms];
default = 30,000 ms; set to 0 for USER MODE or TERMINAL MODE (time-out disabled)
TO2
time-out between 2 characters while the transmission,
indicated in [ms]; default = 300 ms
TELEGRAM
selection of the transfer protocol, internal interface at interrupt level for transfer procedures written by the user. A description of the protocols is
available upon request.
OFF
no protocol selected
others e.g.:
BDE, SAE8, TWG, ZM400, SEAB, SINEC,
3964R, MDROP
For the future the selection ensues as a file name in
the channel, e.g. I17.3964R;
HUNTBYTE
start character at telegram transfer as far as required by the telegram
ENDBYTE
end character at telegram transfer as far as required
by the telegram
BLOCKCHECK
initial sum for CRC checks at telegram transfer as
far as required by the telegram
RECEIVER
-
36
ON
OFF
interrupt generation at line break
no interrupt generation at line break
ON
interrupt generation for received characters
OFF
no interrupt generation, e.g. if the
data line is not used or not connected
MULTIDROP only at telegram mode
VME-ASIO16 Rev. 1.7
Software
BAUD
setting of the transfer rate in [baud]
permissible values: 75, 110, 135, 150, 200, 300, 600,
1050, 1200, 1800, 2000, 2400,
4800, 7200, 9600, 19200, 38400
BUFFERLENGTH
number of characters buffered by the ASIO driver at
interrupt level, e.g. select small for USER, select
big for BINARY
permissible values: 16, 32, 64, 128, 256
CLEAR
(command) reset of the interrupt buffer
RESET
(command) base initialization of the channel
FORCE_BREAK (command) transmit BREAK signal on TxD line, necessary
e.g. at several SIEMENS protocols
STATUS
(command) reset of the parameter channel STATUS
Attention: If at GET or PUT an error occurred,
following instruction are necessary in PEARL:
CLOSE input_kanal;
or
CLOSE output_kanal;
returns a faulty communication element (CE), by
ST(...) /= 0; back to the operating system
GET FROM input_kanal BY LIST; resets the status of the input
channel in the run-time system
or
( ST(...) := 0; )
PUT TO output_kanal BY LIST; resets the status of the output
channel in the run-time system
( ST(...) := 0; )
VME-ASIO16 Rev. 1.7
37
38
VME-ASIO16 Rev. 1.7
Connector Pin Assignment
3. Appendix
3.1 Connector Pin Assignments
3.1.1 VMEbus P1
pin
row a
row b
row c
1
2
3
4
5
6
7
8
9
10
11
12
13
14
15
16
17
18
19
20
21
22
23
24
25
26
27
28
29
30
31
32
DATA 0
DATA 1
DATA 2
DATA 3
DATA 4
DATA 5
DATA 6
DATA 7
GND
SYSCLOCK
GND
DS1*
DS0*
WRITE*
GND
DTACK*
GND
AS*
GND
IACK*
IACKIN*
IACKOUT*
AM4
ADDR 7
ADDR 6
ADDR 5
ADDR 4
ADDR 3
ADDR 2
ADDR 1
- 12V
+ 5V
BG0IN*
BG0OUT*
BG1IN*
BG1OUT*
BG2IN*
BG2OUT*
BG3IN*
BG3OUT*
AM0
AM1
AM2
AM3
GND
GND
IRQ7*
IRQ6*
IRQ5*
IRQ4*
IRQ3*
IRQ2*
IRQ1*
+ 5V
DATA 8
DATA 9
DATA 10
DATA 11
DATA 12
DATA 13
DATA 14
DATA 15
GND
BERR*
SYSRESET*
LWORD*
AM5
ADDR 23
ADDR 22
ADDR 21
ADDR 20
ADDR 19
ADDR 18
ADDR 17
ADDR 16
ADDR 15
ADDR 14
ADDR 13
ADDR 12
ADDR 11
ADDR 10
ADDR 9
ADDR 8
+ 12V
+ 5V
P1 connector according to DIN
Signals with *
Current rating
41 612-C 96 / a+b+c
: active low
: max 1.0 A per pin
-....not connected
...connected
VME-ASIO16 Rev. 1.7
39
Connector Pin Assignment
3.1.2 I/O Connector P2 (at Internal Supply of the TTY Interface)
pin
row a
1
2
3
4
5
6
7
8
9
10
11
12
13
14
15
16
17
18
19
20
21
22
23
24
25
26
27
28
29
30
31
32
DTR
DTR
TxD
TxD
DTR
DTR
DTR
DTR
TxD
TxD
TxD
TxD
DTR
DTR
DTR
DTR
TxD
TxD
TxD
TxD
DTR
DTR
DTR
DTR
TxD
TxD
TxD
TxD
DTR
DTR
TxD
TxD
row c
15
16
15*
16*
14
13
12
11
11*
14*
13*
12*
10
9
8
7
7*
10*
9*
8*
6
5
4
3
3*
6*
5*
4*
2
1
1*
2*
CTS
CTS
RxD
RxD
CTS
CTS
CTS
CTS
RxD
RxD
RxD
RxD
CTS
CTS
CTS
CTS
RxD
RxD
RxD
RxD
CTS
CTS
CTS
CTS
RxD
RxD
RxD
RxD
CTS
CTS
RxD
RxD
15
16
15*
16*
14
13
12
11
14*
12*
11*
13*
10
9
8
7
10*
8*
7*
9*
6
5
4
3
6*
4*
3*
5*
2
1
2*
1*
P2 connector according to DIN 41612-C64 - a+c
Signals with * : active low
TxD*
: Transmitted Data
RxD*
: Received Data
DTR
: Data Terminal Ready
CTS
: Clear To Send
40
(
(
(
(
Output
Input
Output
Input
)
)
)
)
VME-ASIO16 Rev. 1.7
Connector Pin Assignment
3.1.3 I/O Connector P2 (at External Supply of the TTY Interface)
pin
1
2
3
4
5
6
7
8
9
10
11
12
13
14
15
16
17
18
19
20
21
22
23
24
25
26
27
28
29
30
31
32
row a
+12V
+12V
TxD 15* (RS232)
TxD 16* (RS232)
+5V
+5V
DTR 12
DTR 11
TxD 11*
TxD 14* (RS232)
TxD 13* (RS232)
TxD 12*
DTR 10
DTR 9
DTR 8
DTR 7
TxD 7*
TxD 10*
TxD 9*
TxD 8*
DTR 6
DTR 5
DTR 4
DTR 3
TxD 3*
TxD 6*
TxD 5*
TxD 4*
DTR 2
DTR 1
TxD 1*
TxD 2*
row c
-12V
-12V
RxD 15* (RS232)
RxD 16* (RS232)
GND
GND
CTS 12
CTS 11
RxD 14* (RS232)
RxD 12*
RxD 11*
RxD 13* (RS232)
CTS 10
CTS 9
CTS 8
CTS 7
RxD 10*
RxD 8*
RxD 7*
RxD 9*
CTS 6
CTS 5
CTS 4
CTS 3
RxD 6*
RxD 4*
RxD 3*
RxD 5*
CTS 2
CTS 1
RxD 2*
RxD 1*
P2 connector according to DIN 41612-C64 - a+c
Signals with * : active low
TxD*
: Transmitted Data
( Output
RxD*
: Received Data
( Input
DTR
: Data Terminal Ready
( Output
CTS
: Clear To Send
( Input
TxD* (RS232) : Transmitted Data (only valid for
RxD* (RS232) : Received Data
(only valid for
+12V,-12V,
+5V, GND
)
)
)
)
RS232 operation)
RS232 operation)
: Externally supplied power supply of the TTY
interface
VME-ASIO16 Rev. 1.7
41
Connector Pin Assignment
3.1.4 I/O-Connector P2 (if ASIO RS422 Add On is used)
pin
row a
row c
1
2
3
4
5
6
7
8
9
10
11
12
13
14
15
16
17
18
19
20
21
22
23
24
25
26
27
28
29
30
31
32
+12V
+12V
TxD 15* (RS232)
TxD 16* (RS232)
+5V
+5V
TxD 12+
TxD 11+
TxD 11TxD 14* (RS232)
TxD 13* (RS232)
TxD 12TxD 10+
TxD 9+
TxD 8+
TxD 7+
TxD 7TxD 10TxD 9TxD 8TxD 6+
TxD 5+
TxD 4+
TxD 3+
TxD 3TxD 6TxD 5TxD 4TxD 2+
TxD 1+
TxD 1TxD 2-
-12V
-12V
RxD 15* (RS232)
RxD 16* (RS232)
GND
GND
RxD 12+
RxD 11+
RxD 14* (RS232)
RxD 12RxD 11RxD 13* (RS232)
RxD 10+
RxD 9+
RxD 8+
RxD 7+
RxD 10RxD 8RxD 7RxD 9RxD 6+
RxD 5+
RxD 4+
RxD 3+
RxD 6RxD 4RxD 3RxD 5RxD 2+
RxD 1+
RxD 2RxD 1-
P2 connector according to DIN 41612-C64 - a+c
Signal with *
TxD* (RS232)
RxD* (RS232)
TxD+, TxDRxD+, RxD-
:
:
:
:
:
+12V,-12V,
+5V, GND
: Externally supplied power supply of the RS422 Add
On
42
active low
Transmitted Data
Received Data
Transmitted Data
Received Data
(RS232 XON/XOFF only)
(RS232 XON/XOFF only)
RS422
RS422
VME-ASIO16 Rev. 1.7
Adapter
3.2 ASIO16 Adaptor (VME-ASIO-ADAPT)
3.2.1 General
The VME-ASIO16 P2 adaptor offers 16 times 14 pole connector plugs
for the direct connection of the serial interfaces to a flat cable.
Moreover, on the adaptor there are screw terminals available for the
connection of external power supplies.
To avoid overvoltages on the TXD line, pin 2 of the 14 pole connector plug is connected with the +12 V potential via a 24 V Z-diode.
The connector plugs are covered with the signals of the RS-232
interface or of the TTY interface via the jumpers BR1 to BR16.
The externally supplied voltages are fed via the jumpers BR21 to
BR26 to the P2 connector of the ASIO16.
Attention: If the power supplies are fed externally via the ASIO
adaptor, the ASIO16 must be configured correspondingly
(see chapter ’Feeding of the Power Supply’)!
If no external power supplies are connected, the VMEbus voltages
+12V, -12V and GND must be connected with the corresponding terminals! The jumpers BR21 and BR24 to BR26 must remain not inserted.
(The jumpers BR22 and BR23 remain not inserted only, if the ASIO-422
add-on is not inserted.)
VME-ASIO16 Rev. 1.7
43
Adaptor
3.2.2 View of the ASIO16 Adaptor
Fig. 3.2.1: View of the ASIO16 Adaptor with Designation of the
Jumpers
44
VME-ASIO16 Rev. 1.7
Adaptor
3.2.3 Jumpers of the ASIO16 Adaptor
3.2.3.1 Power Supply Selection via BR21 to BR25
The following jumpers must only be inserted, if an external power
supply is desired for the TTY interfaces.
The jumpers may only be inserted, if the ASIO16 is configured for
external power supply!
If the interfaces are supplied by the local ASIO16 VMEbus supply,
the jumpers must not be inserted (different P2 connector pin assignment)!
An exception is the GND jumpers BR22 and BR23, which must always
be inserted, if the ASIO-422 add-on is inserted. This is necessary
to fed the reference potential of the DC/DC converter to the
adaptor!
Connection of the +12V supply of the adaptor with P2 of the ASIO16
via jumper BR26:
BR26
+12V +12V
4
3
Local supply on the ASIO16:
jumpers not inserted
o
o
(default setting)
o
o
External power supply:
jumpers 1-3 and 2-4 inserted
2
1
Connection of the +5V supply of the adaptor with P2 of the ASIO16
via jumper BR21:
BR21
2
4
Local supply on the ASIO16:
jumpers not inserted
o
o
+5V
(default setting)
o
o
+5V
External power supply:
jumpers 1-3 and 2-4 inserted
1
3
Connection of the GND potential of the adaptor with P2 of the ASIO16
via jumper BR22 and BR23:
Local supply on the ASIO16 and
ASIO-422 not inserted:
jumpers not inserted
(default setting)
External power supply
and/or ASIO-422 add-on inserted:
jumpers 1-2 inserted
VME-ASIO16 Rev. 1.7
BR22
BR23
o
o
o
o
1
2
1
2
GND
45
Adaptor
Connection of the -12V supply of the adaptor with P2 of the ASIO16
via jumper BR24 and BR25:
Local supply on the ASIO16:
jumpers not inserted
(default setting)
External power supply:
jumpers 1-2 inserted
46
BR24
BR25
o
o
o
o
1
2
1
2
+12V
VME-ASIO16 Rev. 1.7
Adaptor
3.2.3.2 Fixing of the Connector Pin Assignment via BR1
to BR16
The jumpers BR1 to BR16 are in each case located directly beneath
the corresponding 14 pole connector plug of the single interface
channels (drawn bold in fig. 3.2.1). With these jumpers the assignment of the pins 3, 7 and 9 of the connector plug is selected.
The jumpers and connector plugs are covered as follows:
P2
connector
14 pole connector plug
1
SL1-6
shield
TXD
2 TXD
o
o
o
o
o
o
6
o
o
8
o
o
10
3
1
o
4 -12V
RXD
o
3
2
5
o
DTR
o
5
-12V
4
o
11
o
o
12
o
13
o
o
14
CTS
GND
Example shown: jumpers configuration for RS-232 operation
Following jumpers configurations are possible for the various operating modes:
1. Jumpers configuration BR1 to BR16 for RS-232 and RS-422 operation
VME-ASIO16 Rev. 1.7
1
o
2
o
3
o
4
o
5
o
6
o
47
Adaptor
2. Jumpers configuration BR1 to BR16 for TTY operation (active)
1
o
2
o
3
o
4
o
5
o
6
o
3. Jumpers configuration BR1 to BR16 for TTY operation (passive)
This assignment is only possible, if the channel on the ASIO16 is
equipped for ’passive operation’ (option: ’VME-ASIO16-ISO’).
48
1
o
2
o
3
o
4
o
5
o
6
o
VME-ASIO16 Rev. 1.7
Adaptor
3.2.4 Covering of the 14 pole Connector Plug on the ASIO16 P2
Adaptor
Connecting of the SHIELD
signals at the ASIO P2 Adaptor:
RS232
signal
Pin
signal
SHIELD
1
2
-
RXD(in)
3
4
-
TXD(out)
5
6
-
-
7
8
-
DTR(out)
9
10
-
-
11
12
-
GND
13
14
CTS(in)
100k
GND
2,2nF
SHIELD
(to
connector)
14 pole connector plug
TTY active
signal
pin
TTY passive
signal
signal
pin
*1)
signal
SHIELD
1
2
TXD+
SHIELD
1
2
TXD-
-
3
4
TXD-
-
3
4
-
-
5
6
-
-
5
6
-
RXD+
7
8
-
RXD-
7
8
-
RXD-
9
10
-
RXD+
9
10
-
-
11
12
-
-
11
12
-
GND
13
14
-
GND
13
14
TXD+
14 pole connector plug
14 pole connector plug
1*) Only at special equipment of the corresponding channel on the
ASIO16.
VME-ASIO16 Rev. 1.7
49
Adaptor
3.2.5 Connector Pin Assignment RS-232 via Flat Cable to DSUB-15
or to DSUB-25 Females
7
6
5
4
3
2
1
GND
-
DTR
-
TxD
RxD
Sh
13
11
9
7
5
3
1
connector at
14
12
10
8
6
4
2
ASIO16 adaptor
CTS
-
-
-
-
-
-
15
14
13
12
11
10
9
DSUB-15
20
19
18
17
16
15
14
DSUB-25
ASIO16
TxD
R xD
DTR
CT S
DSUB-15/25
DEVICE
5
TxD
3
R xD
9
DT R
14
CTS
1488
1489
1488
1489
13
GN D
1
Shield
pin numbers of the connector plug on the ASIO16-adapter
Connection of the RS-232 Interface
50
VME-ASIO16 Rev. 1.7
Adaptor
3.2.6 Connector Pin Assignment TTY via Flat Cable to DSUB-9,
DSUB-15 or to DSUB-25 Females
7
6
5
4
3
2
1
DSUB-15/25
-
-
5
4
3
2
1
DSUB-9
-
-
Rx-
Rx+
-
-
Sh
13
11
9
7
5
3
1
connector at
14
12
10
8
6
4
2
ASIO16 adaptor
-
-
-
-
-
Tx-
Tx+
-
-
-
9
8
7
6
DSUB-9
15
14
13
12
11
10
9
DSUB-15
20
19
18
17
16
15
14
DSUB-25
ASIO16
DEVICE
i=20mA
ASIO16
DEVICE
+12V
i=20mA
TTY passive
TTY active
TxD
2
Tx+
4
Tx-
-1 2 V
i=20mA
TxD
i=20mA
2
Tx+
4
Tx-
+ 1 2V
R xD
i=20mA
-1 2 V
+12V
+12V
R xD
7
9
-1 2 V
i=20mA
RxD
Rx+
i =20mA
R xD
TxD
7
Rx+
9
Rx-
i=20mA
-1 2 V
TxD
Rx-
1
Shield
1
Shield
pin numbers of the connector plug on the ASIO16-adapter
pin numbers of the connector plug on the ASIO16-adap ter
Connection of the Active TTY
Interface
VME-ASIO16 Rev. 1.7
Connection of the Passive TTY
Interface
51
Adaptor
3.2.7 Connector Pin Assignment RS422 via Flat Cable to DSUB-15
or to DSUB-25 Females
(only in combination with the ASIO422-Add-On)
7
6
5
4
3
2
1
GND
-
Tx+
-
Tx-
Rx-
Sh
13
11
9
7
5
3
1
connector at
14
12
10
8
6
4
2
ASIO16 adaptor
Rx+
-
-
-
-
-
-
15
14
13
12
11
10
9
DSUB-15
20
19
18
17
16
15
14
DSUB-25
ASIO16
TxD
R xD
DSUB-15/25
DEVICE
9
Tx+
5
Tx-
14
Rx+
3
Rx-
R xD
Tx D
13
GN D
1
Shield
pin numbers of the connector plug on the ASIO16-adap ter
Connection of the RS-422 Interface
52
VME-ASIO16 Rev. 1.7
Add-On
3.3 Add-On ’ASIO-422’
3.3.1 General
The RS-422 add-on, available as an option, has to be inserted into
the jumperfields BR43 to BR50, BR53 to BR56 and BR5 to BR8. If the
add-on shall be inserted, the components of the TTY interfaces must
not be inserted, because this area is required for the add-on.
The add-on offers a maximum of 12 interfaces, electrically isolated
from the VMEbus and from the local components, with a simultaneous
possibility of using 4 RS-232 interfaces in the ’XON/XOFF-only’
operation (channel 13 to 16 - on the base board). Partial insertion
of 4 (channel 9 to 12) or 8 (channel 5 to 12) RS-422 interfaces,
respectively, is possible.
The electrical isolation of the RS-422 interfaces ensues by means of
a DC/DC converter on the add-on. The feeding of the power supply for
the add-on (including DC/DC converter) can ensue from the ASIO16
(VMEbus supply) or externally via the ASIO16 P2 connector.
When using the ASIO P2 adaptor it must be taken care that the add-on
reference potential (GND) has to be fed via the adaptor jumpers BR22
and BR23 to the 14 pole connector plug. These jumpers must also be
inserted if no external power supply is fed to the board!
3.3.2 View of the ASIO422-Add-Ons
Fig. 3.3.1: Top Overlay Placement of the RS-422 Add-Ons with Marking
of the Jumpers
VME-ASIO16 Rev. 1.7
53
Add-On
3.3.3 Jumpers of the ASIO422 Add-Ons
3.3.3.1 Selection of the Power Supply via the Jumpers J1
to J3
If an external power supply of the ASIO422 add-ons is desired, the
jumpers J1 to J3 must be inserted.
Attention:
In this case the connectors P1 to P4 must not be inserted on the
add-ons.(see fig.3.3.1)!
Connection of the +5V power supply of the add-ons with P2 of the
ASIO16 via jumper J1:
J1
4
3
Local supply +5V/VME:
jumpers not inserted
o
o
+5V
(default setting)
o
o
+5V
External power supply:
jumpers 1-2 and 3-4 inserted
2
1
Connection of the +12V power supply of the add-ons with P2 of the
ASIO16 via jumper J2:
J2
4
3
DC/DC converter supplied via +12V/VME:
jumpers not inserted
o
o
+12V
(default setting)
o
o
+12V
External power supply:
jumpers 1-2 and 3-4 inserted
2
1
Connection of the -12V power supply of the add-ons with P2 of the
ASIO16 via jumpers BR24 and BR25:
Local supply -12V/VME:
jumper not inserted
(default setting)
External power supply:
jumpers 1-2 and 3-4 inserted
54
J3
o
o
o
o
1
2
3
4
-12V
VME-ASIO16 Rev. 1.7
Front Panel
3.4 Front Panel
VME-ASIO16 Rev. 1.7
55
56
VME-ASIO16 Rev. 1.7
Circuit Diagrams
3.5 Circuit Diagrams
The circuit diagrams are not included in the PDF-file.
VME-ASIO16 Rev. 1.7
57
58
VME-ASIO16 Rev. 1.7
Data Sheets
3.6 Data Sheets
The data sheets are not included in the PDF-file.
VME-ASIO16 Rev. 1.7
59