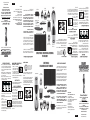
1
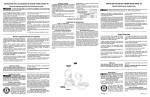
Consignes de
sécuritee
Getting Started:
Now You’re Ready
to Trim Your Beard
1. The trimmer includes a five position comb for
use with the hair trimming blade (2-10mm)
which provide lengths of 3/32" (shortest) to
3/8" (longest).
2. To use the 5-position comb, slide the unit over
the trimmer blades and snap it down into
position. At first, until you become familiar
with the adjustments, use the longest trim
setting. (You can always go back and make
your beard a little shorter.)
3.Begin trimming your
beard using smooth,
even strokes. Start
with your sideburns
and work downward
toward your chin. (Never attempt to trim
against the natural growth of your beard
because the hair will be cut too short.)
4. If you decide you want a
closer trim, you can now
adjust the 5-position
comb attachment to a
shorter setting (such as
3/32" or 5/32") and go over your beard again
until you achieve the desired length.
L’utilisation d’un appareil électrique, surtout en
présence d’enfants, demande que l’on prenne
certaines précautions élémentaires dont les suivantes :
Outlining Your Beard
1. It is always best to begin with a clean, slightly
damp beard.
2. After you have combed through your beard in
the direction it grows naturally, you will want
to outline the desired shape, beginning under
your jawline.
3.Begin defining your
beard’s shape under
your chin and work
upward on each side of
your face toward your
ears. Then define the upper outline of your
beard across your cheeks, past your sideburns,
and toward your hairline.
Types of Beards/Mustaches
For the best trimming results, your beard should
be slightly damp (NOT WET) when using your
trimmer. This will prevent the trimmer from
removing more hair than desired.
LIRE TOUTES LES
DIRECTIVES AVANT
L’UTILISATION
TENIR LOIN DE L’EAU
DANGER –
AVERTISSEMENT–
Growing a Beard and Mustache
There are three key factors that will determine
which beard or mustache style is best for you:
1. The shape and dimensions of your face.
2. The natural growth of your beard/ mustache.
3.The thickness of your beard/mustache. If
you are unsure about the type of beard or
mustache that would most suit your face,
speak with a professional hair stylist and
ask for an opinion on what style would be
best. Once your beard or mustache has been
styled, it is essential that you maintain its
appearance. To do this, use your trimmer to
trim your beard/mustache weekly.
CONSERVEZ CES
DIRECTIVES
MANUEL D'UTILISATION
Avant d'utiliser le bloc d'alimentation de classe
2, lisez ces directives avec soin.
Modèle : SW-056008A
Tension à l'entrée : 120 VCA, 60 Hz, 0,2 A max.
Tension à la sortie : 5,6 VCC, 90 mA
UTILISATION
1. Ne l'utilisez qu'à un endroit au sec. Ne l'exposez
pas à l'eau.
2. Débranchez l'appareil quand vous ne l'utilisez
pas.
3. Ne l'utilisez jamais hors des spécifications de
service.
4. L'appareil peut devenir chaud en cours
d'utilisation.
MISE EN GARDE
Taking Care of Your Trimmer
Three Position taper control
The Conair trimmer taper
control switch is positioned at
the back of the unit. You can
hold the trimmer in your hand
and adjust the switch as needed.
The taper control eliminates
the need in some situations for
an attachment comb because
it lets you gradually adjust the
closeness of the cut. For closest
cut and shortest hair, push switch
all the way to level #3. This is
the setting to use for the 2 day shave look. To
increase the cutting length, slowly push control
down to level #2 or #1 for longer cut. Note that too
much clipped hair on the clipper can slow down
its operation. To remove it without removing the
blades simply use the enclosed cleaning brush
and gently sweep away the clipped hair from
cutting surfaces. Note: The taper control only
works with the facial hair trimmer.
Tout appareil est sous tension, même quand il est éteint. Pour réduire le
risque de mort ou de blessure par choc électrique :
1. Débranchez toujours l’appareil de la prise
de courant après l’avoir utilisé (sauf
quand vous le chargez).
2. Ne placez ni ne rangez l’appareil là où il
pourrait tomber ou être tiré dans une baignoire
ou un lavabo.
3. N’utilisez pas l’appareil en prenant un bain ou
une douche.
4. Ne placez et n’échappez pas l’appareil dans
l’eau ou un liquide quelconque.
5. Si l’appareil tombe dans l’eau, ne le saisissez
pas. Débranchez-le immédiatement.
6. Débranchez l’appareil avant de le nettoyer.
DÉPISTAGE DES PROBLÈMES
Si la tondeuse rechargeable ne semble pas se
recharger, suivez les conseils ci-après avant de
ramener la tondeuse au centre de réparation.
1. Assurez-vous que la prise de courant est sous
tension en utilisant un autre appareil pour en
faire l'essai.
2. Assurez-vous que la prise électrique n’est pas
commandée par un interrupteur qui coupe le
courant quand les lumières sont éteintes.
3. Assurez-vous que toutes les connexions sont
bien faites et que l’interrupteur de la tondeuse
est sur « OFF ».
MODE D'EMPLOI
1. Before using your trimmer for the first time,
charge it for 16 hours. Always charge the
trimmer with the ON/OFF switch in the OFF
position.
2. Always check to see if the charging light is on
when you charge the trimmer.
3. Plug the adaptor into any wall outlet (at
the voltage listed on the label affixed to the
adaptor). Unplug adaptor when not in use.
4. The adaptor may become warm while charging.
This is normal.
5. Battery life can be improved by periodically
allowing the trimmer to run until the motor
stops. Immediately shut the switch OFF and
fully recharge.
6. Maximum battery capacity will only be reached
after three complete charging and discharging
cycles.
7. To maintain the optimum capacity of the
rechargeable batteries, the trimmer should be
recharged for 16 hours approximately every
three months.
Operating Instructions
About once a month you should oil the trimmer
blades with the oil provided in your kit. It is
best to do this over a piece of newspaper. Turn
the trimmer on and hold it so that the blades
are pointed downward. Spread one drop of oil
across the blades, then turn the trimmer off and
wipe away the excess oil with a soft cloth.
Be careful not to use too much oil and don’t oil
your trimmer more than necessary, as this could
damage the motor. (Never attempt to oil the
motor bearing, as it is permanently lubricated.)
After oiling the blades, return the trimmer and
oil packet to the trimmer storage base. Keep oil
away from children.
Blade Care
Because the trimmer blades are precisionmade for a very special use, they should always
be handled with care. Each time you finish
using the trimmer, take the cleaning brush
provided and brush away any loose hair that has
collected in the blades.
Be especially careful when changing or adjusting
blades. When you have your trimmer serviced, be
sure that both blades are sharpened or replaced
at the same time.
To promote the long life of the appliance, use
your trimmer only for the purpose intended
by the manufacturer – to trim your beard and
mustache.
Oiling the Blades
user MAINTENANCE
INSTRUCTIONS
1. Avant d'utiliser la tondeuse la premièrre fois,
chargez-la pendant 16 heures. Chargez-la
toujours avec l'interrupteur éteint.
2. Assurez-vous que le témoin de charge est
allumé quand vous chargez la tondeuse.
3. Branchez l'adaptateur dans une prise de
courant (de tension appropriée, tel qu'indiqué
sur l'adaptateur). Débranchez l'adaptateur
quand vous ne l'utilisez pas.
4. L'adaptateur peut devenir chaud en cours de
charge. Cela est normal.
5. La durée de la pile pourra être prolongée en
laissant périodiquement la tondeuse fonctionner
jusqu'à ce que le moteur s'arrête. Éteignez-la
alors et rechargez-la complètement.
6. La pile n'atteindra sa pleine capacité de charge
qu'après trois cycles complète de charge et
décharge.
7. Afin de maintenir la pile à sa capacité maximale,
la tondeuse devrait être rechargée pendant 16
heures tous les trois mois environ.
ENTRETIEN PAR
L'UTILISATEUR
ENTRETIEN DE LA TONDEUSE
LUBRIFICATION DES LAMES
Lubrifiez les lames environ une fois par mois
avec l’huile fournie dans la trousse. Faites-le audessus d’un papier journal. Mettez la tondeuse
en marche et tenez-la les lames pointant vers le
bas. Étalez une goutte d’huile sur les lames puis
éteignez la tondeuse. Essuyez l’excédent d’huile
avec un linge doux.
N’utilisez pas trop d’huile et ne lubrifiez pas
les lames plus qu’il ne le faut car vous pourriez
endommager le moteur. (Ne lubrifiez jamais
le roulement du moteur car il est scellé.)
Après avoir lubrifié les lames, remettez la
tondeuse et le contenant d’huile sur le support
de rangement. Gardez l'huile hors de la portée
des enfants.
ENTRETIEN DES LAMES
Comme les lames sont fabriquées avec précision pour un usage très spécial, vous devriez en
prendre bien soin. Chaque fois que vous utilisez
la tondeuse, nettoyez les lames avec la petite
brosse fournie.
Une attention particulière doit être apportée lors
du changement ou de l’ajustement des lames.
Quand vous faites réparer la tondeuse, assurezvous de faire affûter les deux lames ou de les
remplacer en même temps.
Pour prolonger la durée utile de la tondeuse, ne
l’utilisez que pour l’usage prévu - tailler la barbe
et la moustache.
Caution
Operation
If your rechargeable trimmer does not seem to be
taking a charge, take the following troubleshooting
steps before returning it for repair:
1. Be sure the electrical outlet is working by plugging
in another appliance to test the outlet.
2. Make sure the electrical plug is not connected
to a switch which turns power off when lights
are turned off.
3. Be sure that all connections are secure, and that
the trimmer switch is in the “OFF” position.
Troubleshooting
Afin de réduire
le risque de brûlure, de choc électrique, d’incendie
ou de blessure :
1. Ne laissez jamais un appareil branché sans
surveillance.
2. L’utilisation par, sur ou près d’enfants ou de
personnes souffrant de certaines infirmités
demande une surveillance étroite.
3. N’utilisez l’appareil que pour l’usage prescrit
dans ce livret. N’utilisez que les accessoires
recommandés par le fabricant. N’utilisez pas de
rallonge avec cet appareil.
4. N’utilisez jamais l’appareil si le cordon ou
sa fiche est endommagée, s’il ne fonctionne
pas correctement, s’il a été échappé ou
endommagé ou s’il a été échappé dans l’eau.
Renvoyez l’appareil au centre de service Conair
où on l’inspectera et le réparera.
5. Tenez le fil de l’appareil loin des surfaces
chauffées.
6. Ne tirez ni ne tordez le fil, et le n'enroulez pas
autour de l'appareil.
7. N’échappez n’insérez jamais d’objets dans les
ouvertures de l’appareil.
8. Ne déposez pas l’appareil sur une surface
pendant qu’il est en marche.
9. N’utilisez pas l’appareil avec un peigne
endommagé ou cassé ou s’il manque des dents
sur les lames. Vous risquez de vous blesser.
Assurez-vous que les lames sont bien alignées
avant chaque emploi.
10. Ne l’utilisez pas à l’extérieur ni là où l’on utilise
des aérosols ou administre de l’oxygène.
11. Ce produit est réservé à l'usage ménager.
1. Risk of electric shock, dry location use only or do
not expose to liquid, vapor, or rain.
2. Do not short the polarity (output cord). Ensure
jack is plugged into the Trimmer unit before
plugging the adaptor into the outlet.
3. Do not operate any appliance which has a
damaged output cord or housing.
4. Always unplug the unit before cleaning or when
not in use.
5. This power unit is intended to be correctly
oriented in a vertical or floor mount position.
6. Be sure voltage is in correct voltage before
plugging in.
1. For dry location use only. Do not expose to
water.
2. When not in use, unplug unit completely.
3. Never operate this unit if the specification is out
of the rating.
4. When using this unit, a warm temperature will
be reached.
Before using the Class 2 Power Supply, read
these instructions carefully.
Model: SW-056008A
Rated input voltage: 120Vac, 60Hz, 0.2 Amax
Rated output: 5.6VDC, 80mA
User Manual
Save These
instructions
1. Risque de choc électrique. Ne l'utilisez qu'à un
endroit au sec; ne l'exposez pas à un liquide,
à la vapeur ou à la pluie. Assurez-vous que la
fiche est branchée dans la tondeuse avant de
brancher l'adaptateur dans la prise de courant.
3. N'utilisez pas l'appareil si son fil ou son boîtier
est endommagé.
4. Débranchez toujours l'appareil avant de le
nettoyer ou quand il n'est pas utilisé.
5. Cet appareil doit être utilisé correctement
orienté selon la vertical ou sur le sol.
6. Assurez-vous que la tension de secteur est la
bonne avant de brancher l'appareil.
COMMANDE DE COUPE À TROIS POSITIONS
La commande de coupe de
Conair se trouve au dos de la
tondeuse. Vous pouvez tenir la
tondeuse d'une main et régler
la commande au besoin. Dans
certains cas, la commande
élimine le besoin d'un peigne
car elle vous permet d'ajuster
graduellement la longueur de
coupe. Pour une coupe plus
courte, poussez la commande
au niveau 3. Cette position donne
une coupe de 2 jours. Pour une coupe plus
longue, poussez la commande lentement vers
le niveau 2 ou 1. Notez que trop de poils dans
la tondeuse en ralentira le fonctionnement. Pour
enlever les poils sans enlever les lames, utilisez
la petite brosse de nettoyage et balayez les poils
de la surface de la tondeuse.
Remarque : La commande ne fonctionne qu'avec
la tondeuse pour poils faciaux.
FAIRE POUSSER UNE BARBE ET UNE MOUSTACHE
Il y a trois facteurs à considérer pour établir quel
style de barbe ou de moustache vous convient
le mieux.
1. La forme et la dimension de votre visage.
2.La croissance naturelle de la barbe /
moustache.
3. L’épaisseur de la barbe/moustache. Si vous
n’êtes pas certain du style qui vous convient le
mieux, parlez-en à un coiffeur professionnel et
demandez-lui son opinion. Une fois votre barbe
ou moustache taillée, vous devez l’entretenir.
Pour une bonne taille, la barbe devrait être
electric shock, fire, or injury to persons:
1. Never leave a plugged-in appliance
unattended.
2. This appliance should not be used by, on,
or near children or individuals with certain
disabilities.
3. Use appliance only for its intended use as
described in this manual. Only use attachments
recommended by the manufacturer. Do not use
an extension cord to operate the appliance.
4. Never operate the appliance if it has a damaged
cord or plug, is not working properly, has been
dropped or damaged, or dropped into water.
Return the appliance to a Conair service center
for examination and repair.
5. Keep the appliance cord away from heated
surfaces.
6. Do not pull, twist or wrap the cord around
the appliance.
7. Never drop or insert any object into any opening
of the appliance.
8. Do not place the appliance on any surface while
it is operating.
9. Do not use the appliance with a damaged or
broken comb or with teeth missing from the
blades, as injury may result. Before each use,
make certain the blades are aligned properly
and oiled.
10.Do not use the appliance outdoors or where
aerosol (spray) products are being used or
oxygen is being administered.
11.This product is for household use only.
warning – To reduce the risk of burns,
NE PAS LE SAISIR
DANS L'EAU
légèrement humide (PAS DÉTREMPÉE). Vous
éviterez ainsi de tondre plus de poils que vous
ne le voudriez.
TYPES DE BARBES/MOUSTACHES
POUR DÉBUTER :
DÉLIMITER LE CONTOUR
1. Il est toujours préférable de commencer avec
une barbe propre et humide.
2. Après avoir peigné votre barbe dans le sens
de croissance naturel, délimtier d’abord le
contour sous la ligne de
la mâchoire.
3.Commencez sous le
menton et suivez une
ligne en direction de
l’oreille, de part et d’autre. Délimitez ensuite le
contour supérieur, le long des joues jusqu’aux
favoris et vers la couronne.
Do not reach
into the water
Any appliance is electrically
live, even when the switch is off.
To reduce the risk of death or injury by
electric shock:
1. Always unplug appliance from electrical
outlet immediately after using (except
when charging unit).
2. Do not place or store appliance where it could
fall or be pulled into a tub or sink.
3. Do not use appliance while bathing or in
the shower.
4. Do not place appliance in, or drop into, water
or other liquid.
5. If appliance has fallen into water, do not reach
for it. Unplug immediately.
6. Unplug this appliance before cleaning.
DANGER –
Read all instructions
before using
Keep away from water
when children are present, basic safety precautions should always be taken, including
the following:
Important Safety
Instructions
When using electrical appliances, especially
MAINTENANT, VOUS ÊTES PRÊT À TONDRE
VOTRE BARBE
1. La tondeuse vient avec un peigne à 5 positions
pour couper les cheveux (2-10 mm), donnant
des longueurs de 3/32 po (la plus courte) à 3/8
po (la plus longue).
2. Pour utiliser le peigne à 5 positions, insérezle sur les lames et enclenchez-le en place.
Commencez par utiliser la position la plus
longue jusqu’à ce que vous soyez confortable
avec l’utilisation de la tondeuse. (Vous pouvez
toujours reprendre la tonte un peu plus
courte.)
3.Commencez la tonte
par mouvements doux
et uniformes, allant des
favoris vers le menton.
(Ne taillez jamais votre
barbe à contre-poil
sinon elle sera beaucoup trop courte.)
4. Si vous voulez une tonte
de plus près, ajustez le
peigne à 5 positions à
une position plus serrée
(2 à 4 mm par exemple) et reprenez la tonte
jusqu’à ce que vous ayez la barbe de la
longueur voulue.
3 Jawline Combs
Adaptor
Lubricating Oil
This warranty gives you specific legal rights,
and you may also have other rights, which vary
from province to province.
IN NO EVENT SHALL CONAIR BE LIABLE
FOR ANY SPECIAL, INCIDENTAL, OR
CONSEQUENTIAL DAMAGES FOR BREACH OF
THIS OR ANY OTHER WARRANTY, EXPRESS
OR IMPLIED, WHATSOEVER.
IB-9170
09CN12120
100 Conair Parkway
Woodbridge Ontario, L4H OL2
©2009 CONAIR CONSUMER PRODUCTS INC.
For more information on any
Conair product call:
1-800-472-7606
Visit our Web site:
www.conaircanada.ca
Consumer Call Centre E-mail:
[email protected]
CONAIR CONSUMER PRODUCTS INC.
ANY IMPLIED WARRANTIES, OBLIGATIONS,
OR LIABILITIES, INCLUDING BUT NOT
LIMITED TO THE IMPLIED WARRANTY OF
MERCHANTABILITY AND FITNESS FOR A
PARTICULAR PURPOSE, SHALL BE LIMITED
IN DURATION TO THE 24 MONTH DURATION
OF THIS WRITTEN, LIMITED WARRANTY.
Instruction Booklet
Model GMT255CSC
Our customer service and product
experts are ready to answer ALL your
questions.
Please call our TOLL-FREE customer
service number at: 1-800-472-7606
or visit us online at
www.conaircanada.ca
Call Us First!
Please do not return this product
to the retailer.
Have a Question?
SERVICE CENTRE:
To obtain service under this warranty, return the
defective product to the service centre listed
below, together with your purchase receipt and
$5.50 for postage and handling. In the absence
of a purchase receipt, the warranty period shall
be 24 months from the date of manufacture.
DÉGRADÉ DE LA LIGNE DE
MÂCHOIRE
Taillez toujours la moustache de haut en bas.
4. Une fois la moustache
taillée à la longueur
voulue, enlevez le peigne
à 5 positions et, n’utilisant
que les lames, découpez
le contour inférieur de la moustache.
5. Utilisez la lame à barbiche pour détailler et
découper avec soin.
INTERRUPTEUR
RETRAIT DE LA PILE
CONTIENT UNE PILE NICKEL-CADMIUM.
ELLE DOIT ÊTRE RAMASSÉE, RECYCLÉE
OU JETÉE CORRECTEMENT. NE PAS
LA JETER AVEC LES ORDURES
MÉNAGÈRES.
1. À l’aide d’un petit tournevis Phillips, enlevez les
3 vis au dos de la tondeuse.
2. Enlevez le capuchon de la pile et tirez la pile.
Déconnectez les fils des plots +/–. Déposez la
pile au centre de récupération le plus près. NE LA
JETEZ PAS avec les ordures ménagères.
Precision
Goatee Trimmer
Facial Trimmer
™
1. Les trois accessoires de ligne de mâchoire à
bien tondre la barbe sous le menton. Enclenchez
l’accessoire sur les lames, un côté à la fois,
jusqu’à ce qu’il soit bien en place.
2. Tenez la tondeuse fermement et bien droite et
amorcez la tonte sous la ligne de la mâchoire,
par petits coups uniformes.
3. Une fois le dégradé obtenu, éteignez la
tondeuse, enlevez l’accessoire en soulevant la
patte soigneusement.
Multi-use Trimmer
5-Position
Attachment Combs
Cleaning Brush
Mustache Comb
Soft Storage Pouch
Facial Hair Blade
Beard, Goatee, Soul Patch & More
Conair will repair or replace (at our option) your
unit free of charge for 24 months from the date
of purchase if the appliance is defective in
workmanship or materials.
Limited Two Year Warranty
GMT255CSC
TONDEUSE POUR BARBE / MOUSTACHE
Lame pour
poils faciaux
Lame de précision
pour barbiche
GARANTIE LIMITÉE DE DEUX ANS
MD
Conair, à son choix, réparera ou remplacera le produit
sans frais au cours des 24 mois sui-vant la date
d’achat, si le produit affiche un vice de matière ou
de fabrication.
Tondeuse faciale
Barbe, barbiche, mouche et autres
Pour obtenir un service au titre de la garantie,
retournez le produit défectueux au service aprèsvente indiquée ci-dessous, accompagné du bon
de caisse et de 5,50 $ pour les frais de poste et
administratifs. En l’absence du bon de caisse, la
période de garantie sera de 24 mois à compter de la
date de fabrication.
Poussez-le vers la lame pour mettre la tondeuse
en marche. Faites-le glisser vers le bas pour
éteindre la tondeuse.
Étui souple pour le rangememnt
SOIN DE LA TONDEUSE
TAILLER LA MOUSTACHE
1. Using a small Phillips head screwdriver,
remove the 3 screws at the back of the
trimmer.
2. Remove the bottom housing and push the
batteries out and disconnect the leadwire
connected with +/– pole. Bring the batteries
to the nearest collection center for proper
disposal. DO NOT throw the battery into the
normal municipal waste system.
CONTAINS NICKEL CADMIUM
BATTERY. MUST BE COLLECTED,
RECYCLED OR DISPOSED OF
PROPERLY. DO NOT DISPOSE OF
IN THE MUNICIPAL WASTE.
GMT255CSC
Beard/Mustache Trimmer
battery removal
Peigne à moustache
Brosse de nettoyage
Huile de lubrification
Peigne à 5 positions
3 peignes de
mâchoire
Tondeuse
multiservice
on/off switch
4. After your mustache
has been trimmed to the
desired length, remove
the 5-position comb and,
using the blades only, define the outline of
the bottom of your mustache.
5. Use the precision goatee trimmer blade for
fine detailing and hair art.
Always trim your mustache
from the top down
REMPLACEMENT (RETRAIT) DU JEU DE
LAMES
Pour enlever le jeu de
lames, éteignez d’abord
la tondeuse. Placez le
pouce contre le petit
couteau et poussez vers
le haut pour séparer
le jeu de lames de la
tondeuse. Posez un
nouveau jeu de lames en procédant en sens
inverse du retrait. Cette fois, cependant, placez
le pouce contre le gros couteau et poussez pour
enclencher le jeu en place. Assurez-vous que la
commande d'angle se trouve à la position 1, la
plus longue.
Blending the Jawline
1. Pour de meilleurs résultats, commencez avec
une moustache propre et légèrement humide.
2.Peignez la moustache dans le sens de la
croissance.
3. Placez le peigne à 5
positions sur les lames
et enclenchez-le. Il est
préférable de commencer
avec le réglage le plus
haut (vous pouvez toujours reprendre la tonte
de plus près). Taillez toujours la moustache de
haut en bas.
1. For best results, start with a clean, slightly
damp mustache.
2.Comb through your mustache in the direction
it grows.
3.Place the 5-position
comb over the facial hair
blade and snap it into
position. It is a good idea
to start with the longest
trim setting adjustment. (You can always go
back and cut your mustache more closely
with a shorter setting.)
To Trim Your Mustache
REPLACEMENT (REMOVAL) OF BLADE SET
To remove blade set
from your trimmer,
make sure the trimmer
is in the OFF position.
Remove the blade set by
placing thumb against
the smaller cutter and
pushing forward, releasing
the cutter assembly from the trimmer housing.
Replace with new cutting system and reverse
the removal procedure, only this time place your
thumb on the large cutter and snap into place.
Make sure the taper control is set to the longest
#1 position.
Care of your trimmer
To operate, simply slide switch toward blade,
to stop push slide away from blade.
1. The three jawline attachments will help you
to achieve a neat, finished trim under your
chin. To use one of the attachments, press it
down over the trimmer blades until it clicks
into position.
2.Hold the trimmer in an upright position and
begin trimming under your jawline, using
short, even strokes.
3.After your beard is blended, turn off the
trimmer and remove the attachment by
gently pulling up on tab.
Adaptateur
TOUTE GARANTIE IMPLICITE, OBLIGATION OU
RESPONSABILITÉ, Y COMPRIS MAIS SANS Y
ÊTRE LIMITÉ, LA GARANTIE
IMPLICITE DE BONNE VENTE ET D’APTITUDE À
ACCOMPLIR UNE TÂCHE PARTICULIÈRE, SERA
LIMITÉE À LA DURÉE DE 24 MOIS DE CETTE
GARANTIE LIMITÉE ÉCRITE. EN AUCUN CAS
PEUT-ON TENIR CONAIR RESPONSABLE DE
QUELQUE DOMMAGE SPÉCIAL, INDIRECT OU
FORTUIT QUE CE SOIT POUR LE BRIS DE CETTE
GARANTIE OU DE TOUTE AUTRE GARANTIE,
EXPRESSE OU IMPLICITE QUE CE SOIT.
Cette garantie vous accorde des droits particuliers et
peut vous accorder
SERVICE APRÈS-VENTE :
Conair Consumer Products Inc.
100 Conair Parkway
Woodbridge Ontario, L4H OL2
©2009 CONAIR CONSUMER PRODUCTS INC.
Pour en savoir plus sur les produits Conair,
composez le : 1-800-472-7606
Visitez notre site Web :
www.conaircanada.ca
Courriel du centre d’appels à la clientèle :
[email protected]
09CN12120
IB-9170
Des questions?
Veuillez ne pas retourner ce produit
au détaillant.
Appelez-nous d’abord!
Notre Service à la clientèle et nos
experts sont prêts à répondre à TOUTES
vos questions. Veuillez composer le
NUMÉRO SANS FRAIS de notre Service
à la clientèle : 1-800-472-7606
Ou visitez notre site Internet au
www.conaircanada.ca
Mode d'emploi
Modèle GMT255CSC