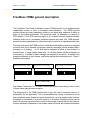
1
TDMA
User Manual
Revision 3.0U
Feb 13, 2004
FreeWave Technologies, Inc
1880 South Flatiron Court
Boulder, CO 80301
USA
Ph. (303) 444-3862
TDMA User Manual
Needs discussion of frame table size set to 109 to satisfy fcc requirements, at 112
with an “even” frame table, you end up with an aliasing effect where the radio
actually only hops on 56 frequencies. With either an odd hop table, or an odd frame
table, things shift in time and fcc requirements are met.
TDMA User Manual
About this document
About this document
General information
This document covers the TDMA protocol available with the FreeWave spread
spectrum transceivers.
Revision History
Table 1 shows revision history of this document
Table 1. Revision History
Revision
Date
th
1.0
Jun 5 2001
3.0m
3.0n
Nov 15, 2001
3.0o
Sept 11, 2002
3.0p
3.0q
Dec 3, 2002
3.0r
Aug 4, 2003
3.0s
Oct 28, 2003
3.0t
3.0U
Dec 9, 2003
Feb 13, 2004
Description
First release.
Misc. in examples, frame table, commands.
Addition of special packet command parameters.
Fixed total frames in epoch discussion.
Added mention of RF data rate in setup parameters.
Added firmware version table.
Added note of no local operation to signal quality and status
packets.
Added description of retry timeout.
How to contact us
We can be reached at:
FreeWave Technologies, Inc.
1880 S. Flatiron Court, Suite F
Boulder, CO 80301
Ph. (303) 444-3862
Fax (303) 786-9948
www.freewave.com
i
TDMA User Manual
About this document
General info e-mail:
[email protected]
ii
TDMA User Manual
Contents
About this document ________________________________________________________ i
General information __________________________________________________ i
Revision History_____________________________________________________ i
How to contact us ____________________________________________________ i
Contents _________________________________________________________________iii
FreeWave TDMA general description __________________________________________6
Definitions ________________________________________________________________8
Slot ________________________________________________________________8
Master slot__________________________________________________________8
System slot _________________________________________________________8
Frame ______________________________________________________________8
Master frame ________________________________________________________9
Slave frame _________________________________________________________9
Frame casing ________________________________________________________9
Epoch ______________________________________________________________9
Master ____________________________________________________________10
Submaster _________________________________________________________10
Slave______________________________________________________________10
Slave repeater _____________________________________________________10
Assigned data and immediate data_____________________________________11
Packetized mode ___________________________________________________11
Transparent mode __________________________________________________11
Local radio _________________________________________________________12
Remote radio_______________________________________________________12
Original and temporary frame tables ___________________________________12
CRC ______________________________________________________________12
TDMA Setup Parameters____________________________________________________13
(0) TDMA Data Communication Mode (0/1):______________________________14
(1) Slave Data Packet Size in bytes (8-240): _____________________________14
iii
TDMA User Manual
(2) Master Data Packet Size in bytes (8-240): ____________________________14
(3) Number of Submasters (0-15):______________________________________15
(4) Number of Slave Frames per Master Frame (1-15): ____________________15
(5) Number of Slave Repeaters per Frame (0-15): ________________________15
(6) Number of Master Frames in Epoch (1-255): _________________________15
(7) Packet Delimiter Character (0-255): _________________________________15
(8) System Slot Length (8-255):________________________________________16
(9) Edit Xmit/Receive Frames:_________________________________________16
(A) Transparent Data Operation (0/1): __________________________________17
(B) Frame Table Reset on Disconnect (0/1):_____________________________17
(C) Disconnect Message (0/1): ________________________________________17
(D) End of Data Character (0-255): _____________________________________18
(E) Overwrite Assigned Buffer (0/1): ___________________________________18
(F) Time Delay (0-238): _______________________________________________18
TDMA Related Parameters __________________________________________________19
Set Baud Rate Manu: ________________________________________________19
Radio Parameters Menu:_____________________________________________19
(3) RF Data Rate:_______________________________________________________ 19
(8) Retry Timeout: ______________________________________________________ 19
Point-to-Multipoint Menu: ____________________________________________19
(1) Master Packet Repeat: _______________________________________________ 19
(6) Network ID: _________________________________________________________ 20
(8) MultiMasterSynch: ___________________________________________________ 20
(9) 1 PPS Enable/Delay: _________________________________________________ 20
Programming the Frame Table_______________________________________________22
Upper Nibble Settings _______________________________________________23
Lower Nibble Settings _______________________________________________23
Master Frame (Frame 00/0) ___________________________________________26
Operation Modes __________________________________________________________27
Operation in Transparent Mode _______________________________________27
Operation in Packetized Mode ________________________________________28
Network Acquisition _______________________________________________________30
Epoch Timing ______________________________________________________30
Examples of TDMA Networks _______________________________________________32
Example 1__________________________________________________________32
iv
TDMA User Manual
Example 2__________________________________________________________39
Example 3__________________________________________________________43
Example 4__________________________________________________________45
Appendix A – Packetized Commands __________________________________________47
Description ________________________________________________________47
TDMA Packetized Commands_________________________________________48
1. ‘0’ Tell local radio to return its radio ID. ___________________________________ 48
2. ‘1’ EEPROM individual address write and read command. ____________________ 49
3. ‘2’ RAM individual address write and read command. ________________________ 53
4. ‘D’ Disconnect and Connect status message.______________________________ 59
5. ‘S’ Tell local radio to go into the setup mode. ______________________________ 61
6. ‘`’ Bulk load of EEPROM TDMA Settings, TDMA Frame Table and Frequency table.
_____________________________________________________________________ 62
7. ‘a’ Bulk load of frame table into RAM. ____________________________________ 66
8. ‘b’ Tell local radio to respond with its signal quality packet. ___________________ 68
9. ‘c’ Get radio’s firmware version number.___________________________________ 71
10. ‘7’ Tell remote radio to respond with its signal quality packet on specified frame. 73
11. ‘B’ Tell remote radio to transmit a status packet on specified frame.___________ 76
12. ‘F’ Special Data Packet command. _____________________________________ 78
13. ‘H’ “Who’s out there” command. ________________________________________ 80
14. ‘L’ Tell remote radio to listen to all packets on specified frame. _______________ 81
15. ‘N’ Tell remote radio to be idle on specified frame. _________________________ 82
16. ‘R’ Tell remote radio to become a repeater/submaster.______________________ 83
17. ‘T’ Tell remote radio to transmit on specified frame. ________________________ 85
18. ‘m’ Gather routing information from source radio to destination radio. __________ 86
19. Send data packet to a specified radio or broadcast. ________________________ 88
Appendix B - ASCII Table (dec, hex, char):_____________________________________90
Appendix C – Firmware Tables: ______________________________________________92
v
FreeWave TDMA general description
TDMA User Manual
FreeWave TDMA general description
The FreeWave Time Division Multiple Access (TDMA) protocol is an enhanced and
sophisticated version of point to multipoint communications. The TDMA protocol
provides timing and other parameters, which in turn allow large networks of radios to
work in a non polled environment. This would be useful, for example, in a network of
GPS stations. If the GPS receivers report in an un-polled manner, numerous packet
collisions would occur if a standard multipoint network was used. The TDMA protocol
provides the timing parameters to allow each radio to report in at a predetermined time.
The basic concept of the TDMA protocol is that each radio within a network is assigned
a specific time slot to transmit a message, receive a message, repeat another radio’s
message, or do nothing. 1 to 16 slots can be assigned to either a slave frame or a
master frame. A single master frame and 1 to 15 slave frames can be assigned to a
frame casing. A number of frame casings are assigned to an epoch. An epoch is the
complete sequence of slots, frames, and frame casings that continually cycle. Figure 1
illustrates this concept.
Master Frame (1 to 16 slots)
Slave Frame 1 (1 to 16 slots)
Slave Frame 15 (1 to 16 slots)
Figure 1 Frame Casing
One Master Frame with 1 to 15 Slave Frames makes one frame casing. One or more
of these frame casings make an epoch.
The design goal of the TDMA protocol was to give the user a maximum amount of
optimization for the application. This is accomplished by having a transparent mode
and packetized mode. Packetized mode requires the use of a header packet to direct
messages or commands to a specific radio or to all radios. Packetized mode can be
used in a poll environment and has no limit on the number of slave radios in the network.
Radios specifically addressed in the header packet will send the received information
6
TDMA User Manual
FreeWave TDMA general description
out the RS-232 port. If all radios have been addressed by doing a broadcast all, all
radios listening will receive information and will transfer it to the RS-232 port.
Transparent mode is most commonly used with devices, which are not capable of
generating header packets. Therefore, all data received from the RS-232 port is
broadcasted to every listening radio. When the data is received by a radio operating in
transparent mode, the data sent to the RS-232 port does not have a header packet
associated with the data. Each slave radio has a frame assigned to them in which they
are allotted a time to transmit data. Therefore, the number of slave radios allowed in a
transparent environment is limited to 255. However, in some applications this number
might be higher. For example, if some of the slaves in the network do not transmit data
and only listen to the master.
A network can be a combination of transparent mode and packetized mode radios.
One of the most common networks consists of a master radio being setup in
packetized mode and the slaves set up in transparent mode. This type of setup allows
the master to issue commands to the listening slaves. Having the slaves in transparent
mode allows the user to connect devices that cannot identify themselves by building
header packets.
The FreeWave TDMA network provides a ‘best effort’ transport meaning that delivered
packets are guaranteed to be error free, but packets containing errors are discarded.
No error correction mechanism is implemented in the TDMA network itself. All packets
must pass a 32-bit CRC check before the packet is sent out the RS232 port. Data is
guaranteed to be accurate, but not guaranteed to be received.
RS-232 data must be sent to the radio following the state of the CTS line, and must be
received before the system slot to be transmitted in the following frames. Even when
there are multiple frames per frame casing for a particular radio, all data for that frame
casing must be received before the system slot.
7
Definitions
TDMA User Manual
Definitions
Slot
A slot is a period of time in which a single message is transmitted, received, or
repeated by a particular radio. The duration of this message is a user-defined setting
and may range from 8 to 240 bytes. A radio, which is assigned a particular slot, will
always transmit at least a header packet regardless of data. It takes 1 to 16 slots to
make a frame (refer to Figure 1). There are two types of slots - master slot and slave
slot. All slave slots are the same size. The master slot and slave slot byte sizes do not
need to be identical.
Master slot
The Master slot occurs as the very first slot of a master frame. The maximum number of
data bytes within this slot can be set differently than a slave’s slot. The number of bytes
can range from 8 to 240 bytes. A master radio will always transmit at least a header
packet regardless of data present in the first slot of a master frame.
System slot
A system slot is a special slot that occurs before the master frame. It is transparent to
the user and is only used by the system to allow the radios to finish processing before
proceeding to the next frame casing. The system slot can also be used to insert a small
amount of dead time to make the overall timing within the network match some external
clock. If used to extend the time for timing issues, there will not be any radios
transmitting during this slot.
Frame
A frame is a grouping of 1 to 16 slots. All slots within a frame are the same size. A
master frame and a slave frame are the only type of frames. Refer to Figure 2. The
frame is used to assign a specific task to a radio. A task can consist of telling the radio
to transmit, listen, do nothing or repeat.
Frame
0
15
A Frame consist of 1 to 16 slots
0
1
2
3
4
5
6
7
8
9
A
Figure 2 Frame Dissection
8
B
C
D
E
F
Definitions
TDMA User Manual
Master frame
The frame number 0 is a master frame. During this frame there can be up to 15
repeating slots, each of which is the same size as the master slot. A master frame
occurs every 1 to 15 frames. The master and submasters use the master frame to
synchronize the timing of the entire network and to send data packets. Every radio
within the network must be able to hear the master or any submaster to remain active
within the system.
Slave frame
A slave frame is a fixed number of slots that follows the master frame. Every frame
except the one master frame is termed a slave frame. There can be up to 15 repeating
slots within a slave frame. Given the fact that all of the radios in the network
synchronized to the master, a radio transmitting in a repeating slot need not hear the
originating slave radio as long as it hears one repeater before it.
Frame casing
A frame casing consists of one master and one to fifteen slave frames. The master
frame is always the first frame of a frame casing and is always followed by at least one
slave frame. There can be different frame casings in the system, but it must always have
the same master frame and the same number of slave frames. The slave frame
functions can vary from frame casing to frame casing as long as the total number of
these frames do not vary. Figure 3 shows an example of a frame casing.
Epoch
Frame Casing 1
Frame Casing
2
Maste
r
Frame
Slave
Frame
Slave
Frame
Maste
r
Frame
Slave
Frame
Slave
Frame
Figure 3 Epoch disection.
Each Frame casing starts with a master frame followed by slave frames. One or more
frame casing makes up an Epoch.
Epoch
9
TDMA User Manual
Definitions
An Epoch is the period in which an integral multiple of master frames is transmitted
before everything is repeated. An epoch can be as little as 1 frame casing or as many
as 255 frame casings. There can be no more than 255 slave frames in an epoch. The
total number of frames in an epoch is equal to the number of master frames plus the
number of master frames multiplied by the number of slave frames. Alternatively, the
total number of frames in an epoch is equal to the number of frames during a frame
casing multiplied by the number of master frames. See Figure 3 for an example of an
epoch consisting of two frame casings.
Master
The master is the radio used within the TDMA network for synchronization. Only one
radio within the network can be assigned to be a master. Every radio within the
network must hear the synchronization signal either directly or through a submaster.
The master always transmits on the first slot of a master frame. The master can also be
a slave or a slave repeater during a slave frame.
Submaster
A submaster is a radio that repeats a master in a master frame. A submaster does not
need to hear the master directly as long as it hears one submaster before it in the same
master frame. A submaster will obtain its synchronization only from the master or a
preceding submaster. A network can have a maximum of 15 submasters.
Slave
A slave is a radio, which originates messages and synchronizes itself with a submaster
or the master. A slave radio can act as a repeater for other slaves in any frame, which is
not the originating radio.
Slave repeater
A slave repeater is a radio that repeats a slave transmission within a slave’s frame.
Repeaters are assigned a specific slot within the slave frame to repeat any messages
heard in a preceding slot. A radio cannot transmit an originating message and then
repeat it in the same frame. The repeater does not need to hear the original message
from the slave as long as it hears one repeater before the assigned transmission slot.
Note that a slave can be, and often is, a repeater in any frame that is not the originating
radio. A repeater will obtain its synchronization and must periodically hear from a
master or one of the submasters.
10
TDMA User Manual
Definitions
Assigned data and immediate data
When the data packet is received from the RS232 port, radio will process it during the
system slot time and may transmit it as assigned data or as immediate data based on
local radio settings.
Transmitting data packet as assigned data assures that the packet will be send out
during radio’s assigned frame as setup in the frame table. The assigned data
transmission mode is the most common data type for TDMA. An originating message
will always be transmitted on the slot number 0 of the assigned slave or master frame.
Immediate data means that the local radio will pick up a random slave frame within the
nearest new frame casing for its transmission. In this mode the packet is transmitted
only one time regardless of the MasterPacketRepeat settings and can be transmitted
during a slot that is assigned to a different radio since it transmits on a random slave
frame.
Packetized mode
Packetized mode allows commands to be sent and received by the radios within a
TDMA network. This gives the user added flexibility and the power of TDMA to solve a
variety of application problems. If the radio is set to packetized mode, all messages
transferred from the RS-232 port to the radio must be formatted into a data packet with
a header. All packets transferred from the radio to the RS-232 port also have a header
attached so the user can utilize the information contained in the header. Radios can be
configured for transparent mode and packetized mode within the same network.
Packetized mode also allows dynamic allocation of frame configuration for each
individual radio in the network.
Transparent mode
Transparent mode is transparent to the user. All packets transferred to or from the
radio to the RS-232 port are strictly data with no header attached. Each RF packet
transmitted contains a 5-byte header packet, which includes the delimiter character, the
three-byte serial number of the radio, and the number of characters within the data
message. A radio in transparent mode that receives a transparent or packetized
packet, strips off the header packet before it is transferred out to the RS-232 port of the
radio. A radio in packetized mode that receives a message from a transparent mode
radio transfers the header packet along with the data message out the RS-232 port of
the radio.
11
TDMA User Manual
Definitions
Local radio
Local radio is a radio, which is connected through the RS232 port to equipment that
generated a command or data to be evaluated by the radio.
Remote radio
Remote radio is a radio, which is a part of the same TDMA network with the local radio
and which potentially can hear transmissions from the local radio directly or through a
repeater(s)/submaster(s).
Original and temporary frame tables
Each radio in the TDMA operation mode stores its frame table in two different memory
blocks. The original frame table is stored in the EEPROM and can be viewed and
edited from the TDMA menu. This table is a hard copy of the frame table, which assures
that the radio will return to a known state after each power-on-off cycle. When the DC
power is applied to the radio, the radio creates an exact copy of the original frame table
in the RAM. This copy is named a ‘temporary frame table’ and will be used by the radio
from that moment until the next power-on-off cycle. The temporary frame table can not
be edited from the TDMA menu, but the whole table or any part of it can be changed
and edited by using special commands if the radio is in the packetized mode.
Moreover, this frame table can be reset back to the original frame table or can be kept
after radio looses synch to a master depending on the FrameTable Reset on
Disconnect settings.
CRC
Cyclical Redundancy Check. The FreeWave Radios implement a 32 bit CRC check on
all data packets to guarantee correct data.
12
TDMA Setup Parameters
TDMA User Manual
TDMA Setup Parameters
The TDMA mode is activated by entering the radio's setup mode and selecting option
zero from the menu. Once in the Operation Mode menu enter 8 for TDMA. Escape back
to the Main menu and enter 6 for TDMA parameter menu. Refer to Table 1 for an
example TDMA parameter table.
Table 1 TDMA Parameters List
13
TDMA User Manual
TDMA Setup Parameters
Following is a brief description of the TDMA parameters:
(0) TDMA Data Communication Mode (0/1):
Note: This parameter can be mixed across the radio network.
(0) Transparent Mode: Data is transferred to and from the RS-232 port without a
header packet. This mode allows relatively ‘dumb’ devices to transfer data to and
from the radio without the need to compile or de-compile the header information.
(1) Packetized Mode: All data to and from the radio begins with a header that
contains delimiter, addressing and/or a command and the data. Therefore, the
device connected to the radio in packetized mode must be capable of compiling or
de-compiling a header packet, which is associated with the data.
In general, there are two types of information that can be sent to the radio in a
packetized mode – command or data. A command can be addressed to a local
radio or to a remote radio. The data can be broadcast or can be sent to a specific
remote radio. Moreover, the data can be sent in the packetized mode as an
assigned data or as an immediate data. Please, refer to the ‘Appendix A’ for more
details on the command/data sending in the packetized mode.
(1) Slave Data Packet Size in bytes (8-240):
This allows the user to assign the maximum number of data bytes in a packet,
which can be sent within one slot. The minimum packet size is 8 and the maximum
size is 240.
While TDMA timing is all based on a RF Data Rate of 3, the TDMA protocol can
be run at a RF Data Rate of 2. When at 2, the packet sizes change from a
maximum of 240 bytes down to a maximum of 180 bytes.
* Note: Firmware versions up through 900 MHz 5.85, 2.4 GHz 1.85, and 225 MHz
1.07 only support Slave Data Packet sizes up to 239 bytes.
Note: The radio will break data up into packets by two methods, the first is a break
in the data stream, and the second is at the set data packet size.
(2) Master Data Packet Size in bytes (8-240):
This allows the user to assign the maximum number of data bytes in a packet,
which can be sent within one master slot.
14
TDMA User Manual
TDMA Setup Parameters
While TDMA timing is all based on a RF Data Rate of 3, the TDMA protocol can
be run at a RF Data Rate of 2. When at 2, the packet sizes change from a
maximum of 240 bytes down to a maximum of 180 bytes.
Note: The radio will break data up into packets by two methods, the first is a break
in the data stream, and the second is at the set data packet size.
(3) Number of Submasters (0-15):
This parameter assigns the number of submasters (master repeaters) within each
master frame. The maximum number of submasters allowed in the network is
fifteen. An entry of zero (0) means that there are no submasters in the network and
the master will hear and talk to the slaves directly.
(4) Number of Slave Frames per Master Frame (1-15):
This assigns the number of slave frames that occur between a master frame. The
minimum slave frame is one and the maximum slave frames allowed are fifteen.
(5) Number of Slave Repeaters per Frame (0-15):
This parameter assigns the number of repeaters within a slave frame. The
maximum number of repeater allowed is fifteen. A setting of zero (0) means that
there are no repeaters in the network and the master hears the slaves directly.
(6) Number of Master Frames in Epoch (1-255):
This assigns the number of master frames/frame castings that occurs within an
epoch. This number can have a minimum number of one (1) or a maximum number
of two hundred and fifty-five (255).
(7) Packet Delimiter Character (0-255):
This assigns a delimiter character in hexadecimal that is used to begin all packet
transfers to and from the RS-232 port. This parameter is only valid in packetized
mode. It is recommended that an ASCII character be used that is not commonly
used. It is also suggested to have the same Packet Delimiter character on all of
the radios in the system.
15
TDMA Setup Parameters
TDMA User Manual
(8) System Slot Length (8-255):
This parameter is commonly used for elongating the frame casing timing for time
sensitive applications. The default setting of eight (8) is the minimum amount of
time necessary to process data before the beginning of the next frame casing.
Note: While many versions of firmware will allow the system slot to be set to less
than 8, the radio will not work properly unless the system slot is set to at least 8.
(9) Edit Xmit/Receive Frames:
When this parameter is selected, the user will get a Frame table (see Figure 4).
This frame table needs to be setup by the user with specific parameters, which is
entry into the individual frame boxes. The specific parameters enter into the
different frames will indicate whether the radio modem is to be a master,
submaster, repeater, a slave or do nothing.
00
10
20
30
40
50
60
70
80
90
A0
B0
C0
D0
E0
F0
0
00
00
00
00
00
00
00
00
00
00
00
00
00
00
00
00
1
00
00
00
00
00
00
00
00
00
00
00
00
00
00
00
00
2
00
00
00
00
00
00
00
00
00
00
00
00
00
00
00
00
3
00
00
00
00
00
00
00
00
00
00
00
00
00
00
00
00
4
00
00
00
00
00
00
00
00
00
00
00
00
00
00
00
00
5
00
00
00
00
00
00
00
00
00
00
00
00
00
00
00
00
6
00
00
00
00
00
00
00
00
00
00
00
00
00
00
00
00
7
00
00
00
00
00
00
00
00
00
00
00
00
00
00
00
00
8
00
00
00
00
00
00
00
00
00
00
00
00
00
00
00
00
9
00
00
00
00
00
00
00
00
00
00
00
00
00
00
00
00
A
00
00
00
00
00
00
00
00
00
00
00
00
00
00
00
00
B
00
00
00
00
00
00
00
00
00
00
00
00
00
00
00
00
C
00
00
00
00
00
00
00
00
00
00
00
00
00
00
00
00
D
00
00
00
00
00
00
00
00
00
00
00
00
00
00
00
00
E
00
00
00
00
00
00
00
00
00
00
00
00
00
00
00
00
F
00
00
00
00
00
00
00
00
00
00
00
00
00
00
00
00
Enter Frame Number (esc returns to main menu)__
Each frame is represented as one entry in the table. To enter a value in a frame, you would first enter
the first value of the line number on the left (row) and combine it with the number on the top (column).
For example, the bold 00 value frame is accessible by typing - 87. The frame below if would be 97 and
so on.
Figure 4 TDMA Frame Table
16
TDMA User Manual
TDMA Setup Parameters
(A) Transparent Data Operation (0/1):
This parameter is valid for the transparent operation mode only. This parameter
assigns the type of data for the radio. The type of data can be either assigned data
or immediate. A value of zero (0) is for assigned data and a one (1) is for
immediate. Assigned data is the most commonly used data type.
Assigned Data: The radio will transmit a packet on the first frame in the next frame
casing that has a 20 (transmit) mark. If this radio does not have a 20 in it’s frame
table, then it will never transmit the data.
Immediate Data: The radio will randomly pick a frame from the next casing and
transmit its data on that frame. The radio does not care if any other radios are set to
transmit during this frame.
Note: Please note, that in the packetized mode selection between the assigned or
immediate data can be done by selecting an appropriate ‘Send data packet
to a specific radio or broadcast’ command format only (refer to ‘Appendix A”
for more details and command format).
(B) Frame Table Reset on Disconnect (0/1):
This parameter controls whether or not a temporary frame table should be reset
back to the original frame table if radio looses the synch to the master. A setting of
zero (0) will not reset back to the original setup on disconnect. A setting of one (1)
will reset the frame table to the original frame table when the radio disconnects.
Note: If the radio loses power, the temporary frame table will be lost due to being
stored in non-volatile RAM. Next time radio turned on, the original frame table
will be copied to the temporary frame table.
(C) Disconnect Message (0/1):
This parameter controls whether or not a disconnect message is transferred out of
the RS-232 port whenever the radio disconnects. A setting of zero (0) gives no
message on disconnect. A setting of a one (1) causes a message to be transferred
out through the RS-232 port. The format of the message is defined by the
‘Disconnect and Connect status message’ command (refer to the ‘Appendix A’ for
more details).
17
TDMA User Manual
TDMA Setup Parameters
The radio must be in packetized mode for this option to have any effect.
(D) End of Data Character (0-255):
This parameter assigns an ASCII character as the end of the data packet. The radio
looks for this character in the data it receives. If the radio sees this end of data
character, the data is parsed into two different packets and sent at different times.
Note: This ASCII character is in hexadecimal.
(E) Overwrite Assigned Buffer (0/1):
* This only applies to assigned buffer.
This parameter determines if the assigned buffer will be overwritten by data being
received. The setting of a zero (0) does not allow the assign buffer to be
overwritten. A setting of one (1) allows the assign buffer to be overwritten.
This parameter allows incoming data on the RS232 port to overwrite data
already in the buffer. For GPS data and such where only the current data is of
importance.
(F) Time Delay (0-238):
This parameter allows for a time delay to be inserted into the network. The time
delay is necessary for links of greater than 20 miles and absolutely critical for links
exceeding 80 miles. The value of the parameter should be incremented by 1 for
every 10 miles over a 20-mile link. For example, a 50-mile link would require a
setting of 3 in the Time Delay parameter.
Adds 2 clock ticks per slot, per increment. This setting effectively adds two bytes
per slot per increment. Time for 2 bytes (138us) times the speed of light, gives a
distance of 25.89 miles. Since this is round trip, dividing by 2 gives ~13 miles.
18
TDMA User Manual
TDMA Related Parameters
TDMA Related Parameters
Following is a list of user selectable options in other than TDMA menu, which define
TDMA system operation and functionality.
Set Baud Rate Manu:
Radio Parameters Menu:
(3) RF Data Rate:
The “RF Data Rate” parameter should be set to 3. All factory testing, specs, and
timing are based on an RF data rate of 3.
Note: A network will work at an RF data rate of 2, but the timing changes, and the
maximum data packet size changes from 240 to approximately 180 bytes.
(8) Retry Timeout:
The value entered here is used to determine how long a radio can not hear the
network before dropping the link to the network. This parameter is the number of
master frames that can be missed before the radio drops the link. For example,
when you leave the coverage area, and the radio can no longer hear the master
(or a submaster), then it starts counting the master frames, or frame casings.
When it reaches the number set here, the radio drops the link and tries to reaquire the network.
The default is 255.
Note: This can cause delays of 1 minute and more easily depending upon your
settings.
All of the setting in these menus define the radio functionality in the TDMA network in
the same manner as they do so in other network types (Peer-to-Peer, Point-to-Point, or
Point-to-Multipoint). Please, refer to the User Manual for more details.
Point-to-Multipoint Menu:
(1) Master Packet Repeat:
19
TDMA User Manual
TDMA Related Parameters
Setting this parameter to a number greater than zero (0) will allow each message
(data packet or command) sent from the master, slave or slave/repeater radio in
the TDMA network being repeated by sending radio an appropriate number of
times. The message is repeated in the following assigned frames.
(6) Network ID:
This parameter adds exactly the same functionality to the TDMA network as it does
to the Point-to-Multipoint network. In general, only radios with the same Network ID
settings will be able to communicate with each other in the TDMA mode.
Note: The NetworkID contains 2 bytes, but in the TDMA system only the least
significant byte (LSB) is used by the radio. Therefore, if the NetworkID is
set to 269 (0x010D), for example, the radio can potentially communicate
with another TDMA network, which has NetworkID set to 13 (0x000D).
(8) MultiMasterSynch:
In the TDMA mode this parameter allows synchronization between a few co-located
TDMA masters. When MultiMasterSync is set to one (1), the co-located TDMA
masters will be synchronized to each other in a manner similar to Point-to-Point or
Point-to-Multipoint GrandMaster operation (refer to the ‘FreeWave Grand Master
Mode’ document for more information). However, in the TDMA mode there are
some additional RS232 lines wiring involved in order to assure a proper
MultiMasterSync functionality. A complete setup procedure for TDMA
MultiMasterSynch may be found in the “TDMA Networks with co-located masters.
Setup instructions.” (please contact FreeWave Technologies regarding this
document).
(9) 1 PPS Enable/Delay:
Note: This feature is available for the radios with the serial numbers 571-0000 and
above and the f/w version 5.59y and higher.
Note: This feature is only available in packetized mode.
Activating this parameter allows independent synchronization of all radios in a
TDMA network to a time stamp generated by an external device and a 1 PPS
20
TDMA Related Parameters
TDMA User Manual
signal generated by a GPS receiver. In some applications it might be beneficial
because in this case every radio in the network does not need to hear master’s or
submaster(s) transmissions. This simplifies the network topology design and
allows for greater mobility of all radios within the network.
Specifications and Limitations:
(1) The radio must be supplied with a one PPS pulse on the DTR pin. The
rising edge of the 1 PPS will be used as a one second timing reference
and must have an accuracy of +/- 500 nsec.
(2) A new time stamp packet has been defined and must be sent to the radio
within 200 msec after its corresponding 1 PPS. These only have to be
sent during the radio acquisition phase but more than one may be
needed until the radio has synched up.
Time Stamp format:
0xDD,0x00,0x04,0x00,0x45,0xMSB of TimeStamp,0xLSB of
TimeStamp, SecondsPerEpoch
Field name
0xDD
0x04
0x45
0xMSB of TimeStamp
and
0xLSB of TimeStamp
SecondsPerEpoch
Meaning/format
Delimiter byte (hex value)
Number of data bytes
Command code
TimeStamp is a 16-bit number, which is the number of
seconds within an arbitrarily defined GPS epoch. If the
GPS epoch is defined as one hour, then the range of
TimeStamp will be 0-3,600. A better epoch may be 7 hours
giving a range from 0-25,200.
SecondsPerEpoch is defined as the number of seconds for
a TDMA Epoch. The minimum allowed is 1. Any other
value must divide into the defined GPS Epoch. If this
Epoch length is 3600 seconds (1 HR) then the allowed
values of SecondsPerEpoch is 1,2,3,4,5,6,8,9,10,12,15,etc
An epoch length of 7 hrs will allow a value of 7 for
SecondsPerEpoch to be used.
(3) The TDMA parameters MUST be set up so that a TDMA Epoch lasts
exactly the number of seconds in SecondsPerEpoch. The SystemSlot
parameter is useful to fine-tune the Epoch length.
(4) A slave radio will try to synchronize through the RF while waiting for the
TimeStamp packet.
(5) When synched up, all radios must continue to get the 1 PPS. If a PPS is
missed the radio will return to acquisition mode.
21
TDMA User Manual
22
TDMA Related Parameters
Programming the Frame Table
TDMA User Manual
Programming the Frame Table
The frame table is used to specify the function of the radio during each frame. The radio
can be programmed to transmit, receive, repeat or do nothing. The Frame Table is
accessible through the TDMA parameter table. By selecting item nine (9), the frame
table will display (see Figure 4). Each box in the frame table is a frame. As you may
recall, a frame is made up of 1 to 16 slots. Refer to Figure 5 for a visual perception.
00
10
20
30
40
50
0
00
00
00
00
00
00
1
00
00
00
00
00
00
2
00
00
00
00
00
00
3
00
00
00
00
00
00
4
00
00
00
00
00
00
5
00
00
00
00
00
00
6
00
00
00
00
00
00
7
00
00
00
00
00
00
8
00
00
00
00
00
00
9
00
00
00
00
00
00
A
00
00
00
00
00
00
9
A
B
B
00
00
00
00
00
00
C
00
00
00
00
00
00
D
00
00
00
00
00
00
E
00
00
00
00
00
00
F
00
00
00
00
00
00
1 to 16 slots equals a frame
0
15
0
1
2
3
4
5
6
7
8
C
D
E
F
Figure 5 Slots in the Frame Table
Frame location 0x04h has been expanded to give a visual representation of the slots
contained in a frame.
From what is seen in Figure 5, the entries in the frame table all have a value of “00”.
Unless we change these values, the radio at this time is programmed to do nothing. The
values for programming the frame table for the radio modem consist of two values,
which are referred to as an upper nibble and a lower nibble settings. The upper nibble
(Figure 6) sets the function of the radio within the frame and the lower nibble sets the
slot position for that function to happen.
Upper nibble sets the radio’s function and the lower nibble specifies what slot the
function will occur within a specified frame.
00
Upper Nibble
Lower Nibble
Figure 6 Frame Nibble Explanation
23
TDMA User Manual
Programming the Frame Table
Note: The frame table is laid out in a square fashion because it displays better on the
screen. The frame table in time is sequential:
00, 01, 02, … 0E, 0F, 10, 11, … 1F, 20, 21 … etc.
Upper Nibble Settings
(0)
A setting of zero (0) assigns the radio to be idle during this frame. It is effectively
doing nothing but listening in the background. The lower nibble is irrelevant and
is ignored. However, any RF commands or data directed to that radio, from a
radio in packetized mode, is received and transferred out the RS-232 output.
Data broadcast to all is ignored and data received from transparent mode
radios is ignored.
(1)
When this is set to one (1) the radio will listen for any radios that transmit within
that particular frame. The radio will receive the data and send this data to the
RS-232 port. However, if the data is from a packetized radio and the data is
addressed to another radio, the data is not sent to the RS-232 port.
(2)
A setting of two (2) in a master radio or a slave radio will transmit any data
received on the RS-232 port during the assigned frame as long as the lower
nibble is set to zero (0). If the radio is to be a submaster (master repeater) or a
repeater (slave repeater) a setting of two (2) in the upper nibble must be
accompanied with a lower nibble pointing to a slot other than slot zero (0). The
radio, which is set to be a repeater or submaster, does not output the data to the
serial port.
(3)
A setting of three (3) in the upper nibble will repeat what radio hears on slot zero.
The lower nibble determines what slot the message will be repeated on. This
setting of three (3) also allows data, which radio received, to be sent out the RS232 port. This setting is useful if you need a slave to act as a repeater.
Lower Nibble Settings
The lower nibble sets the slot position within the frame, which a radio will perform a
specific function. The upper nibble is the main determinant in what the radio will actually
do in a particular frame. The following gives the rules for the lower nibble settings:
24
Programming the Frame Table
TDMA User Manual
(0)
A zero (0) nibble setting is only allowed with an upper nibble setting of a zero (0),
one (1), or two (2). The zero (0) nibble varies in meaning depending on the upper
nibble setting. See Table 2 for different meanings.
Meanings of Different Frame Settings
This setting tells the radio during this frame to do nothing, however if the radio receives
a packetized command from the master the radio will send it out the RS-232 port.
10
This setting tells the radio during this frame to listen and send whatever it hears to the RS-232
port as long as this data is not addressed to another radio using packetized mode.
A radio will listen on all slots, until it hears a valid packet.
Setting to 11, 12, … has no effect, and is not recommended.
20
This setting tells the radio during this frame to transmit data which was received from the RS232 port and transmit this data on slot zero (0) of that frame.
2x
The x – value refers to the slot number in which data or command is repeated which was heard
the slot before from a transmitting master, slave or another repeater. The data, which is heard
and repeated, is not sent to the RS-232 port.
3x
The x – value refers to the slot number in which data or command is repeated which was heard
the slot before from a transmitting master, slave or another repeater. The data, which is heard
and repeated, is sent to the RS-232 port. This setting is useful if a slave is needed to be used
as a submaster or a repeater.
Table 2 Frame Table Settings
(1-15) A lower nibble setting of one (1) to fifteen (15) refers to the slot in which a
process takes place. A setting greater then zero in the lower nibble is used for
radios which have been designated to repeat data that it hears.
Note: The entries in the frame table are to be entered in hexadecimal. Therefore, the
reference made in the lower nibble section referencing the lower nibble (1-15)
should have entries in the frame table consisting of 1, 2, 3, 4, 5, 6, 7, 8, 9, A, B,
C, D, E, or F hexadecimal numbers.
Note: A repeater or submaster will repeat the data from the first slot that that radio
hears prior to its assigned transmit slot. For example, if you have a master with
two submasters through which the data must flow consecutively, the first
submaster will repeat on slot 1 what it heard in slot 0. The second submaster
25
TDMA User Manual
Programming the Frame Table
who can not hear the master directly, will miss the transmission on slot 0, but will
hear the transmission on slot 1 and will repeat that on slot 2.
However, if we have a system where both submasters can hear the master, then
submaster 1 will repeat what it hears on slot 0 in slot 1. Submaster 2 will listen on
slot 0, and if it hears the master’s transmission correctly, then it will repeat this
message on slot 2. If it does not receive the master’s transmission properly, then
it will listen on slot 1 for the repeated message. If it receives this message
correctly, it will repeat this message on slot 2.
26
Programming the Frame Table
TDMA User Manual
Master Frame (Frame 00/0)
As you recall from the definition section, the master and submaster radios only use
Master Frame. The master and submaster radios only use the very first frame of the
frame table (refer to Figure 7). The actual location in the frame table is 00/0.
00
10
20
0
00
00
00
1
00
00
00
2
00
00
00
3
00
00
00
4
00
00
00
5
00
00
00
6
00
00
00
7
00
00
00
8
00
00
00
9
00
00
00
A
00
00
00
B
00
00
00
C
00
00
00
D
00
00
00
E
00
00
00
F
00
00
00
The master frame. Only the master radio and the submaster
are allowed to use this frame.
The radio assigned to transmit in this frame is always the master. Only one master is allowed in a
network. The master frame is the heartbeat of the network. It transmits synchronization and timing
data to every radio within the network either directly or indirectly through submasters.
Figure 7 Master Frame
Frame 00/0 (the first frame in the frame table, Figure 7) is special and represents the
action of the radio during all master frames. No other frame can be set as a master
frame. All master frames must be identical unlike slave frames that can change after
each master frame within an epoch. All successive master frames as specified by the
parameter “Master Frames per Epoch” DO NOT show up in the frame table, they have
the same settings as the 00/0 frame. In other words, the master frame shows up only
once in the frame table at 00/0, but in time there is one master frame per frame casing.
Master’s Frame Table:
2
10
20
3
10
4
10
5
00
6
00
Slave 1 Frame Table
0
1
2
00
21
20
10
21
3
20
4
10
5
00
6
00
10
3
10
4
20
5
00
6
00
00
0
20
1
10
Slave 2 Frame Table
0
1
2
00
10
10
20
2 Slave Frames per Master Frame
2 Master Frames per Epoch.
Implicit master frame that is exactly the same as frame 00/0.
Figure 8 Implicit Master Frames
27
Operation Modes
TDMA User Manual
Operation Modes
There are two modes of operation in TDMA, Transparent Mode and Packetized Mode.
When the radio operates in transparent mode, all characters transferred to and from the
RS-232 port are treated as data only. No additional characters or control commands
are included with the data. Control of the packet size is not necessary because the
radio will automatically parse the data into packets before it is transmitted. Packetized
mode does require control of the packet size. The data that is received from the RS232 must contain a header packet, which contains a delimiter, 3-byte address, byte
count and the data. This header packet size can vary depending on the type of action is
required.
The CTS (clear to send) line can be used to synchronize data transfer to the radio over
the RS-232 port. It will remain asserted (high) until the beginning of a scheduled
transmitting slot. At the beginning of the slot, the CTS line is de-asserted (low), and
remains de-asserted for the duration of the slot. It is asserted (high) at the end of the
slot. To prevent fragmentation of data packets, it is recommended to trigger the data
transfer to the modem on the rising edge of the CTS. The CTS line will de-assert when
the internal 1KByte buffer gets full. The CTS line will stay de-asserted until the internal
buffer starts to empty.
The CD (carrier detect) line is de-asserted when the radio has power. Once the slave
syncs, the CD light on the radio modem turns solid green. For all radios other than the
master, the CD light will stay green as long as the slave radios are synchronized with
the network.
Table 3 CD Light and Line States
CD Light
Green
Red
In sync with network
Out of sync with network
Asserted
De-Asserted
Normally
When radio is receiving data from the network.
CD Line
Operation in Transparent Mode
There are two different data types, immediate and assigned. If the data type is
immediate, the radio will transmit one time only on a random selected slave frame after
the next frame casing. If the data type is assigned data, the radio will transmit the
28
Operation Modes
TDMA User Manual
message in its buffer during the assigned slot. New data received from the RS-232 port
will delete any previous data in the radios RS-232 buffer.
Operation in Packetized Mode
All data sent in and out of the RS-232 port begins with a header packet. All data
packets must be less than or equal to the maximum data size set up initially in the
TDMA setup menu for “Slave Data Packet Size in Bytes” and “Master Data Size in
Bytes”. The header packet is not considered part of the data. See Table 3 for a listing
of all of the packetized commands.
Note: All dynamic allocations of frame function are stored in non-volatile RAM. Any loss
of power will cause all changes to reset back to the original setup parameters
set by the user.
Table 4 Packetized Mode Commands
Commands executed on the local radio only
1
2
3
4
Command code
0x30
0x31
0x32
0x44
5
6
0x53
0x60
7
8
9
0x61
0x62
0x63
10
Command code
0x37
11
12
0x42
0x46
13
14
15
16
17
18
19
0x48
0x4C
0x4E
0x52
0x54
0x6D
0xDD,0x##0x##0x##,0x00+d
ata packet length,####(data)
29
Action
Tell local radio to return its ID number.
EEPROM individual address write and read command.
RAM individual address write and read command.
Disconnect and Connect status message: The TDMA parameter
‘Disconnect Message’ needs to be set for this feature.
Tell local radio to go into the setup mode.
Bulk load of TDMA Settings, TDMA Frame Table and Frequency
table.
Bulk load of frame table.
Tell local radio to respond with its signal quality packet.
Get radio’s firmware version.
Commands executed on the remote radio only
Action
Tell remote radio to respond with its signal quality packet on
specified frame.
Tell remote radio to transmit a status packet on specified frame.
Special Data Packet command: sends data to a specific radio or
radios on a specified frame.
“Who’s out there” command.
Tell remote radio to listen to all packets on specified frame.
Tell remote radio to be idle on specified frame.
Tell remote radio to become a repeater/submaster.
Tell remote radio to transmit on specified frame.
Gather routing information from source radio to destination radio.
Send data packet to a specified radio or broadcast.
TDMA User Manual
Operation Modes
Note: Refer to the Appendix A for detailed commands descriptions.
There are two types of data messages, assigned and immediate. If the address field of
the message is set to the sending radio’s address, the message is called an assigned
message. An assigned message is stored by the radio until a new assigned message
is received on its serial port. An assigned message is then broadcast by the radio
during the frame that is designated for transmitting. However, if the radio has other
messages to broadcast, those messages are transmitted instead.
The second type of data message is an immediate message. An immediate message
is broadcast in a frame selected by the radio. If the radio is a master radio, the data is
broadcast in the next master frame slot. If the radio is a slave radio the data is
broadcast on a randomly selected slave frame between the next slave frames.
30
TDMA User Manual
Network Acquisition
Network Acquisition
A radio operating in TDMA mode will acquire the network the same way as in a
standard point to multipoint mode. If the radio is not the master the radio will search for
any master or submaster which is in its call book. If the call book is not used the
Network Id must be used. The radios in the network must have the same setup, as far
as the “Radio Transmission Parameters” and “Multipoint Parameters”. There are some
parameters, which are not used by the TDMA mode. In the “Radio Transmission
Parameters”, Max Packet size and Min Packet size are not used. In the “Multipoint
Parameters”, Number of Repeaters, Max Slave Retry, Retry Odds, DTR connect,
MultiMasterSync and 1PPS are not used. Even though the items listed are not used, it
is good practice to ensure that all radios in the network have the same setting.
Epoch Timing
The TDMA protocol allocates specific and fixed time slots to radios within the network.
The FreeWave “Time Division Multiple Access” (TDMA) protocol is basically for real
time data collection. Table 4 gives the items and a description of each, that are used to
calculate the transmission time of one epoch.
31
Network Acquisition
TDMA User Manual
Transmission Timing
Items
Description
69.444 µs
the time it takes to transmit one (1) byte of data.
2.917 ms
The overhead and header packet transmission time.
1 System slot time
(Slot length + 4) * 69.444 µs
1 Slave slot time
((Slave Packet Size + 2 * (Time Delay))* 69.444µs) + 2.917 ms
1 Master slot time
((Master Packet Size + 2 * (Time Delay))* 69.444µs) +2.917ms
1 Slave frame time
(1 Slave slot time) * (1 + Number of repeaters)
1 Master frame time
(1 Master slot time) * (1 + number of submasters)
Time for all Slaves
(1 Slave frame time) * (number of slave frames per master frame) in 1
frame casing
1 frame casing time
(1 Master frame time) + (Time for all Slaves In 1 frame casing) +
(System slot time)
Time for 1 epoch
(1 frame casing time) * (Number of master frames in an Epoch)
Figure 9 Epoch Time Calculations
32
Examples of TDMA Networks
TDMA User Manual
Examples of TDMA Networks
Example 1
This section will walk through the process of setting up a TDMA network. Hopefully, by
the end of this section all questions will by eliminated and you will be ready to setup your
own TDMA network.
Step One
We have determined that five radios are needed for collecting real time data. Figure 8
gives an example of the geographical location of our five radios.
Radio A
Radio C
Radio E
Radio D
Radio B
The lines in between radios indicate that these radios can hear each other. So, in this figure Radio
A can hear Radio C, Radio C hears Radio B, Radio D, and Radio E, Radio D hears Radio C and Radio
E, and Radio E hears Radio D and Radio C.
Figure 10 Example Network 1
Referring to Figure 8, Radio A is going to be our Master station, Radio C is going be
setup as a repeater station and have a GPS receiver connected to it. Radios B, D and
E are going to have GPS receivers connected to them and will be setup as Slave
stations only.
Step 2
The next step involves the TDMA Parameter table. Figure 9 shows a default table. The
first parameter we need to determine is the TDMA Data Communication Mode. This
parameter can be select as a packetized or transparent mode. The slave radios are
33
TDMA User Manual
Examples of TDMA Networks
connected to GPS receivers, these devices cannot build packetized data. Therefore,
these radios will be set up in transparent mode. The master station can be setup in
transparent or packetized mode. But we want the ability to use some of the packetized
commands, so the master station is going to be setup in packetized mode. The TDMA
Data Communication Mode setting for our master station will have a setting of one (1)
and the repeater and the slave radios will have a setting of zero (0).
Table 5 Example 1 Settings
Step 3
The next parameters consist of the Slave Data Packet Size and the Master Data
Packet Size. This parameter value can be any number between 8 and 240. The Slave
Data Packet Size is going to be set to 152 data bytes and the Master Data Packet
Size is going to be set to 100 bytes. Referring back to the section Epoch Timing, we
know that it takes 69.444µs to send one byte of data. Therefore, 152 bytes of data to
be sent within one (1) slave frame slot would take
34
TDMA User Manual
Examples of TDMA Networks
(slave packet size * 69.444µs) + 2.917ms = (152 * 69.444µs) +2.917ms=13.472488ms.
A master slot would take:
(master packet size * 69.444µs) + 2.917ms = (100 * 69.444µs) +2.917ms=9.8614ms.
Step 4
The Number of SubMasters and the Number of Slave Repeaters per Frame are the
next parameters to consider. From the description above we know that one of the
radios (Radio C) in our example is going to be a repeater. The radio, which repeats
the master’s signal is labeled as a SubMaster. In our case, Radio C will be our only
submaster in the system. Due to the fact that signals from radios B, D and E cannot be
heard directly by the master, the number of repeaters in the system would only be one
(1). Radio C can hear and be heard by the master and the slaves. Therefore, the
Number of SubMasters should be set to one (1) and the Number of Slave Repeater
per Frame should be set to one (1) as well.
Step 5
Number of Slave Frames per Master Frame is the next parameter to set. Referring
back to our example, we know that radios B, C, D, and E have GPS receivers
connected to them. We also know that Radio C is going to be a SubMaster and a
Repeater for the network. Although Radio C has been designated as a SubMaster and
a Repeater, it will also operate as a slave. Therefore, the number of slaves in the
system per master frame will be four (4).
Step 6
The next parameter we needed to set is Number of Master Frames in Epoch. As you
recall, an Epoch is a period of time that combines 1 or more frame casings. In our
case, we have four (4) slaves and one master in our one (1) frame casing. Therefore,
theoretically we can setup the Number of Master Frames in Epoch to be up to 63:
255/(number of slaves) = (255 / 4) = 63.
Due to simplicity of the network that we are trying to configure, it makes sense to keep
the Number of Master Frames in Epoch at one (1). In some applications the system
may require more than 1 frame casing per epoch. In this case one would need to relate
to the system slot in helping to tune network timing.
Step 7
35
Examples of TDMA Networks
TDMA User Manual
The System Slot Length parameter is used to elongate the frame casing timing for time
sensitive applications. Since we have determined all the necessary parameters for our
network, we can now determine the amount of time it takes to receive our data in an
epoch. The following is the calculations of what time it takes to transfer our real time
data:
1 Slave slot time = (152)*(69.444µs) + 2.917ms = 13.472488ms;
1 Master slot time = (100)*(69.444µs) + 2.917ms = 9.8614ms;
1 Slave frame time = (13.472488ms) * (1 + Number of repeaters) = (13.472488ms)*(2) = 26.9450ms;
1 Master frame time = (9.8614ms)*(1 + Number of submasters) = (9.8614ms)*(2) = 19.7228ms;
Time for all Slaves in 1 frame casing = (26.9450ms) * (Number of slave frames per master frame) =
= (26.9450ms) * 4 = 107.7799ms.
Without the System Slot Length, the epoch time will be
1 frame casing time
without system slot
= (19.7228ms) + (107.7799ms) = 127.5027 ms.
From our experience in some applications it is beneficial to have a TDMA radio
network synchronized to the GPS data dumping timing. Let’s consider a case when
slave radios generate GPS data every 150 msec.
Going back to our ‘1 frame casing time without system slot’ calculations, it is obvious
that in order to synchronize the radio system to the GPS timing the TDMA system
epoch duration has to be increased by about 22.5 msec or so. As mentioned before,
the system slot may help us to do this. The following shows the calculations for
determining the system slot length:
150ms = (1 frame casing time
) + (System slot time);
without system slot
150ms = (127.5027ms) + (System slot time);
System slot time = 150ms - 127.5027ms = 22.4973ms.
Replacing ‘System slot time’ with ‘ (System Slot length + 4) * 69.444µs’, we get
(System Slot length + 4) * 69.444µs = 22.4973ms;
System Slot length = (22.4973ms – 0.277776ms) / 69.444µs;
System Slot length = 31.9982.
Therefore, the System Slot Length needs to be 32 for an epoch timing being 150
msec.
36
TDMA User Manual
Examples of TDMA Networks
Step 8
The next parameters, Packet Delimiter Character, Transparent Operation, Frame
Table Reset on Disconnect, Disconnect Message, End of Data Character, and
Overwrite Assign all need to be set.
The Packet Delimiter Character can range from ‘0’ to ‘255’. It does not make any
difference on the functionality of the radio in general. This parameter does not make
any difference on the functionality of the radio in general, but it is very important for the
packetized mode operation. We will set it arbitrarily to ’99’ (0x63 or ‘c’).
The Transparent Operation is going to be set to zero (0) for data to be assigned.
Setting this parameter to assigned, means the data is sent during the assigned transmit
frame.
The next parameter Frame Table Reset on Disconnect refers to the original frame
table setup. Let's say, during the operation of our network we decided to change the
transfer frame of one of our slave to another frame by using local or remote commands.
By setting Frame Table Reset on Disconnect to one (1), the table will be restored to
the original setting if the radio disconnects from hearing the master directly or indirectly.
The End of Data Character in our example is set to 255, which means there is no end
of data character.
The next parameter, which needs to be set is Overwrite Assign Buffer. If this parameter
is set to zero (0) and our timing is off, our data could be overwritten before we send the
data. For our example, this setting is set to one (1). Therefore, our data will not be
overwritten until we have transferred it.
Step 9
The last parameter to be set is Edit Xmit/Receive Frames. For our example, Radio A
is the master station, Radio B, C, D, and E are slaves and Radio B is acting as a
submaster and repeater for the network.
37
Examples of TDMA Networks
TDMA User Manual
Figure 10 shows a listing of the master table, slave table and the slave – repeater –
submaster tables.
00
10
20
0
20
00
00
1
10
00
00
2
10
00
00
3
10
00
00
4
10
00
00
5
00
00
00
6
00
00
00
7
00
00
00
8
00
00
00
9
00
00
00
A
00
00
00
B
00
00
00
C
00
00
00
D
00
00
00
E
00
00
00
F
00
00
00
D
00
00
00
E
00
00
00
F
00
00
00
a) Master stations radio frame table setup. Master slot 00/0.
00
10
20
0
31
00
00
1
20
00
00
2
21
00
00
3
21
00
00
4
21
00
00
5
00
00
00
6
00
00
00
7
00
00
00
8
00
00
00
9
00
00
00
A
00
00
00
B
00
00
00
C
00
00
00
b) Submaster, Repeater and Slave – refer to Radio C
00
10
20
0
10
00
00
1
00
00
00
2
20
00
00
3
00
00
00
4
00
00
00
5
00
00
00
6
00
00
00
7
00
00
00
8
00
00
00
9
00
00
00
A
00
00
00
B
00
00
00
C
00
00
00
D
00
00
00
E
00
00
00
F
00
00
00
A
00
00
00
B
00
00
00
C
00
00
00
D
00
00
00
E
00
00
00
F
00
00
00
A
00
00
00
B
00
00
00
C
00
00
00
D
00
00
00
E
00
00
00
F
00
00
00
c) Slave, refer to Radio B
00
10
20
0
10
00
00
1
00
00
00
2
00
00
00
3
20
00
00
4
00
00
00
5
00
00
00
6
00
00
00
7
00
00
00
8
00
00
00
9
00
00
00
d) Slave, refer to Radio D
00
10
20
0
10
00
00
1
00
00
00
2
00
00
00
3
00
00
00
4
20
00
00
5
00
00
00
6
00
00
00
7
00
00
00
8
00
00
00
9
00
00
00
e) Slave, Refer to Radio E
Figure 11 Example 1 Frame Table
In a) the master frame table (00/0) is set to 20, the other 4 frames are set to 10. This
assures the radio will hear what is broadcasted in these frames and will be sent to the
serial port. In b), shows the frame table of Radio C. In the frame 0 slot 1 (00/1) the
radio retransmits what it heard in slot 0 and outputs it to the serial port. In frame 00/1 the
38
TDMA User Manual
Examples of TDMA Networks
radio is a slave and should send its data in this frame. The frames 00/2 – 00/4 acts as
repeater frames and the data which it hears is repeated on slot 1. Since the upper
nibble is a 2, the data is not sent out to the serial port. In c) the slave is told to listen and
output what it hears on 00/0, do nothing for frame 00/1, 00/3 and 00/4. In frame 00/2 the
radio is to transmit the data. In d) the slave is told to listen and send what it hears to the
serial port in frame 00/0. For frames 00/1, 00/2, and 00/4 the radio is told to do nothing.
Frame 00/3 the radio is told to transmit its data. In e) the radio is told to listen and send
what it hears on frame 00/0 to it serial port, not to do anything for frames 00/1, 00/2, and
00/3 and to transmit its data on frame 00/4.
Step 10
The radios have now been setup and are ready to go. Make sure that the other
parameters are setup correctly. Now the system is ready to go, make sure the radios
have the same Network ID. If you are not using the Network ID then it is imperative that
the Call Books are properly programmed.
39
Examples of TDMA Networks
TDMA User Manual
Example 2
Note:
The purpose of this example is to show how the frame table from the Example 1
will need to be changed if the network topology described above will be slightly
different. Therefore, in this example we will not review all of the steps taken in the
Example 1 and will concentrate on the changes in the frame table settings only.
Consider the same network topology as in the Example 1, but the Radio E can not hear
the Radio C. Figure 11 below reflects this change.
Radio A
Radio C
Radio E
Radio D
Radio B
The lines in between each pair of radios indicate that these radios can hear each other. So, in this
figure Radio A can hear Radio C, Radio C hears Radio B, and Radio D, Radio D hears Radio C and
Radio E, and Radio E hears Radio D.
Figure 12 Example 2
Referring to Figure 11, Radio D will need to be programmed now to function as a
submaster during the master frame, as a repeater during the frame assigned for Radio
E transmission, and as a slave during its own dedicated frame. Therefore, the Number
of Submasters in this case should be set to 2 (Radio C and Radio D) and the Slave
Repeaters per Frame will also need to be set to 2 (Radio C and Radio D).
Skipping Steps 1 through 8 from the previous Example, let’s see how the frame tables
will need to be changed to accommodate the network topology difference.
Following is analysis of the given frame tables for each radio and the ways of their
improvement/customization.
40
Figure 13 Example 2 Frame Table
Examples of TDMA Networks
TDMA User Manual
00
10
20
0
20
00
00
1
10
00
00
2
10
00
00
3
10
00
00
4
10
00
00
5
00
00
00
6
00
00
00
7
00
00
00
8
00
00
00
9
00
00
00
A
00
00
00
B
00
00
00
C
00
00
00
D
00
00
00
E
00
00
00
F
00
00
00
8
00
00
00
9
00
00
00
A
00
00
00
B
00
00
00
C
00
00
00
D
00
00
00
E
00
00
00
F
00
00
00
a) Master stations radio frame table setup. Master slot 00/0.
00
10
20
0
31
00
00
1
20
00
00
2
22
00
00
3
22
00
00
4
22
00
00
5
00
00
00
6
00
00
00
7
00
00
00
b) Submaster, Repeater and Slave (refer to Radio C).
00
10
20
0
10
00
00
1
00
00
00
2
20
00
00
3
00
00
00
4
00
00
00
5
00
00
00
6
00
00
00
7
00
00
00
8
00
00
00
9
00
00
00
A
00
00
00
B
00
00
00
C
00
00
00
D
00
00
00
E
00
00
00
F
00
00
00
4
21
00
00
5
00
00
00
6
00
00
00
7
00
00
00
8
00
00
00
9
00
00
00
A
00
00
00
B
00
00
00
C
00
00
00
D
00
00
00
E
00
00
00
F
00
00
00
8
00
00
00
9
00
00
00
A
00
00
00
B
00
00
00
C
00
00
00
D
00
00
00
E
00
00
00
F
00
00
00
c) Slave (refer to Radio B).
00
10
20
0
32
00
00
1
00
00
00
2
00
00
00
3
20
00
00
d) Submaster, Repeater and Slave (refer to Radio D).
00
10
20
0
10
00
00
1
00
00
00
2
00
00
00
3
00
00
00
4
20
00
00
5
00
00
00
6
00
00
00
7
00
00
00
e) Slave (refer to Radio E).
Radio A. On the Master radio the master frame (frame 00) is set to ‘20’, the other four
frames are set to ‘10’. This assures that the Radio A will listen to all of the remote
radios transmissions.
Improvement note: Due to the fact that the master radio can hear only Radio C, it is
possible to setup the master’s frame table with ‘20’ in the frame 00, ‘10’ in the
frame 01 and ‘00’ in the rest of the frames. As a matter of fact, this frame table
configuration will allow a slight reduction in master radio power consumption
41
TDMA User Manual
Examples of TDMA Networks
because during the frames 02 through 04 master will be idle instead of being in
the receive mode.
Radio B. There are no changes being made to the frame table of this radio.
Customization note: The contents of Radio B frame 03 and frame 04 may be
changed from ‘00’ to ‘10’, which will allow Radio B to listen to all of the
transmissions from the Radio D and Radio E.
Radio C. During frame 00 slot 1 (00/1) Radios C re-transmits what it heard on slot 0
and outputs it to the serial port. The frame 01/0 is assigned for the Radio C
transmission (value ‘20’ in it). During the frames 00/2 – 00/4 Radio C acts as repeater,
which is indicated by the value of ‘22’ in them. So, during the slot 2 within the frames
01…04 Radio C will re-transmit what it heard on slot 0 or slot 1 within the same frame.
Customization note: The frame 02 and frame 03 contents on Radio C may be
changed from ‘22’ to ‘21’. It will not effect the functionality of the system, but it will
allow the data from Radio B and Radio D to be re-transmitted by the Radio C
one slot sooner. This may or may not have effect on the overall system
performance, but could be useful in some applications. FreeWave Technologies,
from the frame table consistency standpoint, recommends keeping frame 02
and frame 03 contents at ‘22’.
Radio D. During the frame 00 slot 02 this radio re-transmits what it heard on slot 0 or
slot 1 within the same frame. In other words, during the frame 00 Radio D acts as a
submaster.
During the frames 01 and 02 this radio is idle. Frame 03 is assigned for its
transmission and during the frame 04 slot 01 it re-transmits what it heard on frame 04
slot 00 (Radio E transmission).
Warning note: Please note that if Radio C will have ‘32’ in its frame 00 and
Radio D will have ‘31’ in its frame 00, the system will not function because Radio
D will not be able to re-transmit direct master’s transmissions. So, the Radio D
and Radio E will not be able to synch up to the master in this case.
Changing the contents of frame 04 on Radio C from ‘22’ to ‘21’ and at the same time
changing the contents of frame 04 on Radio D from ‘21’ to ‘22’ will cause Radio E
messages being delivered only to Radio D.
Radio E. There are no changes being done to the frame table of this radio.
42
TDMA User Manual
Examples of TDMA Networks
Customization note: The flexibility of the frame table and TDMA system
features allow the user to add one or more ‘listeners’ to the system. ‘Listeners’
will not need to have a dedicated frame assigned to them and will simply act as
control points. If ‘listener’ will be installed somewhere where it can hear
transmission from Radio C, then setting its frame table with all ‘10’ in frames 00
through 04 will allow it to hear all of the transmissions between the radios in the
system without interfering with them.
43
Examples of TDMA Networks
TDMA User Manual
Example 3
Note: The purpose of this example is to show how to add one more frame casing to the
system given in Example 1 and what effect it will have on the system performances.
From the 1 frame casing time
duration of epoch:
without system slot
Time for 1 epoch = 1 frame casing time
calculations in Example 1, we know that the
without system slot
+ system slot time.
If the System Slot Length is set to eight (8), then the system slot time will be
1 System slot time = (System Slot Length + 4) * 69.444µs = 833.328µs.
Therefore, the epoch time (1 frame casing per epoch) will be
Time for 1 epoch = 127.5027ms + 833.328µs = 128.336ms.
So, the master in Example 1 can send up to 100 bytes (refer to Master Data Packet
Size settings) every 128.336ms.
The number of slaves we currently have is four (4). For explanation purposes we can
divide these slaves into two ‘groups’ - two slaves per ‘group’. Each ‘group’ will need to
have its own master frame with the system slot before it. Therefore, the following
changes should be made in the TDMA Parameters menu:
•
Master Data Packet Size
set to 50 (instead of 100);
•
Master Frames in Epoch
set to 2 (instead of 1);
•
Slave Frames per Master Frame
set to 2 (instead of 1).
Please note that the frame table on all of the radios does not need to be changed.
To find what effect on the radio performances these changes will have, let’s make
timing calculations similar to the ones given in the Example 1.
1 Slave slot time = (152)*(69.444µs) + 2.917ms = 13.472488ms;
1 Master slot time = (50)*(69.444µs) + 2.917ms = 6.3892ms;
1 Slave frame time = (13.472488ms) * (1 + Number of repeaters) = (13.472488ms)*(2) = 26.9450ms;
1 Master frame time = (6.8614ms)*(1 + Number of submasters) = (6.3892ms)*(2) = 12.7784ms;
Time for all Slaves in 1 frame casing = (26.945ms) * (Number of slave frames per master frame) =
= (26.945ms) * 2 = 53.89ms.
An epoch time will be:
44
Examples of TDMA Networks
TDMA User Manual
1 frame casing time
without system slot
= (12.7784ms) + (53.89ms) = 66.6684ms;
1 frame casing time with the system slot = 66.6684ms + 0.833328ms = 67.5017ms;
Epoch time = (1 frame casing time) * (Number of master frames in epoch) = 67.5017 ms * 2 =
= 135.0035ms.
Comparing to what we had in the Example 1
Epoch time from the Example 3/Epoch time from the Example 1 = (135.0035ms/128.336ms) = 1.052,
The new epoch time is about 5% longer than what we had before. Obviously, this
increment is due to the fact that there is one extra System Slot and one extra header in
the beginning of the master frame. But, in some cases it might be beneficial.
Following table shows master transmission time calculations (10 seconds period of
time was used for comparison).
Table 6 Example 3 Timing Comparison
Parameter
1 Master Slot time
1 Master Frame time
Total master frame time per epoch
Epoch time
Number of epochs within 10 sec. period
Total Master transmission time in 10sec. period
Example 1
system, ms
9.6814
19.7228
19.7228
128.336
78
1,538.4
Example 3
system, ms
6.3892
12.7784
25.5568
135.0035
74
1,891.2
Notes
Timing comparison of the original system configuration (Example 1) and after an additional master
frame has been added to the epoch with no other settings changed (Example 3).
So, adding one extra master frame per epoch to our original setup increases master
transmission time by about 23% if the rest of system parameters have not being
changed. This means that the remote radios will have 23% higher chance to
synchronize to the master than before for the price of about 5% system’s throughput
degradation and some minimal power consumption increase on the master radio.
Note: The data in the Table 5 was calculated based on assumption that the master in
both examples transmits continuos data. If the master will transmit no data but
the header packets only, the difference between Example 1 and Example 3
configurations will be even higher.
In conclusion, adding an extra master frame per epoch might be beneficial in
applications where primary synchronization between the radios is an issue. But, to
45
TDMA User Manual
Examples of TDMA Networks
achieve the highest slave-to-master data throughput, the number of master frames per
epoch should be as low as possible.
46
Examples of TDMA Networks
TDMA User Manual
Example 4
Note: The purpose of this example is to show how to set up the radios when they are
setup to have more than one Master Frame per Epoch.
For this example, the radios were set up with the following parameters.
Slave Frames per Master Frame
5
Master Frames in Epoch
10
The frame table is assigned such that 00/0 is the master frame, 00/1 is slave 1, 00/2 is
slave 2, continuing to 30/2 being slave 50 (32h = 50d) as shown in table 6. When set
up this way, the sequence will be the system slot, the master frame, and then five slave
frames. Since the Master Frames in Epoch is greater than one, it will keep its place,
and then transmit the next 5 slave frames the next time. The actual transmission
sequence of the system is shown in table 9.
Table 7 Example 4 Radio Frames
00
10
20
30
0
Master
S16
S32
S48
1
S1
S17
S33
S49
2
S2
S18
S34
S50
3
S3
S19
S35
NA
Showing how the frames are assigned to different radios.
4
5
6
7
8
9
A
S4
S5
S6
S7
S8
S9
S10
S20
S21
S22
S23
S24
S25
S26
S36
S37
S38
S39
S40
S41
S42
NA
NA
NA
NA
NA
NA
NA
B
S11
S27
S43
NA
C
S12
S28
S44
NA
D
S13
S29
S45
NA
E
S14
S30
S46
NA
F
S15
S31
S47
NA
The frame table of the master radio should be set to transmit in frame 00/0, and listen in
the other frames that are used. This is shown in table 7.
Table 8 Example 4 Master Frame Table
00
10
20
30
0
20
10
10
10
1
10
10
10
10
The frame table of the master radio, showing in bold the frame where it transmits.
Frames 30/3 through 30/F are unused.
2
3
4
5
6
7
8
9
A
B
C
10
10
10
10
10
10
10
10
10
10
10
10
10
10
10
10
10
10
10
10
10
10
10
10
10
10
10
10
10
10
10
10
10
10
00
00
00
00
00
00
00
00
00
00
D
10
10
10
00
E
10
10
10
00
Each individual radio should be set to listen to the master (frame 00/0), and transmit on
its specified frame. The frame table for slave 38 is shown in table 8.
47
F
10
10
10
00
Examples of TDMA Networks
TDMA User Manual
Table 9 Example 4 Slave 38 Frame Table
00
10
20
30
0
10
00
00
00
1
00
00
00
00
The frame table of slave 38, showing in bold the frame where it transmits and
Listens on frame 00/0 and transmits on frame 20/6.
2
3
4
5
6
7
8
9
A
B
00
00
00
00
00
00
00
00
00
00
00
00
00
00
00
00
00
00
00
00
00
00
00
00
20
00
00
00
00
00
00
00
00
00
00
00
00
00
00
00
listens.
C
00
00
00
00
D
00
00
00
00
Table 10 Example 4 Actual Transmission
SS
SS
SS
SS
SS
SS
SS
SS
SS
SS
48
Master
Master
Master
Master
Master
Master
Master
Master
Master
Master
The actual transmission sequence
Slave 01
Slave 02
Slave 06
Slave 07
Slave 11
Slave 12
Slave 16
Slave 17
Slave 21
Slave 22
Slave 26
Slave 27
Slave 31
Slave 32
Slave 36
Slave 37
Slave 41
Slave 42
Slave 46
Slave 47
of the system.
Slave 03
Slave 08
Slave 13
Slave18
Slave 23
Slave 28
Slave 33
Slave 38
Slave 43
Slave 48
Slave 04
Slave 09
Slave 14
Slave 19
Slave 24
Slave 29
Slave 34
Slave 39
Slave 44
Slave 49
Slave 05
Slave 10
Slave 15
Slave 20
Slave 25
Slave 30
Slave 35
Slave 40
Slave 45
Slave 50
E
00
00
00
00
F
00
00
00
00
TDMA User Manual
Appendix
Appendix A – Packetized Commands
Description
General Rules/Definitions applied to all of the commands and used in this document.
There are two command types: local and remote.
The remote command is addressed to one or more remote radios.
The local command is addressed to a local radio. If the local radio heard the
command, it will evaluate it and in some cases respond back to the RS232 port with a
string indicating that the command took effect.
Any data or command in the packetized mode must begin with a ‘Delimiter’. The
‘Delimiter’ is a byte of data specified in the ‘TDMA Parameters’ Menu under ‘Packet
Delimiter Character’. It could be anything from 0 to 255. Please, note that ‘0’ and ‘255’
are valid entries. ‘Delimiter’ in the command must match ‘Packet Delimiter Character’
settings. Otherwise the command will be discarded without evaluation.
The command must contain at least 5 bytes. The first four bytes of any command should
not be included in the Command length calculations. For example, the length of the
command 0xDD,0x00,0x02,0x00,0x44,0x00 is 2 bytes.
The command string must not include <LF>, <CR> or any other symbols unless
specified in the command format. Comas (“,”) listed in the command format only for
easier-to-read purpose. Comas must not be included when issuing the command to the
radio.
Replies returned back by the radio do not include <LF>, <CR> or any other symbols
unless specified in the return string format. Comas (“,”) listed in the radio replies
formats are for easier-to-read purpose only and will not be a part of an actual radio’s
reply.
In this document ‘Yes’ under the column labeled ‘User adjustable’ means that the
corresponding byte within the command may need some user adjustments.
Respectively, ‘No’ under the same column means that this value should stay the same
as specified in the command format or can not be adjusted because it is a part of
radio’s response.
For example, the ‘Delimiter’ for all commands will need to be chosen by the user
according to ‘Packet Delimiter Character’ settings. However, the user can adjust no
bytes within the response sent back by the radio.
49
TDMA User Manual
Appendix
TDMA Packetized Commands
1. ‘0’ Tell local radio to return its radio ID.
Command general description:
Addressee is a local radio or a remote radio
Local
Command format:
0xDD,0x00,0x01,0x00,0x30
Field name
0xDD
0x01
0x30
Meaning/format
Delimiter byte (hex value)
Command length
Command code
User adjustable
Yes
No
No
Command example:
0x770x000x010x000x30
Output format (at the local radio):
0xDD,0x00,0x04,0x00,0x30,0x##0x##0x##
Field name
Meaning/format
0xDD
0x04
0x30
0x## 0x## 0x##
Delimiter byte (hex value)
Command length
Command code
Local radio’s 3 byte ID number
Output string example (at the local radio):
0x770x000x040x000x300x890x590x12
50
User
adjustable
No
No
No
No
TDMA User Manual
Appendix
2. ‘1’ EEPROM individual address write and read command.
EEPROM write command format:
Command general description:
Addressee is a local radio or a remote radio
Local
Radio will reset after reception of the program command, and will re-acquire the network, assuming no
network sensitive parameters were changed.
EEPROM write command format:
0xDD,0x00,0x05,0x00,0x31,0x01,0xMSB Address,0xLSB Address,####(data)
Field name
0xDD
0x05
0x31
0x01
0xMSB Address
0xLSB Address
####(data)
(*) Note:
Meaning/format
Delimiter (hex value)
Command length
Command code
Write operation
The MSB of the EEPROM address where the data will be
stored (*)
The LSB of the EEPROM address where the data will be
stored (*)
Data (hex value) to be loaded starting from Address specified
above (one byte)
User adjustable
Yes
No
No
No
Yes
Yes
Yes
The address could be one from the list below:
0x0D81, 0x0D82, 0x0D85 … 0x0F41, 0x0F73 … 0x0FFF
EEPROM write command example:
If
•
the Delimiter on the local radio where the command is issued is set to ‘0x77’, which will appear in
the TDMA Menu as ‘119’;
•
we need to store 0x20 in the 0x0F2E location;
then the command will be:
0x770x000x050x000x310x010x0F0x2E0x20
Output format 1:
0xDD,0x00,0x05,0x00,0x31,0x01,0xMSB Address,0xLSB Address,####(data)
Field name
0xDD
0x05
0x31
0x01
0xMSB Address
51
Meaning/format
Delimiter (hex value)
Command length
Command code
Write operation
The MSB of the EEPROM address where the data will be
User adjustable
No
No
No
No
No
TDMA User Manual
0xLSB Address
####(data)
Appendix
stored (*)
The LSB of the EEPROM address where the data will be
stored (*)
Data (hex value) to be loaded starting from Address specified
above (one byte)
No
No
Output string example (at the local radio):
If
•
the Delimiter on the local radio where the command is issued is set to ‘0x77’, which will appear in
the TDMA Menu as ‘119’;
•
0x20 was stored at the address 0x0F2E;
then the command will be:
0x770x000x050x000x310x010x0F0x2E0x20
52
TDMA User Manual
Appendix
EEPROM read command format:
0xDD,0x00,0x05,0x00,0x31,0x00,0xMSB Address,0xLSB Address,####(data)
Field name
0xDD
0x05
0x31
0x00
0xMSB Address
0xLSB Address
####(data)
(*) Note:
Meaning/format
Delimiter (hex value)
Command length
Command code
Read operation
The MSB of the EEPROM address, which we want to read
the data from (*)
The LSB of the EEPROM address, which we want to read
the data from (*)
Dummy data (hex value), one byte only
User adjustable
Yes
No
No
No
Yes
Yes
Yes
The address could be one from the list below:
0x0D81, 0x0D82, 0x0D85 … 0x0F40, 0x0F73 … 0x0FFF
EEPROM read command example:
If
•
the Delimiter on the local radio where the command is issued is set to ‘0x77’, which will appear in
the TDMA Menu as ‘119’;
•
we need to read 0x0F2E location contents;
•
‘FF’ being dummy data byte;
then the command will be:
0x770x000x050x000x310x000x0F0x2E0xFF
Output format1:
0xDD,0x00,0x05,0x00,0x31,0x00,0xMSB Address,0xLSB Address,####(data)
Field name
0xDD
0x05
0x31
0x00
0xMSB Address
0xLSB Address
####(data)
Meaning/format
Delimiter (hex value)
Command length
Command code
Read operation
The MSB of the EEPROM address, which we want to read
the data from (*)
The LSB of the EEPROM address, which we want to read
the data from (*)
Actual data being read from the specified EEPROM location,
one byte only
Output string example (at the local radio):
If
53
User adjustable
No
No
No
No
No
No
No
TDMA User Manual
•
Appendix
the Delimiter on the local radio where the command is issued is set to ‘0x77’, which will appear in
the TDMA Menu as ‘119’;
•
0x20 was stored at the address 0x0F2E;
then the command will be:
0x770x000x050x000x310x000x0F0x2E0x20
Reading or Writing to invalid EEPROM locations will have the Output string:
0xDD,0x00,0x02,0x00,0x31,0x01
54
TDMA User Manual
Appendix
3. ‘2’ RAM individual address write and read command.
RAM write command format:
Command general description:
Addressee is a local radio or a remote radio
Local
RAM write command format:
0xDD,0x00,0x05,0x00,0x32,0x01,0xMSB Address,0xLSB Address,####(data)
Field name
0xDD
0x05
0x32
0x01
0xMSB Address
0xLSB Address
####(data)
(*) Note:
Meaning/format
Delimiter (hex value)
Command length
Command code
Write operation
The MSB of the RAM address where the data will be stored
(*)
The LSB of the RAM address where the data will be stored
(*)
Data (hex value) to be written to the specified RAM location
(one byte only)
User adjustable
Yes
No
No
No
Yes
Yes
Yes
The address could be one from the range below:
5800 … 5900 – TDMA Frame Table
RAM write command example:
If
•
the Delimiter on the local radio where the command is issued is set to ‘0x77’, which will appear in
the TDMA Menu as ‘119’;
•
we need to store 0x20 in the 0x58FE location;
then the command will be:
0x770x000x050x000x320x010x580xFE0x20
Output format:
0xDD,0x00,0x05,0x00,0x32,0x01,0xMSB Address,0xLSB Address,####(data)
Field name
0xDD
0x05
0x32
0x01
0xMSB Address
55
Meaning/format
Delimiter (hex value)
Command length
Command code
Write operation
The MSB of the RAM address where the data will be stored
User adjustable
No
No
No
No
No
TDMA User Manual
0xLSB Address
####(data)
Appendix
(*)
The LSB of the RAM address where the data will be stored
(*)
Data (hex value) to be written to the specified RAM location
(one byte only)
No
No
Output string example (at the local radio):
If
•
the Delimiter on the local radio where the command is issued is set to ‘0x77’, which will appear in
the TDMA Menu as ‘119’;
•
0x20 was stored at the address 0x58FE;
then the command will be:
0x770x000x050x000x310x010x580xFE0x20
56
TDMA User Manual
Appendix
RAM read command format:
0xDD,0x00,0x05,0x00,0x32,0x00,0xMSB Address,0xLSB Address,####(data)
Field name
0xDD
0x05
0x32
0x00
0xMSB Address
0xLSB Address
####(data)
(*) Note:
Meaning/format
Delimiter (hex value)
Command length
Command code
Read operation
The MSB of the RAM address, which we need to read the
data from (*)
The LSB of the RAM address, which we need to read the
data from (*)
Dummy data (hex value), one byte only.
User adjustable
Yes
No
No
No
Yes
Yes
Yes
The address could be one from the range below:
5800 … 5900 – TDMA Frame Table
RAM read command example:
If
•
the Delimiter on the local radio where the command is issued is set to ‘0x77’, which will appear in
the TDMA Menu as ‘119’;
•
we need to read 0x58FE location contents;
•
‘FF’ being dummy data byte;
then the command will be:
0x770x000x050x000x310x000x580xFE0xFF
Output format:
0xDD,0x00,0x05,0x00,0x32,0x00,0xMSB Address,0xLSB Address,####(data)
Field name
0xDD
0x05
0x32
0x00
0xMSB Address
0xLSB Address
####(data)
Meaning/format
Delimiter (hex value)
Command length
Command code
Read operation
The MSB of the RAM address, which we need to read the
data from (*)
The LSB of the RAM address, which we need to read the
data from (*)
Data (hex value) read form the specified RAM location (one
byte only)
Output string example (at the local radio):
If
57
User adjustable
No
No
No
No
No
No
No
TDMA User Manual
•
Appendix
the Delimiter on the local radio where the command is issued is set to ‘0x77’, which will appear in
the TDMA Menu as ‘119’;
•
0x20 was stored at the address 0x58FE;
then the command will be:
0x770x000x050x000x310x000x580xFE0x20
58
TDMA User Manual
Appendix
Network ID and Frequency Key RAM write command format:
Allows a radio to switch between two networks that have similar settings. The radio will receive the
command, process it, and drop the link. Then the radio will attempt to link to a network with the new
Frequency Key and Network ID.
This option was added in firmware versions:
DGR 5.85
DGMR 1.85
* Frame Table Reset On Disconnect must be disabled, as radio will change the parameters, disconnect,
and re-acquire the network (or new network).
0xDD,0x00,0x05,0x00,0x32,0x03,0x58,0xFF,0xNN
Field name
0xDD
0x05
0x32
0x03
0x58
0xFF
0xNN
* Note:
Meaning/format
Delimiter (hex value)
Command length
Command code
Frequency Key and Network ID operation
Dummy Byte
Frequency Key
Network ID
User adjustable
Yes
No
No
No
No
Yes
Yes
The Frequency Key should be between $00 and $0E.
The Network ID should be between $00 and $FF.
Output format:
0xDD,0x00,0x05,0x00,0x32,0x03,0xFF,0xNN,0xXX
Field name
0xDD
0x05
0x32
0x03
0xFF
0xNN
0xXX
Meaning/format
Delimiter (hex value)
Command length
Command code
Frequency Key and Network ID operation
Frequency Key set in RAM
Network ID set in RAM
Dummy Byte
User adjustable
No
No
No
No
No
No
No
Network ID and Frequency Key RAM write command example:
If
•
the Delimiter on the local radio where the command is issued is set to ‘0x77’, which will appear in
the TDMA Menu as ‘119’;
•
The frequency key should be set to 6
•
The network ID should be set to 42
then the command will be:
0x770x000x050x000x320x030x580x060x2A
59
TDMA User Manual
Output string example (at the local radio):
0x770x000x050x000x320x030x060x2A0xAA
60
Appendix
TDMA User Manual
Appendix
4. ‘D’ Disconnect and Connect status message.
The TDMA parameter ‘Disconnect Message’ needs to be set for this feature.
Command general description:
Addressee is a local radio or a remote radio
Local
Note: ‘Disconnect’ message is not available on the master.
Output format (at the local radio): Disconnect
0xDD,0x00,0x02,0x00,0x44,0x##
Field name
0xDD
0x02
0x44
0x##
Meaning/format
Delimiter (hex value)
Command length
Command code
If this location has ‘00’ in it, then the radio has being just
turned on or the radio lost sync to the master for the first
time. If there is a number in this location, that is the number
of times the slave or submaster has lost sync and
disconnected from the network to require a sync signal.
User adjustable
No
No
No
No
Output string example (at the local radio):
If
•
the Delimiter on the local radio where the command is issued is set to ‘0x77’, which will appear in
the TDMA Menu as ‘119’;
•
the local radio just power up;
then the output string will be:
0x770x000x020x000x440x00
If
•
the Delimiter on the local radio where the command is issued is set to ‘0x77’, which will appear in
the TDMA Menu as ‘119’;
•
the local radio has been powered up for a long time and had 20 (0x14) disconnects during this time;
then the output string will be:
0x770x000x020x000x440x14
Output format (at the local radio): Connect
0xDD,0x00,0x01,0x00,0x45
Field name
0xDD
61
Meaning/format
Delimiter (hex value)
User adjustable
No
TDMA User Manual
0x01
0x45
Appendix
Command length
Command code – the submaster or slave has found a synch
signal from the master and has connected to the network.
No
No
Output string example (at the local radio):
If
•
the Delimiter on the local radio where the command is issued is set to ‘0x77’, which will appear in
the TDMA Menu as ‘119’;
•
the local radio just power up;
then the output string will be:
0x770x000x010x000x45
62
TDMA User Manual
Appendix
5. ‘S’ Tell local radio to go into the setup mode.
Command general description:
Addressee is a local radio or a remote radio
Local
Command format:
0xDD,0x00,0x01,0x00,0x53
Field name
0xDD
0x01
0x53
Note:
Meaning/format
Delimiter byte (hex value)
Command length
Command code
After the command will be executed, the RS232 baud rate in setup mode will be the same as it
was before the setup.
Command example:
0x770x000x010x000x53
Output format (at the local radio):
Radio returns its Main Menu text.
63
User adjustable
Yes
No
No
TDMA User Manual
Appendix
6. ‘`’ Bulk load of EEPROM TDMA Settings, TDMA Frame Table and Frequency
table.
Write command format:
Command general description:
Addressee is a local radio or a remote radio
Local
After reception of program command, the radio will reset, and assuming no network sensitive
parameters were changed, re-acquire the network.
Write command format:
0xDD,0x00,0x4+data size,0x00,0x60,0x01,0xMSB Address,0xLSB Address,####(data)
Field name
0xDD
0x04 + data size
0x60
0x01
0xMSB Address
0xLSB Address
####(data)
(*) Note:
Note:
Meaning/format
Delimiter (hex value)
Number of data bytes plus 4
Command code
write operation
Start writing at this address (MSB of this address) (*)
Start writing at this address (LSB of this address) (*)
data (hex value) to be loaded starting from Address specified
above
User adjustable
Yes
Yes
No
No
Yes
Yes
Yes
The address could be one from the list below:
E25 – F2E
TDMA settings including TDMA frame table.
F74 – FFD
Frequency hop table.
For 225-400 MHz radios this hop table starts at F74 (please, refer to “225-400 MHz
radios EEPROM Value to Frequency Calculations” for more details).
Write command example:
If
•
•
the Delimiter on the local radio is set to ‘0x77’, which will appear in the TDMA Menu as ‘119’;
we need to store 0x02 at E26 and 0x12 at E27;
then the command will be:
0x770x000x060x000x600x010x0E0x250x020x12
Output format (at the local radio)2:
0xDD,0x00,0x4+data size,0x00,0x60,0x01,0xMSB Address,0xLSB Address,#####(data)
Output string example (at the local radio):
If
64
TDMA User Manual
•
•
Appendix
the Delimiter on the local radio is set to ‘0x77’, which will appear in the TDMA Menu as ‘119’;
0x02 was stored at 0x0E26 and 0x12 was stared at 0x0E27;
then the command will be:
0x770x000x060x000x600x010x0E0x250x020x12
65
TDMA User Manual
Appendix
Read command format:
0xDD,0x00,0x6,0x00,0x60,0x00,0xStart MSB address, 0xStart LSB address,0xEnd MSB
address,0xEnd LSB address
Field name
0xDD
0x06
0x60
0x00
0xStart MSB
Address
0xStart LSB
Address
0xEnd MSB
Address
0xEnd LSB
Address
(*) Note:
Note:
Meaning/format
Delimiter (hex value)
Command length
Command code
read operation
Start reading at this address (MSB of this address) (*)
User adjustable
Yes
No
No
No
Yes
Start reading at this address (LSB of this address) (*)
Yes
Stop reading at this address (MSB of this address) (*)
Yes
Stop reading at this address (LSB of this address) (*)
Yes
The address could be one from the list below:
E25 – F2E
TDMA settings including TDMA frame table.
F74 – FFD
Frequency hop table.
Maximum allowable length, 140 EEPROM addresses.
For 225-400 MHz radios this hop table starts at F74 (please, refer to “225-400 MHz
radios EEPROM Value to Frequency Calculations” for more details).
Read command example:
If
•
•
the Delimiter on the local radio is set to ‘0x77’, which will appear in the TDMA Menu as ‘119’;
we need to read from 0x0E30 to 0xE32;
then the command will be:
0x770x000x060x000x600x000x0E0x300x0E0x32
Output format 2:
0xDD,0x00,0x4+data size,0x00,0x60,0x00,0xStart MSB Address,0xStart LSB
Address,#####(data)
Field name
0xDD
0x04+data size
0x60
0x00
0xStart MSB
Address
0xStart LSB
Address
66
Meaning/format
Delimiter (hex value)
Number of data bytes plus 4
Command code
read operation
Start reading at this address (MSB of this address) (*)
User adjustable
No
No
No
No
No
Start reading at this address (LSB of this address) (*)
No
TDMA User Manual
Appendix
Output string read command example:
If
•
•
•
the Delimiter on the local radio is set to ‘0x77’, which will appear in the TDMA Menu as ‘119’;
we read from 0x0E30 to 0xE32;
the data read was ‘0x01’, ‘0x0D’, and ‘0xFE’;
then the command will be:
0x770x000x070x000x600x000x0E0x300x0E0x320x010x0D0xFE
Reading or Writing to invalid EEPROM locations will have the Output string:
0xDD,0x00,0x02,0x00,0x60,0x01
67
TDMA User Manual
Appendix
7. ‘a’ Bulk load of frame table into RAM.
Write command format:
Command general description:
Addressee is a local radio or a remote radio
Local
Frame table reset on disconnect is of special interest with this command. If the frame table reset option
is set, then any time the radio loses the link, the frame table will default back to that stored in EEprom.
If the frame table reset option is not set, then the radio will keep the frame table in RAM until loss of
power, upon which the radio will default back to the frame table stored in EEprom.
0xDD,0x00,0x4+data size,0x00,0x61,0x01,0xMSB Address,0xLSB Address,####(data)
Field name
0xDD
0x04 + data size
0x61
0x01
0xMSB Address
0xLSB Address
####(data)
Meaning/format
Delimiter (hex value)
Number of data bytes plus 4
Command code
Write operation
Start writing at this address (MSB of this address) (*)
Start writing at this address (LSB of this address) (*)
Data (hex value) to be loaded starting from Address specified
above
User adjustable
Yes
Yes
No
No
Yes
Yes
Yes
(*) Note:
The address could be one from the list below:
5800 – 5900
Temporary TDMA frame table..
Write command example:
If
•
•
the Delimiter on the local radio is set to ‘0x77’, which will appear in the TDMA Menu as ‘119’;
we need to store 0x20 in the frame ‘01’ on the radio;
then the command will be:
0x770x000x050x000x610x010x580x010x20
Output format (at the local radio)3:
0xDD,0x00,0x4+data size,0x00,0x61,0x01,0xMSB Address,0xLSB Address,#####(data)
Output string example (at the local radio)3:
If
•
•
the Delimiter on the local radio is set to ‘0x77’, which will appear in the TDMA Menu as ‘119’;
0x20 was stored at the address 0x5801 (frame ‘01’);
then the command will be:
0x770x000x050x000x610x010x580x010x20
68
TDMA User Manual
69
Appendix
TDMA User Manual
Appendix
Read command format:
0xDD,0x00,0x6,0x00,0x61,0x00,0xStart MSB address, 0xStart LSB address,0xEnd MSB
address,0xEnd LSB address
Field name
0xDD
0x06
0x61
0x00
0xStart MSB
Address
0xStart LSB
Address
0xEnd MSB
Address
0xEnd LSB
Address
Meaning/format
Delimiter (hex value)
Command length
Command code
read operation
Start reading at this address (MSB of this address) (*)
User adjustable
Yes
No
No
No
Yes
Start reading at this address (LSB of this address) (*)
Yes
Stop reading at this address (MSB of this address) (*)
Yes
Stop reading at this address (LSB of this address) (*)
Yes
Read command example:
If
•
•
the Delimiter on the local radio is set to ‘0x77’, which will appear in the TDMA Menu as ‘119’;
we need to read frames ‘01’ (at the address 0x5801) through ‘03’ (at the address 0x5803);
then the command will be:
0x770x000x060x000x610x000x580x010x580x03
Note: maximum allowable EEPROM read length is 140 EEPROM locations.
Output format 3:
0xDD,0x00,0x4+data size,0x00,0x61,0x00,0xMSB Address,0xLSB Address,#####(data)
Output string read command example:
If
•
•
•
the Delimiter on the local radio is set to ‘0x77’, which will appear in the TDMA Menu as ‘119’;
we read from 0x5801 (frame ‘01’) to 0x5803 (frame ‘03’);
the data read was ‘0x00’, ‘0x20’, and ‘0x21’;
then the command will be:
0x770x000x070x000x610x000x580x010x000x200x021
Reading or Writing to invalid EEPROM locations will have the Output string:
0xDD,0x00,0x02,0x00,0x61,0x01
70
TDMA User Manual
Appendix
8. ‘b’ Tell local radio to respond with its signal quality packet.
Command general description:
Addressee is a local radio or a remote radio
Local
Command format:
0xDD,0x00,0x01,0x00,0x62
Field name
0Xdd
0x01
0x62
Meaning/format
Delimiter byte (hex value)
Command length
Command code
User adjustable
Yes
No
No
Command example:
If
•
the Delimiter on the local radio is set to ‘0x77’, which will appear in the TDMA Menu as ‘119’
then the command will be:
0x770x000x010x000x62
Output format (at the local radio):
0xDD,0x00,0x01+quality packet length,0x00,0x62,####(data)
Field name
0xDD
0x01+quality
packet length
0x62
####(data)
Note.
Meaning/format
Delimiter byte (hex value) of the local radio
1 plus number of bytes in the quality packet in hex format.
For example, if the quality packet includes 4 bytes of data,
then this location will be 0x05
Command code
The actual quality packet data in hex format. Please, see
Note below for more information about this item.
User adjustable
No
No
No
No
The quality packet always consists of n = (2 * (# submasters + 1) + 1) bytes of data. The format
of these data bytes is as follow:
•
if there are no submasters in the network:
DataByte1, DataByte2, DataByte3
•
if there are one or more submasters in the network:
DataByte1, DataByte2, DataByte3, … DataByte(2*i + 2), DataByte(2*i + 3)
71
TDMA User Manual
Appendix
where
i = 1, 2, 3, 4 …
is the number of submasters.
Table below shows DataBytes contents.
DataByte1
DataByte2
DataByte3
DataByte(2*i + 2)
DataByte(2*i + 3)
The average noise level at the local radio.
Percentage of packets sent from the master, which were successfully
decoded by the local radio (during the frame #00, slot #0).
Average signal level measured by the local radio during master’s
transmission (during the frame #00, slot #0).
Percentage of packets sent from submaster ‘i’, which were successfully
decoded by the local radio (during the frame #00, slot #i).
Average signal level measured by local radio during submaster’s ‘i’
transmission (during the frame #00, slot #i).
Output string example (at the local radio):
If
•
•
•
•
the Delimiter on the local radio is set to ‘0x77’, which will appear in the TDMA menu as ‘119’;
there are no submasters in the system (Number of SubMaster in the TDMA menu is set to ‘0’);
the local radio is a slave;
RadioStatistics Menu on the local radios reads ‘29’ for average noise level. Please, note that actual
average noise value returned by the local radio will be greater than shown in the RadioStatistics by
16:
29 + 16 = 45, or
0x1D + 0x10 = 0x2D;
• the percentage of master packets successfully decoded by the local radio is 95% (0x5F);
• the average signal level measured by local radio during master’s transmission (frame #00, slot #0) is
‘87’ (0x57);
Then the output string will be:
0x770x000x040x000x620x2D0x5F0x57
If the local radio is the master, the last two bytes (0x5F and 0x57 above) will be 0x00 and 0x00.
If
•
•
•
•
•
•
72
the delimiter on the local radio is set to ‘0x77’, which will appear in the TDMA menu as ‘119’;
there are two submasters in the system (Number of SubMasters in the TDMA menu is set to ‘2’);
the local radio is the first submaster (its frame table has ‘31’ or ‘21’ in the frame #00);
RadioStatistics Menu on the local radios reads ‘29’ for average noise level. Please, note that actual
average noise value returned by the local radio will be greater than shown in the RadioStatistics
Menu by 16:
29 + 16 = 45, or
0x1D + 0x10 = 0x2D;
the percentage of master packets successfully decoded by the local radio is 95% (0x5F);
the average signal level measured by local radio during master’s transmission (frame #00, slot #0) is
‘87’ (0x57);
TDMA User Manual
Appendix
•
the percentage of packets sent from submaster 2 and successfully decoded by the local radio is
99% (0x63);
• the average signal level measured by local radio during transmission of submaster 2 (frame #00, slot
#2) is ‘85’ (0x55);
Then the output string will be:
0x770x000x080x000x620x2D0x5F0x570x000x000x630x55
positions in the packet, which correspond to
decode success and average signal level of
the radio whose signal quality packet was
requested (the first submaster in our case).
Notes:
•
•
73
The packet will include zeros in the position of the radio whose signal quality packet was
requested.
The average signal level from x radio is only updated when x radio is heard. Therefore, if x
radio is turned off, the average signal level will still show the previous average and its packet
decode success will drop to zero.
TDMA User Manual
Appendix
9. ‘c’ Get radio’s firmware version number.
Command general description:
Addressee is a local radio or a remote radio
Local
Command format:
0xDD,0x00,0x01,0x00,0x63
Field name
0xDD
0x01
0x63
Meaning/format
Delimiter (hex value)
Command length
Command code
User adjustable
Yes
No
No
Command example:
If
•
the Delimiter on the local radio is set to ‘0x77’, which will appear in the TDMA Menu as ‘119’;
then the command will be:
0x770x000x010x000x63
Output format (at the local radio):
0xDD,0x00,0x03,0x00,0x63,0x##0x##
Field name
0xDD
0x03
0x63
0x## 0x##
Meaning/format
Delimiter (hex value)
Command length
Command code
F/w version extension. For example, if the radio has “5.58”
version of f/w, it will return 0x350x38
User adjustable
No
No
No
No
Output string example (at the local radio):
If
•
the Delimiter on the local radio where the command is issued is set to ‘0x77’, which will appear in
the TDMA Menu as ‘119’;
•
the local radio has 5.58 version of the f/w;
•
the output characters are the ASCII codes of the decimal places of the firmware version, 0x36 is the
ASCII code for 6, and 0x38 is the ASCII code for 8.
then the output string will be:
0x770x000x030x000x630x360x38
74
TDMA User Manual
Appendix
Note:
The output may only have one return value, and there is a lookup table available from FreeWave. Here is
the current table as of the writing of this manual.
In this case the output will be, given firmware of 5.85:
0x770x000x020x000x630x69
DGR
Firmware Ver.
5.63
5.64
5.65
5.67g
5.68
5.74
5.75
5.76
5.77
5.79
5.80
5.81
5.82
5.84
5.85
TDMA Command value
Decimal
63
64
65
71
73
91
93
94
95
97
98
99
102
104
105
TDMA Command value
Hexadecimal
3F
40
41
47
49
5B
5D
5E
5F
61
62
63
66
68
69
TDMA Command value
Decimal
21
TDMA Command value
Hexadecimal
15
FGR
Firmware Ver.
2.21
75
TDMA User Manual
Appendix
10. ‘7’ Tell remote radio to respond with its signal quality packet on specified
frame.
Command general description:
Addressee is a local radio or a remote radio
Remote
Command restrictions:
Can be issued only from the master.
Terminology used:
Remote radio of interest will be called ‘addressee’.
Command format:
0xDD,0x00,0x05,0x00,0x37,0x## 0x##,0x##,0xNN
Field name
0xDD
0x05
0x37
0x## 0x## 0x##
0xNN
Meaning/format
Delimiter byte (hex value)
Command length
Command code
Addressee’s 3 byte address
Frame number in hex format
User adjustable
Yes
No
No
Yes
Yes
Command example:
If
•
the Delimiter on the local radio (master) is set to ‘0x77’, which will appear in the TDMA Menu as
‘119’;
•
the addressee’s serial number is ‘900-1234’ (0x890x590x12);
•
the frame number will need to used for the ‘900-1234’ radio’s response is ‘05’
then the command will be:
0x770x000x050x000x370x890x590x120x05
After this command will be received by the radio ‘900-1234’, it will send its quality packet on the frame
05.
Output format (at the master radio):
0xDD,0x00,0x04+quality packet length,0x00,0x37,0x## 0x##,0x##,####(data)
Field name
76
Meaning/format
User adjustable
TDMA User Manual
0Xdd
0x04+quality
packet length
0x37
0x## 0x## 0x##
####(data)
Note.
Appendix
Delimiter byte (hex value) of the addressee
4 plus number of bytes in the quality packet in hex format.
For example, if the quality packet includes 3 bytes of data,
then this location will be 0x07
Command code
Addressee’s 3 byte address
The actual quality packet data in hex format
No
No
No
No
No
The quality packet always consists of n = (2 * (# submasters + 1) + 1) bytes of data. The format
of these data bytes is as follow:
•
if there are no submasters in the network:
DataByte1, DataByte2, DataByte3
•
if there are one or more submasters in the network:
DataByte1, DataByte2, DataByte3, … DataByte(2*i + 2), DataByte(2*i + 3)
where
i = 1, 2, 3, 4 …
is the number of submasters.
Table below shows DataBytes contents.
DataByte1
DataByte2
DataByte3
DataByte(2*i + 2)
DataByte(2*i + 3)
The average noise level at addressee radio.
Percentage of packets sent from the master, which were successfully
decoded by addressee (during the frame #00, slot #0).
Average signal level measured by the addressee during master’s
transmission (during the frame #00, slot #0).
Percentage of packets sent from submaster ‘i’, which were successfully
decoded by the addressee (during the frame #00, slot #i).
Average signal level measured by the addressee during submaster’s ‘i’
transmission (during the frame #00, slot #i).
Output string example (at the master radio):
If
•
•
•
•
•
•
77
the Delimiter on the addressee is set to ‘0x77’, which will appear in the TDMA menu as ‘119’;
the addressee has serial number 900-1234 (0x890x590x12);
the addressee is a slave;
there are no submasters in the system (Number of SubMaster in the TDMA menu is set to ‘0’);
RadioStatistics Menu on the addressee reads ‘29’ for average noise level. Please, note that actual
average noise value returned by the addressee will be greater than shown in the RadioStatistics by
16:
29 + 16 = 45, or
0x1D + 0x10 = 0x2D;
the percentage of master packets successfully decoded by the addressee is 95% (0x5F);
TDMA User Manual
Appendix
•
the average signal level measured by the addressee during master’s transmission (frame #00, slot
#0) is ‘87’ (0x57);
Then the output string will be:
0x770x000x070x000x370x890x590x120x2D0x5F0x57
If
•
the delimiter on the addressee is set to ‘0x77’, which will appear in the TDMA menu as ‘119’;
the addressee has serial number 900-1234 (0x890x590x12);
• there are two submasters in the system (Number of SubMasters in the TDMA menu is set to ‘2’);
• the addressee is the second submaster;
•
RadioStatistics Menu on the addressee reads ‘29’ for average noise level. Please, note that actual
average noise value returned by the addressee will be greater than shown in the RadioStatistics
Menu by 16:
29 + 16 = 45, or
0x1D + 0x10 = 0x2D;
• the percentage of master packets successfully decoded by the addressee is 95% (0x5F);
• the average signal level measured by addressee during master’s transmission (frame #00, slot #0) is
‘87’ (0x57);
• the percentage of packets sent from submaster 2 and successfully decoded by the addressee is
99% (0x63);
• the average signal level measured by addressee during transmission of submaster 2 (frame #00, slot
#2) is ‘85’ (0x55);
Then the output string will be:
•
0x770x000x0B0x000x370x890x590x120x2D0x5F0x570x630x550x000x00
positions in the packet, which correspond to
decode success and average signal level of
the radio whose signal quality packet was
requested (the second submaster in this
case).
Notes:
•
•
•
78
The packet will include zeros in the position of the radio whose packet was requested.
The average signal level from x radio is only updated when x radio is heard. Therefore, if x
radio is turned off, its average signal level will still show the previous value and its packet
decode success will drop to zero.
Does not work for local radio.
TDMA User Manual
Appendix
11. ‘B’ Tell remote radio to transmit a status packet on specified frame.
Command general description:
Addressee is a local radio or a remote radio
Remote
Echoed out at all radios (that are programmed to listen in the frame table), except queried radio.
Command format:
0xDD,0x00,0x05,0x00,0x42,0x## 0x##0x##,0xNN
Field name
0xDD
0x05
0x42
0x## 0x## 0x##
0xNN
Meaning/format
Delimiter byte (hex value)
Command length
Command code
Destination radio’s 3 byte address
Frame number in hex format
User adjustable
Yes
No
No
Yes
Yes
Command example:
If
•
•
•
the Delimiter on the local radio is set to ‘0x77’, which will appear in the TDMA Menu as ‘119’;
the remote radio’s serial number is ‘900-1234’ (0x890x590x12);
the frame number will need to used for the ‘900-1234’ radio’s response is ‘05’
then the command will be:
0x770x000x050x000x420x890x590x120x05
After this command will be received by the radio ‘900-1234’, it will send its status packet on the frame
05.
Output format (at the local radio):
0xDD,0x00,0x07,0x00,0x42,0x## 0x##0x##,0xVt,0xTp,0xRD
Field name
0xDD
0x07
0x42
0x## 0x## 0x##
0xVt
0xTp
0xRD
79
Meaning/format
Delimiter byte (hex value)
Command length
Command code
Destination radio’s 3 byte address
Byte of data that corresponds to the sample of radio’s input
DC voltage measurements with 15VDC being a full scale.
Byte of data that corresponds to the sample of radio’s
temperature measurements. Note: use given below formulas
to convert this Hex value into deg. C.
Byte of data that corresponds to the status of RTS and DTR
inputs on the radio. Bit 7 (MSB) is the RTS line and Bit 4 is
User adjustable
No
No
No
No
No
No
No
TDMA User Manual
Appendix
the DTR line. “1” corresponds to a low level on these pins.
Output string example (at the local radio):
If
•
•
•
•
•
the Delimiter on the local radio is set to ‘0x77’, which will appear in the TDMA Menu as ‘119’;
the remote radio’s serial number is ‘900-1234’ (0x890x590x12);
the input DC voltage measured by the radio is 12VDC (0xCC);
the radio’s temperature 25 deg. C (0x80);
RTS is low and DTR is high (0x10);
then the output string will be:
0x770x000x070x000x420x890x590x120xCC0x800x10
Use listed below algorithm to convert ‘0xTp’ value into deg. Centigrade:
•
•
•
Convert 0xTp readings from the radio into an integer number (Temp%).
Make sure that the value of ‘0xTp’ after conversion is between 6 and 255.
Calculate the result as follows:
Temp% = Temp%/256
Temp% = (Temp% * 22 ) / ((1 – (Temp%/256)) * 25)
Temp% = (-0.0196 + SQR(0.0196^2 + 4 * LOG10(Temp%) * 0.000057))
Temp% = Temp% / (2 * 0.000057)
Temp% = 25 – Temp%
Note: Does not work for local radio.
80
TDMA User Manual
Appendix
12. ‘F’ Special Data Packet command.
Sends data to a specific radio or radios on a specified frame.
Command general description:
Addressee is a local radio or a remote radio
Remote
Ignores delimiter characters inside the data packet. This command is suitable for ‘random’ binary data.
Command format:
0xDD,0x00,0x05+data size,0xEC,0x46,0x##0x##0x##,0xNN,####(data)
Field name
0xDD
0x05+0xdata size
0xEC
0x46
0x## 0x## 0x##
0xNN
####(data)
Meaning/format
Delimiter (hex value)
Number of data bytes plus 5 in hex format. For example, if
the command includes 4 bytes of data in the end, then this
location should be 0x09
$00 for epoch reference, $01 for frame casing reference.
See note.
Command code
Destination radio’s 3 byte address
Frame number to send command on
The actual data being sent in hex format
User adjustable
Yes
Yes
Yes
No
Yes
Yes
Yes
Command example:
If
•
•
•
•
the Delimiter on the local radio is set to ‘0x77’, which will appear in the TDMA Menu as ‘119’;
the remote radio’s serial number is ‘900-1234’ (0x890x590x12);
the frame number will need to used to send data is ‘05’;
the data needs to be sent is ‘123456789A’;
then the command will be:
0x770x000x0E0x000x460x890x590x120x050x010x020x030x040x050x060x070x080x090x0A
Output format (at the remote radio):
0xDD,0x##0x##0x##,0xdata size,####(data)
Field name
0xDD
0x## 0x## 0x##
0xdata size
####(data)
81
Meaning/format
Delimiter (hex value)
Sending radio’s 3 byte address
Number of data bytes in hex format. For example, if the
command includes 4 bytes of data in the end, then this
location should be 0x04
The actual data being sent in hex format
User adjustable
No
No
No
No
TDMA User Manual
Appendix
Output string example (at the remote radio):
If
•
the Delimiter on the local radio where the command is issued is set to ‘0x77’, which will appear in
the TDMA Menu as ‘119’;
•
the remote radio’s serial number is ‘900-1234’ (0x890x590x12);
then the output string will be:
0x770x890x590x120x0A0x010x020x030x040x050x060x070x080x090x0A
Note:
When the destination radio is addressed, the radio will receive the message even if it was
programmed to do nothing for that frame. If the destination address is all radios (hex address FF
FF FF), only the radios programmed to listen will receive the message if there is a good link.
Note:
When the fourth byte is set to zero, the frame number specified in byte 9 is the index
into the epoch. A further discussion is coming soon.
When the fourth byte is set to one, the frame number specified in byte 9 is the index into
the frame casing. Allowable entries are 1 – “slave frames per master frame” setting.
Sending zero will result in nothing, and sending a value higher than “slave frames per
master frame” will lock up the local port indefinitely.
82
TDMA User Manual
Appendix
13. ‘H’ “Who’s out there” command.
Command general description:
Each radio echoes the response out the local port, as well as across the TDMA network back to the
requesting unit.
Addressee is a local radio or a remote radio
Remote
Command format:
0xDD,0x00,0x05,0x00,0x48,0xFF0xFF0xFF,0xF0
Field name
0xDD
0x05
0x48
0xFF0xFF0xFF
0xF0
Meaning/format
Delimiter byte (hex value)
Command length
Command code
Destination radio’s 3 byte address – 0xFF0xFF0xFF means
‘to anybody’
Randomizing factor, FF is 100% response.
User adjustable
Yes
No
No
No
Yes
Command example:
If:
•
the Delimiter on the local radio where the command is issued is set to ‘0x77’, which will appear in
the TDMA Menu as ‘119’;
0x770x000x050x000x480xFF0xFF0xFF0xF0
Output format (at the local radio):
0xDD,0x00,0x04,0x00,0x48,0x## 0x##0x##
Field name
0xDD
0x04
0x48
0x## 0x## 0x##
Meaning/format
Delimiter byte (hex value)
Command length
Command code
Responding radio 3 bytes ID number
User adjustable
No
No
No
No
Output string example (at the local radio):
0x770x000x040x000x480x890x590x12
Note:
83
When this command is transmitted all radios that are listening will randomly transmit an
acknowledgement over the next epoch. Every response will appear on RS232 output of the
local radio in the order it was received. In the case of no collisions, the number of responses
can be equal to the number of listening radios in the network. Repeating this command over
should eventually result in a response from all radios in the network.
TDMA User Manual
Appendix
14. ‘L’ Tell remote radio to listen to all packets on specified frame.
Command general description:
Addressee is a local radio or a remote radio
Remote
Command format:
0xDD,0x00,0x05,0x00,0x4C,0x##0x##0x##,0xNN
Field name
0xDD
0x05
0x4C
0x## 0x## 0x##
0xNN
Meaning/format
Delimiter byte (hex value)
Command length
Command code
Destination radio’s 3 byte address.
Frame number in hex format
User adjustable
Yes
No
No
Yes
Yes
Command example:
If:
•
the Delimiter on the local radio where the command is issued is set to ‘0x77’, which will appear in
the TDMA Menu as ‘119’;
0x770x000x050x000x4C0x890x590x120x02
After this command will be received by the radio ‘900-1234’, its RAM copy of the frame table will have a
new entry in the frame number 02, which is ‘10’.
Note: after the power will be recycled on the radio ‘900-1234’, the contents of the frame number 02 will
be re-stored back to the value viewable from the TDMA Menu option ‘Edit Xmit/Rcv Frames’.
84
TDMA User Manual
Appendix
15. ‘N’ Tell remote radio to be idle on specified frame.
Command general description:
Addressee is a local radio or a remote radio
Remote
Command format:
0xDD,0x00,0x05,0x00,0x4E,0x##0x##0x##,0xNN
Field name
0xDD
0x05
0x4E
0x## 0x## 0x##
0xNN
Meaning/format
Delimiter byte (hex value)
Command length
Command code
Destination radio’s 3 byte address.
Frame number in hex format
User adjustable
Yes
No
No
Yes
Yes
Command example:
If:
•
•
The Delimiter on the local radio is set to ‘0x77’, which will appear in the TDMA Menu as ‘119’.
If remote radio’s serial number is ‘900-1234’ (0x890x590x12),
then the command will be:
0x770x000x050x000x4E0x890x590x120x02
After this command will be received by the radio ‘900-1234’, its RAM copy of the frame table will have a
new entry in the frame number 02, which is ‘00’.
Note: after the power will be recycled on the radio ‘900-1234’, the contents of the frame number 02 will
be re-stored back to the value viewable from the TDMA Menu option ‘Edit Xmit/Rcv Frames’.
85
TDMA User Manual
Appendix
16. ‘R’ Tell remote radio to become a repeater/submaster.
Command general description:
Addressee is a local radio or a remote radio
Remote
Command format:
Tell remote radio to become a repeater
0xDD,0x00,0x06,0x00,0x52,0x##0x##0x##,0xNN,0xSS
or tell remote radio to become a submaster
0xDD,0x00,0x06,0x00,0x52,0x##0x##0x##,0x00,0xSS
Field name
0xDD
0x06
0x52
0x## 0x## 0x##
0xNN
0xSS
Note:
Meaning/format
Delimiter byte (hex value)
Command length
Command code
Destination radio’s 3 byte address.
Frame number in hex format
Slot number in hex format
User adjustable
Yes
No
No
Yes
Yes
Yes
0xNN is a frame number and 0xSS is a slot number to be used by the specified radio to repeat
messages is hears within 0xNN frame on the slots before 0xSS.
Command example:
If:
•
•
The Delimiter on the local radio is set to ‘0x77’, which will appear in the TDMA Menu as ‘119’.
If remote radio’s serial number is ‘900-1234’ (0x890x590x12).
Then the command will be:
Tell remote radio ‘900-1234’ to become a repeater
0x770x000x060x000x520x890x590x120x020x01
After this command will be received by the radio ‘900-1234’, its RAM copy of the frame table will have a
new entry in the frame number 02, which is ‘21’.
Note: after the power will be recycled on the radio ‘900-1234’, the contents of the frame number 02 will
be re-stored back to the value viewable from the TDMA Menu option ‘Edit Xmit/Rcv Frames’.
Tell remote radio ‘900-1234’ to become a submaster
0x770x000x060x000x520x890x590x120x000x01
86
TDMA User Manual
Appendix
After this command will be received by the radio ‘900-1234’, its RAM copy of the frame table will have a
new entry in the frame number 00, which is ‘31’.
Note:
87
after the power will be recycled on the radio ‘900-1234’, the contents of the frame number 00 will
be re-stored back to the value viewable from the TDMA Menu option ‘Edit Xmit/Rcv Frames’.
TDMA User Manual
Appendix
17. ‘T’ Tell remote radio to transmit on specified frame.
Command general description:
Addressee is a local radio or a remote radio
Remote
Command format:
0xDD,0x00,0x05,0x00,0x54,0x##0x##0x##,0xNN
Field name
0xDD
0x05
0x54
0x## 0x## 0x##
0xNN
Meaning/format
Delimiter byte (hex value)
Command length
Command code
Destination radio’s 3 byte address.
Frame number in hex format
User adjustable
Yes
No
No
Yes
Yes
Command example:
If:
•
•
The Delimiter on the local radio is set to ‘0x77’, which will appear in the TDMA Menu as ‘119’.
If remote radio’s serial number is ‘900-1234’ (0x890x590x12).
Then the command will be:
0x770x000x050x000x540x890x590x120x02
After this command will be received by the radio ‘900-1234’, its RAM copy of the frame table will have a
new entry in the frame number 02, which is ‘20’.
Note: after the power will be recycled on the radio ‘900-1234’, the contents of the frame number 02 will
be re-stored back to the value viewable from the TDMA Menu option ‘Edit Xmit/Rcv Frames’.
88
TDMA User Manual
Appendix
18. ‘m’ Gather routing information from source radio to destination radio.
Command general description:
Addressee is a local radio or a remote radio
Local
Command format:
0xDD,0x00,0x05,0xx0,0x6D,0x##0x##0x##,0xFF
Field name
0xDD
0x05
0x6D
0x## 0x## 0x##
0xFF
Meaning/format
Delimiter (hex value)
Command length
Command code
Destination radio’s 3 byte address
Frame number to send the command on
User adjustable
Yes
No
No
Yes
Yes
Command example:
If
•
•
•
the Delimiter on the local radio is set to ‘0x77’, which will appear in the TDMA Menu as ‘119’;
the remote radio’s serial number is ‘900-1234’ (0x890x590x12);
the command has to be sent on the frame ‘05’ (0x05);
then the command will be:
0x770x000x050x000x6D0x890x590x120x05
Output format (at the local radio):
0xDD,0x00,0x05+number of slots,0x00,0x6D,0x##0x##0x##,0xFF,0xSS
Field name
0xDD
0x05 + number of
slots
0x6D
0x## 0x## 0x##
0xFF
0xSS
Meaning/format
Delimiter (hex value)
Command length starting after the first four bytes plus slot
numbers sent on
Command code
Destination radio’s 3 byte address
Frame number to send the command on
slot numbers sent on (example: 0x00,0x01,0x03 would refer
to slot 0, slot 1 and slot3 is the route the command took.)
User adjustable
No
No
No
No
No
No
Output string example (at the local radio):
If
•
89
the Delimiter on the local radio where the command is issued is set to ‘0x77’, which will appear in
the TDMA Menu as ‘119’;
TDMA User Manual
•
•
•
the remote radio’s serial number is ‘900-1234’ (0x890x590x12);
the frame used to send the command on was ‘05’;
the command travel through slot 0 -> slot 2 -> slot 5;
then the output string will be:
0x770x000x080x000x6D0x0890x590x120x050x000x020x05
90
Appendix
TDMA User Manual
Appendix
19. Send data packet to a specified radio or broadcast.
Command general description:
Addressee is a local radio or a remote radio
Remote
Ignores delimiter characters in the data packet. This command is suitable for ‘random’ binary data.
Command format:
Send data packet to a specified radio as immediate data
0xDD,0x##0x##0x##,0xdata packet length,####(data),
where 0x##0x##0x## is different from local radio serial number and it is not 0xFF0xFF0xFF;
broadcast data packet and send it as assigned data
0xDD,0x##0x##0x##,0xdata packet length,####(data),
where 0x##0x##0x## is local’s radio serial number;
or broadcast a data packet and send it as immediate data
0xDD,0xFF0xFF0xFF,0xdata packet length,####(data).
Field name
0xDD
0x## 0x## 0x##
0xdata packet
length
####(data)
Meaning/format
Delimiter byte (hex value)
Destination radio’s 3 byte address. There are three options
available:
•
This address is something different from local radio serial
number and it is not ‘0xFF0xFF0xFF’. In this case the
command will be sent as immediate data and will be
addressed to a specified remote radio only.
•
This address is local’s radio serial number. In this case
the command will be sent as assigned data and will be
addressed to all remote radios (broadcast).
•
This address is ‘0xFF0xFF0xFF’. In this case the
command will be sent as immediate data and will be
addressed to all remote radios (broadcast).
Number of data bytes to be sent
Data packet in hex format
User adjustable
Yes
Yes
Yes
Yes
Command example:
If
•
•
the local radio serial number is ‘900-1234’ (0x890x590x12);
one of the remote radio’s serial number is ‘900-5678’ (0x890x6A0x6E)
then the command will be:
Send ‘123456789A’ data packet to the remote radio with serial number ‘900-5678’ as immediate data
0x770x890x6A0x6E0x0A0x010x020x030x040x050x060x070x080x090x0A
91
TDMA User Manual
Appendix
The string on output of the ‘900-5678’ radio’s RS232 port if it was listening during the frame picked up
by local radio for the transmission, will be:
0x770x890x6A0x6E0x0A0x010x020x030x040x050x060x070x080x090x0A
Broadcast ‘123456789A’ data packet to all remote radios and send it as assigned data
0x770x890x590x120x0A0x010x020x030x040x050x060x070x080x090x0A
The string on output of one of the remote radio, which heard this message during the frame assigned
to the local radio, will be:
0x770x890x590x120x0A0x010x020x030x040x050x060x070x080x090x0A
Broadcast ‘123456789A’ data packet to all remote radios and send it as immediate data
0x770xFF0xFF0xFF0x0A0x010x020x030x040x050x060x070x080x090x0A
The string on the output of the RS232 port of all of the radios, which heard this message, will be:
0x770xFF0xFF0xFF0x0A0x010x020x030x040x050x060x070x080x090x0A
92
TDMA User Manual
Appendix
Appendix B - ASCII Table (dec, hex, char):
Table 11 ASCII, Hex, Dec Table
Dec
0
1
2
3
4
5
6
7
8
9
10
11
12
13
14
15
16
17
18
19
20
21
22
23
24
25
26
27
28
29
30
31
32
33
34
35
36
37
38
39
40
41
42
43
44
45
46
47
48
49
50
51
52
53
54
55
56
57
58
93
Hex
00
01
02
03
04
05
06
07
08
09
0A
0B
0C
0D
0E
0F
10
11
12
13
14
15
16
17
18
19
1A
1B
1C
1D
1E
1F
20
21
22
23
24
25
26
27
28
29
2A
2B
2C
2D
2E
2F
30
31
32
33
34
35
36
37
38
39
3A
Char
Null
SOH
STX
ETX
EOT
ENQ
ACK
BEL
BS
TAB
LF
VT
FF
CR
SO
SI
DLE
DC1
DC2
DC3
DC4
NAK
SYN
ETB
CAN
EM
SUB
ESC
FS
GS
RS
US
Space
!
“
#
$
%
&
‘
(
)
*
+
,
.
/
0
1
2
3
4
5
6
7
8
9
:
Dec
64
65
66
67
68
69
70
71
72
73
74
75
76
77
78
79
80
81
82
83
84
85
86
87
88
89
90
91
92
93
94
95
96
97
98
99
100
101
102
103
104
105
106
107
108
109
110
111
112
113
114
115
116
117
118
119
120
121
122
Hex
40
41
42
43
44
45
46
47
48
49
4A
4B
4C
4D
4E
4F
50
51
52
53
54
55
56
57
58
59
5A
5B
5C
5D
5E
5F
60
61
62
63
64
65
66
67
68
69
6A
6B
6C
6D
6E
6F
70
71
72
73
74
75
76
77
78
79
7A
Char
@
A
B
C
D
E
F
G
H
I
J
K
L
M
N
O
P
Q
R
S
T
U
V
W
X
Y
Z
[
\
]
^
_
`
a
b
c
d
e
f
g
h
i
j
k
l
m
n
o
p
q
r
s
t
u
v
w
x
y
z
Dec
128
129
130
131
132
133
134
135
136
137
138
139
140
141
142
143
144
145
146
147
148
149
150
151
152
153
154
155
156
157
158
159
160
161
162
163
164
165
166
167
168
169
170
171
172
173
174
175
176
177
178
179
180
181
182
183
184
185
186
Hex
80
81
82
83
84
85
86
87
88
89
8A
8B
8C
8D
8E
8F
90
91
92
93
94
95
96
97
98
99
9A
9B
9C
9D
9E
9F
A0
A1
A2
A3
A4
A5
A6
A7
A8
A9
AA
AB
AC
AD
AE
AF
B0
B1
B2
B3
B4
B5
B6
B7
B8
B9
BA
Char
Dec
192
193
194
195
196
197
198
199
200
201
202
203
204
205
206
207
208
209
210
211
212
213
214
215
216
217
218
219
220
221
222
223
224
225
226
227
228
229
230
231
232
233
234
235
236
237
238
239
240
241
242
243
244
245
246
247
248
249
250
Hex
C0
C1
C2
C3
C4
C5
C6
C7
C8
C9
CA
CB
CC
CD
CE
CF
D0
D1
D2
D3
D4
D5
D6
D7
D8
D9
DA
DB
DC
DD
DE
DF
E0
E1
E2
E3
E4
E5
E6
E7
E8
E9
EA
EB
EC
ED
EE
EF
F0
F1
F2
F3
F4
F5
F6
F7
F8
F9
FA
Char
TDMA User Manual
59
60
61
62
63
94
3B
3C
3D
3E
3F
;
<
=
>
?
Appendix
123
124
125
126
127
7B
7C
7D
7E
7F
{
|
}
~
187
188
189
190
191
BB
BC
BD
BE
BF
251
252
253
254
255
FB
FC
FD
FE
FF
TDMA User Manual
Needs to be added:
•
CD and CTS timings
•
Test commands
95
Appendix
TDMA User Manual
Appendix
Appendix C – Firmware Tables:
FGR Firmware.
2.26
2.27
2.30
03-04-2003
04-28-2003
07-28-2003
2.32
09-26-2003
Initial release.
Added remote LED functionality.
Added version of special data packet that references the frame casing
instead of the epoch.
Bug fix.
DGR Firmware.
5.85
09-10-2002
5.87
5.88
03-02-2003
08-04-2003
Added version of Ram write command to load network ID and
frequency key with one command.
Bug Fix.
Added version of special data packet that references the frame casing
instead of the epoch.
DGMR Firmware.
1.86
96
11-23-2002
Added version of Ram write command to load network ID and
frequency key with one command.