1
I mportant Safeguards
When using this electrical appliance, always follow these basic precautions:
1.
2.
3.
4.
5.
6.
7.
8.
9.
10.
11.
12.
13.
14.
15.
16.
17.
18.
Read all instructions before using.
Do not let the coffee brewer operate without water. Permanent damage could result and void your warranty.
Make sure that your outlet voltage corresponds to the voltage stated on the rating label of the coffee maker.
To protect against fire, electric shock and injury do not immerse cord, plug, or brewer in water or other liquid.
ADULT supervision is absolutely necessary and the responsibility of the user(s)/owner(s) when The Behmor
Brazen is being operated near children or in households with children present.
Unplug from outlet before cleaning.
Do not operate any appliance with a damaged cord or plug, after a malfunction or after any damage has occurred.
Do not use any attachment(s), and/or item(s) or make any modifications that are not explicitly approved by
Behmor Inc. in, on or to the Behmor Brazen. Using such items or making modifications is strictly prohibited and
automatically voids all warranties and relieves Behmor Inc. of any/all liabilities arising from such misuse and
tampering.
Do not use outdoors.
Do not use with extension cords.
Do not let cord hang over the edge of a table or counter, or touch hot surfaces.
Do not place on or near a hot gas or electric burner, or in a heated oven.
Do not use this appliance for anything other than the intended use.
To disconnect, remove plug from wall outlet by holding the plug. Never pull the cord.
Scalding may occur if the cover is opened during the brewing cycles. Be careful around the steam.
Do not put anything in the water reservoir except water or water based, approved coffee cleaners. Coffee should
not be put into the reservoir.
Some parts of appliance become hot when operating, use caution when brewing or calibrating the Brazen.
This product is equipped with a grounded plug, which will only fit into a three-prong outlet. Do not attempt to disable
this feature. Improper connection of the grounding conductor may result in electric shock.
Read and Save All I nstructions
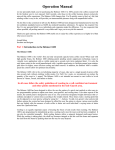
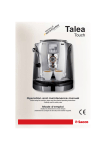
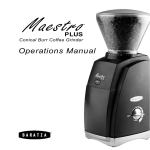
KNOW YOUR COFFEE BREWER
Diagram A: Main Components of the Brazen Brewer
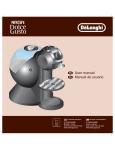
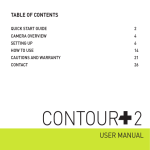
Diagram B: Control Panel Mode Auto
Set
On/off
Start
Manual
release
Control Button Descriptions
Mode button: Press this button once to set automatic time, twice to set pre-soak time, three times to set brew temperature, four
WLPHVWRVHWWKHFXUUHQWFORFNDQGILYHWLPHVWRFDOLEUDWHWKHWHPSHUDWXUH7KH³ ´DQG³ ´EXWWRQVDUH used for increasing and
decreasing these mode settings. See instructions below.
On/Off Button: At any point during operation, press this button to cancel any/ all procedures
Auto Button: Used to turn on and off the ³$XWRPDWLFVWDUW´
Manual Release Button: Used to enter the manual release mode and control the release of water in that mode. To brew coffee
in this mode you should not release water continuously or water will overflow the coffee basket. Alternating 15 to 20 seconds
between water releases is a good place to start.
³
´DQG³
´%XWWRQV: Used for increasing or decreasing the time, the brew temperature and altitude.
Set Button: When setting the automatic start time and current time, it is used for switching between Hour and Minute, and for
switching from °F to °C when setting the brew temperature.
Start Button: For starting the brewing cycles and calibration.
* Power Saving Sleep Cycle: The Brazen is programmed with a Power Saving Sleep Cycle. After 5 minutes of inactivity the
system will go into this mode and the screen will dim. Press any button to bring the brewer out of this mode.
I nitial Set Up and Cleaning 1.
2.
3.
4.
5.
6.
7.
8.
Remove all packing materials.
Check that all parts and accessories are included and that the brewer is not damaged.
Wipe out stainless steel reservoir with a damp cloth.
Add water to the calibration fill line. Leave the reservoir lid OFF.
Be sure the carafe, gold filter and filter basket are in place.
Plug the Brazen Brewer into the power outlet.
Program and Calibrate you brewer (see following page)
After your full calibration procedure is completed, fill reservoir to maximum line (1.2L/ 8 Cup) and place
reservoir lid over reservoir.
9. 3UHVV³6WDUW´WRUXQDEUHZLQJF\FOHRIwater only. This flushes out the system and cleans the internal components
before first use. Be sure carafe and other items are in their proper place(s).
Programming Your Brazen
The Brazen comes with default settings that are appropriate for brewing. Pre-Soak 15 seconds, Brew
Temperature 210° F (99° C), and Altitude of 0 Ft. You can exit the programming modes at any point by
KLWWLQJWKH³2Q2II´EXWWRQ
Videos of the following procedures can be found online at: www.behmor.com
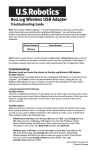
1. Set Auto Start Time: 3UHVV³0RGH.´ A clock time will appear on the LED screen with
the hour digit blinking (Figure 1).
a. Set Hour- press up/down arrows until hour is correct. Once hour is ready press ³Set´.
Note: the time cycle is 12 hours and AM/PM changes as you pass 12:00.
b. Set Minutes- press up/down arrows until minutes are correct. Once minutes are
correct press ³Mode´ to continue to setting the Pre-Soak Time.
2. Set Pre-Soak Time: A clock time will appear on the LED screen with the minute digit
blinking (Figure 2). The adjustable time range is 15 seconds to 4 minutes.
a. Set Minutes - press up/down arrows to desired minute setting. Once done press ³Set´.
b. Set Seconds - press up/down arrows to desired seconds setting. Once done press
³Mode´ to continue to setting the Brewing Temperature.
3. Set Brew Temperature: The current brewing temperature will appear on the LED screen
(Figure 3 and 4). 3UHVVWKH³6HW´EXWWRQWRVZLWFKEHWZHHQ°F and °C.
a. The adjustable range is 190°F-210°F (88°C-99°C).
b. Press up/down arrows until desired temperature is shown, then press ³Mode´ to
continue to setting the Current Time.
4. Set Current Time: A clock time will appear on the LED screen (Figure 5).
a. Set Hour- press up/down arrows until hour is correct2QFHKRXULVUHDG\SUHVV³6HW´.
Note: the time cycle is 12 hours and AM/PM changes as you pass 12:00.
b. Set Minutes- press up/down arrows until minutes are correct. Once minutes are
correct, SUHVV³0RGH´ to continue to the System Calibration.
5. System Calibration7KHZRUG³FDOLEUDWH´DERYHIRXUGLJLWSODFHVZLOODSSHDURQWKH
LED screen.
a. Set elevation in feet: press up/down arrows until the approximate elevation for your
location. Determine your elevation by viewing the table below or visiting a weather
website such as http://wunderground.com. The Brazen is programmed to allow the
user to set their altitude to the nearest 250 feet.
b. Fill the reservoir ZLWKZDWHUWRWKH³&DOLEUDWLRQILOOOLQH´.
c. Remove lid.
d. Press ³Start´
e. The heaters will turn on and bring the water to a boil for 15 to 30 seconds.
f. A beep indicates the system calibration is complete.
g. Top up the water in reservoir to the 8 cup line for EUHZLQJRUSUHVV³6WDUW´DQGOHW a
full cycle run to clean the entire system. Be sure to have the carafe, filter basket and gold filter in place.
Altitudes for M ajor Cities in North America
(Rounded to 250 foot increments used for programming the Brazen)
Atlanta, GA ʹ 876 ft. (750) Eugene, OR -‐ 423 ft. (500) Philadelphia, PA -‐ 203 ft. (250) Austin, TX -‐ 548 ft. (500) Indianapolis, IN -‐ 781 ft. (750) Portland, OR -‐ 617 ft. (500) Boise, ID -‐ 2651 ft. (2500) Kansas City, MO -‐ 755 ft. (750) Reno, NV -‐ 4534 ft. (4500) Boston, MA -‐ 20 ft. (0) Lexington, KY -‐ 997 ft. (1000) Washington DC -‐ 75 ft. (0) Chicago, IL -‐620 ft. (750) Madison, WI -‐ 922 ft. (1000) Edmonton, Canada -‐ 2372 ft. (2250) Cleveland, OH -‐ 689 ft. (750) Miami, FL -‐ 7 ft. (0) Montreal, Canada -‐ 118 ft. (0) Dallas, TX -‐ 449 ft. (500) Minneapolis, MN -‐ 853 ft. (750) Quebec, Canada -‐ 240 ft (250) Dayton, OH -‐778 ft. (750) Nashville, TN -‐ 489 ft. (500) Toronto, Canada -‐ 253 ft. (250) Denver, CO -‐ 5249 ft. (5250) Pittsburgh, PA -‐ 1201 ft. (1250) Vancouver, Canada -‐ 7 ft. (0) Brewing I nstructions
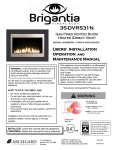
1. Twist and remove the top cover and fill the reservoir with
drinking water, always pouring from the side to avoid getting
display screen wet (see Diagram C). The water level should
not exceed 1.2L / 8 Cup level as indicated on the inside.
The water reservoir has a capacity of 8 Cups or 1.2L. Labeled
marking lines are as shown below:
a. 1.2 L- 8 Cups
b. .9 L - 6 Cups
c. Calibration Fill Line (.6L - 4 Cups) Best used with
Manual Release
Replace and twist the top cover into place.
***Important Note: Do not put coffee or anything other than
water into the reservoir.
***Do not use hot water as it will adversely affect the Power
Controlled Temperature Glide programming.
2. Remove the filter basket, and place ground coffee into the filter. A full pot of brewed coffee in the Brazen
requires 8-10 Tablespoons of ground coffee (60-70 grams or 2 oz). If the Brazen¶VJROG filter is being used, finely
ground coffee is not recommended as it may clog the filter. A grind between a standard drip coffee and a French
Press should be used. If using a paper filter, a grind for a standard drip coffee may be used. Many commercial
grinders have pre-marked settings for metal and paper filters.
3. Place the filter into the filter basket, and slide into place. You will hear a slight clicking when it locks in.
4. Set stainless steel carafe on base.
5. 0DNHVXUHWKHSURJUDPVHWWLQJVDUHWR\RXUOLNLQJVHH³3URJUDPPLQJ<RXUBrazen) and proceed with brewing
using one of three options described below.
6. On Demand, Automatic Timer and M anual Release
a. Brew using On Demand:
1) PreVV³6WDUW´WREUHZFRIIHH
b. Brew using Automatic Timer:
1) Press ³Auto´6WDUWWLPHshould be displayed on LED screen.
2) ³$XWR On´ZLOOEHGLVSOD\HGDVwell as the scheduled brewing time.
3) To turn off the Automatic TimerSUHVV³$XWR´DJDLQRU³2Q2II´.
c. Brew using M anual Release:
1) Place either the Brazen carafe, a Chemex, a press pot or other open brewing container on the base of the
brewer. If using anything but the carafe, remove the brew basket and filter.
2) 3UHVV³0DQXDO5HOHDVH´<RXDUHLQ0DQXDO5HOHDVHPRGH DVLQGLFDWHGE\WKHORZHUOHIW³2Q´IODVKLQJ.
3) Press ³Start´ The Brewer will begin to heat DQG³7HPS´ZLOOVWDUWIODVKLQJDQGWKHDFWXDOWHPSHUDWXUH
will be shown.
4) When the programmed temperature is reached, the system will beep and maintain the brewing
temperature for 10 minutes. Press ³0DQXDO5elease´WRVWDUWWKHIORZRIZDWHU$Wimer on the LED
screen will display the elapsed time. Water is released at approximately 150 ml or 5 oz per 15 seconds.
*Note: The water can also be released before the systHPKDVUHDFKHGWHPSHUDWXUHE\SUHVVLQJ³0DQXDO
5HOHDVH´ Heaters will be turned off and the temperature will NOT be maintained.
5) Press ³0DQXDO5elease´ again to stop flow. The timer on LED screen will track how long the water flow
has been stopped.
6) Continue SUHVVLQJ³0DQXDO5HOHDVH´as needed until the reservoir is empty.
Brewing Process for On Demand and Automatic Timer
Once the ³6WDUW´RU³$XWR´EXWWRQKDVEHHQSUHVVHGthe following will occur:
1.
2.
3.
4.
³2Q´ZLOOVWDUWEOLQNLQJLQWKHXSSHUOHIWFRUQHURIWKH LED screen.
The heating elements will come on and heat the water to the brewing temperature you have programmed
Once the water reaches temperature, the Pre-Soak Cycle begins
During Pre-Soak, approximately a half cup of water will be released. The timer will count down Pre-Soak time
according to your settings.
5. After the Pre-Soak Cycle, programmed temperature will be displayed and water will be released in a staggered
fashion every 15 seconds until the reservoir is empty.
6. Once the reservoir is empty, three beeps will be heard indicating the brew cycle is finished and your coffee is
ready.
Cleaning and M aintenance
* * * * Caution: Always unplug the appliance before cleaning* * * *
1. Clean all detachable parts in hot, soapy water. *Never wash the steel carafe in the dishwasher, Hand-wash only.
2. Wipe down the exterior surface with a soft, damp cloth.
3. Use a damp cloth to gently wipe the base. Never use abrasive cleaner.
4. Water droplets may build up in the area above the brew basket and drip onto the base during brewing. To control
the dripping, wipe off the area with a clean, dry cloth after each use.
5. If flow is reduced or outlet seems clogged, clean the reservoir by partially filling with water and swirling around
spraying with a kitchen sink spray nozzle.
6. If the reservoir is not draining in under three minutes, you can run a cleaner through to remove mineral deposit
build-up from your water. Remove mineral deposits as Follows:
a. Fill the reservoir with water and a household coffee machine cleaner/descaler to the MAX level (the ratio of
water to descaler is 4:1, per the cleaner instructions).
b. Place carafe on base, lining up the center point of the carafe with that of filter basket.
c. Let the brewer sit for 24 hours.
d. Plug in the power cord DQGSUHVVWKH³Manual RHOHDVH´EXtton to empty all the water in the reservoir.
e. Rinse with clean water at least 3 times.
7. Calibrate your brewer every 6 months for optimum performance.
I mportant Tips for Great-Tasting Coffee
Coffee: The quality of the coffee used is directly related to the quality of the cup brewed in the Brazen Brewer. The
Brazen is, we believe, the finest brewer in existence but it can only deliver quality equal to the coffee itself. We highly
recommend buying freshly roasted (under 3 days old) whole bean coffee where possible and supply a list of artisan small
batch roasters who we feel deliver quality coffees.
Grind: Much like the quality of the bean, the degree to which you grind your coffee will affect the character of the cup. If
\RXILQG\RXUFRIIHHDOLWWOH³WKLQ,´ or weak, try grinding slightly finer to fit your preference. While the guidelines of
coffee grounds to water ratio are 8-10 Tablespoons per pot, you can adjust this to taste accordingly. If you are happy with
WKH³FXS,´WKDW is all that matters in the end.
Filters: The Brazen comes with a gold filter. This filter will tend to give your coffee more body and mouth feel. Paper
filters can also be used (in lieu of the gold filter) and will lend a more traditional body to your coffee. If using a paper
filter, you should use a slightly larger filter than you normally would for an 8 cup brewer. 10 cup basket style filters work
well. 12 cup filters are generally too tall to use. Paper filter should not be used together with the gold filter. Cloth filters
are generally not recommended as they can fall in and cause the coffee basket to overflow.
Water: Wherever possible use high quality filtered water. Tap water can carry flavors such as chlorine, salts and other
minerals found in your local water source. Tap water may require the user to run more frequent cleaning cycles as noted
in the ³&OHDQLQJDQGMaintenance´ section.
Pre-Soak: This cycle allows you to determine how long a portion of the brewing water should rest on the grounds prior to
the staggered release of the remaining water. We have found the fresher the roast, the longer the pre-soak should be. This
DOORZVIRUWKH³EORRP´WRULVHDQGIDOO2OGHUURDVWVGRQRWJHQHUDOO\UHTXLUHDVORQJRIDWLPH)UHVKURDVWVXQGHUGD\V
old may benefit from a pre-soak of 1 ½ minutes. Roasts over 5 days old may not need a pre-soak longer than 30 seconds.
Pre-ground coffee can accept the default setting of 15 seconds.
Cleaning: A clean coffee brewer is essential for making great-tasting coffee. Regularly clean the coffee brewer as
specified in the ³&OHDQLQJDQG0DLQWHQDQFH´ section.
Find Your Preferences: Coffees, and what they offer, are very much like any journey, each different and each offering a
different result. Experiment with your grind, brew temperature, pre-soak times and coffee. You may discover that you like
some coffees at a coarser grind brewed at a higher temperature and another one you like slightly finer and at a cooler
temperature. Define where you like each one best.
Troubleshooting Problem Explanation The display has gone dim The Brewer has gone into the Power Press any key to bring it out of this Saver mode. This is normal. mode. E1 ʹ E6 One of the sensors has broken. Contact Behmor Technical Support. E7 The reservoir went dry while heating. Turn the system off. Allow to cool for 5 minutes. Turn on, add water to the reservoir and try brewing again. My coffee basket over flowed Either a -‐ The carafe must be in place when brewing. a -‐ The carafe was not in place. or Solution b -‐ Use a less fine grind or less coffee. b -‐ The filter clogged. If using the metal filter, try a cloth or paper filter. During calibration the water boils over a minute. This is normal. N/A During calibration the lid bounces The lid should not be on during calibration. See Initial Set up and Cleaning ʹ item 4). You may be experiencing a reduction of flow out of the reservoir. See Cleaning and Maintenance. My coffee is sour This is a journey ʹ you have to experiment. Try grinding finer and/or brewing at a higher temperature. My coffee is bitter This is a journey ʹ you have to experiment. Try grinding coarser and/or brewing at a lower temperature. I cannot set my brewing temperature to 210 F. If you have entered an elevation of 1000 Feet or more, your brewing range is restricted because water boils at a lower temperature the higher you go. N/A around. At the end of my brewing cycle there is over 2 oz of water left in the reservoir. Read and Save All I nstructions
Limited Warranty
Brazen Brew System by Behmor I nc. 24 month Limited Warranty: Behmor Inc., warrants to the original owner of this product that the Brazen Brew System is free from
defects in material and workmanship for a period of 24 months from date of purchase, provided the Owner Registration Card has
been completed and returned to Behmor Inc., within thirty (30) days from the original purchase date and/or Owner Registration at
www.behmor.com has been completed online within (30) days from the original purchase date.
DI SCLAI M ER OF ALL OTHER WARRANTI ES ± 6$/(³$6,6´$1'³:,7+$//)$8/76´
(;&(37)257+(/,0,7('(;35(66:$55$17<6(7)257+$%29(7+(6$/(2)7+,6352'8&7,6³$6,6´$1'
³:,7+ $// )$8/76´ %(+025 ,1& ',6&/$,06 $// 27+(5 :$55$17,(6 (;35(66 25 ,03/,(' ,1&/8',1*
WITHOUT LIMITATION, WARRANTIES OF MERCHANTABILITY, FITNESS FOR A PARTICULAR PURPOSE, NONINFRINGEMENT AND TITLE.
,Q WKH HYHQW RI D EUHDFK RI WKH IRUHJRLQJ ZDUUDQW\ %HKPRU ,QF¶V REOLJDWLRQ ZLOO EH OLPLWHG WR UHSDLULQJ RU UHSODFLQJ )2%. the
location specified by Behmor, Inc., any part(s) of the product which is/are defective.
Such warranty will not apply to defects resulting from commercial use, tampering, cosmetic damage, acts of God, accidental breakage,
abuse, negligence, neglect or misuse. Alleged defects caused by the failure to properly maintain the Brazen Brew System as
referenced in the manual and/or Updates posted on the Behmor Inc. website located at www.behmor.com are not covered under the
limited warranty.
If you believe you have a warranty claim within the FI RST 30 days of the purchase date, please contact Behmor Inc. for a return
label, a return authorization or a new part(s) to replace the defective one(s).
If you believe you have a warranty claim after the first 30 days but within the 24 month warranty period, you must take following
actions:
1.
The machine must be packaged securely to protect from damage or breakage in shipment. You alone, not Behmor, Inc., are
responsible for any damage occurring in the shipping process. Behmor, Inc. highly recommends insuring the shipment in case
the shipping firm damages the Brazen brew system.
2.
Email Behmor, Inc. to obtain a Return Merchandise Authorization (RMA). Then ship prepaid to Behmor Inc., by the most
convenient method with the RMA clearly noted on the outside of the box. You must also include $25 for return shipping.
If you wish to have the product serviced after the 24-month warranty period, email Behmor, Inc. to obtain a RMA then ship prepaid to
Behmor, Inc. enclosing $169.00 plus $25 in US Dollars, for shipping, handling and insurance and Behmor Inc. will replace/repair your
machine and return it to you.
This warranty gives you specific legal rights. You may have other or additional rights, depending on the State or Country in which
you reside. Return of Owner Registration Card or on-line Owner Registration is not a condition precedent to warranty coverage.
Behmor Inc. will not be held liable for any special, incidental, or consequential damage, resulting from possession, use, or loss of use
of this product either directly or indirectly.
No returns will be accepted without prior authorization and company issued RMA number. To receive a Return Merchandise Authorization (RMA) email Customer Service at [email protected] for RMA instructions. Date of Purchase _____________________ Serial Number ______________________ The Brazen Brew System is intended for indoor (kitchen) household/residential use only. The Brazen Brew System is not intended to be used commercially or in any commercial/industrial setting. Any commercial use or attempted commercial use automatically voids any and all warranties. This warranty is non-‐transferable