1
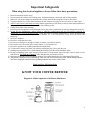
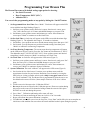
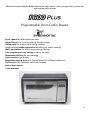
1 Important Safeguards When using this electrical appliance, always follow these basic precautions: 1. 2. 3. 4. 5. 6. 7. 8. 9. 10. 11. 12. 13. 14. 15. 16. 17. 18. Read all instructions before using. Do not operate the coffee brewer without water. Permanent damage could result and void the warranty. Make sure your outlet voltage corresponds to the voltage stated on the rating label of the coffee maker. To protect against fire, electric shock and injury do not immerse cord, plug, or brewer in water or other liquid. ADULT supervision is absolutely necessary and the responsibility of the user(s)/owner(s) when the Brazen Plus is being operated near children or in households with children present. Unplug from outlet before cleaning. Do not operate any appliance with a damaged cord or plug, after a malfunction or after any damage has occurred. Do not use any attachment(s), and/or item(s) or make any modifications that are not explicitly approved by Behmor Inc. in, on or to the Brazen Plus. Using such items or making modifications is strictly prohibited and automatically voids all warranties and relieves Behmor Inc. of any/all liabilities arising from such misuse and tampering. Do not use outdoors. Do not use with extension cords. Do not let cord hang over the edge of a table or counter, or touch hot surfaces. Do not place on or near a hot gas or electric burner, or in a heated oven. Do not use appliance for anything other than the intended use. To disconnect, remove plug from wall outlet by holding the plug. Never pull the cord. Scalding may occur if the cover is opened during the brewing cycles. Be careful around the steam. Do not put anything in the water reservoir except water or water based, approved coffee cleaners such as citric acid (Dezcal). Do NOT use Vinegar! Coffee should not be put into the reservoir. Some parts of appliance become hot during operation. Use caution when brewing or calibrating the Brazen Plus. This product is equipped with a grounded plug, which will only fit into a three-prong outlet. Do not attempt to disable this feature. Improper connection of the grounding conductor may result in electric shock. Read and Save All Instructions KNOW YOUR COFFEE BREWER Diagram A: Main Components of the Brazen Plus Brewer 2 Diagram B: Control Panel Mode Auto Set On/off Start Manual release Control Button Descriptions Mode button: Press this button once to set programmed brew start time, twice to set pre-soak time, three times to set brew temperature, four times to set the current clock and five times to calibrate the temperature. The “ ” and “ ” buttons are used to increase or decrease the mode settings. See specific instructions below for each mode. On/Off Button: At any point during operation, press button to cancel any/all procedures. Auto Button: Use to turn on and off the programmed brew start time. Manual Release Button: Use to enter the manual release mode, which allows the user to release the water into a pitcher, Chemex, or other container instead of the Brazen Plus carafe. To brew coffee in manual mode, the filter basket should be removed and allow the showerhead to dispense water directly into the designated container. Leaving the filter basket in place during manual mode can overfill the filter basket. “ ” and “ ” Buttons: Use to increase or decrease the time, the brew temperature and altitude. Set Button: When setting the programmed brew start time or current time, use the Set button to switching between Hour and Minute. Also used for switching between °F to °C when setting the brew temperature. Start Button: Use the Start button to begin the brewing cycles or Calibration. * Power Saving Sleep Cycle: The Brazen Plus is programmed with a Power Saving Sleep Cycle. After 5 minutes of inactivity the system will go into this mode and the screen will dim. Press any button to bring the brewer out of this mode. Initial Set Up and Cleaning 1. 2. 3. 4. 5. 6. 7. 8. Remove all packing materials. Check to ensure all parts and accessories are included and the brewer is not damaged. Wipe out stainless steel reservoir with a damp cloth. Add water (Filtered or bottled water is best) to the calibration fill line. Leave the reservoir lid OFF. Be sure the carafe and filter basket are in place. Plug the Brazen Plus Brewer into the power outlet. Program and Calibrate brewer (see following page) After calibration procedure is complete, fill the reservoir to maximum line (1.2L/ 8 Cup) and place reservoir lid over reservoir. 9. Press “Start” to run a brewing cycle of water only. This rinses the internal components before the first use. Be sure carafe and other items are in proper place(s). 10. Wash and rinse the removable components (filter basket, gold filter, carafe, and lid) with mild dishwashing detergent before the first use. 3 Programming Your Brazen Plus The Brazen Plus comes with default settings appropriate for brewing. Pre-Soak 15 seconds Brew Temperature 200° F (90° C) Altitude of 0 Ft. You can exit the programming modes at any point by hitting the “On/Off” button. 1. Set Programmed Brew Start Time: Press “Mode.” Clock time will appear on the LED screen with the hour digit blinking (Figure 1). a. Set Hour- press up/down arrows until hour is correct. Once hour is correct, press “Set”. Note: the time cycle is 12 hours and AM/PM changes as you pass 12:00. b. Set Minutes- press up/down arrows until minutes are correct. Once minutes are correct press “Mode” to continue to set Pre-Soak Time. 2. Set Pre-Soak Time: A clock time will appear on the LED screen with the minute digit blinking (Figure 2). The adjustable time range is 15 seconds to 4 minutes. a. Set Minutes - press up/down arrows to desired minute setting. Once done press “Set”. b. Set Seconds - press up/down arrows to desired seconds setting. Once done press “Mode” to continue to set Brewing Temperature. 3. Set Water Brewing Temperature: The current water brewing temperature will appear on the LED screen (Figure 3 and 4). Press the “Set” button to switch between °F and °C. The adjustable range is 190°F-210°F (88°C-99°C). Press up/down arrows until desired temperature is shown, then press “Mode” to continue to set Clock Time. 4. Set Clock Time: A clock time will appear on the LED screen (Figure 5). a. Set Hour- press up/down arrows until hour is correct. Once hour is ready press “Set”. Note: the time cycle is 12 hours and AM/PM changes as you pass 12:00. b. Set Minutes- press up/down arrows until minutes are correct. Once minutes are correct, press “Mode” to continue to System Calibration. 5. System Calibration: The word “calibrate” will appear on the LED screen (Figure 6). a. Set elevation in feet of the brewer’s location: press up/down arrows until the approximate elevation for your location. Determine your elevation by viewing the table below or visiting a weather website such as http://www.gpsies.com and select the “Find Coordinates” Tab. The Brazen Plus is programmed to allow the user to set the altitude to the nearest 250 feet. (Some sample elevations of US cities is below grid.) b. Fill the reservoir with water to the “Calibration fill line”. c. Do not put the reservoir lid on for this Calibration process. Please use caution during this process as the water will be heated to boiling without the reservoir lid in place. DO NOT move the unit during this process. d. Press “Start.” Calibration and heating of the water will start. e. The heaters will turn on and bring the water to a boil for 15 to 30 seconds. f. Beeps will indicate the system calibration is complete. g. Fill additional water in the reservoir to the 8 cup line. Press “Start” and let full cycle run to complete an initial rinse of the machine. Be sure to have the carafe and filter basket in place during this process. 4 Altitudes for Major Cities in North America (Rounded to 250 foot increments used for programming the Brazen Plus) Atlanta, GA – 876 ft. (750) Eugene, OR - 423 ft. (500) Philadelphia, PA - 203 ft. (250) Austin, TX - 548 ft. (500) Indianapolis, IN - 781 ft. (750) Portland, OR - 617 ft. (500) Boise, ID - 2651 ft. (2500) Kansas City, MO - 755 ft. (750) Reno, NV - 4534 ft. (4500) Boston, MA - 20 ft. (0) Lexington, KY - 997 ft. (1000) Washington DC - 75 ft. (0) Chicago, IL -620 ft. (750) Madison, WI - 922 ft. (1000) Edmonton, Canada - 2372 ft. (2250) Cleveland, OH - 689 ft. (750) Miami, FL - 7 ft. (0) Montreal, Canada - 118 ft. (0) Dallas, TX - 449 ft. (500) Minneapolis, MN - 853 ft. (750) Quebec, Canada - 240 ft (250) Dayton, OH -778 ft. (750) Nashville, TN - 489 ft. (500) Toronto, Canada - 253 ft. (250) Denver, CO - 5249 ft. (5250) Pittsburgh, PA - 1201 ft. (1250) Vancouver, Canada - 7 ft. (0) Brewing Instructions 1. Twist and remove the water reservoir top cover and fill with drinking water, always pouring from the side to avoid getting display screen wet (see Diagram C). The water level should not exceed 1.2L / 8 Cup level as marked inside the reservoir. The water reservoir has a maximum capacity of 8 Cups, 40oz or 1.2L. Labeled marking lines are as shown below: a. 1.2 L, 40 ounces or 8 5oz cups b. .9 L, 30 ounces, 6 5oz cups c. Calibration Fill Line .6L, 20 ounces, 4 5oz cups Replace and twist the reservoir cover into its locked position. ***Important Notes: o Do not put coffee or anything other than water into the reservoir. o Do not use hot water as it will adversely affect the water heating process. 2. Remove the filter basket, and place ground coffee into the filter. The provided permanent filter can be used or if you prefer brewing with a paper filter, remove the permanent filter from the filter basket and insert a paper filter. The recommended paper filter is a basket shaped 10 cup filter. Bunn sells a paper filter that fits well. DO NOT brew using a paper filter placed inside the permanent filter as this will slow the water flow and could overflow filter basket. 5 A full pot of brewed coffee in the Brazen Plus requires up to 16 Tablespoons of ground coffee (60-70 grams or 2 oz). If the Brazen Plus permanent filter is being used, finely ground coffee is not recommended as it may clog the filter. A standard drip ground coffee grind setting is recommended for use in the Brazen Plus brewer. For other levels of brewed coffee, see the SCAA Gold Cup Ratio grid on page 9. Adjust the water and coffee amounts based on your taste preference. 3. Place the filter into the filter basket, and slide into place. You will hear a slight clicking when it locks in position. 4. Set stainless steel carafe on base ensuring it is directly under the filter basket and raises the filter basket valve. If the carafe isn’t positioned properly under the filter basket valve, brewed coffee may not flow into the carafe properly and back up water in the filter basket. 5. Make sure the program settings are set to your preference (Water temperature, Pre-soak time). Proceed with brewing using one of three options described below. On Demand, Programmed Brew Start Time, and Manual Release a. Brew using On Demand: Press “Start” to brew coffee. Coffee brewing will begin when Start button pushed. The heater will heat the water to the designated temperature before beginning the Pre-Soak and brewing steps. Note that Pre-Soak will release approximately 4oz of water first to wet the coffee grounds before actual brewing begins based on the Pre-Soak setting. During brewing, water will be pulsed and released every 15 seconds to create turbulence and help improve extraction from the coffee grounds. Once the reservoir is empty, three beeps will be heard indicating the brew cycle is finished and coffee is ready to enjoy. b. Brew using Programmed Brew Start Time: 1) Set the time you’d like the coffee maker to brew at. (See P.5 for further guidance on setting time.) 2) Press “Auto.” Start time should be displayed on LED screen. 3) “Auto On” will be displayed, as well as the scheduled brewing time. Coffee will be brewed at your specified, programmed time. 4) To turn off the Automatic Timer, press “Auto” again or “On/Off”. c. Brew using Manual Release: Note that the Manual Release approach to brewing requires monitoring during brewing to ensure that the water flow and temperature are as intended It is highly recommended to remove the filter basket for Manual Release brewing to avoid any backing up of water in the filter basket beyond its capacity. Manual Release brewing is primarily used for brewing into other containers than a Brazen Plus carafe. 1) Place a Chemex glass carafe, a French press or other open brewing container on the base of the brewer. 2) Press the “Manual Release” button. The Brazen Plus display will indicate “On” flashing. 3) Press “Start.” The Brewer will begin to heat and “Temp” will start flashing and the actual current temperature of the water in the reservoir will be shown in the display. 4) When the programmed temperature is reached, the system will beep and maintain the brewing temperature for 10 minutes. Press “Manual Release” to start the flow of water. A timer on the LED screen will display the elapsed time. Water is released at approximately 150 ml or 5 oz. per 15 seconds. Pressing the “Manual Release” button will start and stop the flow when pressed in Manual Release brewing mode. The timer on LED screen will track the water flow. 5) Continue pressing “Manual Release” as needed until all of the water has been released from the water reservoir. 6 Cleaning and Maintenance **** Caution: Always unplug the appliance before cleaning**** 1. Clean all detachable parts in hot, soapy water. 2. Never wash the steel carafe in the dishwasher, Hand-wash only. 3. Wipe down the exterior surface with a soft, damp cloth. Never use abrasive cleaner. 4. Remove the filter basket and use a clean cloth to wipe off the spray head area above where the filter basket sits. 5. It is recommended to run a coffee maker cleaner such as citric acid (Dezcal) through your brewer at a minimum on a quarterly basis, sooner if chalky residue from minerals forms in your reservoir. Do NOT use Vinegar! 6. If flow is reduced or outlet seems clogged, clean the reservoir with a coffee machine cleaner or descaling product following the manufacturer’s instructions for product. 7. Calibrate brewer every 6 months for optimum performance. Important Tips for Great-Tasting Coffee Coffee: The quality of the coffee and water used is directly related to the quality of the coffee brewed. We highly recommend using freshly ground coffee or commercially packed coffee that is sealed for freshness. The proper amount of ground coffee and water is critical to the finished brew. A ratio of 2 Tablespoons of coffee for every 6 oz. of water is recommended. See SCAA’s Gold Cup Ratio on Page 9 for various quantities of water and coffee. Grind: Grind consistency is one of the most overlooked requirements for a great cup of coffee. It is recommended you use the drip coffeemaker grind coarseness in your brewer. Freshly grinding your coffee before brewing can also help brew a great tasting cup of coffee. Filters: The Brazen Plus comes with a permanent filter included. This filter will tend to give the brewed coffee more body and mouth feel. Paper filters can also be used, which will give your coffee a cleaner taste. For paper filters, a 10 cup size basket filter is recommended. Bunn’s 10 cup paper filter is the proper size and height. Paper filter should not be used together with the permanent filter. Water: Coffee is over 98% water. Wherever possible use high quality filtered or bottled water. Regular unfiltered tap water can impart flavors such as chlorine, salts and other minerals to your finished cup. Tap water with high mineral content WILL also require the user to perform more frequent cleaning cycles as noted in the “Cleaning and Maintenance” section and should be avoided. Pre-Soak: This cycle allows the user to determine how long a pre-soak portion of the brewing water should rest on the grounds prior to the staggered release of the remaining water. The fresher the roast, the longer the pre-soak should be. This allows for the “bloom” or degassing of fresh coffee to dissipate before full the brewing cycle. Less fresh roasts do not generally require as long of a pre-soak time. Fresh roasts under 3 days old may benefit from a pre-soak of 1 ½ minutes. Pre-ground coffee or coffee without a roast date can use a shorter or no pre-soak time. Cleaning: A clean coffee brewer is essential for making great-tasting coffee. Regularly clean the coffee brewer as directed in the “Cleaning and Maintenance” section. Do NOT use Vinegar Find Your Preferences: Coffee offers many flavor elements. Coffee origins have different flavor characteristics and roast profiles, the freshness of the roast date, water temperature, and pre-soak time are just a few of the attributes that go in to the flavor of a brewed cup of coffee. It’s a journey, each offering a different result. Experiment with the grind, brew temperature, pre-soak times and the coffee itself. With the capabilities of the Brazen Plus brewer and your preferences, you will enjoy coffee at a whole new level not experienced at home before! 7 To Brew Gold Cup Coffee The Specialty Coffee Association of America (SCAA) Golden Cup brewing fundamentals provide guidance to brew a great cup of coffee. These brewing fundamentals include the proper coffee grind, water, brewing time, brewing temperature, and coffee dose. With the Brazen Plus brewer and the ability to set your brewing water temperature, SCAA recommends brewing at the 204F setting or above for Gold Cup brewing. Below is a grid of the recommended ground coffee dosage for various volumes of brewed coffee. In its simplest form, Gold Cup ratio is 2 tablespoons of coffee for each 6 ounces of coffee brewed. Read, Follow and Save These Instructions 8 Troubleshooting Problem Explanation Solution The display has gone dim The Brewer has gone into the Power Saver mode. This is normal. Press any key to bring it out of this mode. E0 – E6 One of the sensors has broken. Contact Behmor Technical Support. www.behmor.com or call 855 9BEHMOR E7 The reservoir went dry while heating. Turn the system off. Allow to cool for 5 minutes. Turn on, add water to the reservoir and try brewing again. Coffee basket over flowed The carafe was not in place under the filter basket properly. The carafe must be directly underneath the filter basket and the release valve lifted slightly by the top of the carafe. A permanent filter and paper filter were used together Use a courser ground coffee. Coffee was ground too fine and water flow impeded. Use only a permanent filter or paper filter; not both at once. Reservoir filter clogged. Check and clean the filter at the bottom of the water reservoir. During calibration the water boils over a minute. This is normal. N/A During calibration the lid bounces around. The lid should not be on during calibration. See Initial Set up and Cleaning – item 4). At the end of brewing cycle there is over 2 oz of water left in the reservoir. You may be experiencing a reduction of flow out of the reservoir. Brewer has mineral build up. See Cleaning and Maintenance. My coffee is sour This is a journey – you have to experiment. Try grinding finer and/or brewing at a higher temperature. My coffee is bitter This is a journey – you have to experiment. Try grinding coarser and/or brewing at a lower temperature. I cannot set my brewing temperature to 210 F. If you have entered an elevation of 1000 Feet or more, your brewing range is restricted because water boils at a lower temperature the higher you go. Calibrate your Brazen Plus brewer based on your elevation. Note what the brewer displays as the temperature for boiling water during this process. You will not be able to set a temperature higher than this for brewing coffee. 9 Limited Warranty Brazen Plus Brew System by Behmor Inc. 24 month Limited Warranty: Boyd’s Coffee warrants to the original purchaser of this product that the Brazen Plus Brew System is free from defects in material and workmanship for a period of 24 months from date of purchase, provided the Owner has original proof of purchase. Boyd’s Coffee is the Master Distributor for North America on behalf of Behmor, Inc. DISCLAIMER OF ALL OTHER WARRANTIES – SALE “AS IS” AND “WITH ALL FAULTS” EXCEPT FOR THE LIMITED EXPRESS WARRANTY SET FORTH ABOVE, THE SALE OF THIS PRODUCT IS “AS IS” AND “WITH ALL FAULTS.” BOYD’S DISCLAIMS ALL OTHER WARRANTIES EXPRESS OR IMPLIED INCLUDING, WITHOUT LIMITATION, WARRANTIES OF MERCHANTABILITY, AND FITNESS FOR A PARTICULAR PURPOSE, NON-INFRINGEMENT AND TITLE. In the event of a breach of the foregoing warranty, Boyd’s obligation will be limited to repairing or replacing, F.O.B. any part(s) of the product which is/are defective. Such warranty will not apply to defects resulting from commercial use, tampering, cosmetic damage, acts of God, accidental breakage, abuse, negligence, neglect or misuse, modification, alteration or repair not authorized by Boyd’s. If you choose to have someone other than an authorized service center service your brewer, THIS WARRANTY WILL AUTOMATICALLY BECOME NULL AND VOID. Alleged defects caused by the failure to properly maintain the Brazen Brew System as referenced in the manual are not covered under the limited warranty. If you believe you have a warranty claim within the first 24 months of the purchase date, please contact Boyd’s for a return authorization or a new part(s) to replace the defective one(s). To make a warranty claim, do not return this appliance to the store purchased at. 1. Contact Boyd’s via email at [email protected] or via phone at 1 - 855 – 9BEHMOR to obtain a Return Merchandise Authorization (RMA). Additional information can be found at www.behmor.com also. 2. Once RMA is received, ship prepaid to Boyd’s Coffee, 19730 NE Sandy Blvd, Portland, OR 97230 Attention: Behmor Warranty, by the most convenient method with the RMA clearly marked on the outside of the box. The machine must be packaged securely to protect from damage or breakage in shipment. Boyd’s highly recommends insuring the shipment for loss or damage en route. A copy of the original Proof of purchase must be included to process a warranty claim. This warranty gives you specific legal rights. You may have other or additional rights, depending on the State or Country in which you reside. Boyd’s will not be held liable for any special, incidental, or consequential damage, resulting from possession, use, or loss of use of this product either directly or indirectly. No returns will be accepted without prior authorization and company issued RMA number. KEEP ORIGINAL SALES RECEIPT AS PROOF OF PURCHASE FOR WARRANTY PURPOSES. WARRANTY IS VALID ONLY WITH THE ORIGINAL PROOF OF PURCHASE RECEIPT The Brazen Plus Brew System is intended for indoor (kitchen) household/residential use only. The Brazen Plus Brew System is not intended to be used commercially or in any commercial/industrial setting. Any commercial use or attempted commercial use automatically voids any and all warranties. This warranty is non-transferable 10 Thank you for purchasing the Behmor Brazen Plus coffee brewer. Since you enjoy coffee, you may also enjoy roasting coffee at home. Programmable Drum Coffee Roaster Up to 1 pound of coffee beans per roast Lighted interior for visual monitoring during roasting Cooling cycle for better control during roasting Patent pending smoke suppression technology for indoor roasting Multi-speed motor for better control during roasting 5 pre-programmed roast settings or adjust manually Removable chaff tray for easy cleaning Easy to read and use display Removable roasting drum with internal braces for full bean turbulence Chaff tray and fan separates chaff from the bean Easy to clean interior 1 year warranty 11 www.behmor.com 855-9BEHMOR (855-923-4667) 12