1
LIMITATIONS: A maximum of six (6) smoke alarms of model
(7109CS/CSX & 7139CS/CSX or models with the relay option (F, HF,
TF) may be tandem interconnected. Do not exceed 1125 feet
between first and last smoke alarm.
Wire used for interconnecting shall be in accordance with the
latest edition of article 760 of the National Electrical Code (NEC),
and NFPA 70, and must not exceed a resistance of 10 ohms.
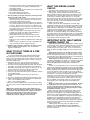
Figure 11
Figure 9
MOUNTING: PLATE & SMOKE
ALARM (7109LS/7139LS only)
LINE CORD MODEL
1. Run a minimum of 16 gauge, 3-conductor cable, plus ground
(4 wires) to the first junction box from a power supply and
between all smoke alarms that are to be connected together.
Use U.L. listed Class 1 wire.
2. Make wire connections to the supplied plug-in connector as
follows: black to black, white to white, 3rd conductor to the
red-yellow wire. The red-yellow wire should be stripped to
make this connection. Connect ground wire between metal
outlet boxes.
NOTES ON TANDEM INTERCONNECTING MODELS
DO NOT connect Gentex Smoke Alarms to other
manufacturers' smoke alarms.
No more than 12 Gentex models 9120/9123, 9120T/9123T,
and 9120H/9123H may be connected in tandem.
No more than 6 Gentex models 7109CS/CSX &
7139CS/CSX, 9120F/9123F, 9120HF/9123HF, and
9120F/9123TF may be connected in tandem.
All units connected in tandem MUST get their power from the
same circuit, that is, all smoke alarms in tandem must be
controlled by the same fuse or circuit breaker.
After installation to verify proper working conditions all horns
must sound in this system.
IMPORTANT WARNING: Failure to observe any of the
conditions set forth may cause system malfunction and damage to
the smoke alarm.
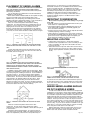
Figure 12
The 7109LS/7139LS is supplied with a 9 foot line cord for
installation to a normal outlet box. For this type of installation:
1. Care should be taken to lace cord through slots in base as shown
in Figure 12 to insure cord does not interfere with engagement of
the mounting bracket.
2. Determine proper location for smoke alarm above a receptacle
that is NOT CONTROLLED BY AN "ON-OFF" SWITCH.
3. If screw anchors are used, drill two 3/16" holes, insert the screw
anchors, and mount the plate to wall using screws.
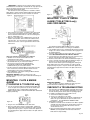
4. Mount the smoke alarm to the bracket as illustrated in Figure 13.
5. Use the enclosed cord retainer clamp as illustrated in Figure 12
to insure the unit is not accidentally disconnected.
Place the smoke alarm up to the mounting plate, rotating it to
about 10:00 o'clock then rotate it clockwise to 12:00. It should
"snap-lock" firmly into place. Keep the smoke alarm parallel to the
mounting plate so upper and lower tabs on the plate seat into the
smoke alarm.
MOUNTING: PLATE & SMOKE
ALARM
(7109CS/CSX & 7139CS/CSX only)
Figure 13
1. Lace the connector through the provided mounting plate and
secure the plate to the junction box so that the smoke alarm
snap-in tabs are in the vertical position if wall mounted.
NOTE: Mounting plate is marked "THIS SIDE OUT" and slotted
for proper positioning.
CHECKOUT & TROUBLESHOOTING
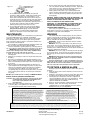
Figure 10
2. Plug the wire connector into the smoke alarm base.
3. Place the smoke alarm up to the mounting plate, rotating it to
about 10:00 o'clock then rotate it clockwise to 12:00. It should
"snap-lock" firmly into place. Keep the smoke alarm parallel to
the mounting plate so upper and lower tabs on the plate seat into
the device.
IMPORTANT WARNING:
Failure to observe any of the conditions set forth may cause
system malfunction and damage to the smoke alarm.
1. Turn test knob to the NORMAL position and supply house power
to the smoke alarm. The red indicator should flash every 15-30
seconds, showing that the smoke alarm is operating properly.
2. If red light is not flashing or the green LED is not on:
a. Check that the battery is installed.
b. Check to see if the plug is in the outlet.
c. If the power and wiring check out, but the red light does not
flash or the green LED is still off, return the device to the
manufacturer. See TO RETURN A SMOKE ALARM.
3. Testing with the Test Knob:
a. Rotate the test knob counter-clockwise to the TEST 1 position
and wait up to 20 seconds for the smoke alarm to sound. If
the device does not sound after 20 seconds, return the
smoke alarm for service.
b. After successfully testing smoke alarm, return test knob to
NORMAL (non-test) position and wait 20 seconds for the
smoke alarm to stop sounding.
Pg. 7-5