1
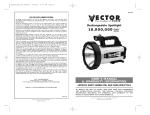
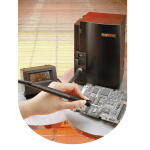
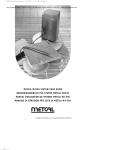
HSK176 MANUAL ENGLISH 2-11-05
11/2/05
2:34 PM
Page 8
HSK176
HUSKY ONE YEAR LIMITED WARRANTY PROGRAM
This Husky Power Product is warranted by Home Depot, to the original purchaser only, to be free of defects
in materials and workmanship for one year from the date of purchase without additional charge. If you
believe that this unit is defective during its original one-year warranty period, return the unit with proper
proof of purchase to the Home Depot store, or you may send the product to Husky Power Products at the
address below.
The warranty does not extend to subsequent purchasers or users. Husky Power Products will not be
responsible for any amount of damage in excess of the retail purchase price of the product under any
circumstances. Incidental and consequential damages are specifically excluded from coverage under this
warranty.
This product is not intended for commercial use. This warranty does not apply to accessories or damage to
units from misuse or incorrect installation/connection. Misuse includes wiring or connecting to improper
polarity power sources.
RETURN/REPAIR POLICY: Defective products, other than accessories, may be returned to Husky Power
Products Any defective product, other than accessories, that is returned to Husky Power Products within 30
days of the date of purchase will be replaced free of charge. If such a product is returned more than 30 days
but less than one year after the purchase date, Husky Power Products will repair the unit or, at its option,
replace it free of charge.
If the unit is repaired, new or reconditioned replacement parts may be used, at Husky Power Product’s
option. A unit may be replaced with a new or reconditioned unit of the same or comparable design. The
repaired or replaced unit will then be warranted under these terms for the remainder of the warranty
period. The customer is responsible for the shipping charges on all returned items after 30 days. During the
warranty period, Husky Power Products will be responsible for the return shipping charges.
LIMITATIONS: This warranty does not cover accessories, bulbs, fuses and batteries, defects resulting from
normal wear and tear (including chips, scratches, abrasions, discoloration or fading due to usage or
exposure to sunlight), accidents, damage during shipping to our service facility, alterations, unauthorized
use or repair, neglect, misuse, abuse, failure to follow instructions for care and maintenance, fire, flood
and Acts of God.
If your problem is not covered by this warranty, call our Technical Support Department toll free at (800) 9167004. for general repair information and charges, if applicable.
STATE LAW RIGHTS: This warranty gives the purchaser specific legal rights; other rights, which vary from
state to state, may apply. Some states do not allow limitations on how long an implied warranty lasts or the
exclusion or limitation of incidental or consequential damages, so the exclusions or limitations stated herein
may not apply.
TO REQUEST WARRANTY SERVICE FOR THIS PRODUCT: Contact Husky Power Products Technical Support
by telephone, fax or mail. We suggest that you keep the original packaging in case you need to ship the
unit. When returning a product, include your name, address, phone number, dated sales receipt (or copy)
and a description of the reason for return and product serial number. After repairing or replacing the unit,
we will make every effort to return it to you within four weeks.
WARRANTY ACTIVATION: Please complete Warranty Activation Card and mail to Husky Power Products.
Enter “HSK176” as Model and “2.25 Million Power Series™ Rechargeable Spotlight” as Product Type. All
Husky Power Product products must be registered within 30 days of purchase to activate this warranty. Mail
the completed registration form, along with a copy of the original sales receipt to:
2.25 Million Power Series™
Rechargeable Spotlight
Cordless • Rechargeable
USER’S MANUAL
& WARRANTY INFORMATION
ATTN.: CUSTOMER SERVICE / HUSKY POWER PRODUCTS
4140 SW 30th Avenue, Ft. Lauderdale, FL 33312
• TOLL FREE: (800) 916-7004 •
IMPORTANT SAFETY INFORMATION, SAVE THESE INSTRUCTIONS
WARRANTY IS NON-TRANSFERABLE AND NON-REFUNDABLE
TO REDUCE THE RISK OF INJURY, USER MUST READ AND UNDERSTAND
THIS INSTRUCTIONAL MANUAL. THIS MANUAL CONTAINS IMPORTANT
INFORMATION REGARDING THE OPERATION AND WARRANTY OF THIS
PRODUCT. PLEASE RETAIN FOR FUTURE REFERENCE.
BD062205
© 2005 VECTOR MANUFACTURING
MADE IN CHINA
8
4140 S.W. 30th Ave., Ft. Lauderdale, FL 33312
Toll Free: (800) 916-7004
HSK176 MANUAL ENGLISH 2-11-05
11/2/05
2:34 PM
Page ii
IMPORTANT SAFETY INFORMATION
1. Although the HUSKY 2.25 Power Series Cordless Rechargeable
Spotlight can be recharged using either AC or DC power sources, it is not
designed to operate directly from the supplied AC recharge adapter. Doing so
may result in damage to the unit, and will also void the warranty.
2. You CAN CHARGE and OPERATE the Spotlight directly from the supplied DC
adapter (recharge/power adapter).
3. Do not use charging systems other than those supplied by the manufacturer.
4. Do not leave the Spotlight charging for more than 24 hours (AC method) or
6 hours (DC Method).
5. Do not completely discharge the battery before recharging. Deep discharge will
decrease battery life.
6. Recharge the battery in a well ventilated area.
7. Never look directly into the light.
8. Use caution when handling the light as the lens becomes hot during use.
9. Store with Spotlight turned OFF and trigger lock ON.
10. Store with area light in handle turned OFF.
11. Do not operate Spotlight with lens against flammable materials.
12. Keep Spotlight away from children; it is not a toy.
WARNING
RISK OF FIRE OR ELECTRIC SHOCK: Do not plug in a detachable power supply
without bulb lens.
GENERAL PRECAUTIONS
• All halogen lights give off heat. Never place the light face down on
any surface when lit.
• Never look directly into light or shine the light into another person’s
eyes.
• Replace bulb with type indicated in specifications or a 12 volt H3
quartz halogen bulb.
• Do not immerse this spotlight in water.
• Use in a dry location only.
Read This User’s Manual Before Using This Unit.
SAVE THESE INSTRUCTIONS
ii
iii
HSK176 MANUAL ENGLISH 2-11-05
11/2/05
2:34 PM
Page iv
TABLE OF CONTENTS
Introduction . . . . . . . . . . . . . . . . . . .
Features . . . . . . . . . . . . . . . . . . . . .
AC and DC Charging/Recharging . . .
Checking Battery Charge Status . . .
120 Volt AC Charging . . . . . . . . .
12 Volt DC Charging . . . . . . . . . .
Operating Instructions . . . . . . . . . . . .
Using the Spotlight . . . . . . . . . . . .
Using the Auxiliary LED Area Lights
Hands-Free Operation . . . . . . . . . .
Care and Maintenance . . . . . . . . . . .
Replacement Parts . . . . . . . . . . . .
Spotlight Bulb Replacement . . . . . .
Fuse Replacement . . . . . . . . . . . . .
Battery Disposal . . . . . . . . . . . . . .
Specifications . . . . . . . . . . . . . . . . . .
.
.
.
.
.
.
.
.
.
.
.
.
.
.
.
.
.
.
.
.
.
.
.
.
.
.
.
.
.
.
.
.
.
.
.
.
.
.
.
.
.
.
.
.
.
.
.
.
.
.
.
.
.
.
.
.
.
.
.
.
.
.
.
.
.
.
.
.
.
.
.
.
.
.
.
.
.
.
.
.
.
.
.
.
.
.
.
.
.
.
.
.
.
.
.
.
.
.
.
.
.
.
.
.
.
.
.
.
.
.
.
.
.
.
.
.
.
.
.
.
.
.
.
.
.
.
.
.
.
.
.
.
.
.
.
.
.
.
.
.
.
.
.
.
.
.
.
.
.
.
.
.
.
.
.
.
.
.
.
.
.
.
.
.
.
.
.
.
.
.
.
.
.
.
.
.
.
.
.
.
.
.
.
.
.
.
.
.
.
.
.
.
.
.
.
.
.
.
.
.
.
.
.
.
.
.
.
.
.
.
.
.
.
.
.
.
.
.
.
.
.
.
.
.
.
.
.
.
.
.
.
.
.
.
.
.
.
.
.
.
.
.
.
.
.
.
.
.
.
.
.
.
.
.
.
.
.
.
.
.
.
.
.
.
.
.
.
.
.
.
.
.
.
.
.
.
.
.
.
.
.
.
.
.
.
.
.
.
.
.
.
.
.
.
.
.
.
.
.
.
.
.
.
.
.
.
.
.
.
.
.
.
.
.
.
.
.
.
.
.
.
.
.
.
.
.
.
.
.
.
.
.
.
.
.
.
.
.
.
.
.
.
.
.
.
.
.
.
.
.
.
.
.
.
.
.
.
.
.
.
.
.
.
.
.
.
.
.
.
.
.
.
.
.
.
.
.
.
.
.
.
.
.
.
.
.
.
.
.
.
.
.
.
.
.
.
.
.
.
.
.
.
.
.
.
.
.
.
.
.
.
.
.
.
.
.
.
.
.
.
.
.
.
.
.
.
.
.
.
.
.
.
.
.
.
.
.
.
.
.
.
.
.
.
.
.
.
.
.
.
.
.
.
.
.
.
.
.
.
.
.
.
.
.
.
.
.
.
.
.
.
.
.
.
.
.
.
.
.
.
.
.
.
.
.
.
.
.
.
.
.
.
.
.
.
.
.
.
.
.
.
.
.
.
.
.
.
.
.
.
.
.
1
1
2
3
3
3
3
3
3
3
4
4
4
6
6
6
INTRODUCTION
Thank you for purchasing the HUSKY 2.25 Million Power Series™ Cordless
Rechargeable Spotlight, with a powerful quartz halogen spotlight and two LED
area lights that provide up to 35 hours of continuous use. Please read this guide
carefully to ensure optimum performance and to avoid damage to the unit.
FEATURES
• The tough, weatherproof HSK176 is built for rugged, outdoor use
• Powerful quartz halogen bulb illuminates up to one mile and easily penetrates rain,
fog or smoke with 10 times the power of an automobile headlight
• Two long-life auxiliary LED area lights that provide up to 35 hours of continuous use
• Computer-designed parabolic reflector
• Cordless operation allows complete freedom of movement
• Engineered to be easy to operate without sacrificing light intensity
• Pistol grip handle design fits comfortably in the hand
• Locking trigger ON/OFF switch delivers an instant beam, locks for continuous
beam
• 3-LED Battery Status Indicator
• May be charged from either 120 volt AC power source (using the built-in AC
charger) or 12 volt DC power source (charging adapter included)
iv
1
HSK176 MANUAL ENGLISH 2-11-05
11/2/05
2:34 PM
Page 2
12 Volt DC Charging
Figure 1
QUARTZ
HALOGEN
BEAM
SPOTLIGHT
BUILT-IN CARRY
HANDLE/
WORKSTAND
Plug the supplied 12 Volt DC Charging Adapter into the 12 Volt DC Recharge Port,
located at the bottom of the pistol grip handle (see Figure 1).
12 VOLT
RECHARGE PORT
TRIGGER
LOCK
SWITCH
AUXILIARY
LED AREA
LIGHTS
12 VOLT DC
RECHARGE PORT
TRIGGER
Insert the power plug into the accessory outlet of your vehicle or other 12 volt DC
power source. Charge until the green Battery Charge Indicator LED lights indicating
the unit is fully charged.
Note:
CARRY LANYARD
PISTOL GRIP HANDLE
Some vehicles must have the ignition turned on to power the vehicle’s
accessory outlet.
WARNING
Do not recharge for more than 6 hours maximum using the 12 volt
DC method.
Figure 2
3-LED BATTERY
STATUS INDICATOR
AUXILIARY
LED AREA LIGHT
POWER BUTTON
OPERATING INSTRUCTIONS
Using the Spotlight
BUILT-IN 120 VOLT
AC CHARGER
AC AND DC CHARGING/RECHARGING
Checking Battery Charge Status
Pressing the Auxiliary LED Area Light Power Button turns on the Battery Status Panel
LEDs. Recharge the unit when the red LED (only) is lit.
120 Volt AC Charging
To recharge, plug a standard 120 volt household extension cord into the 120 volt
AC charger on the back of the unit (see Figure 2). Charge until the green Battery
Charge Indicator LED lights indicating the unit is fully charged.
The Spotlight is controlled by the Trigger on the top front of the pistol grip (see
Figure 1). Squeezing the Trigger turns the Spotlight ON; releasing the Trigger turns
the Spotlight OFF.
For continuous operation, use the Trigger Lock Switch. Simply squeeze the Trigger
and firmly slide the Trigger Lock Switch located on the side of the handle into the
“locked” position. The Spotlight will remain ON until the Trigger Lock Switch is
returned to the “unlocked” position.
Using the Auxiliary LED Area Lights
The LED area lights provide up to 35 hours of continuous utility lighting and are ideal
for:
• for roadside repairs
• for work areas
• for campsites
• for power outages
• for general use as a flashlight, etc.
The ON/OFF button for the area lights is located at the back of the unit below the
battery charge LEDs. Pressing this button toggles the LED area lights between ON and
OFF.
Hands-Free Operation
HOUSEHOLD EXTENSION CORD
(NOT INCLUDED)
WARNING
Do not recharge for more than 24 hours maximum using the 120 volt
AC method.
2
Using the Built-In Carry Lanyard
The carry lanyard may be used to suspend the spotlight from a branch, hook or
other convenient object. Adjust the slide on the cords to keep the lanyard secure
around the supporting object.
3
HSK176 MANUAL ENGLISH 2-11-05
11/2/05
2:34 PM
Page 4
Using the Built-In Carry Handle/Workstand
Turn the spotlight upside-down, and rest it on the built-in carry handle/workstand.
The spotlight and/or area utility light may now be used hands-free.
BUILT-IN CARRY
HANDLE/
WORKSTAND
15. Replace the rubber "O" ring in the groove around the perimeter of the
reflector.
16. Replace glass and retaining ring so that the screw holes are aligned.
17. Secure retaining ring with two screws.
18. Replace rubber bezel by sliding forward to the front of the spotlight.
19. Operate switch to ensure proper operation of spotlight.
Figure 3A
CARRY
LANYARD
RUBBER
BEZEL
PHILLIPS HEAD
SCREWS
LENS
O-RING
REFLECTOR
™
T
SPORTleSPO
Power
ULTRA
,000 Cand
Ltd.
MANUFACTURING,
2,000
CARE AND MAINTENANCE
Replacement Parts
For replacement parts (bulbs, fuses, adapters, etc.), contact Customer Service toll free
at (800) 916-7004. There are no user serviceable parts inside this unit except the
bulb.
Spotlight Bulb Replacement
To replace the H3 type 12 volt bulb, you will need a small Phillips type screwdriver
and a replacement bulb. Bulb life can be shortened by installing a bulb with dirt or
fingerprints on it. The bulb can be wiped clean with a cloth moistened with alcohol.
During bulb installation, avoid touching the glass part of the bulb. (See Figures 3A
and 3B for details.)
1. Disconnect the unit from any charging adapter.
2. Push back the rubber bezel toward the back of the spotlight to reveal two small
Phillips screws in the retaining ring.
3. Using the screwdriver, remove (counterclockwise) the two screws. Set them aside.
4. Lift off the retaining ring, glass lens and rubber "O" ring and set them aside.
5. Carefully remove the reflector and bulb assembly.
6. Disconnect the bulb wire from the red power wire.
7. Unsnap the hairpin retaining wires from the reflector's flange.
8. Using the screwdriver, loosen the retaining screw to remove the bulb from the
reflector (no need to completely remove this screw).
9. Lift out the bulb and the attached wire and set the burned-out bulb aside.
10. Insert the replacement bulb into the reflector's flange.
11. Put back and secure the hairpin retaining wires.
12. Connect the bulb power wire to the red power wire.
13. Tighten the retaining screw on the flange.
14. Place the reflector in position in the body of the spotlight.
4
Figure 3B
METAL PRONGS
BULB
PHILLIPS
HEAD
SCREW
REFLECTOR
DC Charging Adapter Fuse Replacement
The plug of the DC Charging Adapter is equipped with an 8 amp cartridge fuse. If
this fuse blows, there may be a short circuit in the power cord or lamp assembly. The
fuse will blow if the battery is connected with reverse polarity. The fuse is accessed
by unscrewing (counterclockwise) the tip of the large DC plug. Check the fuse with
an ohmmeter or other continuity checker. If the fuse is open, investigate why it blew
5
HSK176 MANUAL ENGLISH 2-11-05
11/2/05
2:34 PM
Page 6
and correct the problem before replacing the fuse. Reassemble the DC plug and
power the lamp from a 8 amp or greater 12 volt power supply.
Fuse Replacement (DC Accessory Adapter)
1. Remove plug from accessory outlet. Remove the gold cap by turning counterclockwise and lifting off.
2. Remove center pin and spring. Remove fuse.
3. Replace fuse with same type and size fuse (8 amp).
4. Replace center pin and spring inside plug.
5. Replace gold cap by turning clockwise.
Battery Disposal
Non-spillable sealed lead-acid battery — This battery is fully
recyclable and should be accepted at any location that accepts
common automotive starter batteries. Examples of places that accept
these batteries are: county or municipal recycling drop-off centers,
scrap metal dealers, and retailers who sell automotive replacement
lead acid starter batteries. For more information on recycling this
recycling this battery, call toll-free (877) 288-7722.
WARNING
Before disposing of the battery, protect exposed terminals with
heavy-duty tape to prevent shorting. (Shorting can result in injury
or fire.)
Do not expose battery to fire or intense heat as it may explode.
SPECIFICATIONS
AC Charger:
120 volt
Halogen bulb size:
H3 Type 12 Volt
Fuse:
8 amp cartridge fuse
6
7