1
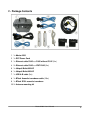
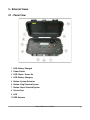
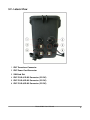
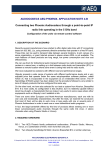
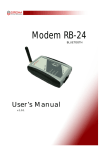
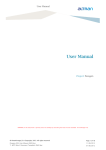
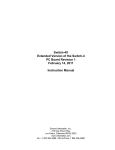
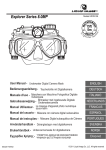
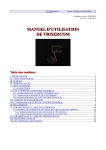
Manta A200 User's Manual Manta A200 User's Manual 1 Copyright © 20102011 LSTS Laboratório de Sistemas e Tecnologia Subaquática This documentation is confidential and proprietary information of Universidade do Porto Faculdade de Engenharia Laboratório de Sistemas e Tecnologia Subaquática (LSTS). It is disclosed pursuant to a nondisclosure agreement or contract between the recipient and LSTS. This document is provided for informational purposes only, and LSTS makes no warranties, either express or implied, in this document. Information in this document, including URL and other Internet website references, is subject to change without notice. The entire risk of the use or the results of the use of this document remains with the user. Unless otherwise noted, the example companies, organizations, products, people, and events depicted herein are fictitious and no association with any real company, organization, product, person, or event is intended or should be inferred. Complying with all applicable copyright laws is the responsibility of the user. Without limiting the rights under copyright, no part of this document may be reproduced, stored in, or introduced into a retrieval system, or distributed or transmitted in any form or by any means (electronic, mechanical, photocopying, recording, on a website, or otherwise) or for any purpose, without the express written permission of LSTS. Except as expressly provided in any written license agreement from LSTS, the furnishing of this document does not give you any license to trademarks, copyrights, or other intellectual property. Other product and company names mentioned herein may be the trademarks of their respective owners. Manta A200 User's Manual 2 Revision History Number Date Description 1 20110214 First edition 2 20110228 Added toolchain information and upgrade instructions Manta A200 User's Manual 3 Table of Contents 1 Overview................................................................................................................................5 1.1 Main Features.................................................................................................................5 2 Package Contents..................................................................................................................6 3 External Views.......................................................................................................................7 3.1 Panel View......................................................................................................................7 3.2 Lateral View....................................................................................................................8 4 Charging.................................................................................................................................9 5 Turning On and Off................................................................................................................9 6 Installing a SIM Card..............................................................................................................9 7 Installing Ubiquiti Radios......................................................................................................10 8 Installing the Acoustic Modem Transducer..........................................................................10 9 Connecting to the Ethernet Ports.........................................................................................10 10 Panel Interface...................................................................................................................10 11 Service Port........................................................................................................................11 12 Network Settings.................................................................................................................11 13 SSH Server.........................................................................................................................11 14 Control Center....................................................................................................................11 15 Handling the Battery...........................................................................................................12 16 Communications Interference and Safety..........................................................................12 17 Software repository.............................................................................................................12 18 Upgrading Firmware...........................................................................................................13 18.1 GLUED........................................................................................................................13 18.2 DUNE..........................................................................................................................13 19 Customer Support..............................................................................................................14 Manta A200 User's Manual 4 1 Overview The Manta Gateway is a portable centralized communication hub supporting several types of wireless networks. The system is capable of transparently route data between heterogeneous network links, balancing bandwidth and range. Additionally the device is capable of providing information about the localization of underwater vehicles and narrow band acoustic transponders. 1.1 Main Features • Portable; • Can be mounted on top of a buoy; • Supports up to three 12V P.O.E. radios connected at the same time; • Powered by an internal battery or 220V AC (in which case the battery is charged at the same time); • 10 hours of autonomy (with two radios); • Opensource GLUED Linux distribution and SDK; • DUNE SDK for easier interaction with the hardware (optional); Manta A200 User's Manual 5 2 Package Contents 1. 1x Manta A200 2. 1x IP67 Power Cord 3. 1x Ethernet cable RJ45 <> RJ45 without P.O.E (2m) 4. 2x Ethernet cable RJ45 <> IP67 RJ45 (2m) 5. 1x Ubiquiti Bullet M2HP 6. 1x Ubiquiti Bullet M5HP 7. 1x USB AB cable (2m) 8. 1x BTech Acoustic transducer cable (10m) 9. 1x BTech 2RCL acoustic transducer 10. 2x Antenna mounting kit Manta A200 User's Manual 6 3 External Views 3.1 Panel View 1. LED: Battery Charged 2. Power Switch 3. LED: Status / Power On 4. LED: Battery Charging 5. Button: System Selection 6. Button: Ping Selected System 7. Button: Abort Selected System 8. Service Port 9. LCD 10. GPS Antenna Manta A200 User's Manual 7 3.2 Lateral View 1. IP67 Transducer Connector 2. IP67 Power Cord Connector 3. SIM Card Slot 4. IP67 P.O.E.#1 RJ45 Connector (12V DC) 5. IP67 P.O.E.#2 RJ45 Connector (12V DC) 6. IP67 P.O.E.#3 RJ45 Connector (12V DC) Manta A200 User's Manual 8 4 Charging Before connecting the device to the power outlet make sure the top lid is open. This will allow hydrogen gas that may form during charging to escape. Connect the Power Cord to the IP67 Power Cord Connector and to an external power source (100V240V@1A AC). The Charging LED will turn on. It will take approximately 8 hours to fully charge the device. After the battery is fully charged, the Charging LED will turn off, and the Charged LED will turn on. You can use your Manta Gateway while charging. Charge your device in a wellventilated area. Avoid charging when the environmental temperature is higher then 40ºC. Do not operate the device if the environmental temperature is higher then 60ºC, as battery leakage or expansion may occur. 5 Turning On and Off To turn on the Gateway, switch the Power Switch to the ON position. The Status LED and LCD will lit. The boot process will take approximately 10 seconds to complete. After that the LCD text will change to the System Selection Menu and the Status LED will blink in a heartbeat pattern. To turn off the device, switch the Power Switch to the OFF position. The shutdown procedure will start and takes at most 30 seconds to complete. The actual duration of the procedure depends on the amount of time the CPU needs to place the file system in a safe state. Usually this can be achieved in around 10 seconds. 6 Installing a SIM Card To use the internal 3G modem you must install a SIM Card in the SIM Card Slot. To do so insert the SIM Card into the slot until it clicks. Manta A200 User's Manual 9 7 Installing Ubiquiti Radios Using one Ethernet cable RJ45 <> IP67 RJ45, connect the RJ45 part to the radio and the IP67 RJ45 part to the gateway and screw it until it's locked. It is safe to hotplug radios. LSTS ships all Ubiquiti radios with the default configuration. The manual for these devices is available at: • http://www.ubnt.com/wiki/AirOS_5.2 8 Installing the Acoustic Modem Transducer 1. Connect the BTech 2RCL acoustic transducer to the BTech Acoustic transducer cable 2. Connect the BTech Acoustic transducer cable to the gateway's IP67 Transducer Connector. 9 Connecting to the Ethernet Ports To connect your gateway to another computer via Ethernet you should use the Ethernet cable RJ45 <> RJ45 without P.O.E. 10 Panel Interface The device is factory configured to communicate acoustically with other LSTS products. If you wish to add support for your own assets contact LSTS for instructions. • System Button: Selects the target system/device for subsequent operations. • Ping Button: Pings the currently selected system/device. If the ping is successful, the distance to the device is displayed on the LCD, or else a message "Ping Time Out" is presented. • Abort Button: Aborts the current plan being executed by the target system (usually an AUV). Manta A200 User's Manual 10 11 Service Port The service port allows direct connection to the CPU console. This port uses an FTDI RS232 to USB converter. Drivers for this hardware are available at: • http://www.ftdichip.com/Drivers/VCP.htm To connect to the CPU console, use the USB AB cable and open a terminal emulator, such as HyperTerminal on Microsoft Windows or GTKTerm on GNU/Linux, using the following settings: Baud Rate: 57600 Parity: None Data Bits: 8 Stop Bits: 1 12 Network Settings The following table contains the factory IP addresses of the gateways. You must use this IP address to connect to the SSH Server and use the Control Center. Manta4 192.168.2.1 Manta5 192.168.2.1 13 SSH Server To login to the internal computer via SSH use the following credentials: User Name: root Password: root 14 Control Center The HTTP Control Center allows you to monitor the state of several internal sensors and control which devices are turned on. To use the control center direct your browser to the device's IP Address, port 8080 (eg. Manta4: http://192.168.2.1:8080) Manta A200 User's Manual 11 15 Handling the Battery This product contains a Leadacid battery. There is a risk of fire and burns if the battery pack is handled improperly. Do not attempt to open the battery pack. Do not disassemble, crush, puncture, short external contacts, dispose of in fire or water, or expose a battery pack to temperatures higher than 60˚C. Close the lid and all unused connectors when operating near water. The battery has a lifetime of approximately two years. Contact LSTS to replace the battery 16 Communications Interference and Safety Do not use the device near places where wireless communication devices are prohibited, such as airports, gas stations, fuel depots, chemical plants or where blasting operations are in progress, or in potentially explosive atmospheres such as fueling areas, fuel storehouses, below deck on boats, chemical plants, fuel or chemical transfer or storage facilities, and areas where the air contains chemicals or particles, such as grain, dust, or metal powders. Please be aware that sparks in such areas could cause an explosion or fire. 17 Software repository To download SDKs, firmware upgrades and documentation use the URL http://whale.fe.up.pt/manta and browse the folder with the model of your gateway (eg. a200). The repository is organized as follows: • dune: DUNE is the software that controls the main functions of the gateway (Panel, LEDs, Power Lines, etc). In this folder you can find documentation, compiled binaries to upload to the gateway and a library that can be used be used to extend DUNE. • glued: GLUED is a GNU/Linux distribution. In this folder you can find the source code of the distribution, compiled binaries to upload to the gateway, crosscompilers and system libraries. Manta A200 User's Manual 12 • imc: IMC is the communication protocol used by DUNE. The user can use this protocol to communicate with DUNE and control its activity. • uboot: UBoot is the second stage bootloader used by the internal computer. In this folder we make available firmware and environment images. • ubiquiti: In this folder we make available firmware images used by the Ubiquiti Bullet devices. 18 Upgrading Firmware 18.1 GLUED To upgrade GLUED copy the file glued<version><device>rootfs.tar.bz2 to the folder /opt/lsts of your Manta Gateway using SSH/SCP. When the upload is complete power down your device, wait a few seconds and turn it back on. The upgrade process will start. Do not turn off the gateway during the upgrade process. Once the upgrade is complete the STATUS LED will blink in a heartbeat pattern. 18.2 DUNE To upgrade DUNE copy the file dunearmv732bitlinuxglibcgcc<gccversion><version> full.tar.bz2 to the folder /opt/lsts of the device using SSH/SCP. When the upload is complete power down your device, wait a few seconds and turn it back on. The upgrade process will start. Do not turn off the gateway during the upgrade process. Once the upgrade is complete the STATUS LED will blink in a heartbeat pattern. Manta A200 User's Manual 13 19 Customer Support Please direct all support inquiries to: LSTS Dep. de Eng. Electrotécnica e de Computadores Universidade do Porto Faculdade de Engenharia Rua Dr. Roberto Frias I203 4200465 Porto, Portugal T: +351 22 508 1539 F: +351 22 508 1443 E: manta.support@lstsfeup.org Manta A200 User's Manual 14