1
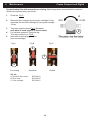
User manual
Coffee Queen Espressomachines
Compact
Digital 2 groups
Digital 3 - 4 groups
Crema Compact Digital
Your retail dealer
U / GB
Rev.070516
1234567890123456789012345678901212345678901234567890123456789012123456789012345678901234567890121234567890123456789012345678901212345678901234567890123456789012123456789
1234567890123456789012345678901212345678901234567890123456789012123456789012345678901234567890121234567890123456789012345678901212345678901234567890123456789012123456789
1234567890123456789012345678901212345678901234567890123456789012123456789012345678901234567890121234567890123456789012345678901212345678901234567890123456789012123456789
1234567890123456789012345678901212345678901234567890123456789012123456789012345678901234567890121234567890123456789012345678901212345678901234567890123456789012123456789
1234567890123456789012345678901212345678901234567890123456789012123456789012345678901234567890121234567890123456789012345678901212345678901234567890123456789012123456789
1234567890123456789012345678901212345678901234567890123456789012123456789012345678901234567890121234567890123456789012345678901212345678901234567890123456789012123456789
1234567890123456789012345678901212345678901234567890123456789012123456789012345678901234567890121234567890123456789012345678901212345678901234567890123456789012123456789
1234567890123456789012345678901212345678901234567890123456789012123456789012345678901234567890121234567890123456789012345678901212345678901234567890123456789012123456789
1234567890123456789012345678901212345678901234567890123456789012123456789012345678901234567890121234567890123456789012345678901212345678901234567890123456789012123456789
1234567890123456789012345678901212345678901234567890123456789012123456789012345678901234567890121234567890123456789012345678901212345678901234567890123456789012123456789
1234567890123456789012345678901212345678901234567890123456789012123456789012345678901234567890121234567890123456789012345678901212345678901234567890123456789012123456789
1234567890123456789012345678901212345678901234567890123456789012123456789012345678901234567890121234567890123456789012345678901212345678901234567890123456789012123456789
1.
Table of contents
1.
2.
3.
4.
5.
6.
7.
Crema Compact and Crema Digital
Table of contents
Orientation
Introduction
Contemplated use and warnings
Technical description
5.1 Overview of the espresso coffee machines Crema Comp/Dig 5
5.2 Operating Principles
5.3 Operation for espresso machine model Crema Compact/Digital
Safety precautions
Installation - Location - Start up
7.1 Precautions for installation
7.2 Locations and connections
7.3 Start up
7.4 P semi-automatic version operation On-Off
7.5 Install decalcification filter
page 2
3
4
5
6
6
6
7
8
8
8
9
7.6 Digital automatic version dose programming
7.7 Failure message
7.8 Automatic cleaning of the groups
10
11
12
8.
User instructions
8.1 Normal operating values
8.2 How to make espresso coffee
8.3 How to make cappuccino
13
13
14
14
9.
Maintenance
9.1 Daily cleaning
9.2 Weekly cleaning
9.3 Exchange Decalcification filter
15
15
16
10.
11.
12.
Faults and routine repairs
Shut-down and dismantling
Technical Data
17- 20
20
21
2.
12345678901234567890123456789012123456789012345678901234567890121234567890123456789012345678901212345678901234567890123456789012123456789012345678901
12345678901234567890123456789012123456789012345678901234567890121234567890123456789012345678901212345678901234567890123456789012123456789012345678901
12345678901234567890123456789012123456789012345678901234567890121234567890123456789012345678901212345678901234567890123456789012123456789012345678901
12345678901234567890123456789012123456789012345678901234567890121234567890123456789012345678901212345678901234567890123456789012123456789012345678901
12345678901234567890123456789012123456789012345678901234567890121234567890123456789012345678901212345678901234567890123456789012123456789012345678901
12345678901234567890123456789012123456789012345678901234567890121234567890123456789012345678901212345678901234567890123456789012123456789012345678901
12345678901234567890123456789012123456789012345678901234567890121234567890123456789012345678901212345678901234567890123456789012123456789012345678901
12345678901234567890123456789012123456789012345678901234567890121234567890123456789012345678901212345678901234567890123456789012123456789012345678901
12345678901234567890123456789012123456789012345678901234567890121234567890123456789012345678901212345678901234567890123456789012123456789012345678901
2. Orientation
3
2
4
5
6
7
8
16
9
1
1
11
12
10
1. Steam pipe
2. Tap handgrip (steam)
3. Manometer
4. Tap handgrip (hotwater)
5. Brew switch (manual)
6. Push-button pad
7. Tap handgrip (steam)
8. Main switch
9. Indication light
10. Drip tray
11. Outlet (hotwater)
12. Handgrip for filterholder
13. Rubber spacer (for automatic cleaning).
14. 1 cup filter
15. 2 cup filter
16. Handle (steam pipe)
12
14
13
3.
15
12345678901234567890123456789012123456789012345678901234567890121234567890123456789012345678901212345678901234567890123456789012123456789012345678901
12345678901234567890123456789012123456789012345678901234567890121234567890123456789012345678901212345678901234567890123456789012123456789012345678901
12345678901234567890123456789012123456789012345678901234567890121234567890123456789012345678901212345678901234567890123456789012123456789012345678901
12345678901234567890123456789012123456789012345678901234567890121234567890123456789012345678901212345678901234567890123456789012123456789012345678901
12345678901234567890123456789012123456789012345678901234567890121234567890123456789012345678901212345678901234567890123456789012123456789012345678901
12345678901234567890123456789012123456789012345678901234567890121234567890123456789012345678901212345678901234567890123456789012123456789012345678901
12345678901234567890123456789012123456789012345678901234567890121234567890123456789012345678901212345678901234567890123456789012123456789012345678901
12345678901234567890123456789012123456789012345678901234567890121234567890123456789012345678901212345678901234567890123456789012123456789012345678901
3.
Introduction:
Crema Compact and Digital
Save; your manual and instructions:
The manual is dedicated the user and/or an authorized personel. It will give you information how to use the
machine in a correctly way, desirable maintenance and a good safety and security for the user.
The manufacturer is not responsible for personnel damage or environment damage, caused by the
machine, if it has been used in a way, which is different from what prescribes in these instructions.
This manual must always be available to the user and/or maintenance technician, who must be
informed of the correct
use of the machine and of possible hidden risks. It must be kept in a dry, clean place.
The information given in this manual does not replace the safety instructions and technical data for
installation and
operating directly affixed to the machine and packaging.
This manual is to be considered as part of the machine and must be kept for future reference until same is
dismantled.
Should you lose it or require further information, contact your area agent or the manufacturer.
This manual reflects the state of the art at the current time and cannot be considered inadequate merely
because it is updated
later on the basis of new developments.
The manufacturer also reserves the right to modify the manual without the duty of updating earlier issues,
except in exceptional
basis of new developments.
If the machine is used incorrectly or in ways, other than described in this manual it will render any
guarantee or
manufacturer´s responsibility condition null and void; it should only be used by a responsible adult.
4.
4.
Contemplated use and warnings
The espresso coffee machine is an appliance for delivering steam/hot water for the professional preparation
of coffee or for obtaining water and/or steam.
Its long lasting, non-toxic components are easily accessible for proper cleaning and maintenance.
The user must be an adult. The machine must not be used by children or unsuitable people.
The user must comply with the safety regulations in force in the country of installation, as well as
with the rules dictated by common sense, and ensure that routine maintenance is carried out regularly and
correctly.
The installer, the user and the maintenance technician must inform the manufacturer of possible faults or
wear which could affect the system´s original safety.
The installer must check that the environmental conditions are suitable, so as to guarantee safety and
hygiene for the operators and users. The various manufacturers are responsible for the commercial
components fitted to the machine; the customer is responsible for the people authorized to use the machine.
Do not expose the machine to the weather (sun, rain, etc. ).
Long machine stoppages at temperatures as below 0ºC (zero degrees celsius) can cause damage or
breakage to the piping boiler ; thus total emptying is recommended.
5. Technical description
Crema Compact and Digital
5.1 Overview of the espresso coffee machines Crema Compact and
Digital
Automatic coffee machines
Crema Compact and Crema Compact Take Away
Espresso coffee machine with microprocessor controlled electronic measured dosage and digital
programming from the push-button pad. Available in 2-group models. Automatic boiler filling is standard. Filter
for mixed use either with ground coffee or with coffee pod upon request. The machines is delivered with a
Turbo Creme Milk-frothingnozzle and descaling filter.
Crema Digital/2-4 Take Away
Espresso coffee machine with microprocessor controlled electronic measured dosage and digital
programming from the push-button pad. Available in 2-3-4 group models. Automatic boiler filling is standard.
Filter for mixed use either with ground coffee or with coffee pod upon request. The machines is delivered with
a Turbo Creme Milk-frothing nozzle and descaling filter.
Semi automatic coffee machines
Crema Compact On-Off and Crema Grande On-Off
Semi-automatic espressomachine with unmeasured brewing and push-button pad.
Delivered with; automatic level regulation of boiler.
Filter for mixed use either with ground coffee or with coffee pod upon request and descaling filter.
5.
5.
Technical description
Crema Compact and Digital
5.2 Operating Principles
An espresso coffee machine is basically made up of the following elements:
Boiler
Is used to contain the hot water and steam.. Made of copper to get a equal temperature over the year.
Brewing group and heat exchanger
The brewing group is the component which, when attached to the filterholder, brews and delivers the
beverages when supplied with hot water. (Containing the filter and the ground coffee or coffee pod).
The heat exchangers, one for each group, are immersed in the water and are used for fast heating of the
fresh water from the network to the optimal temperature and to prevent thermal imbalances within the system.
Heat source
This is normally provided by an electric heating element immersed in the boiler and/or by an external gas
burner , which heat the water and provide the steam.
Electric pump
This device is used to raise the pressure of the network, which is normally inadequate for the purpose, to a
pressure of 9 bars which is ideal for making the best coffee.
Steam taps
This allow steam to be delivered to give the indispensable ”froth” to the milk used for preparing cappuccino,
for heating water and punches and for preparing chocolate drinks.
Water tap
It allows water to be delivered for preparing hot drinks, tea and tisanes.
Control instruments
Manometers:
show the current pressure in the boiler and in Dig. models the pump´s operating
pressure.
Pressure switchest: control the pressure and switching ON/OFF the heat sources to keep the boiler water
temperature constant.
Level gauge:
shows the water level in the boiler.
5.
Technical description
Crema Compact and Digital
5.3 Operation for espresso machine model Crema Compact and Digital
Water system diagram
The water used for production of coffee does not come from the boiler. It is supplied directly from the water
net, through the heat exchangers inside the boiler. The hot water and steam surrounding the heat
exchangers, give the water inside the right temperature. This is shown in the water system diagram
Wiring diagram
The machine is connected to the power supply network by means of the electric cord supplied. See p. 35.
The main switch
The machine is fitted with a two-position power switch:
- Position 0: no power supply to the internal components.
- Position 1: power supply to the operational electric components and to the heating element.
6.
Safety precautions
Do not tamper with the machine´s components or pull on the electric power cord to unplug it.
Never clean the inside of the machine with the power ON or with the plug connected and do not use
detergents or jets of water in any case.
The operator must not touch the machine with damp or wet hands or feet, or use it with bare feet.
Allthough the machine is earthed, we recommend the use of a wooden foot-board and a centralized lifesaving system to prevent the risk of electric schocks as much as possible.
Grinder shall only be used for coffee beans. All other usage could be dangerous and must seems like a
wrong and defective way to handle the machine.
The manufacturer is not responsible for damage which is caused by improper, unreasonable and/or incorrect
usage of machine.
Warning: Do not try to put in spoons, knife´s or other kitchen / housekeeping tools in the grinder
when machine is operating or in use.
6.
7.
Installation - Location - Start up
Crema Compact and Digital
7.1 Precautions for installation
The manufacturer has obviously taken every possible precaution to guarantee user safety, but the different
installation and/or transport conditions could give rise to uncontrollable or unpredictable conditions; so it is
always necessary to assess hidden hazards and to consider the following suggestions:
-
-
-
-
The packing elements (cardboard, cellophane,metal staples, etc.) can cut, wound or cause
accidents if not handled
carefully or if used incorrectly; do not leave them accessible to children or unsuitable people.
Any fault or defect should be promptly notified to the personnel who are qualified and authorized to
carry out installation and maintenance.
An earthing connection is mandatory as is the system´s conformity with the regulations in force in
the country of installation. The manufacturer accepts no responsibility for accidents due to noncompliance with the regulations.
The use of extensions or flying connections is prohibited. The working environment is heavily
exposed to water and damp which prevent the natural conditions for insulating the system.
The machine must only be installed by authorized, qualified personnel.
Check the condition of the components and, should defects or faults arise, stop the installation and ask
for their replacement.
Ensure that the power supply voltage (see rating plate) is the same as that of the mains supply network
to be used in the place of installation.
The customer must provide for the machine´s power supply, protecting the line with a suitable safety
cut-out (life-saver).
It is important to place the machine on a flat surface! Adjust the machine feets and check with a
spirit level.
Fig. 1 Installation
1234-
5678910 11 12 13 1415161718-
Mains electric power supply.
Mains line switch.
Power supply cord.
Main switch.
0-off
1-power supply to controls
Water inlet union.
Drain tray
Drain pipe
Main drain pipe
Water mains tap
Water mains supply line
Hose from water mains to descaling filter
Descaling filter
Hose from descaling filter to water inlet
Filter head
Tap drift (position up)
11
Pipe from gas tap to gas regulator
9
Gas supply pipe
Gas tap
10
FIG 1.
4
6
5
13
14
17
18
7
3
2
15
8
12
16
7.
1
7.
Installation - Location - Start up
Crema Compact and Digital
7.2 Locations and connections
Before installing the machine it is advisable to check the efficiency of the water mains (pos. 10 fig. 1), of the
electrical connections (pos. 1 fig. 1) and of the gas mains ( for gas heated machines). An electric cut out
(pos. 2 fig. 1) with fuses rated for the machine´s electrical input is needed for the machine to be properly
connected.
Attention: the earth connection (yellow/green wire) is mandatory.
Finally the efficiency of the main drain pipe must be checked before it is connected to the machine´s drain
pipe (pos. 7 fig. 1).
Hydraulic connections: - Water inlet: pipe3/8 union int D 10/12 mm.
- Drain: pipe int D 16/17 mm.
Locate the machine on the shelf and find a suitable position for the water softener (pos. 12 fig. 1).
- Connect the softener to the tap (pos. 9) using the pipe (pos. 11 fig 1).
- Connect the pipe (pos. 13) to the water inlet (pos. 12).
Connect pipe (pos. 7) to the drain tray (pos. 6) and then to the main drain pipe (pos. 8).
- Place a recipient under the water softener´s discharging pipe ( see regeneration instructions page 10 ).
- Open tap and run the water through for a few minutes to clean the softener.
The pump is equipped with a inlet filter which prevents unwanted particles from the system of water mains,
to damage the machine.
Make the electrical connections, connecting the power supply cord (pos. 3) to the mains line switch (pos. 2).
If the machine is fitted with a gas system, connect it to the pipe (pos. 16 fig. 1) using the tap (pos.17) and
adjust it as instructed.
7.3 Start up
Make sure that the water tap to the machine is open and that the softener´s tap are turned to the
left!
- Turn ON main switch. The machine is fitted with water level control and boiler will be filled automatically
with water.. Machine is also equiped with a element defence and must not be filled up before starting up the
machine. Before starting machine, make sure that the water is on.
Filling of water stop automatically after 120 seconds. Turn OFF the machine with the main switch (pos.
4) and turn it ON again after 5 seconds. The filling of water will start again. Se chap. 7.6 page 10.
When the water in the boiler reach the right level, the machine stops filling water. Push ON the right button
for each group to fill up the heat exchangers. When the water is coming out from the groups in a even
stream, turn OFF with the same button.
The water will now heats up and the pressure in boiler accumulates to 1 bar. Meanwhile the water is heating
up, place the filter holders in there groups so that the filter holders leaves varm. After brewing allways leave
filterholders with coffee grounds in there groups. It is a better way to make coffee if filterholders are varm.
After a while you hear a ”ventilated sound” . This is normal. When the pressure are approx. 1 bar and the
groups and filterholders are varm. The machine is ready to use.
7.4 P semi-automatic version operation On-Off.
Press the switch located above the selected group to start delivery. When the required quantity has been
delivered, press the switch again to stop it.
8.
7. Installation - Location - Start up
Crema Compact and Digital
Decalcification filter with automatic pre-rinsing. Shall always been mounted with the
machine.(Shall been replaced every six month).
1.
Assemble filter holder.
2.
D
Assemble filter cartridge
by turning the cartridge
1/4 lap.
See figure D.
2
1
Before you connecting filter to water main.
make sure that tap is in position closed.
Fig.C.
To machine.
4
3
3. Connect to water mains.
4. Connect water conduit to espressomachine.
5. Turn tap to position down. Fig.A.
6. Open tap for water mains.
Flush until water is clean!
(approx. 6 litre of water).
7. For machine operation. Open the tap.
Turn tap to position up. Fig.B.
8. Note date for exchanging the filtre.
(also see cartridge).
Water mains.
Fig.A
Fig.B
5
Pre-rinsing
7
Operation
Art. no.;
A. Decalcifi. filter compl.
B. Filter head
C. Filter cartridge
Fig.C
E27700033
E27700032
E27700031
9.
Closed
7.
Installation - Location - Start up
Crema Compact and Digital
7.5 Digital automatic version dose programming:
1
To program the doses:
(fig. 2).
1.
Press button 1 on push-button pad in approx. 8 seconds.
The Indicator lamps above the other buttons will be
switched on.
2.
Now place the empty filterholder in the group (A).
- Choose button and press.
Hot water will now starts flow.
When the water has reached the required level in the cup.
Stop the filling by press at the same button
once again.
3.
The settings is now stored in the memory of push-button pad.
- And the lamp above the button you stored will be switched off.
4.
The other buttons can be programmed in the same way.
(A)
If it should take to long time between programming of the other doses.
All remaining indicator lamps will be switched off;
Then do the programming again as chapter 1.
The indicator lamp above the button which not is programmed will be lighting.
5.
When you are satisfyed with programming of doses on the first group. Go further to the second group.
1
Figure. 2
Ordinary longo
Ordinary espresso
Recommended quantity of water
when programming the doses:
Ordinary espresso
Ordinary longo
Double espr
Double longo
7cl.
9cl.
10cl.
15cl.
10.
Double longo
Double espr
7.
Installation - Location - Start up
Crema Compact and Digital
7.6 Failure message
Finite brewtime for each group are 240 seconds.
If you reach this time indicator lamp start blinking and the group will be blocked.
If the flowmeter operate incorrect, the indic. lamp above the button you pressed will start blinking.
If this should happen you can´t get any doses when machine is brewing.
Still you can do a manuel brewing, by using button
1.
On Model Digital, by using the manuel brew switch (pos. 5 page 3).
To avoid flooding or overflow: The autom water system is equipped with a safety device.
If the water level control solenoid valve remains open for more than 120 seconds; it is automatically
switched off and the fault is signalled by indic. lamps are blinking on all the push-button pads.
To restart, the machine power must be removed for at least 5 seconds, and then start
the machine again.
If failure message repeats, please contact authorized personnel or your retail dealer.
11.
7.
Installation - Location - Start up
7.7 Automatic cleaning of the groups
Crema Compact and Digital
WEEKLY CLEANING:
To start the cleaning program: do as follow:
Unhook the filterholder from the group (A fig. C). Put the 2 cup filter and the rubber pad in filterholder.
(B fig. C) Put 20 gram of detergent in filterholder (C fig. C).
Detergent 1104162 can be ordered from your retail dealer or Coffee Queen AB.
Hook the filterholder in a careful way into the group you want to clean. (D fig. D)
Turn OFF the machine with the main switch. Press button ”double espresso” and keep the button down.
Turn ON the machine with the main switch and the cleaning program will start.
Meanwhile cleaning is going on, approx. 50 seconds, 2 indic. lamps will blinking on the push-button pad.
Unhook the filterholders and rinse the groups, filterholders from detergent. Put back filterholder in group with
rubber pad in filterholder. Then repeat procedure 3 times without detergent. To wash clean with water only.
Complete cleaning with your cleaning brush, following the machine. Clean the groups and filterholder
(bayonet couplings) with the cleaning brush.
FIG. C
FIG. D
D
A
FIG. E
E
C
B
2 cup filter
Rubber
pad
F
12.
G
8.
User instructions
Crema Compact and Digital
The following should be considered general lines of operating. It is quite essential to follow the
manufacturer’s instructions and regulations as regards safety.
Operating the machine is very simple.
The checks that the operator obtains good coffee are:
- use suitably softened fresh mains water
- boiler water temperature between 85 °C and 105°C
- delivery time 20-30 seconds
- ground coffee dose between 6 or 7 g.
- constant cleaning of the coffee dosing grinder
- checking the wear of the dosing grinder’s grindstones
8.1 Normal operating values
Recommended values:
- Pump pressure: 8,5 - 9 bars
Pump pressure are factory adjusted. On Digital-model: Reading/Check the pressure on the manometer.
To Read/Check the pressure on Compact-model use a special equipment:(filterholder with manometer).
- Boiler pressure: 0,8 - 1,2 bars.
Pressure is the red color field on manometer. To regulate the pressure: (turn clockwise to increase
pressure and anticlockwise to decrease the pressure).
- Safety valve opening pressure: ± 1.7 bars
- Expansion valve opening pressure: ± 10.5 bars
Adjust opening pressure with a filterholder (sealed) and a manometer. When indicator shows 10,5 bar
it will start driping from the expansions valve.
- Coffee delivery temperature: 85°C - 92°C
The temperature depends on the type of blend used; it can be checked with a precision thermometer
during delivery.
The pressure switch ’s screw can be used for minor adjustments (see boiler pressure).
Allways adjust pressure when you are brewing coffee.
13.
8.
User instructions
Crema Compact and Digital
8.2 How to make espresso coffee
Remove the filterholder from the group and dispose of the grounds by hitting the edge of the filterholder
against the bar in the apposite drawer. Do not hit the filterholder against an unprotected surface; the
filterholder’s seal could be demaged.
A smart blow should be enough. The small quantity of powder remaining will not have a negative effect on
the taste of the coffee.
Fill the filterholder with finely ground coffee. When the filterholder is filled, press down the ground coffee
with the special tamp, pushing the filterholder upwards. Clean the edge of the filterholder with the palm of
the hand to get rid of excess coffee powder.
This will ensure that the seal between the filterholder and the machine will be perfect.
If a filter for mixed use is being utilized, you can put a coffee pod instead of ground coffee in it. Hook the
filterholder in a careful way into the group. When it can be difficult to unhook filterholder after brewing.
After having fitted the filter holder properly, put a previously heated cup under the spout. Two cups are
required if a double filter holder is used. Press on choosed dose-button. Start brewing immediately. The
coffee deteriorates already after 10 seconds in the hot group.
When delivery is finished, remove the cup and serve it.
8.3 How to make cappuccino
For making cappuccino, fresh milk must be ”frothed” to give a foam which will be poured over the
espresso coffee. A cappuccino consist of 1 third espresso and 2 thirds frothed milk.
Brewing an espresso in a cappuccino cup.
Open steam tap position the steam pipe and switch the steam on for 1 or 2 seconds to clean away milk
residues.
For heating milk, use a jug containing at least three inches of milk.
Approach the jug to the stam pipe so as to immerse the spout in the milk.Slowly open the steam tap and
hollow the jug so that the nozzle is placed exactly at surface. Keep the jug in this position, until you can feel
a heat outside the jug.
Rise the jug a couple of centimetre and angle the jug until you get a wave motion in the milk.
With this procedure you can blow a ”vanilla sauce similar” milk-froth. It is that kind of froth they use in Italy
and with some practice you can draw and design shapes in your cappuccino and caffé latte.
Then quickly close the steam. Remove the jug from the pipe and pour the frothed milk over the espresso
coffee.
N.B. Heat up the milk to 60°C - 65°C
N.B.: the steam pipe is very hot and should not be touched until it has cooled.
Clean the milk from the pipe as soon as possible to prevent it from drying and becoming difficult to
remove.
Inform the customer as soon as possible that the drink is very hot. Keep extra frothed milk for the next
cappuccino.
14.
9.
Maintenance
Crema Compact and Digital
9.1 Daily cleaning
Preferably done in the evening:
- CLEAN nozzles, gasket, filterholder and the bayonets in groups.
Use a clean dishing brush or the angled cleaning brush.
- RINSE 1 cup filter / 2 cup filter and filterholders with hot water. Use detergent intended for coffee
machines or dishing machines to remove oil and dirt
- Put the rubber pad in 2 cup filter. Hook filterholder in the group and start a brewing.
Varying unhook and hook filterholder when brewing is going on.
The hot water will be pressed out between groups and filterholder and cleaning the bayonets in group and
filterholder gasket.
N.B.: the steam pipe is very hot and should not be touched until it has cooled.
- CLEAN
Drip tray (placing the cups)..
- CLEAN
Steam pipes directly after they have been in use.
9.2 Weekly cleaning
- CLEAN
Group and nozzles:
See chap. 7.7
- Clean the tray and the cup support grid.
Carefully clean the steam pipes used for heating beverages immediately after use, so as to avoid
the formation of deposits which could block the delivery nozzles and also to prevent different types
of beverage being heated.
- Cleaning Machine: outwardly
Use a wet cloth (which not scratcing).
You must not use solvent or alcohol!
15.
9.
Maintenance
Crema Compact and Digital
Decalcification filter with automatic pre-rinsing. Shall always been mounted with the machine.
(Shall been replaced every six month).
1.
Close tap. Fig.C..
2.
Dismantle filter cartridge by turning the cartridge 1/4 lap.
Assemble the new filter cartridge by turning the cartridge
1/4 lap.
3.
Turn tap to position down.Fig.A. Pre-rinse
until water is fresh.(approx. 6 litre of water).
For machine operation. Open the tap.
Turn tap to position up. Fig.B.
Note date for exchanging the filtre.
(also see cartridge).
4.
5.
Fig.A
D
Fig.B
2
Fig.C
4
1
3
Pre-rinsing
Operation
Closed
Art. no.;
A. Decalcifi. filter compl.
B. Filter head
C. Filter cartridge
E27700033
E27700032
E27700031
16.
10. Faults and routine repairs
Crema Compact and Digital
Identifying problems:
- Always ensure that there is enough ground coffee for at least one dose in the grinder-doser´s reservoir.
- If the coffee drops are to slowly then grinding is propably too fine. Vice-versa, if it drops to fast, the grinding is too coarse.
- Remember that the machine´s operating process forces the water over the coffee at high pressure. If contact between the
water and the ground coffee lasts more than 30 seconds, the coffee will taste unpleasent and bitter. The effect is called
over-extraction.
- Always heat the cup by rinsing it in hot water. If the cup is cold, the abrupt temperature change of the espresso coffee will
change its taste.
- Never load the filter holder without making an immediate delivery; the ground coffee would ”burn” in the group and the
espresso obtained would be very bitter.
Attention: ALWAYS UNPLUG THE ELECTRICITY when carrying out maintenance checks or operations.
The following maintenance operations must be carried out by specialized personnel, authorized by
the manufacturer. Do not perform makeshift or ad-hoc repairs, and never use non-original spare parts.
Problem:
Cause 1:
Cures:
Cause 2:
Cures:
Problem:
Cause 1:
Cures:
Cause 2:
Cures:
Cause 3:
Cures:
Cause4:
Cures:
Problem:
Cause 1:
Cures:
Cause2:
Cures:
The group does not deliver water and the pump is noisy.
The water mains tap or the softener taps are shut.
Open the taps.
The water entry union filter is obstructed.
Dismantle and clean.
The group does not deliver water.
The jet is obstructed.
Remove the jet plug, check and clean or replace as necessary.
The injector is obstructed.
Dismantle and clean, replace if necessary.
N.B. check the regeneration of the softener resins.
(Only for versions with electronic dosing): the entry union of the doser is obstructed.
Dismantle and clean.
The solenoid valve will not open.
The coil is not getting power; check and correct.
- The coil is broken; replace.
- The core is blocked; preferably replace the complete solenoid valve.
The boiler is under pressure but the group does not heat up.
Air bleeding of the boiler did not occur during the water heating stage.
When cold check that the air vacuum valve is not blocked shut. Replace if necessary.
The water heating circuit is partially obstructed.
Check the group´s inlet and outlet pipes and unions. Clean and replace if necessary.
N.B. Check the regeneration of the softener resins.
Problem:
Cause1:
Cures:
Cause2:
Cures:
The boiler will not heat up.
The heating element is broken.
Replace.
The heating element is not receiving power.
- The safety thermostat is faulty; check and replace if necessary.
- The pressure switch is faulty;. check and replace if necessary.
- One or several Triacar is broken.
17.
10. Faults and routine repairs
Crema Compact and Digital
Fault:
Problem:
Cause 1:
Cures:
Cause 2:
Cures:
Cause 3:
Cures:
Cause 4:
Cures:
Problem:
Cause 1:
Cures:
Cause 2:
Cures:
Problem:
Cause 1:
Cures:
Cause 2:
Cures:
Cause 3:
Cures:
The water level control provides water when it should not.
The level sensor/control centre electrical connection is broken.
Repair.
The frame earthing/control centre electrical connection is broken.
Repair.
The level sensor is dirty.
Clean. When dismantling do not unthread it from the insulator but remove it complete with the union.
The electronic control centre is defective.
Replace.
The water level control provides water when it should not.
The solenoid valve coil is defective (earth fault).
Check and replace if necessary.
The solenoid valve lifter is blocked.
Check and replace solenoid valve if necessary.
The water in boiler is still filling up and the safety valve leaks out water.
Level sensor is not connected.
Check and replace if necessary.
There is a contraries object inside the solenoid valve and the automatic level regulation.
Check and replace if necessary.
Gasket is trayed.
Check and replace if necessary.
18.
10. Faults and routine repairs
Crema Compact and Digital
Fault:
Problem:
Machine is only brewing while the heating element is charged.
Cause 1:
Cures:
Problem:
Cause 1:
Cures:
Cause 2:
Cures:
Cause 3:
Cures:
Cause 4:
Cures:
Cause 5:
Cures:
Neutral conductor is missing. (electric delivery).
Check and cure.
Regulary dosage when machine is brewing is faulty. (only version with dosage).
Flowmeter leaks out water.
If flowmeter is wet on the outside and if diod plate is wet, replace flowmeter.
Flowmeter does not operate in a satisfactory way. (rotor spins unevenly.)
Replace flowmeter.
If photo-diodes at the flowmeter do not give any electric signals to the electronic unit.
Check the photo-diodes operational suitability with an impulse indicator. If it not acts, replace flowmeter.
Solenoid valve (brewing) leaks when machine is brewing.
Check and replace gaskets or replace solenoid valve.
Expansion valve leaks when machine is brewing.
Check the adjustment and the gasket.
N.B.
When adjusting expansion valve. Do not unscrew any connections when boiler is under pressure.
Cause 6:
Cures:
Push-button pad are operating unevenly.
Check cable connections. If this not helps, try a new push-button pad.
Problem:
Economize the coffee powder in best way
Cause 1:
Cures:
Cause 2:
Cures:
Cause 3:
Cures:
Clogged water pump.
Check pressure on manometer when machine is brewing and adjust pressure. To: 8,5 - 9 bar.
Uncorrect adjustment of expansion valve that leaks when machine is brewing.
Adjust expansion valve.
Uncorrect adjustment of brewing temperature.
Check temperature with the coffee outlet. Use a thermometer.
Adjust pressure control device.
Cause 4:
Cures:
Cause 5:
Cures:
Cause 6:
Cures:
Solenoid valve leaks, when machine is brewing.
Check and replace if necessary.
The grinding is not correct.(coffee powder are to finely grounded or coarse-grounded).
Check brewing time and adjust the grinding.
Nozzle and filter are clogged and dirty.
Check and replace if necessary.
Problem:
Cause 1:
Cures:
Problem:
Cause 1:
Cures:
Tap and handgrip for water/steam are closed, still it leaks from water pipe and steam pipes.
Gaskets is frayed or the pipe brackets are dirty.
Check and clean, replace if necessary.
If it leaks out water or steam when open tap handgrips for steam/water.
Valve piston gasket is worn.
Check and replace if necessary.
19.
10. Faults and routine repairs
Crema Compact and Digital
Fault:
Problem:
Cause 1:
Cures:
Cause 2:
Cures:
Problem:
Cause 1:
Cures:
Cause 2:
Cures:
Leakage between group and filterholder when machine is brewing.
Brew groups filter spring are worn out.
Replace it.
1 cup filter/2 cup filter is damaged.
Replace it.
Water leaks from the expansions valve.
Gasket, expansions valve are worn out.
Replace.
The pumps by-pass valve failes.
Check and trashing the valve piston.
11. Shut-down and dismantling
Shutting the machine down should be done by authorized personnel.
Eliminate the pressure from the hydraulic circuit, disconnect the electric flex from the mains
power supply network and dispose of substances which are potentially harmful to the environment.
Place the machine in a suitable place, out of the reach of children or unsuitable people.
For dismantling the machine as refuse, return it to the supplier or take it to an
authorized refuse collection centre.
Do not dispose of it in the environment.
20.
12. Technical Data
Crema Compact and Crema Digital 2-4 groups
Crema Compact
Crema Digital2 group
Crema Digital 3 group
Crema Digital 4 group
Model
Group
Tankage (L)
Voltage V-Hz
Crema Compact
2
6,0
240V1N - 50/60Hz
2670
11,1
Crema Digital/2
2
11,5
400V3N - 50/60Hz
4500
3 x 7,2
Crema Digital/3
3
17,5
400V3N - 50/60Hz
6000
3 x 9,6
Crema Digital/4
4
17,5
400V3N - 50/60Hz
6000
3 x 9.6
21.
Capacity (W)
Current consumption(A)
COFFEE QUEEN
Crema Compact
Crema Digital
FOR SERVICE
Please contact your retail dealer
Your retail dealer
...............................................................................
...............................................................................
...............................................................................
COFFEE QUEEN AB Box 960, 67129 ARVIKA besöksadress; korpralsv. 1B,
Tel vxl; +46 (0)570-477 00, Fax; +46 (0)570 477 19
E-mail: [email protected] www.coffeequeen.se
Art. nr/Art. 170428