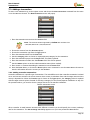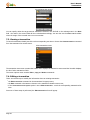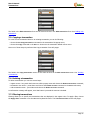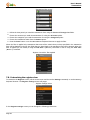
1
rserDs janual
rserDs janual
qable of contents
qable of Contents
1. lverview.....................................................................................................R
N.N. pystem requirements...........................................................................................................R
N.O. curther reading...................................................................................................................R
O. nuick ptart..................................................................................................S
P. rser interface.............................................................................................T
P.N. iists...................................................................................................................................T
P.O. siews.................................................................................................................................T
P.P. corms.................................................................................................................................T
P.Q. doodies..............................................................................................................................U
Q. Accounts...................................................................................................11
Q.N. Accounts list......................................................................................................................NN
Q.O. Adding a new account........................................................................................................NO
Q.P. siewing an account............................................................................................................NO
Q.Q. bditing an account.............................................................................................................NP
Q.R. aeleting an account...........................................................................................................NP
Q.S. Adjusting an account balance.............................................................................................NP
Q.T. oeconciling an account.......................................................................................................NQ
Q.U. murging an account............................................................................................................NR
Q.V. Customizing accounts list...................................................................................................NS
R. Categories.................................................................................................1T
R.N. Categories tree..................................................................................................................NT
R.O. Adding a category.............................................................................................................NT
R.P. siewing a category............................................................................................................NU
R.Q. bditing a category..............................................................................................................NU
R.R. aeleting a category............................................................................................................NV
R.S. Customizing the categories tree..........................................................................................NV
S. Currencies.................................................................................................OM
S.N. Currencies list...................................................................................................................OM
S.O. Adding a new currency......................................................................................................OM
S.P. siewing a currency............................................................................................................ON
S.Q. bditing a currency..............................................................................................................ON
S.R. aeleting a currency............................................................................................................ON
S.S. petting the exchange rate..................................................................................................OO
S.T. Changing the home currency..............................................................................................OO
S.U. Customizing the currencies list view....................................................................................OP
T. qransactions.............................................................................................OQ
T.N. oegister view.....................................................................................................................OQ
T.O. Adding a transaction..........................................................................................................OR
T.P. siewing a transaction.........................................................................................................OS
T.Q. bditing a transaction..........................................................................................................OS
T.R. Copying a transaction.........................................................................................................OT
T.S. aeleting a transaction........................................................................................................OT
mage P
rserDs janual
qable of contents
T.T. ciltering transactions..........................................................................................................OT
T.U. Customizing the register view.............................................................................................OU
U. oeports.....................................................................................................PM
U.N. oeports view.....................................................................................................................PM
U.O. Adding a report.................................................................................................................PM
U.P. siewing a report................................................................................................................PN
U.Q. bditing a report.................................................................................................................PN
U.R. aeleting a report...............................................................................................................PN
U.S. ounning a report...............................................................................................................PO
U.T. Customizing reports view....................................................................................................PP
V. pettings....................................................................................................PR
mage Q
rserDs janual
lverview
1. lverview
Cashew is a full-featured and user-friendly personal finance manager which lets you easily manage and keep track
of your finances without having any experience in accounting. ft supports all the basic features required for
personal accounting. qhese includeW
•
•
•
•
•
complete account management support including account adjustmentI reconciliation and purging operations;
extremely easy transactions entryI convenient browsing and powerful filtering capabilities;
flexible report engine that allows to generate stored and instant reports of different types;
user defined categories hierarchy for convenient transactions classification;
multiple currencies support.
vou can install Cashew from the Android jarket Eit is available in the ApplicationsLcinance areaF. lnce the
application is installed on your device you can launch it using the Cashew icon.
Cashew icon
lnce you launch Cashew you arrive at the main screen. CashewDs main screen contains list of application modes.
CashewDs main screen
bach mode groups functions to work with a particular entity EtransactionsI accountsI reports etcF. qouch a list
item to enter a corresponding mode
1.1. pystem requirements
Cashew will run on any Android device with firmware version higher than N.R.
pupported screen resolutionsW POMxQUM Eothers are not tested yetF.
1.O. curther reading
ff you are an experienced Android platform user you can go to the nuick ptart chapter.
ff you want to know more about Cashew user interface organization principles and useful widgets please refer
to the rser interface chapter.
ff you want to learn Cashew in greater detailsI to understand how it works and to know more about tricks please
carefully read the rest of the chapters.
mage R
rserDs janual
nuick ptart
O. nuick ptart
qhis chapter provides brief instructions on how to quickly prepare Cashew to work after the installation.
1. Configure currencies. qouch the Currencies item in the main screen to enter currencies mode. Add all
currencies you are going to use for you personal finance management. aefine your home currency and set
the actual exchange rates. ff you are not going to use multiple currencies you just need to rename the default
currency to your local one.
2. Configure categories. qouch the Categories item in the main screen to enter categories mode. aefine the
tree of the categories that you are going to use to classify your transactions. vou can organize categories
into a two-level hierarchyI i.e. create subcategories.
3. Create accounts. qouch the Accounts item in the main screen to enter the accounts mode. Create an account
for each of your bank accountI credit cardI and for your cash. pet opening balances for you accounts
accordingly to the actual amounts of funds you have.
4. kow Cashew is ready for entering transactions. Add new transactions for each income or expense. Add
transfer transaction when money is moved between you accounts Ee.g.I cash withdrawal in an AqjF.
5. then you have enough transactions entered you can create and run reports to see how money is spent or
received by an accountI category or month.
qo find detailed information about Cashew featuresI user interface widgetsI tips and more please refer to the
chapters below.
mage S
rserDs janual
rser interface
P. rser interface
torking with personal finance you deal with multiple lists of items. bach operation with money Ereceiving or
spendingF is considered as a transactionI so we have a transaction list called register. rsually you have several
places where you keep your money Ecredit cardI bank accountI cashFI each of these places is considered as an
accountI so we have a list of accounts. vou also need to define incomeLexpense categoriesI to easier classify your
incomes and expenses and see where money comes from and where it goes to. vou may also work with multiple
currenciesI for exampleI when you are going on a business trip or vacation to another country. And finally you
may want to create a number of predefined reports to run them from time to time to assess your financial status.
fn almost every application mode you need to manage a list of itemsW add new itemsI viewI edit or remove existing
ones and so on. torking with lists in Cashew in different modes is implemented in a similar way and is common
with the approach used in other Android applications. fn this chapter we describe the common principles of Cashew
user interface organization.
P.1. iists
then you enter a particular modeI you see a list of items EaccountsI currenciesI transactions etcF.
A list screen menu usually contains two commandsW
• New - allows you to create a new item and add it to the list. then you choose this commandI a corresponding
form is displayed.
• Settings - allows you to customize the list view Echange how it is displayed or how it behavesF. then you
choose this commandI a corresponding list settings screen is displayed.
fn the list settings you can customize the followingW
• Navigation - defines what happens when you touch a list item. bvery list allows you to choose between View
and Edit commandsI some lists provides more options here Ee.g.I Run reportF;
• Sorting - defines the field the list items are sorted by and the sorting order Eascending or descendingF. qree-like
listsI e.g.I categories or reports can not be sorted.
qhere are a few list screensI like accounts or transactions lists that provide additional customization options.
then you touch a list item the action you have configured in the list settings is performedW
• View - opens the siew screen where you can see more details about the item or perform additional operations
on this item Ethis is set by defaultF;
• Edit - opens the bdit form where you can update the itemDs information.
iong touch on a list item calls the listDs popup menuI which usually contains all the operations you can perform
on the selected list item.
BesidesI a list screens can contain a filter. A filter is a spinner in the list header which allows you to limit the
number of displayed items in the list by particular criteria. cor exampleI in the account list you can display accounts
of a particular typeI in the transactions list you can display transactions that belong to a particular account and
so on.
P.O. siews
An item details view is a screen that is displayed when you call the View command.
qhe view screen contains a header which displays the field which best identifies this item Eusually the nameFI a
list with detailed information about the item or additional operations that can be performed on this itemI and an
optional footer.
qhe view screen menu usually contains two commandsW
• Edit - opens the bdit form where you can update the itemDs information;
• Delete - removes the item. then you choose this commandI a confirmation message will appear and once
Yes is pressedI the item will be deleted and you will be returned to the list screen.
P.P. corms
A form is a screen which is used to enter information when you are creating a new item or changing the information
about an existing item.
mage T
rserDs janual
rser interface
qhe number and types of widgets in the form depends on the type of the item you are creating or editing. Cashew
introduces a number of new widgets that are not available in standard Android applications and will probably be
new for you. vou can find more information about those widgets in the doodies chapter.
bach form contains two buttons in the bottomW
• Done - saves your changesI closes the form and returns you to the previous screen;
• Revert - closes the form and returns you to the previous screen without saving changes.
qhe form menu contains the following commandsW
• Done - performs the same action as the Done button;
• Revert - performs the same action as the Revert button;
• Delete - removes the item. qhis command is available only when you are editing the itemI not when you are
creating a new one.
P.Q. doodies
qhis section describes some user interface widgets that are not standard for Android platform but are used in
Cashew and can make your work with the application more convenient.
P.Q.1. Calculator
jost of the number entry fields in Cashew have a button with a calculator icon nearby.
Amount picker
then you press the button the Calculator screen pops up.
Calculator screen
Calculator allows you to perform simple arithmetical operations. mressing = sign completes calculationsI returns
you to the previous screen and set the result to the field. mressing Cancel returns you to the previous screen
without saving the calculations result.
P.Q.O. aate input
aate input fields in Cashew have a button with a calendar icon nearby.
aate picker
then you press the buttonI the standard date picker dialog pops up. Chose the desired date and press Set to
put it into the field.
iong touch the input field to see a popup menuI which allows you to quickly enter dates for yesterdayI today or
tomorrow.
mage U
rserDs janual
rser interface
P.Q.P. aate period input
fn various filter forms you need to specify the date period for the filter. fn this case a pair of date input widgets
is used. qhey work as described above with one additional feature. iong touch on any of the fields calls the
extended popup menu which contains the following optionsW
• TodayI TomorrowI Yesterday or No date to set the corresponding value to the individual field;
• This monthI Last month and This year to set the corresponding period in both fields.
P.Q.Q. Category picker
qhe category picker is a widget that allows you to choose a category from the category tree youDve defined.
Category picker consists of a read-only text entry field and a button with a category icon.
Category picker
then you press a button the category picker screen pops up.
then you need to choose only one category Ein transaction formFI the category picker looks similarly to the
categories tree screenI and you need to choose and touch the required item.
pingle choice category picker
then you need to choose more than one category Ein report filter formsFI each tree item has a checkbox nearby.
jultiple choice category picker
jark required categories and choose the Done command from the screen menu. fn additionI the screen menu
contains Select all and Unselect all commands to markLunmark all categories in the tree.
P.Q.R. Account picker
qhe account picker is a widget that allows you to choose a number of accounts for the transaction filter. qhe
account picker consists of a read-only text entry field and a button with an account icon.
Account picker
mage V
rserDs janual
rser interface
then you press a button the account picker screen pops up.
Account picker screen
jark required accounts and choose the Done command from the screen menu. fn additionI the screen menu
contains Select all and Unselect all commands to markLunmark all categories in the tree.
mage NM
rserDs janual
Accounts
Q. Accounts
An account in Cashew is a record of your finances orI simply putI the place where you keep your money. ftDs
obvious that you may have more than one place where you keep your money. ft might be your bank accountI a
debitLcredit card or just cash in you wallet. Advanced users may also be interested in tracking assets Ee.g.I home
equity or retirement accountsF and liabilities Ee.g.I mortgages or auto loansF.
Cashew allows you to create multiple accounts in different currenciesI modify existing accounts informationI track
account balances and more.
fn Cashew you can define the following fields for an accountW
•
•
•
•
•
•
name - the name of the account which will be used across the application;
type - one of the account types supported by Cashew Eplease see the list belowF;
currency - currency of the accountI all transactions in this account are nominated in the accountDs currency;
opening balance - the accountDs opening balance;
minimum balance - the accountDs minimum balance;
notes - any additional information about the account or a short description.
qhe following account types are supported in CashewW
•
•
•
•
•
•
•
asset - for keeping track of assets such as home equity or retirement accounts;
cash - for keeping track of cash expenditures;
checking - for keeping track of checking accounts;
credit card - for keeping track of credit card accounts;
liability - for keeping track of tracking liabilities like mortgages or auto loans;
savings - for keeping track of savings accounts;
other - for any other accounts.
Cashew supports one more account attribute. qhis is a Favourite flag. vou can mark accounts as favourite and
then choose to display only favourite accounts.
Q.1. Accounts list
qhe accounts list displays information about all your accounts. qhis screen is best for having a birdDs eye view of
your financial state.
Account list
Account list displays account names and their current balances in a currency of a particular account. qouch a list
item to view the account details Edefault behaviourI can be changed in account list settingsF. A long touch on a
list item calls the context menu with the operations you can perform on the selected account.
qhe screen header contains a simple account type filter. qhe spinner contains a list of account types supported
by the application. vou can choose one of them to display only accounts of this type. then the All item is selected
accounts of all types are displayed.
Account list footer contains sum of all displayed accounts balances. Accounts total is displayed in your home
currency. qhe balances of the accounts that use different currencies are converted to the home currency using
the exchange rates defined for those currencies.
qhe screen options menu contains New account and Settings commands.
mage NN
rserDs janual
Accounts
Q.O. Adding a new account
qo create a new account go to the accounts list screen and choose the New account command from the screen
menu or use the Menu+n keyboard shortcut . qhe New account screen will appear.
kew account screen
1.
2.
3.
4.
5.
bnter the name of the account into the Name field.
Choose the account type from the Type spinner.
Choose the account currency from the Currency spinner.
bnter the accountDs opening balance into the Opening field.
bnter the accountDs minimum balance into the Minimum field.
NOTE: The balance values supported by Cashew are numbers from
-1,000,000,000.00 to 1,000,000,000.00.
6. bnter a note or a comment describing the account into the Notes field.
7. mress the Done buttonI or choose the Done menu command or use the Menu+Enter shortcut to store the
account information in the database.
vou can create as many accounts as you needI the number of accounts you can create is limited by the amount
of free space on your device
Q.P. siewing an account
qo view the account details just click on the corresponding list item or choose the View account command from
the accounts list context menu.
Account view screen
qhe account view screen contains a header which displays the account nameI a list with actions that can be
performed on the accountI and a footer displaying the account balance.
fn additionI you can see the star-styled checkbox in the account headerI which reflects the accountDs Favourite
status and allows you to change this status Emark account as favourite or notF. rsing the accounts list settings
screen you can configure the application to display either all accounts or favourite accounts only.
qhe screen options menu contains Edit account-> and Delete account commands.
mage NO
rserDs janual
Accounts
Q.Q. bditing an account
qhere are several ways to modify information about an existing accountW
• the Edit account command in the accounts list popup menu;
• the Edit account command or the Menu+e shortcut in the account details screen menu;
• if the Account touch opens option is set to Edit account - touch the corresponding account list item.
lnce one of these steps is performedI the Edit account form will popup.
bdit account screen
qhe fields in the Edit account form are the same as those in the Add account form. pee DAdding new accountD.
Q.R. aeleting an account
qo delete an account you can use several optionsW
• accounts list screen - long touch the list item to call the popup menu and choose the Delete account command;
• account view screen - press jenu and choose the Delete account command or the Menu+d shortcut;
• edit account screen - press jenu and choose the Delete account command.
A confirmation message will appearI and once Yes is pressed the account is deleted.
NOTE: Account deletion will also delete all its income/expense transactions. All
transfer type transactions will be moved to the Unfiled account.
Q.S. Adjusting an account balance
pometimes you run into situations when an account balance in Cashew doesnDt match the actual amount of money
available or the bankDs balance. ft may happen when an unknown charge appears on your bank statement or you
forget to enter a transaction. Cashew allows you to adjust the balance to keep balances in sync and later when
you determine the cause of the problem you can rollback the adjustment.
qhere are two ways to adjust an account balance in CashewW
• Adjust opening balance - the difference between the actual account balance and Cashew ending balance is
added to the opening account balance;
• Add adjusting transaction - a transaction with the amount equal to the difference between the actual account
balance and Cashew ending balance is added to the accountDs register.
Both commands use similar work flowI but produce the same result - the account balance becomes adjustedI but
they reach it with different meansI as described above.
qo adjust an account balance you can do one of the followingW
• choose the Adjust opening balance or the Add adjusting transaction command in the accounts list popup
menu;
• choose the appropriate Adjust balance action in the account details screen.
lnce this is doneI the Adjust balance form will appear.
mage NP
rserDs janual
Accounts
Adjust balance form
1. ff you want to correct a balance on a particular dateI enter the date into the Date fieldI by default todayDs
date is used. qhe Balance field displays account balance on the specified date.
2. bnter the actual balance on the specified date into the Adjusted balance field.
3. mress the Adjust button to complete the adjustment.
Q.T. oeconciling an account
qo reconcile an account you can do one of the followingW
• choose the Reconcile account command from the accounts list popup menu;
• choose the Reconcile action from the account details screen.
lnce this is doneI the Reconcile account form will appear.
oeconcile account form
1.
2.
3.
4.
bnter
bnter
bnter
bnter
the
the
the
the
start date from your bank statement into the From field.
end date from your bank statement into the Through field.
beginning balance from your bank statement into the Beginning balance field.
ending balance from your bank statement into the Ending balance field.
NOTE: Once the start date is entered the application sets the balance on that
date into the Beginning balance field. Once the end date is entered the
application sets the balance on that date into the Ending balance field.
NOTE: To start clearing transactions, the entered beginning balance has to be
equal to the reconciled balance on the start date, otherwise you will not be able
to start reconciliation.
lnce the data from the bank statement are entered press the Reconcile button. ff the reconciled balance on the
start date doesnDt match the entered beginning balanceI the appropriate warning message will be displayed.
mage NQ
rserDs janual
Accounts
rsually it means that you have unreconciled transactions in an earlier periodI before the start date and need to
complete reconciliation of that period first. ff balances matchI you will see the Reconcile screen.
oeconcile screen
qhe Reconcile screen displays a list of transactions that belong to the corresponding account and fall into the
defined period. ft also contains a footer with the difference between the entered ending balance and the cleared
account balance. qhe list displays a checkbox next to each transaction. then you touch the list itemI the transaction
is marked as Cleared and the difference is adjusted. then all transactions are cleared and the difference between
the ending balance and the cleared balance is zeroI you can complete the reconciliation. qo do thisI choose the
Done command from the screen menu - all cleared transactions will be marked as Reconciled and the reconciliation
will be complete.
auring reconciliation you may notice that register does not contain a transaction which is available in the bank
statementI contains a transaction that is missing in the bank statement or contains a transaction with an incorrect
amount. bach of these makes it impossible to complete reconciliation. qo resolve this you can use New transactionI
Edit transaction and Delete transaction commands. qhe New transaction command is available via the screen
menuI and Edit transaction and Delete transaction commands are available via the transactions list popup
menu.
TIP: The screen menu contains the Go to command, which allows you to quickly
navigate to the top or bottom of the list or to the first transactions on the specified
date.
Q.U. murging an account
qo purge an account transactions you can do one of the followingW
• choose the murge account command from the accounts list popup menu;
• choose the murge action from the account details screen.
lnce this is doneI the murge transactions filter form will appear.
murge transactions filter form
mage NR
rserDs janual
Accounts
1. aefine the time period you need the transactions to be purged from using the From and Through date
fields.
2. Choose the categories you need the transaction to be purged for using the Categories picker.
3. Choose the transaction status of the transactions to be purged from the Status spinner.
4. mress the Purge button to purge transactions.
A confirmation message will appear and once ves is pressedI transactions that match the specified filter are deleted
from the database and the account opening balance is adjusted with the total amount of purged transactionsI
thus the ending account balance remains unchanged.
Q.V. Customizing accounts list
qo customize the account list screenI call the screen options menu and choose the Settings commandI or use
the Menu+p keyboard shortcut. qhe Account list settings screen will popup.
Account list settings screen
fn the Account list settings screen you can change the following preferencesW
• Favourites only. pet this option checked if you want only favourite accounts to be displayed in the account
list. then this option is cleared all accounts will be displayed.
• Sorting field. rse this option to specify the field the account list is sorted by.
• Sorting order. rse this option to specify the sorting order Eascending or descendingF.
• Account touch opens allows you to define the action to be performed when you touch a list item. vou can
choose View accountI Edit account and View register.
mage NS
rserDs janual
Categories
R. Categories
Cashew supports a categories hierarchy to help you to organize your transactions. rsing categories and reporting
you can easily see where your money comes from and where it goes. qhere are two category types supportedW
• income - income categories are usually used for transactions which increase your net worthI e.g. salaryI bonuses
etc;
• expense - expense categories are usually used for things you spend your money onI e.g. clothingI utilitiesI
entertainment etc.
qhe category tree has two levelsI so you can operate with categories and one level of their subcategories. cor
exampleI you can define a cood category and droceriesI iunches and pnacks subcategories inside.
fn Cashew you can define the following fields for categoryW
• name - the name of the category;
• type - the type of the category Efncome or bxpenseF;
• parent - the parent category for second-level categories.
R.1. Categories tree
qhe categories tree displays the hierarchy of all categories you have defined.
Categories tree
qhe categories tree displays a two-level hierarchy of categories. qouch a list item to view the category details
Edefault behaviourI can be changed in the categories tree settingsF. A long touch on a list item calls the context
menu with the operations you can perform on the selected category.
qhe screen header contains a simple category type filter. qhe spinner contains the list of category types supported
by the application. vou can choose one of them to display only categories of this type Efncome or bxpenseF. then
the All item is selected categories of both types are displayed.
qhe screen options menu contains New category and Settings commands.
R.O. Adding a category
qo create a new category go to the categories tree screen and choose the New category command from the
screen menu or use the Menu+n keyboard shortcut . qhe New category screen will appear.
kew category screen
mage NT
rserDs janual
Categories
1. bnter the name of the category into the Name field.
2. Choose the category type from the Type spinner.
3. Choose the parent category for the category you want to create Eor <root> if you want to create a top-level
categoryF from the Parent spinner.
4. mress the Done buttonI or choose the Done menu command or use the Menu+Enter shortcut to store the
category information in the database.
TIP: If you choose a first-level category in the categories tree before creating a
new one, then the Parent spinner in the New category form will be preset to
this category, and the Type spinner will be preset to this category's type. If you
choose a second-level category in the categories tree, the New category form
will be preset with the corresponding values of its parent.
R.P. siewing a category
qo view the category details just click on the corresponding tree item or choose the View category command
from the categories tree context menu.
Category view screen
qhe category view screen contains a header which displays the category name and a list which displays other
category fields.
qhe screen menu contains Edit category-> and Delete category commands.
R.Q. bditing a category
qhere are several ways to modify the information about an existing categoryW
• the Edit category command in the categories tree popup menu;
• the Edit category command or the Menu+e shortcut in the category details screen menu;
• if the Category touch opens option is set to Edit category - touch the corresponding categories tree item.
lnce one of these steps is performed the Edit category form will popup.
bdit category screen
qhe only category field you can change is the name.
mage NU
rserDs janual
Categories
R.R. aeleting a category
qo delete a category you can use several optionsW
• categories tree screen - long touch the tree item to call the popup menu and choose the Delete category
command;
• category view screen - press jenu and choose the Delete category command or the Menu+d shortcut;
• edit account screen - press jenu and choose the Delete category command.
A confirmation message will appearI and once the Yes button is pressed the category is deleted.
NOTE: When you delete a category which is used in one or more transactions
the transaction(s) become uncategorized (the Category field becomes empty).
WARNING: You can not delete a category if it has one or more subcategories.
If you try to do this a corresponding warning message will be displayed. If you
would like to delete the category, delete all its subcategories first.
R.S. Customizing the categories tree
qo customize the categories tree screenI call the screen options menu and choose the Settings commandI or use
the Menu+p keyboard shortcut. qhe Categories tree settings screen will popup.
Categories tree settings screen
qhe only customization available for the categories tree is the tree item touch behaviour. vou can choose either
View category or Edit category options.
mage NV
rserDs janual
Currencies
S. Currencies
Cashew supports multiple currencies allowing you to track your accounts and enter transactions in different
currencies. qhe currency you are using for most of your accountsI usually your local country currency is called
home currency. qhe home currency will be used to display balances and report totals when transactions have
different currencies.
fn Cashew you can define the following fields for currencyW
• name - full currency name;
• code - short currency codeI you can use standard three-letter codes here;
• symbol - currency symbol which is used to display amounts and balances across the application.
then a currency has been added to the databaseI you can define it as home or set its exchange rate to the home
currency.
S.1. Currencies list
qhe currencies list displays information about all the currencies you use. Currency name and exchange rate are
displayed for each currency. qhe home currency is marked with the Deome currencyD icon in the exchange rate
column.
Currencies list screen
qhe screen menu contains New currency and Settings commands.
S.O. Adding a new currency
qo define a new currency go to the currencies list and choose the New currency command from the screen menu
or use the Menu+n keyboard shortcut. qhe New currency screen will popup.
kew currency screen
1. bnter currency name into the Name field.
2. bnter currency code into the Code field.
3. bnter currency symbol into the Symbol field. qo define the currency symbol you can also press the currency
symbol picker button and choose a symbol from the list of most popular currency symbols.
4. mress the Done buttonI or choose the Done options menu command or use the Menu+Enter shortcut to
save the information about the currency to the database.
mage OM
rserDs janual
Currencies
NOTE: When a currency is created its exchange rate to the home currency is
set to 1.00. You can define it later using the Set exchange rate command from
the currency list popup menu, or from the currency details screen menu.
Cashew supports unlimited number of currenciesI actually the number of currencies you can create is limited by
the amount of free space on your device.
S.P. siewing a currency
qhe View currency screen displays the detailed information about a particular currency and provides access to
other currency operations.
Currency view screen
qhe currency details screen contains an actions list with Set exchange rate and Make home commands.
qhe currency details screen menu contains Edit currency and Delete currency commands.
S.Q. bditing a currency
qhere are several ways to modify information about an existing currencyW
• the Edit currency command in the currency list popup menu;
• the Edit currency command or the Menu+e shortcut in the currency details screen options menu;
• if the Currency touch opens option is set to Edit currency - touch corresponding currency list item.
lnce one of these steps is performed the Edit currency form will popup.
bdit currency screen
qhe fields in the Edit currency form are the same as those in the Add currency form. pee DAdding new currencyD.
S.R. aeleting a currency
qhere are several ways to delete a currency from your databaseW
• in the currencies list screen - select a corresponding list itemI and choose the Delete currency command from
the popup menu;
• in the currency details screen - press jenu and choose the Delete currency command;
• in the Edit currency screen - press jenu and choose the Delete currency command.
mage ON
rserDs janual
Currencies
A confirmation dialog will appear and once Yes is pressed the currency is deleted.
NOTE: You can not delete the home currency. If you would like to delete the
home currency you need to set another currency as home first and then delete
the desired one.
WARNING: You also can not delete a currency which is used by one or more
accounts. If you try to do this, a corresponding warning message will be displayed.
If you would like to delete the currency, modify your accounts to use another
currency first.
S.S. petting the exchange rate
qo set a different exchange rate between a particular currency and the home currency you can do one of the
followingW
• choose the Set exchange rate command from the currency list popup menu;
• choose the Set exchange rate command in the currency details screen menu.
lnce this is doneI the Set exchange rate dialog will popup.
Currency exchange rate dialog
bnter the currency exchange rate into the Exchange rate field. mress Done to store the entered exchange rate.
TIP: You can also use the Invert rate checkbox when the usage of the inverted
rate is more convenient. For example, if your base currency is United States
Dollar and you need to define the exchange rate for Japanese Yen, it is more
convenient to define exchange rate as 90 Yens for 1 Dollar than 0.0111 Dollars
for 1 Yen.
rsing inverted exchange rates
S.T. Changing the home currency
qo set another home currency you can do one of the followingW
• choose the Make home currency command from the currency list popup menu;
mage OO
rserDs janual
Currencies
• choose the Make home command in the currency details screen menu.
A confirmation dialog will appear and once Yes is pressed the new home currency is set.
S.U. Customizing the currencies list view
qo customize the currencies list screenI call the screen options menu and choose the Settings commandI or use
the Menu+p keyboard shortcut. qhe Currencies list settings screen will popup.
Currency list settings screen
fn the Currencies list settings screen you can change the following preferencesW
• Sorting field. rse this option to specify the field the currencies list is sorted by.
• Sorting order. rse this option to specify the sorting order Eascending or descendingF.
• Currency touch opens allows you to define the action to be performed when you touch a list item. vou can
choose View currency and Edit currency.
mage OP
rserDs janual
qransactions
T. qransactions
A transaction is a single operation with your money that changes the account balance. A transaction amount is
the value your account balance is increased or decreased by. Cashew supports three types of transactionsW
1. income - any income to an accountI which increases your net worth.
2. expense - any expense from an accountI which decreases your net worth;
3. transfer - any movement of funds from one account to another. qransfers donDt change your net worthI they
decrease the balance of one account and increase the balance of another with the same amount.
qhe following fields can be defined for a transactionW
•
•
•
•
•
•
•
•
amount - the amount of money withdrawn from or deposited to the account;
account - the account the transaction belongs to;
type - the incomeI expense or transfer;
date - the date when transaction was made;
category - the category of the goodLservice funds have been spent for or received from;
payee - a string that describes another party EpersonLorganization you gave money to or received it fromF;
number - the transaction number Eusually specified for cheque accountsF;
notes - any additional information regarding the transaction.
A transfer transaction is a little bit differentI in this case the category is replaced with the targetLsource account.
T.1. oegister view
qhe register screen displays all of the transactions you have entered for all or a particular account and the accountDs
balance.
oegister screen
TIP: The screen menu contains the Go to command, which allows you to quickly
navigate to the top or bottom of the list or to the first transactions on the specified
date.
qhe transaction list displays the transactionDs dateI accountI category and amount. qouch a list item to view the
transaction details Edefault behaviourI can be changed in the register settingsF. A long touch on a list item calls
the context menu with the operations you can perform on the selected transaction.
qhe screen header contains a simple account filter. qhe spinner contains a list of accounts you have defined. vou
can choose one of them to display only the transactions that belong to a particular account. then All is selected
transactions from all accounts are displayed. rnfiled is a built-in pseudo account to keep transactions that donDt
belong to any other account.
qhe footer displays the balance of the account selected in the accounts spinner. qhe total of a particular account
is displayed in the accountDs currency. then All is selected in the spinner - the sum of all account balances is
displayed. ff you have accounts in different currenciesI the total is calculated using the exchange rates defined
for those currencies and shown in your home currency.
qhe screen menu contains New transactionI Apply filterI Go to and Settings commands.
mage OQ
rserDs janual
qransactions
T.O. Adding a transaction
qo enter a new transaction go to the register screen and choose the New transaction command from the menu
or use the Menu+n shortcut. qhe New transaction screen will popup.
kew transaction screen
1. bnter the transaction amount into the Amount field.
NOTE: The amount values supported by Cashew are numbers from
-1,000,000,000.00 to 1,000,000,000.00.
2.
3.
4.
5.
6.
7.
8.
9.
10.
Choose the account from the Account spinner.
Choose the transaction type from the Type spinner.
bnter the transaction date into the Date field.
rse the Category picker to choose an expenseLincome category for the transaction.
bnter the transaction payee into the Payee field. qhis field is optional.
bnter the transaction number into the Number field. qhis field is optional.
rse the Status spinner to set the initial transaction status Ewhen neededF.
bnter a note or comment describing the transaction into the Notes field.
mress the Done buttonI or choose the Done options menu command or use the Menu+Enter shortcut to
save the information about the currency to the database.
T.O.1. Adding a transfer transactions
A transfer transaction is a specific type of transaction. qhe main difference is that a transfer transaction is related
not to one but two accountsW the source account where money is withdrawn from and the target account where
money is deposited to. then the Transfer type is chosen in the Type spinnerI the Category picker is replaced
with the target account spinner. fnstead of choosing a category for the incomeLexpense transaction on step R in
the procedure aboveI you need to choose a target account for the transfer transaction.
qransfer transaction screen
then a transfer is made between accounts with different currencies you should specify the currency exchange
rate for the transaction. qhe Set exchange rate dialog appears once you have pressed the Done button.
mage OR
rserDs janual
qransactions
pet exchange rate screen
vou can specify either the target account transaction amount in the To field or the exchange rate in the Rate
field - the value in the second field will be re-calculated accordingly. vou can also use the Invert rate checkbox
when the usage of the inverted rate is more convenient.
T.P. siewing a transaction
qo view the transaction details just click on the corresponding tree item or choose the View transaction command
from the transaction list context menu.
siew transaction screen
qhe transaction view screen contains the header which displays the transaction amount and the list which displays
the list of other transaction fields.
qhe screen options menu contains Edit->I Copy and Delete commands.
T.Q. bditing a transaction
qhere are several ways to modify the information about an existing transactionW
• the Edit transaction command in the transactions list popup menu;
• the Edit command or the Menu+e shortcut in the transaction details screen menu;
• if the Transaction touch opens option is set to Edit transaction - touch the corresponding transactions list
item.
lnce one of these steps is performedI the Edit transaction form will popup.
mage OS
rserDs janual
qransactions
bdit transaction screen
qhe fields in the Edit transaction form are the same as those in the Add transaction form. pee DAdding new
transactionD.
T.R. Copying a transaction
qo create a new transaction based on an existing transaction you can do followingW
• choose the the Copy transaction command in the transactions list popup menu;
• choose the Copy command or the Menu+c shortcut in the transaction details screen menu.
lnce one of these steps is performed the Copy transaction form will popup.
Copy transaction screen
qhe fields in the Copy transaction screen are the same as those in the Add transaction screen. pee DCreating
a transactionD.
T.S. aeleting a transaction
qo delete a transaction you can use several waysW
• register screen - long touch the list item to call the popup menu and choose the Delete transaction command;
• transaction view screen - press jenu and choose the Delete account command or the Menu+d shortcut;
• edit transaction screen - press jenu and choose the Delete account command.
A confirmation message will appearI once Yes button is pressed the account is deleted.
T.T. ciltering transactions
ciltering allows you to specify the transactions that are displayed in the register view. qo apply a filterI choose
the Apply filter command or use the Menu+f keyboard shortcut. qhe Transactions filter screen will popup.
mage OT
rserDs janual
qransactions
qransactions filter screen
1.
2.
3.
4.
5.
aefine the time period you need the transactions from using the From and Through date fields.
Choose the accounts you need the transactions for using the Accounts picker.
Choose the categories you need the transaction for using the Categories picker.
Choose the transaction status from the Status spinner.
mress the Done button or use the Menu+Enter keyboard shortcut to apply the filter.
then the filter is applied only transactions that meet all the criteria that you have specified in the transaction
filter will be displayed in the list. Any fields that you leave blank in the transaction filter will be ignored. then the
filter is applied you can modify it using the Edit filter-> EMenu+eF command or clear it using the Clear filter
EMenu+cF command.
oegister view with a filter applied
T.U. Customizing the register view
qo customize the Register screenI call the screen menu and choose the Settings commandI or use the Menu+p
keyboard shortcut. qhe Register settings screen will popup.
oegister settings screen
fn the Register settings screen you can change the following preferencesW
mage OU
rserDs janual
qransactions
• Primary field. rse this option to set the information that is displayed in the primary list item field. vou can
choose Category or Payee.
• Secondary field. rse this option to set the information that is displayed in the secondary list item field. vou
can choose Account or Number.
• Sorting field. rse this option to specify the field the currencies list is sorted by.
• Sorting order. rse this option to specify the sorting order Eascending or descendingF.
• Transaction touch opens allows you to define the action to be performed when you touch a list item. vou
can choose View transaction or Edit transaction.
mage OV
rserDs janual
oeports
U. oeports
Cashew allows you to create reports based on your transactions. A report is a pair of a filter that defines which
transactions should be included in the report and a report type which defines the transaction grouping. Currently
Cashew supports the following report typesW
• incomeLexpense by month - the transactions matching the report filter are grouped by monthsI thus each
report result entry is a sum of transaction amounts for the corresponding month;
• incomeLexpense by accounts - the transactions matching the report filter are grouped by accountsI thus each
report result entry is a sum of transaction amounts for the corresponding account;
• incomeLexpense by categories - the transactions matching the report filter are grouped by categoriesI thus
each report result entry is a sum of transaction amounts for the corresponding category.
U.1. oeports view
qhe reports view displays all of your reports or reports of a particular type.
oeports screen
qhe reports view has a two-level tree structure. vou can see the report types at the first tree levelI and stored
reports under each report type node. qouch a list item to view the report details Edefault behaviourI can be changed
in reports list settingsF. iong touch on a list item calls the context menu with the operations you can perform on
the selected report.
rsing the reports screen popup menu you can launch instant and stored reportsI create new reports and modify
and delete existing ones.
qhe screen header contains a simple report type filter. qhe spinner contains a list of report types. vou can choose
one of them to display only reports of the corresponding type. then the All item is selected all reports are displayed.
qhe screen menu contains New report and Settings commands.
U.O. Adding a report
qo create a new report go to the reports view and choose the New report command from the screen menu or
use the Menu+n keyboard shortcut. qhe New report screen will popup.
kew report screen
1. bnter the name of the report into the Name field.
mage PM
rserDs janual
oeports
2.
3.
4.
5.
6.
7.
Choose the report type from the Type spinner.
aefine the time period you need the transactions from using the From and Through date fields.
Choose the accounts you need the transactions for using the Accounts picker.
Choose the categories you need the transactions for using the Categories picker.
Choose the status you need the transactions for using the Status spinner.
mress the Done buttonI or choose the Done popup menu command or use the Menu+Enter shortcut to
save the report information in the database.
U.P. siewing a report
qo view the report details just click on the corresponding list item or choose the View report command from the
reports view context menu.
oeport view screen
qhe Report view screen contains a header which displays the report name and a list with the actions that can be
performed on the report.
qhe screen menu contains Edit report-> and Delete report commands.
U.Q. bditing a report
qhere are several ways to modify information about a reportW
• the Edit report command in the reports list popup menu;
• the Edit report command or the Menu+e shortcut in the report details screen menu;
• if the Report touch opens option is set to Edit report - touch the corresponding report list item.
lnce one of these steps is performedI the Edit report form will popup.
bdit report screen
qhe fields in the Edit report form are the same as those in the Add report form. pee DAdding a reportD.
U.R. aeleting a report
qo delete a report you can use several optionsW
• the reports list screen - long touch the list item to call popup menu and choose the Delete report command;
• the report view screen - press jenu and choose the Delete report command or the Menu+d shortcut;
mage PN
rserDs janual
oeports
• the edit report screen - press jenu and choose the Delete command.
A confirmation message will appearI and once Yes is pressed the report is deleted.
U.S. ounning a report
Cashew supports few ways of running reports. qo run a previously created reportI you can do one of the followingW
• choose the Run report command in the reports list popup menu;
• choose the Run report command in the report details screen action list.
lnce it is done a report view will appear. qhere are three different report views in Cashew which depend on the
report typeW
1. fncomeLexpense by month groups all transactions which match the report filter and belong to a particular
month
bxpense by month report view
2. fncomeLexpense by account groups all transactions that match the report filter and belong to a particular
account
bxpense by accounts report view
3. fncomeLexpense by category groups all transactions that match the report filter and belong to a particular
category
bxpense by category report view
mage PO
rserDs janual
oeports
4. then there are no transactions matching the report filter criteriaI an empty report view is displayed
bmpty report view
fn case you do not have a previously created reportI you can run the instant report. pelect a first-level tree node
which corresponds to the desired report typeI call the reports list popup menu and choose the Run report
command. qhe Instant report form will popup.
fnstant report form
qhe fields in the Instant report form are almost the same Ethe Name field is absentF as those in the New report
screen. pee DAdding a reportD. cill in the desired filter fields and press the Run button or choose Run from the
screen menu to get the report results. ff you want to use this report in future you can store it as you do with New
report. Call the screen menuI choose the Save command or the Menu+s keyboard shortcut. qhe report name
dialog will popup.
paving instant report
bnter the report nameI and press Done to store the report in the database.
U.T. Customizing reports view
qo customize the reports listI call the screen options menu and choose the Settings commandI or use the Menu+p
keyboard shortcut. qhe Reports list settings screen will popup.
mage PP
rserDs janual
oeports
oeports list settings screen
qhe only customization available for the reports list is the list item touch behaviour. vou can choose either the
View categoryI Edit report , or Run report option.
mage PQ
rserDs janual
pettings
V. pettings
qhe Settings screen allows you to customize CashewDs appearance and behaviour and set the password to
protect your private data. vou can access the Settings screen from the Cashew home screen.
pettings screen
qhe Formatting preferences group allows you to configure the way numeric and date values are displayed
throughout the application. vou can configure the followingW
• Highlight negatives. then this option is checked all negative numbers Etransaction amountsI account balancesF
will be displayed in the red colour.
• Currency format. vou can choose the way the numbers should be formatted throughout the application.
• Date format. vou can choose the way the dates should be formatted throughout the application.
qhe Navigation preference allows you to define the application behaviour when the Back button is pressed in the
Register. qhe available options areW Return to the previous screen and Return to the main screen.
qhe Security preferences group allows you to protect the application with a password. Password is a text option
that allows you to define a passwordI that you will have to enter on application start. Check the Enable password
option to enable password protection.
mage PR