1
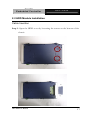
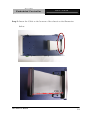
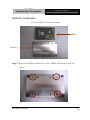
BOXER Embedded Controller AEC-6840 AEC-6840 Fanless Embedded Controller Intel® ULV Celeron® 400/650MHz EBGA CPU With Dual Ethernet, 4 COMs, DIO, CompactFlash AEC-6840 Manual 1st Ed. Jan. 2005 AEC-6840 User Manual 1 BOXER Embedded Controller AEC-6840 Copyright Notice This document is copyrighted, 2005. All rights are reserved. The original manufacturer reserves the right to make improvements to the products described in this manual at any time without notice. No part of this manual may be reproduced, copied, translated, or transmitted in any form or by any means without the prior written permission of the original manufacturer. Information provided in this manual is intended to be accurate and reliable. However, the original manufacturer assumes no responsibility for its use, or for any infringements upon the rights of third parties that may result from its use. The material in this document is for product information only and is subject to change without notice. While reasonable efforts have been made in the preparation of this document to assure its accuracy, AAEON assumes no liabilities resulting from errors or omissions in this document, or from the use of the information contained herein. AAEON reserves the right to make changes in the product design without notice to its users. AEC-6840 User Manual 2 BOXER Embedded Controller AEC-6840 Acknowledgments All other products’name or trademarks are properties of their respective owners. • Award is a trademark of Award Software International, Inc. • CompactFlash™ is a trademark of the Compact Flash Association. • VIA Eden is a trademark of VIA Technology Inc. • Microsoft Windows is a registered trademark of Microsoft Corp. • PC/AT, PS/2, and VGA are trademarks of International Business Machines Corporation. ® AEC-6840 User Manual 3 BOXER Embedded Controller AEC-6840 Packing List Before you begin operating your PC, please make sure that the following materials have been shipped: • 1 AEC-6840 Embedded Controller • 1 Keyboard & mouse cable • 1 Phoenix Power Connector • 2 Wall Mount Bracket • 1 Phoenix DIO Connector • 1 Screw Package • 1 CD-ROM for manual (in PDF format) and drivers If any of these items should be missing or damaged, please contact your distributor or sales representative immediately. AEC-6840 User Manual 4 BOXER Embedded Controller AEC-6840 Safety & Warranty 1. Read these safety instructions carefully. 2. Keep this user's manual for later reference. 3. Disconnect this equipment from any AC outlet before cleaning. Do not use liquid or spray detergents for cleaning. Use a damp cloth. 4. For pluggable equipment, the power outlet must be installed near the equipment and must be easily accessible. 5. Keep this equipment away from humidity. 6. Put this equipment on a reliable surface during installation. Dropping it or letting it fall could cause damage. 7. The openings on the enclosure are for air convection. Protect the equipment from overheating. DO NOT COVER THE OPENINGS. 8. Make sure the voltage of the power source is correct before connecting the equipment to the power outlet. 9. Position the power cord so that people cannot step on it. Do not place anything over the power cord. 10. All cautions and warnings on the equipment should be noted. 11. If the equipment is not used for a long time, disconnect it from the power source to avoid damage by transient over-voltage. 12. Never pour any liquid into an opening. This could cause fire or electrical shock. 13. Never open the equipment. For safety reasons, only qualified service personnel should open the equipment. 14. If any of the following situations arises, get the equipment checked AEC-6840 User Manual 5 BOXER Embedded Controller AEC-6840 by service personnel: a. The power cord or plug is damaged. b. Liquid has penetrated into the equipment. c. The equipment has been exposed to moisture. d. The equipment does not work well, or you cannot get it to work according to the users manual. e. The equipment has been dropped and damaged. f. The equipment has obvious signs of breakage. 15. DO NOT LEAVE THIS EQUIPMENT IN AN ENVIRONMENT WHERE THE STORAGE TEMPERATURE IS BELOW -20° C(4°F) OR ABOVE 60° C (140° F). IT MAY DAMAGE THE EQUIPMENT. FCC Safety This device complies with Part 15 FCC Rules. Operation is subject to the following two conditions: (1) this device may not cause harmful interference, and (2) this device must accept any interference received including interference that may cause undesired operation. Caution: It may cause danger of explosion if battery is incorrectly replaced. Replace only with the same or equivalent type recommended by the manufacturer. Dispose of used batteries according to the manufacturer’s instructions. AEC-6840 User Manual 6 BOXER Embedded Controller AEC-6840 Contents Copyright Notice .......................................................... 2 Acknowledgments ....................................................... 3 Packing List ................................................................ 4 Safety & Warranty........................................................ 5 FCC Safety ................................................................. 6 Chapter 1 General Information ............9 1.1 Introduction ......................................................... 10 1.2 Feature ............................................................... 11 1.3 Specification ........................................................ 12 Chapter 2 Hardware Installation ........15 2.1 Dimension ........................................................... 16 2.2 HDD Module Installation ....................................... 17 2.3 SDRAM Installation .............................................. 22 2.4 COM2 RS-232/422/485 Setting ............................. 24 2.5 Power Linkage Installation .................................... 25 2.6 Wall-mount Installation.......................................... 27 2.7 Din Rail Installation............................................... 28 2.8 COM2 RS-232/422/485 Serial Port Connector ....... 29 2.9 COM1/3/4 RS-232 Serial Port Connector .............. 29 Chapter 3 Award BIOS Setup.............30 3.1 System test and initialization ................................. 31 AEC-6840 User Manual 7 BOXER Embedded Controller AEC-6840 3.2 Award BIOS Setup ............................................... 33 3.3 Main Menu .......................................................... 35 3.4 Advanced BIOS Features...................................... 37 3.5 Advanced Chipset Features .................................. 38 3.6 Integrated Peripherals .......................................... 40 3.7 Power Management Setup .................................... 43 3.8 PnP/PCI configuration .......................................... 45 3.9 PC Health Status.................................................. 46 3.10 Clk/Voltage control ............................................. 47 3.11 Load Optimized Defaults ..................................... 48 3.12 Set Password .................................................... 49 3.13 Save & Exit Setup .............................................. 50 3.14 Exit without saving.............................................. 51 Chapter 4 Driver Installation ..............52 4.1 Installation procedure ........................................... 54 Aappendix A Programming the Watchdog Timer .................................56 A.1 Programming ...................................................... 57 A.2 W83697UF Watchdog Timer Initial Program ........... 61 AEC-6840 User Manual 8 BOXER Embedded Controller AEC-6840 1 Chapter General Information AEC-6840 User Manual 9 BOXER Embedded Controller AEC-6840 1.1 Introduction AEC-6840 is the advanced upgraded version of AEC-6810. The target markets are industrial automation such as applications in factory management, building entrance guard and transportation system. AAEON primarily focuses AEC-6840 on environmental monitoring system. Intel® ULV Celeron® chipset with low power consumption and high performance is widely acceptable and dependable in the market. USB 2.0, four Serial ports and Digital I/O communicates with diverse devices with high transferring rate. Furthermore, an optional Gigabit LAN port is a leading-edge design and also an innovation for communication in IPC industry. AEC-6840 plays a role as connecting all subsystems. AAEON not only enhances your competitive value but also gives you the excellent solution in the future. AEC-6840 User Manual 10 BOXER Embedded Controller AEC-6840 1.2 Feature • Fan-less System • Onboard Intel® ULV Celeron® 400/650MHz EBGA processor • Optional Dual LAN(Gigabit LAN) • 4 serial ports / Digital IO / USB2.0 • Embedded OS WinCE.net 4.2 porting ready for application • Supports CompactFlash Memory and lockable mechanism • Anti-vibration up to 5 g rms / Anti-shock up to 100gn AEC-6840 User Manual 11 BOXER Embedded Controller AEC-6840 1.3 Specification System • CPU: Intel® ULV Celeron® 400/650MHz EBGA CPU • Construction: Rugged Aluminum Alloy Chassis • System Memory: DDR RAM SODIMM x 1, Max. 512MB • VGA: D-sub 15 VGA Connector • Keyboard/Mouse: PS/2 Keyboard & Mouse • Ethernet: 10/100Base-T Ethernet RJ-45 connector x 1 Optional 2nd LAN(10/100 or Gigabit) • SSD: Type II CompactFlash™ slot • Hard Disk Storage: Optional 2.5” Slim HDD Module • Serial Port: 3 x RS-232, 1 x RS-232/422/485 • DIO: 3 in / 3 out • USB: 2 USB 2.0 Ports • Watchdog Timer: Generate a time-out system reset • Power Supply: DC Input: 9VDC~30VDC AC Input: External Power Adapter (Optional) • System Control: Power on / off switch x 1 Reset button x 1 • Indicator: Power LED x 1 HDD active LED x 1 AEC-6840 User Manual 12 BOXER Embedded Controller • OS Support: AEC-6840 Windows® 2000 / XP, Windows® CE, Windows® XP Embedded Mechanical and Environmental • Construction: Aluminum Alloy chassis • Color: Dark Blue • Mounting: Wall-mount (Default), Din Rail • Dimension: 8.35” (W) x 2.53” (H) x 4.21” (D) 212.15mm x 64.2mm x 107mm • Net Weight: 4.75lb (2.16kg) • Gross Weight: 8.36lb (3.8kg) • Operation Temperature: 5°F ~ 140°F (-15°C ~ 60°C) • Operation Humidity: 5~95%@40C, non-condensing • Vibration: 5 g rms / 5~500Hz / random operation (Without HDD Module) 1 g / 5~500Hz / random operation (With HDD Module) • Shock: 100g peak acceleration (11 msec. duration) • EMC: AEC-6840 User Manual CE/FCC Class A 13 BOXER Embedded Controller AEC-6840 Front Side Power LED HDD LED Serial Port DIO D-sub 9 Pin RS232/422/485 Phoenix Connector 6 Pin USB Port x 2 USB 2.0 Power Switch CompactFlash Slot With lockable design for antivibration purpose Rear Side Serial Port x 3 D-sub 9 Pin RS-232 nd 2 Ethernet RJ45, 10/100 or gigabit Reset Power Inlet Phoenix Connector 2 Pin DC 9~30V / GND VGA Ethernet RJ45, 10/100 D-sub 15pin KB/Mouse Mini-DIN 6pin AEC-6840 User Manual 14 BOXER Embedded Controller AEC-6840 2 Chapter Hardware Installation AEC-6840 User Manual 15 BOXER Embedded Controller AEC-6840 2.1 Dimension 240.0 222.0 212.2 AEC-6840 85.0 107.0 Units:mm O5.0 64.1 70.9 LAN2 COM4 COM3 DC-IN AEC-6840 RESET HDD SYS COM2 Power DIO USB GND Vin CFD LAN1 COM1 KB/MS VGA 120.0 AEC-6840 User Manual 16 BOXER Embedded Controller AEC-6840 2.2 HDD Module Installation Cable Insertion Step 1: Open the HDD cover by loosening the screws on the bottom of the chassis. AEC-6840 User Manual 17 BOXER Embedded Controller AEC-6840 Step 2: Insert the Cable to the bottom of the chassis as the illustration below. PIN 1 AEC-6840 User Manual 18 BOXER Embedded Controller AEC-6840 HDD Kit Combination Get the HDD and bracket ready. HDD Bracket Step 1: Stack the HDD and bracket. Fasten HDD and bracket with the screws. AEC-6840 User Manual 19 BOXER Embedded Controller AEC-6840 Step 2: Fasten the HDD module into the HDD kit house. Step 3: Insert the other side of the cable to the HDD module. AEC-6840 User Manual 20 BOXER Embedded Controller AEC-6840 Step 4: Combine the HDD kit house with the chassis and push as the illustration shown below. Push Step 5: Lock with the screws. AEC-6840 User Manual 21 BOXER Embedded Controller AEC-6840 2.3 SDRAM Installation Step 1: Screw the lid off the chassis. AEC-6840 User Manual 22 BOXER Embedded Controller AEC-6840 Step 2: Remove the lid after you screw the lid off the chassis and insert the DDR SDRAM SODIMM module into the slot. SDRAM SODIMM module AEC-6840 User Manual 23 BOXER Embedded Controller AEC-6840 2.4 COM2 RS-232/422/485 Setting RS-232/422/485 Selection (JP2 & JP3) The following table provides the user to set up COM2 port. JP2 Function 1-2, 4-5, 7-8, 10-11 RS-232 (Default) 2-3, 5-6, 8-9, 11-12 RS-422 2-3, 5-6, 8-9, 11-12 RS-485 JP3 Function 1-2 3-4 RS-232 (Default) RS-422 5-6 RS-485 Magnification AEC-6840 User Manual 24 BOXER Embedded Controller AEC-6840 2.5 Power Linkage Installation Step 1: Get the cable and connector ready Step2: Fix the connector to the cable with the screws. AEC-6840 User Manual 25 BOXER Embedded Controller AEC-6840 Step3: Insert the power cable in. Step 4: Screw the power cable into the chassis. Notice: Please make sure that pin assignment of Power and Ground on the accurate location. AEC-6840 User Manual 26 BOXER Embedded Controller AEC-6840 2.6 Wall-mount Installation Fasten the brackets with the screws. Bracket AEC-6840 User Manual Bracket 27 BOXER Embedded Controller AEC-6840 2.7 Din Rail Installation Step 1: Fix the Din Rail kit with the screws on the chassis as the illustration shown. Din Rail Kit Step 2: Press the Din Rail on the Din Rail kit to fix it. Din Rail AEC-6840 User Manual 28 BOXER Embedded Controller AEC-6840 2.8 COM2 RS-232/422/485 Serial Port Connector Different devices implement the RS-232/422/485 standard in different ways. If you are having problems with a serial device, be sure to check the pin assignments below for the connector. Pin Signal Pin Signal 1 DCD (422TXD-/485DATA-) 2 RXD (422RXD+) 3 TXD (422TXD+/485DATA+) 4 DTR (422RXD-) 5 GND 6 DSR 7 RTS 8 CTS 9 RI 10 N.C. 2.9 COM1/3/4 RS-232 Serial Port Connector .Pin Signal Pin Signal 1 DCD 2 RXD 3 TXD 4 DTR 5 GND 6 DSR 7 RTS 8 CTS 9 RI 10 N.C. AEC-6840 User Manual 29 BOXER Embedded Controller AEC-6840 3 Chapter Award BIOS Setup AEC-6840 User Manual 30 BOXER Embedded Controller AEC-6840 3.1 System test and initialization These routines test and initialize board hardware. If the routines encounter an error during the tests, you will either hear a few short beeps or see an error message on the screen. There are two kinds of errors: fatal and nonfatal. The system can usually continue the boot up sequence with non-fatal errors. Non-fatal error messages usually appear on the screen along with the following instructions: Press <F1> to RESUME Write down the message and press the F1 key to continue the boot up sequence. System configuration verification These routines check the current system configuration against the values stored in the CMOS memory. If they do not match, the program outputs an error message. You will then need to run the BIOS setup program to set the configuration information in memory. There are three situations in which you will need to change the CMOS settings: 1. You are starting your system for the first time 2. You have changed the hardware attached to your system 3. The CMOS memory has lost power and the configuration information has been erased. AEC-6840 User Manual 31 BOXER Embedded Controller AEC-6840 The AEC-6840 CMOS memory has an integral lithium battery backup for data retention. However, you will need to replace the complete unit when it finally runs down. AEC-6840 User Manual 32 BOXER Embedded Controller AEC-6840 3.2 Award BIOS Setup Awards BIOS ROM has a built-in Setup program that allows users to modify the basic system configuration. This type of information is stored in battery-backed CMOS RAM so that it retains the Setup information when the power is turned off. Entering setup Power on the computer and press <Del> immediately. This will allow you to enter Setup. Main Menu Use this menu for basic system configuration. (Date, time, IDE, etc.) Advanced BIOS Features Allow you to choose the VIRUS warning feature for IDE Hard Disk boot sector protection. If this function is enabled and someone attempt to write data into this area, BIOS will show a warning message on screen and alarm beep. Advanced Chipset Features DRAM timings, AGP functions etc. Integrated Peripherals Use this menu to specify your settings for integrated peripherals. (Onchip IDE device, Onchip PCI device, Super IO device, mouse etc.) Power Management Setup Use this menu to specify your settings for power management. AEC-6840 User Manual 33 BOXER Embedded Controller AEC-6840 PnP/PCI Configurations This entry appears if your system supports PnP/PCI. PC Health Status This menu shows you the status of PC. Clk/Voltage Control This menu shows you the display of Clock and Spread Spectrum Control. Load Optimized Defaults Use this menu to load the BIOS default values that are factory settings for optimal performance system operations. While AWARD has designated the custom BIOS to maximize performance, the factory has the right to change these defaults to meet their needs. Set Password Change / Set / Disable password. Save and Exit Setup Save the changes you’ve made to CMOS and exit setup. Exit Without Saving Abandon all CMOS value changes and exit setup. AEC-6840 User Manual 34 BOXER Embedded Controller AEC-6840 3.3 Main Menu When you choose Main Menu, the screen shown below is displayed. This Main Menu allows users to configure system components such as date, time, hard disk drive, floppy drive and display. Once a field is highlighted, on-line help information is displayed in the right box of the Menu screen. Ø IDE Primary Master AEC-6840 User Manual 35 BOXER Embedded Controller AEC-6840 Ø IDE Primary Slave Ø CompactFlash Type AEC-6840 User Manual 36 BOXER Embedded Controller AEC-6840 3.4 Advanced BIOS Features By choosing Advanced BIOS Features, the screen below is displayed. This sample screen contains the manufacturer’s default values for the AEC-6840. AEC-6840 User Manual 37 BOXER Embedded Controller AEC-6840 3.5 Advanced Chipset Features By choosing the Advanced Chipset Features, the screen below is displayed. This sample screen contains the manufacturer’s default values for the AEC6840. AEC-6840 User Manual 38 BOXER Embedded Controller AEC-6840 Ø DRAM Clock/Drive Control Ø AGP & P2P Bridge Control AEC-6840 User Manual 39 BOXER Embedded Controller AEC-6840 3.6 Integrated Peripherals By choosing the Integrated, the screen below is displayed. This sample screen contains the manufacturer’s default values for the AEC-6840. Ø OnChip IDE Device AEC-6840 User Manual 40 BOXER Embedded Controller AEC-6840 Ø OnChip PCI Device Ø Super IO Device AEC-6840 User Manual 41 BOXER Embedded Controller AEC-6840 Ø Digital IO Setting AEC-6840 User Manual 42 BOXER Embedded Controller AEC-6840 3.7 Power Management Setup By choosing the Power Management Setup, the screen below is displayed. This sample screen contains the manufacturer’s default values for the AEC6840. AEC-6840 User Manual 43 BOXER Embedded Controller AEC-6840 Ø IRQ/Event Activity Detect Ø IRQ Activity Monitoring AEC-6840 User Manual 44 BOXER Embedded Controller AEC-6840 3.8 PnP/PCI configuration By choosing the PnP/PCI configurations, the screen below is displayed. This sample screen contains the manufacturer’s default values for the AEC6840. AEC-6840 User Manual 45 BOXER Embedded Controller AEC-6840 3.9 PC Health Status By choosing the PC Health Status, the screen below is displayed. This sample screen contains the manufacturer’s default values for the AEC-6840. AEC-6840 User Manual 46 BOXER Embedded Controller AEC-6840 3.10 Clk/Voltage control By choosing the Clk/Voltage Control, the screen below is displayed. This sample screen contains the manufacturer’s default values for the AEC-6840. AEC-6840 User Manual 47 BOXER Embedded Controller AEC-6840 3.11 Load Optimized Defaults When you press <Enter> on this item you get a confirmation dialog box: Load Optimized Defaults (Y/N)? Pressing "Y" loads the default values that are manufacturer’s settings for optimal performance system operations. AEC-6840 User Manual 48 BOXER Embedded Controller AEC-6840 3.12 Set Password In the Security, there’s a function for the users to set up the password. All you need to do is enter the password and then the system will ask you to confirm the password that you’ve typed to double check. Press ESC key if you want to exit the screen where you have been. NOTE: To clear the password, simply press Enter when asked to enter a password. Then the password function is disabled. AEC-6840 User Manual 49 BOXER Embedded Controller AEC-6840 3.13 Save & Exit Setup If you select this option and press <Enter>, the values entered in the setup utilities will be recorded in the chipset’s CMOS memory. The microprocessor will check this every time you turn on your system and compare this to what it finds as it checks the system. This record is required for the system to operate. AEC-6840 User Manual 50 BOXER Embedded Controller AEC-6840 3.14 Exit without saving Selecting this option and pressing <Enter> allows you to exit the Setup program without recording any new value or changing old one. AEC-6840 User Manual 51 BOXER Embedded Controller AEC-6840 4 Chapter Driver Installation AEC-6840 User Manual 52 BOXER Embedded Controller AEC-6840 The AEC-6840 comes with a CD-ROM that contains all drivers and utilities that meet your needs. Follow the sequence below to install the drivers: Step 1 – Install VIA 4 in 1 driver Step 2 – Install Graphic Driver Step 3 – Install Audio Driver Step 4 – Install USB 2.0 Driver Step 5 – Install Ethernet Driver USB 2.0 Drivers are available for download using Windows Update for both Windows XP and Windows 2000. For additional information regarding USB 2.0 support in Windows XP and Windows 2000, please visit www.microsoft.com/hwdev/usb/. The latest step is to install VIA USB 2.0 driver after you complete Windows Service Pack Installation. We recommend you to install VIA USB 2.0 driver due to the compatibility issue. Please read instructions below for further detailed installations. AEC-6840 User Manual 53 BOXER Embedded Controller AEC-6840 Insert the AEC-6840 CD-ROM into the CD-ROM Drive. And install the drivers from Step 1 to Step 5 in order. 4.1 Installation procedure Step 1 Install VIA 4 in 1 for Windows 98SE/2000/XP 1. Double click on the “.exe” file. 2. Follow the instructions that the window will show you. 3. The system will help you install the driver automatically. Step 2 Install Graphic Driver for Windows 98SE/2000/XP 1. Click on the “CLE266_98ME_160108_wIShld_logod” folder or “CLE266_XP2K_16943209_wIShld_logod” folder according to the OS you used and then double click on the setup.exe. 2. Follow the instructions that the window will show you. 3. The system will help you install the driver automatically. 4. Please re-start your computer. Step 3 Install Audio Driver for Windows 98SE/2000/XP 1. Click on the “ComboAudio_A1u390a” folder or “ALC650 codec driver” folder and then double click on the “.exe”. 2. Follow the instructions that the window will show you. 3. The system will help you install the driver automatically. AEC-6840 User Manual 54 BOXER Embedded Controller AEC-6840 4. Please re-start your computer. Step 4 Install USB 2.0 Driver for Windows 98SE/2000/XP Please refer to page 55 remark first 1. Double click on the setup.exe. 2. Follow the instructions that the window will show you. 3. The system will help you install the driver automatically. Step 5 Install Ethernet Driver for Windows 98SE/2000/XP For Windows 98SE 1. Click on the “Auto Setup” folder and then double click on the setup.exe. 2. Follow the instructions that the window will show you. 3. The system will help you install the driver automatically. For Windows 2000/XP Please follow the steps: 1. Start 2. System Setting Hardware 4. Network Adapter 5. Driver Control Panel Device Manager Ethernet Chipset Name Update Driver 6. Follow the wizard and then mark “Specify a location” only. 7. Browse the path to CD-ROM: \ Driver\ Step 5 - Ethernet Driver \ Manual Setup - W2K (For Windows 2000) OR winxp – rtlnic (611) (For Windows XP) AEC-6840 User Manual 55 BOXER Embedded Controller AEC-6840 A Appendix Programming the Watchdog Timer AEC-6840 User Manual 56 BOXER Embedded Controller AEC-6840 A.1 Programming AEC-6840 utilizes Winbond W83697UF chipset as its watchdog timer controller. Below are the procedures to complete its configuration and the AAEON initial watchdog timer program is also attached based on which you can develop customized program to fit your application. WatchDog Timer Configuration Registers Logical Device 8 CRF3---Select WDTO count mode CRF4---Default 0X00 CRF5— Watch Dog Timer status CRF3 (PLED mode register. Default 0 x 00) Bit Reserved [7:3]: Bit 2: select WDTO count mode. 0 second 1 minute CRF4---Default 0X00 Watchdog Timer Time-out value. Writing a non-zero value to this register causes the counter to load the value to watchdog counter and start counting down. Reading this register returns current value in watchdog counter instead of watchdog timer time-out value. Bit [7:0]: = 0 x 00 Time-out Disable = 0 x 01 Time-out occurs after 1 second/minute = 0 x 02 Time-out occurs after 2 second/minutes AEC-6840 User Manual 57 BOXER Embedded Controller AEC-6840 = 0 x 03 Time-out occurs after 3 second/minutes … … … … … … … … … … … … … … … … .. = 0 x FF Time-out occurs after 255 second/minutes CF5 (Default 0 x 00) Bit [7]: Reserved. Bit [6]: invert Watchdog Timer Status Bit 5: Force Watchdog Timer Time-out, Write only 1 Force Watchdog Timer Time-out event; this bit is selfclearing. Bit 4: Watchdog Timer Status, R/W 1 Watchdog Timer Time-out occurred. 0 Watchdog Timer counting . You can use DEBUG commands to test watchdog function. Some examples are listed as below: -o 4e 87 Enter W83697UF configuration mode -o 4e 87 -o 4e 07 logic device register -o 4f 08 logic device number -o 4e f3 select register CRF3 -i 4f read F1 value -00 F3 value;Bit 2=0 ----second 1 ----minute -o 4e f4 AEC-6840 User Manual select register CRF4 58 BOXER Embedded Controller -i 4f 0a AEC-6840 input timeout value,example:10 seconds Digital IO control process: The AEC-6840 digital IO interface are controlled by the W83697UF.The GPIO port locates on Logical Device 7.The CRF1 register can read or write the data of digital I/O, and please read the following information for your reference. F1 register Digital IO interface Bit0 Port 1 in Bit1 Port 2 in Bit2 Port 3 in Bit3 Port 4 in Bit4 Port 5 out Bit5 Port 6 out Bit6 Port 7 out Bit7 Port 8 out You can try the AEC-6840 digital IO interface with some simple tests using DEBUG commands. Some examples are listed as below: -o 4e 87 Enter W83697UF configuration mode -o 4e 87 -o 4e 7 logic device register -o 4f 7 logic device number -o 4e f1 select register CRF1 AEC-6840 User Manual 59 BOXER Embedded Controller -i 4f read F1 value -0f F1 value AEC-6840 -o 4f,1f output "high" to port 5 -o 4f,3f output "high" to port 5 and port 6 -i 4f -0e if input port 1 to "low",then you can read data become to 0e -0d if input port 2 to "low",then you can read data become to 0d Another method: You and setup a base address to digital IO in BIOS, and have four selection:280h,290h,2A0h, 2B0h. Example: select 280h -o 280 1f output "high" to port 5 -o 280 3f output "high" to port 5 and port 6 -i 280 -0e if input port 1 to "low”, and then you can read data become to 0e -0d if input port 2 to "low”, and then you can read data become to 0d AEC-6840 User Manual 60 BOXER Embedded Controller AEC-6840 A.2 W83697UF Watchdog Timer Initial Program ------Enter W83697UF configuration mode mov al,87h out 4eh,al out 4eh,al ;Unlock 83697UF register ------Select Logic device 8(Watch dog device) mov al,07 out 4eh,al mov al,8 out 4fh,al ;logic device register ;logic device 8 ------Select CRF3 (Set unit to minute or second) mov out al,0f3h 4eh,al in al,4fh or al,11111011b ; ;bit 2 :0-> second :1-> minute ;Select second in this example ------Select CRF4 (Set timeout value) mov al,0f4h out 4eh,al mov al,0ah ;10 seconds in this example ;Set this value to 0 disable timeout out AEC-6840 User Manual 4fh,al 61 BOXER Embedded Controller AEC-6840 ------Exit configuration mode mov out AEC-6840 User Manual al,0aah 4eh,al 62