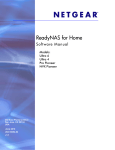
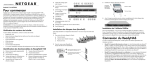
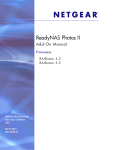
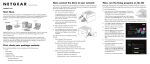
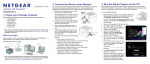
1
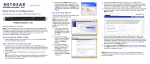
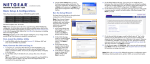
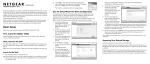
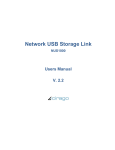
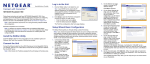
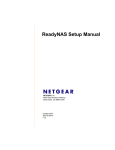
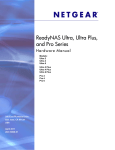
)NSTALLATION'UIDE
•
•
NETGEAR ReadyNAS Duo
Start Here
Follow these instructions to install your NETGEAR® ReadyNAS™ Duo. Then, consult
the ReadyNAS Duo Setup Manual on your Resource CD for instructions on using the
Setup Wizard to configure the ReadyNAS Duo. Some typical ReadyNAS Duo use
scenarios are also included. See the ReadyNAS Duo User Guide to configure any
advanced features (a link to the User Guide is on your Resource CD). The ReadyNAS Duo
User Guide is also on the NETGEAR support site at http://kbserver.netgear.com.
Estimated setup time: 15 minutes
When you have completed installation of the ReadyNAS Duo, your network should
resemble this illustration.
ReadyNAS Duo Resource CD
Four screws for installing an additional hard disk installation (included only with onedisk units)
Before starting installation, check your package contents:
• ReadyNAS Duo
• Installation Guide
• Warranty Card
• Power cable
• Ethernet cable
.
The router in your network must have an ethernet port available to connect the ReadyNAS
Duo unit to the router via the Ethernet cable. Your router also must be configured to
automatically provide an IP address for your network devices.
1.
Unpack the unit and stand the unit on its
feet—be sure it has ample ventilation.
Avoid putting the unit in a location where it
could be knocked over easily. Do not place
items on top of the ReadyNAS Duo.
2.
3.
First, check your package contents
Follow the screen prompts to complete installation of the RAIDar utility. On the last
screen, select the Run RAIDar check box, and click Finish. The RAIDar utility will
locate all ReadyNAS devices on your network.
A shortcut to the RAIDar utility will be placed on your desktop for future use.
Next, connect the ReadyNAS Duo to your network
Connect one end of the provided Ethernet
cable to your router and the other end to the
back of the ReadyNAS Duo unit..
Plug in the power adapter to a power source
and connect the other end to the unit
Note: If you purchased a unit with only one disk, and want to add a second disk for
redundancy, NETGEAR suggests that you install your ReadyNAS Duo and the RAIDar
utility, then connect the ReadyNAS Duo to your network and validate the installation
before adding the disk. See Installing a Disk Drive for installation instructions.
2.
Press the On button on the front of your unit.
The blue light will flicker while the unit boots
and obtains an IP address; then it will turn
solid blue.
Then, install the RAIDar utility
The MAC address of the ReadyNAS Duo, Host Name (which includes the last four
digits of the MAC address), IP Address and other statistics will display. If you have
multiple ReadyNAS units connected to your network, the RAIDar software screen
will list them also.
3.
To set up the ReadyNAS Duo unit, select the ReadyNAS Duo and then click Setup.
4.
On the login screen, enter admin for the user name, and netgear1 for the password
(all lower case letters and the number 1). The ReadyNAS Duo Home screen displays.
5.
Click Setup Wizard and follow the steps to complete the setup of your unit (for
detailed instructions, see the ReadyNAS Duo Setup Manual on your Resource CD).
It should not be necessary to modify any of the suggested default settings.
If you choose not to install RAIDar, you can also access the ReadyNAS Duo by entering
the IP address of the ReadyNAS Duo, which can be obtained from your router, into your
browser. This method is explained in the ReadyNAS Duo User Guide; a link to the User
Guide is on your Resource CD.
Installing the RAIDar software utility provides an easy way for you to detect the
ReadyNAS Duo on your network, and is the method recommended by NETGEAR.
Finally, copy files to your ReadyNAS Duo
Note: To install the RAIDar Widget for Mac OS X (included on the Resource CD), see the
ReadyNAS Duo Setup Manual. An on-line link to the Setup Manual is on the Resource
CD.
The folder structure in the ReadyNAS Duo includes a Backup folder, a Media folder
containing three sub-folders (Music, Pictures and Videos), and a Printer/Fax folder.
To install the RAIDar software utility:
To verify that you can copy files to and from your new ReadyNAS Duo drive.
1.
1.
Insert the Resource CD into your computer. On the Welcome
screen, click Install the ReadyNAS RAIDar utility. (For
Mac OS X, open the Mac RAIDar Setup Folder and doubleclick Setup_Mac.dmg.)
Open the RAIDar utility. Select the ReadyNAS Duo and click Browse. The
ReadyNAS share folders display. (No password is required.)
Note: You can also access your share folders by browsing “My Network
Neighborhood” (or equivalent for Microsoft Vista and Mac OS X). Your ReadyNAS
Duo is located under its workgoup name (the default is Volume), and identified by
Technical Support
“nas-” plus the last 6 digits of its unique MAC address—which is the same name as the
Host Name. The MAC address of your ReadyNAS Duo is printed on the label on the
bottom of the unit.
2.
Thank you for selecting NETGEAR products. After installing your device, locate the serial
number on the label of your product and use it to register your product at http://
www.NETGEAR.com/register. Registration is required before you can use our telephone
support service. Registration via our website is strongly recommended.
From your computer, select a file and either drag it to one of the folders on the
ReadyNAS Duo drive or right-click (Windows) or control-click (Macintosh), choose
Copy from the context menu, and Paste the file into one of the folders.
A
Installing a Disk Drive
If you purchased a ReadyNAS Duo with only one installed drive, and you want to add a
second drive, carefully follow these instructions. The ReadyNAS Duo is “hot-swappable”
which means that you can insert a new disk drive without turning the unit off. The
ReadyNAS Duo automatically detects the new drive and builds it as a “mirror drive.”
1.
Open the RAIDar software utility. On the RAIDar screen, the Status LED for Drive 2
will remain blue until the drive is ready.You can continue to use the Duo during this
time.
2.
Click Browse to access the share folders, or click Setup to access the ReadyNAS Duo
Home screen.
Note: It will take approximately 2 hours (or longer, depending on drive capacity) for the
drive to become fully redundant. See the ReadyNAS Duo User Guide to configure the
device. An on-line link to the User Manual is on the Resource CD.
The Drive 2 green LED on the front of the ReadyNAS Duo also will blink continuously
until the mirror drive build process is complete.
To install a second drive:
Remove the disk tray from the unit.
a.
Swing open the front cover.
b. Press to release the latch.
2.
c. Pull out the tray.
Insert a hard drive into the tray (A). Position
the drive with the bottom facing out from the
tray, and the connectors facing away.
Warning: The ReadyNAS Duo formats hard drives differently than a computer does. Do not
swap hard drives between a ReadyNAS and a computer or your data will be lost.
Troubleshooting
•
Check the status lights to verify correct operation. When powered on, the ReadyNAS
Duo blue power button light will be on. Green status lights labeled 1 and 2 indicate
which hard drive is installed and detected.
With the latch in the open position, slide the disk tray into the ReadyNAS Duo
completely, securing the latch and closing the door.
•
Turning off Your ReadyNAS Duo Correctly. To turn off your ReadyNAS, press the
power button until the blue light blinks (about 5 seconds).
Note: If you want to prevent easy removal of the disk from the drive bay, set the lock
(B): to the right is unlocked; to the left is locked.
•
Website Security Certificate Issue. If you access the ReadyNAS Duo from your
browser, you may see the “Security Certificate” screen. Select Continue to this website
to access the ReadyNAS Duo Home screen.
Use the four screws provided with the unit to secure the drive to the tray.
3.
Note: If you are operating the unit with one drive only, NETGEAR recommends that
you place it in the bay to the left.
An approved hard disk hardware list is available from the NETGEAR Support site.
To access the ReadyNAS Duo after installing a drive:
Warning: Install only NETGEAR-approved hardware in your ReadyNAS. Failure to
comply will void your warranty. A list of approved hardware is in the ReadyNAS Duo User
Manual. A link to the on-line User Guide is on your Resource CD.
1.
B
Go to http://kbserver.netgear.com for product updates and Web support. For Warranty and
Regional Customer Support information, see the Resource CD that came with your product.
Hard Drive Disclaimer
Adding or using your own hard drive(s) is an option with this NETGEAR product. Please refer to the
NETGEAR ReadyNAS hard drive compatibility list for qualified drives when selecting and installing
your own hard drive(s). This NETGEAR product is not data redundant with a single disk drive. By
using this NETGEAR product, you understand and agree that (i) NETGEAR does not warrant any disk
drive not provided or installed by NETGEAR; and (ii) NETGEAR is not responsible and you hereby
release NETGEAR from any liability under any circumstances whatsoever for any damage to, loss of
data or loss of contents of any hard drive use with this NETGEAR product, regardless of whether such
hard drive is provided by NETGEAR or qualified to be compatible with this product. In no event will
NETGEAR’s liability with respect to a failed disk drive or failed product exceed the cost of a
replacement disk drive or replacement product, as applicable. In certain circumstances data loss may be
permanent and unrecoverable and therefore you are highly encouraged to separately maintain a backup
copy of any data that you store on the hard drive(s) used with this NETGEAR product.
This symbol was placed in accordance with the European Union Directive 2002/96 on the
Waste Electrical and Electronic Equipment (the WEEE Directive). If disposed of within the
European Union, this product should be treated and recycled in accordance with the laws of
your jurisdiction implementing the WEEE Directive.
© 2008, 2009 by NETGEAR, Inc. All rights reserved. NETGEAR and the NETGEAR logo are
registered trademarks of NETGEAR, Inc. in the United States and/or other countries. Other brand and
product names are trademarks or registered trademarks of their respective holders. Information is
subject to change without notice.
February 2009