1
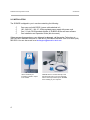
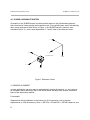
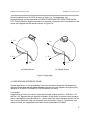
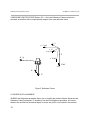
Installation and Operation Guide
Installation
2.1 SENSOR LOCATION
The sensor should be mounted on a non-metallic surface such as wood or plastic, using nonmetallic bolts or 300 series stainless steel bolts. It should not be located near power cords,
power supplies or other low frequency current-generating devices. Their emanations will be
picked up by the sensor and converted into noise on the output orientation measurements. The
sensor will pick up noise when it is operated near a CRT-type display. The amount of noise will
vary depending on the operating frequency of the CRT and the amount of shielding built into
the CRT.
2.2 CONNECTING 3D-BIRD
To connect the 3D-BIRD to your computer you need to do the following:
C
Shut the computer's power off.
C
Attach the DB9 connector of the 3D-BIRD RS232 / power cable to the serial port
connector of your computer. Screw in this connector.
C
Plug the power supply into the electric outlet.
C
You can attach up to four 3D-BIRDs into your computer, one 3D-BIRD per
computer serial port.
Power can then be turned on and commands sent to the 3D-BIRDs.
5