1
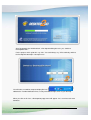
Desktop2Go
TM
BETA 2.0
Quick Guide
NETLEVERAGE PTY LIMITED
Desktop2Go Quick Guide
-1-
Desktop2Go™ BETA 2.0
Quick Guide
(Second Edition, May 2008)
Published by:
NetLeverage Pty. Ltd.
Suite 17, 17 International Business Centre
Australian Technology Park
Garden Street
Eveleigh NSW 1430
Australia
Ph +61-2 9209 4446
www.netleverage.com.au
Fax +61-2 9209 4399
[email protected]
Support:
[email protected]
Desktop2Go Quick Guide
-2-
Desktop2Go™
BETA 2.0
Quick Start
Desktop2Go BETA 2.0
Desktop2Go BETA 2.0 has been developed to primarily function on 32-bit Windows XP
(SP2 and SP3) and 32-bit Windows Vista operating systems. There is experimental
support for Windows Server 2003 and 2008 with the limited testing we have carried out to
date. We have plans to extend the compatibility to Windows Server 2003 and 2008. We
also have longer term plans to also support 64bit versions of above operating systems.
Limited operating system interoperability is currently supported by Desktop2Go BETA 2.0.
This means that if a Desktop2Go was originally created on a Windows XP operating
system it can only be run on another Windows XP host. That particular Desktop2Go will
not run on Windows Vista or other Windows operating systems. Your feedback sent to
[email protected] will help us to develop proper multi-OS interoperability
further. We greatly appreciated your feedback.
Windows driver and service virtualization is not supported by Desktop2Go BETA version.
Application installations which install Windows services and/or drivers will fail.
Desktop2Go provides a user-mode virtualized desktop. This desktop is designed to be
portable. All applications, data and user desktop configurations are encapsulated on the
Desktop2Go user-mode filesystem, Desktop Abstraction Layer and Registry Hive
Subsystem.
Off-the-shelf Windows applications can be installed and made available to instantly run
portably on the Desktop2Go desktop. For software installers requiring the Windows
Installer Service (MSI), Desktop2Go needs to be switched to Admin mode to carryout the
installation process. Desktop2Go will warn the user to switch to D2GO Admin Desktop,
when access to the Windows Installer Service is required. Please note that we have only
done limited tested of installing and/or running various software applications in the market.
Please inform us if Desktop2Go does not function properly with your software.
Once an application is installed in the Desktop2Go desktop, it can be used portably by
moving the Desktop2Go environment (via removable media for example) into another
Windows machine without requiring installation of the application again.
Desktop2Go supports installation of third-party runtime environments, such as Java. You
can then use such runtime environments in a portable fashion.
Desktop2Go Quick Guide
-3-
Applications already installed on the host system can also be run on the Desktop2Go
desktop. All outputs of these applications will be written to the Desktop2Go portable
filesystem & registry. There is no requirement for the user change their behavior when
these applications are used on Desktop2Go Desktop.
Please note that Desktop2Go BETA 2.0 only supports up to 500 MB of virtualized storage
on the Desktop2Go filesystem. A greater filesystem size will soon be supported on a paid
and production version of Desktop2Go.
Desktop2Go Quick Guide
-4-
!
If Desktop2Go is to be used from removable drives, such as the VASCO Digipass 860, the
performance of Desktop2Go is directly related to the speed of file accesses to the removable
drive.
The speed of removable flash drives is generally much slower than an internal hard drive. If
Desktop2Go is placed on a removable flash drive, it will perform much slower than running
Desktop2Go from an internal hard drive.
There are two solutions to increase removable flash drive performance:
A: Enabling write-caching for the removable flash drive.
B: Performing step A and then formatting the removable flash drive to the NTFS file
system.
"
#$
#$
$
%& &
Write-caching is disabled by default for removable flash drives. Enabling write-caching
requires always using the “Safely Remove Hardware” option to remove the flash drive,
otherwise data will be lost, so take care when using this setting.
To enable write-caching, first bring up the Device Manager window. Do this by going to the
Start Menu, then clicking Run. Type “devmgmt.msc” in the Run dialog box, and press Enter.
In this example, we will be enabling write-caching for a DigiPass 860 PicoDisk removable
drive. Start by clicking the plus sign next to “Disk drives”. This will reveal a list of the disk
drives currently in your system. Select your removable flash drive from the list (in this
example, it is “Eusec PicoDisk 4 MS USB Device”), and double click it to open up the
properties window.
Desktop2Go Quick Guide
-5-
Just change the setting to "Optimize for performance" and click OK to continue. You'll have to
reboot for the change to take effect.
'
#$
$
'( $
Formatting a removable flash drive to NTFS generally increases Desktop2Go performance as
well.
When formatting the removable flash drive, choosing a higher “Allocation unit size” will result
in a higher through-put.
-
To enable the option of formatting a removable flash drive to the NTFS file
system, you will need to enable write-caching for the drive as described
above.
Desktop2Go Quick Guide
-6-
-
Please do not attempt to format MP3 players, such as the iPod, as these
devices will not be able to function.
-
Formatting a removable flash drive will erase all of its contents. Make sure to
backup all important files before formatting the drive.
)!
Place Boot_Desktop2Go.exe where you want your Desktop2Go installation to reside (such as
in the root folder of your removable flash drive) and then just run it. The Desktop2Go BETA
executable can be downloaded from the following URL:
http://www.netleverage.com.au/Boot_Desktop2Go.exe
-
The nature of Desktop2Go and the way it handles Filesystem, Windows
Registry and Service objects is somewhat new. Some Desktop Security
Applications might complain about the way Desktop2Go handles these
systems and objects. Please add the following Desktop2Go executables to
the safe zone of your Desktop Security Application.
o
o
o
o
o
Boot_Desktop2Go.exe
Desktop2Go.exe
VPDMaintenance.exe
ExplorerLauncher.exe
ConsoleDll.dll
We have digitally signed our product executables for your peace of mind and
are currently working with various Desktop Security Application vendors to
add Desktop2Go to their trusted executable zone permanently. Any feedback
in this area is greatly appreciated.
-
Please be aware if you don’t add the above executables to the trusted zone,
an installed Desktop Security Application (such as antivirus software) may
prevent Desktop2Go from functioning properly.
-
For further details on how to add Desktop2Go files to the trusted execution
zone, please consult with your Desktop Security Application’s user manual.
After running Boot_Desktop2Go.exe, Desktop2Go will initialize itself and create all the
necessary files and folders automatically when it runs for the first time. This may take a
minute or two.
Desktop2Go will create a folder called “Desktop2Go Kernel” which holds all the Desktop2Go
files, including the virtualized filesystem and registry.
Desktop2Go Quick Guide
-7-
After Desktop2Go has initialized itself, a Desktop2Go dialog box asks you, “Switch to
Desktop2Go now?”
For the purpose of this guide let’s say “NO”. You could always say “YES” to directly switch to
the Desktop2Go desktop in subsequent use.
You will notice a new blue computer display-like icon
(
)
added to the Taskbar Notification Area, usually at the bottom-right corner of your desktop.
When you click on this icon, a Desktop2Go popup menu will appear. Let’s see what each menu
item does.
Desktop2Go Quick Guide
-8-
Use this menu item to shred and re-create
the Desktop2Go desktop.
Use this menu item to uninstall Desktop2Go
Use this menu item or keyboard
shortcut to switch back to the Host
PC desktop
Desktop2Go popup menu title. It displays the
name of the currently active desktop.
Use this menu item or keyboard shortcut
to switch to Desktop2Go Admin Desktop
Use this menu item or keyboard
shortcut to switch to the
Desktop2Go desktop
Use this menu to display
Product help in PDF format.
Use this menu item to display Desktop2Go product
details and copyright information.
Save and exit Desktop2Go. Please always use
this menu item before removing a flash drive.
There is one extra experimental menu item not shown above. This menu item is to
“Detect Internet Settings”. This experimental feature helps manually detecting the Internet
Settings when they are not automatically detected by the BETA 2.0 version. The
production version will not include this menu item so we have not included this item on
the picture above.
Desktop2Go Quick Guide
-9-
"*
-
Please never unplug a removable flash drive containing the Desktop2Go
installation from the host PC before exiting Desktop2Go using “Exit” menu
item above.
-
After Desktop2Go successfully exits, please make sure the Desktop2Go
Taskbar Notification Icon has disappeared and any activity indicator LEDs on
a removable flash drive containing Desktop2Go have stopped indicating
activity.
-
Use the “Safely Remove Hardware” icon in the Taskbar Notification Area to
remove a removable flash drive which contains Desktop2Go.
-
Please be aware that your Desktop2Go installation will be corrupted if
you do not follow the steps above.
Desktop2Go Quick Guide
- 10 -
+
Please answer “YES” to the Desktop2Go initial “Switch Now” dialog box or use “Desktop2Go”
menu item or keyboard shortcut to switch to the Desktop2Go desktop.
Your host PC desktop will be faded out and then your screen will be faded in to an
intermediate screen displaying the message “Composing Desktop2Go” together with an
animated progress indicator. After Desktop2Go is successfully composed, the Desktop2Go
desktop will be displayed.
For better identification, a large on-screen display text “2” displayed on the upper right corner
of the Desktop. This text stands for the Desktop2Go desktop. Overlay text “2A” stands for
“Desktop2Go Admin” desktop and overlay text “DEFAULT” is an identifier for the “Host PC”
Desktop.
-
Please be aware that Desktop2Go composition will take some time when you
switch to the Desktop2Go desktop for the first time.
-
The animated Desktop2Go composition dialog box will be displayed briefly
when switching to the Desktop2Go desktop subsequently.
Desktop2Go Quick Guide
- 11 -
+
Below are the design fundamentals of Desktop2Go:
Desktop looks and feels exactly the same as a normal Windows desktop.
You can use this desktop exactly the same way you use your Windows desktop today.
You can also customize all aspects of the Desktop2Go desktop, either by using Control
Panel, or your favorite desktop customization application.
All applications installed in the Desktop2Go desktop are virtualized so they can be run on
any Windows PC subsequently without installing them again.
The Desktop2Go filesystem is also virtualized, providing complete isolation from the
underlying host PC. For example, when a program attempts to write to the C: drive, it will
actually write to the virtualized Desktop2Go C: drive, and not the host PC’s C: drive.
When application reads files, any files existing in the virtualized Desktop2Go filesystem
supersede those on the host PC filesystem.
Desktop2Go supports Fast Runtime Switching (FRS). The idea behind FRS is that you
can choose to run any application that is already installed on the host PC. Any changes
the application makes to the filesystem and/or registry will automatically be redirected to
the virtualized Desktop2Go filesystem and registry. Also, an application from the host PC
being run on the Desktop2Go desktop can benefit from any Runtime Environments that
may be virtualized in the Desktop2Go desktop, such as a Java Runtime, without you
having to install these runtimes on the host PC.
Applications installers requiring the use of the “Windows Installer Service” need to be
running in Desktop2Go Admin Mode. To do this, please just switch to the Desktop2Go
Admin desktop and run the installer again. Depending on the installer you may not need
to run the installer again once in Desktop2Go Admin, as it may start automatically.
Current BETA version limitations:
-
The customization feature is not fully implemented.
-
When you already on the Desktop2Go desktop the only way to switch to the
Desktop2Go Admin desktop is to first switch to the Host PC desktop and
then switch to the Desktop2Go Admin desktop.
-
Filesystem virtualization needs substantial testing. If you find a discrepancy
from what is advertised above please treat it as a bug and kindly report it to
us. Thank you.
Desktop2Go Quick Guide
- 12 -