1
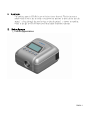
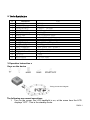
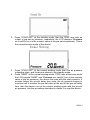
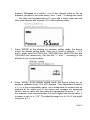
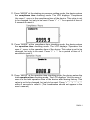
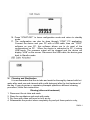
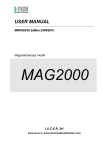
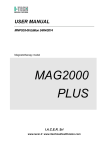
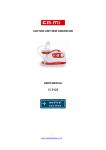
INSTRUCTION
MANUAL
VEGA
Continuous Positive Airway Pressure
MODEL: CP-03
ISO9001 & ISO13485 Certified
This device complies with EU EMC standard EN60601-1-2
READ THIS INSTRUCTION
Version: 1.0
Date: Nov 04, 2009
R404-1
I.
II.
Introduction
The product name is CPAP(Continuous Positive Airway Pressure). The device uses a
motor which drives a fan to create a continuous air pressure to force the air into the
patient's lung through the nasal cavity, so that the patient's airway is expedite,
which is the key to OSA (Obstructive Sleep Apnea Syndrome) therapy.
Product Structure
A. Visual appearance
R404-1
B. Assemblies
R404-1
III.
Important Safeguards
Note: Read all instructions carefully before use.
The following basic precautions are needed when using an electrical product:
Caution: Failure to read and observe all precautions could result in personal
injury or equipment damage.
Product cautions:
1. To avoid electrical shock: Keep the unit away from water‧Do not immerse the
power cord or the unit in liquid‧Do not use while bathing‧Do not reach for a
unit that has fallen into water – immediately unplug the unit.
2. Never operate the unit if it has any damaged parts (including power cord), if it
has been dropped or submersed in water. Promptly send it to a service center
for examination and repair.
3. The unit should not be used where flammable gas, oxygen or aerosol spray
products are being used.
4. Disconnect the unit from the electrical outlet before cleaning, filling and after
each use.
5. Do not use other attachments unless recommended by manufacturer.
Operating Cautions:
1. Connect this product to an appropriate voltage outlet for your model.
2. Do not run this product unattended.
3. Never operate if this unit has a damaged cord or plug, and if it has been
dropped into water.
4. If any abnormality occurs, discontinue use immediately until the unit has been
examined and repaired.
5. Always unplug the product immediately after use.
Storage Cautions:
1. Do not store the unit under direct sunlight, high temperature or humidity.
2. Keep the unit out of reach of small children.
3. Always keep the unit unplugged while not in use.
Cleaning Cautions:
1. Do not immerse the unit in water. It may damage the unit.
2. Disconnect the unit from the electrical outlet before cleaning.
Clean all necessary parts after each use as instructed in this guidebook
R404-1
IV Device Specifications
No.
1
2
3
4
5
6
Value
Description
Power Supply
Current Consuming
Air Pressure Range
Ramp Time
Air Pressure Calibrate
Working Flow
12V DC
Max 1.5A
3 cmH2O – 20 cmH2O
0 – 60 min
± 3 cmH2O
3
3 ± 0.3m /h @ 9 cmH2O
7
Noise
< 33 dB @ 9 cmH2O(1m away)
8
9
10
11
12
13
14
Working Humidity
Working Temperature
Storage Humidity
Storage Temperature
Dimension (L×W×H)
Weight
Life of Use
10% RH to 90% RH
5℃ to 40℃ (41℉ to 104℉)
< 95% RH
-20℃ to 60℃ (-4℉ to 140℉)
143 x 121 x 88mm
400g
3 years
15
Safety Criterion
UL、CE、FDA
V Operation Instruction﹕
Keys on the device
+
-
MODE
RAMP
START/OFF
Tubing Connection Diagram
The following are normal operations
1. Turn on the power, the LCD backlight is on, at the same time the LCD
displays “OFF”. This is the standby mode.
R404-1
2.
Press “START/OFF” at the standby mode, then the CPAP runs with an
output of pre-set air pressure, meanwhile, the LCD displays “Pressure
xx.x cmH2o”(xx.x is the numeric value of the pre-set air pressure). This is
the normal working mode of the device.
3.
Press “START/OFF” at the normal working mode, then the air pressure
outputting stops, and the device returns to the standby mode.
Press “RAMP” at the normal working mode, CPAP runs at the ramp mode,
the LCD outputs “RAMP” and “Pressure xx.x cmH2o”(xx.x is the numeric
value of the air pressure), the device first runs with the start pressure, 5
minutes before the pre-set delay time ends, the air pressure begins to
increase until it reaches the pre-set value at the end of the pre-set delay
time, then the device runs at the normal working mode with the pre-set
air pressure. Use the procedure described in clause 3 to stop the device.
4.
R404-1
Mask off warning: In normal working mode or ramp mode, if the mask falls off the
patient’s face, there is a “Mask off warning” on the screen: the LCD displays “Mask Off”,
meanwhile, the backlight flashes at the frequency of 1 Hz for 1 minute.
The following are configuration operations
5. Press “RAMP” and “-” at the same time in standby mode, then press
“START/OFF”, the configuration mode is on.
6. The configuration first enters work pressure setting mode, the LCD
R404-1
displays “Pressure xx.x cmH2o”, xx.x is the numeric value of the air
pressure you want to set to the device. Use “+”and “-”to change this value
——the value will increase/reduce 0.5 once with a single press and will
take a fast change with a speed of 0.5 with continues press.
7.
Press “MODE” at the working air pressure setting mode, the device
enters the altitude setting mode, there are 4 levels of altitude ----1,2,3
and 4, which stand for 0-2500 feet, 2500-5000 feet, 5000-7500 feet and
7500-9000 feet respectively. Set this with “+” and “-” according to the
altitude of your current location.
8.
Press “MODE” at the altitude setting mode, the device enters the air
pressure calibrate mode. The LCD displays “Fine Adjustment Pressure
x.x”, x.x is the compensation value. use a manometer to measure the air
pressure at the output port of the device and compare the measured
value to the set value and then make the adjustments by using “+” or “-”.
For example, if the measured value is 3 mmH higher than the set value, it
is proper to set x.x to “-0.3”. The adjusting range of x is -3 to 3, the digital
increment is 0.1.
R404-1
9.
Press “MODE” at the air pressure calibrate mode, the device enters the
ramp time setting mode. The LCD displays “Delay Time xx min”, xx is
ramp time. Use “+” or “-” to change this value. The ramp time adjusting
range is 10 to 60.
10. Press “MODE” at the ramp time setting mode, the device enters the
starting air pressure setting mode. The LCD displays “Ramp Start
Pressure xx.x cmH2o”, xx.x is the numeric value of the starting air
pressure. Use “+”and “-”to change this value — — the value will
increase/reduce 0.5 once with a single press and will take a fast change
with a speed of 0.5 with continues press.
In 6,7,8,9,10, symbol “Setting” will flash at the frequency of 1HZ.
R404-1
11. Press “MODE” at the starting air pressure setting mode, the device enters
the compliance time checking mode. The LCD displays “Compliance
Hrs xxxx.x”, xxxx.x is the compliance time of the device. This value is not
to be changed, but only to be reset. Press “+” + “-” for a period of time of
2 seconds to reset it.
12. Press “MODE” at the compliance time checking mode, the device enters
the operation time checking mode. The LCD displays “Operation Hrs
xxxx.x”, xxxx.x is the operation time of the device. This value is not to be
changed, but only to be reset. Press “+” + “-” for a period of time of 2
seconds to reset it.
13. Press “MODE” at the operation time checking mode, the device enters the
total operation time checking mode. The LCD displays “Unit Hrs xxxx.x”,
xxxx.x is the total operation time of the device after leaving factory. This
value is not to be changed, but only to be reset. Press “+” “-” “+” “-” “+” “-”
within 2 seconds to reset it. (This combination should not appear in the
user’s manual)
R404-1
16. Press “START/OFF” to leave configuration mode and return to standby
mode.
17. The configuration can also be done through “CPAP” PC application.
Connect the device and your PC with a USB cable, then run “CPAP”
software on your PC, this software allows you to do most of the
configurations on PC. When the device is connected to PC, it enters
USB mode. The pressure output will be stopped and the device will
display “USB” on the screen. Disconnect the USB cable, the device goes
back to Standby mode.
VI
Cleaning and Sterilization
It is recommended that the air tube and mask be thoroughly cleaned with hot
water after each use and cleaned with a mild detergent after the last treatment of
the day. If your physician or respiratory therapist specifies a different cleaning
procedure, follow their instructions.
Rinsing (after each treatment)
1.
2.
3.
4.
Disconnect the air tube and mask.
Rinse the mouthpiece and mask with water.
Dry them with clean soft towel or let it air dry.
Reassemble the product when completely dry and put these parts in a dry,
R404-1
sealed container.
Disinfections:
Please follow the following steps to disinfect your CPAP unless otherwise
specified by your physician. It is suggested that the unit is disinfected after the last
treatment of the day.
1. Use one part white vinegar with three parts distilled water. Make sure mixed
solution is enough to submerge the air tube, mouthpiece and mask.
2. Complete Rinsing Steps 1-3.
3. Wash air tube, mouthpiece and mask in warm water and a mild detergent.
Then wash them in hot tap water.
4. Submerge these parts in the vinegar and water solution for thirty minutes.
5. Complete Rinsing Steps 3-5.
Filter change
1. Do not wash or clean the filter. And do not operate without a filter.
2. Change the filter every 30 days or when the filter turns gray.
3. Changing procedure:
A. Replace the used filter with a new one.
VII REPLACEABLE PARTS & ACCESSORIES
In order to provide appropriate treatment, please use replaceable parts and
accessories recommended below:
Air tube: 70253- Breathing/Anesthesia Tubing,
HSINER CO., LTD
Mask: CPAP/VPAP Masks(FDA 510(K) No. K063268), HSINER CO., LTD
Power Adapter:
Electronic Co.,Ltd.
UE24WCP-120167SPA,
Dongguan
Shilong
Fuhua
Heated Humidifier: HH-02 Humidifier, Vega Technologies Inc
R404-1
Consult accompanying documents
Type BF equipment
Disposal for separate collection
Device in protection class 2
R404-1