1
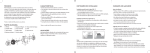
GB
Important Safeguards
To guard against injury, basic safety precautions
should be observed, including the following:
8. Do not install or store the appliance where it will be
exposed to weather or temperatures below freezing.
1. Read and follow all safety instructions and important
notices in these instructions as well as on the product
itself.
9. Make sure any component mounted on a tank is
securely installed before operating it.
10. Ensure input voltage is the same voltage as your
local power supply.
2. This appliance is not intended for use by children
or infirm persons without supervision. Young children
should be supervised to ensure that they do not play
with the appliance.
11. If an extension cable is used it should have the
proper rating. Care should be taken to arrange the cord
so that it will not be tripped or pulled.
3. To avoid possible electric shocks, special care
should be taken since water is employed in the use
of aquarium equipment. For each of the following
situations do not attempt repairs yourself. Return the
appliance to an authorised service facility for service or
discard the appliance.
12. A G.F.C.I (Ground fault circuit interrupter) & surge
protector is recommended for all electrical appliances.
13. Ensure your hands are dry when turning the power
switch on/off and when inserting/removing the power
cable from the socket.
a. If the appliance or any electrical component of the
appliance (non-immersible equipment only) falls into
the water or gets wet, do not reach for it. Unplug it and
then retrieve it.
14. If you are in any doubt about the electrical installation
or safety of this product you must consult a qualified
electrician.
b. If the appliance shows any sign of abnormal water
leakage, immediately unplug it from the power source.
c. Carefully examine the appliance after installation. It
should not be plugged in if there is water on parts which
are not intended to be wet.
d. Do not operate the appliance if it has a damaged
cord or plug, or if it is malfunctioning, or dropped or
damaged in any manner.
4. A “drip loop” (see graphic) should be arranged for
each cable connecting an aquarium to a power supply.
The drip loop is the part of the cable below the level of
the power supply. It prevents water travelling down the
cable and coming into contact with the power supply. If
the plug or the socket does get wet, do not unplug the
appliance. Disconnect the fuse or circuit breaker that
supplies the power to the appliance, then unplug and
examine for presence of water in the socket.
For Guarantee Conditions, please refer to the
Guarantee form that is enclosed with this product.
All products are supplied with fitted plugs. This plug
should not be tampered with in any way or removed.
Removal or tampering with the plug invalidates our
guarantee offered with this product.
5. Always unplug the appliance from the electrical outlet
when not in use, before putting on or taking off parts,
before any type of maintenance or cleaning.
For UK a 3 pin adaptor is supplied with the product and
this must be used.
6. Never yank the cable to pull it from the socket. Pull
the plug carefully to disconnect.
7. Do not use the appliance for reasons other than
the intended use. The use of attachments that are not
recommended or sold by the manufacturer may cause
the product to be unsafe. This is not recommended.
4
GB
Before First Use / Preparation
Read and follow all the instructions, even if you feel
you are familiar with the product and find a place to
keep the instructions handy for future reference.
Your attention is drawn particularly to the sections
concerning “IMPORTANT SAFEGUARDS” and the
“GUARANTEE CONDITIONS”. Please ensure you
retain your original purchase receipt in the event that
guarantee service is required.
Carefully unpack the filter making sure you keep all the
packing material until all the parts of the product have
been found and the product has been assembled.
This product is shipped to you in a factory sealed
carton. Should the product malfunction in any way
or if the unit is damaged and requires replacement,
contact the retailer where the product was purchased
for inspection.
Know Your Skimmer
G216, G220, G224
1
Set up/Parts
1.
2.
3.
4.
5.
6.
7.
8.
9.
10.
11.
12.
13.
2
8
3
9
Collection Cup Lid
Collection Cup
O-ring
Outlet tap
Skimmer Body
Airline
Air intake
Air Flow Adjustor
Inlet O-ring
Fastening Screw
Inlet Pipe
Outlet Sponge
Pump
10
4
5
11
Replacement Parts & Filter Media
6
12
13
Use Aqua One Genuine Spare Parts Only.
See your local Aqua One Dealer and look
for the number listed below for the spare
part you require. Alternatively you will find
these numbers on the silver label located
on the product.
G216/220 Impeller
G224 Impeller
G216/220/224 Sponge
7
5
93I
94I
93S
GB
Installation
Maintanence
1. The pump and associated parts can be found in a
small box. Unpack this box in order to assemble the
pump.
SPONGES
Remove and rinse the outlet sponges weekly to remove
any accumulated waste.
2. Ensure the air intake is attached firmly to the inlet of
the pump.
PUMP
The impeller should be removed and rinsed once a
month to remove any buildup. In the event that there
is significant calcium buildup on the impeller (or any
other part of the pump) it can be soaked in a container
of vinegar for 24 hours.
3. Attach the outlet of the pump to the base of the
inlet pipe. In order to do this, unscrew the threaded
connection, place it over the pump outlet, press the
pump into place and tighten the threaded fitting.
4. Remove the air flow adjustor from the top of the
airline and feed the airline through the airline holder on
the side of the skimmer outlet. Place the airline adjustor
back on the airline.
To access the impeller, turn the base of the pump 90°
and pull it away from the body of the pump. The impeller
sits on a ceramic shaft with rubber grommets at each
end. Ensure all these parts are in the pump when it is
reassembled.
5. Ensure both outlet taps are fully open (turn anticlockwise to open).
COLLECTION CUP
6. Place the skimmer in the desired location. The
skimmer can be placed externally, hanging on the
side of the aquarium/sump, or internally in a sump.
The pump must remain submersed at all times during
operation.
The collection cup and attached airline should be rinsed
every 2-3 months. Airline should be check regularly for
blockages and replaced if required. After washing the
collection cup, the skimmer should be checked daily
for the subsequent 3-4 days to ensure water level
is correct. Removing the film insode the neck of the
collection cup during maintenance can result in slightly
reduced effectiveness of the skimmer for a few days.
The skimmer can be adjusted until performance is back
to normal.
7. There is a second airline hose attached to the base
of the collection cup. This is designed to drain the
collection cup into a separate container. Ensure this
airline always drains into a container such as an empty
PET bottle.
8. Switch the pump on at the power outlet. Ensure
the water level does not fall too low, as the aquarium
skimmer will fill with between 2.5-5L (depending on
skimmer model).
9. Adjust the water level using the outlet taps. The water
level will dictate the amount of bubbles that accumulate
int he collection cup. Water level should be checked
daily and adjusted accordingly over the initial run-in
period. For further advice concerning the adjustment
of your protein skimmer, consult your local Aqua One
retailer.
For “wet” skimming (light coloured waste), adjust the
outlet taps so that the water level is high in the skimmer
and substantial amounts of foam are being forced into
the collection cup.
For “dry” skimming (dark, coffee coloured waste),
adjust the outlet taps so that the water level is low and
only small amounts of foam are being forced into the
collection cup.
6
GB
Specifications
Trouble Shooting
SKIMMER ISN’T PRODUCING ENOUGH BUBBLES
Protein Skimmer Model: ProSkim G216
Dimensions: 21x13x40cm
Max Aquarium Volume: 400L
Flow Rate: 1400L/hr
Power Requirements: 220 – 240V
Power Consumption: 20W
Suitable: Marine
1. Ensure air intake is attached firmly to the inlet of the
pump.
2. Open air flow adjustor by turning clockwise.
SKIMMER IS COLLECTING NO WASTE
1. Ensure the water level is high enough. Adjust the
outlet taps to raise water level.
2. Ensure sufficient air is entering the pump. Refer
above for solution.
3. Ensure pump is running correctly. Check and clean
the impeller.
Protein Skimmer Model: ProSkim G220
Dimensions: 21x13x50cm
Max Aquarium Volume: 800L
Flow Rate: 1400L/hr
Power Requirements: 220 – 240V
Power Consumption: 35W
Suitable: Marine
COLLECTION CUP IS OVERFLOWING
1. Check airline drain. Replace if necessary.
2. Ensure water level is not too high in the skimmer.
Waste exiting the skimmer should be coffee coloured.
If the waste is very watery/light in colour, lower water
level adjusting the outlet taps.
Protein Skimmer Model: ProSkim G224
Dimensions: 21x13x60cm
Max Aquarium Volume: 1000L
Flow Rate: 1850L/hr
Power Requirements: 220 – 240V
Power Consumption: 35W
Suitable: Marine
SKIMMER IS LEAKING
1. Check o-ring at neck of skimmer and replace if
necessary.
OUTLET OR INLET PIPES ARE LOOSE
1. Check o-rings at connections and replace if
necessary.
Disposal of used Electrical & Electronic Equipment
(Applicable in the European Union and other
European countries with separate collection
systems)
This symbol on the product or on its
packaging indicates that the product
must not be disposed of with normal
household waste. Instead, it is your
responsibility to dispose of your waste
equipment by arranging to return it to a designated
collection point for the recycling of waste electrical
and electronic equipment. By separating and recycling
your waste equipment at the time of disposal you will
help to conserve natural resources and ensure that the
equipment is recycled in a manner that protects human
health and the environment. For more information
about recycling this product, please contact your local
city office, your household waste disposal service or
the shop where you have purchased the product.
7