Transcript
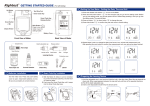
DISCREET
Mendor Discreet blood glucose meter - Quick guide
A. Setting up the meter
Thank you for choosing the Mendor Discreet blood glucose meter. Please follow the stepwise instructions below on how to set up the meter
before use. After these steps the meter is ready for use.
STEP 4 - Refitting the top and bottom covers
1. Refit the covers back on the meter (fig 14 and 15). The bottom cover does not have a sealing rim and is positioned its longer edge facing
the back of the meter. The top cover has a sealing rim and is positioned with its longer edge facing the front of the meter.
NOTE! Close the covers properly for transporting and storing the meter.
The meter does not need to be calibrated as it calibrates automatically when the test strip cartridge is inserted.
Functions and positions of the covers
The covers on the meter are there to protect the meter and the test strips inside. IIn addition to that the covers enable operating the meter.
Pulling down the bottom cover dispenses the test strip and primes the lancet. The four basic positions of the covers are shown below and they
are later referred to in this quick guide. The covers have four positions (fig 1):
Position 1
Position 3
Position 2
covers closed
(starting
position)
top cover up
and bottom
cover down
(for dispensing
a test strip)
top cover up
and bottom
cover closed
Position 4
top cover up
and bottom
cover further
down (for
priming the
lancet).
The cover will
automatically
return to
position 3.
B. Performing a blood glucose measurement
Please follow the stepwise instructions below on how to perform a blood glucose measurement.
STEP 1 - Preparation for the measurement
1. Always measure with clean hands. We recommend washing your hands with soap and warm water.
2. Change a new lancet into the blood glucose meter before every time you measure the blood glucose.
3. Open the top cover (position 2).
STEP 2 - Dispensing a test strip
STEP 1 - Removing the covers
To remove the top cover
(with the sealing rim):
1. Make sure that the bottom cover is completely closed (position 2) before sliding the left
release latch down.
2. While sliding the left release latch down pull
the bottom cover down. The bottom cover
detaches from the meter (fig 3).
NOTE! If the bottom cover is not completely
Slide down to
remove top
cover
closed, it cannot be detached.
NOTE! Please note that the release latches have to
STEP 3 - Priming the lancet
Pull the bottom cover down (fig
16) until the test strip comes out
(position 3). At this point, the meter
powers on automatically.
To remove the bottom cover
(without the sealing rim):
1. Slide the top cover up (position 2).
2. Turn the meter over. While sliding the
right release latch down pull the top cover
off. The top cover detaches from the meter
(fig 2).
Slide down to
remove bottom
cover
STEP 5 - Adjusting date and time settings
To adjust the date and time settings, please see chapter “Settings” in the User manual.
Do not use the meter before you have adjusted the date and time.
The meter is ready for use after these settings have been adjusted.
Pull the bottom cover even further down
(position 4) (fig 17). This step primes the
lancet. The bottom cover returns to position
3 automatically when you stop pulling the
bottom cover.
NOTE! The meter won’t
turn on automatically if there is no
test strip cartridge inside the meter
or the cartridge is empty.
STEP 4 - Taking a blood sample
Position 3, top cover up and
bottom cover down
be slid all the way down for proper release of the
covers (fig 4).
Lancet trigger button
1. Press your fingertip firmly against the lancet holder (fig 18).
2. Press the lancet trigger button to release the needle.
3. If required, you can re-prime the lancet and repeat STEP 4
if the blood sample is insufficient after the first lancing.
STEP 2 - Inserting the Mendor Discreet
test strip cartridge
STEP 5 - Measuring
1. Move the finger so that the tip of the test strip touches the blood drop and fills the test strip (fig 19). Analysis of the blood sample
starts automatically.
2. The test result is shown on the display in 5 seconds (fig 20).
0537
1. Open the protective aluminium coated bag of the
test strip cartridge by tearing the corner of the bag open.
Use scissors if necessary.
2. Pull the cartridge container lid slightly sideways (fig 5)
after which the lid will open downwards.
3. Slide the test strip cartridge in (fig 6) making sure that the
a. cartridge label and meter’s display face the same direction.
b. arrows point towards the meter
4. Close the cartridge container (fig 7) and put the covers
back on the meter.
STEP 3 - Inserting the lancet and adjusting the lancing depth
1. Slide the top cover up and remove the bottom cover (please see STEP 1 b).
2. Firmly pull the lancet holder out of the meter (fig 8).
3. Insert the new lancet into the lancet holder. Hold the base of the lancet holder (fig 9) and push the new lancet through the lancet holder until
it is fully inside the lancet holder (fig 10).
Leave the thin disposable cap attached until you have adjusted the lancing depth and have attached the lancet holder back inside the meter.
4. To adjust the lancing depth, twist the outer part of the lancet holder. There are four (4) penetration depths available, (min I and max IIII) (fig 11).
The desired penetration depth should face with the semi circle on the inner part of the lancet holder.
5. Refit the lancet holder on the meter, so that the visual indicators match: semi-circle shapes on the front of the meter and arrows on the back
of the meter (fig 12).
6. Remove the cap of the new lancet by simply rotating and pulling it (fig 13).
Manufacturer
Distributor
Customer support
E-mail
Mendor Ltd.
Munkkiniemen puistotie 25
00330 Helsinki, Finland
E-mail: [email protected]
Phone: +358 45 345 1970
www.mendor.com
SpringMed Solutions Ltd. (UK)
A. Menarini Diagnostics (Sweden)
Mendor Oy (Finland)
+44 800 032 6601 (UK)
+46 40 32 1270 (Sweden)
+358 45 345 1970 (Finland)
[email protected] (UK)
[email protected]
(Sweden)
[email protected] (Finland)
0537
1. Remove the used test strip by pulling it out (fig 21),and the meter turns itself off automatically.
Do not push the test strip back into the test strip opening.
2. Check the meter and wipe it clean if needed.
4. Close the covers of the meter properly for transportation and storage (position1).
Art. PM020517L04_09 Rev. 03/15
Semi circle
STEP 6 - Removing the test strip
Before using the product for the first time, read the instructions
carefully and practice the measurement with the control solution.
PM020517L04_09_Quick_Guide_EN.indd 1
12.3.2015 14:25:56

![SERUM IRON [SI 7156] - Menarini Diagnostics](http://vs1.manualzilla.com/store/data/006361799_1-94d8786a6e21cbd8d5249c968adda2fc-150x150.png)