1
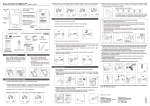
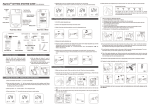
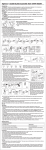
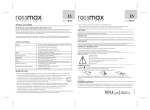
GETTING STARTED GUIDE ( For self-testing )
Up Button
(
)
3
Test Strip Port
1) Press and release main button "
" to turn on the Meter.
2) Press and hold main button "
" for five seconds until you go into the setting mode. Before
you go into setting mode, you will see power off first. Please keep pressing it until you go into
the setting mode. The year will flash.
3) Press up button "
" or down button " " to change the year.
4) Press main button "
" to confirm the year and move to month setting.
Smart Code Key
Smart Code Key
Release Button
Down Button
(
)
Setting Up Your Meter - Setting the Date, Time and Unit
Main Button (
)
Press to turn on/off
meter or go into
setting model.
Display Window
Battery Cover
Back View of Meter
Front View of Meter
Sample Entry
Depth adjustable cap
5) Repeat steps 3 and 4 to change the date, time format, hour, minute and measurement unit.
After pressing the main button to confirm the measurement unit, your set-up has been finished.
Release button
Test strips
View Window
Lancet carrier
Safe switch
Lancing Device
Test Strips
Test strips vial
Control Solution
Check Key
1 Batteries Installation
2
Turn the meter over. Press and push battery
cover to open. Install both batteries at once.
Be sure to put battery in correct direction.
Hub
Plunger
Protective cover
Lancet
Smart Code Key Installation
1) With the Meter off, follow ① and ② direction
to put the new Smart Code Key into the track
on code key base.
2) Push down the Smart Code Key until it snaps
into the Smart Code Key base.
4
Preparing the Lancing Device
1) Hold the adjustable cap in one hand and hold the hub in the other hand. Bend the cap towards the
down side. When a gap appears between the cap and hub, pull them off in opposite directions.
2) Pull off the depth adjustable cap.
3) Insert a new disposable lancet firmly into lancet carrier.
+
+
Bat ter y
-
1
2
3
Ba
tte
ry
-
4) Twist off and set aside the protective cover of the disposable lancet.
5) Replace the depth adjustable cap.
6) Choose a depth of penetration by rotating the top portion of the depth adjustable cap until the
setting depth matches the window. Settings are based on skin type
”
“ for soft or thin skin;
”
“ for average skin;
”
“ for thick or calloused skin.
5) Gently squeeze your fingertip to get a drop of blood. Our Meter only needs a tiny blood sample.
We suggest to get a blood sample size around 1.4~2.5µl to test it. Please don’t squeeze too
much blood. Too much blood might contaminate the Smart Code Key.
Sample Size Example
1.0µl
5
6
7
2.0µl
3.0µl
4.0µl
We suggest you to take 1.4~2.5µl to do the test on glucose
monitoring system. Blood sample size above 4.0µl is too
much which will contaminate the Smart Code Key.
7) Hold the hub in one hand and pull on the plunger in the other hand. The device will be cocked.
Release the plunger, it will automatically move back to its original position near the hub.
4
1.4µl
6) Touch and hold the drop to the edge of sample entry until you hear a " beep " and the view
window is totally filled with blood. If the view window is not totally filled with blood or the test does
not start. Then discard the test strip and repeat the test with a new test strip.
7) You will see the countdown mode on the screen. After 8 seconds, the test result appears. For
more information about your test results, please see your User Manual.
5 Performing a Test
1) Wash and dry your hands. Take one strip from the vial. Close the vial cap immediately.
2) Insert the strip into the strip port on meter with the indication symbol facing up. Push the strip in
until it snaps and stops. The meter will turn on automatically.
8
9
1
4) When you see the flashing blood drop, hold the lancing device to side of your fingertip and press
the release button.
10
11
8) Pull off the depth adjustable cap. Without touching the used disposable lancet, stick the lancet
tip into the protective cover.
9) Hold the release button in one hand and pull on the plunger in the other hand will safely eject
the used
disposable lancet.
10) Discard the used disposable lancet into an appropriate puncture-proof or biohazard container.
11) Replace the depth adjustable cap after finishing the test.
For more information on how to use your meter and understand your test results,
please see the User Manual.
BIONIME CORPORATION
694, Renhua Road, Dali Dist.,
Taichung City 412, Taiwan
Tel: 886-4-24951268 Fax: 886-4-24952568
Email: [email protected]
Website: www.bionime.com
Bionime GmbH
Tramstrasse 16
9442 Berneck
Switzerland
101-3GM300-672
EN
3) Make sure the code number on the meter screen matches the code number on the test strip vial.
2