1
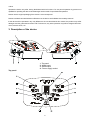
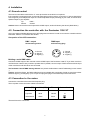
1
2
DMX CONTROL
DOMINATOR
Table of contents
1. Safety instructions ......................................................................................................... 4
2. Operating determinations ............................................................................................. 4
3. Description of the device .............................................................................................. 5
4. Installation ...................................................................................................................... 7
4.1.Sound-control ............................................................................................................ 7
4.2. Connection the controller with the Dominator 1200 XT ............................................ 7
4.3 Connection to the mains ............................................................................................ 7
5. Operation ........................................................................................................................ 8
6.Technical specifications ................................................................................................ 8
7. Cleaning and maintenance ........................................................................................... 8
8. Appendix ........................................................................................................................ 9
3
CAUTION!
Keep this device away from rain and moisture!
Unplug mains lead before opening the housing!
FORYOUR OWN SAFETY, PLEASE READ THIS USER MANUAL CAREFULLY
BEFORE YOU INITIAL START - UP!
1. Safety instructions
Every person involved with installation and maintenance of this device have to:
- be qualilfied
- follow the instructions of this manual
CAUTION!
Be careful with your operations. With a high voltage you can suffer
a dangerous electric shock when touching the wires!
This device has left our premises in absolutely perfect condition. In order to maintain this condition and to ensure
a safe operation, it is absolutely necessary for the user to follow the safety instructions and warning notes written
in this manual.
Important:
The manufacturer will not accept liability for any resulting damages caused by the non-observance of this manual
or any unauthorized modification to the device.
Please consider that damages caused by manual modifications to the device are not subject to warranty.
Never let the power-cord come into contact with other cables! Handle the power-cord and all connections with the
mains with particular caution!
Always plug in the power plug least. The power-plug has to be accessable after installing the device.
Make sure that the power-cord is never crimped or damaged by sharp edges. Check the device and the powercord from time to time.
Always disconnect from the mains, when the device is not in use or before cleaning it. Only handle the power-cord
by the plug. Never pull out the plug by tugging the power-cord.
This device falls under protection class I. Therefore it is essential to connect the yellow/green conductor to earth.
The electric connection, repairs and servicing must be carried out by a qualified employee.
2. Operating determinations
This device was designed for indoor use only.
If the device has been exposed to drastic temperature fluctuation (e.g. after transportation), do not switch it on
immediately. The arising condensation water might damage your device. Leave the device switched off until it has
reached room temperature.
When taking the device into operation, please make sure that the housing is closed firmly with all the necessary
screws tightened up.
Do not shake the device. Avoid brute force when installing or operating the device.
When choosing the installation-spot, please make sure that the device is not exposed to extreme heat, moisture
4
or dust.
Operate the device only after having familiarized with its functions. Do not permit operation by persons not
qualified for operating the device. Most damages are the result of unprofessional operation!
Please use the original packaging if the device is to be transported.
Please consider that unauthorized modifications on the device are forbidden due to safety reasons!
If this device will be operated in any way different to the one described in this manual, the product may suffer
damages and the guarantee becomes void. Furthermore, any other operation may lead to dangers like shortcircuit, electric shock, etc.
3. Description of the device
1 - Top panel
2 - Audio-input
3 - DMX-output
4 - Power supply socket
Top panel:
5
5 - AUTO TRIG-KEY
If the LED shines, the controller is in Auto-mode (normal operation without sound-control).
6 - MUSIC TRIG-KEY
If this LED shines the controller is in Audio-mode (operation with sound-control).
7 - MANUAL TRIG-KEY
With the Manual Trig -key, you can jump from one step to another.
8 - FLASHING-KEY
By pressing the Flashing-key the fixture starts to flash.
9 - SLOW SPEED-KEY
For adjusting the program to slow movement.
10 - MEDIUM SPEED-KEY
For adjusting the program to medium movement.
11 - FAST SPEED-KEY
For adjusting the program to fast movement.
12 - RANDOM SPEED-KEY
For adjusting the program to random movement.
13 - PROGRAM-DISPLAY
14 - BLACKOUT-KEY
The Blackout-function closes the light output of all connected projectors via the shutter.
Caution: The Blackout-key has to be pressed (LED is off), as soon as a program is called up. Otherwise there
will not be any light output.
15 - PROGRAM UP/DOWN-KEYS
6
4. Installation
4.1.Sound-control
The sound control either works via the ¼” mono jack-socket or the built-in microphone.
If the controller is supposed to work via a sound signal at the Audio In-socket, connect the ¼“ jack socket with the
sound signal of your headphones output or a second adjustable output (if existing) of your mixer, or with the loudspeaker output of your amplifier.
Tip:
Data +
Sleeve:
Ground
Caution: Never connect the sound input with the DMX-output, as this will destroy the electric (DMX-driver).
4.2. Connection the controller with the Dominator 1200 XT
Only use a stereo shielded cable and 3-pin XLR-plugs and connectors in order to connect the controller with the
Dominator 1200 XT or one fixture with another.
Occupation of the XLR-connection:
DMX - output
DMX-input
XLR mounting-socket:
XLR mounting-plug:
1 - Ground
2 - Signal (-)
3 - Signal (+)
1 - Ground
2 - Signal (-)
3 - Signal (+)
Building a serial DMX-chain:
Connect the DMX-output of the controller with the DMX-input of the Dominator 1200 XT. If you have more than
one Dominator 1200 XT and you wish to operate them in parallel, connect output of the first fixture with the input
of the next fixture until all fixtures are connected.
The Dominator 1200 XT DMX starting address is 1. (Check the Dominator 1200 XT addressing in user manual
.)
Caution: At the last fixture, the DMX-cable has to be terminated with a terminator. Solder a 120 ohms resistor
between Signal (–) and Signal (+) into a 3-pin XLR-plug and plug it in the DMX-output of the last fixture.
4.3 Connection to the mains
Connect the controller to the mains with the power-plug.
The occupation of the connection-cables is as follows:
Cable (EU)
Cable (US)
Pin
Brown
Black
Live
L
Light blue
White
Neutral
N
Yellow/Green
Green
Earth
The earth has to be connected!
7
International
5. Operation
Calling up a pre-programmed program
Select the desired program between 1-9, C, r via the Program Up/Down-keys.
The selection „C“ means that all programs 1-9 will be run through.
The selection „r“ means that the programs will be randomly selected.
Press the Blackout-key in order to project the program (LED off).
Adjusting the program-speed
The programs run through the selected program step by step with the programmed speed. You can adjust the
program-speed via the Slow Speed-button, Medium Speed-button or Fast Speed-button.
Jump from one step to another
Via the Manual Trig-key, you have the possibility to jump from one step to another.
If a program is run and the Manual Trig-key is pressed, the projector jumps to the next step after finishing the
current step. The Manual Trig-LED shines and the program is stopped.
If you wish to start the program once more, press the Auto Trig-key or the Music Trig-key.
Activating the sound-control
If the sound-control is activated, the program moves in the bass-tact of the music.
Press the Music Trig-key (LED shines) and the sound-control is activated.
Flashing-function
Via the Flashing-key, you can start flash effect.
6. Technical specifications
Power supply:
Power consumption:
Number of control channels:
Sound control:
Sound input:
Audio-sensitivity:
DMX 512-output:
Pre-programed programs
100-125V,200-230V AC, 50/60Hz ~
4W
24
either via ¼” Jack or built-in microphone
¼” mono Jack
0.3 - 1 V
3-pin XLR-connector
9
Dimensions (LxWxH):
Weight:
155 x 110 x 80 mm
0,5 kg
7. Cleaning and maintenance
DANGER!
Disconnect from the mains before starting any
maintenance work
We recommend a frequent cleaning of the device. Please use a soft lint-free and moistened cloth. Never use
alcohol or solvents!
There are no servicable parts inside the device. Maintenance and service operations are only to be carried out by
authorized dealers.
Should you need any spare parts, please use genuine parts.
If the power supply cable of this device will be damaged, it has to be replaced by authorized dealers only in order
to avoid hazards.
8
8. Appendix
We believe you will enjoy your controller. We assure you will enjoy this product for years if you follow the
instructions given in this manual.
If you have any questions and comments, please do not hesitate to contact us.
Version 1.0
9