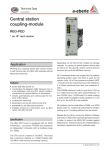
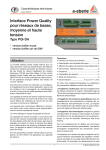
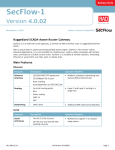
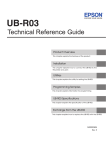
1
Instruction Manual g We take care of it. Author Department Changes Version Date Wolfgang Borchers [email protected] Initial release 0.1 15.02.2009 Wolfgang Borchers [email protected] Revision of all chapters 0.2 05.03.2009 Wolfgang Borchers [email protected] Revision of pictures 0.3 19.03.2009 Wolfgang Borchers [email protected] Revision of pictures, FW 0.4 25.03.2009 Wolfgang Borchers [email protected] Addition of MODBUS 0.5 10.04.2009 Wolfgang Borchers [email protected] MODBUS modifications 0.6 18.05.2009 Wolfgang Borchers [email protected] Various modifications 0.7 29.06.2009 Wolfgang Borchers [email protected] Various modifications 0.8 12.08.2009 Wolfgang Borchers [email protected] Various modifications 0.9 16.09.2009 Wolfgang Borchers [email protected] Release version 1.0 29.01.2010 Wolfgang Borchers [email protected] Addition of IEC103/REG-PE(D) 1.1 10.05.2010 Wolfgang Borchers [email protected] Various modifications 1.2 20.08.2010 Wolfgang Borchers [email protected] DNP3/REG-PE(D) over Ethernet 1.3 19.10.2010 Wolfgang Borchers [email protected] IEC104 with 5 partner stations 1.4 14.02.2011 Wolfgang Borchers [email protected] IEC103 full revision 1.5 05.05.2012 Wolfgang Borchers [email protected] IEC61850 full revision 1.6 26.05.2012 Wolfgang Borchers [email protected] IEC61850 IED name configuration 1.7 11.06.2012 Wolfgang Borchers [email protected] Update to Version 9.9, versioning now same as WinConfig. 9.9 13.09.2012 Wolfgang Borchers [email protected] Extension to new doc guidelines. 9.9.1 13.10.2012 Wolfgang Borchers [email protected] New SCL_Config 9.9.2 13.12.2012 Wolfgang Borchers [email protected] Extension of Modbus and RPL. 9.9.4 01.03.2013 Wolfgang Borchers [email protected] Extension of IEC 104. 9.9.5 08.03.2013 Wolfgang Borchers [email protected] Extension to PRP V0 10.5.2 28.11.2013 Wolfgang Borchers [email protected] Extension to PRP V1 10.5.3 12.12.2013 Wolfgang Borchers [email protected] Extension to Cyber Security Version 11.0.0 23.12.2013 Wolfgang Borchers [email protected] Extension with IEC 60870-5-101 11.0.1 23.05.2014 Wolfgang Borchers [email protected] Cyber Security adjustable, IEC 61850 Ed. 2 11.0.2 23.07.2013 Wolfgang Borchers [email protected] Extension of IEC 61850 client functionality, Grouping in IEC 60870-5-104 11.0.3 10.09.2014 Wolfgang Borchers [email protected] Various modifications 11.0.6 08.10.2015 Copying of this document and giving it to others and the use of communication of the contents thereof are forbidden without express authorities Offenders are liable to the payment of damages. All rights are reserved in the event of the grant of a patent or the registration of a utility model or design Page 2 Table of Contents 1. User Guidance...............................................................................................................10 1.1 Warnings ................................................................................................................................ 10 1.2 Notes ...................................................................................................................................... 10 1.3 Other Symbols........................................................................................................................ 10 2. Scope of Delivery ..........................................................................................................11 2.1 Scope of Delivery ................................................................................................................... 11 3. Supported Software ......................................................................................................11 4. Introduction ..................................................................................................................13 5. Glossary ........................................................................................................................14 6. WinConfig REG-P / REG-PE / REG-PED ............................................................................14 6.1 WinConfig Software introduction .......................................................................................... 14 6.1.1 Mohican server TCP port management and WinConfig logging ............................................ 15 6.2 REG-PEX Loader software ...................................................................................................... 17 6.3 Communication with REG-PE(D) telecontrol board in WinConfig 11 .................................... 18 6.3.1 Rules for higher security ........................................................................................................ 19 6.3.2 SFTP access............................................................................................................................. 19 6.3.3 Actions supported by firmware and their usage: .................................................................. 21 6.3.4 SSH access .............................................................................................................................. 22 6.3.5 Menu and meaning of individual items: ................................................................................ 22 7. Supported protocols and telecontrol board types ..........................................................25 8. Introductory window ....................................................................................................26 9. Work with protocol settings ..........................................................................................26 9.1 Settings tree ........................................................................................................................... 27 9.2 Main menu buttons ............................................................................................................... 28 9.2.1 New settings........................................................................................................................... 28 9.2.2 Open, conversion from INI, import from Excel ...................................................................... 29 9.2.3 Remove, Save ......................................................................................................................... 30 9.2.4 Transfer settings from / to a PC, explained ........................................................................... 30 9.2.5 Remarks to all Ethernet data transfers .................................................................................. 32 9.2.6 TK400 telecontrol board: ....................................................................................................... 32 9.2.7 TK8xx telecontrol board: ........................................................................................................ 32 9.2.8 Transfer settings from PC function ........................................................................................ 34 9.2.9 Transfer settings from PC function for telecontrol boards type REG-PE(D) .......................... 35 9.2.10 Transfer settings to PC function............................................................................................. 38 Table of Contents Page 3 We take care of it. Page 4 9.2.11 Change of IP settings for REG-PE(D) telecontrol boards ........................................................ 40 9.2.12 Submit certificates for REG-PE(D) telecontrol boards ........................................................... 41 9.2.13 Bonding .................................................................................................................................. 43 9.2.14 PRP - Parallel Redundancy Protocol ....................................................................................... 43 9.3 Compare settings function ..................................................................................................... 44 9.4 Rules for export/import using Microsoft Excel ...................................................................... 45 9.4.1 Export to Excel........................................................................................................................ 45 9.4.2 Import from Excel ................................................................................................................... 45 9.5 Migration of settings .............................................................................................................. 46 9.6 Checking of entered values .................................................................................................... 46 10. IEC101 settings.............................................................................................................. 47 10.1 Basic........................................................................................................................................ 47 10.2 Advanced ................................................................................................................................ 49 10.2.1 IEC101 Settings - SCADA for REG-P telecontrol boards.......................................................... 49 10.2.2 IEC101 Settings - SCADA for REG-PE(D) telecontrol boards ................................................... 53 10.2.3 ComServer settings ................................................................................................................ 55 10.2.4 ComServer settings, IEC101 for REG-PE(D) ............................................................................ 56 10.2.5 Supervisory settings, IEC101 for REG-PE(D) ........................................................................... 56 10.3 Linked devices ........................................................................................................................ 56 10.3.1 Time synchronization ............................................................................................................. 57 10.3.2 Internal communication ......................................................................................................... 58 10.3.3 Converter Errors ..................................................................................................................... 59 10.4 Device x .................................................................................................................................. 60 10.4.1 Device request settings .......................................................................................................... 60 10.4.2 Indications .............................................................................................................................. 62 10.4.3 Commands ............................................................................................................................. 65 10.4.4 Editing the IOA in columns ..................................................................................................... 67 10.4.5 Status ...................................................................................................................................... 68 11. Settings – SCADA for IEC103 (REG-P) .............................................................................. 71 11.1 Advanced ................................................................................................................................ 71 11.1.1 Settings – SCADA .................................................................................................................... 71 11.2 Devices ................................................................................................................................... 73 11.2.1 Converter Errors ..................................................................................................................... 73 11.3 Device x .................................................................................................................................. 73 11.3.1 Device request settings .......................................................................................................... 73 12. IEC103 settings (REG-PE(D)) ........................................................................................... 75 Table of Contents 12.1 Common ................................................................................................................................. 75 12.1.1 IEC 60870-5-103-Conformity ................................................................................................. 75 12.1.2 Supported Type Identifications .............................................................................................. 75 12.1.3 Supported Cause of Transmission.......................................................................................... 76 12.1.4 Topical channel (ACC) ............................................................................................................ 76 12.1.5 Fault Number (FAN) ............................................................................................................... 76 12.1.6 Interval between information elements (INT) ....................................................................... 77 12.1.7 Compatibility level (COL)........................................................................................................ 77 12.1.8 Number of channels (NOC) .................................................................................................... 77 12.1.9 Number of information elements of a channel (NOE) ........................................................... 77 12.1.10 Number of tags (NOT) ............................................................................................................ 77 12.1.11 Number of relevant disturbance values per ASDU (NDV) ..................................................... 77 12.1.12 Return information identifier (RII) ......................................................................................... 77 12.1.13 Scan number (SCN) ................................................................................................................ 77 12.1.14 Supplementary information (SIN) .......................................................................................... 77 12.1.15 Status of fault (SOF) ............................................................................................................... 78 12.1.16 Tag position (TAP) .................................................................................................................. 78 12.1.17 Type of order (TOO) ............................................................................................................... 78 12.1.18 Type of disturbance values (TOV) .......................................................................................... 78 12.1.19 Binary time ............................................................................................................................. 79 12.2 Basic settings .......................................................................................................................... 79 12.3 Advanced settings .................................................................................................................. 81 12.3.1 IEC103 Settings – SCADA for PQI-D device ............................................................................ 81 12.3.2 IEC103 Settings – SCADA for EOR-D device ........................................................................... 85 12.3.3 Ethernet-COM-Server ............................................................................................................ 87 12.3.4 ComServer settings PQI-D ...................................................................................................... 89 12.3.5 ComServer settings EOR-D ..................................................................................................... 93 12.3.6 Supervisory settings ............................................................................................................... 95 12.4 Devices ................................................................................................................................... 98 12.4.1 Time synchronization PQI-D................................................................................................... 98 12.4.2 Time synchronization EOR-D.................................................................................................. 99 12.4.3 Internal communication PQI-D ............................................................................................ 100 12.4.4 Internal communication, EOR-D .......................................................................................... 102 12.5 Device x ................................................................................................................................ 104 12.5.1 Device settings ..................................................................................................................... 104 12.5.2 Data points – indications, PQI-D .......................................................................................... 107 Table of Contents Page 5 We take care of it. Page 6 12.5.3 Indications, EOR-D ................................................................................................................ 109 12.5.4 Commands ........................................................................................................................... 110 12.5.5 Fault records......................................................................................................................... 111 12.5.6 EOR-D® defined settings ...................................................................................................... 114 12.5.7 Single disturbance value (SDV)............................................................................................. 114 13. IEC104 settings............................................................................................................ 115 13.1 Basic...................................................................................................................................... 115 13.2 Advanced .............................................................................................................................. 118 13.2.1 Settings - SCADA ................................................................................................................... 118 13.2.2 ComServer settings .............................................................................................................. 120 13.2.3 Supervisory settings ............................................................................................................. 122 13.3 Linked Devices ...................................................................................................................... 125 13.3.1 Time synchronization ........................................................................................................... 125 13.3.2 Internal Communication ...................................................................................................... 126 13.3.3 IEC104 Commands ............................................................................................................... 127 13.3.4 IEC104 indications ................................................................................................................ 128 14. DNP3 settings (REG-P) ................................................................................................. 131 14.1 Basic...................................................................................................................................... 131 14.2 Advanced .............................................................................................................................. 132 14.2.1 Settings - SCADA ................................................................................................................... 132 14.3 Device x ................................................................................................................................ 136 14.3.1 Device request settings ........................................................................................................ 136 14.3.2 Commands ........................................................................................................................... 137 14.3.3 Indications ............................................................................................................................ 138 15. DNP3 settings (REG-PE(D))........................................................................................... 139 15.1 Basic...................................................................................................................................... 139 15.2 Advanced .............................................................................................................................. 140 15.2.1 Settings SCADA ..................................................................................................................... 140 15.3 Device X ................................................................................................................................ 142 15.3.1 Device request settings ........................................................................................................ 142 15.3.2 Indications ............................................................................................................................ 143 15.3.3 Commands ........................................................................................................................... 145 16. CSO settings (REG-P) ................................................................................................... 146 17. CSO settings (REG-PE(D)) ............................................................................................. 148 17.1 CSO channels ........................................................................................................................ 148 17.2 CSO Supervisory settings ...................................................................................................... 150 Table of Contents 18. Modbus settings ......................................................................................................... 151 18.1 Basic settings MODBUS RTU ................................................................................................ 151 18.2 Basic settings MODBUS TCP ................................................................................................. 152 18.3 Advanced - Settings - SCADA................................................................................................ 153 18.4 Devices ................................................................................................................................. 154 18.4.1 Time synchronization ........................................................................................................... 154 18.4.2 Internal communication settings ......................................................................................... 155 18.5 Device x ................................................................................................................................ 156 18.5.1 Device settings ..................................................................................................................... 156 18.5.2 Indications ............................................................................................................................ 157 18.5.3 Commands ........................................................................................................................... 158 19. C37.118 Settings.......................................................................................................... 159 19.1 Basic ..................................................................................................................................... 159 19.2 Advanced.............................................................................................................................. 160 19.2.1 Serial Port Assignment ......................................................................................................... 160 19.2.2 Settings – SCADA .................................................................................................................. 161 19.2.3 ComServer ............................................................................................................................ 162 19.2.4 Supervisory........................................................................................................................... 164 19.3 Linked Devices...................................................................................................................... 167 19.3.1 Time Synchronization........................................................................................................... 168 19.3.2 Internal communication....................................................................................................... 169 19.3.3 Device x ................................................................................................................................ 170 19.3.4 Indications ............................................................................................................................ 171 20. IEC61850 ..................................................................................................................... 172 20.1 General Information ............................................................................................................ 172 20.2 SCL_Config engineering Tool ............................................................................................... 172 20.2.1 Displaying project configuration and properties of nodes .................................................. 174 20.2.2 Displaying source (ICD-file) .................................................................................................. 175 20.2.3 Adding, deleting and renaming devices ............................................................................... 176 20.2.4 Adding, deleting and renaming logical nodes ...................................................................... 177 20.2.5 Editing sAddr ........................................................................................................................ 178 20.2.6 Removing Data Objects ........................................................................................................ 183 20.2.7 Restore Data Objects from Template .................................................................................. 184 20.2.8 Renaming Data Objects........................................................................................................ 185 20.2.9 Changing of DO Data Class ................................................................................................... 186 20.2.10 Changing the control model for controllable data objects .................................................. 187 Table of Contents Page 7 We take care of it. Page 8 20.2.11 GOOSElight Support ............................................................................................................. 189 20.2.12 Actions log ............................................................................................................................ 197 20.3 IED-Server Configuration ...................................................................................................... 197 20.4 Logical Device Configuration ................................................................................................ 198 20.5 Logical Node Configuration .................................................................................................. 198 20.6 Common Data Attribute Configuration ................................................................................ 198 20.6.1 Status Value Configuration................................................................................................... 199 20.6.2 Control Value Configuration................................................................................................. 203 20.6.3 Set point Value Configuration (Single Command) ............................................................... 213 20.7 GOOSE light Settings ............................................................................................................ 215 20.7.1 IEC GOOSE light Architecture ............................................................................................... 215 20.7.2 GOOSE light Control Blocks Settings .................................................................................... 215 20.7.3 GOOSE light Input Streams (Inner Subscribers) ................................................................... 217 20.7.4 Publisher Side ....................................................................................................................... 217 20.7.5 Subscribe Side ...................................................................................................................... 222 20.8 WinConfig Settings ............................................................................................................... 231 20.9 Basic...................................................................................................................................... 231 20.10 Advanced .............................................................................................................................. 233 20.10.1 Serial ports assignment ........................................................................................................ 233 20.10.2 Settings - SCADA ................................................................................................................... 234 20.10.3 ELAN extension (CSE) ........................................................................................................... 236 20.10.4 COM-Server .......................................................................................................................... 240 20.10.5 Supervisory settings ............................................................................................................. 242 20.10.6 Time synchronization ........................................................................................................... 246 20.10.7 Internal communication ....................................................................................................... 249 20.10.8 Attached Devices .................................................................................................................. 251 20.10.9 Saving of settings in IEC61850.............................................................................................. 252 21. WinConfig in Step-by-Step mode ................................................................................. 253 21.1 Templates in Step-by-Step mode ......................................................................................... 253 21.2 Step 1 - hardware ................................................................................................................. 254 21.3 Protocol and templates ........................................................................................................ 255 21.4 Protocol-specific settings ..................................................................................................... 265 21.5 Time synchronization ........................................................................................................... 267 21.6 Devices ................................................................................................................................. 268 21.7 REGSys configuration ........................................................................................................... 268 21.8 Download ............................................................................................................................. 269 Table of Contents 21.9 Finishing ............................................................................................................................... 270 22. Tips on Troubleshooting .............................................................................................. 271 22.1 Common troubleshooting tips ............................................................................................. 271 22.2 Diagnostic Functions in the Context of the REG-P / REG-PE / REG-PED Device .................. 272 23. Related Documentation .............................................................................................. 275 24. Maintenance/Cleaning ................................................................................................ 276 25. Disposal ...................................................................................................................... 276 26. Product Warranty ....................................................................................................... 276 27. List of Figures .............................................................................................................. 277 28. List of Tables ............................................................................................................... 281 Table of Contents Page 9 We take care of it. 1. User Guidance 1.1 Warnings Types of warnings Warnings are distinguished according to the type of risk through the following signal words: 0 Danger warns of a risk of death 0 Warning warns of physical injury 0 Caution warns of damage to property Structure of a warning Nature and source of the danger Actions to avoid the danger. SIGNAL WORD 1.2 Notes Notes on appropriate use of the device 1.3 Other Symbols Instructions Structure of instructions: Guidance for an action. Indication of an outcome, if necessary. Lists Structure of unstructured lists: 0 List level 1 – List level 2 Structure of numbered lists: 1) List level 1 2) List level 1 1. List level 2 2. List level 2 Page 10 User Guidance 2. Scope of Delivery 2.1 Scope of Delivery 0 WinConfig Software, available on FTP: ftp://a-eberle-user:[email protected]/public/SCADA/WinConfig_11/ or at the Download Centre of our Homepage: http://www.a-eberle.de 0 User Manual 0 RS232 cable 0 RPL Loader Software, available on eberle.de/public/SCADA/REG-PE(X)-Loader/ 3. FTP: ftp://a-eberle-user:[email protected] Supported Software Table 1: Topical software state at the 2012-10-10 Name Definitions Date 19-09-2012 Firmware REG-PE Supported XML settings from WinConfig Settings can be found in directory /mnt/jffs2/param XML settings file Images: Firmware ramdisk: settings.xml other files and directories are only temporary generated from settings.xml after each restart uRamdisk (BusyBox, common libraries and utilities) Kernel: kernel.tgz (Linux kernel for TK860) TK860_DNP3.tgz TK860_IEC104.tgz TK860_IEC103.tgz TK860_MODBUS.tgz TK860_CSO.tgz TK860_C37118.tgz TK860_IEC61850.tgz (protocol specific applications and web pages) Scope of Delivery Page 11 We take care of it. Name Definitions Date 19-09-2012 Firmware REG-PED Supported XML settings from WinConfig Settings set in directory /mnt/jffs2/param XML settings file Images: Firmware ramdisk: others files and directories are only temporary generated after each start from settings.xml uRamdisk (BusyBox, common libraries and utilities) Kernel: kernel_16MB.tgz kernel_16MB_SCC4.tgz kernel_32MB.tgz kernel_32MB_SCC4.tgz (Linux kernel for TK885D board with 16 and 32 MB flash) TK885_DNP3.tgz TK885_IEC104.tgz TK885_IEC103.tgz TK885_MODBUS.tgz TK885_CSO.tgz TK885_C37118.tgz TK885_IEC61850.tgz (protocol specific applications and web pages) Page 12 Supported Software settings.xml Firmware REG-P REG-P Version TK509 IEC101 balanced 25-01-2011 asciireg101B509V4215.hex Version 42.15 IEC101 unbalanced 25-01-2011 asciireg101U509V4215.hex Version 42.15 IEC103 04-03-2010 asciireg103_509V4211.hex Version 42.11 REG-P version TK517 DNP3 16-11-2009 DNP3.hex IEC101 balanced 25-01-2011 asciireg101BEXTV4215.hex Version 42.15 IEC101 balanced 25-01-2011 asciireg101BINTV4215.hex Version 42.15 IEC101 unbalanced 25-01-2011 asciireg101UEXTV4215.hex Version 42.15 IEC101 unbalanced 25-01-2011 IEC103 03-03-2010 asciireg101UINTV4215.hex Version 42.15 asciireg103_EXTV4211.hex Version 42.11 IEC103 10-03-2010 asciireg103_INTV4211.hex Version 42.11 REG-P version TK400 DNP3 02-10-2012 DNP3EXT.hex DNP3 02-10-2012 DNP3INT.hex IEC101 balanced 25-01-2011 ASCIIReg101B400V5213.hex IEC101 unbalanced 25-01-2011 Version 52.13 ASCIIReg101U400V5213.hex Version 52.13 IEC103 12-01-2012 ASCIIReg103_400V5216.hex Version 52.16 DNP3 23-07-2012 DNP3.hex CSO 16-11-2009 CSOv6007.hex Version 60.07 PQI-DA (TK400) CSO 16-11-2009 CSOv6007.hex Version 60.07 4. Introduction This document describes the configuration of telecontrol boards REG-P / REG-PE / REG-PED / PQI-DA using DNP3, IEC101, IEC103, IEC104, Modbus, 61850, C37.118 and Ethernet/COM in connection with XXXSysTM devices (e.g. REGSys™ or EORSys devices) of a.eberle company. To understand the ideas and techniques described, you should already be familiar with general concepts concerning the above stated protocols and serial communication settings. Introduction Page 13 We take care of it. Two methods of configuration may be used: either “online” with connection to the REG-PE / REG-PED, or “offline” using a PC-tool called WinConfig Tools. The web server is a permanent part of the firmware of the REG-PE / REG-PED devices and requires no special installation. Web server is also part of the WinConfig offline version. 5. Glossary 6. Combo-Box A text box combined with a List Box within a software program FTP File Transfer Protocol Group-box A named rounded box typically enclosing a group of one or more buttons GUI Graphical User Interface HTTPS Hypertext Transfer Protocol Secure IOA Information Object Address SCADA Supervisory Control And Data Acquisition VM Virtual Machine TSDU Telegram Service Data Unit XML Extensible Markup Language WinConfig REG-P / REG-PE / REG-PED 6.1 WinConfig Software introduction WinConfig is software for managing of firmware and communication protocol settings of telecontrol boards and modules: REG-P / REG-PE / REG-PED placed into a.eberle device racks. WinConfig is a web-based program for creation and management of files containing protocol settings, for two way transfer of settings and firmware from a user PC to REG-P / REG-PE / REG-PED boards and modules, and for identification of REG-P / REG-PE / REG-PED devices connected to the network. Telecontrol board firmware has to be equipped with COM-Server to identify itself within the network. COM-Server is part of all IEC101, IEC103, and IEC104 protocols installed as firmware and accessible by the WinConfig environment. COM-Server cannot work in TK519 and TK509 REG-P types, because Ethernet connections are not available with these board types. WinConfig program equipment consists of web server Mohican equipped with active pages for GUI and libraries developed in C# .NET software development environment for communication with telecontrol boards, file services and additional auxiliary functions. WinConfig prepares settings for REG-P / REG-PE / REG-PED with IEC101, IEC103, IEC104, DNP3 and Modbus protocols and COM-Server on a local host (local web server) and stores them in a standard file format - .XML file. The settings file can then be transferred via Page 14 Glossary HTTPS to board flash memory in the case of REG-PE / REG-PED board types. WinConfig creates binary data files in Intel HEX format and transfers them into the board memory in the case of REG-P boards. Serial transfer via a.eberle device or Ethernet transfer can be used according to the REG-P type. Firmware is always transferred together with settings, WinConfig use the latest firmware, which is part of its package. A part of configuration software is also transferred to the telecontrol board and this online part provides a system functions focused to the management of telecontrol board system software, user management etc. with high level of security. The functionality of this part of WinConfig is described in a separate chapter. WinConfig splits into two main parts: the local web server and the local Web site with application libraries. Settings may be prepared, stored and retrieved for various configurations without a direct link to the device. Settings are saved in .xml file types. WinConfig launches a local web server and a default web browser on your PC. Should one of the expressions used in this document be unclear to you, you may refer to the glossary at the end of this document for an explanation of it. Otherwise please feel free to contact us with your technical questions at this email address: [email protected]. 6.1.1 Mohican server TCP port management and WinConfig logging The default TCP port used by Mohican web server is port 8080. To avoid conflict in the case when this port is occupied, WinConfig always tests whether TCP port 8080 is free. If not, then WinConfig tries to increment the port number and finds the first free port. Such port number is written in the WinConfig configuration file and this number is consequently used for the WinConfig operation. The described test is performed always when WinConfig is launched. The WinConfig software creates two log files: The log files created by C# libraries These files are created in the WinConfig installation folder and are named according to the format YYYY.MM.DD.WinConfig.log, where YYYY.MM.DD is date of the log file creation. The maximum depth of the log files is 10 days, older files are deleted when WinConfig is launched. The log files created by Mohican web server The logging created by Mohican web server is switched off by default. The logging can be switched on by editing the following line in the Mohican.conf configuration file placed in the WinConfig installation folder: <Logging state="off">../log/httpserver.log</Logging> To switch the logging on, change the Logging state option to "on". The option allows also setting of the log file name and folder. In the above stated example the log file name is httpserver.log and will be created in the /log subfolder of the WinConfig installation folder. WinConfig REG-P / REG-PE / REG-PED Page 15 We take care of it. Page 16 WinConfig REG-P / REG-PE / REG-PED 6.2 REG-PEX Loader software The REG-PEX loader (RPL) is software tool for transfer of Linux Kernel and RAM disk into the REG-PE(D) and PQI-DA telecontrol boards equipped only with U-Boot software. Such boards cannot cooperate directly with WinConfig. The RPL also allows change of board IP settings and selection of kernel with/without the bonding feature. The RPL is low-level software tool and should be used by advanced users only. The RPL software is contained in the WinConfig installation package and can be launched from Transfer from PC page by the Run RPL button. The WinConfig also offers launch of RPL in the case when no REG-PE(D) telecontrol board is detected. Figure 1: The RPL window WinConfig REG-P / REG-PE / REG-PED Page 17 We take care of it. To transfer Linux Kernel and RAM disk into the REG-PE(x) follow these steps: 6.3 Connect the PARAM connector of REG-PE(x) board and your computer with the RS232 cable supplied with the eberle device or with any serial null modem cable. Connect your computer and the REG-PE(x) board by Ethernet cable. Some Ethernet adapters do not switch to the correct mode automatically, so please use preferably a crosslink patch cable. Fill the IP address lines in RPL window. Use the (...) button to browse the edc file placed in the WinConfig installation folders. There are two edc files distributed in the WinConfig setup, the difference is in the versions of Kernel - with/without support of bonding. Select whatever of the two files as bonding and related features can be set later using the Change of IP settings for REG-PE(D) telecontrol boards WinConfig function. Press the Update button. The update process can be seen in the RPL tab Terminal. Communication with REG-PE(D) telecontrol board in WinConfig 11 A higher level of security for data transfer and communication with REG-PE(D) telecontrol board is used in WinConfig v.11. The online WinConfig (www pages placed in the board memory) can be disabled in the Transfer settings settings from PC page in offline WinConfig or in the REG-PE(D) board IP settings page in online WinConfig or in user menu. The new firmware supports several functions as described below. The following secured communication technologies are used in WinConfig 11: Page 18 SFTP (SSH file transfer protocol) replaced the online WinConfig. The v.11 firmware supports several functions focused to file transfer. The file transfer via SFTP protocol is encrypted and protected by user login and password; remoteuser login can be used with remoteuser password (factory default). SSH is used instead of former telnet for remote access to console. This access is typically used for basic board configuration. A SSH client (e.g. PUTTY) is necessary for this type of connection. HTTPS (HTTP over SSL) together with SSL certificates is used for communication between off-line WinConfig and telecontrol board. WinConfig REG-P / REG-PE / REG-PED Note on HTTPS accounts functionality when upgrading/downgrading from/to WinConfig 10 When user upgrades from WinConfig 10 to 11 using offline WinConfig, one of the HTTPS accounts (username and password) from version 10 (passwords coded by XOR, not by SHA2 hash) is used. The accounts defined in the version 10 coded by XOR remain in the upgraded version 11. The individual account is changed to the new SHA2 coding version in the moment when user changes this account in the WinConfig 11. The file with SHA2 coded accounts remains in the telecontrol board when downgrading from version 11 to version 10. Offline WinConfig 10 using XOR password coding will not work in such case. To solve such situation, the user can change the accounts using FTP or serial PARAM port or to delete the account file /mnt/jffs2/config/webs_users.conf. When the file is deleted, the default account will be used. 6.3.1 Rules for higher security It is strongly recommended to switch off at least the online WinConfig and change the factory default passwords to get highest security concerning data and software stored in telecontrol board. User should also disable all network services that are not necessary for the board operation and management, namely SFTP, SSH and HTTPS (WinConfig). When creating new user password, keep also in mind the basic rules for secure passwords: Password should be at least 8 characters long Use uppercase and lowercase letters Use also numbers Use also special characters like $#&. For more information about secure and strong passwords please consult the publicly available information in the Internet. 6.3.2 SFTP access A SFTP (SSH file transfer protocol) client program has to be used for connection with telecontrol board and for transfer of files between board and PC computer, e.g. WinSCP for MS Windows, GFTP for MS Windows and Linux or, possibly, SFTP (PSFTP) for the command line mode. The following files can be found in the board memory and transferred to PC: current XML settings ICD file for 61850 protocol WinConfig REG-P / REG-PE / REG-PED Page 19 We take care of it. files with information about hardware, SW version, system kernel log etc. The XML settings and ICD file are placed in the /xload/actual folder and files with information about HW etc. are placed in the folder /xload/info. The XML settings and ICD file can be replaced and thus new configuration can be installed using SFTP. It is also possible to transfer SSL certificates with key that are used for HTTPS communication with WinConfig or to change debugging (logging) parameters as defined in the Supervisory page of WinConfig. The debugging (logging) parameters can be changed without need of board restart. However, the most of parameter changes require restart of board that can be also done via SFTP. Use always the /xload/new folder when transferring files from PC to board. The /xload/new folder is scanned by firmware approximately every 20 seconds and firmware starts required action in the case when relevant files are found in the folder. Page 20 WinConfig REG-P / REG-PE / REG-PED 6.3.3 Actions supported by firmware and their usage: Restart of board Installation of new XML settings and ICD file Prepare empty file named reboot and copy it in the /xload/new folder. Wait approx. 20s for the automatic restart of board. Prepare new settings file named settings.xml and copy it in the /xload/new folder. Prepare new ICD file (if ICD change is required) and copy it to the folder. Prepare empty file named move and copy it. Wait approx. 20s for the automatic move and installation of the files. Prepare empty file named reload and copy it. Wait approx. 20s for the automatic reload of files transferred in the previous sequence. Reload can be used if there was change in the supervisory parameters only. Otherwise use restart, see item 1. Installation of new certificates Prepare device certificate in the cert.pem file and copy in the /xload/new folder. The certificate has to be in the PEM format. Prepare and copy also the key as key.pem file. If required, prepare and copy also the intermediate certificates as intercert.pem file. The certificates must be in PEM format and must be sorted starting with the certificate to the highest level (root CA). Alternatively, the CA certificate can also be copied as the cacert.pem file. Prepare empty file named cert_move and copy it in the /xload/new folder. Restart the board, see item 1. WinConfig REG-P / REG-PE / REG-PED Page 21 We take care of it. 6.3.4 SSH access SSH is used for remote access to console. The file transfer is encrypted and protected by user login and password; remoteuser login can be used with remoteuser password. The access is driven by sequence of user menu that allow user to show and/or change the board settings of to show logs of kernel, system and applications. 6.3.5 Menu and meaning of individual items: Main menu 1. Network menu Go to menu for network setting and diagnostic 2. Services menu Go to menu administration of network services (SSH/SFTP, HTTPS) 3. Log menu Go to menu showing logs 4. Change terminal password Change of SSH and SFTP passwords. Change is applied to the currently logged user. Program asks for entering of old password and two times new password. Attention, a change is applied immediately. 5. HTTPS users management Go to administration of HTTPS users (off-line WinConfig) 6. Logout Terminal logout 7. Reboot Restart telecontrol board 8. Recovery menu Go to recovery mode. This menu item is shown only in the case of access via local serial port. Another condition is that the board has to be prepared for the recovery mode (the R key is pressed in the moment or recovery notification during the card restart). 9. Start root shell Page 22 The root shell is determined only for administrators and is not available for remoteuser and localuser. WinConfig REG-P / REG-PE / REG-PED Network menu 1. Ping ICMP The ICMP ping is determined for the diagnostic of network connection. The system asks for counterparty IP. The ICMP echo-request packet is used. The user network interface is determined by routing table. 2. Ping ARP The ARP ping is determined for the diagnostic of network connection within one subnet. The system asks for counterparty IP and, if there is more network interfaces (TK885), it asks also for the interface to be used. This ping usually passes through firewall. The ARP protocol is not routed to other networks. 3. Show routing table Shows current routing table. 4. Show interfaces Shows current list of network interfaces with parameters (IP address, mask, MAC address and statistics of sent and received data). 5. Show saved network parameters (IP addresses, bonding) Shows network parameters (IP address, mask, gateway, state of bonding) saved in the flash memory. These parameters will be used after board restart. 6. Set network parameters (IP addresses, bonding) Setting of network parameters (IP address, mask, gateway, state of bonding) solved as a series of questions and answers. 7. Back Go to main menu. Services menu 1. Services state Shows the state of SSH/SFTP and HTTPS services (enabled or disabled). 2. Enable SSH/SFTP Enables SSH/SFTP service. The change takes effect after board restart. 3. Disable SSH/SFTP Disables SSH/SFTP service. The change takes effect after board restart. 4. Enable WinConfig (https, network detect) Enables services necessary for the communication with off-line WinConfig. The WinConfig REG-P / REG-PE / REG-PED Page 23 We take care of it. change takes effect after board restart. 5. Disable WinConfig (https, network detect) Disables services necessary for the communication with off-line WinConfig. The change takes effect after board restart. 6. Enable WinConfig WWW pages Enables WinConfig WWW pages. 7. Disable WinConfig WWW pages Disables WinConfig WWW pages. 8. Back Go to main menu. Attention: when both SSH/SFTP and HTTPS accesses are disabled, it is not possible to connect the board remotely. The local access via PARAM port only is possible in such case. Log menu 1. Application and system log Shows log with messages from system and from user applications. 2. Kernel log Shows log with messages from system kernel. 3. Back Go to main menu. HTTPS users management menu 1. List users Shows list of user accounts for HTTPS service (users of off-line WinConfig). 2. Change user password Changes user password. The service asks for old password and two time for the new password. The change takes effect after board restart. 3. Add new user Adds a new user account. The service asks for new account name and two times password. The change takes effect after board restart. 4. Delete user Page 24 Deletes existing user account. The service asks for existing user account name. WinConfig REG-P / REG-PE / REG-PED The change takes effect after board restart. 5. Back Go to main menu. Recovery menu 1. Reboot and format applications part of firmware Sets the formatting flag and performs board reset. Attention, this service formats the jffs2 area without possibility of recovery. This service is determined for emergency situations only, when the board stuck and there is no other possibility of fix. The off-line WinConfig can be consequently used for transfer of new firmware. 2. Back 7. Go to main menu. Supported protocols and telecontrol board types Telecontrol board types Available protocols REG-PE(D) (TK860, TK885, IEC104; DNP3; Modbus; IEC103; IEC61850; ComServer only (CSO); C37.118 Protocols Accessible via PQI-DA(TK885-1) CSO, IEC61850, IEC104, IEC104 REG-P (TK509, TK517) IEC101 balanced; unbalanced; IEC103, DNP3 Serial (Write only) REG-P (TK400) IEC101 balanced, unbalanced; IEC103; DNP3; CSO Serial *(Write only) and Com Server (Read and Write) PQI-DA (TK400) CSO Serial *(Write only) and COM-Server (Read and Write) Further protocols can be implemented on demand, please contact: [email protected]. Supported protocols and telecontrol board types Page 25 We take care of it. 8. Introductory window The following introductory window should appear on your screen after WinConfig is started. The following user actions are available from this screen: 0 Select WinConfig language from the combo box in the upper right corner of the window. 0 Run the standard setting and data transfer wizard from the Step-by-Step button. 0 Run complete WinConfig from the Advanced button. 0 Quit WinConfig using the Quit button. Figure 2: Introductory window Important note: If user tries to run WinConfig from read-only medium (CD, DVD), a warning message appears instead of the introductory window.. 9. Work with protocol settings WinConfig can be used for creation and modification of communication protocol settings. If the settings file was created by a previous version of generator (e.g. GenReg, INI file) then WinConfig can be used also for conversion of INI file to the XML file of settings used by WinConfig. The communication protocol settings file can be transferred into the memory of the telecontrol board. WinConfig always appends corresponding firmware code to the settings thus the matching pair of settings and code is always transferred as a pair. The user can also read the settings from the telecontrol boards and show the settings in the WinConfig window using the transfer to PC function. This function is not available for TK509 telecontrol boards. Page 26 Introductory window 9.1 Settings tree WinConfig can have more than one settings open; all settings are shown in tree structure in the left frame of WinConfig window. The selected settings have an orange background. Figure 3: Settings tree Each setting can be drilled down to sets of editable pages. Clicking the text in the tree structure selects the corresponding page in the right frame of WinConfig window. Work with protocol settings Page 27 We take care of it. 9.2 Main menu buttons 0 New – create new settings based on a default template. User has to enter desired telecontrol board type, protocol, SCADA and device template. WinConfig creates new settings according to the selected options. If the selected SCADA and device template are not defined in WinConfig, a default template will be used instead. (Default settings are based on successful experience in the field and should only be changed if there is good reason to do so). 0 Open – open existing XML settings file or open then convert an existing INI settings file to the newer XML settings format. User has to enter/browse the required settings file and enter the target type of the telecontrol board in case of conversion from the older INI format. 0 Remove – remove selected settings from the tree in the WinConfig window. Selected settings are marked with an orange background. To select settings click the root node of the settings in the tree (e.g. DNP3 on REG-P (TK400)) 0 0 0 Save – save the selected settings to the XML file on local disk. Compare – comparison of settings in XML files with results stored in Microsoft Excel XLS file. Export – export of selected settings to a Microsoft Excel XLS file. 0 Transfer to PC – transfer settings from a connected telecontrol board to WinConfig as described above. 0 Transfer from PC – transfer selected settings from WinConfig to the connected telecontrol board as described above. Figure 4: 9.2.1 Main menu buttons New settings To create new settings from an existing template, please click new button. Select board type, protocol, SCADA template and devices template from combo boxes shown below then click the Add button. These newly created settings will appear in the settings tree. The setting templates are divided into two editions in the case of IEC 61850 protocol. The edition of template can be chosen in the Template edition listbox. This listbox is disabled in the case of other protocols. Page 28 Work with protocol settings Figure 5: Add new settings Predefined templates Valid workable combinations of board_type / protocol / SCADA_template / Devices_template are pre-defined in WinConfig. However, the default template files, which can be created, exist only for valid combinations already used and known. If a template for a given combination is not available, a warning message will appear onto the screen: Template file isn't implemented for chosen combination protocol/SCADA/Eberle devices! Default template will be used! If the Continue button is pressed apart from invalid combinations, a default template will be used to create the new set of settings. Default templates typically contain basic configurations without pre-defined data points or commands. 9.2.2 Open, conversion from INI, import from Excel Open Settings from file (XML settings) In Order to open an existing XML settings file, convert an existing INI file or import a WinConfig-exported Excel file, please click the Open button. To open existing settings please browse the settings file by using the Browse button and then click the Open button in the Open settings from file Group-box Convert settings from GenReg "*.ini" file To convert settings from GenReg INI format, browse the file by using the Browse button, select required telecontrol board type from combo box and click the Convert button in the Convert settings from GenReg “*.ini” file frame. WinConfig will automatically detect the protocol described in the INI file and converts the settings to a suitable format for the required board type. Import settings from WinConfig-exported Excel file To import settings from WinConfig-exported Excel file, browse the file by using the Browse button and click Import button in the Import settings, from WinConfig-exported Excel file frame. Work with protocol settings Page 29 We take care of it. Figure 6: 9.2.3 Open settings Remove, Save Click the Remove button to remove the selected settings from the settings tree. Click the Save button to save selected settings to a WinConfig XML settings file. Select folder and type the settings file name in the dialog box. 9.2.4 Transfer settings from / to a PC, explained The following ways of data transfer are available: 0 Serial transfer via a.eberle device (for example a REG-D regulator) using serial booter firmware saved in the telecontrol board memory (available for boards TK5xx and TK400) 0 Ethernet TCP transfer using Ethernet bbooter firmware saved in the telecontrol board memory (available for TK400 boards). Ethernet transfer can be used in local mode with manual board reset or in remote mode with automatic reset (available for TK400 telecontrol boards with COM-SERVER or CSO firmware installed). 0 Ethernet HTTPS transfer (available for TK8xx telecontrol boards). 0 Direct access to board memory (if running WinConfig directly in the TK8xx board). Page 30 Work with protocol settings Transfer communication protocol settings from PC Transfer from PC to telecontrol board can be performed in the following ways depending upon the types of telecontrol board and application program: 0 Transfer via a serial connection of a.eberle device for telecontrol board types TK517, TK509 and TK400 via Manual transfer from PC button. User has to enter COM port number of connected PC and manually set the a.eberle device and telecontrol board to the serial down/upload state before transfer can begins. 0 Transfer via local Ethernet connection for TK400 board type by Manual transfer from PC button. Telecontrol board has to be manually reset by reset button on TK400 board to run Ethernet booter so this way of data transfer is usable only if user has access to the a.eberle device rack. WinConfig performs automatic detection of manual reset event of telecontrol board and automatically chooses free IP address within the given subnet for connection with the Ethernet booter. IP settings for TCP connection with Ethernet booter are used only for the current TCP session. In the case of manual Ethernet transfer, the WinConfig function has to be started first and then the TK400 board has to be reset so that the WinConfig program can detect start of Ethernet booter program. 0 Transfer via remote via Ethernet connection using COM-Server on remote PC and Ethernet booter application programs for TK400 by Remote transfer from PC button. The Program automatically chooses free IP address within the given subnet for connection with the Ethernet booter. Board reset is performed automatically in this case so this way of data transfer is intended for remote usage. IP settings for TCP connection with Ethernet booter are used only for the current TCP session. This method is not available for the DNP protocol. Detection of available boards has to be performed before the remote transfer function can be activated. 0 Transfer remotely from PC via Ethernet using HTTPS protocol for telecontrol board types TK8xx by Remote transfer from PC button. The User has to enter login and password for access to HTTPS server (typically Admin/teledata). Program automatically chooses free IP address within the given subnet for connection with the telecontrol board. IP settings for TCP connection with telecontrol board are used only for the current TCP session. Detection of available boards has to be performed before the remote transfer function can be activated. Progress bar, operation step and status information are displayed on screen in all cases of data transfer. Transfer from telecontrol board to PC Transfer to PC (reading of settings from telecontrol board) can be performed in similar ways to transfer from PC: 0 Transfer manually via serial line of a.eberle device for board types TK517, TK509 and TK400 0 Transfer manually and locally via Ethernet for TK400 board type 0 Transfer remotely via Ethernet using COM-Server and Ethernet booter application programs for TK400 Work with protocol settings Page 31 We take care of it. 0 Transfer remotely via Ethernet using HTTPS protocol for TK8xx board types. User actions for transfer to PC are similar to those for transfer from PC. Important note: When settings are transferred from PC to telecontrol board, they are always transferred together with appropriate application (protocol converter, firmware), with online WinConfig (web pages etc.) for REG-PE(D) boards and also together with RAMdisk and kernel for REGPE(D) boards (can be selected as option). Thus the remote detection (Detect on LAN) performed by WinConfig after successful transfer of data shows version of application (protocol, firmware) and also version of WinConfig that was also transferred to telecontrol board. The settings file has no version. 9.2.5 Remarks to all Ethernet data transfers Detection of available telecontrol board is done by UDP broadcast telegrams. Remote data transfers are done via TCP session open after successful detection. WinConfig always changes IP settings of connected telecontrol board before the required data transfer is performed. The change of IP settings is temporary and is valid only during the time of data transfer. 9.2.6 TK400 telecontrol board: Detection of board is performed by COM-Server program (CS or CSO) that has to be enabled and running in board memory. Remote operations without running CS cannot be performed while manual Ethernet transfer is still available. Ethernet operations are not available for DNP3 protocol. Data transfer from/to board is done via Ethernet booter program NBOOT that runs after card reset. Temporary change of IP settings applies also to NBOOT. 9.2.7 TK8xx telecontrol board: Temporary change of IP settings applies to one or two (TK885) board interfaces according to the IP configuration of board and connected PC. Original board IP settings are automatically renewed after successful data transfer or after approximately 5 minutes timeout in the case of connection breakage during transfer. Ethernet protocol running on board (IEC104) is interrupted during transfers. Data transfers from/to TK8xx boards are done via secured HTTPS protocol. Survey of cases when Ethernet data transfers cannot be performed: 0 Telecontrol board is connected via LAN with router or firewall, which prevents telegrams used by WinConfig from passing through. 0 PC with running WinConfig has two or more Ethernet interfaces connected to the same subnet. Page 32 Work with protocol settings 0 There is no free IP address in the connected subnet to be used for re-addressing of telecontrol board Ethernet interface. 0 Ethernet interface of PC with running WinConfig has the same IP address as connected telecontrol board Ethernet interface. Work with protocol settings Page 33 We take care of it. 9.2.8 Transfer settings from PC function To transfer selected settings please click the icon that can be found in the main menu. The following Data transfer form now appears on the right side of the settings tree. Figure 7: Remote transfer from PC, REG-P Available controls: 0 Line type – selection of way of data transfer (Ethernet or serial via a.eberle device) 0 Transfer Mode: Manual transfer or Remote transfer – selection of the way of data transfer 0 Detect on LAN – function of automatic detection of telecontrol boards with CSO or COM-SERVER firmware connected to LAN. List of detected boards can be seen in the above placed table after successful detection. 0 Remote transfer from PC – execution button for activating remote transfer function. Page 34 Work with protocol settings Figure 8: Manual transfer from PC If manual transfer function is selected, user has to prepare a.eberle device rack for data transfer manually. Ethernet transfer – click the Manual transfer from PC button first and then reset the telecontrol board. WinConfig waits until Ethernet booter runs, changes temporarily its topical IP settings, establishes TCP connection and performs required data transfer. All actions are performed automatically. Serial transfers – put the a.eberle device in loader mode, reset telecontrol board and wait until the serial booter runs. Then click the Manual transfer from PC button. Comment: Serial null modem cable with modem signals (RTS/CTS) has to be used to enable hardware handshaking during data transfer. 9.2.9 Transfer settings from PC function for telecontrol boards type REGPE(D) HTTPS data transfer is used for transfer of settings, optionally with or without firmware (Linux Kernel and TK8xx RAM disk) in the case of TK8xx telecontrol board type. Correct REGPED version has to be selected using radio buttons in the case when the telecontrol board firmware (Linux Kernel and TK8xx RAM disk) is also transferred. Login information has to be entered to transfer data successfully. Work with protocol settings Page 35 We take care of it. Figure 9: Page 36 Transfer from PC for telecontrol boards type REG-PE(D) Work with protocol settings TK8xx special controls: 0 Automatic firmware transfer/Forced firmware transfer radio button – selection whether WinConfig is supposed to decide about necessity to transfer also kernel, RAM disk or both (Automatic firmware transfer) or whether kernel and RAM disk will be transferred in any case (Forced firmware transfer). 0 Selection of application case – selection of the correct version of the REG-PED board concerning usage of COM ports. This selection affects the version of telecontrol board firmware. 0 User name – user login for HTTPS access 0 Password – user password for HTTPS access 0 Use last login values – used last remembered login values 0 Forget login values – don’t remember the entered login values 0 Transmission protocol: Set HTTPS - use HTTPS protocol for data transfers to ensure security of transferred data, Set HTTP - use standard unsecured HTTP protocol. 0 Available board services: Enable WWW pages, Enable SSH/SFTP, Unlock UBoot, Unlock Console – options are dedicated to advanced user and allow to modify behaviour of telecontrol board to achieve security of data transfers by enabling/disabling the corresponding services or by performing the indicated actions. 0 Change board IP settings – this button switches to the REG-PE(D) board IP settings page. 0 Run RPL – this button runs the REG-PEX loader configuration software that can be used to configure a REG-PE(D) board in the case when the firmware on board is insufficient for the detection by WinConfig. The usage of RPL requires serial connection between the PC and board being configured. 0 Submit certificates – this button switches to the Submit certificates page. 0 Available board services – check buttons to enable/disable board services Enable www pages – this option enables/disables online WinConfig installed in the board. If www pages are disabled, user can manage the board by menu system. Enable SSH/SFTP – this option enables the online console (access to board via menu system). Transfer steps: Work with protocol settings Page 37 We take care of it. WinConfig uses special algorithm for transfer of software necessary to run the application program and settings. The sequence of individual steps can be automatically modified according to the software version and actions needed for complete update of software stored in the board. Step Explanation Preparation of upgrade mode Detection of kernel and ramdisk version, switching the telecontrol board to upgrade mode Creating backup Creation of backup of application and settings, applicable only in the case when kernel will be updated Waiting for backup creation Applicable only in the case when kernel will be updated Transfer of backup to PC Applicable only in the case when kernel will be updated Transfer of kernel and/or ramdisk from PC Applicable only in the case when kernel and/or ramdisk is updated Waiting for kernel and/or ramdisk transfer Applicable only in the case when kernel and/or ramdisk is updated Transfer of backup from PC Applicable only in the case when kernel was updated Firmware transfer from PC Transfer of application program and settings 9.2.10 Transfer settings to PC function To transfer settings from telecontrol board to PC settings click the menu. Transfer form appears in the right side of the settings tree. Page 38 Work with protocol settings icon in the main Figure 10: Transfer settings to PC Work with protocol settings Page 39 We take care of it. All user actions are similar as those for Transfer settings from PC function. The Compare with selected settings button runs the function for comparison of the settings currently selected in WinConfig and settings in the telecontrol board. The results of comparison are presented in the Microsoft Excel workbook. 9.2.11 Change of IP settings for REG-PE(D) telecontrol boards To change IP settings for telecontrol board type TK8xx, click the Change board IP settings button that appears on the screen when successful detection of a TK8xx board on LAN is performed and the particular board selected. The detection can be done before the data transfer either from or to PC. The IP settings of the REG-PE(D) telecontrol board are protocol-independent. The following window appears on screen: Figure 11: REG-PE(D) board IP settings Page 40 Work with protocol settings Enter new values and click the Set button to change IP settings of Ethernet interfaces. If you want to prevent Ethernet interface fail, click the Use Ethernet interfaces bonding option box to bond Ethernet interfaces and to use 'Active backup' policy. The 2nd Ethernet interface is available only for REG-PED (TK885) board type. One of the defined gateways can be selected as default gateway by the radio button Gateway used. To switch off the bonding of Ethernet interfaces check the Use Ethernet interfaces independently checkbox. To use PRP V1(Parallel Redundancy Protocol) check the Use PRP checkbox. 9.2.12 Submit certificates for REG-PE(D) telecontrol boards Security certificates are used for HTTPS communication with REG-PE(D) telecontrol board. Telecontrol boards are supplied with default factory certificates that can be rewritten by user certificates. The certificates are used by board as its own authentication information. The user certificate can be obtained from the Certification Authority (CA) or generated by a special program (e.g. OpenSSL). The certificates have to be in the PEM (Privacy Enhanced Mail) format; other formats can be converter to PEM using appropriate program. The certificate typically consists of certificate file and key file. If the certificate is issued by CA then there is also CA certificate file and possibly also intermediate certification file in the case when Intermediate certification authority is used by CA. The key file must not be password protected to be accepted by REG-PE(D). In the case when a special program is used for generation of certificate, it is possible to generate CA or to use CA that is already available (3 created files) or to generate self-signed certificate (2 created files). For more information about certificates please consult the publicly available information in the Internet. All necessary actions for rewriting the default certificates can be done on Certificates page. To submit user certificates browse the certificate files and transfer them to the telecontrol board by Submit button. Work with protocol settings Page 41 We take care of it. Figure 12: REG-PE(D) board certificates Page 42 Work with protocol settings 9.2.13 Bonding The Ethernet interface bonding is a software feature to achieve higher security. If the feature is activated then Ethernet interfaces have the same MAC and IP addresses. This leads to redundancy in the case or broken Ethernet cable. When the bonding option is switched ON, the firmware uses the Ethernet interface via which the connection was established and in the case of connection breakage (link is down because of broken or disconnected Ethernet cable) the firmware automatically switches to the second bonded interface that works as backup. The Use Ethernet interface bonding option and dual Ethernet ports are available only for TK885 board type, the TK860 and TK885-1 card types have only one Ethernet interface available. Furthermore, there is more conditions in connection with the bonding option: The TK885 board with 2x fibre optic COM ports has always COM 4 port disabled and bonding available. Other versions of TK885 board use two different firmwares (Linux Kernels) according to the bonding function. The checkbox Use Ethernet interfaces bonding in the REG-PE(D) board IP settings page of WinConfig is enabled/disabled according to the Kernel version of the REG-PED board detected and selected in the previous Transfer settings from PC page. If the bonding is required but not supported by the current Kernel loaded in the board, go to the Transfer settings from PC page and transfer the settings together with the firmware and correct version of REG-PED board. If the bonding option is available in firmware then the COM 4 port cannot be used. When using the bonding feature, always keep in mind that the correct version of firmware with bonding option has to be selected for boards with electric or electric/fiber optics Ethernet interfaces and the bonding option has to be switched ON in the RED-PED board IP settings page. Also keep in mind that the COM4 serial port cannot be used in the case of firmware with bonding option. 9.2.14 PRP - Parallel Redundancy Protocol A network redundancy is to have two independent active paths between two devices. The sender (TK885) uses two independent network interfaces that transmit the same data simultaneously. The redundancy monitoring protocol then makes sure that the recipient uses only the first data packet and discards the second. If only one packet is received, the recipient knows that a failure has occurred on the other path. The parallel redundancy protocol is described in the IEC 62439-3 standard. Work with protocol settings Page 43 We take care of it. 9.3 Compare settings function Two compare modes can be found on the WinConfig Compare settings page. Select the desired mode in the Compare mode frame. Compare selected settings with settings file To compare a pair of settings browse two xml setting files to compare, and then click the Compare button. Compare two settings files To compare a currently selected settings with an xml setting file browse this file and click the Compare button. Results of the comparisons are available in a Microsoft Excel xls file that is created from this comparison. Individual sets of settings are arranged in individual sheets in Excel workbook. Differences can be seen colored in the Excel sheets. Black fonts are used for matching pairs of settings, magenta fonts for different pairs and red fonts for missing settings. Figure 13: Compare settings The third compare mode implemented in WinConfig is comparison of the selected settings with settings contained in the connected telecontrol board. This function is available in the Transfer settings to PC page as Compare to selected settings button. It is necessary to detect the board first in the case of remote mode. The rules of comparison are same as described above. This functionality cannot be used with TK509 telecontrol boards where Transfer settings to PC functionality are not available. Page 44 Work with protocol settings 9.4 9.4.1 Rules for export/import using Microsoft Excel Export to Excel Ways of export: 0 Commands only of selected device from Commands page 0 Indications only of selected device from Indications page 0 Entire selected settings using Export icon in the main menu. Data is exported into the new file winconfig-exportxx.xls placed in the system temp folder. Individual parts of exported data are placed in individual sheets of Excel workbook, i.e. commands of each device and indications of each device are placed in corresponding sheets, e.g. sheet of indications of device A: is named x. device A indications and commands sheet is named x. device A commands (where x is the device order number). The character “:“ in device name is skipped as Excel doesn’t allow usage of this character in the sheet name. Data is arranged in lines. First line represents heading with settings names according to the corresponding XML template. The exported sheets also contain plain text describing setting names. This information can be found in the second row of the table-based sheets and in second columns of the other sheets. 9.4.2 Import from Excel Ways of import: 0 Commands from selected sheet to Commands page of selected device. 0 Indications from selected sheet to Indications page of selected device. Import is performed from the Excel file with valid .xls extension. The file has to contain corresponding sheet with appropriate name and heading line with names of settings according to the corresponding XML template (see Export). Import function uses topical settings as target and replaces existing data in the target settings. Figure 14: Import settings Work with protocol settings Page 45 We take care of it. 9.5 Migration of settings WinConfig can migrate settings between different versions of REG-P telecontrol boards. The migration can be done in two ways: 0 Convert GenReg INI file with REG-P board type selected in the Open settings page (other than the telecontrol board for which INI file was originally created, e.g. INI file created for TK517 and IEC101 protocol can be open as IEC101 for TK400 telecontrol board). 0 Using Migrate button on Basic settings page. In this way the migration between TK400 and TK517 boards in both directions can be performed. First step of migration and INI file conversion implemented in WinConfig is to check for completion and correctness of settings data. This has to be done due to some hardware differences that exist between some REG-P boards. The Missing/incorrect values page provides user interaction possibility during the check process and default values are suggested for changing and confirmation. Figure 15: Missing/incorrect values 9.6 Checking of entered values Standard WinConfig pages containing textboxes, checkboxes, selections etc. perform online initial internal checking of values entered in each textbox. The check runs when user leaves the textbox. Entered values are checked for valid limits. If limits are broken, the last or default value is automatically entered and text box is marked by red color. Correctly entered values are also marked – their label color is changed to red. User cannot leave the page without confirmation or resetting of the changed values. WinConfig pages containing tables (values are organized in tabular format, e.g. indications, commands) also contain online internal checking of individual cells. The check runs when the user leaves cell. Entered values are checked on valid limits. If limits are broken, the last or default value is automatically entered and cell is marked by red color. Correctly changed values are not marked. User cannot leave the page without confirmation or resetting of the changed values. Page 46 Work with protocol settings There is also additional integrity test of values present within the confirmation procedure. This test checks three basic rules: 0 Test of non-zero values of object addresses, 0 Existence of non-empty command strings in command tables, 0 Test of uniqueness of object address, which is performed entirely for all addressable objects in the settings, i.e. comparison of each address with other addresses. Uniqueness of devices text IDs is not tested. There are some exceptions from the rule e.g. in IEC103/TK8xx where TK3 type data points are tested on uniqueness together with measurement value type. 10. IEC101 settings 10.1 Basic Basic settings tree branch form contains common settings of IEC protocol – selection of available Baud rates, Link and ASDU addresses shown as one number or pair of Bytes. Basic settings also contain user definable descriptions - and names for the entire set of settings. Figure 16: IEC101 basic settings IEC101 settings Page 47 We take care of it. Table 2: IEC101 basic settings Setting Format Range Default Description Settings description text 50 characters Filename of open settings Short user description of settings file or name of settings file. Baud rate of serial port IEC Bd Selection of values in combo box 9600 Baud rate of IEC101 serial port Link address of REG-P - 0 to 255 1 Link address displayed as word or set of two bytes. The range is determined by the Link address size option in advanced settings. 1 ASDU address displayed as word or set of two bytes. The range is determined by the ASDU address size option found in advanced settings. or 0 to 65535 ASDU address - 0 to 255 or 0 to 65535 Page 48 IEC RS485 activated - option box NOT selected Activation of RS485 interface option. This option is greyed out and not functional in the case for REG-P telecontrol boards with jumpers. IEC fiber optics activated - option box NOT selected Activation of fiber optics interface option. This option is greyed out and not functional in the case for REG-P telecontrol boards with jumpers. IEC RS232 used - option box selected Activation of RS232 interface option. This option is grayed out and not functional in the case for REG-P telecontrol boards with jumpers. Identifier of device text 3 characters defaults defined in the Devices tree branch Device identifier string for device protocol IEC101 settings 10.2 Advanced 10.2.1 IEC101 Settings - SCADA for REG-P telecontrol boards The Settings - SCADA tree branch contains several board specific settings available for TK400 and TK517 telecontrol board types without jumpers and also contains a full range of IEC101 specific settings. Figure 17: Settings – SCADA, IEC101 REG-P IEC101 settings Page 49 We take care of it. Table 3: Settings – SCADA, IEC101 REG-P Setting Format Range Default Description IEC receiver inverted - option box NOT selected Inversion of RxD signal IEC transmitter inverted - option box NOT selected Inversion of TxD signal IEC RTS signal inverted - option box NOT selected Inversion of RTS signal IEC CTS signal inverted - option box NOT selected Inversion of CTS signal IEC RS485 terminator activated - option box NOT selected Activation of RS485 bus terminator. IEC RS485 activated - option box NOT selected Activation of RS485 interface option. This option is not functional in the case for REG-P telecontrol boards with jumpers. IEC fiber optics activated - option box NOT selected Activation of fiber optics interface option. This option is not functional in the case for REG-P telecontrol boards with jumpers. IEC RS232 used - option box selected Activation of RS232 interface option. This option is not functional in the case for REG-P telecontrol boards with jumpers. Baud rate of IEC serial Bd Selection of values in combo box 9600 Baud rate of IEC101 serial port; ON time of serial LEDs 10 ms 1 to 100 1 ON time of serial LEDs indicating activity on the IEC serial interface Link address of REG-P - 0 to 255 1 Link address displayed as word or set of two bytes. The range is determined by the Link address size option. 1 ASDU address displayed as word or set of two bytes. The range is determined by the ASDU address size option. or 0 to 65535 ASDU address - 0 to 255 or 0 to 65535 Page 50 Link address size - Selection of values in combo box 1 Size of link address in Bytes ASDU address size - Selection of values in combo box 2 Size of ASDU address in Bytes Info address size - Selection of values in combo box 3 Size of information address (IOA) in Bytes Use/Don’t use single byte response - option box Use Usage of short single-byte responses. IEC101 settings Setting Format Range Default Description Use single byte response for ACK/Use single byte response for NAK - option box ACK Single-byte response used for ACK/NAK Single byte response HEX 0 to FF E5 Value of single byte response Use originator (0) - option box NOT selected Usage of originator (value 0) Max objects in telegram - 1 to 50 20 Max. No. of data objects in telegram Inter character timeout ms 2 to 100 4 Timeout between two characters in telegram Timeout after interchar ms 0 to 255 10 Timeout after Interchar timeout expiration Time after TK105 conf. 10 ms 0 to 65535 100 Timeout after TK105 confirmation IEC address of error multipoint - 0 to 16777215 0 IEC address (IOA) of multipoint for errors, 0 - undefined TI1 Data type for errors in IEC101 communication or 3x 0 to 255 Errors data type - Selection of values in combo box Balanced mode settings: Figure 18: Balanced mode settings IEC101 settings Page 51 We take care of it. Table 4: Page 52 IEC101 balanced mode settings Setting Format Range Default Description Use balanced mode / Use unbalanced mode - option box unbalanced Selection of IEC101 mode Direction bit - selection of values in combo box 0 Direction bit Timeout for secondary ACK 10 ms 1 to 255 20 Timeout for secondary ACK Max repeats of primary station telegram. - 1 to 255 4 Max. No. of repeats of primary station telegram Use IAWD mode / Don’t use IAWD mode - option box Don’t use IAWD mode selection AT control string text 80 characters empty AT control string Dial string text 20 characters empty Dial string Time to wait for connection s 1 to 60 1 Time to wait for connection Number of dial repeats - 1 to 255 2 Number of dial repeats Dial pause s 1 to 60 1 Dial pause Time to keep connection open s 1 to 60 1 Time to keep connection open IEC101 settings 10.2.2 IEC101 Settings - SCADA for REG-PE(D) telecontrol boards IEC101 Settings – SCADA for REG-PE(D) boards contain IEC101 specific parameters for corresponding firmware in REG-PE(D) (TK860, TK885) telecontrol boards. Figure 19: Settings – SCADA, IEC101 REG-PE(D) IEC101 settings Page 53 We take care of it. Table 5: IEC101 REG-PE(D) Settings – SCADA, interface settings Setting Format Range Default Description Serial port - - COM1 Selection of serial port. This option is disabled, selection is done in the Serial port assignment branch Baud rate of serial port IEC Bd Selection of values in combo box 19200 Baud rate of serial port Parity - Selection of values in combo box EVEN Serial port parity ON time of serial LEDs ms 1 to 100 10 ON time of serial LEDs RS485 activated - checkbox unchecked Activation of RS485 RTS/CTS - checkbox unchecked Activation of RTS/CTS handshaking XON/XOFF - checkbox unchecked Activation of XON/XOFF handshaking Table 6: IEC101 REG-PE(D) Settings – SCADA, protocol settings Setting Format Range Default Description Link address of REG-PE(D) - 1 to 254 1 Link address of REG-PE(D), range is dependent on Link address size ASDU address - 1 ASDU address of REG-PE(D), range is dependent on ASDU address size 1 to 65534 1 to 254 1 to 65534 Page 54 Link address size Byte Selection of values in combo box 1 Link address size ASDU address size Byte Selection of values in combo box 2 ASDU address size Info address size Byte Selection of values in combo box 3 Info address size: Use originator (0) - checkbox unchecked Usage of originator Max. length of telegram Byte 1 to 255 200 Maximum length of telegram Link status timeout ms 2 to 1000 First char timeout ms 0 to 65535 Max. timeout between master requests s 0 to 255 Activate termination after command - checkbox Link status timeout 300 First char timeout Max. timeout between master requests unchecked IEC101 settings Activate termination after command 10.2.3 Max. waiting time for ACK/NACK s 0 to 255 6 Maximum waiting time for ACK/NACK Max. waiting time for command after select s 0 to 255 5 Maximum waiting time for command after select Mode of watchdog LED - Selection of values in combo box blinking Mode of watchdog LED ComServer settings ComServer settings form part of the IEC settings in WinConfig for TK400 and TK8xx. ComServer is included in the protocol conversion firmware in the case of serial protocols with the exception of DNP for the purpose of remote management of telecontrol board configuration. Figure 20: TK400 ComServer settings Table 7: TK400 COM-Server settings Setting Format Range Default Description Use ComServer function / Don’t use ComServer function - option box Don’t use Selection of COM-Server function Local IP address - 4x 0 to 255 0.0.0.0 COM-Server IP address Accept any valid client IP - option box selected Selection whether COM-Server should accept any valid IP for connection Remote IP address - 4x 0 to 255 0.0.0.0 Accepted IP address for connection Gateway IP address - 4x 0 to 255 0.0.0.0 IP address of default gateway. Subnet mask - 4x 0 to 255 0.0.0.0 Subnet mask TCP port - 0 to 65535 1023 COM-Server TCP port. Changing of these settings is not recommended. IEC101 settings Page 55 We take care of it. Setting Format Range Default Description ON time of TCP LEDs ms 1 to 60 2 ON time of TCP LEDs COM-Server for REG-P (TK400) telecontrol board is necessary for all remote operations in WinConfig, i.e. all remote data transfers, detections on LAN, remote comparison of settings with connected board etc. If COM-Server is switched off, only local (manual) operations of WinConfig can be used. 10.2.4 ComServer settings, IEC101 for REG-PE(D) For parameters of ComServer function in IEC101 for REG-PE(D) see the IEC103 for REGPE(D) chapter in this manual. 10.2.5 Supervisory settings, IEC101 for REG-PE(D) For parameters of Supervisory settings in IEC101 for REG-PE(D) see the IEC103 for REGPE(D) chapter in this manual. 10.3 Linked devices The Linked Devices tree branch shows survey of all 8 devices that can be used in settings created by WinConfig. Only the devices checked as Enabled are described in the following tree branches. To add new device to the topical settings check the corresponding Enabled option box. Identifier of the enabled device can be consequently changed in the corresponding Device x tree branch. Figure 21: Linked Devices Page 56 IEC101 settings 10.3.1 Time synchronization Settings tree branch for time synchronization settings. Figure 22: Time synchronization settings For parameters of Time synchronization in IEC101 for REG-PE(D) see the IEC103 for REGPE(D) chapter in this manual. IEC101 settings Page 57 We take care of it. 10.3.2 Internal communication The Internal Communication settings tree branch describes settings of communication settings for communication between telecontrol board and a.eberle device. Figure 23: Internal communication, IEC101 for REG-P Page 58 IEC101 settings Table 8: Internal communication Setting Format Range Default Description Baud rate of device serial Bd selection of values in combo box 115200 Baud rate of serial communication with device ON time of serial LEDs 10 ms 1 to 100 1 ON time of serial LEDs Timeout for reception of first char 10 ms 1 to 255 50 Timeout for reception of first character Inter character timeout 10 ms 1 to 255 20 Timeout between two characters in telegram Number of repeats for SYNC cycle - 1 to 255 5 Number of repeats for SYNC cycle Number of command repeats - 1 to 255 2 Number of command (poll) repeats TX blocking ms 0 to 255 30 Time to wait when answer was received Timeout for analog cyclic sending 100 ms 0 to 650 0 Timeout for analog (measurements) cyclic sending (0 = disable) Time to stop REG-D/A. interrogation s 0 to 650 0 Time to stop regulator interrogation after IEC communication break Round time down / Round time up - Option box Round down Rounding time selection For parameters of Internal communication in IEC101 for REG-PE(D) see the IEC103 for REGPE(D) chapter in this manual. 10.3.3 Converter Errors The Converter Errors table describes settings of error indications generated by telecontrol board. Meaning of individual error bits is described in the table. Multipoint bit comprises all defined bits in the table. Data type of errors in the IEC protocol is defined in IEC101 settings, se chapter 4.2.2. IEC101 settings Page 59 We take care of it. Figure 24: Converter errors 10.4 Device x 10.4.1 Device request settings Device request settings tree branch describes communication settings of individual devices connected to telecontrol board. Figure 25: Device request settings Table 9: Page 60 IEC101 device settings Setting Format Range Default Description Identifier of device text AA: or A(1 to 9): to Z(1 to 4): AA: Identifier of device as appears in the device communication Poll type - selection of values in combo box RPS Device poll type Poll string text 23 chars RPS 4 Device poll string IEC101 settings Setting Format Range Default Description RPS specific: Size of answer byte 1 to 255 244 Size of answer RPS specific: Offset of seconds field byte 0 to 255 18 Offset of seconds field RPS specific: Offset of msec field byte 0 to 255 22 Offset of msec field Figure 26: IEC101 device request settings for REG-PE(D) Table 10: IEC101 device settings for REG-PE(D) Setting Format Range Default Description Data class used - Option boxes Yes Usage of Data class Identifier of device - 3 characters AA: Identifier of device Poll string - 24 characters RPS 4#A20f14 Poll string Size of answer byte 1 to 294 247 Size of answer: Type of seconds field - Selection of values in combo box INT32U Type of seconds field Offset of seconds field byte 0 to 255 18 Offset of seconds field Type of msec field - Selection of values in combo box INT16U Type of seconds field IEC101 settings Page 61 We take care of it. 10.4.2 Setting Format Range Default Description Offset of msec field byte 0 to 255 22 Offset of msec field Comment - 23 characters REG-D Comment Indications Indications tree branch describes indications of individual device. Rules for work with those settings are the same as for work with commands. Figure 27: Indications The RegSys type is disabled by default. To edit RegSys type use the Advanced button to enable corresponding column. The same rule is valid for all protocols using RegSys type as parameter of indications. Table 11: IEC101 indications Setting Format Range Default Description IEC object type - selection of values in combo box TI1 Indication type in IEC communication REG data type - selection of values in combo box Bit Indication type in device communication Information object address (IOA) - 0 to 16777215 0 IEC address (IOA) of indication or (IOA (hi/mi/lo)) Page 62 3x 0 to 255 Abs. deviation float 0 Absolute deviation value Scale float 0 Scale value Max. value - 0 to 65535 32767 Max. value RPS offset - 0 to 255 0 RPS offset RPS bit - selection of values in combo box 0 RPS bit P1 data type (P1 method) - selection of values in combo box IEEE type P1 data type P1 index (P1 method) - 3 to 255 3 P1 index Table (P1 method) - selection of values in combo box 0 Table No. if 32 bit data type is used IEC101 settings Setting Format Range Default Description Bit (P1 method) - selection of values in combo box 0 Bit No. if 32 bit data type is used Description text 50 chars empty Description Figure 28: IEC101 Indications for REG-PE(D) IEC101 settings Page 63 We take care of it. Table 12: IEC101 indications Setting Format Range Default Description Description text 50 chars empty Description Disabled - selection of values in combo box No Option to disable the data point Information object address (IOA) - 0 to 16777215 0 IEC address (IOA) of indication or (IOA (hi/mi/lo)) Page 64 3x 0 to 255 IEC object type - selection of values in combo box TI1 Indication type in IEC communication RegSys type - selection of values in combo box Bit8 Indication type in device communication RPS offset - 0 to 65535 0 RPS offset RPS bit - 0 to 31 0 RPS bit Dead band - float 0 Dead band Dead band absolute number - selection of values in combo box No Selection of Dead band format: absolute number or value in per cent Max. range - float 0 Maximum range Resolution - float 0 Resolution Initial value transmision - selection of values in combo box No Initial value transmision Use in GI - selection of values in combo box Yes Use in GI Group interrogation - 0 to 16 0 Group number for group interrogation Inverted - selection of values in combo box No Inverted Offset connected with remote COT - 0 to 512 0 Offset connected with remote COT Remote COT bits of remote offset - 0 to 7 0 Remote COT bits of remote offset Send group change - selection of values in combo box No Send group change IEC101 settings 10.4.3 Commands Table of settings of individual commands represents command settings. This table is common for all a.eberle devices connected to the telecontrol board. The upper line contains execution buttons for work with the individual command lines and for export/import of the entire table of commands. Selected line in the table is marked by yellow background. All changes have to be confirmed by Confirm button. Figure 29: IEC101 Commands Table 13: IEC101 Commands Setting Format Range Default Description IOA (IOA (hi/mi/lo)) - 0 to 16777215 0 Information object address, identification of information in IEC telegram or 3x 0 to 255 Control code - selection of values in combo box TI45 Information object type (control code) Command string text 50 chars empty Command string Scale exponent - selection of values in combo box 0 Scale exponent 100% value decimal 0 to 65535 0 100% value available for TI48 only Description text 48 chars empty User description IEC101 settings Page 65 We take care of it. Figure 30: IEC101 Commands Table 14: IEC101 Commands Setting Format Range Default Description IOA (IOA (hi/mi/lo)) - 0 to 16777215 0 Information object address, identification of information in IEC telegram or 3x 0 to 255 Control code - selection of values in combo box TI45 Information object type (control code) Command string text 50 chars empty Command string Scale exponent - selection of values in combo box 0 Scale exponent 100% value decimal 0 to 65535 0 100% value available for TI48 only Description text 48 chars empty User description Figure 31: IEC101 Commands REG-PE(D) Table 15: IEC101 Commands REG-PE(D) Setting Page 66 Format Range Default IEC101 settings Description Setting Format Range Default Description Disabled - selection of values in combo box No Option to disable the command IOA (IOA (hi/mi/lo)) - 0 to 16777215 0 Information object address, identification of information in IEC telegram or 3x 0 to 255 10.4.4 Control code - selection of values in combo box TI45 Information object type (control code) Command string text 50 chars empty Command string RegSys type - selection of values in combo box BOOL RegSys type of command Scale exponent - selection of values in combo box 0 Scale exponent 100% value decimal 0 to 65535 0 100% value available for TI48 only Description text 48 chars empty User description Editing the IOA in columns In Order to change the IOA high, middle or low byte in the entire column in the indications or commands table click the right mouse button in the IOA hi/mi/lo table textbox. The following option table will appear on the screen: Figure 32: Editing the IOA bytes in entire columns To set the corresponding bytes to the desired value use the first option. To increase corresponding bytes by the desired value use the first option. To decrease corresponding bytes by the desired value use the first option. If the increased or decreased value of any of the table rows exceeds the valid range, the function will be aborted and a warning message will appear on the screen. IEC101 settings Page 67 We take care of it. 10.4.5 Status Status bits describe bit indication generated by a.eberle device. Bits are arranged in the 32bit table with predefined meaning of individual lines. Entire table is user-editable. Status bits are available for P1 poll type only. Page 68 IEC101 settings Figure 33: Status bits IEC101 settings Page 69 We take care of it. Table 16: Meaning of Status bits Page 70 ID German text English translation 0 Selbsttest-Fehler Autotest error 1 ROM-Fehler ROM error 2 RAM-Fehler RAM error 3 EEPROM-A-Fehler EEPROM-A error 4 EEPROM-B-Fehler EEPROM-AB error 5 Anwender-Fehler-A User error A 7 InternerBatterie-Fehler Internal battery error 10 UV Ausfall UV outage 13 COM1 Kommunikations-Fehler COM1 communication error 14 COM2 Kommunikations-Fehler COM2 communication error 15 COM3 Kommunikations-Fehler COM3 communication error 16 LAN Kommunikations-Fehler LAN communication error 20 LAN/L Fehler LAN/L error 21 LAN/R Fehler LAN/R error 22 LON Fehler LON error 28 Batterie fast verbraucht Low battery IEC101 settings 11. Settings – SCADA for IEC103 (REG-P) IEC103 settings for REG-P telecontrol boards (TK509, TK517, and TK400) are different from settings for REG-PE(D) telecontrol boards (TK860, TK885). This chapter describes IEC103 settings for REG-P in the WinConfig pages, where these settings are different from IEC101. See chapter 11 for description of IEC103 for REG-PE(D) telecontrol boards. 11.1 Advanced 11.1.1 Settings – SCADA Settings – SCADA tree branch contains IEC103 specific settings. Figure 34: IEC103 specific settings Settings – SCADA for IEC103 (REG-P) Page 71 We take care of it. Table 17: IEC103 settings Setting Format Range Default Description Baud rate of IEC serial Bd selection of values in combo box 19200 Baud rate of IEC103 serial port; ON time of serial LEDs 10 ms 1 to 255 1 ON time of serial LEDs indicating activity on the IEC serial interface Link address of REG-P - 1 to 254 1 Link address of REG-P ASDU address - 1 to 254 1 ASDU address Inter character timeout ms 2 to 100 4 Timeout between two characters in telegram Timeout after interchar ms 0 to 255 10 Timeout after interchar timeout expiration IEC address of error multipoint - 0 to 65535 0 IEC address (IOA) of multipoint for errors, 0 - undefined (0 to 255) (function type, information number) Page 72 Compatibility byte - selection of values in combo box 2 Compatibility byte Identification string text 8 chars empty Identification string Identification bytes - 0 to 255 0 Identification bytes Activate serial RTS/CTS / Don't activate serial RTS/CTS - option box NOT activated Activation of RTS/CTS handshaking in the IEC communication (e.g. for driving the modem carrier) RTS leading time ms 1 to 255 1 Overlapping of RTS signal before the telegram RTS trailing time ms 1 to 255 1 Overlapping of RTS signal after the telegram Settings – SCADA for IEC103 (REG-P) 11.2 Devices 11.2.1 Converter Errors Only one device error is available as IEC103 conversion firmware can manage only one a.eberle device at a time. Figure 35: IEC103 converter errors 11.3 Device x 11.3.1 Device request settings This tree branch contains IEC103 specific device settings. Figure 36: IEC103 device request settings Settings – SCADA for IEC103 (REG-P) Page 73 We take care of it. Table 18: IEC103 device settings Page 74 Setting Format Range Default Description Identifier of device text AA: or A(1 to 9): to Z(1 to 4): AA: Identifier of device as appears in the device communication Poll type - selection of values in combo box RPS Device poll type Poll string text 23 chars RPS 3 Device poll string RPS specific: Size of answer byte 1 to 255 244 Size of answer RPS specific: Offset of seconds field byte 0 to 255 18 Offset of seconds field RPS specific: Offset of msec field byte 0 to 255 22 Offset of msec field Settings – SCADA for IEC103 (REG-P) 12. IEC103 settings (REG-PE(D)) Here you are able to set the settings related to IEC60870-5-103. IEC60870-5-103 protocol is a multipoint protocol. This means that one Master can communicate with multiple Slaves on the same communication line. Due to this a given slave must have a unique ID to which it responds - a device Link address. A slave's device address shall be unique on a given communication network - duplicate addresses lead to bus collision. Device addresses must lie in the range 1 to 254. For broadcast “Send/no reply”-service must be used by master and the Link address field is defined as 255. One “Frame” contains not more than one Application Service Data Unit (ASDU). 12.1 Common 12.1.1 IEC 60870-5-103-Conformity The size, contents and values of information fields of ASDU (Application Service Data Unit) are set and used according to IEC 60870-5-4/-103. 12.1.2 Supported Type Identifications The following types are supported: 0 Information in monitor direction Type PQISYS, REGSYS Devices EORSYS Devices <1>:= time-tagged message <4>:= time-tagged measurements with relative time <5>:= identification <6>:= time synchronization <8>:= general interrogation termination <9>:= measurements II <23>:= list of recorded disturbances <26>:= ready for transmission of disturbance data <27>:= ready for transmission of a channel <28>:= ready for transmission of tags <29>:= transmission of tags <30>:= transmission of disturbance values <31>:= end of transmission IEC103 settings (REG-PE(D)) Page 75 We take care of it. 0 Information in control direction 12.1.3 Type PQISYS, REGSYS Devices EORSYS Devices <7>:= general interrogation <6>:= time synchronization <20>:= general command <24>:= order for disturbance data transmission <25>:= acknowledgement for disturbance data transmission Supported Cause of Transmission 0 Information in monitor direction – <1>:= spontaneous – <2>:= cyclic – <3>:= reset frame count bit (FCB) – <4>:= reset communication unit (CU) – <5>:= start / restart – <6>:= power on – <7>:= test mode – <8>:= time synchronization – <9>:= general interrogation – <10>:= termination of general interrogation – <11>:= local operation – <12>:= remote operation – <20>:= positive acknowledgement of command – <21>:= negative acknowledgement of command – <31>:= transmission of disturbance data 0 Information in control direction – <8>:= time synchronization – <9>:= initiation of general interrogation – <20>:= general command – <31>:= transmission of disturbance data 12.1.4 Topical channel (ACC) The value from 1 up to 255 are supported 12.1.5 Page 76 Fault Number (FAN) IEC103 settings (REG-PE(D)) FAN values are ranged from 0 up to 9999. If FAN amounts to 9999, the application sets next FAN to zero. 12.1.6 Interval between information elements (INT) It defines the interval for acquisition of the single information elements is the same for all disturbance data. It is listed in microseconds. Its values can be set in general IEC settings as “Interval for acquisition in TI26 [microsecond]:” 12.1.7 Compatibility level (COL) The compatibility level of protection equipment based on the “Compatibility byte” setting. See figure below. It defined according to on this companion standard and preset to 1. 12.1.8 Number of channels (NOC) The value is set to 8 and is constant for EOR-D 12.1.9 Number of information elements of a channel (NOE) All channels contain the same number of information elements. This number is transmitted in ASDU 26 ‘ready for transmission of disturbance data’ and set to 2048 for EOR-D by default. This setting can be changed in IEC-settings pane. 12.1.10 Number of tags (NOT) The transmission of tag not supported. NOT is preset to 0 as constant. 12.1.11 Number of relevant disturbance values per ASDU (NDV) NDV equals 25 for all disturbance channels. 12.1.12 Return information identifier (RII) RII is not processed in REG-PE(D) and returned to control center according to IEC-60870-5103 7.2.6 12.1.13 Scan number (SCN) It isis use as return identifier in general interrogation responses. 12.1.14 Supplementary information (SIN) It can be can be used as follows: 0 By general interrogation as a number of GI request 0 By positive or negative acknowledgement of command as RII IEC103 settings (REG-PE(D)) Page 77 We take care of it. 12.1.15 Status of fault (SOF) SOF indicates whether the EOR-D has tripped during the fault (bit one), whether the disturbance data are currently being transmitted (bit two). Bit 3 (Test) equals 0 and defines “disturbance data recorded during normal operation”. 12.1.16 Tag position (TAP) It set to 0 as constant. 12.1.17 Type of order (TOO) REG-PE(D) supports the following types: 0 <1> := selection of fault 0 <2> := request for disturbance data 0 <3> := abortion of disturbance data 0 <8> := request for channel 0 <9> := abortion of channel 0 <16> := request for tags 0 <17> := abortion of tags 0 <24> := request for list of recorded disturbances 0 <32> := end of disturbance data transmission without abortion 0 <33> := end of disturbance data transmission with abortion by control system 0 <34> := end of disturbance data transmission with abortion by the protection equipment 0 <35> := end of channel transmission without abortion 0 <36> := end of channel transmission with abortion by control system 0 <37> := end of channel transmission with abortion by the protection equipment 0 <38> := end of tag transmission without abortion 0 <39> := end of tag transmission with abortion by control system 0 <40> := end of tag transmission with abortion by the protection equipment 0 <64> := disturbance data transmitted successfully (positive) 0 <65> := disturbance data transmitted not successfully (negative) 0 <66> := channel transmitted successfully (positive) 0 <67> := channel transmitted not successfully (negative) 0 <68> := tags transmitted successfully (positive) 0 <69> := tags transmitted not successfully (negative) 12.1.18 Type of disturbance values (TOV) Page 78 IEC103 settings (REG-PE(D)) It is not used and set to 1. The value is irrelevant. 12.1.19 Binary time CP32Time2a and CP56Time2a are supported according to IEC 60870-5-4 12.2 Basic settings The Basic page contains basic settings for IEC103 protocol: Figure 37: IEC103 basic settings REG-PE(D) IEC103 settings (REG-PE(D)) Page 79 We take care of it. Table 19: IEC103 basic settings REG-PE(D) Setting Format Range Default Description Settings description text 50 characters Baud rate of IEC serial Bd Selection of values in combo box Link address of REG-P - 1 to 254 Link address in the given range. ASDU address - 1 to 254 ASDU address in the given range. RS485 activated - option box NOT selected Activation of RS485 interface. Identifier of device text AA: or A(1 to 9): to Z(1 to 4): strings defined in the Devices tree branch Device identifier string as appears in the device protocol Short user description of settings file. WinConfig uses text stored in the template file if settings are created from template. 38400 Baud rate of IEC103 serial port; Default values always depend on values entered in the corresponding template. Page 80 IEC103 settings (REG-PE(D)) 12.3 Advanced settings 12.3.1 IEC103 Settings – SCADA for PQI-D device Figure 38: IEC103 settings SCADA for PQI-D IEC103 settings (REG-PE(D)) Page 81 We take care of it. Table 20: IEC103 settings SCADA PQI-D Setting Format Serial port Page 82 Range Default Description Selection of values in combo box COM1 Selection of COM ports for IEC103 communication Baud rate of serial port IEC Bd Selection of values in combo box 38400 Baud rate of IEC103 serial port; Parity - Selection of values in combo box EVEN Selection of parity of IEC103 communication. Conforming to the IEC 60870-5-103 standard, the program sets the default byte parity to even, sets the number of data bits to 8 and the number of stop bits to 1. ON time of serial LEDs ms 1 to 100 10 ON time of serial LEDs Link address of REG-PE(D) - 1 to 254 201 Enter the address field for link layer (IEC 60870-5-2 Frame 1.2.). Address must be unique within a shared line, or it may be unique within a group of links sharing a common channel. Value is configurable in the range 0…254. The default value is 1. Value 255 is reserved for broadcast messages with “Send/no reply” coding. ASDU address - 1 to 254 201 Enter a Common Address Application Service Data Unit (ASDU). The Common Address shall usually be identical to the address used in the link address. Range of setting is from 0 up to 254. The default value is 1. For broadcast “Send/no reply”- services of the master are mandatory. In this case the ASDU address field is defined as 255. Therefore value 255 is not allowed as specific device address. Timeout after command reception [ms] 0 to 65535 1500 The setting determines a maximal waiting time for acknowledgement of the command in control direction. If a command message is received before the previous command has been acknowledged, it will be rejected with negative acknowledgement of command. Commands that cannot be processed for various reasons will be rejected with negative acknowledgement. Value is configurable in the range 0…65535. The default value is 1500. (setting is not used) First character ms 0 to 25 Time of first character IEC103 settings (REG-PE(D)) Setting Format timeout Range Default Description 65535 Max. timeout between master requests s 0 to 255 0 Maximum timeout between master enquires IEC address of error multipoint (function type, information number) - 0 to 255 162 If a protection device sends the error message and this is not a result of transmission with a control station, REG-PE(D) uses address "error multipoint". IEC address of reset command (function type, information number) - 0 to 255 0 Identification string - 8 characters “EBERLE” Name of producer of the device at the time of initialization. The maximal length of the string's name is 8 symbols, which may be chosen freely. The default value is “EBERLE" RS485 activated - option box NOT selected Activation of RS485 interface. RTS/CTS activated - option box NOT selected Activation of Hardware Flow Control. XONN/XOFF activated - option box NOT selected Activation of Software Flow Control. Test Mode activated - Selection of values in combo box activated via Command type 20 Selection of way of activation the test mode. Possible options: deactivated, activated via binary input, activated via Command type 20 Binary Input for Test Mode switching - 0 to 65535 15 Number of binary input for test mode activation Test Mode command func. type - 0 to 255 128 Function type of command for test mode activation Test Mode command info number - 0 to 255 21 Information number of command for test mode activation Interval between information elements (INT in Type 23) [µs]: “Function type of error multipoint” is the function type of multipoint error address. Value is configurable in the range 0…255. The default value is 162. “Information number of error multipoint” is the information of the multi-point error address. Value is configurable in the range 0-255. The default value is 0. The interval for acquisition of the single information elements is the same for all disturbance data. It is listed in microseconds.. Value is configurable in the range 0…65535. The default value is 293. For more information see chapter 7.2.6.7 in IEC 60870-5-103 IEC103 settings (REG-PE(D)) Page 83 We take care of it. Setting Format Range Default Description Max. Number of information elements of a channel (NOE in Type 26): The number of information elements in each channel. All channels contain the same number of information elements. This number is transmitted in ASDU Type id. 26 ‘ready for transmission of disturbance data’, being valid for all channels. Inter transmission delay for transmission ASDU Type 23 [ms]: Value is configurable in the range 0…65535. The default value is 700. Default values always depend on values entered in the corresponding template. Page 84 IEC103 settings (REG-PE(D)) 12.3.2 IEC103 Settings – SCADA for EOR-D device Figure 39: IEC103 settings SCADA for EOR-D IEC103 settings (REG-PE(D)) Page 85 We take care of it. Table 21: IEC103 settings SCADA for EOR-D Setting Format Serial port Page 86 Range Default Description Selection of values in combo box COM1 Selection of COM ports for IEC103 communication Baud rate of serial port IEC Bd Selection of values in combo box 38400 Baud rate of IEC103 serial port; Parity - Selection of values in combo box EVEN Selection of parity of IEC103 communication. ON time of serial LEDs ms 1 to 100 10 ON time of serial LEDs Link address of REGPE(D) - 1 to 254 201 Link address in the given range. ASDU address - 1 to 254 201 ASDU address in the given range. Inter character timeout ms 2 to 1000 20 Timeout between two characters Timeout after command reception Ms 0 to 65535 1500 Timeout after command reception First character timeout ms 0 to 65535 25 Time of first character Max. timeout between master requests s 0 to 255 0 Maximum timeout between master enquires IEC address of error multipoint (function type, information number) - 0 to 255 162 IEC address (IOA) of multipoint for errors, 0 undefined IEC address of reset command (function type, information number) - 0 IEC address (IOA) of multipoint for errors, 0 undefined Compatibility byte - Selection of values in combo box 1 Value of compatibility byte Identification string - 8 characters “EBERLE” Identification string RS485 activated - option box NOT selected Activation of RS485 interface option. Cause of transmission template - Selection of values in combo box LSA Cause of transmission template Interval between information elements (INT in Type 23) μs 0 to 65535 293 Interval between information elements (INT in Type 23) Max. number of information elements of a channel (NOE in Type 26) - 1 to 2048 700 Max. number of information elements of a channel (NOE in Type 26) Transmission delay for ASDU Type 23 ms 0 to 65535 1500 Transmission delay for ASDU Type 23 0 to 255 IEC103 settings (REG-PE(D)) 12.3.3 Setting Format Range Default Description Serial flow control - Selection of values in combo box Handshake RTS OFF Serial flow control Ethernet-COM-Server Working additionally as COM-Server the latest REG-PE(D)-type enables users to setup the telecontrol card for remote parameterization or retrieving data of REG-D®(DA)/PQI-D®/EORD -devices by WinReg software or for other programs which request data per Ethernet. The most useful feature of COM-Server is the supporting a shared serial channel mode for IEC control center as well as for WinPQ software at the same time. The TCP/IP access from WinPQ via COM-Server allows a receiving online data Figure 40: Receiving Online-Data from PQI-D per shared channel COM-Server IEC103 settings (REG-PE(D)) Page 87 We take care of it. Figure 41: Online data Overview via REG-PE(D) COM-Server ComServer Figure 42: Online graphic disturbance data from PQI-D With this new type of telecontrol card you are able to have the following operation modes now: 0 IEC only 0 IEC and COM-Server at the same time where IEC is regarded of higher priority 0 COM-Server only These operation modes are online changeable without need of changing settings, i.e. if you have mostly IEC communication operation mode only you will be able to use from time to Page 88 IEC103 settings (REG-PE(D)) time additionally the COM-Server functionality e.g. for retrieving saved recorder data via WinReg (not supported yet for EORSys and PQI-D). Another application case is an outage of IEC line: in this case you will be able to connect to COM-Server via WinReg and retrieve important data from regulator during the IEC outage. The COM-Server also may be used for maintenance purposes with any standard terminal program. A disturbance data receiving from PQI-D can last sufficiently long (up to 1-2 min).The IEC control center does not receive the information at same time, because PQI-D gives out the data in output stream. A size of output stream in COM-Server optimized and set to 2 Kbytes. For example, the transmission 110 Kbytes disturbance data per COM-Server needs aboutabout 35 sec. 12.3.4 ComServer settings PQI-D ComServer settings for PQI-D and also for REG-PE(D) type telecontrol boards shows common parameters in the basic view. To show and edit also parameters intended for advanced user click the Extend button. Warning message is displayed before WinConfig shows advanced parameters as change of these parameters can affect the ComServer functionality. Figure 43: IEC103 advanced settings PQI-D – ComServer Table 22: IEC103 ComServer settings PQI-D Setting Format Range Default Description Use/Don’t use ComServer function - Option box Don’t use Option to select whether ComServer will be used IEC103 settings (REG-PE(D)) Page 89 We take care of it. Page 90 Setting Format Range Default Description Timeout for response ms 1 to 65535 2000 Timeout for response IEC103 settings (REG-PE(D)) Table 23: IEC103 ComServer settings PQI-D, Channels Setting Format Range Default Description Activate - Yes/No No Option to disable the channel Connection type - Selection of values in combo box RAW State of channel. IP address - 4x 0 to 255 TCP port - 0 to 65535 Inactivity timeout S Serial port - Baud rate (SOCKET, Serial Direct, Telnet, Shared with IEC, OFF) IP address 3003 TCP port 180 Timeout after which the serial device is closed if data transfer does not occur. By default is 0. It means that serial device is closed only by closing TCP-Port. Selection of values in combo box COM2 Selection of serial port Bd Selection of values in combo box 115200 Baud rate Parity - Selection of values in combo box Even Parity Stop bits - Selection of values in combo box 1 Stop bits Data bits - Selection of values in combo box 8 Data bits XON/XOFF - Selection of values in combo box No Option to select XON/XOFF handshaking RTS/CTS - Selection of values in combo box No Option to select RTS/CTS handshaking RTS/CTS inverted - Selection of values in combo box No Option to select inversion of RTS, CTS signals Rxd/TxD inverted - Selection of values in combo box No Option to select inversion of RxD, TxD signals Interface type - Selection of values in combo box RS232 Option to select type of interface Max. message length - 0 to 65535 0 Max. message length Tx blocking time ms 0 to 65535 0 Tx blocking time IEC103 settings (REG-PE(D)) Page 91 We take care of it. Page 92 IEC103 settings (REG-PE(D)) 12.3.5 ComServer settings EOR-D Figure 44: ComServer settings, EOR-D Table 24: IEC103 ComServer settings EOR-D Setting Format Range Default Description Use/Don’t use ComServer function - Option box Don’t use Option to select whether ComServer will be used Timeout for response ms 1 to 65535 2000 Timeout for response Activate - Yes/No No Option to disable the channel Connection type - Selection of values in combo box RAW State of channel. IP address - 4x 0 to 255 TCP port - 0 to 65535 Inactivity timeout S Serial port - Baud rate Parity IEC103 settings (REG-PE(D)) (SOCKET, Serial Direct, Telnet, Shared with IEC, OFF) IP address 3003 TCP port 180 Timeout after which the serial device is closed if data transfer does not occur. By default is 0. It means that serial device is closed only by closing TCP-Port. Selection of values in combo box COM2 Selection of serial port Bd Selection of values in combo box 115200 Baud rate - Selection of Even Parity Page 93 We take care of it. Setting Format Range Default Description values in combo box Page 94 Stop bits - Selection of values in combo box 1 Stop bits Data bits - Selection of values in combo box 8 Data bits XON/XOFF - Selection of values in combo box No Option to select XON/XOFF handshaking RTS/CTS - Selection of values in combo box No Option to select RTS/CTS handshaking RTS/CTS inverted - Selection of values in combo box No Option to select inversion of RTS, CTS signals Rxd/TxD inverted - Selection of values in combo box No Option to select inversion of RxD, TxD signals Interface type - Selection of values in combo box RS232 Option to select type of interface Max. message length - 0 to 65535 0 Max. message length Tx blocking time ms 0 to 65535 0 Tx blocking time IEC103 settings (REG-PE(D)) 12.3.6 Supervisory settings IEC103 firmware for TK8xx telecontrol boards can be parameterized to send diagnostic supervisory messages. These messages are sent to the parameterization port of telecontrol board. Logging level and type of messages can be set in the Supervisory settings window contained in the IEC103 settings. Logging level can be set to ERROR, WARNING, INFORMATION or DEBUG mode in the combo box and individual types or messages can be selected by checkboxes. IEC103 settings (REG-PE(D)) Page 95 We take care of it. Figure 45: Supervisory settings, REG-PE(D) Page 96 IEC103 settings (REG-PE(D)) Table 25: IEC103 Supervisory settings Setting Format Range Default Description Level - Selection of values in combo box Deactivate Level of Log messages Trace output - radio button PARAMconnector Option to trace via PARAM connector or via TCP General options: Extended Trace - checkbox unchecked Extended Trace for Common Functions General options: Parse Settings - checkbox unchecked Parse Settings General options: General Warnings - checkbox unchecked General Warnings and Errors General options: General Events - checkbox unchecked General Events General options: Time Synchronization - checkbox unchecked Time Synchronization (SNTP and Device) General options: Process Image - checkbox unchecked Process Image General options: Commands Execution - checkbox unchecked Commands Execution Eberle-Device: Verbose output - checkbox unchecked Verbose output Eberle-Device: Link Layer - checkbox unchecked Link layer log Eberle-Device: Link State machine - checkbox unchecked Link State machine log Eberle-Device: Application Layer - checkbox unchecked Application layer log IEC103: Verbose output - checkbox unchecked Verbose output IEC103: Link Layer - checkbox unchecked Link layer log IEC103: Link State machine - checkbox unchecked Link State machine log IEC103: Application Layer - checkbox unchecked Application layer log checkbox checked Protocol debug option activation COM-Server Trace: Activate trace Level - Selection of values in combo box user Option to select lever of supervisory messages (user, developer) Trace via PARAMConnector) - radio button checked Logging to PARAM-Connector Trace via TCP-Port - radio button unchecked Logging to TCP port IEC103 settings (REG-PE(D)) Page 97 We take care of it. Setting Format Range Default Description TCP port - 1 to 65535 5010 TCP port Logging with Timestamp - checkbox checked Logging with Timestamp Mirroring: Activate - checkbox checked Activation TCP-port - 1 to 65535 5011 TCP port 12.4 Devices 12.4.1 Time synchronization PQI-D Figure 46: IEC103 Devices, Time synchronization settings, PQI-D Table 26: IEC103 Devices, Time synchronization settings, PQI-D Page 98 Setting Format Range Default Description Strategy of device time synchronization - Selection of checkboxes all Strategy of device time synchronization UTC character - 0 to 255 176 UTC character List of synchronized devices - 3 characters of device ID - List of synchronized devices if only the following list option is used IEC103 settings (REG-PE(D)) 12.4.2 Time synchronization EOR-D Figure 47: IEC103 Devices, Time synchronization settings, EOR-D Table 27: IEC103 Devices, Time synchronization settings, EOR-D Setting Format Range Default Description Strategy of device time synchronization - Selection of checkboxes all Strategy of device time synchronization UTC character - 0 to 255 176 UTC character List of synchronized devices - 3 characters of device ID - List of synchronized devices if only the following list option is used IEC103 settings (REG-PE(D)) Page 99 We take care of it. 12.4.3 Internal communication PQI-D Figure 48: IEC103 Internal communication, PQI-D Table 28: IEC103 Internal communication, PQI-D Page 100 Setting Format Range Default Description Baud rate of device serial port Bd Selection of values in combo box 115200 Baud rate of device serial port Parity - Selection of values in combo box EVEN Parity ON time of serial LEDs ms 1 to 65535 10 ON time of serial LEDs Cycle time of poll ms 0 to 65535 300 The parameter determines the cycle time of the substation call. If you set the parameter to zero, the call is executed as soon as possible. Value is configurable in the range 0…65535. The default value is 300. IEC103 settings (REG-PE(D)) Setting Format Range Default Description Wait time for ACK or next sequence frame ms 0 to 65535 800 This parameter specifies how long the program waits for sequenced next frame (data > 2000 Bytes) or the acknowledgement for command. The wait time is dependent on the baud rate and the maximum message length. Value is configurable in the range 0…65535. The default value is 800. Cycle time of device status check ms Number of repeats for SYNC cycle 0 to 65535 1400 Cycle time of device status check, if connection with device fault 1 to 255 2 Max count of synchronization requests, if serial communication with regulator fails. Value is configurable in the range 0…255. The default value is 3. Number of poll repeats - 0 to 255 1 Max. number of the device's polling. The setting is not used to the commands. Value is configurable in the range 0…255. The default value is 1. Round time down - Check box NOT checked If value equals 0, time stamps are rounded down in scale of one second to prevent time inconsistencies with substation. If value equals one time stamps are rounded up in scale of one second. The default value is 0. Measurements transmission mode (MEA) - Option boxes Transmit on reception Defines a transmitting behavior of the measurands. If “on receiving” checked, all data transmitted forthright after their changing. In this case a cause of transmission will be “spontaneous”. If “one time per interval” checked, all measured values transmitted once per interval “Measurements receiving interval”. In this case a cause of transmission will be “cyclic” Transmission interval of measurements ms 0 to 65535 1000 Defines a time interval of the cyclic transmitting the measured values. Value is configurable in the range 0…65535. The default value is 1000 ms. PQI-D version of firmware - Option boxes V2.xx, V3.xx Defines used version of PQI-D firmware. It is very important setting. IEC103 settings (REG-PE(D)) Incompatibility of the application setting with topical used PQI-D firmware version gives wrong data and events! Page 101 We take care of it. Setting Format Range Default Description Command executed on startup of REG-PE(D) - 64 characters sysopen__;p qibreset 9;sysrese t=0; Command that will be executed once after first connection with device. 0 to 255 0 Frequency of interrogation of IP addresses of all devices. Value is configurable in the range 0…255. The default value is 0. (setting is not used) Number of polls for IP check Setting is applicable only for REG-D device. 12.4.4 Internal communication, EOR-D Figure 49: IEC103 Devices, EOR-D, Internal communication Page 102 IEC103 settings (REG-PE(D)) Table 29: IEC103 Devices, EOR-D, Communication settings Setting Format Range Default Description Baud rate of device serial port Bd Selection of values in combo box 115200 Baud rate of device serial port Parity - Selection of values in combo box EVEN Parity ON time of serial LEDs ms 1 to 65535 10 ON time of serial LEDs Inter character timeout ms 1 to 65535 80 Inter character timeout Time to wait after answer rec. ms 1 to 65535 30 Time to wait after answer reception 1 to 255 2 Number of repeats for SYNC cycle Number of repeats for SYNC cycle Number of poll repeats - 0 to 255 1 Number of poll repeats Round time down - Check box NOT checked Round time down 0 to 255 16 Frequency of interrogation of IP addresses of all devices. Value is configurable in the range 0…255. The default value is 0. (setting is not used) Option boxes Yes Earth fault acquisition activate. Number of polls for IP check Earth fault acquisition [on/off] ms Initial delay of first sample request ms 0 to 65535 2000 Max. wait for repetition of the initial state of device to start state machine. Value is configurable in the range 0…65535. The default value is 800 ms. Earth fault acquisition timeout s 0 to 65535 100 Max. wait for repetition of new EarthFaults samples request from device to start “get mode”. Value is configurable in the range 0…65535. The default value is 100 sec. Delay of List Records transmission ms 0 to 65535 300 Min. timeout in device response in Earth-Faults transmit to control center with type identification 30 according to standard IEC 60870-5-103 . Value is configurable in the range 0…65535. The default value is 300 ms. IEC103 settings (REG-PE(D)) If “On” set, all data with earth-faults will be transmitted from current device to control center. Otherwise this feature not supported and off. Note: the feature supported now only for EORSys® devices. Page 103 We take care of it. Setting Format Range Default Description Sampling rate divisor [1...3] - 1 to 5 3 Defines a sampling frequency factor (instance for value 2: 2 Samples of three each are deleted). Value is configurable in the range 0…65535. The default value is 3. Full-scale valuation in records - 1 to 1000000 32767 Defines the maximum amplitude a disturbance data can present. If the amplitude exceeds the limit, REGPE(D) halves the maximum amplitude to ensure the values up to “Full-scale valuation”. Value is configurable in the range 1…32767. The default value is 32767. 12.5 Device x 12.5.1 Device settings Figure 50: IEC103 Device x, PQI-D Page 104 IEC103 settings (REG-PE(D)) Table 30: IEC103 Device x, Device settings PQI-D Setting Format Range Default Description Data class used - Option boxes Yes Usage of Data class Identifier of device - 3 characters Q1: Identifier of device Data class - Selection of values in combo box 1(C_s2_1 interval 200 ms) Data class Class Type - Selection of values in combo box Interval The poll type of logical device. It is the characteristic of the delivered setting’s set. Do not change the setting without confirmation of Eberle staff. Number of read 256-byte records - Selection of values in combo box 1 Defines a number of the entries replayed in one request. Comment - 23 characters C_c2_1 200 ms Comment Figure 51: IEC103 Device x, Device settings EOR-D IEC103 settings (REG-PE(D)) Page 105 We take care of it. Table 31: IEC103 Device x, Device settings EOR-D Setting Format Range Default Description Data class used - Option boxes Yes Usage of Data class Identifier of device - 3 characters E1: Identifier of device Device role - Option boxes In master Device role Poll string - 24 characters eormess 11 Poll string Size of answer byte 1 to 255 118 Size of answer: Type of seconds field - Selection of values in combo box INT32U Type of seconds field Offset of seconds field byte 0 to 255 0 Offset of seconds field Type of msec field - Selection of values in combo box INT16U Type of seconds field Offset of msec field byte 0 to 255 4 Offset of msec field Earth-faults acquisition - Option boxes active If “active” selected, all data with earth-faults will be transmitted from current device to control center. Otherwise this feature not supported. Note: feature is supported only for EORSys® devices. Number of fault files 0 to 255 1 Maximal number of Samples files in the EORSys® device. Value is configurable in the range 0…8. The default value is 3. Function ID for faults 0 to 255 151 IEC functional identify for current device. Instance in a 19”rack had mounted three EOR-D devices. For first EOR-D Functional Id. 151 is set, for second – 152 and for third – 153. It is needed for an identification disturbance data on the control center’s side. 23 characters EOR-D Comment Comment Page 106 - IEC103 settings (REG-PE(D)) 12.5.2 Data points – indications, PQI-D Figure 52: IEC103 Device x, Indications, PQI-D Table 32: IEC103 Device x, Indications, PQI-D Setting Format Range Default Description Disabled - Option boxes No Enabling/disabling of individual data point IOA (function type / information number) - 2x 0 to 255 0 The corresponding IEC data type must be entered. The Type Identification is used for the compatible range. IEC object type - Selection of values in combo box Type 1: Timetagged message IEC 60870-5-103 type of data Selection of values in combo box not defined Information order number of Common Address Application Service Data Unit (ASDU). It is applied only to type 3 and 9. MEA number in ASDU Processing of changes - Selection of values in combo box value Processing of changes. Should be set to value for EOR-D device type. REG data type - Selection of values in combo box BIT0 Selection of regulator data type RPS offset - 0 to 255 0 Definition of RPS offset Channel number - 0 to 255 0 Channel number Data structure type - Selection of values in combo box Measured [FLT]/Event Data structure type Dead band % float 1 Dead band defines threshold to save new value in process im- IEC103 settings (REG-PE(D)) Page 107 We take care of it. Setting Format Range Default Description age and to send spontaneous message Page 108 Scale - float 1 Scale exponent value Value normalized for 100% - float 3 Max. value of data point accepted in the device communication Use in GI - Selection of values in combo box No Option whether the data point will be used in GI Initial value transmission - Selection of values in combo box No Initial value transmission Description string 50 characters empty string User description of data point IEC103 settings (REG-PE(D)) 12.5.3 Indications, EOR-D Figure 53: IEC103 Device x, Indications, EOR-D Table 33: IEC103 Device x, Data points – indications, EOR-D Setting Format Range Default Description Disabled - Option boxes No Enabling/disabling of individual data point IOA (function type / information number) - 2x 0 to 255 0 IEC address (IOA) of indication IEC object type - Selection of values in combo box Type 1: Time-tagged message IEC data type of data point Processing of changes - Selection of values in combo box value Processing of changes. Should be set to value for EOR-D device type. REG data type - Selection of values in combo box BIT0 Selection of regulator data type RPS offset - 0 to 255 0 Definition of RPS offset Dead band % float 1 Dead band defines threshold to save new value in process image and to send spontaneous message Scale - float 1 Scale exponent value Value normalized for 100% - float 1 Max. value of data point accepted in the device communication Selection of values in combo box No Option whether the data point will be used in GI 0 to 65535 1 REG-D/EOR-D specific setting. Definition of data offset in the case of Use in GI Offset connected with remote IEC103 settings (REG-PE(D)) - Page 109 We take care of it. Setting Format Range Default COT 12.5.4 Description remote cause of the transition (COT). If 0, the data point will not be mapped to remote operation. Remote COT bits of remote offset - 0 to 255 0 Remote COT bits of remote offset Feeder string 50 characters empty Feeder Description string 50 characters empty string User description of data point Commands Figure 54: IEC103 Device x, Commands Table 34: IEC103 Device x, Data points – commands Setting Format Range Default Description Disabled - Option boxes Yes Enabling/disabling of individual data point IOA (function type / information number) - 2x 0 to 255 0 The corresponding IEC data type must be entered. The Type Identification is used for the compatible range. Control code - Selection of values in combo box Type 20: General command IEC 60870-5-103 type of data Command string string 50 characters empty string Command string to be sent to device REG data type - Selection of values in combo box INT8 Device data type of command Scale exponent - Selection of values in combo box 0 Normally, scale is used as exponent with single commands. Only if Maximal Value is 0 scale has Double Point type: with<0> := not used, <1> := OFF, <2> := ON, <3> := not used. In either case scale is an enumeration. Use method of command value Page 110 - Selection of values in Applied in command Application method of command value. If “ignored” is selected, command IEC103 settings (REG-PE(D)) Setting Format Range Default combo box Description 12.5.5 - 50 characters Description value will be ignored. empty string User description of command Fault records The terms earth-faults and channels are used to describe particular of a single channel in an IEC 60870-5-103 sense. Using WinEDC software is able to get sample files saved in inner EOR-D memory. Data can be saved in COMTRADE or CSV (comma separated) files. Earth fault channels page contains parameterization of transmission disturbances. Figure 55: IEC103 Device x, Fault records, EOR-D Table 35: IEC103 Device x, Fault records, EOR-D Setting Format Range Default Description Disabled - Option boxes Yes Enabling/disabling of individual data point Channel - 0 to 255 64 According to IEC 60870-5-103, the number of channels indicates the number of analogue channels in transmission data (NOC Number). Reference factor - float 1 Reference factor (RFA) defined in 7.2.6.17 IEC 60870-5-103© RFA is pre-set to 0.001. REG-PE(D) calculates the additional factors for each channel to limit values in range up to 31767 (two bytes). Then this additional factor is multiplied with preset RFA. The result is transmitted as IEC “Reference factor”. Rated primary value - IEC103 settings (REG-PE(D)) float 1 Rated primary value (RPV) defined in 7.2.6.18 IEC 60870-5-103© The value is calculated for each set channel using EOR-D factor commands “EorKni X” or “EorKnu Y” accordingly with type of channel (voltage or current) Page 111 We take care of it. Setting Format Range Default Description Rated secondary value - float 1 Rated secondary value (RSV) defined in 7.2.6.19 IEC 60870-5-103© Data type - Selection of values in combo box INT8 Device data type Offset - 0 to 7 12 Channel data offset in Records Request command string - 63 characters empty string Factor request command string Description - 63 characters empty string User description Value set to 1 for EORSys™. The conformity of IEC-channels and earth-fault channels of EOR-D shown in figure below. EOR-D earth-fault record is able to read and to save in COMTRADE or comma-separated (CSV) file format. The data mapping of channels particular are are explained on an example. Figure 56: Read Faults Record from EOR-D With the help of WinEDC program (see Figure above) records data from EOR-D device “E1” saved to CSV-file. The IEC-channel data are located in the column “i1”. Page 112 IEC103 settings (REG-PE(D)) IEC103 settings (REG-PE(D)) Page 113 We take care of it. 12.5.6 EOR-D® defined settings The meaning of offset is explained in table below. “i1”- earth-faults values are located in the faults record with begin offset 4. Table 36: Channel offset term 7 EOR-D Test_3 E3: 1320 11540 1 0 1 0 0 0 963 0 0 0 383,73 0 0 0 Data from WinEDC CSV-file: Index u1 u2 u3 u4 i1 i2 i3 i4 0 -2233 -2488 -4 -43 489 -1 0 0 1 645 -2488 -29 -92 450 -1 0 -1 2 -2233 -2488 -4 -43 359 -1 -1 -1 3 -5111 -2488 21 -43 359 -1 -1 -1 4 -5111 -2488 -29 -92 359 -1 -1 -1 5 -5111 -2488 -29 -43 359 -1 0 -1 6 645 -2488 194 406 489 -1 0 -1 1 2 3 4 5 6 7 Description: Offset 12.5.7 0 Single disturbance value (SDV) SDV := F16[1..16] <-1..+1-2–15> is defined and calculated according to IEC requirements. The raw-values are transmitted as integer in range from – 32768 up to 32767 and then normalized to -1.0 … +1.0. Page 114 IEC103 settings (REG-PE(D)) 13. IEC104 settings IEC 104 settings are available only for TK860 and TK885D telecontrol boards. Chapter IEC104 settings describes only settings not described above. 13.1 Basic The basic settings tree branch contains table of 20 available IEC104 channels. Each IEC104 channel can be operated in client or server modes, the channel mode assumes corresponding remote side with corresponding remote IP addresses and remote ASDUs, i.e. IEC104 remote client for server mode and IEC104 server for client mode. IEC104 settings Page 115 We take care of it. Figure 57: IEC104 basic settings Page 116 IEC104 settings Table 37: IEC104 settings Setting Format Range Default Description Settings description text 50 characters Filename of open settings Short user description of settings file or name of settings file. Enabled - checkbox unchecked Option to enable/disable the corresponding IEC104 channel Remote IP address - 4x 0 to 255 192.168.1.68 IP addresses of remote station authorized for connection with telecontrol board 192.168.1.64 192.168.1.43 Remote ASDU address - 0 to 65534 1 ASDU address of remote station authorized for connection with telecontrol board ASDU address - 0 to 65534 1 ASDU address AA: Identifier of device (ASDU2, ASDU1) Identifier of device IEC104 settings or 0 to 255 text AA: or A(1 to 9): to Z(1 to 4): Page 117 We take care of it. 13.2 Advanced 13.2.1 Settings - SCADA IEC104 Settings - SCADA tree branch contains complete IEC104 specific settings. Figure 58: IEC104 Settings - SCADA Page 118 IEC104 settings Table 38: IEC104 settings - SCADA Setting Format Range Default Description Port - 1 to 65535 2404 TCP port for IEC104 connection Enabled - checkbox unchecked Option to enable/disable the corresponding IEC104 channel Remote IP address - 4x 0 to 255 192.168.1.68 IP addresses of remote station authorized for connection with telecontrol board 192.168.1.64 192.168.1.43 Remote ASDU address - 0 to 65534 1 ASDU address of remote station authorized for connection with telecontrol board ASDU address - 1 to 65534 62166 ASDU address (ASDU2, ASDU1) or 0 to 255 Errors data type - selection of values in combo box TI30 IEC data type of errors IEC address of error multipoint - 0 to 16777215 0/0/162 IEC address (IOA) of multipoint for errors or 3x 0 to 255 Reject commands with unknown address - option box Not selected Reject commands with unknown address (otherwise ignore) Port - 1 to 65535 2404 TCP Port Max. telegram length - 1 to 249 240 Maximum telegram length k-Value - 1 to 32767 12 Max. No. of invalidated APDUs w-Value - 1 to 32767 8 Acknowledge latest after this number of APDUs, w <= 2/3k t0-Timeout s 1 to 255 30 Timeout for connection establishment t1-Timeout s 1 to 255 15 Timeout for send or test APDUs t2-Timeout s 1 to 255 10 Timeout for acknowledgement in the case of no messages t2 < t1 t3-Timeout s 1 to 255 20 Timeout for sending test frames in case of idle state IEC104 settings Page 119 We take care of it. 13.2.2 ComServer settings IEC104 advanced settings tree branch contains ComServer specific settings. Figure 59: IEC104 ComServer settings Table 39: IEC104 ComServer settings Page 120 Setting Format Range Default Description Activate - Yes/No No Option to disable the channel Connection type - Selection of values in combo box RAW State of channel. IP address - 4x 0 to 255 TCP port - 0 to 65535 Inactivity timeout S Serial port - Baud rate (SOCKET, Serial Direct, Telnet, Shared with IEC, OFF) IP address 3003 TCP port 180 Timeout after which the serial device is closed if data transfer does not occur. By default is 0. It means that serial device is closed only by closing TCP-Port. Selection of values in combo box COM2 Selection of serial port Bd Selection of values in combo box 115200 Baud rate Parity - Selection of values in combo box Even Parity Stop bits - Selection of values in combo box 1 Stop bits Data bits - Selection of values in combo box 8 Data bits XON/XOFF - Selection of No Option to select XON/XOFF IEC104 settings Setting Format Range Default values in combo box Description handshaking RTS/CTS - Selection of values in combo box No Option to select RTS/CTS handshaking RTS/CTS inverted - Selection of values in combo box No Option to select inversion of RTS, CTS signals Rxd/TxD inverted - Selection of values in combo box No Option to select inversion of RxD, TxD signals Interface type - Selection of values in combo box RS232 Option to select type of interface Max. message length - 0 to 65535 0 Max. message length Tx blocking time ms 0 to 65535 0 Tx blocking time IEC104 settings Page 121 We take care of it. 13.2.3 Supervisory settings The Supervisory settings tree branch can be used for activation and configuration of debug logs. Page 122 IEC104 settings Figure 60: IEC104 Supervisory settings IEC104 settings Page 123 We take care of it. Table 40: IEC104 Supervisory settings Setting Format Range Default Description Level - Selection of values in combo box Deactivate Level of Log messages Trace output - radio button PARAMconnector Option to trace via PARAM connector or via TCP General options: Extended Trace - checkbox unchecked Extended Trace for Common Functions General options: Parse Settings - checkbox unchecked Parse Settings General options: General Warnings - checkbox unchecked General Warnings and Errors General options: General Events - checkbox unchecked General Events General options: Time Synchronization - checkbox unchecked Time Synchronization (SNTP and Device) General options: Process Image - checkbox unchecked Process Image General options: Commands Execution - checkbox unchecked Commands Execution Eberle-Device: Verbose output - checkbox unchecked Verbose output Eberle-Device: Link Layer - checkbox unchecked Link layer log Eberle-Device: Link State machine - checkbox unchecked Link State machine log Eberle-Device: Application Layer - checkbox unchecked Application layer log IEC protocol: Verbose output - checkbox unchecked Verbose output IEC protocol: Link Layer - checkbox unchecked Link layer log IEC protocol: Link State machine - checkbox unchecked Link State machine log IEC protocol: Application Layer - checkbox unchecked Application layer log checkbox checked Protocol debug option activation COM-Server Trace: Activate trace Page 124 Level - Selection of values in combo box user Option to select lever of supervisory messages (user, developer) Trace via PARAMConnector) - radio button checked Logging to PARAM-Connector IEC104 settings Setting Format Range Default Description Trace via TCP-Port - radio button unchecked Logging to TCP port TCP port - 1 to 65535 5010 TCP port Logging with Timestamp - checkbox checked Logging with Timestamp Mirroring: Activate - checkbox checked Activation TCP-port - 1 to 65535 5011 TCP port 13.3 Linked Devices Figure 61: IEC104 Linked devices 13.3.1 Time synchronization IEC104 time synchronization tree branch contains IEC104 specific settings for time synchronization. Figure 62: IEC104 time synchronization settings IEC104 settings Page 125 We take care of it. Table 41: IEC104 time synchronization 13.3.2 Setting Format Range Default Description Time source - option box NTP Time source selection Sync. all devices connected to ELAN - option box Not selected Sync. all devices connected to ELAN Sync. period of connected devices min 0 to 999 1 Sync. period of connected devices (0 = disabled) NTP primary server IP address - 4x 0 to 255 0.0.0.0 NTP primary server IP address NTP secondary server IP address - 4x 0 to 255 0.0.0.0 NTP secondary server IP address Internal Communication Communication settings tree branch contains communication settings of devices for TK8xx board types and IEC104 protocol conversion. Figure 63: Internal communication settings Table 42: IEC104 Device communication settings Page 126 Setting Format Range Default Description Baud rate of device serial Bd 1200115200 115200 Baud rate of device serial port ON time of serial LEDs 10 ms 1 to 100 2 ON time of serial LEDs Timeout for recep- 10 ms 1 to 255 50 Timeout for reception of first character IEC104 settings Setting Format Range Default Description Inter character timeout 10 ms 1 to 255 20 Timeout between two characters in telegram Number of repeats for SYNC cycle - 1 to 255 10 Number of repeats for SYNC cycle Number of command repeats - 1 to 255 3 Number of command (poll) repeats TX blocking ms 0 to 255 0 Time to wait when answer was received Timeout for analog cyclic sending s 0 to 650 0 Timeout for analog (measurements) cyclic sending (0 = disable) Time to stop reg. interrogation s 0 to 650 0 Time to stop regulator interrogation after IEC communication break Round time down / up - option box round down Rounding time selection tion of first char 13.3.3 IEC104 Commands The IEC104 commands table contains commands and also data points transmitted in the direction toward to the REG-PE(D) board. Figure 64: IEC104 commands Table 43: IEC104 commands Setting Format Range Common address of ASDU - 0 to 65534 Default 1 Description ASDU address of remote station authorized for connection with telecontrol board Information object address (IOA) - 0 to 16777215 or 0 IOA of the corresponding data point TI45/TI5 8 Type of information object 3x 0 to 255 Control code IEC104 settings Selection of values Page 127 We take care of it. Setting Format Range Default Description in listbox Command string text 50 Command string characters Scale exponent - Selection of values in listbox 1/0 Addition command parameter according to the available list 100% value - 0 to 65535 0 100% value, available for TI48 only Description text 50 User description characters 13.3.4 IEC104 indications Figure 65: IEC104 indications Table 44: IEC104 indications Setting Format Range Default Description Description text 50 chars empty Description IEC object type - selection of values in list box TI1 Indication type in IEC communication RegSys type - selection of values in list box Bit Indication type in device communication Information object address (IOA) - 0 to 16777215 0 IEC address (IOA) of indication (IOA (hi/mi/lo)) or 3x 0 to 255 Page 128 Abs. deviation float 0 Absolute deviation value Scale float 0 Scale value Max. value - 32767 Max. value 0 to 65535 IEC104 settings Setting Format Range Default Description RPS offset - 0 to 255 0 RPS offset RPS bit - selection of values in list box 0 RPS bit Use in GI - selection of values in list box Yes Usage of indication in General Interrogation Gr. 0 - selection of values in list box Yes Group 0 in general interrogation Gr. 1 - selection of values in list box No Group 1 in general interrogation Gr. 2 - selection of values in list box No Group 2 in general interrogation Gr. 3 - selection of values in list box No Group 3 in general interrogation Gr. 4 - selection of values in list box No Group 4 in general interrogation IEC104 settings Page 129 We take care of it. The available types of information objects are stated in the following list: Page 130 TI30: Single-point information with time tag TI31: Double-point information with time tag TI9/TI34: Measured value, normalized value/ Measured value, normalized value with time tag TI13/TI36: Measured value, short floating point value/ Measured value, short floating point value with time tag TI45/TI58: Single command/ Single command with time tag TI46/TI59: Double command/ Double command with time tag TI47/TI60: Regulating step command/ Regulating step command with time tag TI48/TI61: Set point command, normalized value/ Set point command, normalized value with time tag TI49/TI62: Set point command, scaled value/ Set point command, scaled value with time tag TI50/TI63: Set point command, short floating point value/ Set point command, short floating point value with time tag IEC104 settings 14. DNP3 settings (REG-P) Chapter DNP settings describes only settings not described above. 14.1 Basic Basic settings branch tree contains basic settings for DNP protocol conversion. Figure 66: DNP3 basic settings REG-P Table 45: DNP3 basic settings REG-P Setting Format Range Default Description Settings description text 50 characters Filename of open settings Short user description of settings file or name of settings file. Baud rate of serial port DNP3 Bd selection of values in combo box 9600 Baud rate of serial port DNP Link address of REG-P - 0 to 65535 103 Link address of REG-P Link address of DNP3 master - 0 to 65535 1 Link address of DNP master DNP3 RS485 activated - option box not selected DNP3 RS485 activated DNP3 fiber optics activated - option box not selected DNP3 fiber optics activated DNP3 settings (REG-P) Page 131 We take care of it. Setting Format Range Default Description DNP3 RS232 used - option box selected DNP3 RS232 used Identifier of device text AA: or A(1 to 9): to Z(1 to 4): AA: Identifier of device 14.2 Advanced 14.2.1 Settings - SCADA Advanced tree branch for Settings - SCADA contains complete DNP3 specific communication settings. Figure 67: Advanced Settings - SCADA for REG-P (TK509, TK400) Page 132 DNP3 settings (REG-P) Table 46: DNP3 Settings - SCADA REG-P (TK509, TK400) Setting Format Range Default Description DNP3 receiver inverted - checkbox unchecked DNP3 receiver inverted without jumpers DNP3 transmitter inverted - checkbox unchecked DNP3 transmitter inverted DNP3 RS485 terminator activated - checkbox unchecked DNP3 RS485 terminator activated DNP3 RS485 activated - radio button unchecked DNP3 RS485 activated DNP3 fiber optics activated - radio button unchecked DNP3 fiber optics activated DNP3 RS232 used - radio button checked DNP3 RS232 used Baud rate of serial port DNP3 Bd selection of values in combo box 9600 Baud rate of serial port DNP ON time of serial LEDs 10 ms 1 to 255 4 ON time of serial LEDs Link address of REG-P - 0 to 65535 103 Link address of REG-P Link address of DNP3 master - 0 to 65535 1 Link address of DNP master Inter character timeout Fosc/12 1000 to 65535 18000 Timeout between two characters in telegram Timeout after interchar ms 0 to 255 0 Timeout after inter character timeout expiration Time till reset 10 ms 1 to 65535 100 Time until reset after cold restart Number of TSDU fragments - 1 to 128 1 Number of TSDU fragments Size of each TSDU fragment - 249 - 2048 249 Size of each TSDU fragment Using confirmation for EVENT response - checkbox unchecked Using confirmation for EVENT response Timeout for receiving AL confirmation 10 ms 1 to 65535 80 Timeout for receiving AL confirmation 0 to 255 1 Number repetitions after AL confirm timeout Number of repetitions after AL confirm timeout Timeout select/operate function 10 ms 1 to 65535 500 Timeout select/operate function Event queue size - 10 to 1024 256 Event queue size DNP3 settings (REG-P) Page 133 We take care of it. Figure 68: Advanced Settings - SCADA for REG-P (TK517) Page 134 DNP3 settings (REG-P) Table 47: DNP3 Settings - SCADA REG-P (TK517) Setting Format Range Default Description selection of values in combo box TK517/FL4 Selection from 4 available board types to get correct version of firmware. - checkbox unchecked DNP3 receiver inverted, option for board without jumpers - checkbox unchecked DNP3 transmitter inverted, option for board without jumpers - checkbox unchecked DNP3 RS485 terminator activated, option for board without jumpers - radio button unchecked DNP3 RS485 activated, option for board without jumpers - radio button unchecked DNP3 fiber optics activated, option for board without jumpers - radio button checked DNP3 RS232 used, option for board without jumpers Baud rate of serial port DNP3 Bd selection of values in combo box 9600 Baud rate of serial port DNP ON time of serial LEDs 10 ms 1 to 255 4 ON time of serial LEDs Link address of REG-P - 0 to 65535 103 Link address of REG-P Link address of DNP3 master - 0 to 65535 1 Link address of DNP master Inter character timeout Fosc/12 1000 to 65535 18000 Timeout between two characters in telegram Timeout after interchar ms 0 to 255 0 Timeout after inter character timeout expiration Time till reset 10 ms 1 to 65535 100 Time until reset after cold restart Number of TSDU fragments - 1 to 128 1 Number of TSDU fragments Size of each TSDU fragment - 249 - 2048 249 Size of each TSDU fragment Using confirmation for EVENT response - option box Not selected Using confirmation for EVENT response Timeout for receiving AL confirmation 10 ms 1 to 65535 80 Timeout for receiving AL confirmation 0 to 255 1 Number repetitions after AL confirm timeout Telecontrol board designation DNP3 receiver inverted DNP3 transmitter inverted DNP3 RS485 terminator activated DNP3 RS485 activated DNP3 fiber optics activated DNP3 RS232 used Number of repetitions after AL confirm timeout DNP3 settings (REG-P) Page 135 We take care of it. Setting Format Range Default Description Timeout select/operate function 10 ms 1 to 65535 500 Timeout select/operate function Event queue size - 10 to 1024 256 Event queue size 14.3 Device x 14.3.1 Device request settings Device request settings tree branch contains device specific settings. Figure 69: DNP3 device request settings REG-P Table 48: DNP3 device settings REG-P Page 136 Setting Format Range Default Description Identifier of device text AA: or A(1 to 9): to Z(1 to 4): AA: Identifier of device as appears in the device communication Poll type - selection of values in combo box RPS Device poll type Poll string text 23 chars RPS 3 Device poll string RPS specific: Size of answer byte 1 to 255 244 Size of answer RPS specific: Offset of seconds field byte 0 to 255 18 Offset of seconds field RPS specific: Offset of msec field byte 0 to 255 22 Offset of msec field DNP3 settings (REG-P) 14.3.2 Commands Commands tree branch contains DNP specific settings for DNP protocol. Figure 70: DNP3 commands REG-P Table 49: DNP3 commands REG-P Setting Format Range Default Description Output type - selection of values in combo box Relay Output type Obj. index - 0 to 128 0 Control code - selection of values in combo box Operate on object Control code Scale - selection of values in combo box 1 Scale, valid for analog data type Command string text 50 characters empty Command string Description text 50 characters empty User description The function for storage of descriptions of commands and data points in the telecontrol board memory is not implemented for DNP3 protocol. Settings transferred back to PC from REG-P telecontrol board will have empty descriptions of commands and data points. DNP3 settings (REG-P) Page 137 We take care of it. 14.3.3 Indications Indications tree branch contains DNP specific settings for DNP protocol. Figure 71: DNP3 indications REG-P Table 50: DNP3 indications REG-P Setting Format Range Default Description DNP3 object type - selection of values in combo box Binary input DNP object type REG data type - selection of values in combo box Bit REG data type DNP3 obj. index - 0 to 65535 0 DNP object index Static definitions - selection of values in combo box no class 0 point Static definitions Event definitions - selection of values in combo box no event Event definitions Event class - selection of values in combo box 1 Event class Abs. deviation - 0 to 65535 0 Absolute deviation Scale float 1 Scale 0 to 255 0 RPS offset RPS offset Page 138 RPS bit - selection of values in combo box 0 RPS bit Description text 50 characters empty User description DNP3 settings (REG-P) 15. DNP3 settings (REG-PE(D)) 15.1 Basic Figure 72: DNP3 basic settings REG-PE(D) Table 51: DNP3 basic settings REG-PE(D) Setting Format Range Default Description Settings description text 50 characters Identification if the template source Short user description of settings file. Line type - selection of values in combo box serial Type of communication line – serial, Ethernet TCP, Ethernet UDP Authorized central stations IP addresses - 4x 0 to 255 192.168.1.68 IP addresses of central stations authorized to connect to telecontrol board Baud rate of serial port DNP3 Bd selection of values in combo box 19200 Baud rate of serial port DNP Link address of REG-P - 0 to 65535 103 Link address of REG-P Link address of DNP3 master - 0 to 65535 1 Link address of DNP master RS485 activated - option box not selected RS485 activated Identifier of device text AA: or A(1 to 9): to Z(1 to 4): AA: Identifier of device DNP3 settings (REG-PE(D)) 192.168.1.64 192.168.1.43 Page 139 We take care of it. 15.2 Advanced 15.2.1 Settings SCADA The advanced tree branch SCADA setting contains complete DNP3 specific communication settings. Figure 73: Advanced settings SCADA REG-PE(D) Page 140 DNP3 settings (REG-PE(D)) Table 52: DNP3 advanced settings REG-PE(D) Setting Format Range Default Description Line type - selection of values in combo box serial Type of communication line – serial, Ethernet TCP, Ethernet UDP Authorized central stations IP addresses - 4x 0 to 255 192.168.1.68 IP addresses of central stations authorized to connect to telecontrol board Port - 1 to 65535 20000 TCP or UDP Port Serial port - selection of values in combo box COM1 Selection of DNP3 COM port Baud rate of serial port DNP3 Bd selection of values in combo box 19200 Baud rate of serial port DNP Parity - selection of values in combo box Off Parity of serial port DNP ON time of serial LEDs ms 0 to 255 4 ON time of serial LEDs Link address of REG-PE(D) - 0 to 65535 103 Link address of REG-P Link address of DNP3 master - 0 to 65535 1 Link address of DNP master Inter character timeout ms 2 to 1000 4 Timeout between two characters in telegram Time till reset ms 1 to 65535 1000 Time until reset after cold restart RS485 activated - option box Not selected RS485 activated Number of TSDU fragments - 1 to 128 1 Number of TSDU fragments Size of each TSDU fragment - 64 - 2048 2048 Size of each TSDU fragment Using confirmation for EVENT response - option box selected Using confirmation for EVENT response Timeout for receiving AL confirmation ms 1 to 65535 800 Timeout for receiving AL confirmation Number of repetitions after AL confirm timeout - 0 to 255 1 Number repetitions after AL confirm timeout Timeout select/operate function ms 1 to 65535 5000 Timeout select/operate function DNP3 settings (REG-PE(D)) 192.168.1.64 192.168.1.43 Page 141 We take care of it. 15.3 Device X 15.3.1 Device request settings Device request settings tree branch contains device specific settings. Figure 74: DNP3 device request settings REG-PE(D) Table 53: DNP3 device settings REG-PE(D) Page 142 Setting Format Range Default Description Identifier of device text AA: or A(1 to 9): to Z(1 to 4): AA: Identifier of device as appears in the device communication Poll string text 23 chars fread RPS 3 Device poll string Size of answer byte 1 to 255 244 Size of answer Offset of seconds field byte 0 to 255 18 Offset of seconds field Offset of msec field byte 0 to 255 22 Offset of msec field Description string 30 characters Empty string User description DNP3 settings (REG-PE(D)) 15.3.2 Indications Figure 75: DNP3 indications REG-PE(D) Table 54: DNP3 indications REG-PE(D) Setting Format Range Default Description DNP3 object type - selection of values in combo box Binary input DNP3 object type REG data type - selection of values in combo box Bit REG data type DNP3 obj. index - 0 to 65535 0 DNP object index Static definitions - selection of values in combo box no class 0 point Static definitions Event definitions - selection of values in combo box no events Event definitions Event class - selection of values in combo box 1 Event class Abs. deviation float 0 Absolute deviation Scale float 1 Scale 0 to 255 0 RPS offset RPS offset RPS bit - selection of values in combo box 0 RPS bit Description text 50 characters empty User description Simulation selection of values in combo box No Option whether the data point value can be simulated Simulation value according to the data 0 Simulated data point val- DNP3 settings (REG-PE(D)) Page 143 We take care of it. Setting Format Range Default type Description ue Simulation of the data point value is new feature in WinConfig v.11.0.6. User can allow simulation and prepare simulation values of individual data points. The simulation can be consequently launched by Run simulation button in the online WinConfig in REG-PE(D) telecontrol board. Page 144 DNP3 settings (REG-PE(D)) 15.3.3 Commands Figure 76: DNP3 commands REG-PE(D) Table 55: DNP3 commands REG-PE(D) Setting Format Range Default Description Output type - selection of values in combo box Relay Output type Obj. index - 0 to 255 1 Object index Control code - selection of values in combo box Operate on object Control code Scale - selection of values in combo box 1 Scale, valid for analog data type Command string text 50 characters empty Command string Description text 50 characters empty User description DNP3 settings (REG-PE(D)) Page 145 We take care of it. 16. CSO settings (REG-P) CSO settings are used for COM-Server Only firmware type. Only one tree branch with setting is available. Changes of Communication settings of REG-P are recommended for advanced user only. Figure 77: CSO settings REG-P Page 146 CSO settings (REG-P) Table 56: CSO settings REG-P Setting Format Range Default Description Settings description text 50 characters Filename of open settings Short user description of settings file or name of settings file. Local (REG-P) IP address - 4x 0 to 255 192.168.56.90 Local (REG-P) IP address Gateway IP address - 4x 0 to 255 192.168.1.43 IP address of default gateway Subnet mask - 4x 0 to 255 255.255.0.0 Subnet mask Accept any valid client IP - checkbox checked Accept any valid client IP Refuse second connection - checkbox checked Refuse second connection if other connection is already set. Otherwise the current connection is closed and the new one established. Authorized central stations IP addresses - 4x 0 to 255 0.0.0.0 IP address of authorized central stations, 6 available addresses TCP port (data transfer) - 1 to 65535 1023 TCP port for data transfer. Changing of this value is not recommended. UDP port (remote parameterization) - 1 to 65535 12000 UDP port for remote parameterization. Changing of this value is not recommended. Baud rate of device serial Bd selection of values in combo box 115200 Baud rate of device serial communication. Device settings are accessible after clicking the Enable button. Experienced staff should do changing of device settings only. Timeout of REG-P responses 10ms 1 to 255 200 Timeout of REG-P responses Inter character timeout ms 1 to 255 70 Timeout between two characters in device communication Time to wait after REG-P response ms 0 to 255 0 Timeout after message reception CSO settings (REG-P) Page 147 We take care of it. 17. CSO settings (REG-PE(D)) 17.1 CSO channels Figure 78: CSO channels REG-PE(D) Table 57: CSO settings REG-PE(D) - Channels Setting Format Range Default Description Disabled - Yes/No No Option to disable the channel State - Selection of values in combo box RAW State of channel. OFF disables the port from accepting connections. It can be turned on later. RAW enables the port and transfers all data as-is between the port and the device. RAWLP enables the port and transfers all input data to device; device is open without any POSIX setting or directly. TELNET enables the port and runs the telnet protocol on the port to set up telnet settings. This is most useful for using telnet. USD enables the shared port and transfers all data as-is between port and the device vie shared serial. USD mode used for global-resource sharing from Network and IEC control center Page 148 IP address - 4x 0 to 255 0.0.0.0 IP address TCP port - 0 to 65535 3003 TCP port Inactivity timeout s 180 Inactivity timeout Serial port - Selection of values in combo box COM2 Selection of serial port Baud rate Bd Selection of values in combo box 115200 Baud rate CSO settings (REG-PE(D)) Setting Format Range Default Description Parity - Selection of values in combo box Even Parity Stop bits - Selection of values in combo box 1 Stop bits Data bits - Selection of values in combo box 8 Data bits XON/XOFF - Selection of values in combo box No Option to select XON/XOFF handshaking RTS/CTS - Selection of values in combo box No Option to select RTS/CTS handshaking RTS inverted - Selection of values in combo box No Option to select inversion of RTS signal TxD inverted - Selection of values in combo box No Option to select inversion of TxD signal Interface type - Selection of values in combo box RS232 Selection of interface type CSO settings (REG-PE(D)) Page 149 We take care of it. 17.2 CSO Supervisory settings The Supervisory settings tree branch can be used for activation and configuration of debug logs. Figure 79: CSO channels REG-PE(D) Table 58: CSO Supervisory settings Setting Format Activate Page 150 Range Default Description checkbox checked Protocol debug option activation Level - Selection of values in combo box user Option to select lever of supervisory messages (user, developer) Verbose Output - checkbox unchecked Verbose Output Trace via PARAMConnector) - radio button checked Logging to PARAM-Connector Trace via TCPPort - radio button unchecked Logging to TCP port TCP port - 1 to 65535 55555 TCP port Logging with Timestamp - checkbox checked Logging with Timestamp Mirror port: Activate trace - checkbox checked Mirror port: Activate TCP-port - 1 to 65535 55444 TCP port CSO settings (REG-PE(D)) 18. Modbus settings You are able to select of either two connection type “serial” or “TCP”. 18.1 Basic settings MODBUS RTU Basic settings tree branch form contains common settings of MODBUS protocol – selection of available Baud rates, Slave address and identifier if device (devices). Basic settings also contain use definable description - name of the entire settings. Figure 80: MODBUS RTU basic settings Table 59: MODBUS basic settings Setting Format Range Default Description Settings description Text 50 characters Filename of open settings Short user description of settings file or name of settings file. Slave address - 1-247 2 Address of slave RS485 activated Bd Checkbox unchecked If unchecked then RS232 or fiber optic mode is selected. Identifier of device text AA: or A(1 to 9): to Z(1 to 4): defaults defined in the Devices tree branch Device identifier string as appears in the device protocol Modbus settings Page 151 We take care of it. 18.2 Basic settings MODBUS TCP Basic settings tree branch form contains common settings of MODBUS TCP protocol – selection of Unit ID and identifier if device (devices). Basic settings also contain user definable description - name of the entire settings. Figure 81: Modbus TCP basic settings Table 60: MODBUS TCP basic settings Setting Format Range Default Description Settings description Text 50 characters Filename of open settings Short user description of settings file or name of settings file. Unit Id - 1-247 2 Slave Address (same as the Unit ID used in MODBUS TCP/IP). Identifier of device text AA: or A(1 to 9): to Z(1 to 4): defaults defined in the Devices tree branch Device identifier string as appears in the device protocol The port number is default 502. Page 152 Modbus settings 18.3 Advanced - Settings - SCADA Advanced settings tree branch contains the complete range of MODBUS settings: Figure 82: MODBUS SCADA settings Modbus settings Page 153 We take care of it. Table 61: MODBUS advanced settings Setting Format Range Default Description Serial port - Selection of values in combo box COM1 Selection of available COM ports for Modbus communication Baud rate of serial [Bd] Bd Selection of values in combo box 19200 Baud rate of Modbus serial port Parity - Selection of values in combo box Even Parity of Modbus serial port ON time of serial LEDs ms 0 to 65535 20 ON time of serial LEDs indicating activity on the Modbus serial interface Slave address - 1-247 2 Address of slave RS 485 activated - checkbox Not checked Activation of RS485 interface RTS/CTS - checkbox Not checked RTS/CTS handshaking XON/XOFF - checkbox Not checked XON/XOFF handshaking Response timeout ms 2 to 100 5 SCADA response timeout Turnaround delay ms 0 to 65535 250 Turnaround delay No reply - 0 to 255 0 No reply Mode of watchdog LED - Selection of values in combo box blinking Mode of watchdog LED (blinking/switched off) 18.4 Devices Devices tree branch is the same as for IEC101 protocol. See chapter 9.2. 18.4.1 Time synchronization Time synchronization tree branch is the same as for IEC104 protocol. See chapter 11.2.2. Page 154 Modbus settings 18.4.2 Internal communication settings Device communication settings contain the following options: Figure 83: Device internal communication settings Table 62: Device communication settings for MODBUS Setting Format Range Default Description Baud rate of device serial Bd Selection of values in combo box 115200 Baud rate of device serial port Parity - Selection of values in combo box Even Parity of device serial port ON time of serial LEDs ms 0 to 65535 10 ON time of serial LEDs for indication of device communication Timeout for reception of first char ms 0 to 65535 90 Timeout for reception of first character Inter character timeout ms 0 to 65535 80 Timeout between two characters in telegram TX blocking ms 0 to 65535 30 Timeout to wait when answer was received Number of repeats for SYNC cycle - 0 to 255 3 Number of repeats for SYNC cycle Number of command repeats - 0 to 255 1 Number of command (poll) repeats Round time down / Round time up - option box round down Rounding time selection Use UTC for time synchronization - check box unchecked Selection of usage UTC for time synchronization Modbus settings Page 155 We take care of it. 18.5 Device x 18.5.1 Device settings Figure 84: MODBUS device request settings Table 63: MODBUS device settings Page 156 Setting Format Range Default Description Identifier of device text 3 chars AA: Identifier of device as appears in the device communication Poll string text 63 chars RPS 4 Device poll string Type of seconds field - Selection of values in combo box INT32U Type of “seconds” field Offset of seconds field byte 0 - 65535 18 Offset of seconds field Type of msec field - Selection of values in combo box INT32U Type of “milliseconds” field Offset of msec field byte 0 - 65535 22 Offset of “milliseconds” field Description text 30 chars empty User description Modbus settings 18.5.2 Indications Indications tree branch describes indications of individual device. Figure 85: MODBUS indications Table 64: MODBUS indications Setting Format Range Default Description Function - 0 to 999 0 Function number Address - 0 to 65535 0 Address Class - 0 to 65535 0 Class 0 to 999 0 Indication device offset 0 to 999 0 Indication device type Device offset Dev type - Deviation float 0 Absolute deviation value Scale float 0 Scale value Max. value float 0 to 65535 0 Max. value Description text 50 chars empty User description Modbus settings Page 157 We take care of it. 18.5.3 Commands Table of settings of individual commands represents command settings. This table is common for all a.eberle devices connected to the telecontrol board. The upper line contains execution buttons for work with the individual command lines and for export/import of the entire table of commands. Selected line in the table is marked by yellow background. All changes have to be confirmed by using the Confirm button. Figure 86: MODBUS commands Table 65: MODBUS Commands Page 158 Setting Format Range Default Description Function - 1 to 128 1 Function number Address - 1 to 128 0 Information address Type - 1 to 128 0 Data type Scale - 1 to 128 0 Scale Max value - 1 to 128 0 Maximum value Command text 50 chars empty Command string Description text 50 chars empty User description Modbus settings 19. C37.118 Settings 19.1 Basic Basic settings tree branch form contains common settings of for C37.118 protocol. Figure 87: C37.118 basic settings Table 66: C37.118 basic settings Setting Format Range Default Description Settings description Text 50 characters Filename of open settings Short user description of settings file or name of settings file. Line type - Selection of values in combo box Ethernet - TCP Type of line for C37.118 protocol (Ethernet, serial line) PMU base identifier - 1 to 65535 100 Base identifier of virtual PMU devices defined by firmware; individual PMU identifiers are defined as Base Identifier + PMU Order Number (e.g. Base Identifier = 100, PMU identifiers are 101, 102 …). Authorized central stations IP addresses - 4x 0 to 255 As defined in the template IP address of central stations (SCADAs) authorized to communicate with telecontrol board using C37.118 protocol. C37.118 Settings Page 159 We take care of it. 19.2 Advanced 19.2.1 Serial Port Assignment Serial Port assignment tree branch form contains common settings of serial ports for protocols available in C37.117 firmware. This WinConfig page also contains internal checks to assure that each serial port can be used only one time in the configuration. Figure 88: C37.118 Serial Port Assignment Table 67: C37.118 Serial Ports Settings Setting Format Enabled Range Default Description checkbox Checked/ Assignment of serial ports for protocols used by firmware. Telecontrol protocol for internal communication with device GDASys is always checked. Unchecked Page 160 Usage - - - Explanation of usage of the corresponding port. Port - Selection of values in combo box As defined in template COM port number used for the corresponding protocol. Each port can be used only for one of defined protocols. C37.118 Settings 19.2.2 Settings – SCADA Settings – SCADA tree branch form contains settings of SCADA-related parameters, namely important communication parameters of the C37.117 protocol. Figure 89: C37.118 SCADA Settings Table 68: C37.118 SCADA Settings Setting Format Range Default Description Line type - Selection of values in combo box Ethernet - TCP Type of line for C37.118 protocol (Ethernet, serial line) TCP port (data transfer) - - - Explanation of usage of the corresponding port. Port - 1 to 65535 4712 TCP port used for C37.118 protocol. PMU base identifier - 1 to 65535 100 Base identifier of virtual PMU devices defined by firmware; individual PMU identifiers are defined as Base Identifier + PMU Order Number (e.g. Base Identifier = 100, PMU identifiers are 101, 102 …). Authorized central stations IP addresses - 4x 0 to 255 192.168.1.92 IP address of central stations (SCADAs) authorized to communicate with telecontrol board using C37.118 protocol. ID - - - Read-only ID of virtual PMU in C37.118 communication; ID is defined by PMU base identifier Comment text 50 characters “” User comment Name Text 50 characters As defined in template Name of virtual PMU in C37.118 communication C37.118 Settings 192.168.1.64 192.168.1.43 Page 161 We take care of it. 19.2.3 ComServer ComServer tree branch form contains settings of ComServer -related parameters. Figure 90: C37.118 ComServer Settings Table 69: C37.118 ComServer Settings Page 162 Setting Format Range Default Description Activate - Selection of values in combo box Yes Activation Connection type - Selection of values in combo box Socket Connection type IP address - 4x 0 to 255 0.0.0.0 IP address TCP port - 1 to 65535 1023 CS TCP port. Inactivity timeout s 1 to 65535 60 Inactivity timeout Serial port - - COM3 Read only; CS serial port defined in Serial Ports Assignment page Baud rate of serial port - Selection of values in combo box 115200 Baud rate of serial port Parity - - NONE Read only; Parity Stop bits - - 1 Read only; Stop bits Data bits - - 8 Read only; Data bits XON/XOFF - Selection of values in combo box Yes XON/XOFF handshaking RTS/CTS - Selection of values in combo box No RTS/CTS handshaking Interface type - - RS232 Read only; interface type Max. message length - 0 to 65535 0 Max. message length Tx blocking time ms 0 to 65535 0 Tx blocking time C37.118 Settings C37.118 Settings Page 163 We take care of it. 19.2.4 Supervisory Supervisory settings allow user to define logging options to see log of C37.118 conversion operation. Page 164 C37.118 Settings Figure 91: C37.118 Supervisory settings C37.118 Settings Page 165 We take care of it. Table 70: C37.118 Supervisory settings Setting Format Range Default Description Level - Selection of values in combo box Deactivate Level of Log messages Trace output - radio button PARAMconnector Option to trace via PARAM connector or via TCP Eberle-Device: Link Layer - checkbox unchecked Level of Log in device communication Eberle-Device: Application Layer - checkbox unchecked Level of Log in device communication C37.118 protocol: Link Layer - checkbox unchecked Level of Log in C37.118 protocol communication C37.118 protocol: Application Layer - checkbox unchecked Level of Log in C37.118 protocol communication checkbox unchecked Trace activation DCF77: Activate trace DCF77: Level - Selection of values in combo box Deactivate Level of Log messages DCF77: TCP port - 1 to 65535 10777 TCP port checkbox checked Protocol debug option activation COM-Server Trace: Activate trace Page 166 Level - Selection of values in combo box user Option to select lever of supervisory messages (user, developer) Trace via PARAMConnector) - radio button checked Logging to PARAM-Connector Trace via TCP-Port - radio button unchecked Logging to TCP port TCP port - 1 to 65535 10888 TCP port Logging with Timestamp - checkbox checked Logging with Timestamp Mirroring: Activate trace - checkbox checked Mirror port: Activate TCP-port - 1 to 65535 23456 TCP port C37.118 Settings 19.3 Linked Devices Linked Devices page allows user to define virtual devices from the point of view of the RegSys internal communication. Figure 92: C37.118 Linked Devices Table 71: C37.118 Linked Devices Setting Format Range Default Description Device - - - Read only; order number of device from the point of view of RegSys communication Enabled - checkbox Checked/ unchecked Option whether the corresponding device is enabled Identifier of device text checkbox AA: Identifier of the device in RegSys communication Poll type - - RPS Read only; Poll type C37.118 Settings Page 167 We take care of it. 19.3.1 Time Synchronization Time Synchronization page sets time synchronization options. Figure 93: C37.118 Time Synchronization Table 72: C37.118 Time synchronization Page 168 Setting Format Range Default Description Time source - checkbox NTP Read only; NTP time source Synchronize all devices connected to ELAN - checkbox Unchecked Option whether synchronize all devices connected to ELAN Sync. period of connected devices min 0 to 999 1 Synchronization period of connected devices NTP primary server IP address - 4x 0 to 255 0.0.0.0 NTP primary server IP address NTP secondary server IP address - 4x 0 to 255 0.0.0.0 NTP secondary server IP address C37.118 Settings 19.3.2 Internal communication Internal communication page allows user to set parameters of internal communication with RegSys device. Figure 94: C37.118 Internal communication Table 73: C37.118 Internal communication Setting Format Range Default Description Baud rate of device serial port Bd Selection of values in combo box 115200 Baud rate of device serial port Parity - Selection of values in combo box EVEN Parity of device serial port ON time of serial LEDs ms 1 to 65535 100 ON time of serial LEDs Timeout for reception of first char ms 1 to 65535 200 Timeout for reception of first char Inter character timeout ms 1 to 65535 150 Inter character timeout TX blocking ms 0 to 255 50 TX blocking C37.118 Settings Page 169 We take care of it. 19.3.3 Device x Device x page sets device-related parameters of internal communication. Figure 95: C37.118 Device x Table 74: C37.118 Device Request Settings Page 170 Setting Format Range Default Description Identifier of device - - AA: Read only: Identifier of device Data class - 1 to 255 As defined in template Device data class Class type - Selection of values in combo box As defined in template Class type Cycle time of poll ms 1 to 65535 2000 Cycle time of poll Length of response - 1 to 65535 142 Length of response Data buffers - 1 to 255 As defined in template Data buffers Offset of priority value in REG response - 1 to 65535 - Offset of priority value in REG response Comment string 50 characters As defined in template User comment C37.118 Settings 19.3.4 Indications Indications page sets parameters of individual data points. Figure 96: C37.118 Indications Table 75: C37.118 Indications Setting Format Range Default Description Description string 100 characters As defined in template Description Data class buffer - 0 to 254 As defined in template Data class buffer Buffer offset - 0 to 65535 As defined in template Buffer offset PMU ID - Selection of values in combo box As defined in template PMU ID in C37.118 communication PMU data field - Selection of values in combo box As defined in template PMU data field in C37.118 communication Data field offset - 0 to 65534 As defined in template Data field offset in C37.118 communication Data point name - 16 characters As defined in template Data point name in C37.118 communication C37.118 Settings Page 171 We take care of it. 20. IEC61850 20.1 General Information The firmware, according to IEC 61850-6, imports an SCL file with name space definitions. The contents of described attributes are used to generate a project specific MMS-context from SCL file. The project specific file with extension .ICD is located in settings with *.xml file. WinConfig and SCL_Config engineering Tool represent for REG-PE / REG-PED all data attributes as product (IED) model. IED Server Logical Device Logical Node Data Objects Figure 97: Product (IED) Model 0 IED - substation automation (SA) device performing SA functions by means of logical nodes (LNs). It allows access via the communication system and is the only access point to the data of the logical devices and logical nodes contained in the server. 0 LDevice - a logical device (LD), according to IEC 61850-7-2, that is contained in the server of IED. 0 LNode - a logical node (LN). The LN contains Data (DO), which other logical nodes request, and it may need DOs contained in other LNs to perform its function. The offered DOs (server capability) are described in ICD - file. 0 DO - the DATA contained in the LNs. The tree view sub-entries of the server are directly resolved from the name space of the ICD file. 20.2 SCL_Config engineering Tool This Tool lets you do the following: 0 creating new project of WinConfig settings with ICD-file, Page 172 IEC61850 0 creating new project of archive jffs2.tar with ICD-file from a template project or other archive, 0 creating new project of WinConfig settings from archive jffs2.tar, 0 viewing the ICD-file in a tree structure, 0 using this tool as project-independent basis to edit objects and nodes of ICD-file in a comfortable way for project specific use. I.e. a common base can be modified to fit your project depending settings. 0 viewing and editing the GOOSE publishers and subscribers. Figure 98: SCADA Settings Figure 99: Execute SCL_Config engineering Tool IEC61850 Page 173 We take care of it. After the adjust and save in SCL_Config engineering Tool, all changes have to be activated in WinConfig automatically. The tree view subentries of the server are directly resolved from the name space of the ICD file. This defines that there may be different names for the logical devices and their subordinated Nodes and their subordinated attributes. That’s why only an example can be discussed in the description. 20.2.1 Displaying project configuration and properties of nodes ICD-file is shown as the logical structure tree on page “Configuration”. On the right panel of the page section “IED” parameters are shown, as well as options of the configuration logical object and options of the field sAddr, if exists in the chosen object DAI. Figure 100: Displaying the project configuration Figure 101: Displaying the properties of nodes Page 174 IEC61850 20.2.2 Displaying source (ICD-file) Full original ICD-configuration file is displayed on the page "ICD file". You can stay and expand individual nodes configuration similar to the display of XML-files in Microsoft Internet Explorer. Figure 102: Displaying the ICD file IEC61850 Page 175 We take care of it. 20.2.3 Adding, deleting and renaming devices Configuration change is done on the page "Configuration”. To change the content of the device and its name use hot-keys and popup menu panel “Device”. Figure 103: Adding and deleting devices Figure 104: Renaming device Page 176 IEC61850 20.2.4 Adding, deleting and renaming logical nodes To add new logical nodes of the necessary type, to rename or delete from the configuration use hot-keys and popup menu of the panel “Device”. Figure 105: Adding, deleting and renaming logical nodes IEC61850 Page 177 We take care of it. 20.2.5 Editing sAddr Upon choosing DAI “stVal” on the right panel “sAddr Editing” parameters’ editor of sAddr field is available. To accept changes of the parameters press OK, to cancel the changes press Cancel. Figure 106: Editing sAddr Such editors are accessible for the use: ICD Template (sAddr) Type = “ASCIIx61850”, Record Type = “ST” (Status\Measurands) Page 178 IEC61850 ICD Template (sAddr) Type = “ASCIIx61850”, Record Type = “CO” (Control). The behavior of “scale” setting for DoublePoint, Boolean and other types is different. IEC61850 Page 179 We take care of it. Page 180 IEC61850 ICD Template (sAddr) Type = “ASCIIx61850”, Record Type = “SP” (Setpoint\Setting group). The behavior of “scale” setting for DoublePoint, Boolean and other types is different. IEC61850 Page 181 We take care of it. ICD Template (sAddr) Type = “PQIx850”, Record Type = “ST” (Status\Measurands) Page 182 IEC61850 ICD Template (sAddr) Type = “PQIx850”, Record Types “CO” (Control) & “SP” (Setpoint\Setting group) are not supported. 20.2.6 Removing Data Objects Removing of DO is executed in two steps: 1. when an user executes the function “Remove DO” in application: 0 verifications of name 0 mandatory DO list for LPHD Logical Node - "PhyNam", "PhyHealth", "Proxy", for other "Mod", "Beh", "Health", "NamPlt". A removing the DO is blocked. 0 if DO is system, confirmation of operation is required. A not system DO has a DA with name “dataNs” 0 ICD can have more than one of Logical Node same type, that means all these DO will be removing. List of LN will be shown and confirmation of operation is required 0 removing DOI from LNode 0 excluding empty Data Sets 0 excluding Reports without data set. 2. when an user closes project - removing unused DO's types from the section “DataTypeTemplates” IEC61850 Page 183 We take care of it. Figure 107: Removing Data Objects 20.2.7 Restore Data Objects from Template Restoring of DO is executed when an user executes the function “Restore DO” in application. Based on a template (original ICD-file) is created: 0 in the section “DataTypeTemplates” - DO Type and DO for LNodeType, if they are not exists 0 DOI for all LNode of the LNodeType 0 DataSet and Report, if they are not exists Figure 108: Restore Data Objects from template Page 184 IEC61850 20.2.8 Renaming Data Objects Figure 109: Renaming the Data Objects Algorithm of renaming DO 1. verifications of old name 0 Mandatory DO list for LPHD Logical Node - "PhyNam", "PhyHealth", "Proxy", for other "Mod", "Beh", "Health", "NamPlt". A change the name is blocked. 0 If DO is system, confirmation of operation is required. A not system DO has a DA with name “dataNs”. 0 ICD can have more than one of Logical Node same type, that means all these DO will be renamed. List of LN will be shown and confirmation of operation is required Figure 110: Confirmation to rename DO list 1. verifications of new name 0 A change the name from mandatory DO list is blocked. 0 If the new name exists, renaming is canceled 2. Rename DO in LNodeType from section “DataTypeTemplates” 3. Rename DOI in Logical Node 4. Rename FCDA in DataSets of Logical Node IEC61850 Page 185 We take care of it. 20.2.9 Changing of DO Data Class Changing of DO Data Class is accessible for changing “SPC” to “DPC” and vice versa. In this case DO Editor is displaying on editor panel. Figure 111: Changing of DO Data Class Algorithm of changing of DO Data Class: 1. Changing of DO Data Class is accessible for changing “SPC” to “DPC” and vice versa 2. Search DOType in LNodeType from section “DataTypeTemplates” where: 0 “id” = new type (“SPC” or “DPC”) 0 DOType has not DA with name ”SBOw” 0 If DOType has DA with name ”dataNs”, it is preferring 3. Setting the new value of Type Id for DO 4. DO will to have new Data Class 5. If new DOType is not searched, then changing is canceled Page 186 IEC61850 20.2.10 Changing the control model for controllable data objects For “Status only” Data Objects a control model does not change. Changing of DO Data Class is accessible for four control models: 0 Direct with normal security 0 SBO with normal security 0 SBO with enhanced security 0 Direct with enhanced security Figure 112: Changing the control model for controllable data objects User is able to select a control model from the drop-down list “Control Model”. The program finds new DO type for selected model by algorithm: 1. New DO type has the same Data Class; 2. Direct with normal security requires mandatory Data structure Oper; 3. SBO with normal security requires mandatory Data attribute SBO, mandatory Data structure Oper and optional Data structure Cancel. Cancel can be omitted if cancel service is unsupported; 4. SBO with enhanced security requires mandatory Data structure SBOw, mandatory Data structure Oper and optional Data structure Cancel. Cancel can be omitted if cancel service is unsupported; 5. Direct with enhanced security requires mandatory Data structure Oper and optional Data structure Cancel. Cancel can be omitted if cancel service is unsupported; Can be searched several types. In this case user can select from choose one. If “sbo” type is selected, the user is able to edit “sboTimeout” and “sboClass” DAs. After a confirmation a program changes a type of DO and brings all DAs conformably with selected DO type (fig. 29 & 30) IEC61850 Page 187 We take care of it. Figure 113: New attributes for selected “sbo” control model Figure 114: Excluded attributes for selected “direct” control model Page 188 IEC61850 20.2.11 GOOSElight Support GOOSElight contains the settings for Publisher and Subscriber sides. These are different and perform different functions. SCL_Config provides the ability to create, to edit, to adjust and to save all settings for both sides. All functions are available on “GOOSElight” page of application. All GOOSE settings are saved in form of “param” files: 0 for project type “Archive Tar” inside archive (jffs2.tar) 0 for project type “WinConfig” in settings file (xml) as CData sections Figure 115: GOOSE settings page 20.2.11.1 Limitations and scope The GOOSE features are applied only for sAddr type "ASCIIx61850". Attributes that can be added to the GOOSE publisher Data Set : 0 “stVal”, 0 “mag.f”, 0 “valWTr.transInd”, IEC61850 Page 189 We take care of it. 0 “valWTr.posVal”, 0 “q” 20.2.11.2 Common GOOSE Settings for Publisher side Editor “General Settings for GOOSE” provides editing common settings - activation, timing strategy, and timing settings. 20.2.11.3 GOOSE Publisher Control Block functions The GOOSE Publisher Control Block List is available on the “GOOSE Control Blocks” box. Figure 116: GOOSE Control Blocks list Selected block can be removed using function “Remove GOOSE Control Block”. When user deletes a block, the ICD sections for this block are removed – “GSE”, “GSEControl”, “DataSet”. Function “Add GOOSE Control Block” will prompt to define the required parameters for the new block. The new block will be shown in the list. The maximum number of blocks is 4. Figure 117: Parameters for the new GOOSE Control Block 20.2.11.4 GOOSE Publisher Control Block settings For the selected in the list GOOSE control block is available to view and edit the parameters of this block. The properties editor has 3 pages of settings. Page “Common Settings” allows defining names and descriptions of main sections. Page 190 IEC61850 Figure 118: Common settings of the GOOSE Control Block Page “Communication Settings” allows defining MAC address. Figure 119: Communication settings of the GOOSE Control Block Page “Data Set” shows the Data Set of the Control Block and allows editing it. Functions “Data Object Up”, “Data Object Down” and “Remove Data Object” are processing all Data Attributes records for current Data Object. Functions “Data Attribute Up” and “Data Attribute Down” are changing order of Data Attributes records for current Data Object. Figure 120: Data Set of the GOOSE Control Block Adding the Data Object to Data Set of GOOSE Control Block is done in a device tree. For the selected Data Object is used function “Add DO to GOOSE Control Block”. IEC61850 Page 191 We take care of it. Figure 121: Adding the Data Object to Data Set of GOOSE Control Block Before adding it will be necessary to select a Control Block and Data Attributes. Attributes list is defined by a Data Object type from template section of ICD. Figure 122: Adding the Data Object to Data Set of GOOSE Control Block Note: For structure “valWTr” data attribute “q” will be added twice – for each attribute. To Data Set will be added 4 records. Figure 123: Adding structure “valWTr” to Data Set of GOOSE Control Block Page 192 IEC61850 20.2.11.5 GOOSE External Publisher – Internal Subscriber Side The application contains up to 16 internal subscribers. They are able to receive GOOSE messages from external GOOSE Publisher. Each subscriber can receive the messages from one Publisher. Each subscriber contains a list of the external data objects, which are included in messages from conformed external publisher. Subscribers and data objects are shown as the logical structure tree on box “GOOSE Light Subscriber Configuration”. Figure 124: External Publishers List 20.2.11.6 Adding and deleting Subscribers and Data Objects Use hot-keys and popup menu of the top panel to add new Subscribers and Data Objects or to delete them. Figure 125: Adding and deleting Subscribers and Data Objects Communication and GOOSE publisher settings may be got from external ICD. After select this function the new form will be shown. It is need to select ICD-file and GOOSE Control Block from it, to check necessary data objects. Selected control block and data objects will be added as new Subscriber. IEC61850 Page 193 We take care of it. Figure 126: Adding Subscribers and Data Objects from ICD-file Page 194 IEC61850 20.2.11.7 External Publisher Settings For selected Subscriber is available settings editor. Logical Devices list contains Logical Devices from ICD of project. If publisher was loaded from external ICD, then GOOSE ID, Control Block and DataSet names, MAC-address will be filled from it. Figure 127: External Publisher Settings IEC61850 Page 195 We take care of it. 20.2.11.8 External Dataset Object Settings For selected Data Object is available settings editor. Locked data in form is defined by Subscriber. The behavior of “scale” setting for DoublePoint, Boolean, Quality and other command types is different. Figure 128: External Dataset Object Settings Page 196 IEC61850 20.2.12 Actions log All events open and save files, add and delete nodes, change sAddr stored in the log file and displayed on the page "Log". Log files saved in "Log" application folder. Figure 129: Actions log 20.3 IED-Server Configuration Within IED-Server Configuration, the IED name and the description can be changed. The tree view subentries of the server are directly resolved from the name space of the ICD file. This defines that there may be different names for the logical devices and their subordinated Nodes and their subordinated attributes. That’s why only an example can be discussed in the description Figure 130: IED Server Description The length of the IED Name shall be at least one, at maximum 64 characters. It starts with an alpha character, and contains only alphanumeric characters and the underscore character. IEC61850 Page 197 We take care of it. Note that there might be more restrictions in other parts of this standard, in IEDs implemented according to previous versions of this standard, or due to usage of this name at engineering time. 20.4 Logical Device Configuration At the moment only the description of the logical device can be changed. Depending on the ICD file, there are normally two logical devices. The numeric part at the end of the instance name results in the instance number. This instance number has to be related to the physical device in the menu “Devices”. To do this, the field “Device relocation” in the menu “Devices” has to have the same numeric value. 20.5 Logical Node Configuration Figure 131: Logical Node Configuration Topically logical node settings are read only. Depending on the ICD file, all nodes having attributes are shown. 20.6 Common Data Attribute Configuration The data attributes, which can be parameterized, are passed by the ICD file. These attributes have a private data record of type “sAddr” in field of IED DOI. Since this data record it is already default, e.g. an IEC61850 status value or control value can be parameterized. There is no user support for directly editing the ICD file. That’s why only the interface of the web server is described. Special courses on ICD file editing for engineers are available at aEberle on demand. Page 198 IEC61850 20.6.1 Status Value Configuration Figure 132: Status Data mapped in device data IEC-Data point REGD1/LLN0.Mod is not mapped in internal device data (only for example) The interface changes versus the setting of “Data mapping in device” set or cleared. For example, in REGSys™ documentation displayed OpCntRs data attribute is described as follow: OFFSET IEC 61850 object REG-D™/DA measured unit REG-Data type RPS 4 LN ATCC1, Attr .mag.f Common Tap counter 1 double word 96 OpCntRs OptCntRs data object is mapped in data of the device and can be imaged in other outside tool or program. However not mapped Mod data attribute is displayed as follows: Figure 133: Status Data Point not mapped in device data. IEC61850 Page 199 We take care of it. Table 76: Status Data Configuration Data Form entry Description Common IEC61850 Data Type: Defines the corresponding IEC data type. Mapping in Poll String activate: The parameter defines the using of data attribute in internal device data. If “No (not mapped in internal data)” has been selected, there is not corresponding offset in internal poll device data. GOOSElight Using as Subscriber timeout-error alarm The parameter defines the using of data attribute for reporting about timed-out GOOSE telegram, which occurs with waiting timeout expiration. Number of the observed Subscriber (if set as alarm) The parameter defines the subscriber index for timeout error reporting DPS Events 20.6.1.1 Auxiliary Group The parameter defines any auxiliary flag for future using. It is not applicable now Extended SyntaxSettings Defines the complex behavior rules and event processing for status object. Extended Lexical Elements Format To define the complex behavior rules and event processing for status objects there are additional lexical elements, which are used by means of additional extended syntax-settings setting. Any new rule must start with the lexical element. The character ";" works as a separator between lexical elements. The space character is ignored. It is necessary to note, that syntactically all language rules are case-insensitive. The following is a list of used Lexical elements: 1. Lexical element $EVN. It defines data status behavior, if a current event occurs. 2. Lexical element$CMD. Not used yet. Each Lexical element may be composed of keywords, types and values. The character “:” is a delimiter between the separate keywords, types or values. The three possible keyword groups are: Table 77: Keyword group for definition the position in poll-string: Keyword Description Page 200 Values range Off offset in poll-string Bit bit-offset begin with offset in poll-string (it is applied only for binary or for Boolean types) IEC61850 Table 78: Keyword group for event type definition: Keyword Description Values range Bool Boolean or binary type 0,1 Char Character or signed character type -128... +127 Byte Unsigned character type 0.. +255 Unt16 Unsigned two bytes or unsigned short. 0…65535 Word Signed two bytes or Signed short. -32768…+32767 ULong Unsigned four bytes or unsigned long. 0…0xFFFFFFFF Long Signed four bytes or signed long. -0x7FFFFFFF…0x7FFFFFFF Float IEEE 754: floating point bytes Table 79: Keyword group for definition the directed-behavior in directional protection activation information (ACD) Keyword Description Values range Back Backward from IEC61850 enumeration “dir”. Without value For Forward from IEC61850 enumeration “dir”. Without value Both Both from IEC61850 enumeration “dir”. Without value Table 80: Keywords group for definition complex data object behavior 20.6.1.2 Keyword Description Values range Clear Event clears the status object ( to 0 ) Without value Set Event sets the status object ( to one ) Without value Value Event sets encapsulated value to the status object Without value DpHi Event answers to the purpose “Higher” in complex DPS data status. It sets anyway its TRUE as [10] by means “any or all gate” Without value DpLo Event answers to the purpose “Lower” in complex DPS data status. It sets anyway its TRUE as [01] by means “any or all gate” Without value Mapping with Extended Lexical Elements Here there are some examples shortly of the different ways to use this notification. 0 Example: DPS complex status object mapping Extended syntax-setting is: $Evn:Bool:Off=19:Bit=0:DpHi; $Evn:Bool:Off=19:Bit=1:DpLo IEC61850 Page 201 We take care of it. Figure 134: Example of DPS-complex status – IEC61850 type is “DoublePoint” (enumeration DPos); – Device internal type is inapplicable, because this status is not mapped in internal data and is not arranged in the poll-string; – First Event( $Evn:Bool:Off=19:Bit=0:DpHi ) defines internal SPS-data: offset 19, bit offset 0. Its behavior fits with DPS-Higher request. If this SPS (status point) is set to TRUE, value [10] will be set by means “any or all gate” after clear of high byte. If this SPS (status point) is set to FALSE, high bit will be cleared. – Second Event( $Evn:Bool:Off=19:Bit=1:DpLo ) defines internal SPS-data: offset 19, bit offset 1. Its behavior fits with DPS-Lower request. If this SPS (status point) is set to TRUE, value [01] will be set by means “any or all gate” after clear of lower bit. If this SPS (status point) is set to FALSE, low bit will be cleared. 0 Example: Status object by means directional protection activation Extended syntax-setting is: $Evn:Bool:Off=19:Bit=0:Forw; $Evn:Bool:Off=19:Bit=1:Back; $Evn:Bool:Off=19:Bit=3:Both – IEC61850 type is “DoublePoint” (enumeration “dir”); <EnumType id="dir"> <EnumVal ord="0">unknown</EnumVal> <EnumVal ord="1">forward</EnumVal> <EnumVal ord="2">backward</EnumVal> <EnumVal ord="3">both</EnumVal> </EnumType> – Device internal type is inapplicable, because this status is not mapped in internal data and is not arranged in the poll-string; Page 202 IEC61850 – First Event( $Evn:Bool:Off=19:Bit=0:Forw ) defines internal SPS-data event: offset 19, bit offset 0. Its behavior fits with Dir-enumeration type in IEC61850. If this SPS (status point) is set to TRUE, value 1 will be set. Value FALSE ignored. – Second Event( $Evn:Bool:Off=19:Bit=1:Back ) defines internal SPS-data event: offset 19, bit offset 1. Its behavior fits with Dir-enumeration type in IEC61850. If this SPS (status point) is set to TRUE, value 2 will be set. Value FALSE ignored. – Third Event( $Evn:Bool:Off=19:Bit=2:Both ) defines internal SPS-data event: offset 19, bit offset 2. Its behavior fits with Dir-enumeration type in IEC61850. If this SPS (status point) is set to TRUE, value 3 will be set. Value FALSE ignored. 0 Example: Triggered status object Extended syntax-setting is: $Evn:Bool:Off=19:Bit=0:Set; $Evn:Bool:Off=19:Bit=1:Clear – IEC61850 type is BOOLEAN – Device internal type is inapplicable, because this status is not mapped in internal data and is not arranged in the poll-string; – First Event( $Evn:Bool:Off=19:Bit=0:Set ) defines internal SPS-data event: offset 19, bit offset 0. If this SPS (status point) is set to TRUE, value 1 will be set. Value FALSE ignored. – Second Event( $Evn:Bool:Off=19:Bit=1:Clear ) defines internal SPS-data event: offset 19, bit offset 0. If this SPS (status point) is set to TRUE, value 0 will be set. Value FALSE ignored. 20.6.2 Control Value Configuration The operate request is performed through the use of a Write.request of the appropriate Oper structure. The Oper$ctlVal settings and executing behavior are defined in “Control Value Configuration” section. The parameter Oper$Check specifies the kind of checks a control object and is defined only in ICD file. All conditional tests before and after the control operations are adjustable and defined below. IEC61850 Page 203 We take care of it. 20.6.2.1 Single Command Here “Multi-Command” is not checked. If it is checked, the mode will be changed to “Multi Command”. Figure 135: Control Value Configuration (Single Command) Table 81: Control value settings Form entry Description Common Control Type IEC Defines the corresponding IEC control data type. Multi-command The parameter defines using of the multi command CO-data attribute. Leave unchecked for single command Single command Field Section “XXXXCommand” Normally, this parameter is used as exponent with single commands. If a Boolean or DoublePoint IEC control data type is used, scale has special meaning. (See below) The parameter can be adjusted from -127…128. By default set to 0. Page 204 IEC61850 Form entry Description Command Defines the command string, which is assigned with converted IEC control value of scale rule. The result is sent to XXXSysTM – device. If IEC-Type of command is BOOLEAN, scale parameter will be used as shown below: IEC61850 Page 205 We take care of it. Table 82: Boolean conversion rules for [command] [convert (ctlVal)] Page 206 Scale IEC Value Conversion 1 False [command][2] 1 True [command][1] 2 False/True [command] 3 False [command][space][1] 3 True [command][space][2] IEC61850 IEC61850 Scale IEC Value Conversion 4 True [command][2] 4 False [command][1] 5 False [command][1] 5 True [command][0] Page 207 We take care of it. Scale IEC Value Conversion Default 0 False [command][0] Default 0 True [command][1] If IEC-Type of command is DOUBLEPOINT, scale parameter will be used as shown below: Page 208 IEC61850 Table 83: Double Point conversion rules for [command][convert(ctlVal)] 20.6.2.2 Scale IEC Value Conversion 1 [00] Negative response. 1 [01] [command][0] 1 [10] [command][1] 1 [11] Negative response. 2 [00] [command][0] 2 [01] [command][1] 2 [10] [command][2] 2 [11] Negative response. 3 ( unused value. Instead of this a default value is used) [00] [command][0] [01] [command][1] [10] [command][2] [11] [command][3] 4 [00] Negative response. 4 [01] [command][1] 4 [10] [command][0] 4 [11] Negative response. 5 [00] Negative response. 5 [01] [command][2] 5 [10] [command][1] 5 [11] Negative response. Default value [command][value] Multi Command Here the check box for “Multi-command” is checked. If it gets unchecked, the mode will be changed to “Single Command”. This mode is only available for Boolean and DoublePoint commands. Multi-command mode has been left for backward compatibility and will not be supported in future. IEC61850 Page 209 We take care of it. Figure 136: Control Value Configurations (Multi Command) Multi commands are built, as a chain of the comma-separated commands. For example, commands No.1 and No.2 create the multi-command: A: regAUTO=1, ,aa:q20='if,regup=1,else,regdown=1', aa:q20‘ Table 84: Multi command control value settings Form entry Description Common IEC-type of control Defines the corresponding IEC control data type. Multi-Command activate The parameter defines using of the multi command CO-data attribute. Leave unchecked for single command Single command Scale Normally, scale is used as exponent with single commands. If a Boolean/Double IEC control data type is selected, scale has special meaning. (See following tables.) The parameter can be adjusted from -127…128. By default set to 0. Command Page 210 Defines the command string, which is assigned with converted IEC control TM value of scale rule. The result is sent to XXXSys – device. IEC61850 20.6.2.3 Pre-Conditions Command pre-conditions define the behavior of check before the control operation. They are checked each time before control operation. Figure 137: Executing Command Pre-Conditions 0 If predicable condition check finished successful, control operation continues and command will be sent to device. 0 If predicable condition check faulted, application sends “response-“ and an information report with Last Error cod to client according to a selected control model in ICD file. Even if a part of checks finished successful, command will be never sent, if at least one condition faulted. Selector “Condition” defines a predicable type by mean of test-behavior. Figure 138: Condition Type (behavior) Extended Settings define test behavior and data point, which will be checked. The maximal and minimal limit position can be defined too. IEC61850 Page 211 We take care of it. Figure 139: Condition extended Settings Table 85: Predicable Condition Extended Settings 20.6.2.4 Form entry Description Checked data Point Type Defines a checked Data Point type in Poll string. Poll String Offset Defines a checked Data Point Poll string offset. Checked Value(optional) Defines a checked value as FLOAT32 value Minimal Position (optional) Defines minimal position by “Limit condition” Maximal Position (optional) Defines maximal position by “Limit condition” Allowed Command Value to leave minimal Position Defines command value, that permitted at minimal position by “Limit condition” Allowed Command Value to leave maximal Position Defines command value, that permitted at maximal position by “Limit condition” Command Acknowledgement Command Acknowledgement condition defines a check behavior after command executing. Figure 140: Acknowledgement Condition Settings Page 212 Form entry Description Check Behavior Defines the estimation behavior Data Point Type Defines test data point type in poll string Poll String Offset Defines test data point offset in poll string Set Point (optional Optional defines the test value. For example 0 for reset command. IEC61850 Figure 141: ACK-NACK test behavior The check behaviors are same as in predicable condition. However, there is “Setpoints..” condition, which literal meaning same with name. 20.6.2.5 Control Model Parameter ctlModel specifies the control model of IEC 61850-7-2 that corresponds to the behavior of the data. The configured value for ctlModel becomes effective as soon as the real device has been configured. The values may be overwritten in Webserver if the conditions and acknowledgment allow overwriting this value. If a data instance of a control class has no status information associated, then the attribute stVal does not exist. In that case, the value range for ctlModel is restricted to direct-with-normal-security and sbo-withnormal-security. Figure 142: Control Model Parameter 20.6.3 Set point Value Configuration (Single Command) Set point values are to be configured as a mixed form of a status value and a command. Here the check box “Multi Line” is not checked. If it gets checked, the mode will be changed to “Multi Command”. IEC61850 Page 213 We take care of it. Figure 143: Set point Value Configuration (only with Single Command) Table 86: Single command Set point settings Form entry Description Common (Status and Measured) Read-Write IEC Data Type Defines the corresponding IEC control data type. Mapping in Poll String activate: The parameter defines using this data attribute in internal device data. If “No (not mapped in internal data)” has been selected, there is not corresponding offset in internal poll device data. Read-Write Device Data Type: Defines the corresponding XXXSysTM – device data type. If “IGNORE” is selected or “Deviation and offset are used” is not checked, this data point is not allocated. Device data type determines the interpretation of “Deviation” Read Poll String Offset Defines offset of the device answer string, where this data is located. If -1, the data point will not be mapped to the answer string. The parameter can be adjusted from -1…255. By default it is -1. Scale in Write Command Normally, scale is used as exponent with single commands. If a Boolean IEC control data type is selected, scale has special meaning. (See following tables.) The parameter can be adjusted from -127…128. By default set to 0. Write Command: Defines the command string, which is assigned with converted IEC control value of scale rule. The result is sent to XXXSysTM – device. GOOSE light Subscriber Number ( if activated ): The parameter defines any auxiliary flag for future using. It is not applicable now. Pre-Conditions Page 214 Checked data Point Type Defines a checked Data Point type in Poll string. Poll String Offset Defines a checked Data Point Poll string offset. Checked Value(optional) Defines a checked value as FLOAT32 value Minimal Position (optional) Defines minimal position by “Limit condition” Maximal Position (optional) Defines maximal position by “Limit condition” Allowed Command Value to leave minimal Position Defines command value, that permitted at minimal position by “Limit condition” Allowed Command Value to leave maximal Position Defines command value, that permitted at maximal position by “Limit condition” IEC61850 20.7 GOOSE light Settings 20.7.1 IEC GOOSE light Architecture The implementation of the IEC 61850 GOOSE services provides a mechanism for sending and receiving the standardized GOOSE telegrams. The settings and architectures are quite similar for publisher and subscribers. It is assumed that the reader is familiar with the GOOSE light architecture. 20.7.2 GOOSE light Control Blocks Settings Figure 144: GOOSE light Control Blocks Configuration In this case, application transmits data from GoDsUI dataset in Goose Output telegrams. The content of a GOOSE light message is defined with a dataset. The GOOSE light message is sent as multicast messages over the communication network. IEC61850 Page 215 We take care of it. One example of SCL configuration shown below: <ConnectedAP iedName="REGD159" apName="P1"> <GSE ldInst="REGD1" cbName="GoCbUI_REGD1"> <Address> <P type="MAC-Address" xsi:type="tP_MAC-Address">01-0C-CD-01-00-00</P> <P type="APPID">0BB8</P> <P type="VLAN-PRIORITY">4</P> <P type="VLAN-ID">000</P> </Address> <MinTime unit="s" multiplier="m">10</MinTime> <MaxTime unit="s" multiplier="m">1000</MaxTime> </GSE> </ConnectedAP> The captured fragment of the GOOSE light output telegram illustrated below. Figure 145: Capture fragment of GOOSE light telegram Page 216 IEC61850 20.7.3 GOOSE light Input Streams (Inner Subscribers) The application allows the configuration of up to 15 GOOSE light input streams. The architecture of GOOSE light subscribing is shown in Fehler! Verweisquelle konnte nicht gefunden werden.. Index 0 Index 1 Subscribed input stream Index 0 ObjectNo 0 Object No 1 Object No 2 Object No 3 Object No 4 Subscribed input stream Index 1 Object No 1 Object No 6 Object No 8 Index 14 Subscribed input stream Index 14 Object No 4 Object No 5 Object No 6 Figure 146: GOOSE light Input architecture Each subscriber holds one set of objects in sequence order. Each object of the subscribed set is given a particular number in received GOOSE light telegram. If the subscriber has not been configured in numerical order, its input telegrams cannot be handled in an application. More detailed information is available below. 20.7.4 Publisher Side The current paragraph illustrates the generic Object Oriented Substation Event configuration within the MMS server and SCL which defined in ICD file in your settings. The GOOSE light configuration database contains settings with the following data elements: IEC61850 Page 217 We take care of it. Figure 147: Publisher and Subscriber sides Adjusted GOOSE settings will be saved to file goose.param. At the same time an ICD-file contains the factory GOOSE settings. You should also take that into account. All changed parameters are available only after resetting the REG-PE/REG-PED. Figure 148: "Common Options“ Tab There are two Timing strategy types: arithmetic and profile. The arithmetic scheme has three parameters: first interval, multiplier, and maximum interval. The first retransmission occurs after the first interval time. Each subsequent interval is the product of the last interval times the multiplier, until the maximum interval is reached. Thus, for first interval = 400, multiplier = 2, and maximum interval = 3200, the retransmissions will occur at intervals beginning at 2, and doubling each time until the maximum interval is reached (400, 800, 1600, 3200). If any changes of GOOSE data occur the application immediately sends GOOSE data and then resets the retransmission time to interval to first interval. The profile scheme allows for a specific set of intervals to be specified. Each interval (specified in milliseconds) is used in sequence of GOOSE light telegrams. When the last specified interval has been used, the parameters of the arithmetic scheme are then used for subsequent intervals (including the maximum retransmission interval). If any changes of GOOSE light data occur, the application immediately sends GOOSE data and then resets the retransmission time to interval to first interval. Page 218 IEC61850 Figure 149: GOOSE Retransmission Settings Tab Firmware supports up to 4 Control Blocks. Their number is defined of ICD Communication Section. For example, if an ICD file contains the 3 GOOSE GSEs, only these GOOSE Control blocks will be shown here. The settings data elements are described in the table below. Table 87: Settings of GOOSE light Name Unit Range Standard Description value Common GSE GOOSE activate Used/ Not used Used Parameter activates/deactivates IEC GOOSE service. If GOOSE will be not used, the service will be deactivated. It can reduce a network busy schedule. Setting “No” switches off all GOOSE services. GSE Control Blocks adjustment activate Y/N Yes/ No (use only MMSGoose Control Blocks) No Parameter activates/deactivates an adjustment of the published IEC GOOSE Control Blocks, which have been described in the ICD file. If “No” is selected, REG-PE/REG-PED publishes all GOOSE Control Blocks as this has been described in ICDfile. If the adjustment has been deactivated, all following APPID and VLAN settings will be not applied. IEC61850 Page 219 We take care of it. Name Unit Range Standard Description value MAC Address (destination of GOOSE messages) hex 6 octet IEC618508 Parameter defines the multicast data link destination address for a first IEC GOOSE Control Block from GSE-Section in ICD file. Application ID Hex/ dec From 0 32 up to 2 0x3ED The parameter defines VLAN APPLD which identifies a using the VLAN (802.1q) for a first IEC GOOSE Control Block from GSE-Section in ICD file. or 1001 in decimal notation VLAN ID Hex/ dec From 0 32 up to 2 0 For detailed information see please IEC61850-8-1 The parameter defines the unique identified of VLAN ID (802.1q) 0 - indicates that the tag header contains only user priority information, no VLAN ID. 1 - Default PVID value used for classifying frames on ingress through a bridge port. FFF - Reserved for implementation use. VLAN Priority dec From 0 up to 7 4 The parameter defines the VLAN Priority as 3-bit binary number representing 8 priority levels, 0-7 (802.1q). 500 Parameter defines minimal timeout for IEC Goose service. Service function checks all changes in a poll of the Goose published Data Points and activates Goose transmission in any case. It activates retransmission even if the settings of retransmission strategies are not set. geometric ( other name is arithmetic) Selection of the Goose strategy type: arithmetic and profile. 1000 The parameter defines the first interval in milliseconds in arithmetic retransmission scheme. GOOSE Retransmission Strategy Default Step Delay ms Retransmission Strategy Type list First interval: ms 0…65535 0… up to 65535 “Disabled” option enables the. application to send new GOOSE telegrams after changes or by expiring default step delay timeout. Zero will be ignored and the application sets default value 1000 ms. Multiple (arithmetic) dec 0… up to 255 2 The setting defines the multiplier the for arithmetic retransmission scheme. Zero will be ignored and the application sets default value 2. Page 220 IEC61850 Name Unit Range Standard Description value Max Interval (arithmetic) ms 0… up to 65535 4000 The setting defines the maximal interval in milliseconds in arithmetic retransmission scheme. Zero will be ignored and the application sets default value 4000 ms. Number of Intervals dec up to 6 6 The setting defines a number of intervals in the profile retransmission scheme Interval timeouts dec Up to 255 1000 The intervals in milliseconds in profile retransmission schema. If any changes of Goose data occur, the application sends Goose data and then resets the retransmission time to value of first interval. 1500 2000 2500 3000 4000 IEC61850 Page 221 We take care of it. 20.7.5 Subscribe Side 20.7.5.1 List of GOOSE light External Publishers The application allows subscribing from 1 up to 16 external publishers as GOOSE partners for REG-PE / REG-PED. The external GOOSE lightpublishers are complying with a specification of REG-PE / REG-PED inner Subscribers. The GOOSE lightSubscribers List pane contains full information about the subscribed GOOSE streams: Figure 150: GOOSE lightSubscribers pane SCL_Config is able to create Publisher from ICD file, as shown below. Page 222 IEC61850 Figure 151: Add Subscriber from other ICD file IEC61850 Page 223 We take care of it. The detailed settings of one subscriber described below. Table 88: GOOSE subscribed stream settings Name Unit Range Standard Description value Order No. (input number to select): dec From 1 up to 16 - It defines selected number and used to quick select a subscriber. REG-PE(D) Subscriber Index [0..15]: dec From 0 up to 15 0 Defines the unique index which operates as a primary key for the extern bonded objects. Read only parameter. Subscriber activate: check box On/Off off It activates subscriber. GOOSE MAC Address: hex 6 octet IEC618508 The parameter defines the multicast data link address of the IEC GOOSE Input telegrams. GOOSE ID: string up to 64 symbols Test_GoID _A The parameter defines the GOOSE lightidentifier string of GOOSE input telegram. It shall be set identical to a unique identifier publisher. GOOSE Control Block: string up to 64 symbols Test_GoRe f_A The parameter defines the full name of the Goose control block for IEC GOOSE Publishing without MMS-Control Blocks. Description It shall have a unique name in one GOOSE. GOOSE Data Set: string up to 64 symbols Test_GoDs _A The parameter defines the name of the dataset being sent in IEC GOOSE. Application ID [dec/hex]: Hex/ dec From 0 up 16383 (3FFF) 0x3ED or The parameter defines the VLAN AppId, which identifies the application using the VLAN (802.1q) Failure service interval [ms] ms 0…999 99 4000 After first GOOSE message: list list executed 1001 in decimal notation The parameter defines maximal timeout (ms) for the first message. It is used to set a maximum time to wait for the first message in a subscribed GOOSE lightstream. If an input GOOSE message is not received before the timer expires, the subscriber’s alarm status value will be set. The parameter defines the handling of first GOOSE telegram. 1)After start-up of REG-PEX the process image will be filled with topical value. Only if the value changes it will be sent to eberle device. This makes sense e.g. at auto/man command. Page 224 IEC61850 Name Unit Range Standard Description value 2)After start-up of REG-PEX the first reception of a GOOSE message will lead to an immediate command to eberle device. This makes sense e.g. at trip/close information of relays for paragramer use, since the eberle device needs an up-to-dateinformation right from the beginning. Failure detection commands: Comment 20.7.5.2 Defines behavior and commands in case: At publisher timeout detection If publisher is received successfully again string up to 64 symbols Not default User commentary for subscriber stream Binding to External Inputs 0 List of GOOSE light External Input Objects The application allows flexible to set properties of external Input Objects (partial data objects from a published GOOSE). The GOOSE lightExternal Input Objects pane contains the information about the subscribed objects and commands, which will be executed after any changing of object’s value. Figure 152: List of GOOSE lightexternal Input Objects IEC61850 Page 225 We take care of it. 0 Input Object Configuration Double click on an item “Object Configuration” in the left-hand menu. The GOOSE lightInput Object Configuration pane contains settings of one object and allows to adjust it’s for a particular structure of GOOSE telegrams. Figure 153: External GOOSE lightobject configuration. Table 89: External GOOSE lightobject settings Name Unit Range Standard Description value Order No. (input number to select): dec Up to 300 1 It defines selected number and used to quick select a data object. text Drop down list with 16 subscribers 0 The parameter defines a subscriber which contains this data object. Description GOOSE ID and DataSet: Page 226 IEC61850 Name Unit Range Standard Description value Order number in Dataset: dec From 0 up to 300 0 The parameter defines an order number of the data object in data set. For more information see IEC61850 Standards. Input activate: string checked The parameter defines the use of the object. Parameter allows not delete set object from settings file, although it will be not used in firmware. Command execution activate: check box checked The parameter defines kind of handling of object in data set. If “not checked” will be set, the object will be passed for GOOSE command. Logical Device for command: string A It defines a name of Logical Device IEC 61850 in Structure "Server". The GOOSE command will be applied for defined device only. The name must contain no white space. The naming rules conform to IEC61850 part 6. Data Type: list BOOLEAN It defines the IEC61850 data type. For example, it has been marked on the screenshot above. Up to 64 symbols All possible choices are listed in the drop-down list. For example, GOOSE bit string [10] can be executed as double point [2] command. Maximal Value [ex. SP,DC] float Scale dec 128…1 27 1 Nowadays it isn’t supported for GOOSE commands. The parameter is leaved only for compatibility with the previous versions. 0 The parameter defines scale of command value. Normally, scale is used as exponent with single commands. If a Boolean or Bitstring IEC control data type is selected, scale has special meaning. (See following tables.). The parameter can be adjusted from -127…128. By default set to 0. Behavior and types of scale shown below IEC61850 Page 227 We take care of it. Name Unit Range Standard Description value Command string REG-L command B20= Command string according to RGL-settings of REG-D™ Data-Quality order: list Values are listed in the pulldown list. Valuequality The parameter defines a kind of quality rating of object in data set. Possible choices are listed in the pull-down list. . Executing types with quality enable to handle the object dependent on of their quality. The object with quality should be represented in GOOSE dataset as two-part data attribute with value and its quality (as Bitstring 13 [0000000000000]). The quality can be located instant before or after value data attribute. Only value: Command must be executed after change of object value, regardless of whether quality is invalid or valid. Value-quality (quality is located instant after value) Object will be accepted only, if its quality is valid. Object quality must be instant follow. If quality is valid and value of the object was changed, command will be executed. Otherwise object will be ignored. Quality-value (quality is located instant before value) Object will be accepted only, if its quality is valid. Object quality must be instant before value. If quality is valid and value of the object was changed, command will be executed. Otherwise object will be ignored. Only Quality Special type. It is used for handling of the quality triggering. If quality will change, a corresponded command will be sent to REGSYS. This type is applicable only for data type QUALITY. Comment Page 228 string Up to 64 symbols No Commentary for configuration. IEC61850 Table 90: Boolean conversion rules for GOOSE command Table 91: Double Point conversion rules for GOOSE command Scale Conversion and commands those will be sent 0 (default) 1 IEC61850 Page 229 We take care of it. Scale Conversion and commands those will be sent -1 2…31 Direct Command Rule: First, CMD will be calculated conform with: CMD = (Bitstring & 0xC0000000)>>(scale-2) Then, if CMD is 1, command looks same [command][0]. If CMD is 2, command looks same [command][1] For example: 1) GOOSE input is [0100000000000]. Scale is 13. Command will be completed as [command]0 2) GOOSE input is [1000001110000000]. Scale is 16. Command will be completed as [command]1 -31..-2 Inverse Command Rule: First CMD will be calculated conform with: CMD = (Bitstring & 0xC0000000)>>(2-scale) Then, if CMD is 1, command looks same [command][1]. If CMD is 2, command looks same [command][0] For example: 1) GOOSE input is [0100000000101]. Scale is -13. Command will be completed as [command]1 2) GOOSE input is [1000000111110000]. Scale is -16. Command will be completed as [command]0 Page 230 IEC61850 20.8 WinConfig Settings IEC61850 settings are available for TK860 and TK885D telecontrol boards. Settings for IEC61850 protocol consists of XML template and corresponding ICD file. Both files are contained in WinConfig and corresponding ICD file is automatically selected together with IEC61850 template. Data points and commands are defined in ICD file. ICD file editor SCL_Config is also part of WC. SCL-Config and WinConfig share the IED name parameter (Intelligent Electronic Device). SCL-Config can be run from the Settings – SCADA tree branch using the Edit ICD file button. IED name is automatically transferred back to WinConfig when edit in SCL-Config is finished. 20.9 Basic The Basic tree branch contains basic settings for IEC61850. Figure 154: IEC61850 Basic Settings IEC61850 Page 231 We take care of it. Table 92: IEC61850 Basic Settings Page 232 Setting Format Range Default Description Identification string Text 64 characters Identification string of open settings Identification string of open settings IED name Text 10 characters IED name defined in settings IED (Intelligent Electronic Device) name defined in settings, capital letters only Description Text 64 characters User description defined in settings User description Identifier of device - 3 characters defaults defined in the Devices tree branch Identifier of device as appears in the device communication NTP primary server IP address - 4x 0 to 255 0.0.0.0 NTP primary server IP address NTP secondary server IP address - 4x 0 to 255 0.0.0.0 NTP secondary server IP address IEC61850 20.10 Advanced 20.10.1 Serial ports assignment The Serial ports assignment tree branch is tool for management of telecontrol board serial ports. The serial ports available in telecontrol board are well-arranged in table together with the information about their usage in protocols and COM-Server channels. The page contains also internal checks to avoid conflicts in usage of COM ports. At the same time, the table also allows to switch ON/OFF individual protocols or COM-Server channels. Figure 155: IEC61850 Serial Ports Settings Table 93: IEC61850 Serial Ports Settings IEC61850 Setting Format Range Enabled checkbox ON/OFF Default Description Checkbox enables/disables corresponding protocol (COM-Server channel) Usage text - Definition of corresponding protocol /COM-Server channel (read only) Port - Selection of values in combo box Selection of corresponding COM port TCP port - - TCP port used by CS channels (read only) Page 233 We take care of it. 20.10.2 Settings - SCADA Under this Item you can Export ICD-file. Default values should only be changed if you received an explicit instruction. During the System engineering phase some settings regarding the SCL ICD file might have to be adjusted (like the IED Server name for example.). This setting can be done offline with WinConfig. The naming of the ICD-file is flexible. The import ICD-file with name xxx.icd changes SCL name in parameter from current name to xxx.icd. Settings – SCADA tree branch shows information concerning IEC61850 protocol and allows TCP configuration. The button Export ICD file can be used for corresponding export and the button Edit ICD file runs the SCL-Config for ICD file edit. Page 234 IEC61850 Figure 156: IEC61850 Settings - SCADA Table 94: IEC61850 Settings - SCADA IEC61850 Setting Format Range Version of settings - - Default Description Version of settings (read only) Control version number - - Control version number (read only) Mode of watchdog LED - Selection of values in Mode of watchdog LED, blinking or switch off Page 235 We take care of it. Setting Format Range Default Description combo box Firmware version - - Firmware version (read only) Firmware build - - Firmware build (read only) ICD file name - - ICD file name (read only) IEC Selection of values in combo box Eth0 Selection of values in combo box Eth0 Configure TCP checkbox unchecked Configure TCP Keep alive interval Selection of values in combo box 3 Keep alive interval Keep alive probes Selection of values in combo box 4 Keep alive probes Keep alive time 0 to 20 15 Keep alive time GOOSE Common behaviour: Password Selection of Ethernet interface for IEC protocol Selection of Ethernet interface for GOOSE textbox Password to unblock the following option Common behaviour: activate origin of commands Selection of values in combo box false activate origin of commands File transfer: Activate checkbox unchecked Activation of file transfer 20.10.3 ELAN extension (CSE) The ELAN extension (CSE) tree branch can be used for activation and configuration of CSE. Page 236 IEC61850 Figure 157: ELAN extension over Ethernet (CSE) IEC61850 Page 237 We take care of it. Table 95: ELAN extension over Ethernet (CSE) Setting Format Range Default Description Version - - CSE version (read only) Activate CSE checkbox ON/OFF CSE switch ON/OFF Serial port - - COM4 Selection of CSE serial port (Read only). To change CSE serial port go to Serial ports assignment tree branch Baud rate of serial port Bd - 115200 Baud rate of serial port (read only) Parity - - none Parity (read only) RTS/CTS - ON/OFF off RTS/CTS (read only) XON/XOFF - ON/OFF off XON/XOFF(read only) Port - 1 to 65535 TCP listen port Interface - Selection of values in combo box Selection of Ethernet interface Activate - Selection of values in combo box Activation of TCP send port (Yes/No) IP address 4x 0 to 255 IP address Port 0 to 65535 TCP port 20.10.3.1 Use case: Setting for two REG-PE(X) connected via CSE In the following example, two REG-PEDs were used, where the first REG-PED had the IP 193.162.58.1 and the second 193.168.58.3. The channel of the device has to be set to nonactivated. In the following use case port addresses 130030 till 130037 were predefined and the first two used. Configuration of the first REG-PED Page 238 Configuration of the second REG-PED IEC61850 IEC61850 Page 239 We take care of it. 20.10.4 COM-Server The COM-Server tree branch can be used for activation and configuration of COM-Server channels. The table of COM-Server channels shows basic parameters. To show all channel parameters press the Extend button. For changing the serial port number go to Serial ports assignment tree branch. Figure 158: IEC61850 - COM-Server Figure 159: IEC61850 - COM-Server Extended Page 240 IEC61850 Table 96: IEC61850 - COM-Server Setting Format Range Default Description Activate - Selection of values in combo box Option to activate the CS channel (Yes/No) Connection type - Selection of values in combo box Type of connection. OFF disables the port from accepting connections. It can be turned on later. Socket enables the port and transfers all data as-is between the port and the device. Serial direct enables the port and transfers all input data to device, device is open without any POSIX setting or directly. Telnet enables the port and runs the telnet protocol on the port to set up telnet settings. This is most useful for using telnet. IEC61850 IP address - 4x 0 to 255 IP address TCP port - 0 to 65535 Inactivity timeout S Serial port - Selection of values in combo box Baud rate Bd Selection of values in combo box 115200 Baud rate Parity - Selection of values in combo box None Parity (read only) Stop bits - Selection of values in combo box 1 Stop bits XON/XOFF - Selection of values in combo box No XON/XOFF handshaking RTS/CTS - Selection of values in combo box No RTS/CTS handshaking RTS/CTS inverted - Selection of values in combo box No RTS/CTS inverted Interface type - Selection of values in combo box RS232 Interface type (RS232, RS485) Max. message length - 0 to 65535 0 Max. message length Tx blocking time ms 0 Tx blocking time 3003 TCP port 180 Inactivity timeout Serial port (read only). To change serial port go to Serial ports assignment tree branch Page 241 We take care of it. 20.10.5 Supervisory settings The Supervisory settings tree branch can be used for activation and configuration of debug logs. Page 242 IEC61850 Figure 160: IEC61850 Supervisory settings IEC61850 Page 243 We take care of it. Table 97: IEC61850 Supervisory settings Setting Format Range Default Description Level - Selection of values in combo box user Option to select lever of supervisory messages (user, developer) checkbox checked Protocol debug option activation radio TCP port Selection of trace output, PARAM connector or TCP port Activate trace Trace output - button Page 244 TCP-Port - 1 to 65535 10689 TCP port Log to file - checkbox unchecked Log to file Logging with timestamp - checkbox unchecked Logging with timestamp IEC61850 IEC61850 Setting Format Range Default Description CSE trace: Activate - checkbox unchecked CSE trace activation CSE trace: TCP port - 1 to 65535 10888 TCP port DCF77 trace: Activate - checkbox unchecked DCF77 trace activation DCF77 trace: TCP port - 1 to 65535 10777 TCP port COM-Server Trace: Activate Trace - checkbox unchecked COM-Server Trace activation COM-Server Trace: Trace Output - checkbox unchecked COM-Server Trace: Verbose Output COM-Server Trace:Trace via PARAM-Connector - radio button checked COM-Server Trace: Trace via TCP Port: - radio button unchecked Radio button to select PARAMConnector or TCP port as output interface for COM-Server debug messages COM-Server Trace: TCP port - 1 to 65535 10897 COM-Server Trace: TCP port COM-Server Trace:Logging with Timestamp - checkbox checked COM-Server Trace:Logging with Timestamp Mirroring: Activate - checkbox unchecked Mirror port debug option activation Mirroring: TCP port - 1 to 65535 55777 Mirror port: TCP port Page 245 We take care of it. 20.10.6 Time synchronization The NTP (Network Time Protocol) Configuration is used for time synchronization. The SNTP client is implemented as a single thread which periodically requests NTP servers or listens for NTP broadcasts and Ipv4 multicasts, and optionally sends SNTP unicast requests to defined NTP servers. The SNTP-client will be automatically started by the start of the application, if it receives a list of NTP servers (main and secondary) from the sntp.param file. Otherwise time is not synchronized by the user with NTP- server. REG-PE / REG-PED use these servers for installation of system time at real time. The current SNTP settings provide one or two IP addresses of the NTP servers available for time synchronization. One server acts as primary server and the other as a backup server. The NTP servers must be listed in the order of preference. You can choose your preferred NTP servers (on default – Main NTP server). REG-PE / REG-PED analyses the availability of servers, their priority, and also their switching. If the main NTP-Server does not work or is not defined, time is set by the secondary NTPServer. NTP-Servers provide first time synchronization at the start of the application. If your NTPServers support broadcast request-responses, a first time synchronization can proceed up to 10 seconds before. Figure 161: IEC61850 Time synchronization Page 246 IEC61850 Table 98: IEC61850 Time synchronization Setting Format Range Default Description NTP primary server IP address - 4x 0 to 255 192.168.1. 140 NTP primary server IP address NTP secondary server IP address - 4x 0 to 255 192.168.1. 5 NTP secondary server IP address Period between the attempts to set the clock sec Selection of values in combo box 16 sec Period between the attempts to set the clock Max. timeout for the server response sec Selection of values in combo box 1 sec Max. timeout for the server response Number of time samples in each clock cycle - Selection of values in combo box 3 samples Number of time samples in each clock cycle Minimal time offset of clock relative to server sec float 0.000001 Minimal time offset of clock relative to server Scale for estimation of the NTPoffset worth - 1 Scale for estimation of the NTP-offset worth DCF77: Version - - DCF77 clock activate - Radio button No DCF77 clock activate Strategy of device time synchronization - Selection of checkboxes Only attached device The Firmware includes a very flexible yet simple mechanism for time synchronization schemes for attached devices. There are three strategy types: all devices, only device, devicelist and DCF77. The all devices scheme allows for a synchronizing of the all devices in E-LAN or per Time-Bus. DCF77: Version (Read only) The only device scheme allows for a time synchronization of the only first device. In standard settings a first device is master in E-LAN. The device-list scheme allows for a specific time synchronization of the devices specified in the “List of the synchronized devices” fields. Each field specifies the a-Eberle ID-device. The DCF77 scheme: the firmware sends DCF77 time to device, which can be set in 3 modes. The REG-L time synchronization command via COM2 is not used here. DCF77 device modes: IEC61850 Page 247 We take care of it. Setting Format Range Default Description SINGLE: via COM1/2 can be synchronized the system time in the DCF mode. The time synchronization bus is not supported. SLAVE: the time synchronization bus synchronizes the device system time. MASTER: device receives the time via COM1 in the DCF mode, the DCF signal is switched directly to the synchronization bus. Otherwise the device sends his system time as DCF telegram via the synchronization bus. Sync. period of connected devices min 1 to 65535 5 The parameter determines an interval time between the sequential time synchronizations by NTP servers. It is applied for the all attached devices according to the selected "Strategy of the device time synchronization ". Value is configurable in the range 0…255. The default value is 5. 20.10.6.1 UTC-Settings by REG-Sys equipment Connect the REG-Sys (REG-D, REG-DP, PQI-D and EOR-D) IED COM1 by using the delivered RS-232 Null Modem Cable with your PC. Use a terminal-program, e.g. WinReg, for the UTCsettings. If the regulator has the station-ID A: you will see after pressing the button: <A> Afterwards you can take following time zone settings: utcTZ [= <time zone>] utcDST [= <use dst>] utcSH Time Zone: -12..0..+12 hours (part of an hour (e.g. 9.75) Daylight Saving Time: 0=not used, 1=used [= <south hemisphere>] Hemisphere: 0:north, 1:south The system is now adjusted for correct time synchronization. Example settings for Germany, time zone 1, daylight saving time and north hemisphere: Page 248 utcTZ = 1 TimeZone = 1 utcDST = 1 Daylight Saving Time = Yes utcSH = 0 South Hemisphere = No IEC61850 20.10.7 Internal communication This tree branch contains settings concerning the internal communication between telecontrol board and the device. Figure 162: IEC61850 Internal communication IEC61850 Page 249 We take care of it. Table 99: IEC61850 Internal communication Setting Format Range Default Description Serial port - - COM2 Serial port for internal communication with device (read only). To change serial port go to Serial ports assignment tree branch Baud rate of device serial port Bd Selection of values in combo box 115200 Baud rate of device serial port Parity - Selection of values in combo box EVEN Serial port parity ON time of serial LEDs ms 1 to 65535 10 ON time of serial LEDs Cycle time of poll ms 0 to 65535 300 The parameter determines the cycle time of the substation call. If you set the parameter to zero, the call is executed as soon as possible. Value is configurable in the range 0…65535. The default value is 150. Maximum timeout between sequenced ASCII-Data ms 0 to 65535 800 This parameter specifies how long the program waits for sequenced next frame (data > 2000 Bytes) or the acknowledgement for command. The wait time is dependent on the baud rate and the maximum message length. Value is configurable in the range 0…65535. The default value is 800. Cycle time of device status check ms 0 to 65535 2000 This parameter specifies the cycle time with which the program checks the link status of the device is polling in the case of error in serial or frame. Value is configurable in the range 0…65535. The default value is 1500... Number of repeats for SYNC cycle - 1 to 255 2 Defines a maximal count of synchronization requests, if serial communication with XXXSysTM-Device fails. The parameter can be adjusted from 0…255. By default it is 2. Number of poll repeats - 0 to 255 1 Defines a maximal number of repetitions of one command. Default value is 2. Round time down checkbox unchecked If value equals “No”, time stamps are rounded up in scale of one second to prevent time inconsistencies with substation. If value equals “Yes”, time stamps are rounded down in scale of one second. Default value is “Yes”. Device IP address request repetition 0 to 65535 120 Defines number of polls after which IPaddress, netmask and gateway are requested from a-Eberle device. They will are set then in the loader environment. The feature is supported only for REGSys devices. Value is configurable in the range 0…255. The default value is 0. Page 250 IEC61850 Setting Format Range Default Description Wait for change timeout ms 100 to 65535 8000 Maximal waiting time of the changes caused by the command. Value is configurable in the range 0…65535. The default value is 8000. SBO unselecting timeout ms 100 to 65535 10000 Maximal waiting time of the Operate request after receipt of a Select request. Value is configurable in the range 0…65535. The default value is 10000. Command executed on startup text 64 characters empty Command that will be executed once after startup. 20.10.8 Attached Devices Special device settings are valid for each individual attached device. The default values must be adjusted to the respective device. A complete data record describes an attached device. Up to eight a-Eberle devices can be attached. This tree branch contains specific device settings. Figure 163: IEC61850 Device x Advanced LDevice Instance in ICD-file IEC61850 The parameter defines device identification by its number. It must be the same as the IEC61850 Logical Device (LD) instance number (e.g., logical device name REG2 must have value 2 for “Device relocation”). Page 251 We take care of it. Table 100: IEC61850 Device x Setting Format Range Default Description LDevice Instance in ICDfile text Uppercase up to 10 char no The parameter defines device identification by its number. It must be the same as the IEC61850 Logical Device (LD) instance number (e.g., logical device name REG2 must have value 2 for “Device relocation”). Identifier of device text AA: or A(1 to 9): to Z(1 to 4): AA: The parameter defines an XXXSysTMDevice name. The name should consist of 2 or 3 characters. A template of the name is: [A-Z] [empty or 0-9] [:]. (E.g., “F:””A8:””V7”.) By default it is “A:” for regulators. Poll string text 24 characters RPS 4 The parameter defines a poll string for a serial request. By default it is “RPS 4” for attached regulators, for other devices it is preconfigured in a different way. Size of answer byte 1 to 255 244 The parameter defines a size of answer corresponding to selected poll string Type of seconds field - Selection of values in combo box Int32U The parameter defines type of a second’s value in defined poll string. Default value REGSys™ - “INT32”. Offset of seconds field byte 0 to 255 18 The parameter defines the byte offset in defined poll string which includes a second’s part of time. Default value is 18. Type of msec field - Selection of values in combo box Int32U The parameter defines type of a milliseconds part of time in poll string. Default value for REGSys™ - “INT16”. Offset of msec fieldbyte byte 0 to 255 22 The parameter defines the byte offset in defined poll string which includes a milliseconds part of time. Default value is 22. Comment text 23 characters User comment 20.10.9 Saving of settings in IEC61850 As the settings for IEC61850 protocol consist of XML template and ICD file, the Save selected settings to file icon offers separately saving of settings and saving of ICD file. Figure 164: Saving of settings in IEC61850 Page 252 IEC61850 21. WinConfig in Step-by-Step mode To run WinConfig in Step-by-Step mode click the Step-by-Step button in the splash screen when WinConfig starts. WinConfig Step-by-Step mode is especially useful case when default configuration settings can be used with minimum modifications and the simplest failsafe way of data transfer. Step-by-Step mode enables user to create and use typical configuration of settings without having exact knowledge of SCADA protocol data point settings, protocol standards, firmware-specific settings and other complex settings. User typically selects board type, SCADA and device template and enters a few applicationspecific settings to create settings and to load the created settings into the board in the corresponding step. Step-by-Step mode also gives the possibility to open settings predefined in advanced mode (XML file) or settings created in GenReg (INI file). Quick help is displayed in all steps in the right part of window to explain the corresponding settings and actions. The Confirm button switches to the next step (all entered values remembered). The Back button switches to the previous step (all entered values on the current form will be forgotten). The Cancel button switches to the first step (all previously entered values on the current form/s will be forgotten). The Finish button completes the protocol settings transactions and switches the user to the first step for another round of protocol settings should the user choose to enter another set of settings (only on the last page). 21.1 Templates in Step-by-Step mode Step-by-Step mode of WinConfig works with pre-defined templates of settings as described in chapter 8.2.1.1. Thus usage of templates is limited to configurations containing known and already used combination of board_type/protocol/SCADA_template/Devices_template. WinConfig will be equipped with other templates in new versions as soon as new templates will be available. Individual steps are numbered according to the sequence valid for the individual board and protocol. WinConfig in Step-by-Step mode Page 253 We take care of it. 21.2 Step 1 - hardware User selects pre-defined type of telecontrol board in the first step. Selection is done in the corresponding combo box. Figure 165: Selection of hardware Page 254 WinConfig in Step-by-Step mode 21.3 Protocol and templates The selection of protocol is performed in next step. Available options are stated in the following table. Table 101: Protocols and templates Board Protocol SCADA Devices Template availability Note TK509, TK517, Basic REG-D Yes Basic template type of SCADA is defined as typical configuration not related to particular SCADA producer Basic REG-DP No Basic REG-D Yes ABB REG-D Yes Areva REG-D No IDS REG-D Yes SAT REG-D Yes Siemens REG-D No Sprecher REG-D No Basic REG-DP Yes ABB REG-DP No Areva REG-DP No IDS REG-DP Yes SAT REG-DP No Siemens REG-DP No Sprecher REG-DP No Basic EOR-D Yes ABB EOR-D No Areva EOR-D No IDS EOR-D No SAT EOR-D No Siemens EOR-D No Sprecher EOR-D No Basic 2x REG-D Yes ABB 2x REG-D No Areva 2x REG-D No IDS 2x REG-D No SAT 2x REG-D No Siemens 2x REG-D No Sprecher 2x REG-D No Basic 3x REG-D Yes DNP3 TK400, IEC101 IEC101 IEC101 IEC101 IEC101 WinConfig in Step-by-Step mode Page 255 We take care of it. Board Protocol IEC101 IEC101 IEC101 IEC101 IEC101 Page 256 SCADA Devices Template availability ABB 3x REG-D No Areva 3x REG-D No IDS 3x REG-D No SAT 3x REG-D No Siemens 3x REG-D No Sprecher 3x REG-D No Basic 4x REG-D Yes ABB 4x REG-D No Areva 4x REG-D No IDS 4x REG-D No SAT 4x REG-D No Siemens 4x REG-D No Sprecher 4x REG-D No Basic 2x REG-DP Yes ABB 2x REG-DP No Areva 2x REG-DP No IDS 2x REG-DP No SAT 2x REG-DP No Siemens 2x REG-DP No Sprecher 2x REG-DP No Basic 4x REG-DP Yes ABB 4x REG-DP No Areva 4x REG-DP No IDS 4x REG-DP No SAT 4x REG-DP No Siemens 4x REG-DP No Sprecher 4x REG-DP No Basic REG-D + REG-DP Yes ABB REG-D + REG-DP No Areva REG-D + REG-DP No IDS REG-D + REG-DP No SAT REG-D + REG-DP No Siemens REG-D + REG-DP No Sprecher REG-D + REG-DP No Basic 2x REG-D + 1x REG-DP Yes ABB 2x REG-D + 1x REG-DP No Areva 2x REG-D + 1x REG-DP No IDS 2x REG-D + 1x No WinConfig in Step-by-Step mode Note Board Protocol SCADA Devices Template availability Note REG-DP IEC101 IEC101 IEC101 WinConfig in Step-by-Step mode SAT 2x REG-D + 1x REG-DP No Siemens 2x REG-D + 1x REG-DP No Sprecher 2x REG-D + 1x REG-DP No Basic 1x REG-D + 2x REG-DP No ABB 1x REG-D + 2x REG-DP No Areva 1x REG-D + 2x REG-DP No IDS 1x REG-D + 2x REG-DP No SAT 1x REG-D + 2x REG-DP No Siemens 1x REG-D + 2x REG-DP No Sprecher 1x REG-D + 2x REG-DP No Basic 2x REG-D + 2x REG-DP Yes ABB 2x REG-D + 2x REG-DP No Areva 2x REG-D + 2x REG-DP No IDS 2x REG-D + 2x REG-DP No SAT 2x REG-D + 2x REG-DP No Siemens 2x REG-D + 2x REG-DP No Sprecher 2x REG-D + 2x REG-DP No Basic 2x REG-DP + 1x EOR-D Yes ABB 2x REG-DP + 1x EOR-D No Areva 2x REG-DP + 1x EOR-D No IDS 2x REG-DP + 1x EOR-D No SAT 2x REG-DP + 1x EOR-D No Page 257 We take care of it. Board Protocol IEC103 IEC103 IEC103 IEC103 Page 258 SCADA Devices Template availability Siemens 2x REG-DP + 1x EOR-D No Sprecher 2x REG-DP + 1x EOR-D No Other REG-D Yes ABB REG-D Yes Areva REG-D Yes DB REG-D No IDS REG-D No Mauell REG-D Yes NRM REG-D No SAT REG-D Yes Siemens REG-D Yes Sprecher REG-D Yes Basic REG-DP Yes ABB REG-DP Yes Areva REG-DP Yes DB REG-DP No IDS REG-DP No Mauell REG-DP No NRM REG-DP No SAT REG-DP Yes Siemens REG-DP Yes Sprecher REG-DP Yes Basic EOR-D Yes ABB EOR-D No Areva EOR-D No DB EOR-D No IDS EOR-D No Mauell EOR-D No NRM EOR-D No SAT EOR-D No Siemens EOR-D No Sprecher EOR-D No Basic 2x EOR-D No ABB 2x EOR-D No Areva 2x EOR-D No DB 2x EOR-D No IDS 2x EOR-D No Mauell 2x EOR-D No NRM 2x EOR-D No WinConfig in Step-by-Step mode Note Board Protocol SCADA Devices Template availability SAT 2x EOR-D No Siemens 2x EOR-D No Sprecher 2x EOR-D No Basic 3x EOR-D No ABB 3x EOR-D No Areva 3x EOR-D No DB 3x EOR-D No IDS 3x EOR-D No Mauell 3x EOR-D No NRM 3x EOR-D No SAT 3x EOR-D No Siemens 3x EOR-D No Sprecher 3x EOR-D No Basic PQI-D No ABB PQI-D No Areva PQI-D No DB PQI-D No IDS PQI-D No Mauell PQI-D No NRM PQI-D No SAT PQI-D No Siemens PQI-D No Sprecher PQI-D No CSO - - Yes DNP3 Basic REG-D Yes Basic REG-DP Yes Basic EOR-D Yes TRANS POWER REG-D Yes UNISON REG-D Yes IEC101 Basic REG-D Yes IEC103 Basic REG-D Yes ABB REG-D No Areva REG-D No DB REG-D No IDS REG-D No Mauell REG-D No NRM REG-D No IEC103 IEC103 TK8xx WinConfig in Step-by-Step mode Note No SCADA or device specific data are applicable for CSO protocol. CSO is not available for TK509 and TK517 boards. Page 259 We take care of it. Board Protocol IEC103 IEC103 IEC103 IEC103 Page 260 SCADA Devices Template availability SAT REG-D No Siemens REG-D No Sprecher REG-D No Basic REG-DP No ABB REG-DP No Areva REG-DP No DB REG-DP No IDS REG-DP No Mauell REG-DP No NRM REG-DP No SAT REG-DP No Siemens REG-DP No Sprecher REG-DP No Basic EOR-D No ABB EOR-D No Areva EOR-D No DB EOR-D Yes IDS EOR-D No Mauell EOR-D No NRM EOR-D No SAT EOR-D No Siemens EOR-D No Sprecher EOR-D No Basic 2x EOR-D No ABB 2x EOR-D No Areva 2x EOR-D No DB 2x EOR-D Yes IDS 2x EOR-D No Mauell 2x EOR-D No NRM 2x EOR-D No SAT 2x EOR-D No Siemens 2x EOR-D No Sprecher 2x EOR-D No Basic 3x EOR-D No ABB 3x EOR-D No Areva 3x EOR-D No DB 3x EOR-D Yes IDS 3x EOR-D No Mauell 3x EOR-D No NRM 3x EOR-D No WinConfig in Step-by-Step mode Note Board Protocol IEC103 IEC104 61850 WinConfig in Step-by-Step mode SCADA Devices Template availability Note SAT 3x EOR-D No Siemens 3x EOR-D No Sprecher 3x EOR-D No Basic PQI-D No ABB PQI-D No Areva PQI-D No DB PQI-D No IDS PQI-D Yes Mauell PQI-D No NRM PQI-D Yes SAT PQI-D No Siemens PQI-D No Sprecher PQI-D No Basic REG-D Yes Basic REG-DP Yes Basic REG-D + REG-DP Yes Basic EOR-D Yes Basic CPR-D No Basic REG-DP + EOR-D No Basic 2x REG-DP No Basic 3x REG-D No Basic 8x REG-D No REG-D(A) Yes REG-D(A) Standard Configuration without GOOSE V4.3 REG-D(A) Yes REG-D(A) Standard Configuration V4.3 With GOOSE REG-D(A) Yes REG-D(A) V4.3 With GOOSE, File transfer (COLDFIRE) REG-D(A) x2 Yes REG-D(A)x2 without GOOSE V4.3 REG-D(A)x3 Yes REG-D(A)x3 without GOOSE V4.3 REG-D(A) + REGDP(A) Yes REG-D(A) + REG-DP(A) without goose V4.3 /1.6 REG-D(A) + REGDP(A) Yes REG-D(A) + REG-DP(A) with GOOSE V4.3/1.6 REG-D(A)x3 + REG-DP(A) Yes REG-D(A)x3 + REG-DP(A) with GOOSE V4.3/.16 REG-D(A) Yes REG-D(A) without GOOSE V4.0 Page 261 We take care of it. Board Protocol SCADA Devices Template availability Note REG-D(A) Yes REG-D(A) without GOOSE V4.1 REG-DP(A) Yes REG-DP(A) without GOOSE V1.6 REG-DP(A)x2 Yes REG-DP(A)x2 without GOOSE V1.6 EOR-D Yes EOR-D without GOOSE V4.5 EOR-D Yes EOR-D with GOOSE V4.5 PQI-D Yes PQI-D without GOOSE V2.0 GDASYS Yes GDASYS without GOOSE V2.0 C37.118 Basic GDASys Yes MODBUS Basic REG-D Yes If the selected template is not available, the following text appears in the window: Template file isn't implemented for chosen combination protocol/SCADA/Eberle devices ! Page 262 WinConfig in Step-by-Step mode Other options available in the window: Table 102: Settings of protocols and templates Setting Format Range Default Description Protocol - Selection of values in combo box DNP3 Selection of transmission protocol Template edition - Selection of values in combo box Edition 1 for IEC61850 protocol or empty for other protocols Selection of templates for chosen protocol SCADA template - Selection of values in combo box Protocol dependent Selection of templates for chosen protocol Attached eberle devices - Selection of values in combo box Protocol dependent Option to select attached Eberle devices, disabled for IEC61850 Transmission mode - Selection of values in combo box balanced IEC101 specific setting, selection of balanced or unbalanced mode. Physical medium - Selection of values in combo box RS232 Option to select type of serial interface, available for serial protocols. Idle state - Selection of values in combo box Non-inverted Option to select inverted or non-inverted mode in the case when fiber optic serial interface is selected. Open userspecific file - Option box not selected Option enables selection of existing XML or INI file with predefined settings Local path to WinConfig *.xml file - Option box not selected Option enables selection of WinConfig *.xml file (Browse button). Local path to GenReg *.ini file - Option box not selected Option enables selection of GenReg *.ini file (Browse button). WinConfig in Step-by-Step mode Page 263 We take care of it. Figure 166: Selection of protocol and templates Page 264 WinConfig in Step-by-Step mode 21.4 Protocol-specific settings User enters protocol-specific settings step 3. Available controls in step 3 are protocoldependent so the appearance of this window changes according to the selections of previous steps. Figure 167: IEC101 settings Table 103: IEC101 settings Setting Format Range Default Description Link address unstructured - 1 to 65534 1 Link address as 16-bit number Link address structured - 2x 0 to 255 0, 1 Link address as two 8-bit numbers ASDU Address unstructured - 1 to 65534 1 ASDU address as 16-bit number ASDU Address structured - 2x 0 to 255 0, 1 ASDU address as two 8-bit numbers Enable Originator - Option box not selected Option to enable originator in IEC101 protocol Baud rate - Selection of values in combo box 19200 Speed of IEC101 serial port WinConfig in Step-by-Step mode Page 265 We take care of it. Figure 168: Protocol selection, REG-P, IEC103 Table 104: IEC103 settings, REG-P Setting Format Range Default Description Link address - 1 to 254 1 Link address ASDU Address - 1 to 254 1 ASDU address Baud rate - Selection of values in combo box 19200 Speed of IEC103 serial port Figure 169: Protocol selection, REG-P, CSO Table 105: CSO settings, REG-P Page 266 Setting Format Range Default Description IP address - 4x 1 to 254 1 IP address of telecontrol board Netmask - 4x 1 to 254 1 Network mask of telecontrol board Gateway - Selection of values in combo box 19200 Default gateway of telecontrol board WinConfig in Step-by-Step mode Figure 170: Protocol selection, DNP3 Table 106: DNP3 settings Setting Format Range Default Description Baud rate - Selection of values in combo box 19200 Baud rate of DNP3 serial port Link address of REG-x - 0 to 65535 103 Link address of REG-x Link address of DNP3 master - 0 to 65535 103 Link address of DNP3 master 21.5 Time synchronization Time synchronization page appears in the case when the used telecontrol board or protocol enables time synchronization using NTP server. User selects time synchronization either by NTP server or by the used protocol. Figure 171: Time synchronization Table 107: Time synchronization Setting Format WinConfig in Step-by-Step mode Range Default Description Page 267 We take care of it. Setting Format Range Default Description Time Source - Option box NTP Selection of time source NTP server IP - 4x 1 to 254 0.0.0.0 IP address of NTP server 2nd NTP Server - 4x 1 to 254 0.0.0.0 IP address of second alternative NTP server 21.6 Devices Devices step displays devices contained in the settings. User can modify configuration by un-checking the individual device via the Enabled Check-box option. User can also change identifiers of individual devices by the Identifier textbox. Figure 172: Devices 21.7 REGSys configuration REGSys configuration step refers to the necessity of equal setting of communication configuration between telecontrol board and device. User has to modify the device communication settings to match the given settings of telecontrol board. The HANDSHAKE value reflects the version of telecontrol board. Page 268 WinConfig in Step-by-Step mode Figure 173: REGSys configuration 21.8 Download Download step is intended for transfer of created settings and corresponding firmware to the telecontrol board. The appearance of the Download page differs according to the available data transfer possibilities of individual board and necessary settings. Figure 174: Download (REG-P) Functionality and user actions of data transfer of settings and firmware to REG-P telecontrol board are similar to Manual data transfer which can be found in Advanced mode as described in chapter 8.2.4. –– WinConfig in Step-by-Step mode Page 269 We take care of it. Figure 175: Download (REG-PE(D)) Functionality and user actions of data transfer of settings and firmware to REG-PE(D) telecontrol board are similar to Remote data transfer which can be found in Advanced mode as described in chapter 8.2.4. User detects the board in the network first to get the board settings and then selects the chosen board in the table. Confirm button is enabled after transfer. 21.9 Finishing The last step allows the user to save their newly created settings into the WinConfig .XML file that can be processed by WinConfig in Advanced mode and/or for exporting the settings to the .XLS file. Page 270 WinConfig in Step-by-Step mode Figure 176: Finishing 22. Tips on Troubleshooting The subject of this chapter is for providing tips on troubleshooting with the REG-PE / REGPED device. Firstly, here are the essential points necessary to ensure correct operation. DANGER Only qualified personnel should work on this equipment, and only after becoming thoroughly familiar with all warnings and safety notices of this and the associated manuals, as well as with the applicable safety regulations. 22.1 Common troubleshooting tips IP address 0 0 Has an IP address been set in the device? If this setting has not been made, it will not be possible to establish a link. To validate the IP address, it is possible to execute a ping from the network to the device's IP address using a Ping function on the Command line. Has the subnet mask been correctly set? The subnet mask results from the addressing scheme used in the network segment. Subnet mask 0 Remote access not possible 0 Has the gateway address been correctly set in the device? If it is not No time synchronization via NTP 0 0 0 0 correct, it will not be possible to access a device via two or more networks. Is there at least one timeserver in the network and what is its address? Has the timeserver’s address been correctly set in the NTP-setting of REG-PE / REG-PED device? Is the device correctly parameterized for use of time synchronization via Ethernet? If the timeserver is a PC, are the Windows time service deactivated and the correct NTP service started? Do you have permission to store the file or does the path of your file contain illegal characters? You can’t save a data to jffs2.tar 0 You can’t restore a 0 Do you have permission to the working file and directory? Tips on Troubleshooting Page 271 We take care of it. data from jffs2.tar 22.2 Diagnostic Functions in the Context of the REG-P / REG-PE / REG-PED Device The subject of this section is troubleshooting problems with the settings of REG-PE / REGPED device and XXXSysTM-Device interconnection. Table 108: Diagnostic functions in the context of the device LED’s status of REG-PE/ REG-PED device Indication Normal operation: 1. Indication of Ethernet activity, depends on current activity on Ethernet line 2. Indication of communication on serial ports 1 to 4 (S – send data, R – receive data, F - error) 3. Watchdog indication Hardware or application fault. 0 First of all check please network connection and power supply. 0 Then follow the instructions described above. Page 272 Tips on Troubleshooting Communication REG-PE – REG-D™ faults. 1. Check please device settings 2. Check communication settings of REGSys™ (baud rate, parity etc.) Note: If the problems persist, please ask your system administrator first. For further assistance please contact a.eberle product support at http://www.a-eberle.de LED’s status of REG-P version TK400 board Indication Normal operation: 1. Reset button 2. Indication of watchdog or COM-Server running 3. Indication of transmit, receive and error in communication between REG-P and external device using the topical protocol 4. Indication of transmit, receive and error in internal communication between REG-P and a.eberle device All LEDs blinking – invalid combination of firmware and settings Ethernet booter operation: 1. Ethernet booter is waiting for connection (LEDs alternately blinking) 2. Ethernet booterfinished data transfer and stores data in the internal memory “Running light” indicates data transfer Tips on Troubleshooting Page 273 We take care of it. Serial booter operation: 0 Serial booter is waiting for connection. LED’s status of REG-P version TK517 board Indication Normal operation: 1. Indication of transmit, receive and error in communication between REG-P and external device using the topical protocol 2. Indication of transmit, receive and error in internal communication between REG-P and a.eberle device 3. Indication of power supply voltage and running watchdog All LEDs blinking – invalid combination of firmware and settings. Parallel booter operation: 0 Parallel booter for data transfer via parallel Param port is running. This way of data transfer is not supported by WinConfig. Page 274 Tips on Troubleshooting Serial booter operation: 0 Serial booter is running. Alternate blinking of some LEDs indicates data transfer. 23. Related Documentation Document Author "REG-PE Firmware Update IEC61850.v1.2.doc" a-Eberle "REG-PE Quick Guide for technicians IEC61850 1.2.doc" a-Eberle "REG-PE User Management IEC61850.v1.4.doc" a-Eberle Installation instructions COM-Server functionality of PQI-DA.doc a-Eberle PQI-DA_loader_mode.MOV a-Eberle Related Documentation Page 275 We take care of it. 24. Maintenance/Cleaning This unit is maintenance-free for customers. Danger of electric shock! Do not open the unit. DANGER Maintenance of the equipment can only be carried out by A-Eberle. For service, contact A-Eberle. Service address: A. Eberle GmbH & Co. KG Frankenstraße 160 D-90461 Nuremberg 25. Disposal To dispose of the device and its accessories, send all components to A-Eberle. 26. Product Warranty A-Eberle guarantees that this product and accessories will remain free of defects in material and workmanship for a period of three years from the date of purchase. This warranty does not cover damage caused by accident, misuse or abnormal operating conditions. To obtain service during the warranty period, please contact A-Eberle GmbH & Co KG in Nuremberg. Page 276 Maintenance/Cleaning 27. List of Figures Figure 1: Figure 2: Figure 3: Figure 4: Figure 5: Figure 6: Figure 7: Figure 8: Figure 9: Figure 10: Figure 11: Figure 12: Figure 13: Figure 14: Figure 15: Figure 16: Figure 17: Figure 18: Figure 19: Figure 20: Figure 21: Figure 22: Figure 23: Figure 24: Figure 25: Figure 26: Figure 27: Figure 28: Figure 29: Figure 30: Figure 31: Figure 32: Figure 33: Figure 34: Figure 35: Figure 36: Figure 37: Figure 38: Figure 39: Figure 40: Figure 41: The RPL window ..................................................................................................................... 17 Introductory window ............................................................................................................. 26 Settings tree ........................................................................................................................... 27 Main menu buttons ............................................................................................................... 28 Add new settings.................................................................................................................... 29 Open settings ......................................................................................................................... 30 Remote transfer from PC, REG-P ........................................................................................... 34 Manual transfer from PC ....................................................................................................... 35 Transfer from PC for telecontrol boards type REG-PE(D) ...................................................... 36 Transfer settings to PC ........................................................................................................... 39 REG-PE(D) board IP settings ................................................................................................... 40 REG-PE(D) board certificates ................................................................................................. 42 Compare settings ................................................................................................................... 44 Import settings ....................................................................................................................... 45 Missing/incorrect values ........................................................................................................ 46 IEC101 basic settings .............................................................................................................. 47 Settings – SCADA, IEC101 REG-P ............................................................................................ 49 Balanced mode settings ......................................................................................................... 51 Settings – SCADA, IEC101 REG-PE(D) ..................................................................................... 53 TK400 ComServer settings ..................................................................................................... 55 Linked Devices........................................................................................................................ 56 Time synchronization settings ............................................................................................... 57 Internal communication, IEC101 for REG-P ........................................................................... 58 Converter errors..................................................................................................................... 60 Device request settings .......................................................................................................... 60 IEC101 device request settings for REG-PE(D) ....................................................................... 61 Indications .............................................................................................................................. 62 IEC101 Indications for REG-PE(D)........................................................................................... 63 IEC101 Commands ................................................................................................................. 65 IEC101 Commands ................................................................................................................. 66 IEC101 Commands REG-PE(D)................................................................................................ 66 Editing the IOA bytes in entire columns ................................................................................ 67 Status bits............................................................................................................................... 69 IEC103 specific settings .......................................................................................................... 71 IEC103 converter errors ......................................................................................................... 73 IEC103 device request settings .............................................................................................. 73 IEC103 basic settings REG-PE(D) ............................................................................................ 79 IEC103 settings SCADA for PQI-D ........................................................................................... 81 IEC103 settings SCADA for EOR-D .......................................................................................... 85 Receiving Online-Data from PQI-D per shared channel COM-Server .................................... 87 Online data Overview via REG-PE(D) COM-Server ComServer .............................................. 88 List of Figures Page 277 We take care of it. Figure 42: Figure 43: Figure 44: Figure 45: Figure 46: Figure 47: Figure 48: Figure 49: Figure 50: Figure 51: Figure 52: Figure 53: Figure 54: Figure 55: Figure 56: Figure 57: Figure 58: Figure 59: Figure 60: Figure 61: Figure 62: Figure 63: Figure 64: Figure 65: Figure 66: Figure 67: Figure 68: Figure 69: Figure 70: Figure 71: Figure 72: Figure 73: Figure 74: Figure 75: Figure 76: Figure 77: Figure 78: Figure 79: Figure 80: Figure 81: Figure 82: Figure 83: Figure 84: Page 278 Online graphic disturbance data from PQI-D ......................................................................... 88 IEC103 advanced settings PQI-D – ComServer ....................................................................... 89 ComServer settings, EOR-D .................................................................................................... 93 Supervisory settings, REG-PE(D)............................................................................................. 96 IEC103 Devices, Time synchronization settings, PQI-D .......................................................... 98 IEC103 Devices, Time synchronization settings, EOR-D ......................................................... 99 IEC103 Internal communication, PQI-D ............................................................................... 100 IEC103 Devices, EOR-D, Internal communication ................................................................ 102 IEC103 Device x, PQI-D ......................................................................................................... 104 IEC103 Device x, Device settings EOR-D ............................................................................... 105 IEC103 Device x, Indications, PQI-D ..................................................................................... 107 IEC103 Device x, Indications, EOR-D .................................................................................... 109 IEC103 Device x, Commands ................................................................................................ 110 IEC103 Device x, Fault records, EOR-D ................................................................................. 111 Read Faults Record from EOR-D........................................................................................... 112 IEC104 basic settings ............................................................................................................ 116 IEC104 Settings - SCADA ....................................................................................................... 118 IEC104 ComServer settings .................................................................................................. 120 IEC104 Supervisory settings ................................................................................................. 123 IEC104 Linked devices .......................................................................................................... 125 IEC104 time synchronization settings .................................................................................. 125 Internal communication settings ......................................................................................... 126 IEC104 commands ................................................................................................................ 127 IEC104 indications ................................................................................................................ 128 DNP3 basic settings REG-P ................................................................................................... 131 Advanced Settings - SCADA for REG-P (TK509, TK400) ........................................................ 132 Advanced Settings - SCADA for REG-P (TK517) .................................................................... 134 DNP3 device request settings REG-P.................................................................................... 136 DNP3 commands REG-P ....................................................................................................... 137 DNP3 indications REG-P ....................................................................................................... 138 DNP3 basic settings REG-PE(D) ............................................................................................ 139 Advanced settings SCADA REG-PE(D)................................................................................... 140 DNP3 device request settings REG-PE(D) ............................................................................. 142 DNP3 indications REG-PE(D) ................................................................................................ 143 DNP3 commands REG-PE(D) ................................................................................................ 145 CSO settings REG-P ............................................................................................................... 146 CSO channels REG-PE(D) ...................................................................................................... 148 CSO channels REG-PE(D) ...................................................................................................... 150 MODBUS RTU basic settings ................................................................................................ 151 Modbus TCP basic settings .................................................................................................. 152 MODBUS SCADA settings ..................................................................................................... 153 Device internal communication settings.............................................................................. 155 MODBUS device request settings ........................................................................................ 156 List of Figures Figure 85: Figure 86: Figure 87: Figure 88: Figure 89: Figure 90: Figure 91: Figure 92: Figure 93: Figure 94: Figure 95: Figure 96: Figure 97: Figure 98: Figure 99: Figure 100: Figure 101: Figure 102: Figure 103: Figure 104: Figure 105: Figure 106: Figure 107: Figure 108: Figure 109: Figure 110: Figure 111: Figure 112: Figure 113: Figure 114: Figure 115: Figure 116: Figure 117: Figure 118: Figure 119: Figure 120: Figure 121: Figure 122: Figure 123: Figure 124: Figure 125: Figure 126: Figure 127: MODBUS indications ............................................................................................................ 157 MODBUS commands ............................................................................................................ 158 C37.118 basic settings.......................................................................................................... 159 C37.118 Serial Port Assignment ........................................................................................... 160 C37.118 SCADA Settings ...................................................................................................... 161 C37.118 ComServer Settings ................................................................................................ 162 C37.118 Supervisory settings ............................................................................................... 165 C37.118 Linked Devices ....................................................................................................... 167 C37.118 Time Synchronization ............................................................................................ 168 C37.118 Internal communication ........................................................................................ 169 C37.118 Device x .................................................................................................................. 170 C37.118 Indications.............................................................................................................. 171 Product (IED) Model............................................................................................................. 172 SCADA Settings..................................................................................................................... 173 Execute SCL_Config engineering Tool .................................................................................. 173 Displaying the project configuration ................................................................................ 174 Displaying the properties of nodes................................................................................... 174 Displaying the ICD file ....................................................................................................... 175 Adding and deleting devices ............................................................................................ 176 Renaming device............................................................................................................... 176 Adding, deleting and renaming logical nodes .................................................................. 177 Editing sAddr..................................................................................................................... 178 Removing Data Objects .................................................................................................... 184 Restore Data Objects from template ............................................................................... 184 Renaming the Data Objects .............................................................................................. 185 Confirmation to rename DO list ....................................................................................... 185 Changing of DO Data Class ............................................................................................... 186 Changing the control model for controllable data objects .............................................. 187 New attributes for selected “sbo” control model ............................................................ 188 Excluded attributes for selected “direct” control model ................................................. 188 GOOSE settings page ........................................................................................................ 189 GOOSE Control Blocks list ................................................................................................. 190 Parameters for the new GOOSE Control Block................................................................. 190 Common settings of the GOOSE Control Block ................................................................ 191 Communication settings of the GOOSE Control Block ..................................................... 191 Data Set of the GOOSE Control Block ............................................................................... 191 Adding the Data Object to Data Set of GOOSE Control Block .......................................... 192 Adding the Data Object to Data Set of GOOSE Control Block .......................................... 192 Adding structure “valWTr” to Data Set of GOOSE Control Block ..................................... 192 External Publishers List ..................................................................................................... 193 Adding and deleting Subscribers and Data Objects ........................................................ 193 Adding Subscribers and Data Objects from ICD-file ......................................................... 194 External Publisher Settings ............................................................................................... 195 List of Figures Page 279 We take care of it. Figure 128: Figure 129: Figure 130: Figure 131: Figure 132: Figure 133: Figure 134: Figure 135: Figure 136: Figure 137: Figure 138: Figure 139: Figure 140: Figure 141: Figure 142: Figure 143: Figure 144: Figure 145: Figure 146: Figure 147: Figure 148: Figure 149: Figure 150: Figure 151: Figure 152: Figure 153: Figure 154: Figure 155: Figure 156: Figure 157: Figure 158: Figure 159: Figure 160: Figure 161: Figure 162: Figure 163: Figure 164: Figure 165: Figure 166: Figure 167: Figure 168: Figure 169: Figure 170: Page 280 External Dataset Object Settings ...................................................................................... 196 Actions log......................................................................................................................... 197 IED Server Description ...................................................................................................... 197 Logical Node Configuration............................................................................................... 198 Status Data mapped in device data .................................................................................. 199 Status Data Point not mapped in device data. ................................................................. 199 Example of DPS-complex status........................................................................................ 202 Control Value Configuration (Single Command)............................................................... 204 Control Value Configurations (Multi Command) .............................................................. 210 Executing Command Pre-Conditions ................................................................................ 211 Condition Type (behavior) ................................................................................................ 211 Condition extended Settings............................................................................................. 212 Acknowledgement Condition Settings.............................................................................. 212 ACK-NACK test behavior ................................................................................................... 213 Control Model Parameter ................................................................................................. 213 Set point Value Configuration (only with Single Command) ............................................ 214 GOOSE light Control Blocks Configuration........................................................................ 215 Capture fragment of GOOSE light telegram ..................................................................... 216 GOOSE light Input architecture......................................................................................... 217 Publisher and Subscriber sides ......................................................................................... 218 "Common Options“ Tab .................................................................................................... 218 GOOSE Retransmission Settings Tab ................................................................................ 219 GOOSE lightSubscribers pane ........................................................................................... 222 Add Subscriber from other ICD file ................................................................................... 223 List of GOOSE lightexternal Input Objects ........................................................................ 225 External GOOSE lightobject configuration. ....................................................................... 226 IEC61850 Basic Settings .................................................................................................... 231 IEC61850 Serial Ports Settings .......................................................................................... 233 IEC61850 Settings - SCADA ............................................................................................... 235 ELAN extension over Ethernet (CSE) ................................................................................. 237 IEC61850 - COM-Server .................................................................................................... 240 IEC61850 - COM-Server Extended .................................................................................... 240 IEC61850 Supervisory settings .......................................................................................... 243 IEC61850 Time synchronization ........................................................................................ 246 IEC61850 Internal communication ................................................................................... 249 IEC61850 Device x ............................................................................................................. 251 Saving of settings in IEC61850 .......................................................................................... 252 Selection of hardware ....................................................................................................... 254 Selection of protocol and templates ................................................................................ 264 IEC101 settings.................................................................................................................. 265 Protocol selection, REG-P, IEC103 .................................................................................... 266 Protocol selection, REG-P, CSO ......................................................................................... 266 Protocol selection, DNP3 .................................................................................................. 267 List of Figures Figure 171: Figure 172: Figure 173: Figure 174: Figure 175: Figure 176: Time synchronization ....................................................................................................... 267 Devices .............................................................................................................................. 268 REGSys configuration........................................................................................................ 269 Download (REG-P) ............................................................................................................ 269 Download (REG-PE(D))...................................................................................................... 270 Finishing ............................................................................................................................ 271 28. List of Tables Table 1: Table 2: Table 3: Table 4: Table 5: Table 6: Table 7: Table 8: Table 9: Table 10: Table 11: Table 12: Table 13: Table 14: Table 15: Table 16: Table 17: Table 18: Table 19: Table 20: Table 21: Table 22: Table 23: Table 24: Table 25: Table 26: Table 27: Table 28: Table 29: Table 30: Table 31: Topical software state at the 2012-10-10 .............................................................................. 11 IEC101 basic settings .............................................................................................................. 48 Settings – SCADA, IEC101 REG-P ............................................................................................ 50 IEC101 balanced mode settings ............................................................................................. 52 IEC101 REG-PE(D) Settings – SCADA, interface settings ........................................................ 54 IEC101 REG-PE(D) Settings – SCADA, protocol settings ......................................................... 54 TK400 COM-Server settings ................................................................................................... 55 Internal communication......................................................................................................... 59 IEC101 device settings ........................................................................................................... 60 IEC101 device settings for REG-PE(D) .................................................................................... 61 IEC101 indications .................................................................................................................. 62 IEC101 indications .................................................................................................................. 64 IEC101 Commands ................................................................................................................. 65 IEC101 Commands ................................................................................................................. 66 IEC101 Commands REG-PE(D)................................................................................................ 66 Meaning of Status bits ........................................................................................................... 70 IEC103 settings ....................................................................................................................... 72 IEC103 device settings ........................................................................................................... 74 IEC103 basic settings REG-PE(D) ............................................................................................ 80 IEC103 settings SCADA PQI-D................................................................................................. 82 IEC103 settings SCADA for EOR-D .......................................................................................... 86 IEC103 ComServer settings PQI-D .......................................................................................... 89 IEC103 ComServer settings PQI-D, Channels ......................................................................... 91 IEC103 ComServer settings EOR-D ......................................................................................... 93 IEC103 Supervisory settings ................................................................................................... 97 IEC103 Devices, Time synchronization settings, PQI-D .......................................................... 98 IEC103 Devices, Time synchronization settings, EOR-D ......................................................... 99 IEC103 Internal communication, PQI-D ............................................................................... 100 IEC103 Devices, EOR-D, Communication settings................................................................ 103 IEC103 Device x, Device settings PQI-D ............................................................................... 105 IEC103 Device x, Device settings EOR-D .............................................................................. 106 List of Tables Page 281 We take care of it. Table 32: Table 33: Table 34: Table 35: Table 36: Table 37: Table 38: Table 39: Table 40: Table 41: Table 42: Table 43: Table 44: Table 45: Table 46: Table 47: Table 48: Table 49: Table 50: Table 51: Table 52: Table 53: Table 54: Table 55: Table 56: Table 57: Table 58: Table 59: Table 60: Table 61: Table 62: Table 63: Table 64: Table 65: Table 66: Table 67: Table 68: Table 69: Table 70: Table 71: Table 72: Table 73: Table 74: Page 282 IEC103 Device x, Indications, PQI-D ..................................................................................... 107 IEC103 Device x, Data points – indications, EOR-D .............................................................. 109 IEC103 Device x, Data points – commands .......................................................................... 110 IEC103 Device x, Fault records, EOR-D ................................................................................. 111 Channel offset term ............................................................................................................. 114 IEC104 settings ..................................................................................................................... 117 IEC104 settings - SCADA ....................................................................................................... 119 IEC104 ComServer settings .................................................................................................. 120 IEC104 Supervisory settings ................................................................................................. 124 IEC104 time synchronization ................................................................................................ 126 IEC104 Device communication settings ............................................................................... 126 IEC104 commands ................................................................................................................ 127 IEC104 indications ................................................................................................................ 128 DNP3 basic settings REG-P ................................................................................................... 131 DNP3 Settings - SCADA REG-P (TK509, TK400)..................................................................... 133 DNP3 Settings - SCADA REG-P (TK517)................................................................................. 135 DNP3 device settings REG-P ................................................................................................. 136 DNP3 commands REG-P ....................................................................................................... 137 DNP3 indications REG-P ....................................................................................................... 138 DNP3 basic settings REG-PE(D) ............................................................................................ 139 DNP3 advanced settings REG-PE(D) ..................................................................................... 141 DNP3 device settings REG-PE(D) .......................................................................................... 142 DNP3 indications REG-PE(D) ................................................................................................ 143 DNP3 commands REG-PE(D) ................................................................................................ 145 CSO settings REG-P ............................................................................................................... 147 CSO settings REG-PE(D) - Channels ...................................................................................... 148 CSO Supervisory settings ...................................................................................................... 150 MODBUS basic settings ........................................................................................................ 151 MODBUS TCP basic settings ................................................................................................. 152 MODBUS advanced settings ................................................................................................. 154 Device communication settings for MODBUS...................................................................... 155 MODBUS device settings ...................................................................................................... 156 MODBUS indications ............................................................................................................ 157 MODBUS Commands............................................................................................................ 158 C37.118 basic settings .......................................................................................................... 159 C37.118 Serial Ports Settings ............................................................................................... 160 C37.118 SCADA Settings ....................................................................................................... 161 C37.118 ComServer Settings ................................................................................................ 162 C37.118 Supervisory settings ............................................................................................... 166 C37.118 Linked Devices ........................................................................................................ 167 C37.118 Time synchronization ............................................................................................. 168 C37.118 Internal communication ......................................................................................... 169 C37.118 Device Request Settings ......................................................................................... 170 List of Tables Table 75: C37.118 Indications.............................................................................................................. 171 Table 76: Status Data Configuration Data ........................................................................................... 200 Table 77: Keyword group for definition the position in poll-string: .................................................... 200 Table 78: Keyword group for event type definition: ........................................................................... 201 Table 79: Keyword group for definition the directed-behavior in directional protection activation information (ACD)..................................................................................................................................... 201 Table 80: Keywords group for definition complex data object behavior ............................................ 201 Table 81: Control value settings .......................................................................................................... 204 Table 82: Boolean conversion rules for [command] [convert (ctlVal)] ................................................ 206 Table 83: Double Point conversion rules for [command][convert(ctlVal)] .......................................... 209 Table 84: Multi command control value settings ................................................................................ 210 Table 85: Predicable Condition Extended Settings .............................................................................. 212 Table 86: Single command Set point settings...................................................................................... 214 Table 87: Settings of GOOSE light ........................................................................................................ 219 Table 88: GOOSE subscribed stream settings ...................................................................................... 224 Table 89: External GOOSE lightobject settings .................................................................................... 226 Table 90: Boolean conversion rules for GOOSE command ................................................................. 229 Table 91: Double Point conversion rules for GOOSE command .......................................................... 229 Table 92: IEC61850 Basic Settings ....................................................................................................... 232 Table 93: IEC61850 Serial Ports Settings ............................................................................................. 233 Table 94: IEC61850 Settings - SCADA .................................................................................................. 235 Table 95: ELAN extension over Ethernet (CSE) .................................................................................... 238 Table 96: IEC61850 - COM-Server........................................................................................................ 241 Table 97: IEC61850 Supervisory settings ............................................................................................. 244 Table 98: IEC61850 Time synchronization ........................................................................................... 247 Table 99: IEC61850 Internal communication ...................................................................................... 250 Table 100: IEC61850 Device x............................................................................................................. 252 Table 101: Protocols and templates................................................................................................... 255 Table 102: Settings of protocols and templates................................................................................. 263 Table 103: IEC101 settings ................................................................................................................. 265 Table 104: IEC103 settings, REG-P...................................................................................................... 266 Table 105: CSO settings, REG-P .......................................................................................................... 266 Table 106: DNP3 settings ................................................................................................................... 267 Table 107: Time synchronization ....................................................................................................... 267 Table 108: Diagnostic functions in the context of the device ............................................................ 272 List of Tables Page 283 We take care of it. Page 284 List of Tables Notes Notes Page 285 We take care of it. Page 286 Notes Notes Page 287 A. Eberle GmbH & Co. KG Frankenstraße 160 D-90461 Nuremberg Germany Tel.: +49 (0) 911 / 62 81 08-0 Fax: +49 (0) 911 / 62 81 08 96 E-Mail: [email protected] http://www.a-eberle.de Software - Version: Version: 11.0.6 _______________________________ Creation Date: 2008-02-15 Release Date: 2015-08-06 Copyright 2015 by A. Eberle GmbH & Co. KG Subject to change without prior notice. Configuration of Telecontrol Boards