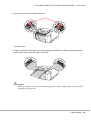
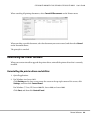
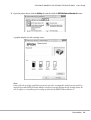
1
User’s Guide
BPS0139-02 EN
GP-C830/GP-M830/GP-C831/GP-M831/GP-C832/GP-M832
User’s Guide
Contents
Chapter 1 Getting to Know Your Printer
Features. . . . . . . . . . . . . . . . . . . . . . . . . . . . . . . . . . . . . . . . . . . . . . . . . . . . . . . . . . . . . . . . . . . . . . . . . . . . . . . 7
Chapter 2 Safety Instructions
Safety Instructions. . . . . . . . . . . . . . . . . . . . . . . . . . . . . . . . . . . . . . . . . . . . . . . . . . . . . . . . . . . . . . . . . . . . . . . 8
Warnings, Cautions, and Notes. . . . . . . . . . . . . . . . . . . . . . . . . . . . . . . . . . . . . . . . . . . . . . . . . . . . . . . . 8
Important safety instructions. . . . . . . . . . . . . . . . . . . . . . . . . . . . . . . . . . . . . . . . . . . . . . . . . . . . . . . . . . 8
For Turkish users. . . . . . . . . . . . . . . . . . . . . . . . . . . . . . . . . . . . . . . . . . . . . . . . . . . . . . . . . . . . . . . . . . 12
For Ukrainian users. . . . . . . . . . . . . . . . . . . . . . . . . . . . . . . . . . . . . . . . . . . . . . . . . . . . . . . . . . . . . . . . 12
For Brazilian users. . . . . . . . . . . . . . . . . . . . . . . . . . . . . . . . . . . . . . . . . . . . . . . . . . . . . . . . . . . . . . . . . 12
For Argentina users. . . . . . . . . . . . . . . . . . . . . . . . . . . . . . . . . . . . . . . . . . . . . . . . . . . . . . . . . . . . . . . . 13
Chapter 3 Paper Handling
Acceptable Paper Conditions. . . . . . . . . . . . . . . . . . . . . . . . . . . . . . . . . . . . . . . . . . . . . . . . . . . . . . . . . . . . . 15
Printing on Continuous Paper. . . . . . . . . . . . . . . . . . . . . . . . . . . . . . . . . . . . . . . . . . . . . . . . . . . . . . . . . . . . 15
Printing with the push tractor. . . . . . . . . . . . . . . . . . . . . . . . . . . . . . . . . . . . . . . . . . . . . . . . . . . . . . . . 16
Using the tear-off function. . . . . . . . . . . . . . . . . . . . . . . . . . . . . . . . . . . . . . . . . . . . . . . . . . . . . . . . . . . 20
Loading Special Paper. . . . . . . . . . . . . . . . . . . . . . . . . . . . . . . . . . . . . . . . . . . . . . . . . . . . . . . . . . . . . . . . . . . 22
Labels. . . . . . . . . . . . . . . . . . . . . . . . . . . . . . . . . . . . . . . . . . . . . . . . . . . . . . . . . . . . . . . . . . . . . . . . . . . . 22
Using the Micro Adjust Function. . . . . . . . . . . . . . . . . . . . . . . . . . . . . . . . . . . . . . . . . . . . . . . . . . . . . . . . . 23
Adjusting the tear-off position. . . . . . . . . . . . . . . . . . . . . . . . . . . . . . . . . . . . . . . . . . . . . . . . . . . . . . . 23
Adjusting the top-of-form position. . . . . . . . . . . . . . . . . . . . . . . . . . . . . . . . . . . . . . . . . . . . . . . . . . . . 24
Chapter 4 Printer Software
About Your Printer Software. . . . . . . . . . . . . . . . . . . . . . . . . . . . . . . . . . . . . . . . . . . . . . . . . . . . . . . . . . . . . 26
Using the Printer Driver. . . . . . . . . . . . . . . . . . . . . . . . . . . . . . . . . . . . . . . . . . . . . . . . . . . . . . . . . . . . . . . . . 26
Accessing the printer driver from Windows applications. . . . . . . . . . . . . . . . . . . . . . . . . . . . . . . . . . 27
Accessing the printer driver from the Start menu. . . . . . . . . . . . . . . . . . . . . . . . . . . . . . . . . . . . . . . . 27
Changing the printer driver settings. . . . . . . . . . . . . . . . . . . . . . . . . . . . . . . . . . . . . . . . . . . . . . . . . . . 28
Printing barcodes. . . . . . . . . . . . . . . . . . . . . . . . . . . . . . . . . . . . . . . . . . . . . . . . . . . . . . . . . . . . . . . . . . 28
Contents
2
GP-C830/GP-M830/GP-C831/GP-M831/GP-C832/GP-M832
User’s Guide
Printer Driver Settings Overview. . . . . . . . . . . . . . . . . . . . . . . . . . . . . . . . . . . . . . . . . . . . . . . . . . . . . . . . . . 29
Printer settings. . . . . . . . . . . . . . . . . . . . . . . . . . . . . . . . . . . . . . . . . . . . . . . . . . . . . . . . . . . . . . . . . . . . 30
Monitoring settings. . . . . . . . . . . . . . . . . . . . . . . . . . . . . . . . . . . . . . . . . . . . . . . . . . . . . . . . . . . . . . . . 31
Using EPSON Status Monitor 3. . . . . . . . . . . . . . . . . . . . . . . . . . . . . . . . . . . . . . . . . . . . . . . . . . . . . . . . . . . 32
Setting up EPSON Status Monitor 3. . . . . . . . . . . . . . . . . . . . . . . . . . . . . . . . . . . . . . . . . . . . . . . . . . . 32
Accessing EPSON Status Monitor 3. . . . . . . . . . . . . . . . . . . . . . . . . . . . . . . . . . . . . . . . . . . . . . . . . . . 34
Setting the Auto Tear-Off Function. . . . . . . . . . . . . . . . . . . . . . . . . . . . . . . . . . . . . . . . . . . . . . . . . . . . . . . 35
Setting the Buzzer. . . . . . . . . . . . . . . . . . . . . . . . . . . . . . . . . . . . . . . . . . . . . . . . . . . . . . . . . . . . . . . . . . . . . . 35
Setting whether the buzzer sounds when printing is finished. . . . . . . . . . . . . . . . . . . . . . . . . . . . . . 35
Setting whether the buzzer sounds when an error occurs. . . . . . . . . . . . . . . . . . . . . . . . . . . . . . . . . . 36
Using Reduce Scraping Mode. . . . . . . . . . . . . . . . . . . . . . . . . . . . . . . . . . . . . . . . . . . . . . . . . . . . . . . . . . . . 36
Adjusting the Print Position. . . . . . . . . . . . . . . . . . . . . . . . . . . . . . . . . . . . . . . . . . . . . . . . . . . . . . . . . . . . . . 36
USB Replacement Service. . . . . . . . . . . . . . . . . . . . . . . . . . . . . . . . . . . . . . . . . . . . . . . . . . . . . . . . . . . . . . . . 37
Installing USB Replacement Service. . . . . . . . . . . . . . . . . . . . . . . . . . . . . . . . . . . . . . . . . . . . . . . . . . . 37
Replacing a USB-connected printer. . . . . . . . . . . . . . . . . . . . . . . . . . . . . . . . . . . . . . . . . . . . . . . . . . . 38
BI Parallel Port Driver. . . . . . . . . . . . . . . . . . . . . . . . . . . . . . . . . . . . . . . . . . . . . . . . . . . . . . . . . . . . . . . . . . 38
EpsonNet Config. . . . . . . . . . . . . . . . . . . . . . . . . . . . . . . . . . . . . . . . . . . . . . . . . . . . . . . . . . . . . . . . . . . . . . . 39
Installing EpsonNet Config. . . . . . . . . . . . . . . . . . . . . . . . . . . . . . . . . . . . . . . . . . . . . . . . . . . . . . . . . . 40
EPSON Printer Setting. . . . . . . . . . . . . . . . . . . . . . . . . . . . . . . . . . . . . . . . . . . . . . . . . . . . . . . . . . . . . . . . . . 41
Setting Up Your Printer on a Network. . . . . . . . . . . . . . . . . . . . . . . . . . . . . . . . . . . . . . . . . . . . . . . . . . . . . 41
Sharing the printer. . . . . . . . . . . . . . . . . . . . . . . . . . . . . . . . . . . . . . . . . . . . . . . . . . . . . . . . . . . . . . . . . 41
Setting up your printer as a shared printer. . . . . . . . . . . . . . . . . . . . . . . . . . . . . . . . . . . . . . . . . . . . . . 42
Setting the clients. . . . . . . . . . . . . . . . . . . . . . . . . . . . . . . . . . . . . . . . . . . . . . . . . . . . . . . . . . . . . . . . . . 45
Canceling Printing. . . . . . . . . . . . . . . . . . . . . . . . . . . . . . . . . . . . . . . . . . . . . . . . . . . . . . . . . . . . . . . . . . . . . 47
Using the printer button. . . . . . . . . . . . . . . . . . . . . . . . . . . . . . . . . . . . . . . . . . . . . . . . . . . . . . . . . . . . 47
Using Windows. . . . . . . . . . . . . . . . . . . . . . . . . . . . . . . . . . . . . . . . . . . . . . . . . . . . . . . . . . . . . . . . . . . . 47
Uninstalling the Printer Software. . . . . . . . . . . . . . . . . . . . . . . . . . . . . . . . . . . . . . . . . . . . . . . . . . . . . . . . . 48
Uninstalling the printer driver and utilities. . . . . . . . . . . . . . . . . . . . . . . . . . . . . . . . . . . . . . . . . . . . . 48
Chapter 5 Control Panel
Using the Control Panel. . . . . . . . . . . . . . . . . . . . . . . . . . . . . . . . . . . . . . . . . . . . . . . . . . . . . . . . . . . . . . . . . 51
Control panel buttons and lights. . . . . . . . . . . . . . . . . . . . . . . . . . . . . . . . . . . . . . . . . . . . . . . . . . . . . . 51
Chapter 6 Troubleshooting
Using the Error Indicators. . . . . . . . . . . . . . . . . . . . . . . . . . . . . . . . . . . . . . . . . . . . . . . . . . . . . . . . . . . . . . . 55
Problems and Solutions. . . . . . . . . . . . . . . . . . . . . . . . . . . . . . . . . . . . . . . . . . . . . . . . . . . . . . . . . . . . . . . . . 57
Contents
3
GP-C830/GP-M830/GP-C831/GP-M831/GP-C832/GP-M832
User’s Guide
Power supply. . . . . . . . . . . . . . . . . . . . . . . . . . . . . . . . . . . . . . . . . . . . . . . . . . . . . . . . . . . . . . . . . . . . . . 57
Printing. . . . . . . . . . . . . . . . . . . . . . . . . . . . . . . . . . . . . . . . . . . . . . . . . . . . . . . . . . . . . . . . . . . . . . . . . . 57
Paper handling. . . . . . . . . . . . . . . . . . . . . . . . . . . . . . . . . . . . . . . . . . . . . . . . . . . . . . . . . . . . . . . . . . . . 60
Network problems. . . . . . . . . . . . . . . . . . . . . . . . . . . . . . . . . . . . . . . . . . . . . . . . . . . . . . . . . . . . . . . . . 61
Other problems. . . . . . . . . . . . . . . . . . . . . . . . . . . . . . . . . . . . . . . . . . . . . . . . . . . . . . . . . . . . . . . . . . . . 61
Correcting USB Problems. . . . . . . . . . . . . . . . . . . . . . . . . . . . . . . . . . . . . . . . . . . . . . . . . . . . . . . . . . . . . . . 61
Make sure that your computer is a Windows 8, 7, Vista, XP, or 2000 pre-installed model. . . . . . . 62
Printer does not work correctly with the USB cable. . . . . . . . . . . . . . . . . . . . . . . . . . . . . . . . . . . . . . 62
Clearing Paper Jams. . . . . . . . . . . . . . . . . . . . . . . . . . . . . . . . . . . . . . . . . . . . . . . . . . . . . . . . . . . . . . . . . . . . 62
Chapter 7 Where To Get Help
Technical Support Web Site. . . . . . . . . . . . . . . . . . . . . . . . . . . . . . . . . . . . . . . . . . . . . . . . . . . . . . . . . . . . . . 64
Contacting Customer Support. . . . . . . . . . . . . . . . . . . . . . . . . . . . . . . . . . . . . . . . . . . . . . . . . . . . . . . . . . . . 64
Before Contacting Epson. . . . . . . . . . . . . . . . . . . . . . . . . . . . . . . . . . . . . . . . . . . . . . . . . . . . . . . . . . . . 64
Help for Users in Australia. . . . . . . . . . . . . . . . . . . . . . . . . . . . . . . . . . . . . . . . . . . . . . . . . . . . . . . . . . 65
Help for Users in Singapore. . . . . . . . . . . . . . . . . . . . . . . . . . . . . . . . . . . . . . . . . . . . . . . . . . . . . . . . . . 66
Help for Users in Thailand. . . . . . . . . . . . . . . . . . . . . . . . . . . . . . . . . . . . . . . . . . . . . . . . . . . . . . . . . . . 66
Help for Users in Indonesia. . . . . . . . . . . . . . . . . . . . . . . . . . . . . . . . . . . . . . . . . . . . . . . . . . . . . . . . . . 66
Help for Users in Hong Kong. . . . . . . . . . . . . . . . . . . . . . . . . . . . . . . . . . . . . . . . . . . . . . . . . . . . . . . . 66
Help for Users in Malaysia. . . . . . . . . . . . . . . . . . . . . . . . . . . . . . . . . . . . . . . . . . . . . . . . . . . . . . . . . . . 67
Help for Users in India. . . . . . . . . . . . . . . . . . . . . . . . . . . . . . . . . . . . . . . . . . . . . . . . . . . . . . . . . . . . . . 67
Help for Users in the Philippines. . . . . . . . . . . . . . . . . . . . . . . . . . . . . . . . . . . . . . . . . . . . . . . . . . . . . 67
Help for Users in Europe. . . . . . . . . . . . . . . . . . . . . . . . . . . . . . . . . . . . . . . . . . . . . . . . . . . . . . . . . . . . 68
Help for Users in North America. . . . . . . . . . . . . . . . . . . . . . . . . . . . . . . . . . . . . . . . . . . . . . . . . . . . . 68
Help for Users in Latin America. . . . . . . . . . . . . . . . . . . . . . . . . . . . . . . . . . . . . . . . . . . . . . . . . . . . . . 69
Chapter 8 Consumables
Replacing the Ink Cartridges. . . . . . . . . . . . . . . . . . . . . . . . . . . . . . . . . . . . . . . . . . . . . . . . . . . . . . . . . . . . . 71
Genuine Epson ink cartridges. . . . . . . . . . . . . . . . . . . . . . . . . . . . . . . . . . . . . . . . . . . . . . . . . . . . . . . . 71
Checking the ink cartridge status. . . . . . . . . . . . . . . . . . . . . . . . . . . . . . . . . . . . . . . . . . . . . . . . . . . . . 71
Precautions on ink cartridge replacement. . . . . . . . . . . . . . . . . . . . . . . . . . . . . . . . . . . . . . . . . . . . . . 73
Replacing an ink cartridge. . . . . . . . . . . . . . . . . . . . . . . . . . . . . . . . . . . . . . . . . . . . . . . . . . . . . . . . . . . 75
Chapter 9 Product Information
Printer Parts. . . . . . . . . . . . . . . . . . . . . . . . . . . . . . . . . . . . . . . . . . . . . . . . . . . . . . . . . . . . . . . . . . . . . . . . . . . 80
Contents
4
GP-C830/GP-M830/GP-C831/GP-M831/GP-C832/GP-M832
User’s Guide
Printer Specifications. . . . . . . . . . . . . . . . . . . . . . . . . . . . . . . . . . . . . . . . . . . . . . . . . . . . . . . . . . . . . . . . . . . 81
Mechanical. . . . . . . . . . . . . . . . . . . . . . . . . . . . . . . . . . . . . . . . . . . . . . . . . . . . . . . . . . . . . . . . . . . . . . . 81
Electronic. . . . . . . . . . . . . . . . . . . . . . . . . . . . . . . . . . . . . . . . . . . . . . . . . . . . . . . . . . . . . . . . . . . . . . . . . 83
Electrical. . . . . . . . . . . . . . . . . . . . . . . . . . . . . . . . . . . . . . . . . . . . . . . . . . . . . . . . . . . . . . . . . . . . . . . . . 88
Environmental. . . . . . . . . . . . . . . . . . . . . . . . . . . . . . . . . . . . . . . . . . . . . . . . . . . . . . . . . . . . . . . . . . . . 89
Paper. . . . . . . . . . . . . . . . . . . . . . . . . . . . . . . . . . . . . . . . . . . . . . . . . . . . . . . . . . . . . . . . . . . . . . . . . . . . 89
Printable area. . . . . . . . . . . . . . . . . . . . . . . . . . . . . . . . . . . . . . . . . . . . . . . . . . . . . . . . . . . . . . . . . . . . . . 92
AC Adapter Electrical Specifications. . . . . . . . . . . . . . . . . . . . . . . . . . . . . . . . . . . . . . . . . . . . . . . . . . . . . . . 93
Command Lists. . . . . . . . . . . . . . . . . . . . . . . . . . . . . . . . . . . . . . . . . . . . . . . . . . . . . . . . . . . . . . . . . . . . . . . . 94
Character Tables. . . . . . . . . . . . . . . . . . . . . . . . . . . . . . . . . . . . . . . . . . . . . . . . . . . . . . . . . . . . . . . . . . . . . . . 94
Standards and Approvals. . . . . . . . . . . . . . . . . . . . . . . . . . . . . . . . . . . . . . . . . . . . . . . . . . . . . . . . . . . . . . . . 95
Taiwan. . . . . . . . . . . . . . . . . . . . . . . . . . . . . . . . . . . . . . . . . . . . . . . . . . . . . . . . . . . . . . . . . . . . . . . . . . . 96
North America. . . . . . . . . . . . . . . . . . . . . . . . . . . . . . . . . . . . . . . . . . . . . . . . . . . . . . . . . . . . . . . . . . . . 96
Europe. . . . . . . . . . . . . . . . . . . . . . . . . . . . . . . . . . . . . . . . . . . . . . . . . . . . . . . . . . . . . . . . . . . . . . . . . . . 97
Checking the Print Head Nozzles. . . . . . . . . . . . . . . . . . . . . . . . . . . . . . . . . . . . . . . . . . . . . . . . . . . . . . . . . 97
Using the Nozzle Check utility for Windows. . . . . . . . . . . . . . . . . . . . . . . . . . . . . . . . . . . . . . . . . . . . 97
Using the control panel. . . . . . . . . . . . . . . . . . . . . . . . . . . . . . . . . . . . . . . . . . . . . . . . . . . . . . . . . . . . . 98
Cleaning the Print Head. . . . . . . . . . . . . . . . . . . . . . . . . . . . . . . . . . . . . . . . . . . . . . . . . . . . . . . . . . . . . . . . . 99
Using the Head Cleaning utility for Windows. . . . . . . . . . . . . . . . . . . . . . . . . . . . . . . . . . . . . . . . . . . 99
Using the control panel. . . . . . . . . . . . . . . . . . . . . . . . . . . . . . . . . . . . . . . . . . . . . . . . . . . . . . . . . . . . 100
Aligning the Print Head. . . . . . . . . . . . . . . . . . . . . . . . . . . . . . . . . . . . . . . . . . . . . . . . . . . . . . . . . . . . . . . . 101
Adjusting the media feed. . . . . . . . . . . . . . . . . . . . . . . . . . . . . . . . . . . . . . . . . . . . . . . . . . . . . . . . . . . 101
Adjusting the bi-directional printing. . . . . . . . . . . . . . . . . . . . . . . . . . . . . . . . . . . . . . . . . . . . . . . . . 101
Printing the Status Sheet. . . . . . . . . . . . . . . . . . . . . . . . . . . . . . . . . . . . . . . . . . . . . . . . . . . . . . . . . . . . . . . . 102
General information. . . . . . . . . . . . . . . . . . . . . . . . . . . . . . . . . . . . . . . . . . . . . . . . . . . . . . . . . . . . . . . 102
Network settings. . . . . . . . . . . . . . . . . . . . . . . . . . . . . . . . . . . . . . . . . . . . . . . . . . . . . . . . . . . . . . . . . . 103
Printer settings. . . . . . . . . . . . . . . . . . . . . . . . . . . . . . . . . . . . . . . . . . . . . . . . . . . . . . . . . . . . . . . . . . . 103
Initializing the Network Setting. . . . . . . . . . . . . . . . . . . . . . . . . . . . . . . . . . . . . . . . . . . . . . . . . . . . . . . . . . 103
Cleaning the Printer. . . . . . . . . . . . . . . . . . . . . . . . . . . . . . . . . . . . . . . . . . . . . . . . . . . . . . . . . . . . . . . . . . . 103
Cleaning the outer case. . . . . . . . . . . . . . . . . . . . . . . . . . . . . . . . . . . . . . . . . . . . . . . . . . . . . . . . . . . . . 104
Cleaning the inside of the printer. . . . . . . . . . . . . . . . . . . . . . . . . . . . . . . . . . . . . . . . . . . . . . . . . . . . 104
Cleaning the paper feed rollers. . . . . . . . . . . . . . . . . . . . . . . . . . . . . . . . . . . . . . . . . . . . . . . . . . . . . . 106
Transporting the Printer. . . . . . . . . . . . . . . . . . . . . . . . . . . . . . . . . . . . . . . . . . . . . . . . . . . . . . . . . . . . . . . . 107
Copyright and Trademarks
Operating System Versions
Contents
5
GP-C830/GP-M830/GP-C831/GP-M831/GP-C832/GP-M832
User’s Guide
Index
Contents
6
GP-C830/GP-M830/GP-C831/GP-M831/GP-C832/GP-M832
User’s Guide
Chapter 1
Getting to Know Your Printer
Features
®
Your EPSON GP-C830/GP-M830/GP-C831/GP-M831/GP-C832/GP-M832 is an ink jet printer
with a tractor feeder. Your printer provides high-quality printing and superior performance in a
compact design. The printer has the following features:
❏ The ability to handle a wide range of paper types, including continuous medicine bags, labels
(continuous base sheet), continuous plain paper, and other paper with sprocket holes.
❏ The ability to use individual, large-capacity ink cartridges. Durable design for high-volume
printing.
❏ The pigment inks that are used achieve high-quality printing on plain paper and have excellent
waterproof capability.
Your printer comes packaged with the printer driver and other software, including the EPSON Status
Monitor 3 utility for Microsoft Windows 8, 7, Vista, XP, Server 2012, Server 2008 R2, Server 2008, and
Server 2003. The EPSON Status Monitor 3 utility lets you check the status of your printer quickly and
easily.
Getting to Know Your Printer
7
GP-C830/GP-M830/GP-C831/GP-M831/GP-C832/GP-M832
User’s Guide
Chapter 2
Safety Instructions
Safety Instructions
Warnings, Cautions, and Notes
! Warnings
must be followed carefully to avoid bodily injury.
! Cautions
must be observed to avoid damage to your equipment.
Notes
contain important information and useful tips on the operation of your printer.
Important safety instructions
Read all of these safety instructions before using the printer. In addition, follow all warnings and
instructions marked on the printer itself.
When setting up the printer
! Warning:
Use the specified AC Adapter (EPSON AC Adapter K, Model: M248A) only.
❏ Do not place the printer on an unstable surface or near a radiator or heat source.
❏ Place the printer on a flat, stable surface. Tilting or placing the printer at an angle may adversely
affect the print quality.
❏ Do not place the printer on a soft, unstable surface like a bed or a sofa, or in a small, enclosed area,
as this restricts ventilation.
❏ Do not block or cover the slots and openings in the printer’s cabinet, and do not insert objects
through the slots.
❏ Leave adequate room around the printer for easy operation and maintenance.
Safety Instructions
8
GP-C830/GP-M830/GP-C831/GP-M831/GP-C832/GP-M832
User’s Guide
❏ Place the printer where you can easily connect it to a interface cable, if necessary.
❏ Use only the type of power source indicated on the printer’s label. If you are not sure of the power
supply specifications in your area, contact your local power company or consult your dealer.
❏ Connect all equipment to properly grounded electrical outlets. Avoid using outlets on the same
circuit as photocopiers or air control systems that regularly switch on and off.
❏ Do not use a damaged or frayed power cord.
❏ The power cord should be placed to avoid abrasions, cuts, fraying, crimping, kinking, and other
damage.
❏ If you use an extension cord with the printer, make sure the total ampere rating of all devices
plugged into the extension cord does not exceed the cord’s ampere rating. Also, make sure the total
ampere of all devices plugged into the electrical outlet does not exceed the electrical outlet’s
ampere rating.
❏ Use only the power cord that comes with this product. Use of another cord may result in fire or
electric shock.
❏ This product’s power cord is for use with this product only. Use with other equipment may result
in fire or electric shock.
❏ Be sure the AC power cord meets the relevant local safety standards.
❏ Depending on the area, the interface cable may be included with the product. If so, use that cable.
❏ Seiko Epson Corporation shall not be held liable for any damage resulting from electromagnetic
interference that occurs from the use of any interface cables other than those designated as Epson
approved products. For details about approved cables, contact Epson customer support.
❏ Avoid using or storing the printer in places subject to rapid changes in temperature and humidity.
Also, keep it away from direct sunlight, strong light, heat sources, or excessive moisture or dust.
❏ Avoid places subject to shocks and vibrations.
❏ Place the printer near a wall outlet where you can easily unplug the power cord.
❏ Keep the entire computer system away from potential sources of electromagnetic interference,
such as loudspeakers or the base units of cordless telephones.
❏ Avoid electrical outlets controlled by wall switches or automatic timers. An interruption in power
can erase information in the memory of your printer or computer. Also, avoid outlets on the same
circuit as large motors or other appliances that can cause voltage fluctuations.
❏ Use a grounded power outlet; do not use an adapter plug.
Safety Instructions
9
GP-C830/GP-M830/GP-C831/GP-M831/GP-C832/GP-M832
User’s Guide
❏ If you plan to use a printer stand, follow these guidelines:
- Use a stand that can support at least twice the weight of the printer.
- Never use a stand that tilts the printer. The printer should always be kept level.
- Position your printer’s power cord and interface cable so they do not interfere with paper
feeding. If possible, secure the cables to a leg of the printer stand.
When maintaining the printer
❏ Unplug the printer before cleaning it, and always clean it with a damp cloth only.
❏ Do not spill liquid onto the printer.
❏ Do not attempt to service the printer yourself except as specifically explained in this manual.
❏ Unplug the printer and refer servicing to qualified service personnel under the following
conditions:
i. If the power cord or plug is damaged.
ii. If liquid has entered the printer.
iii. If the printer has been dropped or the cabinet damaged.
iv. If the printer does not operate normally or exhibits a distinct change in performance.
❏ Do not use aerosol blowers which contain flammable gas inside or around this product. Doing so
may cause fire.
❏ Adjust only those controls that are covered in this manual.
When handling paper
Do not load paper that is curled or has been folded.
When operating the printer
❏ Adjust only those controls that are covered in the user documentation. Improper adjustment of
other controls may result in damage requiring extensive repair by a qualified technician.
❏ When the printer encounter difficulties, turn off the printer, and then unplug the power cord from
the electrical outlet.
When handling ink cartridges
Observe the following when handling ink cartridges:
❏ Keep ink cartridges out of the reach of children and do not drink the ink.
Safety Instructions
10
GP-C830/GP-M830/GP-C831/GP-M831/GP-C832/GP-M832
User’s Guide
❏ If ink gets on your skin, wash it off with soap and water. If it gets in your eyes, flush them
immediately with water.
❏ For best results, shake the ink cartridge four or five times.
! Caution:
Do not shake cartridges (that have been installed previously) with too much force.
❏ Use an ink cartridge prior to the date printed on the cartridge carton.
❏ Use up the ink cartridge within six months of installation for best results.
❏ Do not disassemble or modify the ink cartridge; otherwise, you may not be able to print normally.
❏ Store ink cartridges in a cool, dark place.
❏ After bringing an ink cartridge inside from a cold storage site, allow it to warm up at room
temperature for at least three hours before using it.
❏ Do not touch the green IC chip on the side of the cartridge. This may affect normal operation and
printing.The IC chip on this ink cartridge retains a variety of cartridge related-information, such
as the ink cartridge status, so that the cartridge may be removed and reinserted freely. If you
remove an ink cartridge for later use, protect the ink supply area from dirt and dust, and store it in
the same environment as this product. Note that there is a valve in the ink supply port, making
covers or plugs unnecessary, but care is needed to prevent the ink from staining items that the
cartridge touches. Do not touch the ink supply port or surrounding area.
Safety Instructions
11
GP-C830/GP-M830/GP-C831/GP-M831/GP-C832/GP-M832
User’s Guide
Restriction of use
When this product is used for applications requiring high reliability/safety, such as transportation
devices related to aviation, rail, marine, automotive, etc.; disaster prevention devices; various safety
devices, etc.; or functional/precision devices, etc., you should use this product only after giving
consideration to including fail-safes and redundancies into your design to maintain safety and total
system reliability. Because this product was not intended for use in applications requiring extremely
high reliability/safety such as aerospace equipment, main communication equipment, nuclear power
control equipment, or medical equipment related to direct medical care etc., please make your own
judgment on this product's suitability after a full evaluation.
For Turkish users
AEEE Yönetmeliğine Uygundur.
For Ukrainian users
Обладнання відповідає вимогам Технічного регламенту обмеження використання деяких
небезпечних речовин в електричному та електронному обладнанні.
For Brazilian users
A Epson preocupa-se com o meio ambiente e sabe que o planejamento para o futuro requer um forte
compromisso ambiental. Para isso, nos empenhamos em criar produtos inovadores que são
confiáveis, recicláveis e eficientes. Produtos melhores utilizando menos recursos naturais para ajudar
a garantir um futuro melhor para todos.
As embalagens deste produto - papelão, plástico, isopor e espuma - são recicláveis e podem ser
entregues a cooperativas de reciclagem, postos de recolhimento de resíduos ou empresas recicladoras.
Os materiais que compõem o produto - plástico, metais, placa eletrônica e cartucho - são recicláveis. O
produto não deve ser desmontado, deve ser encaminhado para os Centros de Serviços Autorizados
que darão o destino ambientalmente adequado. Consulte em nosso site - http://
global.latin.epson.com/br os Centros de Serviços Autorizados.
Todos os Centros de Serviços Autorizados podem receber equipamentos da marca Epson destinados
para reciclagem.
Conheça nossas ações ambientais e o Programa de Coleta de Cartuchos (www.epson.com.br/coleta)
em nosso site.
Safety Instructions
12
GP-C830/GP-M830/GP-C831/GP-M831/GP-C832/GP-M832
User’s Guide
For Argentina users
When handling AC adapter
! Precaución:
Confirme que el cable de alimentación de CA cumpla con las normas de seguridad locales
pertinentes.
❏ Coloque la impresora y la fuente externa de poder cerca a una toma eléctrica de pared de la que
pueda desenchufar la fuete externa de poder fácilmente.
❏ No coloque el cable de alimentación de CA en lugares donde se pueda enroscar, cortar, desgastar,
deshilachar o rizar. No coloque ningún objeto sobre el cable de alimentación de CA y no coloque la
fuente extrerna de poder o el cable de alimentación en zonas donde se puedan pisar. Tome especial
precaución de no doblar los cables de alimentación en los extremos y en los puntos de entrada de la
fuente extrerna de poder.
❏ Utilice únicamente la fuente extrerna de poder suministrada con la impresora. El uso de otro
fuente externa de poder podría provocar incendios, descargas eléctricas u otros daños.
❏ La fuente extrerna de poder está diseñada para ser utilizada con la impresora a la que acompaña.
No intente usarla con otros dispositivos electrónicos, a menos que esté especificado.
❏ Utilice sólo el tipo de corriente indicado en la etiqueta de la fuente extrerna de poder. Use siempre
tomas de corriente eléctricas, domésticas y estándar con el cable de alimentación que cumplan con
las regulaciones locales de seguridad.
❏ No use tomas de corriente que se encuentren en el mismo circuito que fotocopiadoras o sistemas
de aire acondicionado que se enciendan y apaguen periódicamente. Si utiliza un cable de extensión
con el impresor, compruebe que la suma de las corrientes nominales en amperios de todos los
dispositivos conectados al cable de extensión no sea superior a la corriente nominal de dicho cable.
Además, compruebe que el total de amperios de intensidad de todos los dispositivos enchufados a
la toma eléctrica de pared no supere el total de amperios de la toma. No coloque varias cargas en la
toma eléctrica de la pared.
❏ Nunca desmonte, modifique o intente reparar Ud. mismo la fuente externa de poder o la
impresora.
❏ No inserte objetos en las aberturas del impresor, pues podrían entrar en contacto con puntos de
voltaje peligrosos o provocar cortocircuitos en dichos elementos. Existe el peligro de descargas
eléctricas.
Safety Instructions
13
GP-C830/GP-M830/GP-C831/GP-M831/GP-C832/GP-M832
User’s Guide
❏ Desenchufe la impresora y la fuente externa de poder antes de limpiar la impresora. Límpiela sólo
con un paño húmedo. No utilice productos de limpieza líquidos o en aerosol. No aplique líquido
de ningún tipo directamente al cristal de la impresora.
❏ Desenchufe la impresora y la fuente externa de poder y póngase en contacto con un técnico de
servicio ante las siguientes situaciones: el cable de CA o el enchufe están estropeados; ha entrado
líquido en el impresor o en la fuente externa de poder; la impresora o la fuente externa de poder se
han caído o se ha dañado la carcasa; la impresora o la fuente externa de poder no funcionan con
normalidad o muestran un cambio en su rendimiento. (No ajuste los controles que no hayan sido
especificados en las instrucciones de funcionamiento).
❏ Cuando no vaya a utilizar el impresor durante un periodo de tiempo prolongado, desenchufe la
fuente externa de poder de la toma eléctrica.
Safety Instructions
14
GP-C830/GP-M830/GP-C831/GP-M831/GP-C832/GP-M832
User’s Guide
Chapter 3
Paper Handling
Acceptable Paper Conditions
! Caution:
❏ Do not use paper that is folded, creased, curled, torn, stained, or stamped.
A: Torn
B: Curled
C: Creased
D: Folded
❏ Use only paper that meets the paper specifications. For more information, see “Paper” on
page 89.
Printing on Continuous Paper
Your printer can handle continuous paper with the push tractor.
Paper Handling
15
GP-C830/GP-M830/GP-C831/GP-M831/GP-C832/GP-M832
User’s Guide
Position the printer and continuous paper as shown in the illustrations below so that the paper is
loaded smoothly.
* 1 m or less
Note:
❏ The printing position may be misaligned if the continuous paper touches the printer’s stand or any
cables. Position the continuous paper so that it is loaded smoothly. (A)
❏ Overlapping paper may be fed if the top of the stack of continuous paper is as high as or higher than
the push tractor. (B)
❏ Be sure to remove the continuous paper from its box and place it within 1 m of the printer. (C)
❏ Load the continuous paper straight into the printer. (D)
Printing with the push tractor
Follow these steps to load continuous paper using the push tractor.
Note:
Do not touch the paper sensor on the left sprocket unit.
1. Turn off the printer.
Paper Handling
16
GP-C830/GP-M830/GP-C831/GP-M831/GP-C832/GP-M832
User’s Guide
2. Facing the back of the printer, release the right sprocket unit by pulling the sprocket lock lever
up.
3. Slide the right sprocket to match the width of your paper, but do not lock it.
Note:
The left sprocket unit is fixed in place and cannot be adjusted.
4. Slide the center paper support halfway between the two sprockets.
Paper Handling
17
GP-C830/GP-M830/GP-C831/GP-M831/GP-C832/GP-M832
User’s Guide
5. Open the sprocket covers of both sprockets.
* sprocket cover
6. Fit the first two holes of the paper over the sprocket pins on both sides. Slide the right sprocket unit
slightly to the right so that the paper is not slack.
! Caution:
Make sure the first sheet of your continuous paper has a clean, straight edge so that it can feed
smoothly into the printer.
Paper Handling
18
GP-C830/GP-M830/GP-C831/GP-M831/GP-C832/GP-M832
User’s Guide
7. Close the sprocket covers.
8. Slide the right sprocket unit to remove any slack in the paper and lock it in place.
9. Turn on the printer.
10. Press the Load/Eject button to feed the paper to the top-of-form position. When the printer
receives data, it begins printing.
11. After you finish printing, follow the steps in the next section to tear off your printed document. If
the first printed line on your page appears too high or low, you can change its position using the
Micro Adjust function. See “Adjusting the top-of-form position” on page 24.
Note:
❏ After you finish printing, tear off your printed document, and then turn off the printer. If you turn the
printer off and on without tearing off the printed document, the top-of-form position setting may
become misadjusted.
Paper Handling
19
GP-C830/GP-M830/GP-C831/GP-M831/GP-C832/GP-M832
User’s Guide
❏ If the trailing edge of the paper is past the paper sensor after the printed document is torn off, the
paper will be fed forward without being printed.
❏ Do not pull the loaded paper out of the tractor unit. Doing so may cause paper jams or printer
malfunctions. Also, the top-of-form position setting may become misadjusted.
❏ The last page of continuous paper that is printed may have low print quality.
❏ If the first line on your page appears too high or low, you can change its position using the Micro
Adjust function. For more information, see “Adjusting the top-of-form position” on page 24.
❏ Make sure that the right and left edges of continuous paper are straight and not slack when you load
the paper.
❏ Do not pull the paper while printing. Doing so may adversely affect the print quality.
! Caution:
Never open the top cover or ink cartridge cover while printing.
Using the tear-off function
You can use the tear-off function to advance your continuous paper to the printer’s tear-off position
after you finish printing.
❏ To tear off the printed sheet manually after printing, press the Tear Off button to advance the
perforation of the paper to the tear-off position.
❏ To enable the auto tear-off function, turn on the Auto Tearoff Setting from the printer driver. The
printer advances the perforation of the paper to the tear-off position automatically when a set time
has passed after printing. When the printer receives the print data, the printer feeds the paper
backward to the top-of-form position automatically. For more information, see “Setting the Auto
Tear-Off Function” on page 35.
If the paper perforation is not in the desired tear-off position, you can use the Micro Adjust function to
adjust the position of the perforation. For more information, see “Adjusting the tear-off position” on
page 23.
Follow these steps to use the auto tear-off function.
Paper Handling
20
GP-C830/GP-M830/GP-C831/GP-M831/GP-C832/GP-M832
User’s Guide
1. After printing is finished and the printer advances the paper to the tear-off position, tear off all
printed pages while holding the paper.
* perforation
Note:
The time until the paper begins to advance to the tear-off position after printing is finished can be set.
To change the settings, see “Setting the Auto Tear-Off Function” on page 35.
2. When you resume printing, the printer feeds the paper back to the top-of-form position and
begins printing.
Removing continuous paper
Follow these steps to remove continuous paper from the printer.
1. After printing is finished and the printer advances the paper to the tear-off position, tear off all
printed pages.
2. Press the Tear Off button to feed the paper backward to the top-of-form position.
3. Press the Load/Eject button to feed the paper backward out of the printer to the standby position.
Note:
Do not feed the paper backward 558.8 mm (22 inches) or more using the Load/Eject button. Doing
so may cause paper jams.
4. To completely remove the paper from the printer, open the sprocket covers. Remove the paper
from the tractor unit, and then close the sprocket covers.
Paper Handling
21
GP-C830/GP-M830/GP-C831/GP-M831/GP-C832/GP-M832
User’s Guide
Loading Special Paper
Labels
You can use only labels with a continuous base sheet. Single-sheet labels cannot be used.
Follow these steps to load labels.
! Caution:
❏ Use labels only under normal operating conditions because labels are especially sensitive to
temperature and humidity.
❏ When using glossy labels, tear off the printed label form and turn off the printer after printing is
finished. Do not leave the printed label form connected to the unprinted label forms.
1. Make sure that your software settings keep the printing entirely within the printable area. For
information about the printable area, see “Printable area” on page 92.
2. Load labels as described in “Printing on Continuous Paper” on page 15.
Ejecting labels
Always follow these steps to tear off and eject labels.
! Caution:
Never feed labels backward using the Load/Eject button. Labels can easily peel off their backing
and jam the printer.
1. At the back of your printer, tear off the last label form that has entered the printer along the
perforation. See the illustration below.
Paper Handling
22
GP-C830/GP-M830/GP-C831/GP-M831/GP-C832/GP-M832
User’s Guide
2. Press the FF button to eject the last label form forward.
Using the Micro Adjust Function
The Micro Adjust function allows you to move the paper forward or backward in 0.141 mm
(1/180-inch) increments so that you can make precise adjustments to the top-of-form and tear-off
positions.
Adjusting the tear-off position
If the paper perforation is not in the desired tear-off position, you can use the Micro Adjust function to
adjust the position of the perforation.
Follow these steps to adjust the tear-off position.
Note:
Your tear-off position setting remains in effect until you change it, even if you turn off the printer.
1. Make sure the paper is at the current tear-off position.
2. Hold down the Pause button for about three seconds. The Pause light flashes and the printer
enters Micro Adjust mode.
3. Press the FF D button to feed the paper forward, or press the Load/Eject U button to feed the
paper backward, until the paper perforation is in the desired tear-off position.
Paper Handling
23
GP-C830/GP-M830/GP-C831/GP-M831/GP-C832/GP-M832
User’s Guide
Note:
The printer has a minimum and a maximum tear-off position (up to 50.8 mm [2 inches] backward
or 25.4 mm [1 inch] forward). If you try to adjust the tear-off position beyond these limits, the printer
beeps and stops moving the paper. When the paper reaches the default tear-off position, the printer
also beeps.
4. Tear off the printed pages.
5. Press the Pause button to exit Micro Adjust mode.
Adjusting the top-of-form position
The top-of-form position is the position on the page where the printer starts printing. If your printing
appears too high or low on the page, you can use the Micro Adjust function to adjust the top-of-form
position.
Follow these steps to adjust the top-of-form position.
Note:
❏ Your top-of-form position setting remains in effect until you change it, even if you turn off the
printer.
❏ The top margin setting made in some applications overrides the top-of-form position setting you
make with the Micro Adjust function. If necessary, adjust the top-of-form position in your
application.
1. Open the top cover.
2. Hold down the Pause button for about three seconds. The Pause light flashes, the printer enters
Micro Adjust mode, and then the paper is advanced to the current top-of-form position.
3. Press the FF D button to move the top-of-form position down on the page, or press the Load/Eject
U button to move the top-of-form position up on the page.
Note:
❏ The printer has a minimum and a maximum top-of-form position (up to 23.4 mm [0.921 inches]
backward or 50.8 mm [2 inches] forward). If you try to adjust it beyond these limits, the printer
beeps and stops moving the paper.
❏ When the paper reaches the default top-of-form position, the printer also beeps and stops moving
the paper briefly. You can use the default setting as a reference point when adjusting the
top-of-form position.
Paper Handling
24
GP-C830/GP-M830/GP-C831/GP-M831/GP-C832/GP-M832
User’s Guide
You can adjust the top-of-form position by opening the top cover and aligning the paper with the
scale in the printer.
* top-of-form position
4. Press the Pause button to exit Micro Adjust mode.
Note:
❏ If the forward adjustment of the top-of-form position is longer than the page length of the paper that
you are using, you cannot print on the page that has been moved forward.
❏ If the backward adjustment of the top-of-form position is longer than the page length of the paper
that you are using, you cannot print the first part of the document or image.
Paper Handling
25
GP-C830/GP-M830/GP-C831/GP-M831/GP-C832/GP-M832
User’s Guide
Chapter 4
Printer Software
About Your Printer Software
The Epson software includes the printer driver and EPSON Status Monitor 3.
The printer driver is software that allows your computer to control the printer. You need to install the
printer driver so your Windows applications can take full advantage of the printer’s capabilities.
EPSON Status Monitor 3 allows you to monitor the status of your printer, alerts you when errors
occur, and provides you with troubleshooting tips. EPSON Status Monitor 3 is automatically installed
when you install the printer driver.
Note:
❏ Before proceeding, make sure you have installed the printer driver on your computer described in the
Start Here.
❏ On-screen displays on the following pages may differ depending on the version of the printer driver.
Using the Printer Driver
You can access the printer driver from your Windows applications or from the Start menu.
❏ When you access the printer driver from a Windows application, any settings you make apply only
to the application you are using. For more information, see “Accessing the printer driver from
Windows applications” on page 27.
❏ When you access the printer driver from the Start menu, the printer driver settings you make apply
to all your applications. For more information, see “Accessing the printer driver from the Start
menu” on page 27.
To check and change the printer driver settings, see “Changing the printer driver settings” on
page 28.
Note:
While many Windows applications override the settings made with the printer driver, some do not.
Therefore, you must verify that the printer driver settings match your requirements.
Printer Software
26
GP-C830/GP-M830/GP-C831/GP-M831/GP-C832/GP-M832
User’s Guide
Accessing the printer driver from Windows applications
Follow these steps to access the printer driver from a Windows application.
1. Select Print Setup or Print from the File menu of your application. In the Print or Print Setup
dialog box displayed, make sure that your printer is selected.
2. Click Preferences, Printer Properties, or Options. (The button you click depends on your
application and you may need to click a combination of these buttons.) The Document Properties
dialog box appears. The Main, Paper, Layout, and Utility menus in the dialog box contain the
printer driver settings.
3. To view a menu, click the corresponding tab at the top of the dialog box. To change the settings, see
“Changing the printer driver settings” on page 28.
Accessing the printer driver from the Start menu
Follow these steps to access the printer driver from the Start screen or Start menu.
Note:
The screen shots used in this procedure are from Windows XP. They may vary in appearance from what
actually appears on your screen; however, the instructions are the same.
1. For Windows 8 or Server 2012:
Click Desktop on the Start screen, move the cursor to the top-right corner of the screen, click
Settings, and then click Control Panel. Next, click View devices and printers from the
Hardware and Sound category.
For Windows 7 or Server 2008 R2:
Click Start, and then click Devices and Printers.
For Windows Vista or Server 2008:
Click Start, click Control Panel, click Hardware and Sound, and then click Printers.
For Windows XP Professional or Server 2003:
Click Start, and then click Printers and Faxes.
2. Right-click your printer icon, and then click Printing Preferences. The Printing Preferences
dialog box appears. The Main, Paper, Layout, and Utility menus in the dialog box contain the
printer driver settings.
Printer Software
27
GP-C830/GP-M830/GP-C831/GP-M831/GP-C832/GP-M832
User’s Guide
If you click Printer properties (Windows 8, 7, Server 2012, or Server 2008 R2) or Properties
(Windows Vista, XP, Server 2008, or Server 2003) in the menu displayed by right-clicking the
printer icon, the Properties dialog box appears. The menus in the dialog box are used to make the
printer driver settings.
Note:
For Windows 8, 7, Server 2012, or Server 2008 R2, do not click Properties even though both
Properties and Printer properties are displayed in the menu.
3. To view a menu, click the corresponding tab at the top of the dialog box. To change the settings, see
“Printer Driver Settings Overview” on page 29.
Changing the printer driver settings
Your printer driver has three menus (Main, Paper, and Layout) from which you can change the printer
driver settings. You can also change settings on the Utility menu in the printer software. For an
overview of the available settings, see “Printer Driver Settings Overview” on page 29. To view online
help, click Help on the Printer Driver dialog box. You can also view online help by right-clicking items
in the driver and selecting Help.
When you finish making your printer driver settings, click OK to apply the settings, or click Cancel to
cancel your changes.
Once you have checked your printer driver settings and changed them if necessary, you are ready to
print.
Printing barcodes
Barcodes can be easily printed using barcode fonts loaded in the printer driver.
Printer Software
28
GP-C830/GP-M830/GP-C831/GP-M831/GP-C832/GP-M832
User’s Guide
Before printing barcodes, specify the font name for the barcode, the font size, the font script of the
printed data, the common settings, and the barcode settings with the printer driver, and then specify
the font name, the font size, and the font script with your application. For more information about
these settings, see the online help.
Note:
❏ Specify the font size that is set with the Specified Point for the barcode. If other font sizes are
specified, the barcode cannot be printed.
❏ When printing and using barcodes, make sure that they can be scanned correctly under the actual
usage conditions.
Printer Driver Settings Overview
The following tables show the Windows printer driver settings. Note that not every setting is available
in all versions of Windows. For more information, see the online help for the printer driver.
Printer Software
29
GP-C830/GP-M830/GP-C831/GP-M831/GP-C832/GP-M832
User’s Guide
Printer settings
Settings
Explanations
Media Type
Select the media type you want to use.
Color
This setting cannot be changed. The GP-C830/GP-C831/GP-C832 can print only in color
and the GP-M830/GP-M831/GP-M832 can print only in black and white.
Mode*
Select Automatic to print with the best settings based on the Media Type and Color
settings.
Select Custom if you prefer to have more control over the printer driver settings.
Select Silent Feed to make the operating sound of the printer quiet.
Print Density
This setting allows you to prevent the printout from becoming blurry depending on the
media type.
Select Custom, click Advanced, and then adjust the print density using the Print Density
slider.
Ink Levels
The amount of ink remaining is displayed.
Print Preview
This setting allows you to see a preview of your document before printing it.
Paper Size
Select the size of the paper you want to use. If you do not see your paper size, use the
scroll bar to scroll through the list. If your paper size is not included in the list, see
“Adding custom paper sizes” on page 31 for instructions.
Note:
If the width of the paper size set with the printer driver is larger than the width of the
loaded paper, the portion of the data that is outside the printable area for the loaded
paper is not printed.
Copies*
Specify the number of copies in the Copies box.
Select Collate to print multi-page documents in sets.
Select Reverse Order to print from back to front.
Orientation
Select Portrait or Landscape.
Select Rotate by 180 degrees to print the documents upside down.
Reduce/Enlarge*
These settings allow you to enlarge or reduce the size of a document while maintaining
its aspect ratio.
Multi-Page*
These settings allow you to enable the multi-page printing.
Stampmark*
These settings allow you to print documents with the selected stampmark.
Extended Settings
This setting allows you to adjust the print position vertically.
* For more information, see Windows Help.
Printer Software
30
GP-C830/GP-M830/GP-C831/GP-M831/GP-C832/GP-M832
User’s Guide
Adding custom paper sizes
If your paper is not included in the Paper Size drop-down list, you can add the size to the list.
1. For Windows 8 or Server 2012:
Click Desktop on the Start screen, move the cursor to the top-right corner of the screen, click
Settings, and then click Control Panel. Next, click View devices and printers from the
Hardware and Sound category.
For Windows 7 or Server 2008 R2:
Click Start, and then click Devices and Printers.
For Windows Vista or Server 2008:
Click Start, click Control Panel, click Hardware and Sound, and then click Printers.
For Windows XP Professional or Server 2003:
Click Start, and then click Printers and Faxes.
2. Right-click your printer icon, and then click Printing Preferences.
3. Click the Paper tab.
4. Select User Defined for the Paper Size setting.
5. Enter a paper size name in the Paper Size Name box.
6. Select 1 mm or 1 inch under Unit, and then enter the paper size in the Paper Width and Paper
Height boxes.
7. Click Save, and then click OK.
Note:
For more information, see the online help for the printer driver.
Monitoring settings
Settings
Explanations
EPSON Status Monitor 3
You can access EPSON Status Monitor 3 when you click this button in the
Utility menu. To monitor the printer, make sure the Disables EPSON Status
Monitor 3 check box is cleared in the Other Config dialog box.
Printer Software
31
GP-C830/GP-M830/GP-C831/GP-M831/GP-C832/GP-M832
User’s Guide
Settings
Explanations
Monitoring Preferences
Click this button to open the Monitoring Preferences dialog box where you
can make settings for EPSON Status Monitor 3. For more information, see
“Setting up EPSON Status Monitor 3” on page 32.
Using EPSON Status Monitor 3
EPSON Status Monitor 3 allows you to monitor your printer’s status, alerts you when printer errors
occur, and provides troubleshooting instructions when needed.
EPSON Status Monitor 3 is available when:
❏ The printer is connected directly to the host computer using the parallel port [LPTx] or [BILPTx],
or the USB port.
❏ Your system is configured to support bidirectional communication.
EPSON Status Monitor 3 is installed when the printer is connected directly and you install the printer
driver as described in the Start Here.
! Caution:
Although you can print using the printer that is directly connected to the computer from a remote
location using the Remote Desktop function* of Windows 8, 7, Vista, or XP, communication errors
may occur.
* Remote Desktop function: Function which enables a user to access applications or files on a
computer connected to the office network from a mobile computer at a remote location.
Note:
If you are using a computer running Windows 8, 7, Vista, or XP, a communication error message may be
displayed when monitoring printers if multiple users are logged on.
Setting up EPSON Status Monitor 3
Follow these steps to set up EPSON Status Monitor 3.
1. For Windows 8 or Server 2012:
Click Desktop on the Start screen, move the cursor to the top-right corner of the screen, click
Settings, and then click Control Panel. Next, click View devices and printers from the
Hardware and Sound category.
Printer Software
32
GP-C830/GP-M830/GP-C831/GP-M831/GP-C832/GP-M832
User’s Guide
For Windows 7 or Server 2008 R2:
Click Start, and then click Devices and Printers.
For Windows Vista or Server 2008:
Click Start, click Control Panel, click Hardware and Sound, and then click Printers.
For Windows XP Professional or Server 2003:
Click Start, and then click Printers and Faxes.
2. Right-click your printer icon, click Printing Preferences, and then click the Utility tab.
3. Click Other Config, and then click Monitoring Preferences. The Monitoring Preferences
dialog box appears.
4. The following settings are available:
Printer Software
33
GP-C830/GP-M830/GP-C831/GP-M831/GP-C832/GP-M832
Select Notification
User’s Guide
Displays the error item check box On/Off status.
Select this check box to display the selected error notification.
Select Shortcut Icon
The selected icon is displayed on the taskbar. The setting’s example is shown on
the right window. By clicking the shortcut icon, you can access the Monitoring
Preferences dialog box easily.
Note:
Click Default to revert all items to the default settings.
Accessing EPSON Status Monitor 3
Do one of the following to access EPSON Status Monitor 3:
❏ Double-click the printer shortcut icon on the taskbar. To add a shortcut icon to the taskbar, see
“Setting up EPSON Status Monitor 3” on page 32.
❏ Open the Utility menu, and then click the EPSON Status Monitor 3 button. To open the Utility
menu, see “Setting up EPSON Status Monitor 3” on page 32.
When you access EPSON Status Monitor 3 as described above, the following printer status window
appears.
Printer Software
34
GP-C830/GP-M830/GP-C831/GP-M831/GP-C832/GP-M832
User’s Guide
You can check the printer status in this window.
Note:
It might not be possible to retrieve the printer status during printing. In this situation, click the EPSON
Status Monitor 3 button in the Utility tab, and use the printer with the status window left open.
Setting the Auto Tear-Off Function
You can select whether to turn on the auto tear-off function. When the auto tear-off function is turned
on, the printer advances the continuous paper to the tear-off position automatically when a set time
has passed after printing.
1. Access the printer driver. See “Using the Printer Driver” on page 26.
2. Click the Utility tab, and then click the Auto Tearoff Setting button.
3. Select auto tearoff enabled and select the delay time box, or select auto tearoff disabled.
4. Click OK.
Setting the Buzzer
Setting whether the buzzer sounds when printing is finished
1. Access the printer driver. See “Using the Printer Driver” on page 26.
2. Click the Utility tab, and then click Other Config.
3. Select the Control Buzzer Settings check box, and then select Every Page or Only Last Page in
the Control Buzzer Settings drop-down list to have the buzzer sound when printing is finished.
Clear the Control Buzzer Settings check box to have the buzzer not sound.
4. Click OK.
5. Click OK.
Printer Software
35
GP-C830/GP-M830/GP-C831/GP-M831/GP-C832/GP-M832
User’s Guide
Setting whether the buzzer sounds when an error occurs
1. Access the printer driver. See “Using the Printer Driver” on page 26.
2. Click the Utility tab, and then click the Notification Setting button.
3. Select Beep to have the buzzer sound when an error occurs, or select No Beep to have the buzzer
not sound.
4. Click OK.
Using Reduce Scraping Mode
In Reduce scraping mode, scraping by the print head can be reduced.
1. Access the printer driver. See “Using the Printer Driver” on page 26.
2. Click the Utility tab, and then click the Printer and Option Information button. The Printer and
Option Information dialog box appears.
3. Select the Reduce scraping check box.
4. Click OK.
Note:
When the printer is in reduce scraping mode, printing speed may be reduced, printed characters may be
blurred, and the print quality of barcodes may decline.
Adjusting the Print Position
Follow these steps to adjust the print position horizontally.
1. Access the printer driver. See “Using the Printer Driver” on page 26.
2. Click the Utility tab, and then click the Print Position Adjustment button.
3. Set an adjustment value for Print Position, and then click OK.
Select a value using the slider or enter a value in the box.
Printer Software
36
GP-C830/GP-M830/GP-C831/GP-M831/GP-C832/GP-M832
User’s Guide
To adjust the print position to the left when viewed from the front of the printer, set a positive
value. To adjust the print position to the right, set a negative value.
4. Click OK.
Note:
Data that is outside the printable area due to the print position adjustment cannot be printed.
USB Replacement Service
USB Replacement Service is software that automatically changes the output port when another printer
of the same model is replaced. When a printer connected using a USB interface is replaced with
another printer of the same model, this software detects the new printer, rewrites the printer driver
properties registered in Windows, and changes the output port automatically. For example, if a
USB-connected printer is malfunctioning, this software allows you to simply change the printer and
continue printing without having to manually change the settings in the application or operating
system.
Note:
Do not use USB Replacement Service in environments with two or more printers of the same model.
Installing USB Replacement Service
Before installing USB Replacement Service, make sure that the printer driver is installed.
Follow these steps to install USB Replacement Service.
1. Turn off the printer.
2. Make sure that Windows is running on your computer.
Printer Software
37
GP-C830/GP-M830/GP-C831/GP-M831/GP-C832/GP-M832
User’s Guide
3. Insert the printer software CD-ROM in the CD-ROM drive.
Note:
❏ If the language selection dialog box appears, select your language.
❏ If the EPSON Installation Program dialog box does not appear automatically, double-click the
My Computer icon, right-click the CD-ROM icon, click OPEN in the menu that appears, and
then double-click InstallNavi.exe.
4. When the license agreement dialog box appears, read the statement, and then click Next.
5. Select your printer.
6. Select USB Replacement Service, and then click Install.
7. When the installation is complete, click OK.
Replacing a USB-connected printer
Follow these steps to replace a printer with another printer of the same model.
1. Access the printer driver, click the Utility tab, and then write down the current settings for Auto
Tear Off Setting, Notification Settings, and Print Position Adjustment. See “Using the
Printer Driver” on page 26.
2. Turn off the printer, and then disconnect the USB cable from the printer.
3. Connect the USB cable to the new printer, and then turn on the printer.
4. Access the printer driver, click the Utility tab, and then specify the settings that you wrote down in
step 1.
5. Confirm that the top-of-form position is adjusted correctly vertically, and then adjust it with the
Micro Adjust function if necessary. See “Adjusting the top-of-form position” on page 24.
BI Parallel Port Driver
BI Parallel Port Driver is software used when communicating at high speed if the printer is connected
using a parallel port. The transmission rate quickens when communicating at high speed.
Printer Software
38
GP-C830/GP-M830/GP-C831/GP-M831/GP-C832/GP-M832
User’s Guide
This software is installed automatically when the printer driver is installed.
Specify the following settings to communicate at high speed.
1. For Windows 8 or Server 2012:
Click Desktop on the Start screen, move the cursor to the top-right corner of the screen, click
Settings, and then click Control Panel. Next, click View devices and printers from the
Hardware and Sound category.
For Windows 7 or Server 2008 R2:
Click Start, and then click Devices and Printers.
For Windows Vista or Server 2008:
Click Start, click Control Panel, click Hardware and Sound, and then click Printers.
For Windows XP Professional or Server 2003:
Click Start, and then click Printers and Faxes.
2. Right-click the icon for the printer you want to change the settings for, and then click Printer
properties (Windows 8, 7, Server 2012, or Server 2008 R2) or Properties (Windows Vista, XP,
Server 2008, or Server 2003).
3. Click the Ports tab.
4. Select the BILPTx check box.
The parallel port name is BILPTx.
5. Change the BIOS setting on your computer to ECP mode.
For more information about this setting, see the manual for your computer.
EpsonNet Config
EpsonNet Config is software that allows the network administrator to detect printers on the network,
and then setup or change functions for the network printers individually or as a batch.
❏ You can make settings or changes for individual network printers or all network printers as a
batch.
Printer Software
39
GP-C830/GP-M830/GP-C831/GP-M831/GP-C832/GP-M832
User’s Guide
❏ You can output configuration information for the network printer as a SYLK format file. Because
the SYLK format is supported by Microsoft Excel, the user can make batch settings or changes to
the configuration information for multiple printers.
❏ Previous configuration information is stored as a log, and the file can be output or changed. By
performing a batch import of the file, you can restore the settings for individual or multiple
network printers.
❏ The administrator can set a password to protect the network printer's configurations.
❏ You can simplify printer management by registering the printer to My Device.
❏ As well as printers on the local network, you can also make settings or changes to printers on an
external network (you need to change Search Parameters).
Installing EpsonNet Config
Follow these steps to install EpsonNet Config.
1. Turn off the printer.
2. Make sure that Windows is running on your computer.
3. Insert the printer software CD-ROM in the CD-ROM drive.
Note:
❏ If the language selection dialog box appears, select your language.
❏ If the EPSON Installation Program dialog box does not appear automatically, double-click the
My Computer icon, right-click the CD-ROM icon, click OPEN in the menu that appears, and
then double-click InstallNavi.exe.
4. When the license agreement dialog box appears, read the statement, and then click Next.
5. Select your printer.
6. Select EpsonNet Config, and then click Install.
7. When the installation is complete, click OK.
Printer Software
40
GP-C830/GP-M830/GP-C831/GP-M831/GP-C832/GP-M832
User’s Guide
EPSON Printer Setting
EPSON Printer Setting allows you to change the printer's default settings.
This tool is included in the printer software CD-ROM. Start the tool from the printer software
CD-ROM. To change the settings, see the online help for EPSON Printer Setting.
Setting Up Your Printer on a Network
Sharing the printer
This section describes how to share the printer on a standard Windows network.
The computers on a network can share a printer that is directly connected to one of them. The
computer that is directly connected to the printer is the printer server, and the other computers are the
clients which need permission to share the printer with the printer server. The clients share the printer
through the printer server.
According to the versions of Windows and your access rights on the network, perform the appropriate
settings for the printer server and clients.
Setting the printer server
See “Setting up your printer as a shared printer” on page 42.
Setting the clients
See “Setting the clients” on page 45.
Note:
❏ When connecting to a Windows XP shared printer, error and warning notifications do not appear
during printing. Installing Windows XP Service Pack 1 or later will solve this problem.
❏ When connecting to a shared printer beyond a router, error and warning notification for shared
printers during printing is not available in some cases because of the router’s settings.
❏ The printer server and clients should be set on the same network system, and they should be under the
same network management before making the settings.
Printer Software
41
GP-C830/GP-M830/GP-C831/GP-M831/GP-C832/GP-M832
User’s Guide
❏ The screen shots that are shown on the following pages may differ depending on the version of
Windows that you are using.
Setting up your printer as a shared printer
Note:
You must log on to the printer server computer as the administrator.
1. For Windows 8 or Server 2012:
Click Desktop on the Start screen, move the cursor to the top-right corner of the screen, click
Settings, and then click Control Panel. Next, click View devices and printers from the
Hardware and Sound category.
For Windows 7 or Server 2008 R2:
Click Start, and then click Devices and Printers.
For Windows Vista or Server 2008:
Click Start, click Control Panel, click Hardware and Sound, and then click Printers.
For Windows XP Professional or Server 2003:
Click Start, and then click Printers and Faxes.
2. For Windows 8, 7, Server 2012, or Server 2008 R2:
Right-click your printer icon, click Printer properties, and then click the Sharing tab in the
dialog box that appears.
For Windows Vista, XP, Server 2008, or Server 2003:
Right-click your printer icon, and then click Sharing in the menu that appears.
For Windows XP:
If the following menu appears, click either Network Setup Wizard or If you understand the
security risks but want to share printers without running the wizard, click here.
Printer Software
42
GP-C830/GP-M830/GP-C831/GP-M831/GP-C832/GP-M832
User’s Guide
In either case, follow the on-screen instructions.
3. For Windows 8, 7, Vista, XP, Server 2012, Server 2008 R2, Server 2008, or Server 2003:
Select Share this printer, and then type the name in the Share name box and click OK.
Note:
❏ Do not use spaces or hyphens for the shared printer name. Otherwise, an error may occur.
❏ For Windows 8, 7, Vista, Server 2012, Server 2008 R2, or Server 2008 you cannot select Share
this printer until you click Change sharing options.
You need to set the client computers so that they can use the printer on a network. For more
information, see “Setting the clients” on page 45.
Printer Software
43
GP-C830/GP-M830/GP-C831/GP-M831/GP-C832/GP-M832
User’s Guide
Sharing the printer when the firewall is on
Note:
To share files and printers when the Windows firewall is on, perform the following procedure.
Windows 8 or Server 2012
1. Click Desktop on the Start screen, move the cursor to the top-right corner of the screen, click
Settings, and then click Control Panel. Next, click System and Security, and then click
Windows Firewall.
2. Click Turn Windows Firewall on or off in the window on the left. Make sure that Block all
incoming connections, including those in the list of allowed apps is not selected, and then
click OK.
3. Click Allow an app or feature through Windows Firewall in the window on the left.
4. Select File and Printer Sharing, and then click OK.
Windows 7 or Server 2008 R2
1. Click Start, click Control Panel, click System and Security, and then click Windows
Firewall.
2. Click Turn Windows Firewall on or off in the window on the left. Make sure that Block all
incoming connections, including those in the list of allowed programs is not selected, and
then click OK.
3. Click Allow a program or feature through Windows Firewall in the window on the left.
4. Select Share file and printer, and then click OK.
Windows Vista or Server 2008
1. Click Start, and then click Control Panel.
2. Click Security, and then click Windows Firewall to open the Windows Firewall dialog box.
3. Click Turn Windows Firewall on or off in the window on the left. When the User Account
Control dialog box is displayed, click Continue.
4. Make sure that Block all incoming connections is not selected in the General tab.
Printer Software
44
GP-C830/GP-M830/GP-C831/GP-M831/GP-C832/GP-M832
User’s Guide
5. Click the Exceptions tab, select File and Printer Sharing, and then click OK.
Windows XP or Server 2003
1. Click Start, and then click Control Panel.
2. Click Security Center.
3. Click Windows Firewall to open the Windows Firewall dialog box.
4. Make sure that Don’t allow exceptions is not selected in the General tab.
5. Click the Exceptions tab, select File and Printer Sharing, and then click OK.
Setting the clients
This section describes how to install the printer driver by accessing the shared printer on a network.
Note:
❏ To share the printer on a Windows network, you need to set the printer server. For more information,
see “Setting up your printer as a shared printer” on page 42.
❏ This section describes how to access the shared printer on a standard network system using the server
(Microsoft workgroup). If you cannot access the shared printer due to the network system, ask the
administrator of the network for assistance.
❏ If the printer drivers are not already installed on the client, please install them before performing
these settings.
1. For Windows 8 or Server 2012:
Click Desktop on the Start screen, move the cursor to the top-right corner of the screen, click
Settings, and then click Control Panel. Next, click View devices and printers from the
Hardware and Sound category.
For Windows 7 or Server 2008 R2:
Click Start, and then click Devices and Printers.
For Windows Vista or Server 2008:
Click Start, click Control Panel, click Hardware and Sound, and then click Printers.
For Windows XP Professional or Server 2003:
Click Start, and then click Printers and Faxes.
Printer Software
45
GP-C830/GP-M830/GP-C831/GP-M831/GP-C832/GP-M832
User’s Guide
2. Right-click the icon for the printer you want to change the settings for, and then click Printer
properties (Windows 8, 7, Server 2012, or Server 2008 R2) or Properties (Windows Vista, XP,
Server 2008, or Server 2003).
3. Click the Ports tab, and then click Add Port.
4. When the Printer Ports dialog box appears, select Local Port, and then click New Port.
Printer Software
46
GP-C830/GP-M830/GP-C831/GP-M831/GP-C832/GP-M832
User’s Guide
5. Enter the following information for the port name, and then click OK.
\\Name of computer connected to the target printer\name of shared printer
6. After returning to the Printer Ports dialog box, click Close.
7. Check that the name you entered for the port has been added and selected, and then click
Close.
Canceling Printing
If the printouts are not what you expected and contain incorrect or garbled characters or images, you
may need to cancel printing. Follow the instructions below to cancel printing.
Using the printer button
Press the Pause button, and then press the Job Cancel button for three seconds to cancel a print job in
progress.
Using Windows
Double-click the printer shortcut icon on the taskbar.
Printer Software
47
GP-C830/GP-M830/GP-C831/GP-M831/GP-C832/GP-M832
User’s Guide
When canceling all printing documents, select Cancel All Documents on the Printer menu.
When canceling a specific document, select the document you want to cancel, and then select Cancel
on the Document menu.
The print job is canceled.
Uninstalling the Printer Software
When you want to reinstall or upgrade the printer driver, uninstall the printer driver that is currently
installed.
Uninstalling the printer driver and utilities
1. Quit all applications.
2. For Windows 8 or Server 2012:
Click Desktop on the Start screen, move the cursor to the top-right corner of the screen, click
Settings, and then click Control Panel.
For Windows 7, Vista, XP, Server 2008 R2, Server 2008, or Server 2003:
Click Start, and then click Control Panel.
Printer Software
48
GP-C830/GP-M830/GP-C831/GP-M831/GP-C832/GP-M832
User’s Guide
3. Click Uninstall a program (Windows 8, 7, Vista, Server 2012, Server 2008 R2, or Server 2008) or
click the Add or Remove Programs icon (Windows XP or Server 2003).
4. Select the EPSON Printer Software, and then click Uninstall/Change (Windows 8, 7, Vista,
Server 2012, Server 2008 R2, or Server 2008) or Change/Remove (Windows XP or Server 2003).
Printer Software
49
GP-C830/GP-M830/GP-C831/GP-M831/GP-C832/GP-M832
User’s Guide
5. Click the Printer Model tab, select the icon of the printer you want to uninstall, and then click
OK.
Note:
❏ EPSON Status Monitor 3 is uninstalled with the printer driver. EPSON Status Monitor 3 cannot
be uninstalled separately.
❏ USB Replacement Service and BI Parallel Port Driver can be uninstalled separately. To uninstall
only USB Replacement Service or BI Parallel Port Driver, make sure that nothing is selected in
the Printer Model tab. Then, click the Utility tab, select USB Replacement Service or BI
Parallel Port Driver, and click OK.
6. Follow the on-screen instructions.
Printer Software
50
GP-C830/GP-M830/GP-C831/GP-M831/GP-C832/GP-M832
User’s Guide
Chapter 5
Control Panel
Using the Control Panel
You can control simple printer operations—such as advancing paper to the tear-off position, form
feeding, loading and ejecting paper, cleaning the print head, and canceling print jobs—with the
buttons on the control panel. The control panel lights show the printer’s status.
Control panel buttons and lights
Note:
The lights may flash when an error has occurred. For more information, see “Using the Error Indicators”
on page 55.
For Chinese users
GP-C832
GP-M832
Control Panel
51
GP-C830/GP-M830/GP-C831/GP-M831/GP-C832/GP-M832
User’s Guide
For Taiwanese users
GP-C830
GP-M830
For other users
GP-C830/GP-C831
GP-M830/GP-M831
1. Cover light
On when the right/left ink cartridge cover or top cover is open.
Control Panel
52
GP-C830/GP-M830/GP-C831/GP-M831/GP-C832/GP-M832
User’s Guide
2. Left ink light ( K)
❏ Flashes when ink is low.
❏ On when an ink cartridge has reached its replacement time or when the left ink cartridge cover is
closed with an ink cartridge not installed.
3. On light
❏ On when the printer is turned on.
❏ Flashes when receiving data and during print head cleaning.
❏ Flashes rapidly until the printer is turned off using the On button.
4. On button
❏ Turns the printer on.
❏ Turns the printer off when pressed for three seconds.
5. Paper light
❏ On when no paper is loaded or when paper is not loaded correctly.
❏ Flashes when the paper failed to eject or a paper jam has occurred.
6. Cleaning button
Cleans the print head when pressed for three seconds.
7. Tear Off light
On when continuous paper is in the tear-off position.
8. Tear Off button
❏ Advances continuous paper to the tear-off position.
❏ Feeds continuous paper backward from the tear-off position to the top-of-form position.
9. FF button
Inserts a page break.
10. Load/Eject button
Control Panel
53
GP-C830/GP-M830/GP-C831/GP-M831/GP-C832/GP-M832
User’s Guide
❏ Loads continuous paper from the standby position.
❏ Feeds continuous paper backward to the standby position.
11. Pause light
❏ On when the printer is paused.
❏ Flashes when the printer is in Micro Adjust mode.
12. Pause button
Stops printing temporarily, and resumes printing when pressed again. When pressed for three
seconds or more, the printer enters Micro Adjust mode*. The printer exits the mode when pressed
again.
13. Job Cancel button
Cancels the print job when pressed for three seconds or more when the printer is paused.
14. Right ink light ( Y, M, C) (GP-C830/GP-C831/GP-C832)
❏ Flashes when ink is low.
❏ On when an ink cartridge has reached its replacement time or when the right ink cartridge cover is
closed with an ink cartridge not installed.
15. Right ink light ( K) (GP-M830/GP-M831/GP-M832)
❏ Flashes when ink is low.
❏ On when an ink cartridge has reached its replacement time or when the right ink cartridge cover is
closed with an ink cartridge not installed.
* Micro Adjust mode: When you hold down the Pause button for three seconds, the printer enters
Micro Adjust mode. In this mode, you can press the FF D and Load/Eject U buttons to adjust the
top-of-form or tear-off position. For more information, see “Adjusting the top-of-form position” on
page 24.
Control Panel
54
GP-C830/GP-M830/GP-C831/GP-M831/GP-C832/GP-M832
User’s Guide
Chapter 6
Troubleshooting
Using the Error Indicators
You can identify many common printer problems using the lights on the control panel. If your printer
stops working and one or more control panel lights are on or flashing or the printer beeps, use the
following table to diagnose and fix the problem. If you cannot fix your problem using this table, see
“Problems and Solutions” on page 57.
Panel light state
Beep pattern
Problem
Solution
N On
O
N Paper
No paper is attached to the tractor unit or the paper is used up during
printing.
Attach the paper to the tractor, and then press the Load/Eject
button.
N On
O
F Paper
The paper is not fully loaded.
Remove the paper if there is a paper jam. Then, reattach the paper to
the tractor and press the Load/Eject button.
The paper is not ejected completely.
If the paper is advanced too far and ejection failed, press the Load/
Eject button again to feed the paper backward. However, to prevent
a paper jam, do not feed the paper backward 558.8 mm (22 inches) or
more.
If the length of the paper that you want to eject is longer than about
550 mm (22 inches), tear off the paper, and then press the Load/
Eject button.
N On
N Cover
-
The top cover or ink cartridge cover is open.
Close the covers.
Troubleshooting
55
GP-C830/GP-M830/GP-C831/GP-M831/GP-C832/GP-M832
Panel light state
Beep pattern
User’s Guide
Problem
Solution
N On
O
NKB
Replace the ink cartridge. For more information, see “Replacing an
ink cartridge” on page 75.
N Y B*
N M B*
O
N C B*
N On
The ink cartridge has reached its replacement time.
The ink cartridge is not installed.
Install the ink cartridge. For more information, see “Replacing an ink
cartridge” on page 75.
-
FKB
Ink is low.
Obtain a replacement ink cartridge.
F Y B*
F M B*
F C B*
F On
OOOOO
F Cover
A product maintenance error has occurred.
Contact a qualified service person.
F K B, F Y B, F M B, F C B
**
F K B, F K B ***
F On
F Cover
F Paper
F Tear Off
F Pause
OOOOO
A fatal error has occurred.
Turn off the printer and check for a paper jam. If there is a paper jam,
remove the jammed paper, and then turn on the printer.
If the scale is dirty, clean it with a soft cloth. See “Cleaning the Printer”
on page 103.
If the problem persists, turn off the printer, wait several minutes, and
then turn it on again.
* The status of the right black ink light is shown for the GP-M830/GP-M831/GP-M832.
** All of the ink lights flash at the same time (GP-C830/GP-C831/GP-C832).
*** Both of the ink lights flash at the same time (GP-M830/GP-M831/GP-M832).
N = on, F = flashing
O = Ten long beeps
O O O O O = Five sets of five short beeps (twenty-five beeps)
Troubleshooting
56
GP-C830/GP-M830/GP-C831/GP-M831/GP-C832/GP-M832
User’s Guide
Note:
The printer beeps once when the printer enters or exits Micro Adjust mode. In Micro Adjust mode, the
printer also beeps once when the printer reaches the default top-of-form and tear-off positions. When the
printer reaches the minimum and maximum adjustment limits, the printer beeps twice.
Problems and Solutions
Most problems you may encounter while operating your printer have simple solutions.
Power supply
Power is not being supplied
The lights on the control panel do not go on.
Cause
What to do
The power cord may be unplugged.
Check that the power cord is properly plugged into the electrical
outlet.
The outlet may not be operating.
If the electrical outlet is controlled by an outside switch or
automatic timer, use a different outlet. Plug another electrical
device, such as a lamp, into the outlet to determine whether the
outlet is operating properly.
Printing
Printing or printout quality problems
The Pause light is off, but nothing is printed.
Cause
What to do
The software may not be installed properly.
Check that the software is installed properly for your printer, as
described in the Start Here. Check the software’s printer settings.
The interface cable may not match the
specifications of the printer or computer.
Check both ends of the interface cable. Make sure the cable meets
both the printer and computer specifications.
Troubleshooting
57
GP-C830/GP-M830/GP-C831/GP-M831/GP-C832/GP-M832
The printer port may not be set correctly.
User’s Guide
For Windows 8 or Server 2012:
Click Desktop on the Start screen, move the cursor to the top-right
corner of the screen, click Settings, and then click Control Panel.
Next, click View devices and printers from the Hardware and
Sound category.
For Windows 7 or Server 2008 R2:
Click Start, and then click Devices and Printers.
For Windows Vista, XP, Server 2008, or Server 2003:
Click Start, click Control Panel, and then click Printers and
Faxes.
When the icon of the printer you are using appears, right-click it
and select Printer properties (Windows 8, 7, Server 2012, or
Server 2008 R2) or Properties (Windows Vista, XP, Server 2008, or
Server 2003). Then, click the Ports or Details tab and select the
appropriate port.
The Paper light is on and the printer beeps ten times.
Cause
What to do
The printer may be out of paper.
Load paper in the printer.
The printer makes a strange noise, the beeper sounds ten times, and the printer stops abruptly.
Cause
What to do
Paper may be jammed.
Turn off the printer and check for a paper jam. If there is a paper
jam, remove the jammed paper, and then turn on the printer. If the
problem persists, turn off the printer, wait several minutes, and
then turn it on again.
The beeper sounds five sets of five short beeps (twenty-five times) and all the lights except the ink lights flash.
Cause
What to do
A fatal error has occurred.
Turn off the printer and turn it on again. If the problem persists,
check for a paper jam. If there is no jam, contact your dealer or a
qualified service person.
Print quality declines.
Cause
What to do
The print head nozzles are clogged.
Run the Head Cleaning utility to clear any clogged ink nozzles. For
more information, see “Cleaning the Print Head” on page 99.
Ink cartridges not manufactured by Epson are
used.
Use genuine Epson ink cartridges.
Troubleshooting
58
GP-C830/GP-M830/GP-C831/GP-M831/GP-C832/GP-M832
User’s Guide
Medicine bags may become dirty when printing in
an environment with high humidity if the surface
of the medicine bags is a polyvinyl resin.
Print in an environment with humidity of 65% or less.
The printout may become blurry depending on
the media type.
Adjust the print density for the media type to prevent the printout
from becoming blurry. For more information, see “Printer settings”
on page 30.
Misaligned vertical lines appear.
Cause
What to do
The gaps in the print head are misaligned.
Run the Print Head Alignment utility. For more information, see
“Aligning the Print Head” on page 101.
The printing speed is slow when connecting using the parallel port.
Cause
What to do
The parallel interface is not set for high-speed
communication.
Use BI Parallel Port Driver, which is installed with the printer driver,
to communicate at high speed. For more information, see “BI
Parallel Port Driver” on page 38.
Printed characters are not what you expected
The typestyles or characters you sent with your software did not print.
Cause
What to do
The software may not be properly configured.
Check that the software is correctly configured for your printer.
Printing position problems
Printing starts too high or too low on the page, or the bottom part of one page is printed at the top of the next
page.
Cause
What to do
The top margin or top-of-form position settings
are incorrect.
Check and adjust the margin or top-of-form position settings in
your application. For more information, see “Printable area” on
page 92.
You can also adjust the top-of-form position using the Micro
Adjust function. However, settings made in Windows applications
override settings made in Micro Adjust mode. For more
information, see “Adjusting the top-of-form position” on
page 24.
Printing starts too far to the right or left on the page.
Troubleshooting
59
GP-C830/GP-M830/GP-C831/GP-M831/GP-C832/GP-M832
User’s Guide
Cause
What to do
The left or right margin settings are incorrect.
Check and adjust the margin settings in your application. For more
information, see “Printable area” on page 92.
If the settings cannot be changed in your application, adjust the
print position horizontally in the printer driver. For more
information, see “Adjusting the Print Position” on page 36.
Page length does not match the length of the paper.
Cause
What to do
The page length setting in your application may
be incorrect.
Check the page length setting in your application and adjust it if
necessary.
Paper handling
Paper loading or feeding problems
The tractor does not feed the paper.
Cause
What to do
The paper may have come off the tractor.
Reattach the paper to the tractor.
The paper supply is obstructed.
Make sure the paper supply is not obstructed by a cable or some
other object.
The tear-off position is not aligned correctly.
Cause
What to do
The tear-off position setting is incorrect.
Adjust the tear-off position using the Micro Adjust function. For
more information, see “Adjusting the tear-off position” on
page 23.
Paper feeding is crooked or the paper jams.
Cause
What to do
The paper supply is too far away from the printer.
Make sure that your paper supply is within 1 meter (3 feet) of the
printer.
The holes on the sides of the paper are misaligned.
Check that the holes on the sides of the paper are aligned with
each other. Also, make sure the sprocket units are locked and their
covers are closed.
Troubleshooting
60
GP-C830/GP-M830/GP-C831/GP-M831/GP-C832/GP-M832
User’s Guide
Your paper may be the wrong size or thickness for
the printer.
Make sure that the paper size and thickness are within the
specified ranges. For information on the continuous paper
specifications, see “Paper” on page 89.
The paper may jam depending on your operating
environment.
To prevent a paper jam, select Silent Feed mode with the printer
driver. See “Printer settings” on page 30.
The paper does not eject properly.
Cause
What to do
The page may be too long or too short.
Tear off the supply of paper and eject the page from the printer.
Use only paper that is within the specified length range described
under “Paper” on page 89.
Network problems
A communication error has occurred.
Cause
What to do
Multiple users are logged on to a single computer
at the same time.
On a Windows 8/7/Vista/XP system with multiple users, a
communication error may occur when switching to a new user
and starting a new print job while the print job for the previous
user is still printing.
Make sure that the print job for the first user is complete and the
user is logged off before switching to a new user and starting a
new print job.
Other problems
The color inks are consumed even when printing black and white documents (GP-C830/GP-C831/GP-C832 only).
Cause
What to do
Not only the black ink, but also the color inks are
consumed during the following operations: print
head cleaning and self-cleaning.
-
Correcting USB Problems
If you are having difficulty using your printer with a USB connection, read the information in this
section.
Troubleshooting
61
GP-C830/GP-M830/GP-C831/GP-M831/GP-C832/GP-M832
User’s Guide
Make sure that your computer is a Windows 8, 7, Vista, XP, or 2000
pre-installed model
Your computer must be a Windows 8, 7, Vista, XP, or 2000 pre-installed model. You may not be able to
install or run the USB printer driver on a computer which is not equipped with a USB port or which has
been upgraded from Windows 95 to Windows XP, Me, 98, or 2000.
For details about your computer, contact your dealer.
Printer does not work correctly with the USB cable
If your printer does not work correctly with the USB cable, try one or more of these solutions:
❏ Make sure that the cable you are using is a standard, shielded USB cable.
❏ If you are using a USB hub, connect the printer to the first tier of the hub, or connect the printer
directly to the computer’s USB port.
Clearing Paper Jams
Follow these steps to clear a paper jam.
! Caution:
Pull out the jammed paper gently. If you remove the jammed paper with force, torn pieces may stay
inside the printer or the printer may be damaged.
When the printer detects an error and stops printing:
1. Tear off the printed part of the paper.
2. Open the sprocket covers of both sprockets.
3. Remove the paper. Pull the continuous paper forward or backward out of the printer.
Note:
Pull paper straight out to remove it from the printer.
4. Open the top cover and make sure there is no paper left.
Troubleshooting
62
GP-C830/GP-M830/GP-C831/GP-M831/GP-C832/GP-M832
User’s Guide
5. Attach the continuous paper to the tractor unit. See “Printing on Continuous Paper” on
page 15.
6. Turn off the printer, and then turn on the printer.
7. Determine which pages were not printed correctly and print them again.
When the user finds a paper jam before the printer detects an error:
1. Press the Pause button to stop printing.
2. Hold down the Tear Off and FF buttons for about three seconds. The jammed paper is released.
3. Tear off the printed part of the paper.
4. Open the sprocket covers of both sprockets.
5. Remove the paper. Pull the continuous paper forward or backward out of the printer.
Note:
Pull paper straight out to remove it from the printer.
6. Open the top cover and make sure there is no paper left.
7. Attach the continuous paper to the tractor unit. See “Printing on Continuous Paper” on
page 15.
8. Press the Job Cancel button to cancel printing.
9. Press the Pause button again to restart printing.
10. Determine which pages were not printed and print them again.
Troubleshooting
63
GP-C830/GP-M830/GP-C831/GP-M831/GP-C832/GP-M832
User’s Guide
Chapter 7
Where To Get Help
Technical Support Web Site
Epson’s Technical Support Web Site provides help with problems that cannot be solved using the
troubleshooting information in your product documentation. If you have a Web browser and can
connect to the Internet, access the site at:
http://support.epson.net/
If you need the latest drivers, FAQ’s, manuals, or other downloadables, access the site at:
http://www.epson.com
Then, select the support section of your local Epson Web site.
Contacting Customer Support
Before Contacting Epson
If your Epson product is not operating properly and you cannot solve the problem using the
troubleshooting information in your product documentation, contact customer support services for
assistance. If customer support for your area is not listed below, contact the dealer where you
purchased your product.
Customer support will be able to help you much more quickly if you give them the following
information:
❏ Product serial number
(The serial number label is usually on the back of the product.)
❏ Product model
❏ Product software version
(Click About, Version Info, or similar button in the product software.)
❏ Brand and model of your computer
Where To Get Help
64
GP-C830/GP-M830/GP-C831/GP-M831/GP-C832/GP-M832
User’s Guide
❏ Your computer operating system name and version
❏ Names and versions of the software applications you normally use with your product
Help for Users in Australia
Epson Australia wishes to provide you with a high level of customer service. In addition to your
product documentation, we provide the following sources for obtaining information:
Your Dealer
Don’t forget that your dealer can often help identify and resolve problems. The dealer should always be
the first call for advise on problems; they can often solve problems quickly and easily as well as give
advise on the next step to take.
Internet URL http://www.epson.com.au
Access the Epson Australia World Wide Web pages. Worth taking your modem here for the
occasional surf! The site provides a download area for drivers, Epson contact points, new product
information and technical support (e-mail).
Epson Helpdesk
Epson Helpdesk is provided as a final backup to make sure our clients have access to advise. Operators
on the Helpdesk can aid you in installing, configuring and operating your Epson product. Our
Pre-sales Helpdesk staff can provide literature on new Epson products and advise where the nearest
dealer or service agent is located. Many types of queries are answered here.
The Helpdesk numbers are:
Phone:
1300 361 054
Fax:
(02) 8899 3789
We encourage you to have all the relevant information on hand when you ring. The more information
you prepare, the faster we can help solve the problem. This information includes your Epson product
documentation, type of computer, operating system, application programs, and any information you
feel is required.
Where To Get Help
65
GP-C830/GP-M830/GP-C831/GP-M831/GP-C832/GP-M832
User’s Guide
Help for Users in Singapore
Sources of information, support, and services available from Epson Singapore are:
World Wide Web (http://www.epson.com.sg)
Information on product specifications, drivers for download, Frequently Asked Questions (FAQ),
Sales Enquiries, and Technical Support via e-mail are available.
Help for Users in Thailand
Contact for information, support, and services are:
World Wide Web (http://www.epson.co.th)
Information on product specifications, drivers for download, Frequently Asked Questions (FAQ),
and e-mail are available.
Help for Users in Indonesia
Contacts for information, support, and services are:
World Wide Web (http://www.epson.co.id)
❏ Information on product specifications, drivers for download
❏ Frequently Asked Questions (FAQ), Sales Enquiries, questions through e-mail
Help for Users in Hong Kong
To obtain technical support as well as other after-sales services, users are welcome to contact Epson
Hong Kong Limited.
Internet Home Page
Epson Hong Kong has established a local home page in both Chinese and English on the Internet to
provide users with the following information:
❏ Product information
Where To Get Help
66
GP-C830/GP-M830/GP-C831/GP-M831/GP-C832/GP-M832
User’s Guide
❏ Answers to Frequently Asked Questions (FAQs)
❏ Latest versions of Epson product drivers
Users can access our World Wide Web home page at:
http://www.epson.com.hk
Help for Users in Malaysia
Contacts for information, support, and services are:
World Wide Web (http://www.epson.com.my)
❏ Information on product specifications, drivers for download
❏ Frequently Asked Questions (FAQ), Sales Enquiries, questions through e-mail
Help for Users in India
Contacts for information, support, and services are:
World Wide Web (http://www.epson.co.in)
Information on product specifications, drivers for download, and products enquiry are available.
Help for Users in the Philippines
To obtain technical support as well as other after sales services, users are welcome to contact the Epson
Philippines Corporation.
World Wide Web (http://www.epson.com.ph)
Information on product specifications, drivers for download, Frequently Asked Questions (FAQ),
and E-mail Enquiries are available.
Where To Get Help
67
GP-C830/GP-M830/GP-C831/GP-M831/GP-C832/GP-M832
User’s Guide
Help for Users in Europe
Check your Pan-European Warranty Document for information on how to contact Epson
Customer support.
Help for Users in North America
Epson provides the technical support services listed below.
Internet Support
Visit Epson’s support website for your printer (U.S. or Canada) for solutions to common problems.
You can download drivers and documentation, get FAQs and troubleshooting advice, or e-mail
Epson with your questions.
Speak to a Support Representative
Before you call Epson for support, please have the following information ready:
❏ Product name
❏ Product serial number (located on the back of product)
❏ Proof of purchase (such as a store receipt) and date of purchase
❏ Computer configuration
❏ Description of the problem
Then call:
❏ U.S.: (562) 290-4322, 6 am to 8 pm, Pacific Time, Monday through Friday, and 7 am to 4 pm,
Saturday.
❏ Canada: (905) 709-2567, 6 am to 6 pm, Pacific Time, Monday through Friday.
Days and hours of support are subject to change without notice. Toll or long distance charges may
apply.
Where To Get Help
68
GP-C830/GP-M830/GP-C831/GP-M831/GP-C832/GP-M832
User’s Guide
Purchase Supplies and Accessories
You can purchase Epson ribbons at http://www.epson.com (U.S. sales) or http://www.epson.ca
(Canadian sales).You can also purchase supplies from an Epson authorized reseller. To find the
nearest one, call 800-GO-EPSON (800-463-7766).
Help for Users in Latin America
Epson provides the technical support services listed below.
Internet Support
Visit Epson’s support web site for your printer for solutions to common problems. You can download
drivers and documentation, get FAQs and troubleshooting advice, or e-mail Epson with your
questions.
Speak to a Support Representative
Before you call Epson for support, please have the following information ready:
❏ Product name
❏ Product serial number (located on the back of product)
❏ Proof of purchase (such as a store receipt) and date of purchase
❏ Computer configuration
❏ Description of the problem
Then call:
Country
Telephone
Argentina
(54 11) 5167-0300
Brazil
0800-880-0094
Bolivia*
800-100-116
Chile
(56 2) 484-3400
Colombia
(57 1) 523-5000
Costa Rica
800-377-6627
Where To Get Help
69
GP-C830/GP-M830/GP-C831/GP-M831/GP-C832/GP-M832
Country
Telephone
Dominican Republic*
1-888-760-0068
Ecuador*
1-800-000-044
El Salvador*
800-6570
Guatemala*
1-800-835-0358
Honduras**
800-0122
User’s Guide
Code: 8320
Mexico
Mexico City
(52 55) 1323-2052
Other cities
01-800-087-1080
Nicaragua*
00-1-800-226-3068
Panama*
00-800-052-1376
Peru
Lima
(51 1) 418-0210
Other cities
0800-10126
Uruguay
00040-5210067
Venezuela
(58 212) 240-1111
* Contact your local phone company to call this toll free number from a mobile phone.
** Dial first 7 digits, wait for a message, then enter code.
If your country is not on the list, please contact your nearest Epson office. May be subject to additional
local or long distance calling costs.
Purchase supplies and accessories
You may purchase Epson original ribbons at an authorized Epson reseller. To find your nearest
reseller, please contact Epson as described above.
Where To Get Help
70
GP-C830/GP-M830/GP-C831/GP-M831/GP-C832/GP-M832
User’s Guide
Chapter 8
Consumables
Replacing the Ink Cartridges
Genuine Epson ink cartridges
When replacement of any of the ink cartridges is required, you cannot print. Genuine Epson ink
cartridges are designed and manufactured to work properly with your Epson printer. They ensure
proper operation and long life of the print head and other printer parts. Other products not
manufactured by Epson may cause damage to your printer, which is not covered by Epson’s
warranties.
Your printer uses the following ink cartridges:
GP-C830
GP-M830
GP-C831
GP-M831
GP-C832
GP-M832
Black
GJIC4(K)
S020559
GJIC4(K)
S020559
GJIC5(K)
S020563
GJIC5(K)
S020563
GJIC6(K)
S020567
GJIC6(K)
S020567
Cyan
GJIC4(C)
S020560
-
GJIC5(C)
S020564
-
GJIC6(C)
S020568
-
Magenta
GJIC4(M)
S020561
-
GJIC5(M)
S020565
-
GJIC6(M)
S020569
-
Yellow
GJIC4(Y)
S020562
-
GJIC5(Y)
S020566
-
GJIC6(Y)
S020570
-
Checking the ink cartridge status
To check the ink cartridge status, do one of the following:
❏ Double-click the printer shortcut icon on the taskbar. To add a shortcut icon to the taskbar, see
“Setting up EPSON Status Monitor 3” on page 32.
Consumables
71
GP-C830/GP-M830/GP-C831/GP-M831/GP-C832/GP-M832
User’s Guide
❏ Open the printer driver, click the Utility tab, and then click the EPSON Status Monitor 3 button.
A graphic displays the ink cartridge status.
Note:
If any of the ink cartridges installed in the printer is broken, incompatible with the printer model, or
improperly installed, EPSON Status Monitor 3 will not accurately display the ink cartridge status. Be
sure to replace or reinstall any ink cartridge as indicated by EPSON Status Monitor 3.
Consumables
72
GP-C830/GP-M830/GP-C831/GP-M831/GP-C832/GP-M832
User’s Guide
❏ The progress meter appears automatically when you start a print job.
Note:
To display the progress meter automatically, click the Utility tab in the printer driver dialog box,
click Other Config, and then select the Show Progress Meter check box.
Precautions on ink cartridge replacement
Read all the instructions in this section before replacing the ink cartridges.
❏ This product uses ink cartridges equipped with an IC chip that monitors the amount of ink used by
each cartridge. Cartridges are usable even if they are removed and reinserted. However, some ink
is consumed each time cartridges are inserted, because the product automatically checks their
reliability.
❏ The valve in the ink supply port is designed to contain any excess ink that may be released.
However, careful handling is recommended. Do not touch the supply port of the ink cartridge or
its surrounding area.
❏ Ink is consumed during the following operations: ink charging when an ink cartridge is installed
for the first time, print head cleaning, and automatic cleaning executed periodically.
Consumables
73
GP-C830/GP-M830/GP-C831/GP-M831/GP-C832/GP-M832
User’s Guide
❏ For maximum ink efficiency, only remove an ink cartridge when you are ready to replace it.
❏ Do not refill the ink cartridges. Other products not manufactured by Epson may cause damage
that is not covered by Epson’s warranties, and under certain circumstances, may cause erratic
product behavior.
❏ Keep ink cartridges out of the reach of children and do not drink the ink.
❏ Be careful when you handle used ink cartridges, as there may be some ink around the ink supply
port. If ink gets on your skin, wash the area thoroughly with soap and water. If ink gets into your
eyes, flush them immediately with water. If discomfort or vision problems continue after a
thorough flushing, see a doctor immediately.
❏ Epson recommends the use of genuine Epson ink cartridges. The use of non-genuine ink may
cause damage that is not covered by Epson’s warranties, and under certain circumstances, may
cause erratic product behavior. Epson cannot guarantee the quality or reliability of non-genuine
ink. The ink cartridge status is not displayed when non-genuine ink is used.
❏ Do not open the ink cartridge package until you are ready to install it in the product.
❏ Use ink cartridges within six months after installing them in the printer.
❏ Leave the old cartridge installed in the product until you have obtained a replacement; otherwise,
ink remaining in the print head nozzles may dry out.
❏ You cannot continue printing if any of the ink cartridges has reached its replacement time, even if
the other cartridges still contain ink. Before printing, replace the used cartridge.
❏ Do not turn off the product or open the ink cartridge cover while loading ink (On light is flashing).
Opening the covers may cause the ink to reload, resulting in more of the ink being consumed. Also,
normal printing may be disturbed.
❏ If the ink cartridge is not recognized even if it is correctly installed, dirt may be attached to the
green IC chip. Remove the cartridge, wipe the IC chip with a soft cloth, and install it again.
❏ Color adjustment of the product is based on the use of genuine Epson ink cartridges. Use of
non-genuine ink cartridges may result in reduced print quality and the product performance may
not be optimum.
❏ When an Ink light is flashing or lit, the ink cartridge is not correctly installed. Check that it is
installed correctly.
❏ If installing an ink cartridge does not provide normal printing, press the Cleaning button for
three seconds. If it does not resolve the problem, repeat the process one or two times.
Consumables
74
GP-C830/GP-M830/GP-C831/GP-M831/GP-C832/GP-M832
User’s Guide
❏ When the printer is turned off using the On button, the print head is automatically covered to
prevent the ink from drying. If you will not use the printer after installing the ink cartridges, make
sure to turn off the printer using the On button. Do not unplug the power cord or turn off the
circuit breaker while the power is on.
❏ When moving or transporting the printer after installing the ink cartridges, leave the ink
cartridges installed.
❏ During printing, the black ink cartridge with the most ink remaining is used (GP-M830/
GP-M831/GP-M832 only).
❏ You cannot print when either black ink cartridge has reached its replacement time (GP-M830/
GP-M831/GP-M832 only).
Replacing an ink cartridge
Note:
❏ Do not open the ink cartridge package until you are ready to install it in the product.
❏ To confirm the status of each ink cartridge, see “Checking the ink cartridge status” on page 71.
This table describes the status of the Ink lights and the actions you need to take.
Lights
Action
F
Ink is low. Obtain a replacement ink cartridge.
N
The ink cartridge has reached its replacement time. Replace the ink cartridge.
F : flashing N : on
Follow these steps to replace an ink cartridge.
! Caution:
Do not remove the cartridge from the product until you are ready to replace it with another.
Note:
❏ The illustrations show replacement of the black ink cartridge of the left ink slot, but the instructions
are the same for all the cartridges.
❏ When installing an ink cartridge into the GP-C830/GP-C831/GP-C832, make sure that the color of
the cartridge matches the color of the label that is affixed to the printer.
1. Make sure that the On light is on, but not flashing.
Consumables
75
GP-C830/GP-M830/GP-C831/GP-M831/GP-C832/GP-M832
User’s Guide
2. Open the ink cartridge cover.
Note:
Wait for four seconds or more before removing the ink cartridge. Otherwise, ink may squirt.
3. Push in the used cartridge so the cartridge pops out slightly.
Consumables
76
GP-C830/GP-M830/GP-C831/GP-M831/GP-C832/GP-M832
User’s Guide
4. Carefully pull the used cartridge straight out of the slot. Dispose of it properly.
5. For best results, shake the new ink cartridge four or five times.
6. Remove the new ink cartridge from the package.
Consumables
77
GP-C830/GP-M830/GP-C831/GP-M831/GP-C832/GP-M832
User’s Guide
! ❏Caution:
Do not touch the green IC chip on the side of the cartridge. This can damage the ink
cartridge.
❏ Always install an ink cartridge immediately after removing the old cartridge. If the
cartridge is not installed promptly, you may not be able to print.
❏ Do not refill the ink cartridge. Other products not manufactured by Epson may cause
damage that is not covered by Epson’s warranties, and under certain circumstances, may
cause erratic product behavior.
7. Place the new ink cartridge into the slot. Then, push the ink cartridge until it clicks into place.
Consumables
78
GP-C830/GP-M830/GP-C831/GP-M831/GP-C832/GP-M832
User’s Guide
8. Close the ink cartridge cover.
Consumables
79
GP-C830/GP-M830/GP-C831/GP-M831/GP-C832/GP-M832
User’s Guide
Chapter 9
Product Information
Printer Parts
a. top cover
b. control panel
c. ink cartridge cover (left)
d. output tray
e. ink cartridge cover (right)
a. center paper support*
b. paper sensor
Product Information
80
GP-C830/GP-M830/GP-C831/GP-M831/GP-C832/GP-M832
User’s Guide
c. sprockets*
d. connector cover
e. power plug connector
f. USB interface connector
g. parallel interface connector
h. ethernet interface connector
i. cable holders
* tractor unit parts
Printer Specifications
Mechanical
Printing method:
Serial ink jet
Printing speed:
Print quality:
Super Draft/
Draft
450 cps
Print quality:
Normal/
Fine
360 cps
Print quality:
Extra Fine 1/
Extra Fine 2/
Extra Fine 3
200 cps
Printing direction:
Bidirectional, unidirectional
Printable columns:
80 columns (at 10 cpi)
Product Information
81
GP-C830/GP-M830/GP-C831/GP-M831/GP-C832/GP-M832
Resolution:
Print quality:
Super Draft/
Draft/
Normal
360 × 360 dpi
Print quality:
Fine
360 × 720 dpi
Print quality:
Extra Fine 1/
Extra Fine 2
720 × 720 dpi
Print quality:
Extra Fine 3
5760 × 1440 dpi
Feeding method:
Push tractor feed (rear paper entry)
Feeder:
Rear push tractor
Paper feed speed:
Normal mode:
User’s Guide
Intermittent
25.4 mm/line at 1-inch line
spacing
Continuous feed
381 mm/second
(15 inches/second)
Reliability:
Total print volume
0.6 million sheets
(paper size: 241.3 × 279.4 mm
(9.5 × 11.0 inches))
Dimensions and weight:
Height
224 mm (8.82 inches)
Width
464 mm (18.27 inches)
Depth
465 mm (18.30 inches)
Weight
Approx. 12.2 kg (26.9 lb)
(without the ink cartridges)
Product Information
82
GP-C830/GP-M830/GP-C831/GP-M831/GP-C832/GP-M832
Ink cartridges:
User’s Guide
Color: GP-C830/GP-C831/
GP-C832
Black, Yellow, Magenta, Cyan
Color: GP-M830/
GP-M831/GP-M832
Black
Cartridge life
Use within 6 months after
installing in the printer.
Temperature
Operation:
10 to 35 ˚C (50 to 95 ˚F)
Electronic
! Caution:
For the Ethernet cable, use a cable with CAT5e shielding.
Interfaces:
One standard bidirectional, 8-bit, parallel interface with
IEEE-1284 nibble mode and high-speed communication
support, one USB2.0 (High Speed) interface, and the
100BASE-TX/10BASE-T interface.
Buffer:
64 KB or more
Product Information
83
GP-C830/GP-M830/GP-C831/GP-M831/GP-C832/GP-M832
Built-in fonts:
User’s Guide
For Indian users
Bitmap fonts:
EPSON Draft 10, 12, 15 cpi
EPSON Roman 10, 12, 15 cpi, proportional
EPSON Sans Serif 10, 12, 15 cpi, proportional
EPSON Courier 10, 12, 15 cpi
EPSON Prestige 10, 12 cpi
EPSON Script 10 cpi
EPSON OCR-B 10 cpi
EPSON Orator 10 cpi
EPSON Orator-S 10 cpi
EPSON Script C proportional
Indian fonts*1:
CDAC Devanagari proportional*2
CDAC Bengali proportional*2
CDAC Tamil proportional*2
CDAC Telugu proportional*2
CDAC Assamese proportional*2
CDAC Oriya proportional*2
CDAC Kannada proportional*2
CDAC Malayalam proportional*2
CDAC Gujarati proportional*2
CDAC Punjabi proportional*2
*1 These fonts are available for Indian model only.
*2 Each font has two sizes (14 pt and 10.5 pt) and two qualities
(LQ and Draft).
Scalable fonts:
EPSON Roman 10.5, 8-32 pt (every 2 pt)
EPSON Sans Serif 10.5, 8-32 pt (every 2 pt)
EPSON Roman T 10.5, 8-32 pt (every 2 pt)
EPSON Sans Serif H 10.5, 8-32 pt (every 2 pt)
Barcode fonts:
EAN-13, EAN-8, Interleaved 2 of 5, UPC-A, UPC-E, Code 39,
Code 128, POSTNET
Product Information
84
GP-C830/GP-M830/GP-C831/GP-M831/GP-C832/GP-M832
User’s Guide
For Thai users
Bitmap fonts:
EPSON Draft 10, 12, 15 cpi
EPSON Roman 10, 12, 15 cpi, proportional
EPSON Sans Serif 10, 12, 15 cpi, proportional
EPSON Courier 10, 12, 15 cpi
EPSON Prestige 10, 12 cpi
EPSON Script 10 cpi
EPSON OCR-B 10 cpi
EPSON Orator 10 cpi
EPSON Orator-S 10 cpi
EPSON Script C proportional
Scalable fonts:
EPSON Roman 10.5, 8-32 pt (every 2 pt)
EPSON Sans Serif 10.5, 8-32 pt (every 2 pt)
EPSON Roman T 10.5, 8-32 pt (every 2 pt)
EPSON Sans Serif H 10.5, 8-32 pt (every 2 pt)
SV Busaba 10.5, 8-32 pt (every 2 pt)*1
SV Jittra 10.5, 8-32 pt (every 2 pt)*1
Barcode fonts:
EAN-13, EAN-8, Interleaved 2 of 5, UPC-A, UPC-E,
Code 39, Code 128, POSTNET
*1 These fonts are available for Thai model only.
Product Information
85
GP-C830/GP-M830/GP-C831/GP-M831/GP-C832/GP-M832
User’s Guide
For Taiwanese users
Bitmap fonts:
EPSON Draft 10, 12, 15 cpi
EPSON Roman 10, 12, 15 cpi, proportional
EPSON Sans Serif 10, 12, 15 cpi, proportional
EPSON Courier 10, 12, 15 cpi
EPSON Prestige 10, 12 cpi
EPSON Script 10 cpi
EPSON OCR-B 10 cpi
Traditional Chinese fonts:
Scalable fonts:
EPSON Roman 10.5, 8-32 pt (every 2 pt)
EPSON Sans Serif 10.5, 8-32 pt (every 2 pt)
EPSON Roman T 10.5, 8-32 pt (every 2 pt)
EPSON Sans Serif H 10.5, 8-32 pt (every 2 pt)
Barcode fonts:
EAN-13, EAN-8, Interleaved 2 of 5, UPC-A, UPC-E, Code 39,
Code 128, POSTNET
Product Information
86
GP-C830/GP-M830/GP-C831/GP-M831/GP-C832/GP-M832
User’s Guide
For Chinese users
Bitmap fonts:
EPSON Draft 10, 12, 15 cpi
EPSON Roman 10, 12, 15 cpi, proportional
EPSON Sans Serif 10, 12, 15 cpi, proportional
EPSON OCR-B 10 cpi
Simplified Chinese fonts:
Scalable fonts:
EPSON Roman 10.5, 8-32 pt (every 2 pt)
EPSON Sans Serif 10.5, 8-32 pt (every 2 pt)
EPSON Roman T 10.5, 8-32 pt (every 2 pt)
EPSON Sans Serif H 10.5, 8-32 pt (every 2 pt)
Barcode fonts:
EAN-13, EAN-8, Interleaved 2 of 5, UPC-A, UPC-E, Code 39,
Code 128, POSTNET
Product Information
87
GP-C830/GP-M830/GP-C831/GP-M831/GP-C832/GP-M832
User’s Guide
For other users
Bitmap fonts:
EPSON Draft 10, 12, 15 cpi
EPSON Roman 10, 12, 15 cpi, proportional
EPSON Sans Serif 10, 12, 15 cpi, proportional
EPSON Courier 10, 12, 15 cpi
EPSON Prestige 10, 12 cpi
EPSON Script 10 cpi
EPSON OCR-B 10 cpi
EPSON Orator 10 cpi
EPSON Orator-S 10 cpi
EPSON Script C proportional
Scalable fonts:
EPSON Roman 10.5, 8-32 pt (every 2 pt)
EPSON Sans Serif 10.5, 8-32 pt (every 2 pt)
EPSON Roman T 10.5, 8-32 pt (every 2 pt)
EPSON Sans Serif H 10.5, 8-32 pt (every 2 pt)
Barcode fonts:
EAN-13, EAN-8, Interleaved 2 of 5, UPC-A, UPC-E, Code 39,
Code 128, POSTNET
Character tables:
One Italic and 12 graphical character tables. (34 graphical
character tables are available in some countries.) See “Character
Tables” on page 94 for more information on the available
character tables.
Character sets:
14 international character sets and one legal character set
Electrical
Supply voltage*
DC 42 V
Rated current
1.0 A
* Be sure to use the included AC Adapter K (M248A).
Product Information
88
GP-C830/GP-M830/GP-C831/GP-M831/GP-C832/GP-M832
AC power consumption
User’s Guide
Approx. 33 W (ISO24712 pattern)
Approx. 8 W in standby mode
Approx. 2.9 W in sleep mode*
Approx. 0.2 W in power-off mode
* When three minutes pass in the following conditions, the printer enters sleep mode.
- No error
- There is no data in input buffer
- Ink cartridge covers are closed
- Top cover is closed
Environmental
Temperature
(without condensation)
Humidity
(without condensation)
Operation
10 to 35 ˚C (50 to 95 ˚F)
20 to 80% RH
Storage
-20 to 40 ˚C (-4 to 104 ˚F)
5 to 85% RH
Paper
Note:
❏ Do not load paper that has been folded or is damaged, wrinkled, or curled.
❏ Medicine bags may become dirty when printing in an environment with high humidity if the
backside of the medicine bags is a polyvinyl resin.
Continuous paper:
Width
76.2 to 241.3 mm (3.0 to 9.5 inches)
Length (one page)
12.7 to 558.8 mm (0.5 to 22.0 inches)*
Thickness
0.065 to 0.14 mm (0.0025 to 0.0055 inch)
Weight
52 to 129 g/m² (14 to 34.3 lb)
Quality
Plain paper, Reclaimed paper
Not broken, torn, turned over, or wrinkled
* You cannot load continuous paper if 139.7 mm (5.5 inches) or less remains.
Product Information
89
GP-C830/GP-M830/GP-C831/GP-M831/GP-C832/GP-M832
User’s Guide
Labels (continuous base sheet):
Label size
38.1 mm (1.5 inches) in height, minimum
50.8 mm (2.0 inches) in width, minimum
2.5 mm (0.1 inch) corner radius, minimum
Base sheet width
76.2 to 241.3 mm (3.0 to 9.5 inches)
Base sheet length
38.1 to 558.8 mm (1.5 to 22.0 inches)
Base sheet thickness
0.076 to 0.14 mm (0.003 to 0.0055 inch)*
Total thickness
0.143 to 0.225 mm (0.0056 to 0.0089 inch)
Label weight
63 to 190 g/m² (17 to 28 lb)
* Print in an environment with humidity of 55% or less when using labels that have a continuous base sheet with a thickness
of 0.058 to 0.075 mm.
Note:
❏ Use only labels that are designed for use with ink jet printers.
❏ Epson recommends using labels with a base sheet that is not covered with label material.
* label
** base sheet
*** corner radius: 2.5 mm (0.1 inch) or more
Medicine bag (continuous):
Width
76.2 to 241.3 mm (3.0 to 9.5 inches)
Product Information
90
GP-C830/GP-M830/GP-C831/GP-M831/GP-C832/GP-M832
Length (one page)
12.7 to 558.8 mm (0.5 to 22.0 inches)*
Thickness
0.11 to 0.13 mm (0.0043 to 0.0051 inches)
Weight
63 to 104.7 g/m² (17 to 28 lb)
Quality
Plain paper, Reclaimed paper
Not broken, torn, turned over, or wrinkled
User’s Guide
* You cannot load continuous paper if 139.7 mm (5.5 inches) or less remains.
Pre-printed Paper
Pre-printed paper is paper that has ruled lines, letters, or figures printed in the top and bottom
margins. The middle of the paper is left blank. The margin areas are often used for letterheads, borders,
and so on. You can make your own pre-printed paper or you can purchase it.
You cannot use pre-printed paper if the areas shown with diagonal lines in the illustration below have
been printed on.
Area measurements
A
12.5 mm (0.492 inch)
B
6 mm (0.236 inch)
Product Information
91
GP-C830/GP-M830/GP-C831/GP-M831/GP-C832/GP-M832
C
User’s Guide
2 mm (0.079 inch)
Printable area
Continuous paper:
A
The minimum top and bottom margins above and below the perforation are 2.0 mm (0.079
inch) each.
B
The minimum left and right margins are 13 mm (0.51 inch) each.
The maximum paper width is 241.3 mm (9.5 inches) and the maximum printable width is
203.2 mm (8.0 inches).
For continuous paper wider than 229.2 mm (9.02 inches), the right margins increase
proportionally to match the width of the paper.
Product Information
92
GP-C830/GP-M830/GP-C831/GP-M831/GP-C832/GP-M832
User’s Guide
Label (continuous base sheet):
A
2 mm (0.0787 inch) or more
B
12.7 mm (0.5 inch) or more
C
2 mm(0.0787 inch) or more
D
1.5 mm (0.0591 inch) or more
AC Adapter Electrical Specifications
Use the specified AC Adapter (EPSON AC Adapter K, Model: M248A) only.
Input
Output
Rated voltage
AC 100 to 240 V
Rated frequency
50-60 Hz
Rated current
1.6 A
Supply voltage
DC 42 V
Rated current
1.38 A
Product Information
93
GP-C830/GP-M830/GP-C831/GP-M831/GP-C832/GP-M832
User’s Guide
Command Lists
For information about the commands, please access http://www.epson.com.
Character Tables
You can select the character tables and character sets below.
Character tables:
For Indian users
One Italic and 17 graphical character tables:
Italic table, PC437 (US, Standard Europe), PC850
(Multilingual), PC860 (Portuguese), PC861 (Icelandic), PC863
(Canadian-French), PC865 (Nordic), BRASCII, Abicomp,
Roman 8, ISO Latin 1, PC858, ISO 8859-15, ISCII, PC-ISCII,
EA-ISCII, TAB-Tamil99, TAM-Tamil99
For Thai users
One Italic and 14 graphical character tables:
Italic table, PC437 (US, Standard Europe), PC850
(Multilingual), PC860 (Portuguese), PC863
(Canadian-French), PC865 (Nordic), PC 858, ISO 8859-15,
KU42 (Thai), TIS11 (Thai), TIS18 (Thai), TIS17 (Thai), TIS13
(Thai), TIS16 (Thai), TSM/WIN (Thai)
For Taiwanese users
One Italic and eight graphical character tables:
Italic table, PC437 (US Standard Europe), PC850
(Multilingual), PC858 (Multilingual Euro), NS, TCA, BIG-5,
IBM5550, DCI
For Chinese users
One Italic and eight graphical character tables:
Italic table, PC437 (US, Standard Europe), PC850
(Multilingual), PC860 (Portuguese), PC863
(Canadian-French), PC865 (Nordic), PC858 (Multilingual
Euro), GB18030
Product Information
94
GP-C830/GP-M830/GP-C831/GP-M831/GP-C832/GP-M832
User’s Guide
For other users
Standard version:
One Italic and 12 graphical character tables:
Italic table, PC437 (US Standard Europe), PC850
(Multilingual), PC860 (Portuguese), PC861 (Icelandic), PC863
(Canadian-French), PC865 (Nordic), Abicomp, BRASCII,
Roman 8, ISO Latin 1, PC858, ISO 8859-15
NLSP version:
One Italic and 39 graphical character tables:
Italic table, PC437 (US Standard Europe), PC850
(Multilingual), PC860 (Portuguese), PC861 (Icelandic), PC863
(Canadian-French), PC865 (Nordic), Abicomp, BRASCII,
Roman 8, ISO Latin 1, PC858, ISO 8859-15, PC437 Greek,
PC852 (East Europe), PC853 (Turkish), PC855 (Cyrillic),
PC857 (Turkish), PC866 (Russian), PC869 (Greek),
MAZOWIA (Poland), Code MJK (CSFR), ISO 8859-7 (Latin/
Greek), ISO Latin 1T (Turkish), Bulgaria (Bulgarian), Estonia
(Estonia), PC 774 (LST 1283:1993), ISO 8859-2, PC866 LAT.
(Latvian), PC866 UKR (Ukraina), PC771 (Lithuania), PC437
Slovenia, PC MC, PC1250, PC1251, PC864 (Arabic), PCAPTEC
(Arabic), PC708 (Arabic), PC720 (Arabic), PCAR864 (Arabic)
Character sets:
14 international character sets and one leagal character sets.
USA, France, Germany, UK, Denmark 1,
Sweden, Italy, Spain 1,
Japan, Norway, Denmark 2, Spain 2,
Latin America, Korea, Legal
Standards and Approvals
WARNING:
❏ This is a Class A product. In a domestic environment this product may cause radio interference in
which case the user may be required to take adequate measures.
❏ The connection of a non-shielded printer interface cable to this printer will invalidate the EMC
standards of this device.
Product Information
95
GP-C830/GP-M830/GP-C831/GP-M831/GP-C832/GP-M832
User’s Guide
❏ You are cautioned that changes or modifications not expressly approved by Seiko Epson
Corporation could void your authority to operate the equipment.
Taiwan
EMC
CNS13438 Class A
Safety
CNS14336-1
North America
EMI
FCC/ICES-003 Class A
FCC compliance statement for United States users
This equipment has been tested and found to comply with the limits for a Class A digital device,
pursuant to Part 15 of the FCC Rules. These limits are designed to provide reasonable protection
against harmful interference when the equipment is operated in a commercial environment. This
equipment generates, uses, and can radiate radio frequency energy and, if not installed and used in
accordance with the instruction manual, may cause harmful interference to radio communications.
Operation of this equipment in a residential area is likely to cause harmful interference, in which case
the user will be required to correct the interference at his own expense.
This device complies with Part 15 of the FCC Rules. Operation is subject to the following two
conditions:
(1) this device may not cause harmful interference, and
(2) this device must accept any interference received, including interference that may cause undesired
operation.
For Canadian users
This Class A digital apparatus complies with Canadian ICES-003.
Cet appareil numérique de la classe A est conforme à la norme NMB-003 du Canada.
Product Information
96
GP-C830/GP-M830/GP-C831/GP-M831/GP-C832/GP-M832
User’s Guide
Europe
EMC Directive 2004/108/EC
EN 55022 Class A
EN 55024
IEC 61000-4-2
IEC 61000-4-3
IEC 61000-4-4
IEC 61000-4-5
IEC 61000-4-6
IEC 61000-4-11
Checking the Print Head Nozzles
If you find that the printout is unexpectedly faint or that dots are missing, you may be able to identify
the problem by checking the print head nozzles.
You can check the print head nozzles from your computer using the Nozzle Check utility in the printer
driver or from the printer using the control panel buttons.
Note:
When you print a nozzle check pattern, use paper with a width of 116.8 mm (4.6 inches) or more.
Using the Nozzle Check utility for Windows
Follow these steps to use the Nozzle Check utility.
1. Make sure that no lights are indicating errors.
2. Make sure that paper is attached to the tractor unit.
3. Access the printer driver. See “Using the Printer Driver” on page 26.
4. Click the Utility tab, and then click the Nozzle Check button.
5. Follow the on-screen instructions.
Product Information
97
GP-C830/GP-M830/GP-C831/GP-M831/GP-C832/GP-M832
User’s Guide
Using the control panel
Follow these steps to check the print head nozzles using the control panel.
1. Make sure that paper is attached to the tractor unit.
2. While pressing the Load/Eject button, press the On button until the On light flashes.
Below are two sample nozzle check patterns.
Compare the quality of the printed check page with the sample shown below. If there are no print
quality problems, such as gaps or missing segments in the test lines, the print head is fine.
GP-C830/GP-C831/GP-C832
GP-M830/GP-M831/GP-M832
If any segment of the printed lines is missing, as shown below, this could mean that an ink nozzle is
clogged. See “Cleaning the Print Head” on page 99.
GP-C830/GP-C831/GP-C832
GP-M830/GP-M831/GP-M832
Product Information
98
GP-C830/GP-M830/GP-C831/GP-M831/GP-C832/GP-M832
User’s Guide
Cleaning the Print Head
If you find that the printout is unexpectedly faint or that dots are missing, you may be able to solve
these problems by cleaning the print head, which ensures that the nozzles are delivering ink properly.
You can clean the print head from your computer using the Head Cleaning utility in the printer driver
or from the printer using the control panel buttons.
Note:
❏ Because print head cleaning uses ink from all cartridges, clean the print head only if print quality
declines; for example, if the printout is blurry, the color is incorrect or missing, or the vertical lines are
pronouncedly misaligned.
❏ Use the Nozzle Check utility first to confirm that the print head needs to be cleaned. This saves ink.
❏ When ink is low, you may not be able to clean the print head. When ink is expended, you cannot clean
the print head. Replace the appropriate ink cartridge first. For more information, see “Replacing an
ink cartridge” on page 75.
Using the Head Cleaning utility for Windows
Follow these steps to clean the print head using the Head Cleaning utility.
1. Turn on the printer.
Product Information
99
GP-C830/GP-M830/GP-C831/GP-M831/GP-C832/GP-M832
User’s Guide
2. Make sure that no lights are indicating errors.
3. Access the printer driver. See “Using the Printer Driver” on page 26.
4. Click the Utility tab, and then click the Head Cleaning button.
5. Follow the on-screen instructions.
The On light flashes while the printer performs the cleaning cycle.
! Caution:
❏ Never turn off the printer while the On light is flashing. Doing so may damage the printer.
❏ Never open the top cover or ink cartridge cover while the On light is flashing.
Note:
❏ If print quality has not improved after repeating this procedure, turn off the printer and wait for at
least six hours. Then, run the nozzle check again and repeat the head cleaning if necessary.
❏ If print quality remains a problem, contact Epson Service Center. For more information, see
“Contacting Customer Support” on page 64.
❏ To maintain print quality, Epson recommends printing a few pages on a regular basis.
Using the control panel
Follow these steps to clean the print head using the control panel.
1. Hold down the Cleaning button for about three seconds.
! ❏Caution:
Never turn off the printer while the On light is flashing. Doing so may damage the printer.
❏ Never open the top cover or ink cartridge cover while the On light is flashing.
2. When the On light stops flashing, print a nozzle check pattern to confirm that the head is clean. For
more information, see “Checking the Print Head Nozzles” on page 97.
Note:
❏ If print quality has not improved after repeating this procedure, turn off the printer and wait for at
least six hours. Then, run the nozzle check again and repeat the head cleaning if necessary.
Product Information
100
GP-C830/GP-M830/GP-C831/GP-M831/GP-C832/GP-M832
User’s Guide
❏ If print quality remains a problem, contact Epson Service Center. For more information, see
“Contacting Customer Support” on page 64.
❏ To maintain print quality, Epson recommends printing a few pages on a regular basis.
Aligning the Print Head
Adjusting the media feed
If you notice a misalignment of vertical lines or horizontal banding, you may be able to solve this
problem by aligning the print head.
You can align the print head from your computer using the Print Head Alignment utility in your
printer driver.
Note:
If you notice a pronounced misalignment of vertical lines, be sure to clean the print head first. For more
information, see “Cleaning the Print Head” on page 99.
Follow these steps to align the print head using the Print Head Alignment utility.
1. Make sure that no lights are indicating errors.
2. Make sure that paper is attached to the tractor unit.
3. Access the printer driver. See “Using the Printer Driver” on page 26.
4. Click the Utility tab, and then click the Print Head Alignment button.
5. Select Media Feed Adjustment, and then click Next.
6. Follow the on-screen instructions.
Adjusting the bi-directional printing
This utility tool allows you to make adjustments if the vertical lines are misaligned.
Follow these steps to use Bi-D Adjustment.
Product Information
101
GP-C830/GP-M830/GP-C831/GP-M831/GP-C832/GP-M832
User’s Guide
! Caution:
Do not turn off the printer while the printer is printing the adjustment patterns. Doing so may
cause the printer to store incorrect settings. If you turned off the printer during the adjustment
process, start Bi-D Adjustment again.
1. Make sure that no lights are indicating errors.
2. Make sure that paper is attached to the tractor unit.
3. Access the printer driver. See “Using the Printer Driver” on page 26.
4. Click the Utility tab, and then click the Print Head Alignment button.
5. Select Bi-directional Printing Adjustment, and then click Next.
6. Follow the on-screen instructions.
Note:
Bi-directional printing may not be adjusted correctly if the paper is wavy. Clear the High Speed
check box in the printer driver dialog box to perform adjustments correctly.
Printing the Status Sheet
You can print a status sheet to check the detailed information on the printer status. You can print three
types of status sheets.
Note:
When you print a status sheet, use paper with a width of 114.3 mm (4.5 inches) or more.
General information
The serial number, firmware version, and total print volume are printed on the status sheet.
1. Turn off the printer.
2. Make sure that paper is attached to the tractor unit.
3. While pressing the FF button, press the On button until the On light flashes.
Product Information
102
GP-C830/GP-M830/GP-C831/GP-M831/GP-C832/GP-M832
User’s Guide
Network settings
The information for the network settings, such as the MAC address, IP address, and security settings,
are printed on the status sheet.
1. Make sure that paper is attached to the tractor unit and that the printer is turned on.
2. Press the Tear Off button and Load/Eject button at the same time for three seconds.
Printer settings
The current printer settings are printed on the status sheet.
1. Turn off the printer.
2. Make sure that paper is attached to the tractor unit.
3. While pressing the Cleaning button, press the On button until the On light flashes.
Initializing the Network Setting
When network connection fails, follow the step below to initialize the network setting to the default.
1. Turn off the printer.
2. While pressing the Tear Off button and Load/Eject button, press the On button.
! Caution:
The initialization takes about 30 seconds. Do not turn off the printer during the initialization.
Cleaning the Printer
To keep your printer operating at its best, you should clean it thoroughly several times a year.
Product Information
103
GP-C830/GP-M830/GP-C831/GP-M831/GP-C832/GP-M832
User’s Guide
Cleaning the outer case
! Caution:
❏ Never use alcohols or thinners to clean the printer; these chemicals can damage the printer
components as well as the case.
❏ Be careful not to get water onto the printer mechanism or electronic components.
1. Turn off the printer and remove any paper loaded in the printer.
2. Clean the outer case with a dry cloth. If the outer case is still dirty or dusty, clean it with a clean cloth
dampened with a mild detergent dissolved in water.
Cleaning the inside of the printer
! Caution:
❏ Never use alcohols or thinners to clean the printer; these chemicals can damage the printer
components as well as the case.
❏ Be careful not to get water onto the printer mechanism or electronic components.
❏ Do not use a hard or abrasive brush.
❏ Do not spray the inside of the printer with lubricants; unsuitable lubricants can damage the
printer mechanism. Contact an Epson dealer if you think lubrication is needed.
Follow these steps to clean your printer.
1. Turn off the printer and remove any paper loaded in the printer.
2. Slide the right sprocket unit completely to the right.
3. Use a soft brush to carefully brush away all dust and dirt from the outer case.
Product Information
104
GP-C830/GP-M830/GP-C831/GP-M831/GP-C832/GP-M832
User’s Guide
! ❏Caution:
When cleaning the printer using a brush, be careful not to touch the linear scale or the
carriage shafts with the brush and make sure that dust does not adhere to the shafts.
Otherwise, the print quality may be adversely affected.
❏ Do not brush any dust toward the print head. Brush dust that is near the print head
forward or backward away from the head.
* linear scale
** carriage shaft
*** print head
4. Slide the right sprocket unit completely to the left.
5. Clean the scale with a soft cloth.
Product Information
105
GP-C830/GP-M830/GP-C831/GP-M831/GP-C832/GP-M832
User’s Guide
! Caution:
When cleaning the scale, be careful not to touch or damage the linear scale or the carriage
shafts.
* scale
** linear scale
*** carriage shaft
Cleaning the paper feed rollers
Dirty paper feed rollers may cause paper jams or dirty printouts. Follow these steps to clean the paper
feed rollers.
! Caution:
❏ Be careful not to get water onto the printer mechanism or electronic components.
❏ Do not spray the inside of the printer with lubricants; unsuitable lubricants can damage the
printer mechanism. Contact an Epson dealer if you think lubrication is needed.
1. Turn off the printer and attach the paper to the tractor unit.
2. Turn on the printer.
3. Press the Load/Eject button to feed the paper to the top-of-form position.
4. Press the Tear Off button to advance the perforation of the paper to the tear-off position.
5. Open the top cover.
Product Information
106
GP-C830/GP-M830/GP-C831/GP-M831/GP-C832/GP-M832
User’s Guide
6. Hold down the Pause button for about three seconds. The Pause light flashes and the printer
enters Micro Adjust mode.
7. Clean the paper feed rollers with a cotton-tipped applicator dampened with alcohol (ethanol or
isopropyl alcohol).
Press the FF button or Load/Eject button to rotate the rollers while cleaning them.
! Caution:
When cleaning the paper feed rollers, be careful not to touch or damage the linear scale or the
carriage shafts.
* paper feed roller
** linear scale
*** carriage shaft
8. Turn off the printer.
Transporting the Printer
If you need to transport your printer for some distance, carefully repack it using the original box and
packing materials.
Follow these steps to repack the printer in its original packing materials.
! Caution:
Leave the ink cartridges installed. Removing the cartridges may cause ink to leak and adversely
affect the print quality.
Product Information
107
GP-C830/GP-M830/GP-C831/GP-M831/GP-C832/GP-M832
User’s Guide
1. Press the Load/Eject button and remove any paper loaded in the printer.
2. Turn off the printer.
3. Unplug the power cord from the electrical outlet, and then disconnect the interface cable from the
printer.
4. Repack the printer and power cord in their original packing materials and place them in the
printer’s original box.
Product Information
108
GP-C830/GP-M830/GP-C831/GP-M831/GP-C832/GP-M832
User’s Guide
Copyright and Trademarks
No part of this publication may be reproduced, stored in a retrieval system, or transmitted in any form or by any means,
electronic, mechanical, photocopying, recording, or otherwise, without the prior written permission of Seiko Epson
Corporation. The information contained herein is designed only for use with this Epson printer. Epson is not responsible for any
use of this information as applied to other printers.
Neither Seiko Epson Corporation nor its affiliates shall be liable to the purchaser of this product or third parties for damages,
losses, costs, or expenses incurred by the purchaser or third parties as a result of: accident, misuse, or abuse of this product or
unauthorized modifications, repairs, or alterations to this product, or (excluding the U.S.) failure to strictly comply with Seiko
Epson Corporation’s operating and maintenance instructions.
Seiko Epson Corporation shall not be liable for any damages or problems arising from the use of any options or any consumable
products other than those designated as Original Epson Products or Epson Approved Products by Seiko Epson Corporation.
EPSON, EXCEED YOUR VISION, and ESC/P are registered trademarks, and ESC/P2 is a trademark of Seiko Epson
Corporation in Japan and other countries/regions.
®
®
®
®
Microsoft , Windows , Windows Server , and Windows Vista are registered trademarks of Microsoft Corporation in the
United States and/or other countries.
General Notice: Other product names used herein are for identification purposes only and may be trademarks of their respective
owners. Epson disclaims any and all rights in those marks.
The contents of this manual are subject to change without notice.
Copyright © 2012 Seiko Epson Corporation. All rights reserved.
OPEN SOURCE SOFTWARE LICENSE
1.
This printer product includes open source software programs listed in Section 5) according to
the license terms of each open source software program.
2.
We provide the source code of the GPL Programs, LGPL Programs, Apache License Program
and ncftp license Program (each is defined in Section 5) until five (5) years after the
discontinuation of same model of this printer product. If you desire to receive the source code
above, please contact the customer support of your region. You shall comply with the license
terms of each open source software program.
3.
The open source software programs are WITHOUT ANY WARRANTY; without even the
implied warranty of MERCHANTABILITY AND FITNESS FOR A PARTICULAR
PURPOSE. See the license agreements of each open source software program for more details,
which are described on \Manual\OSS\OSS.pdf in the Utility & Documents Disk included with
the product.
Copyright and Trademarks
109
GP-C830/GP-M830/GP-C831/GP-M831/GP-C832/GP-M832
User’s Guide
4.
The license terms of each open source software program are described on \Manual\OSS
\OSS.pdf in the Utility & Documents Disk included with the product.
5.
The list of open source software programs which this printer product includes are as follows.
GNU GPL
This printer product includes the open source software programs which apply the GNU General
Public License Version 2 or later version (“GPL Programs”).
The list of GPL Programs:
linux-2.6.35-arm1-epson12
busybox-1.17.4
udhcp 0.9.8cvs20050124-5
ethtool-2.6.35
iptables 1.4.10
GNU LGPL
This printer product includes the open source software programs which apply the GNU Lesser
General Public License Version 2 or later version (“LGPL Programs”).
The list of LGPL Programs:
uclibc-0.9.32
libusb-1.0.8
zeroconf 0.6.1-1
iksemel-rev25
Apache License
This printer product includes the open source software program “Bonjour” which apply the Apache
License Version2.0 (“Apache License Program”).
Copyright and Trademarks
110
GP-C830/GP-M830/GP-C831/GP-M831/GP-C832/GP-M832
User’s Guide
Bonjour License
This printer product includes the open source software program “Bonjour” which applies the terms
and conditions provided by owner of the copyright to the “Bonjour”.
Net-SNMP license
This printer product includes the open source software program “Net-SNMP” which applies the
terms and conditions provided by owner of the copyright to the “Net-SNMP”.
BSD License (Berkeley Software Distribution License)
This printer product includes the open source software program “busybox-1.17.4” which apply the
Berkeley Software Distribution License (“BSD Program”).
Sun RPC License
This printer product includes the open source software program “busybox-1.17.4” which apply the
Sun RPC License (“Sun RPC Program”).
ncftp license
This printer product includes the open source software program “ncftp-3.2.4” which applies the
terms and conditions provided by owner of the copyright to the “ncftp”.
Copyright and Trademarks
111
GP-C830/GP-M830/GP-C831/GP-M831/GP-C832/GP-M832
User’s Guide
Operating System Versions
In this manual, the following abbreviations are used.
Windows refers to Windows 8, 7, Vista, XP, Server 2012, Server 2008 R2, Server 2008, and Server 2003.
❏ Windows 8 refers to Windows 8, Windows 8 Pro, and Windows 8 Enterprise.
❏ Windows 7 refers to Windows 7 Home Basic, Windows 7 Home Premium, Windows 7
Professional, Windows 7 Enterprise, and Windows 7 Ultimate.
❏ Windows Vista refers to Windows Vista Home Basic Edition, Windows Vista Home Premium
Edition, Windows Vista Business Edition, Windows Vista Enterprise Edition, and Windows Vista
Ultimate Edition.
❏ Windows XP refers to Windows XP Professional x64 Edition and Windows XP Professional.
❏ Windows Server 2012 refers to Windows Server 2012 Standard Edition and Windows Server 2012
Essentials Edition.
❏ Windows Server 2008 R2 refers to Windows Server 2008 R2 Standard Edition and Windows
Server 2008 R2 Enterprise Edition.
❏ Windows Server 2008 refers to Windows Server 2008 Standard Edition and Windows Server 2008
Enterprise Edition.
❏ Windows Server 2003 refers to Windows Server 2003 Standard Edition and Windows Server 2003
Enterprise Edition.
Operating System Versions
112
GP-C830/GP-M830/GP-C831/GP-M831/GP-C832/GP-M832
User’s Guide
Index
A
H
Aligning print head...........................................................101
Auto tear-off.........................................................................20
Head cleaning
Windows...........................................................................99
B
I
Barcode printing..................................................................28
Bi-D adjustment................................................................101
Buttons..................................................................................51
Buzzer setting.......................................................................35
Ink
checking ink cartridge status..........................................71
replacing when expended...............................................75
Ink cartridges
part number......................................................................71
C
Canceling printing...............................................................47
Cleaning
print head..........................................................................99
Cleaning the printer..........................................................103
Clients
with Windows 8, 7, Vista, XP, Server 2012, Server
2008 R2, Server 2008, or Server 2003.....................45
Contacting Epson................................................................64
Continuous paper
loading...............................................................................15
removing...........................................................................21
specifications....................................................................89
Control panel.................................................................51, 55
buttons...............................................................................51
lights...................................................................................51
panel...................................................................................51
Customer support...............................................................64
L
Labels.....................................................................................22
loading...............................................................................22
specifications....................................................................89
Lights.....................................................................................51
M
Medicine bag
specifications....................................................................89
Micro adjust function
tear-off position................................................................23
top-of-form position.......................................................24
N
Nozzle check........................................................................97
Windows...........................................................................97
D
Driver (printer driver)........................................................26
E
EPSON Status Monitor 3.............................................26, 32
accessing............................................................................34
setting up...........................................................................32
Error indication...................................................................55
P
Panel......................................................................................51
Paper jams............................................................................62
Paper specifications.............................................................89
Print head
aligning............................................................................101
checking............................................................................97
cleaning.............................................................................99
Index
113
GP-C830/GP-M830/GP-C831/GP-M831/GP-C832/GP-M832
Printer
sharing...............................................................................41
Printer driver
accessing from Windows 8, 7, Vista, XP, Server 2012,
Server 2008 R2, Server 2008, or Server 2003.........27
settings...............................................................................29
settings for Windows 8, 7, Vista, XP, Server 2012,
Server 2008 R2, Server 2008, or Server 2003.........28
uninstalling.......................................................................48
User’s Guide
USB replacement service....................................................37
R
Removing
continuous paper.............................................................21
S
Server
with Windows 8, 7, Vista, XP, Server 2012, Server
2008 R2, Server 2008, or Server 2003.....................42
Specifications
character tables.................................................................94
electrical............................................................................88
environmental..................................................................89
mechanical........................................................................81
paper..................................................................................89
standards and approvals.................................................95
Status Monitor 3..................................................................32
Status sheet.........................................................................102
T
Tear-off function.................................................................20
Technical support................................................................64
Transporting the printer..................................................107
Troubleshooting
paper jams.........................................................................62
USB problems...................................................................61
U
Uninstalling
printer software................................................................48
USB interface
problems............................................................................61
Index
114