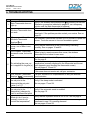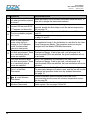
1
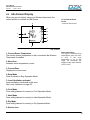
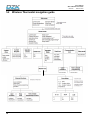
Main & Wireless Thermostat User’s Manual SUMMARY 1. WARNINGS AND ENVIRONMENTAL POLICY ................................................................... 4 1.1 SAFETY CONSIDERATIONS ...................................................................................... 4 1.2 ENVIRONMENTAL POLICY ........................................................................................ 4 1.3 FCC REGULATORY NOTICES ................................................................................... 5 1.4 INTERTEK / UL REGULATORY NOTICES ....................................................................... 6 2. GETTING STARTED ........................................................................................................... 7 3. MAIN THERMOSTAT .......................................................................................................... 8 3.1 Home Screen Display .................................................................................................. 8 3.2 Using your Main Thermostat ...................................................................................... 10 3.2.1 Adjusting the temperature ............................................................................... 10 3.2.2 Operation Mode ............................................................................................... 10 3.2.3 Cleaning the Main Thermostat......................................................................... 11 3.3.1 Thermostat Help Screens ................................................................................ 11 3.3 Time Schedule Programming..................................................................................... 12 3.3.1 Time schedule programming activation ........................................................... 12 3.3.2 Create a new time scheduled program ............................................................ 13 3.3.3 Using the Time Schedule Programming editor ................................................ 13 3.4 Remote zone control .................................................................................................. 14 3.4.1 Remote control ................................................................................................ 14 3.4.2 Edit Name Zone............................................................................................... 14 3.5 Eco-Adapt .................................................................................................................. 15 3.5.1 Description....................................................................................................... 15 3.5.2 Eco-Adapt menu .............................................................................................. 15 3.6 Configuring your Main Thermostat ............................................................................. 16 3.6.1 Interface .......................................................................................................... 16 3.6.2 User settings.................................................................................................... 17 3.7 Understanding the Alerts ........................................................................................... 18 3.7.1 DZK system Alerts ........................................................................................... 18 4. WIRELESS THERMOSTAT ............................................................................................... 19 4.1 Home Screen Display ................................................................................................ 19 4.2 Idle Screen Display .................................................................................................... 21 4.3 Using you Wireless Thermostat ................................................................................. 22 4.3.1 Adjusting the temperature ............................................................................... 22 4.3.2 Low batteries ................................................................................................... 22 4.3.3 Cleaning the Wireless Thermostat................................................................... 23 4.4 Advanced functions in your Wireless Thermostat ...................................................... 23 4.4.1 Time Schedule Programming .......................................................................... 23 4.4.2 Local Ventilation .............................................................................................. 23 4.4.3 Sleep Mode ..................................................................................................... 24 4.5 Remote zone control .................................................................................................. 25 4.6 Wireless Thermostat Configuration ............................................................................ 25 4.7 Understanding the Alerts.............................................................................................. 26 4.7.1 List of DZK zoning system alerts ....................................................................... 26 5. NAVIGATION GUIDES .......................................................................................................... 27 5.1 Main Thermostat navigation guide ............................................................................. 27 5.2 Wireless Thermostat navigation guide ....................................................................... 28 6. TROUBLESHOOTING ........................................................................................................... 29 User´s Manual Main & Wireless thermostat Rev1.00 Date 11-2013 1. WARNINGS AND ENVIRONMENTAL POLICY 1.1 SAFETY CONSIDERATIONS For personal safety and protection of the equipment, use the following safety precautions: • Do not handle the system with wet or damp hands. • Disconnect the power supply before making any connections. • Disconnect the power supply from the air conditioning and heating system before connecting or disconnecting equipment. • Take care not to cause a short circuit in any of the system’s connections. 1.2 ENVIRONMENTAL POLICY Do not dispose of this equipment with household waste. Electrical and electronic equipment contain substances that may damage the environment if not handled appropriately. The symbol of a crossed-out waste bin indicates electrical equipment that must be disposed separately from other urban waste. For correct environmental management, it must be taken to the collection centers provided for this purpose when it is no longer usable. Equipment components may be recycled. Act in accordance with current regulations on environmental protection. If you replace it with other equipment, you must return it to the distributor or take it to a specialized collection center. Those breaking the law or by-laws will be subjected to environmental protection fines. 4 User´s Manual Main & Wireless thermostat Rev1.00 Date 11-2013 1.3 FCC REGULATORY NOTICES Modification statement Corporación Empresarial Altra S.L. has not approved any changes or modifications to this device by the user. Any changes or modifications could void the user’s authority to operate the equipment. Interference statement This device complies with Part 15 of the FCC Rules. Operation is subject to the following two conditions: (1) this device may not cause interference, and (2) this device must accept any interference, including interference that may cause undesired operation of the device. Radiation Exposure Statement This device complies with FCC radiation exposure limits set forth for an uncontrolled environment and meets the FCC radio frequency (RF) Exposure Guidelines in Supplement C to OET65 This transmitter must not be co-located or operating in conjunction with any other antenna or transmitter. FCC Class B digital device notice This equipment has been tested and found to comply with the limits for a Class B digital device, pursuant to part 15 of the FCC Rules. These limits are designed to provide reasonable protection against harmful interference in a residential installation. This equipment generates uses and can radiate radio frequency energy and, if not installed and used in accordance with the instructions, may cause harmful interference to radio communications. However, there is no guarantee that interference will not occur in a particular installation. If this equipment does cause harmful interference to radio or television reception, which can be determined by turning the equipment off and on, the user is encouraged to try to correct the interference by one or more of the following measures: • • • • Reorient or relocate the receiving antenna. Increase the separation between the equipment and receiver. Connect the equipment into an outlet on a circuit different from that to which the receiver is connected. Consult the dealer or an experienced radio/TV technician for help. 5 User´s Manual Main & Wireless thermostat Rev1.00 Date 11-2013 1.4 INTERTEK / UL REGULATORY NOTICES • • 6 The units shall be tested by a Nationally Recognized Testing Laboratory (NRTL) in accordance with ANSI/UL Standard UL 1995/CAN/CSA-C22.2 No. 236-11 – 4th Edition (R2011) – Heating and Cooling Equipment, and will bear the Listed Mark. All wiring shall be in accordance with the National Electric Code (NEC)/Canadian Electrical Code (CEC). User´s Manual Main & Wireless thermostat Rev1.00 Date 11-2013 2. GETTING STARTED Main Thermostat Key features of the Main Thermostat - Color display. - Precision +/- 1ºF (0.5ºC) temperature control. - Dual set. - Auto changeover mode. - Remote zone control. - Vacation programming. - Seven day programming. - Automatic adjustment for Daylight Savings Time (DST). Wireless Thermostat Key features of the Wireless Thermostat - Backlit LCD display. - Precision +/- 1ºF (0.5ºC) temperature control. - Dual set point - Remote zone control. 7 User´s Manual Main & Wireless thermostat Rev1.00 Date 11-2013 3. MAIN THERMOSTAT The Main Thermostat has a user-friendly color screen that displays all the information you need to set and manage your DZK Zoning unit. 3.1 Home Screen Display The Main Screen options for the Main Thermostat are: 2 5 4 3 6 1 7 13 8 12 To access Eco-Adapt menu - Press to access. To access Operation Mode - Press Operation mode icon to access. To change Local Ventilation Value - Press 8 to change. 11 10 9 Home Screen 1. Eco-Adapt & Efficiency Indicator The energy efficiency level is indicated by color and is a function of temperature and the Eco-Adapt system. • Green: High Energy Efficiency • Yellow: Medium-High Energy Efficiency • Orange: Medium-Low Energy Efficiency • Red: Low Energy Efficiency See Eco-Adapt mode on page 15. 2. Operation Mode The current mode of temperature control: Stop, Heat, Cool, Dry, Emergency Heat, or Automatic. See Operation Mode on page 10. 3. Local ventilation This option allows activation (White icon) or deactivation (Grey icon) of the ventilation in the selected zone during system inactivity periods. See Local Ventilation on page 18. User´s Manual Main & Wireless thermostat Rev1.00 Date 11-2013 To access Set Date &Time Menu - Press current day to access. 4. Current day and time Displays the current day and time for your time zone. 5. Time schedule programming This option allows activating or deactivating schedule programming on the Main Thermostat. See Time schedule programming on page 12. the Time To change Time schedule programming value - Press 6. Current Zone Displays the current zone and allows access to remote zone control. See Remote Zone Control on page 14. 7. Current Set point The programmed temperature for a zone to maintain during a particular timeframe. Press (Up) or (Down) to manually adjust by increments of 1ºF (0.5ºC). If the system is set to Auto, press the set point temperature to switch between heating and cooling set points. See Adjust the Temperature on page 10. to change. To access Remote Zone control Menu - Press current Zone to access. 8. Sleep Mode Activated Display if the Sleep timer is activated. See Sleep mode on page 17. 9. On/Off Icon On is indicated by (Blue) and Off is indicated by the room where the Main Thermostat is installed. (Red) in 10. Info Displays screen help information and alerts about your system. See Info on page 11 and 18. 11. Configuration Menu Use to set the Operation mode, Remote zones, Time schedule programming, Eco-Adapt, and System setup. See the Configuration Menu on page 16 12. Eco-Adapt Menu The energy efficiency level for the system is set through the Eco-Adapt Menu. See Eco-Adapt on page 15. 13. Current Room Temperature The current (actual) temperature in the room where the Main Thermostat is installed. To access Help info - Press to access. To access Configuration menu - Press to access. To access Eco-Adapt menu - Press to access. Room temperature The range of measured room temperature goes from 50ºF to 95ºF If the room temperature is out of those limits, the temperature will be displayed as >95 ºF or <50 ºF 9 User´s Manual Main & Wireless thermostat Rev1.00 Date 11-2013 3.2 Using your Main Thermostat The color touch-screen on your Main thermostat makes it simple to review and adjust the settings at any time. 3.2.1 Adjusting the temperature The set point displayed on the screen is the current default temperature. You can easily adjust the temperature on your Main Thermostat. • Press to activate or deactivate the zone’s air conditioning. • Press to increase the temperature set point by 1ºF (0.5ºC). • Press to decrease the temperature set point by 1ºF (0.5ºC). • Press 74ºF (Current set point) to switch between heating and cooling set points. The permitted temperature range is: • Heating mode: 59º F – 84º F. • Cooling mode: 64º F – 86º F. To change Operation Mode If you are using Auto mode, note that there is a minimum difference allowed between heating and cooling set point temperatures. The system will prevent you from setting the temperatures to within those limits From the Home Screen: - Press (icon mode). - Select your Operation Mode: • Stop • Cool • Heat • Autochange • Dry • Emergency Heat* *This option is only visible when it is configured. 3.2.2 Operation Mode This menu sets your system to use heat, cool or auto mode. • STOP The air-conditioning system will remain switched off regardless of the demand status of any zone, and all the motorized dampers will stay open. • COOL In this mode the air-conditioning unit will start a Cooling cycle any time that any zone is in cool demand (TSet-Point < Troom). • HEAT Enables the heating cycle whenever a zone is in heat demand. (TSet-Point > Troom). 10 User´s Manual Main & Wireless thermostat Rev1.00 Date 11-2013 • AUTOCHANGE The AUTO mode allows automatic switching between Cool and Heat , depending on the global demand. • EMERGENCY HEAT This mode activates the Auxiliary Heat to provide heated air in case of a mechanical failure in the system. *Note: This mode is only visible when the installation includes an auxiliary heating device. • DRY In this mode the air-conditioning unit will start a Dry Cooling cycle any time that any zone is under demand (TSet-Point < Troom). 3.2.3 Cleaning the Main Thermostat You can clean the Main Thermostat screen by spraying water or any mild, non-abrasive household cleaner onto a clean cloth. Wipe the surface of the screen with the dampened cloth. *Note: Do not spray any liquids directly onto your Main Thermostat. Dry Dry mode decreases humidity in the room by entering the dry cycle. To clean the screen From the Home Screen - Press to turn off. - Press to access to clean mode. - Press Clean to Start. Screen blocked during 30 sec. 3.3.1 Thermostat Help Screens Help Navigation buttons The help icon is displayed on every screen on the Main thermostat. When touched, it displays informative help text. The help screens can be viewed at any time with easy access to return to a prior screen. - Press to go on. - Press exit. to go back or - Press to return to Home Screen. 11 User´s Manual Main & Wireless thermostat Rev1.00 Date 11-2013 To access the Programming menus From the Home Screen: for the - Press Configuration menu. - Press Programming for the Programming menu. An enabled program displays a green button. A disabled program displays a grey button. To change Time Schedule Programming activation From the Home Screen: - Press value. to change the 3.3 Time Schedule Programming Your heating and cooling needs, change depending on the time of day and the day of the week. For example, if no one is in the house during the workday, you can reduce energy by letting the temperature go up in the summer and down in the winter. By default, the Main Thermostat includes six configurable periods: • WAKE: The start time of this period typically represents when you get up in the morning. It is an occupied program. • DAY: This represents when you leave to go to work. It is a setback program. • EVENING: This represents when you get home from work in the evening. It is an occupied program. • SLEEP: This represents when you go to bed at night. It is an occupied program. • OCCUPIED: This represents when you are at work. It is an occupied program. • UNOCCUPIED: This represents when you are not at work. It is a setback program. For protection, the default programs cannot be deleted, but they can be edited, enabled, or disabled. You can create 18 different additional programs. The Main thermostat allows three types of Time schedule programming: • AC MODE: Sets an operation mode for the defined period. • OCCUPIED: Sets a comfortable temperature for the defined period. • SETBACK: Defines a period when the room is unused so the Zoning system can establish a setback temperature for the zone. 3.3.1 Time schedule programming activation This menu can enable the option of time programs. • Time schedule programming activated. • Time schedule programming deactivated. Remember to set the time-scheduled programs before Time Schedule Programming is activated. 12 User´s Manual Main & Wireless thermostat Rev1.00 Date 11-2013 3.3.2 Create a new time scheduled program • • • • • Press Select type of program: o AC MODE o OCCUPIED o SETBACK Customize the name: Press - Press to confirm the value. - Press the parameter to change or be edited. and use the arrows pad : o Up-Down: Changes the character. o Left-right: Selects the next character position. o Delete : Deletes the selected character. Select: o Operation mode for OPERATION MODE programs. o Cool & Heating set point for Occupied/Setback programs. Select days desired for the program: o o o o Keep in mind Full week Week days Weekend Personalized • Select the start and end time. If you wish to define a time to end the schedule, touch the box to enable the end of schedule parameter. • Check the time program summary. Once a program is completed, it will be displayed in the active time schedule programming list available in the memory. 3.3.3 Using the Time Schedule Programming editor - Use value. to select the - Press to go back or exit to previus menu. - Press Screen. to return to Home Keep in mind If there is no another time schedule starting right away, there will be no airflow in the zone until the next schedule starts. If no end of time is used, the current schedule will end when the next schedule starts. End Event If End Time is configured, when reaching that time, the zone will: - In AC Mode program will STOP. - In Occupied program will set the zone to Off. - In Setback program is On will stay with the last set point. The Time Schedule Programming editor lets you set specific times, temperatures, and Operation modes for each day of the week. If your system is enabled for auto-changeover mode, the heating and cooling set temperatures will automatically be adjusted to ensure a minimum difference. The available options are: • • • • COPY: Allows the user to copy the selected program to any other zone in the system. EDIT: Allows editing of the values defined in the selected time program. DISABLE/ENABLE: Disable or Enable the selected time schedule programming. DELETE: Delete the selected time program from memory. This option is only available and visible for customer- created programs. Edit Same process as Create a New Program. When the program is enabled, a green button next to the named program is displayed. 13 User´s Manual Main & Wireless thermostat Rev1.00 Date 11-2013 When disabled, a grey button is displayed. To Remote zone control From the Home Screen: 3.4 Remote zone control to access - Press Configuration menu. 3.4.1 Remote control - Press Remote zones to access. Keep in mind - Press value. to confirm the - Press to return to the previous menu. - Press Screen. to return to Home Selecting the Remote Zone menu, lists all zones in the system and by selecting the zone, the user can access any thermostat in the system from the Main Thermostat. - Press the zone label to access a remote zone to modify. - Press to access the global zone to modify all zones at the same time. • • • • • Room Name & Temperature. Set point Mode. to activate or deactivate the zone’s air o Press conditioning. o Press to increase the temperature set point by 1ºF (0.5ºC). to decrease the temperature set point by 1ºF o Press (0.5ºC). o Press 72ºF (Current set point) to switch between heating and cooling set points. Auto: Time schedule programming activation. o Press value to change. Sleep: Timer information on page 17. o Press on value to change. Time schedule programming : Access time schedule programming in selected zone. 3.4.2 Edit Name Zone To edit Time schedule programming See on page 13. You can customize the name of your zone in the Main Thermostat from remote zone menu. The process is as follows: • Press . • Press the zone that you want to rename, i.e., . • 14 To change the name, use the arrows pad . o Up-Down: changes the character. o Left-Right: selects the next character position. o Delete : deletes the selected character. User´s Manual Main & Wireless thermostat Rev1.00 Date 11-2013 3.5 Eco-Adapt 3.5.1 Description Eco-Adapt allow the user to enhance the energy efficiency by setting a temperature limit for all zones. Setting temperatures allows the user to set different energy-efficient levels, choosing from Light, Medium, or Strong. This function ensures a more efficient use of the DZK system installation. 3.5.2 Eco-Adapt menu • • Off: All temperature ranges are available and the system will work in Comfort Mode. On: Temperature ranges are limited and the system will work in Efficiency Mode. To change Eco-Adapt The saving-modes available are: From the Home Screen: - Manual mode: Temperature limit is defined manually by the temperature selected by the user on the Main thermostat. Manual Mode - Lim. Min. Lim. Max. 64 F 86 F 59 F 86 F . - Press - Select ON or OFF. If you are selected ON: Press Manual Mode or select the Efficiency level: • Light • Medium • Strong Efficiency Level: Temperature limits are limited as follows: Efficiency level Light Medium Strong ≥75 F ≥78 F ≥79 F ≤72 F ≤70 F ≤68 F Note: It is important to know that if a temperature time schedule programming is running, the set point temperatures will be limited to those selected on the Eco-Adapt. 15 User´s Manual Main & Wireless thermostat Rev1.00 Date 11-2013 3.6 Configuring your Main Thermostat To Configuration menu From the Home Screen: - Press In the configuration menu the following options are available. • • • • • . Mode. See on page 10. Programming. See on page 12. Remote zones. See on page 14. Eco-Adapt. See on page 15. Settings: o o o To Interface settings From the setting menu screen: - Press Interface. Keep in mind - Press the parameter to change or be edited. - Use value. - Press to select the to confirm. - Press to go back or exit to previus menu. - Press to return to main menu or Home Screen. Interface User settings Configuration (Only for contractors) 3.6.1 Interface Brightness • • Select the screen brightness for both active modes. Select the standby mode (Off or Bright). Date & Time Select Date: • Select current day, month and year. Select Time: • Select current time. • Select a 12-hour (AM/PM) or 24-hour time format. • Enable or disable daylight savings. Language Select among 3 languages: • Español • English (default) • Français Beeping Select the beeping sound mode: • Sound ON (default) • Sound OFF 16 User´s Manual Main & Wireless thermostat Rev1.00 Date 11-2013 3.6.2 User settings Units Select temperature to be displayed: • ºC (Celsius) • ºF (Fahrenheit) To Interface settings From the setting menu screen, press User setting. Vacation The Vacation mode feature helps you save energy while you are away for extended periods of time. Select type of Vacation mode: • System: Activate (On) or deactivate (Off) vacation mode to all zone’s system. • Zone: Activate (On) or deactivate (Off) vacation mode to the current zone. Display the set temperatures: o Heat: Select 52-54-56ºF. o Cool: Select 89-91-93ºF. Vacation Press on the value to change. Sleep Sleep mode is a zone timer that shifts the set point temperature to a more energy efficient value. Select the value. • • OFF: Eco-Timer is not activated. 30: Thirty minutes after its activation, the zone will vary its set point temperature by 2ºF (1ºC). • 60: Thirty minutes after its activation, the zone will vary its set point temperature by 2ºF (1ºC) and sixty minutes after its activation, the zone will vary another 2ºF (1ºC). • 90: Thirty minutes after its activation, the zone’s set point temperature will vary by 2ºF (1ºC), another 2ºF (1ºC) after sixty minutes, and will again vary 2ºF (1ºC) following ninety minutes after its activation. After the selected time, the set point temperature will remain at the lowest value. When Sleep mode is activated, a timeline is displayed on the Home Screen that informs of its evolution. Global ventilation* When global ventilation is activated, the icon modes are displayed on the Home Screen: Global Ventilation • Stop Global Ventilation allows activation of ventilation in all system zones during the system inactivity periods. Select Status. • Heat • • NO. Disable Global ventilation. YES. Enable Global ventilation. o Every (mins). Length of the interval between periods of ventilation (in minutes). o Run for (mins). Duration of ventilation (in minutes). • Cool • Dry *This option will be deactivated when a zone is in demand. 17 User´s Manual Main & Wireless thermostat Rev1.00 Date 11-2013 Local Ventilation Local ventilation Not available for the Operation Mode and global ventilation enabled. Local ventilation allows activation of ventilation in the Main Thermostat zone during system inactivity periods. Select Status: • On: Enable Local ventilation • Off: Disable Local ventilation 3.7 Understanding the Alerts If a problem arises, the DZK Alerts system displays a warning message about the current zone shown on the Home Screen. If a problem arises in the Daikin system, a help icon on the screen until the problem is resolved. remains 3.7.1 DZK system Alerts The Main Thermostat can generate the following alert messages. Depending on your configuration, some of these may not apply. ECO: If you do not want to retain the temperature limit set by the Eco-Adapt function, disable Eco-Adapt or select a lower efficiency setting. UNOCCUPIED: The Setback time schedule programming is activated. If you touch the Home Screen, the setback program deactivates and returns to occupancy set point during the override time. OVERRIDE: The override time is activated. When the override time has finished, the zone returns to its previous status. VACATION: The vacation mode is activated. Error 1: Communication error between Main Thermostat and controller board. This error blocks the thermostat and you should notify your contractor. Error 9: Air-conditioning communication error with the system. The system will open every motorized outlet, enabling the air-conditioning controller. Contact your contractor. 18 User´s Manual Main & Wireless thermostat Rev1.00 Date 11-2013 4. WIRELESS THERMOSTAT The Wireless Thermostat has a backlit LCD touch screen that displays all the information you need to set and manage your zone. 4.1 Home Screen Display To deactivate Time Schedule Programming - Press on Home Screen. The Home Screen options for the Wireless Thermostat are: 4 5 6 7 8 3 2 1 9 To deactivate the Sleep mode - Press Screen. on the Home 10 11 14 13 12 Home Screen 1. On/Off icon Enables turning the air conditioning On or Off in the zone where the Wireless Thermostat is installed. 2. Current Set point The zone temperature programmed to be maintained during a designated timeframe. Press (Up) or (Down) to adjust manually by increments of 1ºF (0.5ºC). If the system is set to Auto, press the set point value to switch between heating and cooling set points. See Adjusting the Temperature on page 22. 3. Hand Icon Indicates zone air conditioning is activated. 4. Time Schedule Programming activated Displays that Time schedule programming is activated. See Time schedule programming information on page 23. 5. Current Zone Displays the current zone allowing remote zone control. See Remote Zone Control on page 23. 6. Sleep Mode Activated Displays sleep mode is activated in this zone. See Sleep Mode on page 24. 19 User´s Manual Main & Wireless thermostat Rev1.00 Date 11-2013 7. Stop Operation mode The current operation mode is Stop. To deactivate the Local Ventilation - Press Screen. on the Home 8. Local Ventilation activated Indicates local ventilation is activated in this zone. See Local Ventilation described on page 23. 9. Cool Set point & Operation mode Display Cool Set point or Current operation mode. 10. Heat Set point & Operation mode Display Heat Set point or Current operation mode. 11. Dry Operation mode The current operation mode is Dry. 12. Communication Icon Displays the communications between the Wireless Thermostat and the zoning box control board. To save battery life, the thermostat updates its screen every 5 minutes, and the current status may not be shown in the screen. To manually update the screen just touch it and the current status will be shown. 13. Airzone Icon Used to enter another menu or confirm a value. 14. Low Battery Displayed when batteries have run low. It has 2 weeks of life left*. See how to change the batteries on page 22. *Note: The indicated battery life is based on the original batteries shipped from Manufacturing. 20 User´s Manual Main & Wireless thermostat Rev1.00 Date 11-2013 4.2 Idle Screen Display When you are not actively using your Wireless thermostat, the screen will dim to indicate an Idle Screen. 3 To activate the Home Screen - Press the Idle Screen. 4 5 2 6 1 7 8 9 Idle Screen 1. Current Room Temperature The current (actual) temperature in the room where the Wireless Thermostat is installed. 2. Hand Icon Indicates active temperature control. Room temperature The range of measured room temperatures goes from 50ºF to 95ºF, if the room temperature is out of that range, the thermostat will display the last value allowed. (50ºF or 95ºF) 3. Current Zone Displays the current zone. 4. Stop Mode Zone is actively in Stop Operation Mode. 5. Local Ventilation activated Local ventilation is activated in this zone. See Local Ventilation on page 23. 6. Cool Mode Zone calling demand is currently in Cool Operation Mode. 7. Heat Mode Zone calling demand is currently in Heat Operation Mode. 8. Dry Mode Zone calling demand is currently in Dry Operation Mode. 9. Airzone icon 21 User´s Manual Main & Wireless thermostat Rev1.00 Date 11-2013 Keep in mind To save battery life, the thermostat updates its screen every 5 minutes, and the current status may not be shown in the screen. To manually update the screen just touch it and the current status will be shown. 4.3 Using you Wireless Thermostat The backlit LCD touch screen on your Wireless Thermostat allows easy access to adjust the settings. 4.3.1 Adjusting the temperature By default, the set point displayed on the screen is the current Operation Mode. You can easily adjust the temperature on your Main Thermostat. • Press to activate or deactivate the zone’s air conditioning. to increase the temperature set point by 1ºF • Press (0.5ºC). • Press to decrease the temperature set point by 1ºF (0.5ºC). • Cool & Heat set point When you press the current set point, the mode’s selected set point will be blinking. Press (current set point) to switch between heating and cooling set points. The permitted range is as follows: • Heating mode: 59ºF – 84ºF. • Cooling mode: 64ºF – 86ºF. When the zone is activated, a hand icon is displayed. If using Auto mode, note that there is a minimum difference allowed between heating and cooling set temperatures. The system prevents you from setting the temperatures outside these limits. See the DZK Zoning Box Installation manual for information about configuring the minimum temperature-difference settings. 4.3.2 Low batteries When is displayed on Wireless Thermostat, batteries have 2 weeks of life left. It is time to change the batteries for new ones. To replace the batteries, insert a coin in the slot placed at the bottom of the frame and turn the coin until the thermostat opens. Once the touch screen is separated from the support, replace the batteries according to the indicated polarity near the battery contacts (2 AAA 1.5V batteries). Reassemble both parts to their original positions. 22 User´s Manual Main & Wireless thermostat Rev1.00 Date 11-2013 4.3.3 Cleaning the Wireless Thermostat You can clean the Wireless Thermostat screen by spraying water or any mild, non-abrasive household cleaner onto a clean cloth. Wipe the surface of the screen with the dampened cloth. *Note: Do not spray any liquids directly onto your Wireless Thermostat. 4.4 Advanced functions in your Wireless Thermostat From this menu, you can execute actions such as Time schedule programming, Local Ventilation and Sleep Mode. 4.4.1 Time Schedule Programming The DZK Zoning system allows activation or deactivation of the Time schedule programming set on the Wireless Thermostat. Activation Press on to activate time schedule programming in the current zone. The thermostat then returns to Home Screen. To access the Advance Functions screen From Home Screen. - Short press on . The arrows will disappear in Advance Screen. The arrows are displayed on the Home Screen. The icon is displayed on the Home Screen, indicating that this function is activated. Deactivation If the time schedule programming is activated, you can deactivate it from the Home Screen. Press on to deactivate time schedule programmming. The icon will no longer be displayed. 4.4.2 Local Ventilation This function activates the zone ventilation while the AC unit is not running a heating or cooling cycle. Activation Press on to activate local ventilation in the current zone. The thermostat then returns to Home Screen. The icon will be displayed on both the Home and Idle screens, indicating that this function is activated. Local Ventilation Not available when in Operation Mode and when global ventilation is enabled. 23 User´s Manual Main & Wireless thermostat Rev1.00 Date 11-2013 Deactivation If local ventilation is activated, you can deactivate it from the Home Screen. Press on to deactivate the local ventilation. The icon will no longer be displayed. 4.4.3 Sleep Mode To set Sleep Mode - Press to set the value. - Press value. to select the - Press - Press to confirm. to exit. Sleep mode is a zone timer and operates as follows: • : Sleep Mode Timer is activated 30 minutes after its activation, the zone varies it set point temperature by 2ºF (1ºC). • : Sleep Mode Timer is activated 30 minutes after its activation, the zone varies its set point temperature by 2ºF (1ºC) and 60 minutes after its activation, varies by 2ºF (1ºC) more. • : Sleep Mode Timer is activated 30 minutes after its activation, the zone varies its set point temperature by 2ºF (1ºC), another 2ºF (1ºC) after 60 minutes and 2ºF (1ºC) more after 90 minutes of activation. Activation Press on icon, then select the value and confirm to activate sleep mode in the current zone. The thermostat will return to Home Screen. The icon is displayed on the Home Screen, indicating that this function is activated. Deactivation If the sleep mode is activated, you can deactivate it from the Home Screen. Press on to deactivate the sleep mode. The icon will no longer be displayed. If you deactivate sleep mode before the selected time, the set point temperature remains as the last value set. 24 User´s Manual Main & Wireless thermostat Rev1.00 Date 11-2013 4.5 Remote zone control Select the Remote Zone menu to list all zones in the system, and by selecting a zone, the user can access any thermostat in the system from the Wireless Thermostat. • • Select the room’s zone number (ie, # .) provides global zone access to modify all zones simultaneously and control all every room’s system. To Remote zone control From Home Screen, press on : (current zone). - Press to exit. to select the - Press value. - Press to confirm. In remote zone screen, display: • • • • Room Number. On/Off icon. o On: Display Set point and hand icon are displayed. o Off: Set point and hand icon no longer displays. Set point mode. Operation mode. You can select the Operation mode only for all zones if you lost the Main thermostat. - Press to On/Off. - Press set point. - Press to switch between heat and cool set point. The set point icon mode is blinking. The current mode icon is fixed. - Press 4.6 Wireless Thermostat Configuration to select the to confirm. To configuration access From Home Screen: . - Turn Off the room setting. This section describes how to configure user settings. Units Select temperatures to be displayed. • º (Celsius) • º (Fahrenheit) - Short Press on advance screen. The icons displayed. - Long Press on display . to are .till 25 User´s Manual Main & Wireless thermostat Rev1.00 Date 11-2013 Vacation mode Keep in mind - Press - Press value. to go back. to select the - Press to edit a value or confirm. The Vacation mode feature helps you save energy while you are away for extended periods of time. It also ensures your home is comfortable when you return. Select status: • Enable (Default) • Disable Vacation set point temperatures Select the set temperatures: • Heat: Select --º • Cool: Select --º 4.7 Understanding the Alerts In case of system alerts regarding problems in the DZK Zoning system, a message is posted for the current zone displayed on the Home Screen. 4.7.1 List of DZK zoning system alerts Your Wireless Thermostat can generate the following alert messages: Unoccupied: The Setback time schedule programming is activated. If you touch on the Home Screen, it will deactivate the setback program and return to occupancy set point during the override time. - Eco limit: The user has tried to exceed the Eco-Adapt temperature limit. If required, disable the Eco-Adapt to set the desired temperature. See on page 15 - Override: The override time is activated. When the override time has finished, the system returns to its previous status. Vacation: The vacation mode is activated. . - Error 1: Communication error between Wireless thermostat and the control board. This error blocks the thermostat so notify your contractor immediately. . - Error 9: Air-conditioning communication error with the system. The system will open every motorized outlet and the air-conditioning controller will be enabled. Notify your contractor. 26 User´s Manual Main & Wireless thermostat Rev1.00 Date 11-2013 5. NAVIGATION GUIDES 5.1 Main Thermostat navigation guide 27 User´s Manual Main & Wireless thermostat Rev1.00 Date 11-2013 5.2 28 Wireless Thermostat navigation guide User´s Manual Main & Wireless thermostat Rev1.00 Date 11-2013 6. TROUBLESHOOTING Item Symptom 1 Main Thermostat does not light up 2 Wireless Thermostat does not work 3 4 5 6 After a power failure, the Wireless Thermostat displays When accessing remote zones, one of them is not listed The Wireless Thermostat shows all zones, but not its own On activating the zone, no air is supplied to its grille (s) Verification/Action Verify if the wireless thermostats show contact your service. Otherwise, proceed as indicated in pages 25 as a temporary solution until the Main thermostat is replaced If the screen is blank, replace the batteries. See on page 22. If the screen is blocked, disconnect the batteries and re-install them back. If the problem persists contact your service. See on page 22. The Wireless Thermostats can take up to 5 minutes to update the screen. Touch the screen to force an immediate update. Verify that the thermostat of the zone missing is working correctly. See on pages 10 and 22. When trying to remote access other zones, the wireless thermostat will not show its own zone. Verify that the unit is not in Stop mode in the Main thermostat. See on page 8. Verify if the zones is in demand, checking the ambient temperature (normally displayed in the thermostat and the set point (appears upon touching the thermostat screen) See on pages 8, 19 and 21. If this zone does not receive air, call your contractor. 7 8 9 10 One Wireless Thermostat displays "" permanently Some time after changing the set point in the thermostat the set point varies 1 or 2 ºF Some time after changing the set point in the thermostat it changes by itself to a different set point What do I do if one (or several) zones do not control the temperature? Call your contractor for a replacement to verify the wireless communication. Verify if the sleep mode is activated. See on pages 17 and 24. Verify if the automatic mode is enabled. See on page 10. Verify that the Operation mode is not STOP. See on page 8. Verify room and set point temperatures in the non-working zone thermostat to see if it is creating demand. See on pages 10 and 22. 29 User´s Manual Main & Wireless thermostat Rev1.00 Date 11-2013 Item Symptom How much time do I have 11 left when the battery symbol is shown? When trying to lower or 12 increase the set point ECO/ appears on the screen 13 14 15 16 17 18 19 30 The time schedule program don´t work. When in Heat operation mode, when trying to change to Cool operation mode, the thermostat returns to Heat mode. The global ventilation does not work as expected. There is no ventilation after all zones are satisfied. The local ventilation does not work as expected. There is no ventilation after all zones are satisfied. . Error 1 in the Main Thermostat in the Wireless Thermostat Error 9 in the Main & Wireless Thermostat Verification/Action When the battery icon is shown in the screen there are about 15 days left to change the thermostat batteries. You have tried to exceed the Eco-Adapt temperature limit. If required, disable the Eco-Adapt to set the desired temperature. See on page 15. Verify the time of the system in the Main thermostat. See on page 16. Verify that the time schedule program activation is enabled. See on page 12 and 23 The operational mode in the installation is controlled by the Heat Pump Changeover Master. The operation mode can only be changed from the Master DZK Main thermostat. Verify if the installation is controlled by the Heat Pump Changeover Master. If that is the case, until all zones of all interconnected DZKs are satisfied, the global ventilation will not be activated. Verify if the installation is controlled by the Heat Pump Changeover Master. If that is the case, until all zones of all interconnected DZKs are satisfied, the local ventilation will not be activated. This error indicates that the Main thermostat is inoperative. The associated damper will remain open, and the use will be able to change the operation mode from any wireless thermostat. See page 16. This error indicates that the wireless thermostat is not communicating and the zone will not have temperature control. See on page 26. This error indicates that the zoning system is not controlling the Daikin system. See on pages 18 and 26. Phone: 972 245 1510 E-mail: [email protected] http://www.daikinac.com 4008862