Transcript
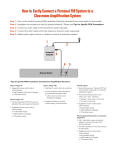
How to Easily Connect a Personal FM System to a Classroom Amplification System Step 1: Step 2: Step 3: Step 4: Step 5: Turn on the student’s personal FM transmitter. Press the transmitter’s mic mute switch for best results. Straighten the microphone cord (or optional antenna). *Please see Tips for Specific PFM Transmitters. Connect an audio cable to the transmitter’s audio input jack. Connect the other cable end to the classroom receiver’s audio output jack. Adjust audio output volume on classroom receiver if desired by student. *Tips for Specific PFM Transmitters and Classroom Amplification Receivers: Oticon Amigo T5: Suggested receiver audio output volume setting Half (FrontRow ToGo and Pro Digital) 5 (FrontRow Lasso) Oticon Amigo T10: Turn the transmitter OFF (don’t worry, it will detect the audio signal and transmit) Suggested receiver audio output volume setting: Full (FrontRow to Go) Half (FrontRow Pro Digital) 3 (FrontRow Lasso) Oticon Amigo T30: Skip Step 2—patch cord acts as antenna Connect receivers audio output jack to the transmitters microphone jack. 3.5mm mono to 2.5mm mono (FrontRow Pro Digital) Suggested classroom receiver volume setting: minimal (lowest) Phonak Inspiro: Special features (i.e. “Dynamic FM”) will not work when connected to a classroom amplification system Audio Input setting must be set to “iPod nano” from “General” Settings > Audio input > iPod nano Connect to audio jack Suggested receiver audio output volume setting: Full (FrontRow ToGo) Half (FrontRow Pro Digital) 7 (FrontRow Lasso) Phonak EasyLink (SmartLink+, ZoomLink+, EasyLink+): Link+ transmitters require a separate adapter to connect the audio cord (see User Manual) Turn transmitter on first, then connect for best results Suggested receiver audio output Full (FrontRow ToGo) Half (FrontRow Pro Digital) 7 (FrontRow Lasso)