1
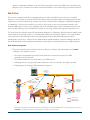
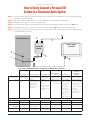
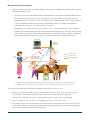
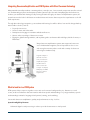
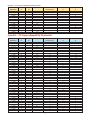
How to Combine Personal FM
and Classroom Sound Systems:
The Total Auditory Integration Method
for Students’ Benefit
March 2013
Table of Contents
Abstract . . . . . . . . . . . . . . . . . . . . . . . . . . . . . . . . . . . . . . . . . . . . . . . . . . . . . . . . . . . . . . . . . . . . . . . . . . . . . . . . . . . . . . . . . 1
Introduction. . . . . . . . . . . . . . . . . . . . . . . . . . . . . . . . . . . . . . . . . . . . . . . . . . . . . . . . . . . . . . . . . . . . . . . . . . . . . . . . . . . . . . . . .
1
Why Do It?. . . . . . . . . . . . . . . . . . . . . . . . . . . . . . . . . . . . . . . . . . . . . . . . . . . . . . . . . . . . . . . . . . . . . . . . . . . . . . . . . . . . . . . 1
Keep your students with hearing loss connected to the rest of the class.. . . . . . . . . . . . . . . . . . . . . . . . . . . . . . . . . . . . . . . 1
Ensure your students have access to all classroom multimedia. . . . . . . . . . . . . . . . . . . . . . . . . . . . . . . . . . . . .
“Level the playing field” for students with hearing loss. . . . . . . . . . . . . . . . . . . . . . . . . . . . . . . . . . . . . . . . . . .
Teachers can maximize their whole-class instruction time. . . . . . . . . . . . . . . . . . . . . . . . . . . . . . . . . . . . . . . . .
The technology supports a team-teaching environment, rather than a teacher-focused set-up.. . . . . . . . . . . .
The teacher only has to wear one microphone. . . . . . . . . . . . . . . . . . . . . . . . . . . . . . . . . . . . . . . . . . . . . . . . .
2
2
3
3
3
How It’s Done . . . . . . . . . . . . . . . . . . . . . . . . . . . . . . . . . . . . . . . . . . . . . . . . . . . . . . . . . . . . . . . . . . . . . . . . . . . . . . . . . . . . . . .
4
Total Auditory Integration . . . . . . . . . . . . . . . . . . . . . . . . . . . . . . . . . . . . . . . . . . . . . . . . . . . . . . . . . . . . . . . . . 4
How to Easily Connect a Personal FM System to a Classroom Amplification System. . . . . . . . . . . . . . . . . . . . . . . . .
5
Microphone-Restricted Integration . . . . . . . . . . . . . . . . . . . . . . . . . . . . . . . . . . . . . . . . . . . . . . . . . . . . . . . . . . 6
Types of Classroom Amplification. . . . . . . . . . . . . . . . . . . . . . . . . . . . . . . . . . . . . . . . . . . . . . . . . . . . . . . . . . . . . . . . . . . . . .
7
What to Look for in a Classroom Amplification System. . . . . . . . . . . . . . . . . . . . . . . . . . . . . . . . . . . . . . . . . . . . . . . . . . .
8
Equal Classroom Sound Distribution. . . . . . . . . . . . . . . . . . . . . . . . . . . . . . . . . . . . . . . . . . . . . . . . . . . . . . . . . . . . . . . .
Performance. . . . . . . . . . . . . . . . . . . . . . . . . . . . . . . . . . . . . . . . . . . . . . . . . . . . . . . . . . . . . . . . . . . . . . . . . . . . . . . . . . . . .
Accessories to Encourage Participation . . . . . . . . . . . . . . . . . . . . . . . . . . . . . . . . . . . . . . . . . . . . . . . . . . . . . . . . . . . . .
Simplicity and Comfort . . . . . . . . . . . . . . . . . . . . . . . . . . . . . . . . . . . . . . . . . . . . . . . . . . . . . . . . . . . . . . . . . . .
Minimal Installation .. . . . . . . . . . . . . . . . . . . . . . . . . . . . . . . . . . . . . . . . . . . . . . . . . . . . . . . . . . . . . . . . . . . . . . . . . . . . .
Full Multimedia Integration .. . . . . . . . . . . . . . . . . . . . . . . . . . . . . . . . . . . . . . . . . . . . . . . . . . . . . . . . . . . . . . .
8
Integrating Classroom Amplification and PFM Systems with Other Classroom Technology . . . . . . . . . . . . . . . . . . . .
8
9
9
9
9
Classroom Amplification/Technology Integration. . . . . . . . . . . . . . . . . . . . . . . . . . . . . . . . . . . . . . . . . . . . . . . . . . . . 10
What to Look for in a PFM System
8
. . . . . . . . . . . . . . . . . . . . . . . . . . . . . . . . . . . . . . . . . . . . . . . . . . . . . . . . . . . . . . . . . . . 10
Speech Intelligibility Features . . . . . . . . . . . . . . . . . . . . . . . . . . . . . . . . . . . . . . . . . . . . . . . . . . . . . . . . . . . . . . . . . . . .
Maximum Speech Bandwidth . . . . . . . . . . . . . . . . . . . . . . . . . . . . . . . . . . . . . . . . . . . . . . . . . . . . . . . . . . . . . . . . . . . .
Simplicity and Ease of Use . . . . . . . . . . . . . . . . . . . . . . . . . . . . . . . . . . . . . . . . . . . . . . . . . . . . . . . . . . . . . . . . . . . . . .
Easy Channel Management . . . . . . . . . . . . . . . . . . . . . . . . . . . . . . . . . . . . . . . . . . . . . . . . . . . . . . . . . . . . . . . . . . . . .
Upgrade Capability . . . . . . . . . . . . . . . . . . . . . . . . . . . . . . . . . . . . . . . . . . . . . . . . . . . . . . . . . . . . . . . . . . . . . . . . . . . . .
Versatile, Compatible Equipment . . . . . . . . . . . . . . . . . . . . . . . . . . . . . . . . . . . . . . . . . . . . . . . . . . . . . . . . . . . . . . . .
Reliability & Service . . . . . . . . . . . . . . . . . . . . . . . . . . . . . . . . . . . . . . . . . . . . . . . . . . . . . . . . . . . . . . . . . . . . . . . . . . . . .
Conclusion
10
11
11
11
11
11
11
. . . . . . . . . . . . . . . . . . . . . . . . . . . . . . . . . . . . . . . . . . . . . . . . . . . . . . . . . . . . . . . . . . . . . . . . . . . . . . . . . . . . . . . . 11
Appendix 1 – 216 Frequency Compatibility . . . . . . . . . . . . . . . . . . . . . . . . . . . . . . . . . . . . . . . . . . . . . . . . . . . . . . . . . . . .
Appendix 2 – 173 Frequency Compatibility (Australia) . . . . . . . . . . . . . . . . . . . . . . . . . . . . . . . . . . . . . . . . . . . . . .
12
13 - 14
Appendix 3 – 173 Frequency Compatibility (New Zealand) . . . . . . . . . . . . . . . . . . . . . . . . . . . . . . . . . . . . . . . . . . . . . .
14
Abstract
Combining personal FM (PFM) systems and classroom amplification (sound field) technologies in the classroom
can have huge educational and social benefits for students with hearing loss or auditory deficits – or it can
contribute to their isolation. The key is how they are combined. When connected the right way, students can:
• hear the voices of their peers by way of a pass-around microphone.
• hear multimedia – including movies, sound from educational software, music, and more.
• review recordings of instructional content and class discussion to clarify anything they missed.
In addition to the well-documented social and academic advantages to hearing the teacher’s voice consistently and
clearly, these features offer a huge advantage for classroom engagement and participation.
In this paper, you’ll learn how to easily connect PFM systems and classroom amplification systems in the proper
way to fully enrich your students’ learning experience.
Introduction
For children with hearing loss or auditory processing disorders, listening
and learning in a noisy classroom environment is extremely challenging.
A personal FM (PFM) system can solve the bulk of the problem by
transmitting the teacher’s voice directly to the students, and should be the
primary technology for overcoming listening barriers in school. But what
about sound from videos or other multimedia played in class? And how
well does the student with hearing loss hear their peers during classroom
discussions? PFM systems do not yet handle these important aspects of
auditory learning well, if at all.
The best way to ensure
all students’ needs
are met auditorily,
educationally, and socially
is to support them with
both PFM systems and
properly-designed
classroom amplification.
The best way to ensure all students’ needs are met auditorily,
educationally, and socially is to support them with both PFM systems and
properly designed classroom amplification.
Only then can students have equal access to all educational content and truly feel on the same level as their peers.
Why Do It?
It is well documented that classroom amplification systems are beneficial for all students – even those with no
hearing or auditory deficits. In just one example, Chelius (2004) reported that students in grades 1, 3, 4, and 5 in
amplified classes achieved better standardized test scores in early literacy and in reading fluency than students
in unamplified classrooms did.*
Students with hearing loss can have access to these benefits when hearing-health professionals integrate their
PFM systems with classroom amplification. For example, interfacing the two technologies can:
*This and many other research references are available at www.gofrontrow.com/classroom/case-studies.
1
Keep your students with hearing loss
connected to the rest of the class.
One-to-one PFM systems are almost universally
available to students with hearing loss, so the biggest
challenge isn’t hearing the teacher – it’s hearing
classmates. That’s because PFM systems excel at
clarifying the teacher’s voice, but do a poor job of
transmitting what’s happening throughout the rest of
the classroom – if they do so at all. For example, if Erin is reading a
story aloud to the class, Becky — who has a hearing loss and sits on
the other side of the room — may miss a significant portion of Erin’s
story and the class discussion. She may feel alienated and hesitant to
participate in a conversation she cannot follow.
By adding classroom amplification to the PFM systems, however, Becky’s hearing health-care professional
makes it possible for Erin to talk into a pass-around microphone that also transmits sound directly to
Becky’s personal receiver. As this microphone gets passed around to various students, Becky isn’t just
hearing her teacher; now she’s hearing all of her classmates too. Because most classroom audio systems
aren’t limited to allowing one talker at a time like some PFM systems are, Becky can participate in natural
peer-to-peer discussions in a way that she wasn’t able to do with her PFM system alone. This can have a
profound effect on her confidence, enjoyment of class, and academic performance.
The benefit of student microphones doesn’t stop with Becky either; as research indicates, all students
will benefit from an enhanced audio signal when it comes to language understanding and acquisition.
The psychosocial benefits that come from feeling important, heard, and listened to when speaking in a
microphone should not be ignored.
While a large part of
the school day centers
around verbal instruction
from the teacher, students
also spend a significant
amount of time learning
through technology.
Ensure your students have access to all classroom multimedia.
While a large part of the school day centers around verbal instruction,
students also spend a significant amount of time learning through
technology. Interactive whiteboards, DVDs, streaming video, iPods, and
other multimedia sources are commonplace tools for enriching learning.
The only way to ensure everyone has equal access to the audio
coming from these devices is to incorporate classroom amplification.
Without it, only those kids with healthy hearing will be able to consistently
understand the content. Even for them, sound quality will be sacrificed
since any of the small loudspeakers typically attached to interactive whiteboards or laptops can’t properly
and evenly project sound throughout an entire classroom.
 For students with hearing loss, properly integrating classroom amplification is even more critical
because it is the only practical method for giving them access to all the educational content required
for the class.
“Level the playing field” for students with hearing loss.
Even with excellent PFM equipment, students with hearing loss or auditory processing disorders often
2
have to work much harder to understand the lesson. Classroom amplification provides an opportunity
to record all class content for students to review at their own pace — clarifying any details or shades of
meaning they may have missed.
Universal design supports mainstreaming.
Students like Becky often feel uncomfortably different from other kids — and having the teacher wear a
microphone to accommodate her alone can make this worse.
Classroom amplification gives Becky the auditory clarity she needs to keep up with the rest of the class
in a universally-designed environment where the teaching tools benefit everyone without stigma. When
classroom amplification is used, students recognize that using microphones is normal and helpful.
The classroom becomes less restrictive – both educationally and socially — now that every student
participates both in hearing and in being heard.
Indeed, there are fewer special education referrals when classroom amplification is used. In a study conducted in the Oconto Falls School District in Wisconsin, special education referrals fell from an average of 7.72% between 1989 and 1998, to 4.6% from 1998 to 2000 where classroom amplification systems were installed in all Kindergarten to grade five classrooms district-wide (Flexer and Long, 2004).
For teachers, the benefits of integrating PFM systems and classroom amplification systems are just as significant.
For example:
Teachers can maximize their whole-class instruction time.
Studies have shown that when classroom amplification is used, there is less need for teachers to repeat
instructions to individual students. That’s because when students can hear the lesson better, they become
more engaged in it.
In a 2007 study of nearly 1,200 K-3 students in New Brunswick, Canada (entitled “Evaluating Sound Field
Amplification Technology in New Brunswick Schools”), results confirmed that in classes with classroom
amplification, students were more attentive and more focused because they could hear better. While the
teacher was talking, they spent less time talking to their peers and more time listening. When the
hand-held microphone was given to them to pass around, it increased the participation of shy and quiet
children and built their confidence. In contrast, over the course of the study in unamplified classrooms,
there was a significant drop in student response rate to statements directed to them.
The technology supports teachers as coaches, not just lecturers.
In the interest of building student engagement and participation, the archaic
pedagogical model of a teacher standing at the front of the class and talking to students
is being replaced with teachers talking with students. Using their wireless microphone,
teachers can move freely within the room and interact with students as they collaborate
on and discuss various projects.
The teacher only has to wear one microphone.
Combining PFM and classroom amplification technologies does not mean that teachers have to wear two
microphones. The teacher simply wears one microphone (the classroom amplification microphone) that
3
directly or indirectly broadcasts to both the classroom speakers as well as the PFM receiver simultaneously.
With just a press of a button, the teacher can reach all students – those with hearing loss and those without.
How It’s Done:
There are two standard methods for integrating classroom audio with PFM; however, they are not equally
effective so it’s important to select the solution that achieves the best balance between management ease and
student access to the broadest range of classroom content. The first method – Microphone Restricted Integration
(or “Matching”) – allows for the teacher’s voice and one other audio source to be transmitted directly to the
student’s PFM system. However, since matching only works with FM systems, channel management issues may
arise and, dependent upon the manufacturer’s system you are using, multimedia integration may also be lost.
The second and more effective method is Total Auditory Integration (or “Patching”). With this method, multiple audio
sources can be connected at one time, so the student with hearing loss can hear the teacher’s voice, other students’
voices, and audio from multimedia sources. Since patching can be done with infrared (IR) systems, channel
management is not an issue – a school can be outfitted with an unlimited number of systems. Patching may also be
done with FM-based sound field systems but attention must be paid to selected channels for potential interference.
Total Auditory Integration:
• T
his preferred method sums all audio from the teacher, the students, and multimedia sources before
sending it to the student’s receiver.
o The classroom amplification receiver’s Audio Output is connected via a cord to the PFM
transmitter’s Audio Input jack.
o The PFM transmitter then sends all audio to the PFM receiver.
o Advantage: Ensures your special needs students have access to all audio; recording is possible.
A
o Disadvantage: Connecting a PFM transmitter is required.
media center
2+2=4
classroom
amplification
receiver
PFM
transmitter
AND
teacher
mic
classroom
amplification
speaker
Teacher and student can
converse simultaneously
PFM
receiver
student
mic
classroom
amplification
speaker
Teacher’s Voice
Student’s Voice
Multimedia Audio
Total Auditory Integration is the preferred method of integrating sound field and PFM systems as it keeps students connected to
everything – including the teacher’s voice, multimedia, and peer-to-peer discussions.
4
B
Tear out and keep for easy reference.
How to Easily Connect a Personal FM
System to a Classroom Audio System
Step 1: Connect an audio cable to the classroom audio receiver output jack. If recording, first connect a splitter cable (1a),
then attach the audio cable (1b).
Step 2: Turn on the student’s PFM transmitter. Press the transmitter’s mic mute switch for best results.
Step 3: Straighten the microphone cord (or optional antenna).
Step 4: Connect the audio cable to the transmitter audio in jack (or, if using Amigo T30, the mic jack). See Tips below.
Step 5: Set audio output volume on classroom receiver as recommended in Tips below, or as desired by student.
Step 6: If recording, connect a second audio cable from the splitter to the audio in (microphone) jack of a computer. Follow
recording software instructions.
2
Classroom Audio Receiver
3
Teacher’s Computer
(if recording)
Personal FM
Transmitter
5
1b
3 4 5
6
2
1
7
0 8
1
Volume
4
6
1a
Audio
Output
Tips for Specific PFM Transmitters and Classroom Amplification Receivers:
On PFM transmitter,
connect cable to...
Oticon Amigo T5
Oticon Amigo T10
Oticon Amigo T30
Phonak Campus
S/SX
Phonak Inspiro
Phonak EasyLink
(SmartLink+,
ZoomLink+,
EasyLink+):
Audio In (3.5mm)
Audio In (3.5mm)
Mic In (2.5mm)
Audio In (3.5mm)
Audio In (3.5mm)
Audio In (3.5mm)
Notes
•Turn the
transmitter OFF
(don’t worry; it
will detect the
audio signal and
transmit)
•Skip Step 3 –
patch cord acts as
antenna
•Turn capsule on
MM8 lapel mic to
‘X’ to mute the mic
•Note that the Mic
In jack is 2.5mm —
an adapter may be
needed
•Phonak disables
“Dynamic FM”
when connected
to classroom
amplification
•Link+ transmitters
require a separate
adapter to connect
the audio cord
(see User Manual)
•Audio Input
setting must be set
to “iPod nano”
from “General”
•Turn the
transmitter on first,
then connect for
best results
•Settings > Audio
input > iPod nano
Suggested Classroom Audio Output Settings (adjust as needed for student preference)
FrontRow Juno
8
8
1 / 2.5*
8
7 / 8*
8
FrontRow Lasso
5 / 7*
3 / 5*
1 / 2*
7 / 8*
7 / 8*
7 / 8*
FrontRow
Pro Digital
Half /
Three Quarters*
Half /
Three Quarters*
Low /
One Quarter*
Half /
Three Quarters*
Half /
Three Quarters*
Half /
Three Quarters*
FrontRow ToGo
Half /
Three Quarters*
Half /
Three Quarters*
Low /
One Quarter*
Full
Full
Full
*A higher output setting may be needed if using a splitter cable for recording
5
PFM
receiver
student
mic
Microphone-Restricted Integration:
classroo
amplificat
speake
• U
ses the teacher’s transmitter to transmit directly to the classroom amplification receiver and the student’s
PFM device simultaneously.
Teacher’s Voice
oThis method only works with FM-based classroom amplification systems with compatible PFM frequencies.Student’s Voice
Multimedia Audio
oThe teacher’s transmitter must be on the same channel as both the PFM receiver and the classroom
amplification receiver. In the case of the Phonak Digimaster, an additional synchronization step is required
to pair the teacher transmitter with the classroom amplification receiver on a different band/channel.
oAdvantage: No connection of a PFM transmitter is required.
oDisadvantage: The student will only hear the teacher’s voice — not multimedia audio. Those models (in
particular, the Phonak Digimaster) that do allow the student with hearing loss to hear other students permit
only one active mic at a time: this can limit natural discussions in a classroom setting. In addition, FM channel
B
pairing and management must be considered to avoid potential channel overlap and interference.
media center
2+2=4
classroom
amplification
receiver
OR
teacher
mic
Teacher’s Voice
Student’s Voice
Teacher and student
may not be able to
converse simultaneously
Multimedia Audio
PFM
receiver
student
mic
Microphone-Restricted Integration allows the teacher to transmit his/her voice directly to the student with hearing
loss and the classroom amplification receiver. However, it does not allow the student to hear multimedia audio.
If you must use the Microphone-Restricted Integration method, here is how to do it:
1.Ensure your teacher mic, PFM receiver and sound field receiver are all tuned to the same frequency
(only available on FM-based systems). Please see the channel matching chart in Appendix 1.
If using a Phonak Digimaster system, a separate pairing step is required. (See User Manual).
2. Once reconfigured, turn your classroom amplification receiver on and off to re-set.
3.The teacher may now use the transmitter. The teacher will be heard by the entire class as well as by the
student with hearing loss directly through their personal system. (Student voices and multimedia audio
may not be heard by the student with hearing loss).
6
Types of Classroom Amplification
There are two main types of classroom amplification systems: Infrared (IR) and FM. The features/benefits for each
are noted below:
FM (Radio)
Infrared
Main advantage
Simpler installation, no drop out, indoor/outdoor
No channel management, generally better
audio bandwidth
Main disadvantage
Each classroom needs at least one unique channel;
potential for outside radio interference
More involved installation
Number of useable
soundfield systems
per school
Depends on available channels and external interference sources (cordless phones, WiFi, Bluetooth,
car alarms in the case of 2.4GHz; television or wireless PA systems in the case of 216MHz)
Unlimited
Choose when
Tech integration is important
More than 6 systems/school or plan to outfit
entire school
Avoid if
Many systems will be used nearby, channel
management resources are limited
Gym or other very large space; walls don’t exist
between classrooms
In addition to transmission type, schools can choose from a number of different speaker configurations, depending
on their needs:
Ceiling or Wall
Line Array
Flat-Panel
Features
Speakers are placed strategically
throughout the classroom to ensure
maximum sound coverage
A group of speaker elements
arrayed in a straight line, closely
spaced and operating with equal
amplitude and in phase
A single-speaker unit consisting of
one or more small drivers mounted
to a single plastic panel
Advantages
Clear, distortion-free sound is
spread uniformly around a classroom, resulting in less feedback
and no hot spots
No installation required, can be
moved from class to class with the
identified student, more uniform
speech range coverage than a
flat-panel device
No installation required, can be
moved from class to class with the
identified student
Disadvantages
Installation is required
Slightly less-even coverage than
fully-installed system
Poor sound quality; doesn’t
adequately cover a classroom;
distortion hot spots and feedback
are common
7
What to Look for in a Classroom Amplification System
Aside from compatibility with PFM systems, some factors that you’ll want to consider in selecting the right
classroom amplification system are:
Equal Classroom Sound Distribution
In today’s classrooms it is very rare for any student to be sitting in the same chair all day long. For this reason, it is imperative that your entire classroom have equal sound distribution. This requires a multi-speaker
solution — either a line array or, ideally, a distributed speaker system to ensure equal coverage throughout the room. Line arrays (like the FrontRow ToGo, Juno, and Phonak DigiMaster) give a good balance of
sound coverage and portability, having measurable dispersion patterns that minimize signal drop off in a
highly transportable housing. This, by the way, is the reason line arrays are used in auditoriums and concerts
instead of flat-panel speakers. Flat panels and other point sources tend to produce feedback-vulnerable “hot
spots,” which over-amplify regions near the speaker in an attempt to reach the farthest listeners.
Performance
• O
bviously, a clear, distortion-free signal is important for all of your students. Be aware that looking
at specification sheets is usually not a good enough indicator of the actual sound quality of the product.
Most good manufacturers offer some type of free evaluation period. Ask for a side-by-side
demonstration and listen to the products yourself and with the teachers who will be using the equipment.
• S
ome manufacturers offer features that can improve speech comprehension. For example, the
FrontRow OptiVoice feature emphasizes consonant sounds to help improve intelligibility.
• Y
ou may want to consider choosing a system with automatic feedback suppression — especially in
single-speaker models where higher output levels and limited speaker locations may create problems
— to help eliminate harsh interruptions.
• M
ultiple speakers or line arrays provide the most even sound coverage, even in large rooms. Singlespeaker solutions (e.g., flat panels, small portable units) are convenient to move and often less expensive,
but don’t provide the most even sound coverage.
• B
ecause these products are used with children, durability is a factor for consideration. In recent years,
a number of brands have emerged that are simply sourcing inexpensive karaoke products in Asia. The
build quality of really inferior products will be apparent to the naked eye, but the manufacturers you are
considering should be able to demonstrate that they have high-quality (and socially responsible) design
and manufacturing processes in place. Look for things like evidence of ISO qualification, reliability testing,
a strong warranty, and other signs that the company is focused on quality.
Accessories to Encourage Participation
A student pass-around microphone is a must to ensure students with hearing loss
can hear their peers and join in on the conversation. Manufacturers are getting better
at designing microphones specifically for children rather than just re-purposing adult
karaoke microphones. Look for ones that are durable and manageable for kids.
A few systems today are available with multiple student microphones — one for each
student table, for example. This can further save time and improve usage.
8
Simplicity and Comfort
• Teachers will be wearing their microphones all day, so choose one that is light and comfortable.
• T
eachers have been observed using the transmitter mute button up to 30 times per day, so select
teacher microphones that make this easy to find and use by touch alone.
• E
ven though boom microphones provide the best sound quality, most teachers find even sleek boom
microphones uncomfortable and unattractive. Keep this in mind when considering long-term usability
of a particular solution. Some manufacturers offer transmitters that can be either worn around the neck
(i.e., without a boom mic) or can also accept a boom microphone. If you want to push for boom mic usage you
may want to choose a mic that gives you this flexibility and go with ‘Plan B’ if you meet resistance.
• Y
ou probably know from PFM experience that most teachers have very little time or patience for overlycomplex gadgets. In general, the number of knobs and switches on the transmitter and receiver is in
direct proportion to the amount of time you’ll have to spend in training, retraining, and troubleshooting.
You’ll be better off choosing a classroom amplification system that minimizes the buttons. The good news is,
there are a number of simple, yet good options available — some even let the teacher use just one button.
Minimal Installation
Only a few years ago, the responsibility for installing and maintaining classroom amplification systems
almost always fell on the audiologist or speech-language pathologist. These days, it’s increasingly common
to have these fall under the purview of the district technology director. If you are concerned about having
to install or move a classroom amplification system, there are a number of no- or low-installation options that don’t necessarily compromise
You should probably
sound quality. Your first choice for balancing the conflicting demands of
avoid flat-panel
no-toolbelt-required setup with good sound coverage should be line
speakers if you are
arrays. These do a generally excellent job of maintaining good and even
concerned with coverage.
speech intelligibility, and they set up in minutes. You should probably avoid
flat-panel speakers if you are concerned with coverage, however: when it
comes to measured intelligibility indices, they don’t compare well with multi-speaker or line array configurations
(see http://gofrontrow.com/files/documents/research/Whitepaper-(LightSpeed-flatpanel-speakers).pdf).
Full Multimedia Integration
The ability to run all classroom media through your classroom amplification system to deliver better audio
to the whole class – and straight to your students with hearing loss — is a crucial benefit of combining
these technologies. That’s why it’s important to select a classroom receiver that not only accepts multiple
secondary inputs (e.g., DVD player, computer) but also offers a mixed output for connection to the
PFM transmitter. Most do, but there are still a few models that do not offer this important feature, so
don’t leave this off your checklist!
Recording Capability
Lesson capture (sometimes called “screencasting”) is a powerful new tool for reinforcing instruction for
students with hearing impairment. Quite simply, it’s a recording of all classroom audio (teacher, students,
multimedia) plus any visuals from the teacher’s computer screen — available online to the student for
review, clarification, homework help, and test preparation. FrontRow’s Juno product stands out in this
regard, since it fully automates the process (thereby greatly increasing teacher compliance).
9
Integrating Classroom Amplification and PFM Systems with Other Classroom Technology
Many materials viewed by students – streaming videos, news clips, etc. – have an audio component as well as a visual
one. Unfortunately, projectors and computer speakers just aren’t up to the task of amplifying the whole classroom,
let alone your students with hearing loss. By running all audio through your classroom amplification system, the
system becomes the hub for all classroom media devices and ensures that everyone has equal access to the full
audio experience.
Through this technology integration, your students with hearing loss will be able to hear and do things that they
weren’t able to before, such as:
•
•
•
•
•
Properly view movies.
Listen to music and other audio.
Participate and engage in interactive whiteboard lessons. Access online recordings of classroom content.
Engage in global learning activities, such as placing video conference calls with Skype, Adobe Connect, or
Elluminate.
Many classroom amplification systems can support at least some
level of multimedia integration, but it’s important to choose one
with enough connection jacks to work with a variety of classroom
technologies simultaneously.
A typical example of
the kinds of connections your classroom
amplification system
should be able to
make to other technologies. A computer,
DVD player, and MP3
player are common
requirements.
What to Look for in a PFM System
PFM systems help to improve signal-to-noise ratio and overcome background noise, distance to sound
source, and/or reverberation that can interfere with clear speech understanding. For younger students, speech
understanding is critical to language development, learning, and socializing.
Just as with classroom amplification, quality and performance are key. Look for:
Speech Intelligibility Features
Advanced digital sound processing in order to provide clearer access to vital speech.
10
Maximum Speech Bandwidth
Research has shown that children with hearing loss can benefit from additional high-frequency information
available with broader bandwidth (Kortekaas & Stelmachowicz, 2000). With a broader bandwidth, transmitters
can make the soft consonants stand out more clearly. Look for models that have an audio bandwidth for
speech in the range of 7500 Hz and higher.
Simplicity and Ease of Use
Just as with classroom amplification systems, you’ll want to keep the convenience to your teachers as a
priority when choosing PFM systems. Keep it simple and comfortable.
Easy Channel Management
A number of options are available today that offer full programming and fitting capabilities in the palm of
your hand – such as pre-programmed channels to take the work out of channel management by creating a
prioritized channel list.
Upgrade Capability
The software offered by leading PFM manufacturers changes regularly, so you should look for devices with a
USB port for easy upgrading of software, and access to new features that will keep your PFM system efficient
and cost-effective.
Versatile, Compatible Equipment
Unless you’re in tight control of your students’ hearing aid choice, you should look
for PFM solutions that work with a broad range of behind-the-ear (BTE) instruments,
cochlear implant (CI) processors, and other brands of receivers and transmitters,
without compromising signal durability or sound quality. Most major brands offer
solutions that can handle the typically unpredictable variety of devices that will
appear on your students’ ears.
Reliability & Service
• Accident-proof, moisture-repellent transmitters.
• Batteries should last approximately 10 hours and come with fail-safe charging. • Quick turnaround time if units need factory repair.
Conclusion
For a rich and engaging learning experience, your students with hearing loss can benefit most from a PFM
system properly integrated with classroom amplification. The Total Auditory Integration method effectively
ensures your special needs kids are connected on all levels – enabling them to hear their teacher
better, engage in every lesson, catch all the conversation, and feel included with their peers.
11
Appendix 1 – 216 Frequency Compatibility (significant only if using the Microphone-Restricted Integration method)
216 MHZ FREQUENCY Oticon
T5
Oticon PHONAK
T10 OTICON AMIGO
T20/T21/T30/T31 PHONIC EAR
RADIUM SF FRONTROW
TOGO SF
215.9875
N31
216.0125
01
1
N01
01
216.0375
02
2
N02
02
216.0750
42
42
216.0875
04
N04
04
216.1125
05
N05
05
216.1875
08
N08
08
216.2125
09
N09
09
216.2250
45
216.2750
46
216.2875
12
45
12
N12
42
45
13
N13
45
42
45
46
12
216.2750
216.3125
42
46
13
216.3250
47
47
216.3750
48
48
48
216.3875
16
N16
16
216.4125
17
N17
17
216.4375
18
N18
18
216.5125
21
N61
21
216.5250
51
216.5375
22
N62
22
216.5750
52
N52
52
216.5875
24
N64
24
216.6125
25
N65
25
216.6250
53
48
51
24
48
51
51
51
52
53
216.6750
545454
216.6875
28
N68
28
216.7125
29
N69
29
216.7250
55
N55
55
55
216.7750
56
56
216.7875
32
216.8125
216.8250
216.8750
58
216.8875
36
N76
36
216.9125
37
N77
37
216.9625
39
N79
39
216.9750
60
60
N60
60
216.9875
40
40
N80
40
32
N72
32
33
N73
33
57
N57
57
57
37
58
57
58
217.0125
N32
217.1875
N33
217.2875
N34
217.4375
N35
217.5875
N36
217.7875
N37
217.9875
N38
218.0125
N39
218.1875
N40
218.2875
N41
218.4375
N42
218.5875
N43
218.7875
N44
12
Appendix 2 – 173 Frequency Compatibility (Australia)
(significant only if using the Microphone-Restricted Integration method)
173 MHZ FREQUENCY Oticon
T5
Oticon PHONAK
T10 OTICON AMIGO
T20/T21/T30/T31 FRONTROW TOGO
SF
FRONTROW TEMPO
SF
169.4375
H41
169.6750
H45
169.7250
H38
169.7750
H46
169.8250
H39
173.0000
A1
H96
173.0100
A8
H91
A8
173.0500
A2
173.1000
A3
H92
173.1500
A4
173.2000
A5
H93
173.2500
A6
173.3000
A7
H94
173.3400
12
173.3500
13
H01
13
13
173.4000
15
15
H02
15
15
15
173.4300
16
173.4500
17
17
173.4600
18
173.4650
19
H03
19
173.4900
20
173.5000
21
21
173.5200
22
173.5450
23
H04
23
173.5500
24
24
173.6000
25
25
173.6400
26
26
H05
26
26
173.6500
27
27
173.6950
28
H11
28
173.7000
29
29
173.7500
30
30
173.7550
31
H95
31
173.7750
72
H12
173.8000
32
32
173.8125
91
H35
91
173.8250
33
H13
173.8500
34
34
173.9000
35
35
35
173.9500
36
H14
36
36
173.9625
93
H34
173.9900
69
69
H33
69
174.0000
37
37
37
174.0500
38
38
38
174.1000
40
H47
40
174.1200
41
41
H16
41
41
174.1250
H85
174.1750
H77
77
174.1850
H17
174.2250
H86
86
174.2700
H18
174.2750
H87
87
174.3000
H48
174.3250
H78
174.3600
H19
78
174.3750
H88
88
174.4150
51
51
H20
51
174.4250
H89
89
174.4750
H79
79
174.5250
H90
90
174.6000
55
55
H06
55
55
174.6500
H57
57
174.6750
H07
174.7000
2
2
H27
2
59
13
Appendix 2 – 173 Frequency Compatibility (Australia) continued
173 MHZ FREQUENCY Oticon
T5
Oticon PHONAK
T10 OTICON AMIGO
T20/T21/T30/T31 FRONTROW TOGO
SF
FRONTROW TEMPO
SF
174.7700
61
61
H08
61
61
174.7750
H81
174.8500
63
174.9000
65
174.9500
66
175.0000
H67
67
175.5000
H25
94
175.6000
H26
95
175.7000
H27
2
175.8000
H28
9
175.8500
97
175.9000
H29
175.9500
10
176.0000
11
11
H30
11
11
Appendix 3 – 173 Frequency Compatibility (New Zealand)
173 MHZ FREQUENCY Oticon
T5
Oticon PHONAK
T10 OTICON AMIGO
T20/T21/T30/T31 FRONTROW TOGO
SF
FRONTROW TEMPO
SF
169.4375
H41
169.6750
H45
169.7250
H38
169.7750
H46
169.8250
H39
173.0000
A1
H96
A1
A1
173.0100
A8
H91
A8
173.0500
A2
A2
A2
173.1000
A3
H92
A3
A3
173.1500
A4
A4
A4
173.2000
A5
H93
A5
A5
173.2500
A6
A6
A6
173.3000
A7
H94
A7
A7
173.3400
12
12
173.3500
13
13
H01
13
13
13
173.4000
15
15
H02
15
15
15
173.4300
16
16
173.4500
17
17
17
173.4600
18
18
173.4650
19
19
H03
19
19
173.4900
20
20
173.5000
21
21
21
173.5200
22
22
173.5450
23
23
H04
23
23
173.5500
24
24
24
173.6000
25
25
25
173.6400
26
26
H05
26
26
173.6500
27
27
27
173.6950
28
28
H11
28
28
173.7000
29
29
29
173.7500
30
30
30
173.7550
31
31
H95
31
31
173.7750
72
H12
173.8000
32
32
32
173.8125
91
H35
91
91
173.8250
33
33
H13
33
33
173.8500
34
34
34
173.9000
35
35
35
35
173.9500
36
36
H14
36
36
36
173.9625
93
H34
93
93
173.9900
69
69
H33
69
69
174.0000
37
37
37
37
174.0500
38
38
38
38
174.1000
40
40
H47
40
14
40
For further information contact:
USA/Global
Corporate Headquarters
2080 Lakeville Highway
Petaluma, CA 94954-6713
Toll-free: 800-227-0735
Tel: 707-769-1110
FAX: 707-769-9624
www.gofrontrow.com
Canada
6950 Creditview Road, Unit 1
Mississauga, ON L5N 0A6
Toll-free: 800.340.9894
Tel: 905.461.5300
FAX: 905.677.7760
www.gofrontrow.com
New Zealand
142 Lambton Quay
Wellington
Toll-Free 0800 684 266
Tel: +64 4 473 3330
FAX: +64 4 329 684
www.gofrontrow.com
Australia
12/97 Castlemaine Street
Milton Qld 4064
Australia
Freecall: 1 800 746 642
FAX: 1300 737 983
www.gofrontrow.com.au
USA
PO Box 6724
Somerset, NJ 08875-6724
Tel: 1-888-684-7331
FAX: 732-748-2011
www.oticonusa.com
Canada
6950 Creditview Rd., Unit 1
Mississauga, Ontario
L5N 0A6
Tel: +1 800-263-8700
FAX: +1 905-677-7760
www.oticon.ca
New Zealand
142 Lambton Quay
Wellington
Toll-Free 0800 684 266
Tel: +64 4 473 3330
FAX: +64 4 329 684
www.oticon.co.nz
Australia
Suite 4, Level 4, Building B
11 Talavera Road
North Ryde NSW 2113
Tel.: +61 9857 8288
Fax: +61 9857 8292
www.oticon.au
©2013 FrontRow Calypso LLC. Phonic Ear, FrontRow, and the names of FrontRow products are trademarks or registered trademarks of FrontRow Calypso LLC in the US and
other countries. Oticon and the names of Oticon products are trademarks or registered trademarks of Oticon, Inc. in the US and other countries. Phonak and Digimaster are
trademarks of Phonak Communications AG.