1
Agilent 2200 TapeStation
User Manual
Agilent Technologies
Notices
© Agilent Technologies, Inc. 2011, 2012
Warranty
No part of this manual may be reproduced
in any form or by any means (including electronic storage and retrieval or translation
into a foreign language) without prior agreement and written consent from Agilent
Technologies, Inc. as governed by United
States and international copyright laws.
The material contained in this document is provided “as is,” and is subject to being changed, without notice,
in future editions. Further, to the maximum extent permitted by applicable
law, Agilent disclaims all warranties,
either express or implied, with regard
to this manual and any information
contained herein, including but not
limited to the implied warranties of
merchantability and fitness for a particular purpose. Agilent shall not be
liable for errors or for incidental or
consequential damages in connection
with the furnishing, use, or performance of this document or of any
information contained herein. Should
Agilent and the user have a separate
written agreement with warranty
terms covering the material in this
document that conflict with these
terms, the warranty terms in the separate agreement shall control.
Manual Part Number
G2964-90001
Edition
11/2012
Printed in Germany
Agilent Technologies
Hewlett-Packard-Strasse 8
76337 Waldbronn
This product may be used as a component of an in vitro diagnostic system if the system is registered with
the appropriate authorities and complies with the relevant regulations.
Otherwise, it is intended only for general laboratory use.
receive no greater than Restricted Rights as
defined in FAR 52.227-19(c)(1-2) (June
1987). U.S. Government users will receive
no greater than Limited Rights as defined in
FAR 52.227-14 (June 1987) or DFAR
252.227-7015 (b)(2) (November 1995), as
applicable in any technical data.
Safety Notices
CAUTION
A CAUTION notice denotes a
hazard. It calls attention to an
operating procedure, practice, or
the like that, if not correctly performed or adhered to, could
result in damage to the product
or loss of important data. Do not
proceed beyond a CAUTION
notice until the indicated conditions are fully understood and
met.
Technology Licenses
The hardware and/or software described in
this document are furnished under a license
and may be used or copied only in accordance with the terms of such license.
Restricted Rights Legend
If software is for use in the performance of a
U.S. Government prime contract or subcontract, Software is delivered and licensed as
“Commercial computer software” as
defined in DFAR 252.227-7014 (June 1995),
or as a “commercial item” as defined in FAR
2.101(a) or as “Restricted computer software” as defined in FAR 52.227-19 (June
1987) or any equivalent agency regulation
or contract clause. Use, duplication or disclosure of Software is subject to Agilent
Technologies’ standard commercial license
terms, and non-DOD Departments and
Agencies of the U.S. Government will
WA R N I N G
A WARNING notice denotes a
hazard. It calls attention to an
operating procedure, practice,
or the like that, if not correctly
performed or adhered to, could
result in personal injury or
death. Do not proceed beyond a
WARNING notice until the indicated conditions are fully understood and met.
Agilent 2200 TapeStation - User Manual
Contents
Contents
1 Introduction to the 2200 TapeStation System
Overview of the System
2 Specifications
5
6
11
Technical Specifications 12
ScreenTape Specifications 14
3 Installing the System
21
Unpacking the System 22
Contents of the ScreenTape System
Installing the System 27
24
4 Using the 2200 TapeStation System
31
Intended Use of the 2200 TapeStation System 32
Performance Limitations of Use 33
Additional Components Required by the User 34
Operating Procedure 35
How to prepare your samples 47
Good Measurement Practices for Analysing DNA on the Agilent 2200
TapeStation 49
DNA Sample Preparation 54
RNA Sample Preparation 58
Protein Sample Preparation 62
5 Maintenance
67
General Information 68
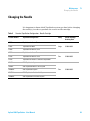
Changing the Needle 69
Agilent 2200 TapeStation - User Manual
3
Contents
6 Appendix
73
Limited Use Label License 74
Sound Emission 75
The Waste Electrical and Electronic Equipment Directive
Technical Service 77
4
76
Agilent 2200 TapeStation - User Manual
Agilent 2200 TapeStation - User Manual
1
Introduction to the 2200 TapeStation
System
Overview of the System 6
ScreenTape Architecture 7
Agilent 2200 TapeStation Components
8
This chapter gives an introduction to the system
Agilent Technologies
5
1
Introduction to the 2200 TapeStation System
Overview of the System
Overview of the System
The Agilent 2200 TapeStation system is a revolutionary tape-based platform
for simpler, faster and more reliable electrophoresis. It is made up of three
elements: a consumable tape (ScreenTape), an instrument (the 2200
TapeStation) and an analysis software. The system is very straightforward to
use, simply place the sample tubes and ScreenTape in to the 2200 TapeStation
and let it load, separate, image, analyse and present the results.
Place ScreenTape and some tips in the 2200 TapeStation.
Place your samples in the 2200 TapeStation and click Start on the
controller software.
View your analysed results in around 1 min per sample.
This User Manual guides the operation of ScreenTape, the 2200 TapeStation
and software for the analysis of DNA, RNA and protein samples. The contents
of the ScreenTape System are detailed below.
Information pertaining to the 2200 TapeStation can be found in:
• 2200 TapeStation Technical Specification
• 2200 TapeStation Components
6
Agilent 2200 TapeStation - User Manual
Introduction to the 2200 TapeStation System
Overview of the System
1
• Installing the 2200 TapeStation
Information pertaining to sample and ScreenTape requirements can be found
in:
• ScreenTape Architecture
• Operating Procedure
ScreenTape Architecture
Barcode:
The unique barcode tracks lane usage within individual ScreenTape and
allows traceability of results.
Buffer chamber:
The buffer chamber is located at the top of the channel and contains
optimised buffers for the effective separation of nucleic acid fragments or
proteins.
Electrodes:
The integrated electrodes apply a current across the ScreenTape and
eliminate the need for any additional electrophoresis equipment.
Gel:
The gel contained within ScreenTape has been developed specifically to
resolve nucleic acids or proteins.
ScreenTape product
details:
The information is unique to each consumable item. This includes:
ScreenTape type, product expiry date and a unique serial number.
Figure 1
Example: P200 ScreenTape
Agilent 2200 TapeStation - User Manual
7
1
Introduction to the 2200 TapeStation System
Overview of the System
Agilent 2200 TapeStation Components
8
Lid:
The 2200 TapeStation lid must be closed each time the instrument
controller software is initialized, and whilst the instrument is in operation.
LED:
The LED will illuminate once the instrument is on. When the LED is
flashing slowly, the instrument is in use and the lid should not be opened,
rapid flashing indicates that the TapeStation requires some attention.
Sample Block:
There are 2 sample blocks provided that can either hold 0.2 mL sample
tube strips or a 96 well plate.
Tip Holder:
The tip holder can accommodate up to 16 TapeStation loading tips at any
one time.
ScreenTape:
The tape must be placed into the holder with the barcode towards the
front of the instrument, facing towards the right.
USB Socket:
The USB connector is inserted into the USB socket to link the laptop to the
2200 TapeStation.
Power-cable socket:
The power cable must be connected to the 2200 TapeStation and the
relevant mains electricity outlet.
Agilent 2200 TapeStation - User Manual
Introduction to the 2200 TapeStation System
Overview of the System
1
A^Y
HXgZZcIVeZ
I^e]daYZg
HVbeaZWadX`
A:9
Figure 2
2200 TapeStation (front view)
Figure 3
2200 TapeStation (back view)
Dc$d[[hl^iX]
EdlZg"XVWaZhdX`Zi
JH7hdX`Zi
Agilent 2200 TapeStation - User Manual
9
1
10
Introduction to the 2200 TapeStation System
Overview of the System
Agilent 2200 TapeStation - User Manual
Agilent 2200 TapeStation - User Manual
2
Specifications
Technical Specifications
ScreenTape Specifications
12
14
This chapter provides information on specifications.
Agilent Technologies
11
2
Specifications
Technical Specifications
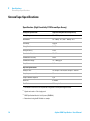
Technical Specifications
2200 TapeStation
Input voltage:
12 V DC
Power consumption:
40 W (VA)
Current:
3A
Interface:
USB cable (PC comms.)
Instrument Housing:
UL94/VO rated flame retardant cast polyurethane
Dimensions:
400 x 310 x 310 mm
Weight:
12.5 kg
Power Supply
Input voltage:
100 – 240 V AC
Input frequency:
50 – 60 Hz
Phase:
1
Current:
0.45 – 1.1 A
Environmental condition
12
Optimal operating
temperature
23 °C (73.4 °F).
Ambient operating
temperature
12 – 37 °C (53.6 – 98.6 °F) for D1K
17 – 37 °C (62.6 – 98.6 °F) for HS D1K
15 – 30 °C (59.0 – 86.0 °F) for Genomic DNA
14 – 30 °C (57.2 – 86.0 °F) for RNA applications
10 – 33 °C (50.0 – 91.4 °F) for Protein applications
Agilent 2200 TapeStation - User Manual
Specifications
Technical Specifications
NOTE
2
If the instrument is out of the recommended temperature range for the ScreenTape inserted
the following error message will appear in the controller software:
• If the quoted current temperature is above the specified range, please move the
system out of direct sunlight and away from any windows. Check that any air
conditioning is functioning.
• If the quoted current temperature is below the specified range please allow the
instrument to equilibrate to the ambient temperature, and avoid using in a cooled
area.
Agilent 2200 TapeStation - User Manual
13
2
Specifications
ScreenTape Specifications
ScreenTape Specifications
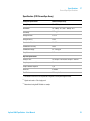
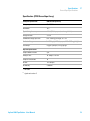
Specification (High Sensitivity D1K ScreenTape Assay)
Analytical Specification
High Sensitivity D1K ScreenTape Assay
Sizing Range
35 – 1000 bp
Resolution1
35 – 300 bp: 15 %, 300 – 1000 bp: 10 %
Sensitivity2
5 pg/µL3
Sizing Precision
5 % CV
Sizing Accuracy4
±10 %
Quantitative Precision
15 % CV
Quantitative Accuracy
±20 %
Quantitative Range
75 – 1000 pg/µL
Carry Over
N/A
Physical Specification
14
Analysis Time
16 samples < 20 min, 96 samples < 100 min
Samples per consumable
16
Sample Volume Required
2 µL
Shelf Life
4 months
Box/Kit size
112 samples/box
1
Resolution is defined as the separation of fragments at half peak height or better
2
Signal:noise ratio > 3 for single peak
3
2200 TapeStation Nucleic Acid System (G2965AA)
4
Determined using the D1K ladder as sample
Agilent 2200 TapeStation - User Manual
Specifications
ScreenTape Specifications
2
Specification (D1K ScreenTape Assay)
Analytical Specification
D1K ScreenTape Assay
Sizing Range
35 – 1000 bp
Resolution1
35 – 300 bp: 15 %, 300 – 1000 bp: 10 %
Sensitivity2
0.05 ng/µL
Sizing Precision
5 % CV
Sizing Accuracy3
±10 %
Quantitative Precision
10 % CV
Quantitative Accuracy
±20 %
Quantitative Range
0.1 – 50 ng/µL
Carry Over
N/A
Physical Specification
Analysis Time
16 samples < 20 min, 96 samples < 100 min
Samples per consumable
16
Sample Volume Required
1 µL
Shelf Life
4 months
Box/Kit size
112 samples/box
1
Resolution is defined as the separation of fragments at half peak height or better
2
Signal:noise ratio > 3 for single peak
3
Determined using the D1K ladder as sample
Agilent 2200 TapeStation - User Manual
15
2
Specifications
ScreenTape Specifications
Specification (Genomic DNA ScreenTape Assay)
Analytical Specification
Genomic DNA ScreenTape
Sizing Range
200 bp to > 60000 bp
Sensitivity
0.5 ng/µL
Sizing Precision1
200 – 15000 bp 15 %CV
Sizing Accuracy1
200 – 15000 bp ±10 %
Quantitative Precision2
15 % CV
Quantitative Accuracy2
±20 %
Linear Concentration Range
10 – 100 ng/µL
Carry Over
N/A
Physical Specification
16
Analysis Time
16 samples < 25 min, 96 samples < 150 min
Samples per consumable
16
Sample Volume Required
1 µL
Shelf Life
4 months
Box/Kit size
112 samples/box
1
Determined using the Genomic DNA ladder as sample
2
Average result from various genomic DNA sample types
Agilent 2200 TapeStation - User Manual
Specifications
ScreenTape Specifications
2
Specification (High Sensitivity R6K ScreenTape Assay)
Analytical Specification
High Sensitivity R6K ScreenTape Assay
Quality Score
RINe
Sensitivity
100 pg/µL
Quantitative Precision1
20 % CV
Qualitative Range
100 – 10000 pg/µL
Physical Specification
Analysis Time
16 samples < 15 min, 96 samples ~ 100 min
Samples per consumable
16
Sample Volume Required
2 µL
Shelf Life
4 months
ScreenTape box size
112 samples/box
1
Within a ScreenTape
Agilent 2200 TapeStation - User Manual
17
2
Specifications
ScreenTape Specifications
Specification (R6K ScreenTape Assay)
Analytical Specification
R6K ScreenTape Assay
Quality Score
RINe
Sensitivity
2 ng/µL
Quantitative Precision1
15 % CV
Qualitative Range
2 – 500 ng/µL
Physical Specification
Analysis Time
16 samples < 20 min, 96 samples ~ 100 min
Samples per consumable
16
Sample Volume Required
1 µL
Shelf Life
4 months
ScreenTape box size
112 samples/box
1
18
Within a ScreenTape
Agilent 2200 TapeStation - User Manual
Specifications
ScreenTape Specifications
2
Specification (P200 ScreenTape Assay)
Analytical Specification
P200 ScreenTape Assay
Sizing range
10 – 200 kDa
Resolution1
15 %
Typical Sizing Accuracy
±10 % (CAII, Lysozyme, beta lactoglobulin)
Sizing Precision
3 % CV
Quantitative Range/precision
100 – 1000 ng/µL for IgG; 15 % CV
Qualitative Range
5 – 5000 ng/µL BSA, Lysozyme; 12.5 – 5000 ng/µL IgG
Sensitivity2
5 ng/µL Lysozyme; 12.5 ng/µL IgG
Physical Specification
Sample volume needed
2 µL
Analysis Time
16 samples <15 min
Samples/consumable
16
Kit Size
112 Samples
Kit Stability
4 months
1
for ladder
2
signal :noise ratio > 3
Agilent 2200 TapeStation - User Manual
19
2
20
Specifications
ScreenTape Specifications
Agilent 2200 TapeStation - User Manual
Agilent 2200 TapeStation - User Manual
3
Installing the System
Unpacking the System
22
Contents of the ScreenTape System
24
Installing the System 27
Software Installation 27
Agilent 2200 TapeStation Set Up
28
This chapter gives information about how to install the system.
Agilent Technologies
21
3
Installing the System
Unpacking the System
Unpacking the System
Unpacking the Agilent 2200 TapeStation
Prerequisites
CAUTION
Do not attempt to unpack the 2200 TapeStation instrument until you have read the
accompanying Site and Safety Manual.
Condensation within the instrument
Condensation will damage the system electronics.
➔ If your instrument was shipped in cold weather, leave it in its box and allow it to
warm slowly to room temperature to avoid condensation.
CAUTION
"Defective on arrival" problems
If there are signs of damage, please do not attempt to install the instrument. Inspection
by Agilent is required to evaluate if the instrument is in good working condition.
➔ Notify your local Agilent Representative and the Technical support channel.
➔ An Agilent service representative will inspect the instrument at your site and
initiate appropriate actions.
WA R N I N G
Personal injury
The TapeStation is heavy.
➔ Enlist the aid of a co-worker to share the lifting load to avoid personal injury.
1 Remove the TapeStation from the packaging and place on a clean, dry, flat
surface.
2 Allow the TapeStation to acclimatise to the ambient temperature of the
operating environment.
22
Agilent 2200 TapeStation - User Manual
Installing the System
Unpacking the System
3
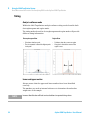
3 Remove the label covering the tape holder, as shown in the image below.
Figure 4
Remove before use
Delivery Checklist
Ensure all parts and materials have been delivered with your system. The
delivery checklist is shown below.
Please report any missing or damaged parts to your local Agilent Technologies
sales and service office.
Agilent 2200 TapeStation - User Manual
23
3
Installing the System
Contents of the ScreenTape System
Contents of the ScreenTape System
The Agilent 2200 TapeStation
Table 1
The Agilent 2200 TapeStation System (G2964AA, G2965AA)
Product
Volume
Properties
Agilent 2200
TapeStation
1x
Instrument for loading, electrophoresing, imaging and analysing:
• 2200 TapeStation System (G2964AA) or
• 2200 TapeStation Nucleic Acid System (G2965AA)
TapeStation Software
Setup Disc
1 x CD
The software is required to drive the 2200 TapeStation and visualise the
ScreenTape analysis
Laptop
1 x Laptop
Instrument Control Laptop
USB Cables/Power
supply units
1 x USB cable
2 x power cords
1 x USB cable to connect the laptop to the TapeStation
1 x Power supply unit for the laptop
1 x Power supply unit for the TapeStation
Sample Block
1 x 0.2 mL strip
and
1 x 96 well plate
A removable sample block for the correct loading of samples within the
TapeStation
Tip Holder
2x
A removable cartridge for pipette tips placed in the TapeStation
TapeStation loading
tips
1 x 384 tips
Pipette tips to use in the 2200 TapeStation
TapeStation compatible 0.2 mL
tube strips and lids
1x box of 120
tubes and caps
Tube strips for placing samples mixed with loading buffer into the 2200
TapeStation
96 well plates
pack of 10
96 well plate foil seal
pack of 100
Loading tip transfer
tool (optional)
1x
Guides
24
Site Safety guide and Quick Guides (G2964AA - Protein, DNA and RNA;
G2965AA - DNA and RNA)
Agilent 2200 TapeStation - User Manual
Installing the System
Contents of the ScreenTape System
3
ScreenTape Products
Kit Components (High Sensitivity D1K Assay)
Part Number
Name
Color
Amount
5067-5363
High Sensitivity D1K ScreenTape
7 ScreenTape
5067-5364
High Sensitivity D1K Reagents
• High Sensitivity D1K Ladder
• High Sensitivity D1K Sample Buffer
2 vials
75 µL
300 µL
Kit Components (D1K Assay)
Part Number
Name
Color
Amount
5067-5361
D1K ScreenTape
7 ScreenTape
5067-5362
D1K Reagents
• D1K Ladder
• D1K Sample Buffer
2 vials
75 µL
400 µL
Kit Components (Genomic DNA Assay)
Part Number
Name
5067-5365
Genomic DNA ScreenTape
7 ScreenTape
5067-5366
Genomic DNA Reagents
• Genomic DNA Ladder
• Genomic DNA Sample Buffer
2 vials
75 µL
1350 µL
Agilent 2200 TapeStation - User Manual
Color
Amount
25
3
Installing the System
Contents of the ScreenTape System
Kit Components (High Sensitivity R6K Assay)
Part Number
Name
Color
Amount
5067-5369
High Sensitivity R6K ScreenTape
7 ScreenTape
5067-5370
High Sensitivity R6K Reagents
• High Sensitivity R6K Sample Buffer
1 vial
300 µL
Kit Components (R6K Assay)
Part Number
Name
Color
Amount
5067-5367
R6K ScreenTape
7 ScreenTape
5067-5368
R6K Reagents
• R6K Sample Buffer
1 vial
500 µL
Kit Components (P200 Assay)
Part Number
Name
5067-5371
P200 ScreenTape
7 ScreenTape
5067-5372
P200 Reagents
• P200 5X Labeling Dye
• P200 Labeling Buffer
• P200 Reducing Sample Buffer
• P200 pH Buffer
• P200 Non-Reducing Sample Buffer
• P200 Markers (pre-stained)
• P200 Ladder
70 µL
350 µL
550 µL
1000 µL
550 µL
270 µL
40 µL
26
Color
clear
Amount
Agilent 2200 TapeStation - User Manual
3
Installing the System
Installing the System
Installing the System
Software Installation
The software for your Agilent 2200 TapeStation system is preinstalled on the
system laptop.
NOTE
For updates, or if you have to change the laptop, you may download the latest version of the
software from the update server http://www.agilent.com/genomics/tapestation.
For details on installation of the software refer to the readme.txt file on the installation CD
Agilent 2200 TapeStation Software TAPESTATION INSTRUMENT CONTROL AND DATA
ANALYSIS.
Agilent 2200 TapeStation - User Manual
27
3
Installing the System
Installing the System
Agilent 2200 TapeStation Set Up
Hardware required
Laptop
Software required
Agilent 2200 TapeStation Software (already installed)
WA R N I N G
Personal injury, explosion or fire
➔ Do not operate the instrument in an atmosphere containing explosive gases or near
flammable volatile liquids.
➔ Only approved mains cord set supplied with the instrument must be used with this
instrument and if an extension lead is required, the lead must be earthed.
➔ If the equipment is used in a manner not specified by the manufacturer, the
protection provided by the equipment may be impaired.
NOTE
WA R N I N G
For general safety information, please refer to the 2200 TapeStation System - Site and
Safety Manual.
Use of unsupplied cables or power adaptors
Using cables or power adaptors not supplied by Agilent Technologies can lead to
damage of the electronic components or personal injury.
➔ Never use cables or power adaptors other than the ones supplied by Agilent
Technologies to ensure proper functionality and compliance with safety or EMC
regulations.
1 Connect the supplied USB cable between the port on the back of the
instrument and your laptop.
2 Power the instrument with the supplied power lead and adaptor.
3 Turn the instrument on using the power switch located at the back of the
TapeStation.
When powered and idle, the instrument will have a blue LED visible on the
front of the case.
28
Agilent 2200 TapeStation - User Manual
3
Installing the System
Installing the System
4 Windows may display a Found New Hardware wizard once the software has
loaded. In this instance, always perform the following steps:
a Select No, not this time to prevent connecting to Windows Update and
searching for software.
b In the next window select Install the Software automatically.
c If a window appears, indicating the software did not pass the windows
logo testing, click Continue Anyway.
A window appears, indicating that the hardware has been successfully
installed. The TapeStation system will function.
NOTE
As there is more than one driver that can be detected and installed, you may need to follow
these steps more than once.
You may need to follow these steps if you change the USB port on the laptop for the
TapeStation connector cable.
Agilent 2200 TapeStation - User Manual
29
3
30
Installing the System
Installing the System
Agilent 2200 TapeStation - User Manual
Agilent 2200 TapeStation - User Manual
4
Using the 2200 TapeStation System
Intended Use of the 2200 TapeStation System
Performance Limitations of Use
32
33
Additional Components Required by the User
34
Operating Procedure 35
Add Experiment Notes 40
Describe Samples 41
Start the TapeStation Run 43
Final Check 43
Running System 44
Abort the TapeStation Run 44
Complete TapeStation Run 44
Empty Tip Buckets 45
How to Use the Agilent TapeStation Software
Shutdown and Restarting Procedure 46
How to prepare your samples
45
47
Good Measurement Practices for Analysing DNA on the Agilent 2200
TapeStation 49
Quantification 49
Sizing 52
DNA Sample Preparation
54
RNA Sample Preparation
58
Protein Sample Preparation
62
This chapter explains the intended use of the 2200 TapeStation System.
Agilent Technologies
31
4
Using the 2200 TapeStation System
Intended Use of the 2200 TapeStation System
Intended Use of the 2200 TapeStation System
The 2200 TapeStation system (Agilent 2200 TapeStation Software) carries out
electrophoretic separation of Nucleic Acids and proteins. The system detects:
• Fluorescently stained double stranded DNA including genomic DNA
• Fluorescently stained total RNA
• Fluorescently labelled proteins
32
Agilent 2200 TapeStation - User Manual
4
Using the 2200 TapeStation System
Performance Limitations of Use
Performance Limitations of Use
The 2200 TapeStation System (Agilent 2200 TapeStation Software) can
analyse a maximum of 16 samples at any one time, more samples can be run
using a 96 well plate and multiple ScreenTape.
The user is responsible for establishing performance characteristics necessary
for upstream and downstream applications. Appropriate controls must be
included in any upstream application requiring analysis on the 2200
TapeStation System (Agilent 2200 TapeStation Software).
Agilent 2200 TapeStation - User Manual
33
4
Using the 2200 TapeStation System
Additional Components Required by the User
Additional Components Required by the User
Additional Consumables required for the 2200 TapeStation
instrument
• Loading tips (5067-5152 or 5067-5153)
• Optical Tube 8x Strip (401428) and and Optical Cap 8x Strip (401425) or
96-well Sample Plates (5067-5150) and 96-well Plate Foil Seal (5067-5154).
Additional Material Required (Not Supplied)
• Volumetric pipette
• Vortex mixer
• Centrifuge
• Heating block or PCR machine
34
Agilent 2200 TapeStation - User Manual
Using the 2200 TapeStation System
Operating Procedure
4
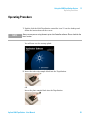
Operating Procedure
1 Double click the 2200 TapeStation controller icon
follow the instructions on the screen.
NOTE
on the desktop and
Always ensure you are using the most up-to-date Controller software. Please check for the
latest version.
You will now see the startup splash.
2 Insert the tube strip sample block into the TapeStation.
OR
Insert the plate sample block into the TapeStation.
Agilent 2200 TapeStation - User Manual
35
4
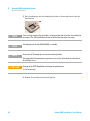
Using the 2200 TapeStation System
Operating Procedure
3 Place loading tips into the loading tip holder as shown and insert into the
TapeStation.
NOTE
If any used tips are left in the tip-buckets, a pop up window will ask for the discarded tips to
be removed. The 2200 TapeStation will not run until all the tip buckets are empty.
NOTE
A Loading tip transfer tool (G2964-60000) is available.
NOTE
Ensure that all 16 loading tips are inserted into the tip holder.
The laptop utilised for performing any previous use(s) of the ScreenTape must be utilised
for all further re-use.
CAUTION
Damage to the 2200 TapeStation and impact on performance
➔ Use correct tips.
4 Remove ScreenTape from the foil packet.
36
Agilent 2200 TapeStation - User Manual
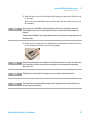
Using the 2200 TapeStation System
Operating Procedure
4
5 Hold the tape with the ScreenTape label facing you and gently flick the top
of the tape.
If there are any small bubbles present then this will move them to the top of
the chamber.
NOTE
The presence of small bubbles within the buffer chamber of the ScreenTape is normal.
These bubbles often occur at the gel/buffer interface and need to be displaced prior to
running.
Failure to remove bubbles from the gel/buffer interface is detrimental to the performance of
the ScreenTape.
6 Insert the ScreenTape into the TapeStation, with the label towards the front
of the instrument and the barcode facing right.
NOTE
Protect the individual gel lanes within the ScreenTape from excessive force. Do not bend or
flex ScreenTape and store in the provided packaging at the recommended temperature,
when not in use.
NOTE
TapeStation instrument will not recognize the screen tape if inserted incorrectly.
NOTE
The TapeStation will automatically recognise the sample plate type and ScreenTape and
load the required parameters.
Agilent 2200 TapeStation - User Manual
37
4
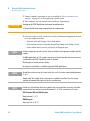
Using the 2200 TapeStation System
Operating Procedure
7 Prepare samples according to type as detailed in “How to prepare your
samples” on page 47 or the appropriate Quick Guide.
8 Place samples into the sample block inside the TapeStation.
CAUTION
Damage to the 2200 TapeStation and impact on performance
➔ Ensure the lids have been removed from the sample tubes.
9 Select the tubes or wells you wish to run by clicking and dragging the mouse
over the sample locations.
• Selected wells will change colour from white.
• Selected lanes on the controller ScreenTape image will change colour.
• Lanes which have been run previously will appear grey.
NOTE
For best sizing precision and accuracy, the user should run the appropriate ladder with the
samples.
For RNA applications, or if 16 samples need to be analysed in parallel, the user may insert a
saved ladder in the 2200 TapeStation analysis software.
RNA reagent kits do not contain a ladder.
No software saved ladder is available for genomic DNA applications.
NOTE
ScreenTape can be used up to 2 weeks after first use if it has been stored upright between
2 – 8 °C.
Simply select the samples in the same manner as whole ScreenTape. The first sample
selected will automatically appear in the first available lane.
NOTE
Partially used ScreenTape (those that contain lanes run on previous occasions) should be
returned to the box and stored vertically between 2 – 8 °C for a maximum of 2 weeks.
D1K, Genomic DNA and R6K Reagents
Store between 2 – 8 °C.
P200 Reagents
Store from -30 to -20 °C.
38
Agilent 2200 TapeStation - User Manual
Using the 2200 TapeStation System
Operating Procedure
4
10 The sample selection can be deleted by right clicking on the sample plate
image.
A menu will appear with the following options:
• Clear All Selections - this will clear ladder well and all sample wells
selected
• Clear Last Selection - this will only clear the last samples to be highlighted
NOTE
Pressing Escape on the keyboard will also cancel the current selections.
Agilent 2200 TapeStation - User Manual
39
4
Using the 2200 TapeStation System
Operating Procedure
Add Experiment Notes
1 If required, notes can be manually entered into the software before the
instrument is started.
40
Agilent 2200 TapeStation - User Manual
4
Using the 2200 TapeStation System
Operating Procedure
Describe Samples
1 Sample descriptions can be manually entered into the software before the
instrument is started and whilst the TapeStation is operating, before
analysis software is launched.
OR
If samples are barcoded, place the cursor in the desired track description
and scan the sample barcode with a hand-held barcode scanner.
OR
Sample data can be copied and pasted from for example an Excel table.
NOTE
The entered Sample descriptions data can be copied to clipboard by using the Copy to
Clipboard link in the top right hand corner of the Sample Description table.
Agilent 2200 TapeStation - User Manual
41
4
42
Using the 2200 TapeStation System
Operating Procedure
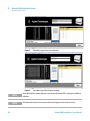
Figure 5
Controller image (8 way strip selection)
Figure 6
Controller image (96 well plate selection)
NOTE
In the 96 well plate sample selection screen the panel labeled LDR is no longer available for
selection.
NOTE
All information entered in the control software will appear in the analysed results.
Agilent 2200 TapeStation - User Manual
4
Using the 2200 TapeStation System
Operating Procedure
Start the TapeStation Run
1 Click the start button.
This will produce a Save As window.
As a default the file name starts with the date, in reverse order, and a run
counter. When run continuously, the save function auto increments the
counter part of the file name.
2 Type in the name that you wish the analysis to be saved as. Do not include a
full stop ( . ) in file names.
Final Check
ScreenTapeController:
1 Lift the lid of the TapeStation.
2 Ensure that there are fresh tips in the tip holder and that all the samples
have been correctly loaded with lids removed and correspond to the sample
selection on the screen.
3 Close the lid.
NOTE
Lifting the lid of the TapeStation after this time will abort the experimental run.
Agilent 2200 TapeStation - User Manual
43
4
Using the 2200 TapeStation System
Operating Procedure
Running System
WA R N I N G
Exposure to potentially dangerous mechanical parts
➔ Do not open the lid whilst the light is flashing.
Abort the TapeStation Run
1 If, for any reason, you wish to abort an experiment, click the abort button
on the pop-up controller. The instrument will ask:
a If you want to reset the instrument to begin another experiment – this
will return the controller software and TapeStation to the beginning of
the next experiment.
b If you want to close down the controller – this will close the controller
software and keep the TapeStation temporarily locked in its current
state.
NOTE
Aborting the experiment will irretrievably discard any progress made and samples loaded.
Complete TapeStation Run
When finished, a pop up will ask for removal of the tip cartridge and tape.
1 Remove tip cartridge and tape.
2 Click OK.
44
Agilent 2200 TapeStation - User Manual
Using the 2200 TapeStation System
Operating Procedure
4
Empty Tip Buckets
1 Empty tip buckets.
NOTE
Used loading tips must be removed from the tip buckets before the next experimental run.
The TapeStation will not start if tips are detected in the buckets.
Used ScreenTape, sample strips and tips should be disposed of in accordance to local
regulations.
How to Use the Agilent TapeStation Software
NOTE
For further information please refer to the software help.
This can be accessed by selecting the question mark (?) button in the top right hand corner
of the 2200 TapeStation Analysis Software.
Agilent 2200 TapeStation - User Manual
45
4
Using the 2200 TapeStation System
Operating Procedure
Shutdown and Restarting Procedure
Shutdown Procedure
NOTE
The controller software, TapeStation instrument and laptop should be shut down when not
in use (preferably at the end of every working day).
Ensure that the TapeStation System is shut down in the following order:
1 Exit the TapeStation Controller Software.
2 Turn off the TapeStation instrument.
3 Power down the laptop.
Restarting Procedure
Ensure that the ScreenTape System is restarted in the following order:
1 Power up the laptop.
2 Turn on the TapeStation.
3 Start the TapeStation Controller Software.
46
Agilent 2200 TapeStation - User Manual
4
Using the 2200 TapeStation System
How to prepare your samples
How to prepare your samples
WA R N I N G
Toxic agents
The handling of solvents, samples and reagents can hold health and safety risks.
➔ When using/handling the ScreenTape and working with these substances observe
appropriate safety procedures (for example by wearing goggles, safety gloves and
protective clothing).
➔ Always follow good laboratory practices and adhere to the guidelines established in
your laboratory.
➔ Refer to product material safety datasheets for further information.
➔ The volume of substances should be reduced to the minimum required for the
analysis.
CAUTION
Damage to the 2200 TapeStation instrument
➔ Use only the recommended consumables and reagents with the 2200 TapeStation
system.
NOTE
• When pipetting sample buffer, ensure that excess buffer droplets are removed from the
tip before transfer to the sample tubes. Care must be taken due to viscosity of Sample
Buffers.
• When pipetting small volumes ensure that no sample remains within the tip.
• When adding sample buffer to sample, please ensure that they are mixed correctly.
To achieve this, gently mix several times with additional pipetting, then cap the tubes,
mix the samples using a vortex mixer for 5 s and briefly centrifuge to collect the
contents at the base of the tubes. Improper mixing can lead to quantification errors.
• For best results ensure that all reagents are allowed to equilibrate to room temperature
for 30 minutes prior to use.
Agilent 2200 TapeStation - User Manual
47
4
Using the 2200 TapeStation System
How to prepare your samples
NOTE
For successful loading, the sample solution must be placed at the bottom of the tube or
well without any air-bubbles. The 2200 TapeStation will load a sample from a minimum of
3 µL onto ScreenTape.
Ladder Options
NOTE
In Ladder mode in the controller software, a ladder should be loaded into the first available
lane.
Alternatively the user can choose to run a software ladder. This is done by choosing No
ladder in the 2200 TapeStation Controller software ladder menu, then running the
instrument as normal. A software saved ladder can then be inserted in the 2200
TapeStation Analysis software.
Ladders not run in the first available position, or in No ladder mode can later be assigned as
ladder using the 2200 TapeStation Analysis Software.
48
Agilent 2200 TapeStation - User Manual
4
Using the 2200 TapeStation System
Good Measurement Practices for Analysing DNA on the Agilent 2200 TapeStation
Good Measurement Practices for Analysing DNA on the Agilent
2200 TapeStation
Quantification
Protocol
Ensure that sample and sample buffer volumes are from the correct protocol.
Ensure that the reagents are used with the corresponding ScreenTape type.
Ensure correct pipetting technique. When pipetting sample buffer, ensure that
excess buffer droplets are removed from the tip before transfer to the sample
tubes.
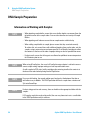
Correct Mixing
Sample and sample buffer must be vortex mixed on maximum speed for 5
seconds followed by centrifugation to remove any bubbles.
Insufficient mixing can cause discrepancies in quantification.
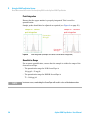
B^m^c\IZhi"9&@
GZedgiZYXdcXZcigVi^dcVhV
eZgXZciV\Zd[ZmeZXiZY
XdcXZcigVi^dc
&'%
&%%
-%
+%
)%
'%
%
KdgiZmb^m^c\i]Zche^cYdlc
Figure 7
E^eZiiZb^m^c\dcan
Cdb^m^c\
Effect of sample mixing on quantification results
Agilent 2200 TapeStation - User Manual
49
4
Using the 2200 TapeStation System
Good Measurement Practices for Analysing DNA on the Agilent 2200 TapeStation
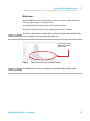
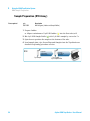
Peak Integration
Ensure that the upper marker is properly integrated. This is used for
quantification.
Sample peaks should also be adjusted as required (see Figure 8 on page 50).
HVbeaZ6&"XdggZXi
eZV`^ciZ\gVi^dc
HVbeaZ6&"^cXdggZXi
eZV`^ciZ\gVi^dc
8dcXZcigVi^dc"
)'#'c\$¥A
8dcXZcigVi^dc"
'.#.c\$¥A
Figure 8
Peak integration (examples for correct and incorrect integration)
Quantitative Range
For accurate quantification, ensure that the sample is within the range of the
chosen ScreenTape.
• The quantitative range for D1K ScreenTape is
100 pg/μL - 50 ng/μL
• The quantitative range for HSD1K ScreenTape is
75 – 1000 pg/μL
NOTE
50
In extreme cases, overloading the ScreenTape will result in a loss of the bottom marker.
Agilent 2200 TapeStation - User Manual
4
Using the 2200 TapeStation System
Good Measurement Practices for Analysing DNA on the Agilent 2200 TapeStation
Other Issues
Residual AMPure beads from SureSelect protocol can give signal which runs
with the upper marker (see figure below).
Any signal under the upper marker affects quantification.
Removal of the beads removes the signal under the upper marker.
NOTE
This can be achieved using a magnetic plate as detailed in the Sure Select protocol. If you
see this signal please increase the duration of this step.
:caVg\ZY^bV\Zd[jeeZg
bVg`Zgl^i]h^\cVa[gdb
6BEjgZWZVYh
Figure 9
NOTE
Upper marker with signal from AMPure beads
Over amplification can also cause signal to run concurrently with the upper marker.
Agilent 2200 TapeStation - User Manual
51
4
Using the 2200 TapeStation System
Good Measurement Practices for Analysing DNA on the Agilent 2200 TapeStation
Sizing
Analysis software mode
Within the 2200 TapeStation analysis software sizing can be found in both
electropherogram and region mode.
The sizing methods used in electropherogram and region mode will provide
different sizing information.
Electropherogram View
Region View
•
•
•
•
Calculates data for a peak
The size reported is that of the highest point
in the peak
Calculates data for a smear or region
Size given is that of the centre of the
region's mass
Lower and upper marker
Always ensure that the upper and lower markers have been identified
correctly.
The markers are used as internal references to determine the molecular
weight size of the sample.
NOTE
52
Incorrect identification will lead to miscalculations in reported sizing values.
Agilent 2200 TapeStation - User Manual
Using the 2200 TapeStation System
Good Measurement Practices for Analysing DNA on the Agilent 2200 TapeStation
4
Molarity
Molarity is determined from both size and quantity.
NOTE
Errors in sizing and quantification will result in erroneous molarity calculations.
Always ensure that the good measurement practices for sizing and
quantification have been followed to ensure accurate molarity values.
Agilent 2200 TapeStation - User Manual
53
4
Using the 2200 TapeStation System
DNA Sample Preparation
DNA Sample Preparation
Information on Working with Samples
NOTE
• When pipetting sample buffer, ensure that excess buffer droplets are removed from the
tip before transfer to the sample tubes. Care must be taken due to viscosity of Sample
Buffers.
• When pipetting small volumes ensure that no sample remains within the tip.
• When adding sample buffer to sample, please ensure that they are mixed correctly.
To achieve this, mix several times with additional pipetting, then cap the tubes, mix the
samples using a vortex mixer on maximum speed for 5 s and briefly centrifuge to collect
the contents at the base of the tubes. Improper mixing can lead to quantification errors.
• For best results ensure that all reagents are allowed to equilibrate to room temperature
for 30 minutes prior to use.
NOTE
When using 96 well plates, the use of a 96 well plate vortex adaptor is advised to ensure
correct sample mixing. Improper mixing can lead to quantification errors.
As with samples in PCR strips, briefly centrifuge after vortexing to collect the contents at
the base of the tubes before placing into the TapeStation.
NOTE
For successful loading, the sample solution must be placed at the bottom of the tube or
well without any air-bubbles. The 2200 TapeStation will load a sample from a minimum of
3 µL onto ScreenTape.
NOTE
For best sizing precision and accuracy, the user should run the appropriate ladder with the
samples.
If 16 samples need to be analysed in parallel, the user may choose to insert a saved ladder
in the 2200 TapeStation analysis software.
54
Agilent 2200 TapeStation - User Manual
Using the 2200 TapeStation System
DNA Sample Preparation
4
Sample Preparation (High Sensitivity D1K Assay)
Parts required
p/n
Description
5067-5364
High Sensitivity D1K Reagents (Ladder and Sample Buffer)
1 Prepare Ladder
a Aliquot a minimum of 3 μL High Sensitivity D1K Ladder ( ) into the first
tube/well.
2 Mix 2 μL High Sensitivity D1K Sample Buffer ( ) with 2 μL DNA sample by
vortex for 5 s.
3 Spin down to position the sample at the bottom of the tube.
4 Load sample plate, tips, ScreenTape and Samples into the TapeStation as
detailed in operating procedure section.
=H9&@/
'¥A=H9&@
hVbeaZWj[[Zg
KdgiZm[dg*hZXh
'¥AhVbeaZ
Agilent 2200 TapeStation - User Manual
8Zcig^[j\Z
EaVXZijWZh
^cIVeZHiVi^dc
'¥AhVbeaZ
'¥AhVbeaZWj[[Zg
55
4
Using the 2200 TapeStation System
DNA Sample Preparation
Sample Preparation (D1K Assay)
Parts required
p/n
Description
5067-5362
D1K Reagents (Ladder and Sample Buffer)
1 Prepare Ladder
a Aliquot a minimum of 3 μL D1K Ladder ( ) into the first tube/well.
2 Mix 3 μL D1K Sample Buffer ( ) with 1 μL DNA sample by vortex for 5 s.
3 Spin down to position the sample at the bottom of the tube.
4 Load sample plate, tips, ScreenTape and Samples into the TapeStation as
detailed in operating procedure section.
9&@/
(¥A9&@
hVbeaZWj[[Zg
KdgiZm[dg*hZXh
&¥AhVbeaZ
56
8Zcig^[j\Z
EaVXZijWZh^c
IVeZHiVi^dc
&¥AhVbeaZ
(¥AhVbeaZWj[[Zg
Agilent 2200 TapeStation - User Manual
Using the 2200 TapeStation System
DNA Sample Preparation
4
Sample Preparation (Genomic DNA Assay)
Parts required
p/n
Description
5067-5366
Genomic DNA Reagents
1 Equilibrate all reagents to room temperature for 30 min.
2 Prepare Ladder
a Aliquot a minimum of 3 μL Genomic DNA Ladder ( ) into the first
tube/well.
NOTE
Use a fresh ladder for each run. If using 96-well plates, always run the ladder in first
selected position. No software saved ladder is available for the Genomic DNA assay.
NOTE
Do not shake or over vortex ladder vial. This could result in degradation of the gDNA ladder.
3 Prepare Sample
a Mix 1 μL DNA sample with 10 μL Genomic DNA Sample Buffer ( ).
b Spin down, then vortex for 5 s.
c Spin down to position the sample at the bottom of the tube.
4 Load sample plate, tips, ScreenTape and Samples into the TapeStation as
detailed in operating procedure section.
<Zcdb^X9C6/
&%¥A\9C6
hVbeaZWj[[Zg
\9C6hVbeaZ&¥A
Agilent 2200 TapeStation - User Manual
He^c!kdgiZm!VcYhe^c
EaVXZijWZh^c
IVeZHiVi^dc
IdiVakdajbZ&&¥A
57
4
Using the 2200 TapeStation System
RNA Sample Preparation
RNA Sample Preparation
Information on Working with RNA
CAUTION
Sample degradation
➔ Ensure all working areas, reagents and plastic ware are RNase free.
➔ Handle RNA samples with care.
➔ Wear gloves at all times.
➔ Thaw RNA samples on ice.
➔ Store RNA samples on ice throughout the ScreenTape analysis procedure.
CAUTION
Solidification of DMSO
R6K Sample Buffer contains DMSO, which may solidify when cold, for example if taken
directly from the fridge or stored on ice.
➔ Ensure R6K Sample Buffer is equlibrated to room temperature and mixed thoroughly
prior to use.
➔ Maintain Sample Buffer vials at room temperature throughout sample preparation.
➔ Sample Buffer mixed with sample should always be kept on ice during sample
preparation and after sample denaturation.
➔ The Sample Buffers should be returned to 2 – 8 °C storage, once the analysis
procedure has been completed.
NOTE
• It is important to place the samples on ice directly after the denaturation step as this
aids complete and stable denaturation of the RNA.
• To ensure optimal performance of the ScreenTape R6K platform samples should be
analysed, using the 2200 TapeStation, within 3 h of the denaturation step when left on
the 2200 TapeStation system. Beyond 3 h, denatured samples should be stored on ice, or
in a suitable freezable sample block.
58
Agilent 2200 TapeStation - User Manual
4
Using the 2200 TapeStation System
RNA Sample Preparation
NOTE
• Do not vortex mix samples vigorously as this may degrade them.
• When pipetting Sample Buffer, ensure that excess buffer droplets are removed from the
tip before transfer to the sample tubes.
Care must be taken due to the viscosity of Sample Buffers.
• When pipetting small volumes ensure that no sample remains within the tip.
• Please ensure samples and Sample Buffer are mixed correctly. To achieve this, gently
mix several times with additional pipetting, then cap the tubes, gently vortex mix for 5 s,
followed by briefly centrifuging on maximum speed to collect the contents at the base of
the tubes. This is essential for accurate quantification of samples.
• For best results ensure that all reagents are allowed to equilibrate to room temperature
prior to use.
NOTE
RNA applications are only available to run without a ladder. If required, a software ladder
can be added in the Agilent 2200 TapeStation analysis software.
Agilent 2200 TapeStation - User Manual
59
4
Using the 2200 TapeStation System
RNA Sample Preparation
Sample Preparation (High Sensitivity R6K Assay)
Parts required
#
p/n
Description
1
5067-5370
High Sensitivity R6K Reagents
1 Mix 1 μL High Sensitivity R6K Sample Buffer ( ) with 2 μL RNA sample.
2 Sample denaturation
• Heat the samples to 72 °C for 3 min.
• Place samples on ice for 2 min.
• Briefly centrifuge the samples to collect the contents in the base of the
tubes.
3 Load sample plate, tips, ScreenTape and Samples into the TapeStation as
detailed in operating procedure section.
=^\]hZch^i^k^inG+@/
>XZ[dg'b^c
&¥AhVbeaZWj[[Zg
EaVXZijWZh^c
''%%IVeZHiVi^dc
,'8[dg(b^c
'¥AhVbeaZ
60
IdiVakdajbZ
(¥A
Agilent 2200 TapeStation - User Manual
Using the 2200 TapeStation System
RNA Sample Preparation
4
Sample Preparation (R6K Assay)
Parts required
p/n
Description
5067-5368
R6K Reagents
1 Mix 4 μL R6K Sample Buffer ( ) with 1 μL RNA sample.
2 Sample denaturation
• Heat the samples to 72 °C for 3 min.
• Place samples on ice for 2 min.
• Briefly centrifuge the samples to collect the contents in the base of the
tubes.
3 Load sample plate, tips, ScreenTape and Samples into the TapeStation as
detailed in operating procedure section.
G+@/
)¥AhVbeaZWj[[Zg
,'8[dg(b^c
&¥AhVbeaZ
Agilent 2200 TapeStation - User Manual
>XZ[dg'b^c
EaVXZijWZh^c
''%%IVeZHiVi^dc
IdiVakdajbZ
*¥A
61
4
Using the 2200 TapeStation System
Protein Sample Preparation
Protein Sample Preparation
Information on Working with Samples
NOTE
• When pipetting sample buffer, ensure that excess buffer droplets are removed from the
tip before transfer to the sample tubes. Care must be taken due to viscosity of Sample
Buffers.
• When pipetting small volumes ensure that no sample remains within the tip.
• When adding sample buffer to sample, please ensure that they are mixed correctly.
To achieve this, mix several times with additional pipetting, then cap the tubes, mix the
samples using a vortex mixer on maximum speed for 5 s and briefly centrifuge to collect
the contents at the base of the tubes. Improper mixing can lead to quantification errors.
• For best results ensure that all reagents are allowed to equilibrate to room temperature
for 30 minutes prior to use.
NOTE
When using 96 well plates, the use of a 96 well plate vortex adaptor is advised to ensure
correct sample mixing. Improper mixing can lead to quantification errors.
As with samples in PCR strips, briefly centrifuge after vortexing to collect the contents at
the base of the tubes before placing into the TapeStation.
NOTE
For successful loading, the sample solution must be placed at the bottom of the tube or
well without any air-bubbles. The 2200 TapeStation will load a sample from a minimum of
3 µL onto ScreenTape.
NOTE
For best sizing precision and accuracy, the user should run the appropriate ladder with the
samples.
If 16 samples need to be analysed in parallel, the user may choose to insert a saved ladder
in the 2200 TapeStation analysis software.
62
Agilent 2200 TapeStation - User Manual
4
Using the 2200 TapeStation System
Protein Sample Preparation
Sample Preparation (P200 Assay)
Parts required
p/n
Description
5067-5372
P200 Reagents
1 Prepare the P200 stain solution.
a Dilute P200 5X Labeling Dye ( ) at a ratio of 1 :5 with P200 Labeling
Buffer ( )
NOTE
The prepared stain solution is best used on the day of formulation, however it can be stored
for up to one week below -20 °C.
For normal applications, 2 µL of formulated stain solution is required for 2 µL of sample. For
16 samples 8 µL of 5X Stain would be diluted with 32 µL of Stain Buffer. The resultant stain
solution should be thoroughly mixed before use.
For certain applications, particularly with high protein concentrations, higher
concentrations of stain can be used in combination with altered ratios of stain to sample.
-¥AE'%%*m
&+hVbeaZh/egZeVgZ
)%¥AhiV^chdaji^dc
aVWZa^c\YnZ
('¥AE'%%
aVWZa^c\Wj[[Zg
JhZ
^bbZY^ViZan
dg
HidgZWZadl
"'%8 ä &lZZ`
2 Stain protein sample or ladder.
NOTE
The P200 ladder ( ) should be processed through the P200 sample preparation procedure
in the same manner as your samples.
In Ladder mode, selected in the ladder options in the controller software, P200 ladder is
automatically selected as the first sample in the TapeStation controller.
The user can also select to run no ladder, and then to insert a software saved ladder in the
2200 TapeStation Analysis software.
Agilent 2200 TapeStation - User Manual
63
4
Using the 2200 TapeStation System
Protein Sample Preparation
a Place 2 μL of P200 stain solution (prepared above)into a PCR tube strip
or 96 well plate.
b Pipette 2 μL of the protein sample or ladder into the tube, mix and attach
the lids or foil cover to prevent evaporation.
c Heat for 7 min at 75 °C.
d After heating, remove condensation from the lids (or foil cover) of the
tubes by centrifugation.
NOTE
P200 pH buffer (clear) is supplied to allow the user to dilute samples to alleviate issues with
staining efficiency caused by low pH. The use of P200 pH Buffer resolves these issues in
most circumstances. For further information on buffer compatibility, contact your Agilent
Technologies representative.
3 Denaturate sample.
a Choose which sample buffer is required: P200 Reducing Sample Buffer
( ) or P200 Non-reducing Sample Buffer ( ).
NOTE
It is recommended that P200 Reducing Sample Buffer is used for the denaturation of P200
Ladder.
b Add 4 μL of the relevant P200 sample buffer to the stained sample and
replace the lids or foil cover.
c Mix and heat at 75 °C for 5 min.
d Remove condensation from the lids (or foil cover) of the tubes by
centrifugation.
4 Add 2 μL of P200 Marker ( ) to each sample and to the P200 ladder.
5 Mix the solution well, and centrifuge to ensure that the sample is at the
bottom of the tube, ready for analysis on the TapeStation.
NOTE
64
P200 Marker is formulated with a high percentage of glycerol. Due to the high density of
this reagent, the user must ensure that the samples are adequately mixed prior to analysis
on the TapeStation. Failure to do so may result in unsatisfactory analysis results.
Agilent 2200 TapeStation - User Manual
Using the 2200 TapeStation System
Protein Sample Preparation
4
6 Load sample plate, tips, ScreenTape and Samples into the TapeStation as
detailed in operating procedure section.
'¥AhiV^chdaji^dc
)¥AhVbeaZWj[[Zg
,*8",b^c
HVbeaZdg
E'%%AVYYZg
K2'¥A
idi
dg
'¥AbVg`Zgh
,*8"*b^c
K2)¥A
idi
Agilent 2200 TapeStation - User Manual
K2-¥A
idi
65
4
66
Using the 2200 TapeStation System
Protein Sample Preparation
Agilent 2200 TapeStation - User Manual
Agilent 2200 TapeStation - User Manual
5
Maintenance
General Information
Changing the Needle
68
69
This chapter describes the maintenance of the TapeStation system.
Agilent Technologies
67
5
Maintenance
General Information
General Information
Annual Preventative Maintenance (PM) is essential for the TapeStation as it
has many moving parts.
This PM should be arranged with your local Agilent representative and
consists of
• Fan Filter replacement
• Needle replacement
• Electrophoresis probe replacement
• Internal instrument inspection for wear, foreign objects and general clean
inside and out
In addition to the above, the engineer will check that the instrument is
functional by running a full ScreenTape.
For customers with exceptionally high usage the needle replacement
procedure as detailed in the section below can also be performed between
annual PM services.
68
Agilent 2200 TapeStation - User Manual
Maintenance
Changing the Needle
5
Changing the Needle
It is important to know which TapeStation system you have before changing
the needle(s), in order to purchase the correct needle cartridge.
Table 2
Overview TapeStation Configuration - Needle Cartridge
Product Number
TapeStation Configuration
ST007
TapeStation for ScreenPlex
ST008
TapeStation for DNA
ST009
TapeStation for Nucleic acids
ST017
TapeStation for ScreenPlex
ST019
TapeStation for Nucleic acids
ST010
TapeStation for Protein / Combined TapeStation
G2960A
2200 TapeStation System
G2961A
2200 TapeStation Nucleic Acid System
G2964AA
2200 TapeStation System
G2965AA
2200 TapeStation Nucleic Acid System
G2966AA
2200 TapeStation ScreenPlex System
Agilent 2200 TapeStation - User Manual
Pump
Needle Cartridge
Ordering Code
Single
G2960-60062
Twin
G2960-60063
Twin
G2960-60063
69
5
Maintenance
Changing the Needle
Needle change intervals:
• After 3840 (7680 lanes in a Dual loading system) pierces, the controller
software will inform the user that a needle change is pending. The word
Needle will appear in the bottom of the controller software inside a yellow
box.
• After 4160 pierces (8320 lanes in a Dual loading system), a needle change
is recommended. The box around the word Needle will change from yellow
to red.
• After 4480 pierces (8960 lanes in a Dual loading system), the needle has
completed its lifetime and must be changed before the TapeStation will
start.
Figure 10
70
Controller software indicating a Needle change is recommended
Agilent 2200 TapeStation - User Manual
Maintenance
Changing the Needle
Parts required
OR
NOTE
#
p/n
Description
1
G2960-60062
Needle cartridge (for use in single pump systems)
For use with product numbers ST007, ST008 and ST009
1
G2960-60063
Needle cartridge (for use in dual pump systems)
For use with product numbers ST017, ST019, ST010, G2960A,
G2961A, G2964AA, G2965AA and G2966AA
5
New needles cartridges can be ordered at any time from Agilent Technologies by
contacting your local sales agent.
For details on correct needle cartridge for your TapeStation model, refer to Table 2 on
page 69.
Change the needle cartridge
1 Remove the sample plate and tip holder.
2 Remove the foil tab from the top of the needle cartridge.
NOTE
Care must be taken to keep the needle cartridge level after removing the foil tab
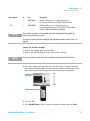
3 Insert the needle cartridge into the tip holder space, using the label for
orientation. The cartridge should be placed so that the label faces to the
right, and the printed arrow points to the front of the TapeStation.
IVeZHiVi^dc
GZVg
;gdci
CZZYaZXVgig^Y\Z
4 Close the lid.
5 Go to Needle Change on the Controller software toolbar and select Run.
Agilent 2200 TapeStation - User Manual
71
Changing the Needle
72
Agilent 2200 TapeStation - User Manual
Agilent 2200 TapeStation - User Manual
6
Appendix
Limited Use Label License
Sound Emission
74
75
The Waste Electrical and Electronic Equipment Directive
Technical Service
76
77
This chapter provides addition information.
Agilent Technologies
73
6
Appendix
Limited Use Label License
Limited Use Label License
Some products within this system contain SYBR® Green I or SYBR® Gold
nucleic acid stain which are provided under an agreement between Molecular
Probes, Inc. (a wholly owned subsidiary of Invitrogen Corporation) and
Agilent Technologies UK Limited, and the manufacture, use, sale or import of
this product is subject to one or more of U.S. Patents and corresponding
international equivalents, owned by Molecular Probes, Inc.
The purchase of this product conveys to the buyer the non-transferable right
to use the purchased amount of the product and components of the product in
research conducted by the buyer in conjunction with Agilent Technologies UK
Limited’s automated gel electrophoresis system, where such research does not
include testing, analysis or screening services for any third party in return for
compensation on a per test basis. The buyer cannot sell or otherwise transfer
(a) this product (b) its components or (c) materials made using this product or
its components to a third party or otherwise use this product or its
components or materials made using this product or its components for
Commercial Purposes. Commercial Purposes means any activity by a party for
consideration and may include, but is not limited to: (1) use of the product or
its components in manufacturing; (2) use of the product or its components to
provide a service, information, or data; (3) use of the product or its
components for therapeutic, diagnostic or prophylactic purposes; or (4) resale
of the product or its components, whether or not such product or its
components are resold for use in research.
For information on purchasing a license to this product for purposes other
than research, contact Molecular Probes, Inc., Business Development, 29851
Willow Creek Road, Eugene, OR 97402, USA. Tel: (541) 465-8300, Fax: (541)
335-0354.
74
Agilent 2200 TapeStation - User Manual
Appendix
Sound Emission
6
Sound Emission
Manufacturer’s Declaration
This statement is provided to comply with the requirements of the German
Sound Emission Directive of 18 January 1991.
This product has a sound pressure emission (at the operator position) < 70 dB.
• Sound Pressure Lp < 70 dB (A)
• At Operator Position
• Normal Operation
• According to ISO 7779:1988/EN 27779/1991 (Type Test)
Agilent 2200 TapeStation - User Manual
75
6
Appendix
The Waste Electrical and Electronic Equipment Directive
The Waste Electrical and Electronic Equipment Directive
Abstract
The Waste Electrical and Electronic Equipment (WEEE) Directive
(2002/96/EC), adopted by EU Commission on 13 February 2003, is
introducing producer responsibility on all electric and electronic appliances
starting with 13 August 2005.
NOTE
This product complies with the WEEE Directive (2002/96/EC) marking requirements. The
affixed label indicates that you must not discard this electrical/electronic product in
domestic household waste.
Product Category:
With reference to the equipment types in the WEEE Directive Annex I, this product is
classed as a Monitoring and Control Instrumentation product.
NOTE
Do not dispose off in domestic household waste
To return unwanted products, contact your local Agilent office, or see www.agilent.com for
more information.
76
Agilent 2200 TapeStation - User Manual
Appendix
Technical Service
6
Technical Service
For more information, please contact
Agilent Technologies UK Limited
e: www.agilent.com/genomics/contact
Agilent 2200 TapeStation - User Manual
77
Index
Index
A
protocol
pipetting 49
sample and buffer 49
ScreenTape type 49
analysis mode
select 35
Q
change
needle 69
check
final 43
condensation 22
quantification
49
S
D
delivery checklist
23
E
76
L
limitations 33
load
screentape 35
tips 35
N
needle
change 69
notes
add 40
P
parts
damaged 23
missing 23
78
77
U
C
electronic waste
technical service
tip buckets
empty 45
samples
describe 41
select
samples 35
test 35
service
technical 77
set up
TapeStation 28
shutdown
procedure 46
software
start up 35
sound emission 75
specifications 11
ScreenTape 14
unpacking 22
user
change 35
use
TapeStation 35
W
waste
electrical and electronic
equipment 76
WEEE directive 76
T
TapeStation
abort 44
complete 44
set up 28
start 43
unpacking 22
use 35
Agilent 2200 TapeStation - User Manual
Appendix
Index
Agilent 2200 TapeStation - User Manual
6
79
www.agilent.com
In This Book
The manual describes the following:
• Introduction to the system
• Site requirements and specifications
• Installation
• Using the system
• Maintenance
• Product notices
© Agilent Technologies 2011, 2012
Printed in Germany
11/2012
*G2964-90001*
*G2964-90001*
G2964-90001
Agilent Technologies