1
PC Requirements
Minimum System Requirements:
Introduction
With V.LinkTM, kids can save game scores from supporting V.SMILETM products, and then upload the
game scores to the Web via a Personal Computer (PC).
PRODUCT FEATURES
V.SMILE® Cyber PocketTM
Software Requirements:
Microsoft® Windows® 2000, XP or Windows
Vista® Operating System
Internet Explorer® version 6 or above
Adobe® Flash® Player 9 (To acquire the latest
version of Flash player, please visit
www.adobe.com)
• Internet connection required for Internet enabled functions.
Attention: Do not touch the
open connector end on the
V.LinkTM while it is inserted
into a VTech® product or PC.
V.SMILE® V-MotionTM
Hardware Requirements:
CPU: Pentium® 4, 1 GHz or above
Memory: 256MB
Video Adaptor: Graphic card with 1024 x 768 at 16
or 32 bit color
Monitor Resolution: 1024 x 768
USB 1.1 or higher
100MB Hard disk space
Windows® compatible sound card and speakers
Microsoft, Windows® is a registered trademark of Microsoft Corporation in the United States and other countries. Adobe®, the Adobe logo,
Flash® are either registered trademarks or trademarks of Adobe Systems Incorporated in the United States and/or other countries. Intel®,
Pentium® are trademarks of Intel Corporation in the United States and Other countries. All other trademarks are the property of their respective
owners. THIS PRODUCT IS NOT ENDORSED OR SPONSORED BY ADOBE SYSTEMS INCORPORATED, PUBLISHER OF FLASH.
INSTALLATION AND REGISTRATION
Note: Do not insert the V.LinkTM into your PC before installing the V.LinkTM setup file.
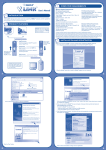
1. Go to http://www.vsmilelink.com/download and download the V.LinkTM setup file.
V.SMILE® PC PALTM
Connect to VTech® product
VTech® Connector
Slide the button
toward ‘USB’ to
uncover the USB
connector.
• Insert this connector into V.LinkTM-supported
products’ V.LinkTM port.
Sliding Button
• Slide this button to uncover the VTech® and
USB connectors.
• Indicator light lets you know that the V.LinkTM is
transferring information.
uSb
uSb
Slide button toward
the VTech® logo
to uncover the
VTech® connector.
USB Connector
• Insert this connector into the computer’s USB port.
Connect to PC
2. Run the V.LinkTM setup file to install the V.LinkTM program on your computer.
0788vlinksetup.exe
Sb
u
Please run this program
.
1
Run the downloaded program to start the installation.
.
.
2
.
.
4
.
3. Now, you can insert the V.LinkTM into your PC. A browser will be launched and will go to
www.vsmilelink.com automatically.
To insert the V.LinkTM into the PC:
• Slide the button toward ‘USB’ to uncover the USB connector.
• Insert the V.LinkTM into the computer’s USB port.
4. Click the “Sign-in” icon and follow the steps during registration to create your parent account and
register your V.LinkTM.
Click the “Next” button.
Enter a valid e-mail address to begin account registration.
Check your e-mail account for mail from VTech®. Read the instructions and click on the link provided
to proceed with the registration process.
Click the “Install” button to start the installation.
When the installation is complete, click the “Finish” button.
.
3
.
Kid’s Account: Multiple Kid’s Accounts can be entered under the same Parental Account for individual children in your household. Each of these accounts will contain each child’s
individual records and status. Click “Add Kid’s Account” to create a new account for
your child.
Read and accept the “End User License Agreement.”
Enter the details of the Kid’s Account.
• First Name: Enter the first name of your child for identity purposes.
• Login Name: This will be the name your child will use to login to the V.SMILETM Web Site.
• Password: This will be the password your child will use login to the V.SMILETM Web Site.
Fill in the information as instructed.
• Login Name: Your account login name will be the same as the e-mail address you entered.
• Password: Please enter the password you wish to use to login to your account.
• Address: We do not sell our members’ information. This information will only be used to offer
special promotions and keep you up-to-date on what’s happening with VTech®!
Click “Submit” to complete the registration.
.
5
Enter the details of the Kid’s Account.
.
.
6
.
8
.
troubleshooting
No response while the V.LinkTM is inserted into PC:
• Make sure the software is installed correctly.
• Remove the V.LinkTM and re-insert it into PC again.
Score cannot be uploaded to www.vsmilelink.com:
• The connection is blocked by firewall or virus scanner.
• Change the firewall or virus scanner settings to allow the connection.
Cannot login to www.vsmilelink.com:
• Complete the registration process.
• Confirm you’re using the correct login name and password you used during registration.
Received message that V.LinkTM memory is full:
• Go to the V.LinkTM File Manager and delete some old files.
TECHNICAL SUPPORT
Registration is completed.
HOW TO UPLOAD SCORES
1. Make sure the V.LinkTM is plugged into the V-MotionTM, Cyber PocketTM or PC PALTM .
2. Select the “V.Link” option from the Smartridge’s main menu.
3. Follow the on-screen and audio instructions to download the score to the
V.LinkTM. The flashing light on the V.LinkTM will indicate information is being
transferred.
4. Once the score is downloaded, remove the V.LinkTM from the product, then
insert the V.LinkTM into the PC.
5. A browser will be launched and go to www.vsmilelink.com. Then the scores will be uploaded to
www.vsmilelink.com automatically.
6. If your score is high enough to collect gold coins, you can unlock bonus games online!
CAUTION:
• Do not touch the open connector end on the V.LinkTM while it is inserted into a VTech® product or PC.
• Do not remove the V.LinkTM when it is reading or writing information.
Performing these actions may damage the V.LinkTM, V.SMILETM products or computer, and may permanently
destroy data.
• If you have a problem that cannot be solved by using this manual, we encourage you to visit us
online or contact our Consumer Services Department with any problems and/or suggestions that you
might have. A support representative will be happy to assist you. Before requesting support, please
be ready to provide or include the information below:
• The name of your product or model number (the model number is typically located on the back or
bottom of your product).
• The actual problem you are experiencing.
• The actions you took right before the problem occurred.
Internet : www.vtechkids.com
Phone : 1-800-521-2010 in the U.S. or 1-877-352-8697 in Canada
Notice: This equipment has been tested and found to comply with the limits for a Class B digital device,
pursuant to Part 15 of the FCC Rules.
These limits are designed to provide reasonable protection against harmful interference in a residential
installation. This equipment generates, uses and can radiate radio frequency energy and, if not installed
and used in accordance with the instructions, may cause harmful interference to radio communications.
However , there is no guarantee that interference will not occur in a particular installation. If this
equipment does cause harmful interference to radio or television reception, which can be determined
by turning the equipment off and on, the user is encouraged to try to correct the interference by one or
more of the following measures:
• Reorient or relocate the receiving antenna.
• Increase the separation between the equipment and receiver.
CARE & MAINTENANCE
1. Keep your V.LinkTM clean by wiping it with a slightly damp cloth. Never use solvents or abrasives.
2. Keep it out of direct sunlight and away from direct sources of heat.
3. Remove the V.LinkTM from the PC when not using it for an extended period of time.
4. Avoid dropping it. Never try to dismantle it.
5. Always keep the V.LinkTM away from water.
6. Avoid inserting VTech® connector into PC or other computer devices.
.
7
.
• Connect the equipment into an outlet on a circuit different from that to which the receiver is connected.
• Consult the dealer or an experienced radio/TV technician for help.
Caution : Changes or modifications not expressly approved by the party responsible for compliance
could void the user’s authority to operate the equipment.
This Class B digital apparatus complies with Canadian ICES-003.
Cet appareil numerique de la class B est conforme a la norme NMB-003 du Canada.
91-002319-004-000 (US)
.