1
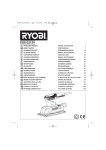
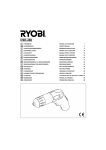
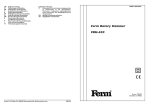
S33K F GB D E I P NL S DK N FIN GR HU CZ RU RO PL PONCEUSE VIBRANTE SHEET SANDER SCHWINGSCHLEIFER LIJADORA EXCÉNTRICA U ORBITAL LEVIGATRICE ORBITALE LIXADEIRA VIBRATÓRIA VLAKSCHUURMACHINE VIBRATIONSSLIP RYSTEPUDSER PLANSLIPER TÄRYHIOMAKONE ∆ΟΝΟΥΜΕΝΗ ΜΗΧΑΝΗ ΛΕΙΑΝΣΗΣ REZGÃCSISZOLÓ VIBRAâNÍ BRUSKA òãàîéÇÄãúçÄü ÇàÅêéåÄòàçäÄ MAŞINĂ DE ŞLEFUIT VIBRANTĂ SZLIFIERKA OSCYLACYJNA MANUEL D’UTILISATION USER’S MANUAL BEDIENUNGSANLEITUNG MANUAL DE UTILIZACIÓN MANUALE D’USO MANUAL DE UTILIZAÇÃO GEBRUIKERSHANDLEIDING INSTRUKTIONSBOK BRUGERVEJLEDNING BRUKSANVISNING KÄYTTÄJÄN KÄSIKIRJA Ο∆ΗΓΙΕΣ ΧΡΗΣΗΣ HASZNÁLATI ÚTMUTATÓ NÁVOD K OBSLUZE êìäéÇéÑëíÇé èé ùäëèãìÄíÄñàà MANUAL DE UTILIZARE INSTRUKCJA OBS¸UGI 4 8 11 15 19 23 27 31 35 39 43 47 51 55 59 63 67 Attention ! Il est indispensable que vous lisiez les instructions contenues dans ce manuel avant le montage et la mise en service de l’appareil. Important! It is essential that you read the instructions in this manual before mounting and operating this machine. Achtung! Bitte lesen Sie unbedingt vor Montage und Inbetriebnahme die Hinweise dieser Bedienungsanleitung. ¡Atención! Es imprescindible que lea las instrucciones de este manual antes del montaje y de la puesta en servicio. Attenzione! Prima di procedere al montaggio e alla messa in funzione, è indispensabile leggere attentamente le istruzioni del presente manuale. Atenção! É indispensável ler as instruções deste manual antes de montar e pôr em serviço. Let op ! Het is absoluut noodzakelijk vóór montage en inbedrijfstelling de aanwijzingen in deze handleiding te lezen. Observera! Det är nödvändigt att läsa instruktionerna i denna bruksanvisning före montering och driftsättning. OBS! Denne brugsanvisning skal læses igennem inden montering og ibrugtagning. Advarsel! Vennligst les instruksjonene i denne bruksanvisningen før du monterer og tar i bruk maskinen. Huomio! On ehdottoman välttämätöntä lukea tässä käyttöohjeessa annetut ohjeet ennen asennusta ja käyttöönottoa. Προσοχή ! Είναι απαραίτητο να διαβάσετε τις συστάσεις των οδηγιών αυτών πριν τη συναρµολγηση και τη θέση σε λειτουργία. Figyelem ! Feltétlenül fontos, hogy a jelen használati útmutatóban foglalt elŒírásokat az összeszerelés és az üzembe helyezés ellŒt elolvassa ! DÛleÏité upozornûní! Pfied montáÏí náfiadí a uvedením do provozu je nutné si pfieãíst následující pokyny. ÇÌËχÌËe! èee‰ Ò·ÓÍÓÈ Ë Á‡ÔÛÒÍÓÏ ËÌÒÚÛÏeÌÚ‡ ÌeÓ·ıÓ‰ËÏÓ ÔÓ˜eÒÚ¸ ËÌÒÚÛ͈ËË ËÁ ̇ÒÚÓfl˘e„Ó ÛÍÓ‚Ó‰ÒÚ‚‡. Aten—ie ! Este indispensabil sã citi—i instruc—iunile con—inute în acest mod de utilizare înainte de montaj …i de punerea în func—iune. Uwaga ! Przed montowaniem i uruchomieniem, koniecznie musicie si´ Paƒstwo zapoznaç z zaleceniami zawartymi w niniejszym sposobie u˝ycia. Sous réserve de modifications techniques / Subject to technical modifications / Technische Änderungen vorbehalten / Bajo reserva de modificaciones técnicas / Con riserva di eventuali modifiche tecniche / Com reserva de modificações técnicas / Technische wijzigingen voorbehouden / Med förbehåll för tekniska ändringar / Med forbehold for tekniske ændringer / Med forbehold om tekniske endringer / Tekniset muutokset varataan / Υπ την επιφύλαξη τεχνικών τροποποιήσεων / A mıszaki módosítás jogát fenntartjuk / Zmûny technick˘ch údajÛ vyhrazeny / åÓ„ÛÚ ·˚Ú¸ ‚ÌeÒeÌ˚ ÚeıÌ˘eÒÍËe ËÁÏeÌeÌËfl / Sub rezerva modifica—iilor tehnice / Z zastrze˝eniem modyfikacji technicznych Fig. 1 A B Fig. 2 C D Fig. 3 Fig. 4 GB 1. GENERAL SAFETY INSTRUCTIONS READ ALL THE INSTRUCTIONS • KNOW YOUR POWER TOOL. Read the user manual carefully. Find out about the tool's applications and its limitations as well as the potential hazards associated with the tool. • KEEP GUARDS IN PLACE and in good working order. IMPORTANT: Maintenance of this tool requires great care and a thorough knowledge of the tool: servicing should only be carried out by a qualified technician. For repairs, you should take the tool to your nearest Authorised RYOBI Service Centre. • REPLACEMENT PARTS: All repairs, whether electrical or mechanical, should be carried out by a qualified technician at an Authorised RYOBI Service Centre. WARNING: Only manufacturer's original replacement parts must be used. Using any other spare part may be dangerous or damage your tool. • KEEP WORK AREA CLEAN. Cluttered work areas and workbenches invite accidents. • DO NOT USE IN DANGEROUS ENVIRONMENTS. Do not use power tools near petrol or other flammable liquids, in damp or wet conditions, or expose them to rain. • NEVER USE YOUR TOOL IN AN EXPLOSIVE ATMOSPHERE. The sparks produced by the motor could ignite flammable liquids, gases or vapours. • KEEP CHILDREN AND VISITORS AWAY. All visitors should wear safety glasses and be kept at a safe distance from the work area. Do not let visitors touch the tool or the extension cable when the tool is operating. • ENSURE THAT THE WORKSHOP IS SAFE FOR CHILDREN by using padlocks and master switches or removing on/off keys. • NEVER FORCE THE TOOL. The tool will be more efficient and safer when used at the speed for which it was designed. • USE THE RIGHT TOOL. Do not force the tool or attachment to do a job it was not designed for. Do not use them for any purpose other than those intended by the manufacturer. • USE AN APPROPRIATE EXTENSION CORD. Make sure your extension cord is in good condition. When using an extension cord, be sure to use one with adequate wattage rating. An undersized cord will cause a drop in line voltage resulting in loss of power and overheating • INSPECT EXTENSION CORDS PERIODICALLY and replace them if damaged. • USE OUTDOOR EXTENSION CORDS. When the tool is used outdoors, use only earthed extension cords that are approved for outdoor use and marked as such. • WEAR PROPER CLOTHES. Do not wear loose clothing, gloves, ties, rings, bracelets or other jewellery. They can get caught in the tool and draw you into the moving parts, possibly resulting in serious injury. Rubber gloves and non-skid footwear are recommended when working outdoors. If you have long hair, tie it back and wear protective hair covering to keep it from being drawn into the ventilation slots.. • ALWAYS WEAR SAFETY GLASSES WITH SIDE SHIELDS. Ordinary glasses have only impact-resistant lenses; they are NOT safety glasses. • PROTECT YOUR LUNGS. Wear a face mask or dust mask if the work generates dust. • PROTECT YOUR EARS. During extended periods of operation, wear proper hearing protection to dampen the sound pressure level . • SECURE YOUR WORKPIECE PROPERLY before starting your tool. Whenever possible, use clamps or a vice to hold your workpiece. NEVER hold the workpiece in your hand or between your legs. • KEEP YOUR BALANCE. Always keep well balanced. Do not use your tool while standing on a ladder or any other unstable support. Always secure your tool and remain aware of what is underneath you when working in elevated positions. • MAINTAIN THE TOOL IN GOOD WORKING CONDITION. For optimum safety and best results, keep your tool sharp and clean at all times. Follow the instructions for lubricating and changing accessories. • DISCONNECT ALL TOOLS. When not in use, during maintenance operations or when changing attachments (blades, bits, cutters, etc.) all tools should be disconnected. • AVOID ACCIDENTAL STARTING. Make sure the switch is in the "off" position or locked when you plug in your tool. • CHECK DAMAGED PARTS AND ACCESSORIES. If a tool part or accessory is damaged, check that it can continue to work and perform its function correctly before continuing to use the tool. Check the alignment of the moving parts and make sure they move freely. Check that no part is broken. Check the assembly and anything else that might affect the operation of the tool. A guard or other part or accessory that is damaged must be properly repaired or replaced by a qualified technician to avoid risk of personal injury. • NEVER LEAVE THE TOOL RUNNING UNATTENDED. SWITCH IT OFF. Do not walk away from the tool until it comes to a complete stop. 8 GB 2. • KEEP THE POWER CABLE IN GOOD CONDITION. Never pull the cable to disconnect the tool. Keep the cable away from sources of heat, oil and sharp edges. • INSPECT THE TOOL'S POWER CABLE REGULARLY. If it is damaged, have it replaced by a qualified technician at an Authorised RYOBI Service Centre. Always keep track of the position of the cable and keep it well away from any moving parts. • DO NOT USE THE TOOL IF THE ON/OFF SWITCH DOES NOT TURN IT ON AND OFF. Have defective switches replaced by a qualified technician at an Authorised RYOBI Service Centre. • KEEP THE TOOL DRY AND CLEAN (FREE FROM OIL AND GREASE). Always use a clean cloth to clean your tool. Never use brake fluid, petroleum-based products or solvents to clean your tool. • DO NOT USE THE TOOL WHILE UNDER THE INFLUENCE OF DRUGS OR ALCOHOL OR IF YOU ARE TAKING MEDICATIONS. • STAY ALERT AND REMAIN IN CONTROL AT ALL TIMES. Do not let familiarity (gained from frequent use of the tool) lead to carelessness. Always remember that a moment of inattention is sufficient to inflict severe injury. Watch what you are doing and use common sense. Do not operate the tool when you are tired. Do not rush. • MAKE SURE THE WORK AREA IS WELL LIT so that you can clearly see what you are doing and that there are no hazards BEFORE you start using your tool. • PUT YOUR TOOL AWAY AFTER USE. When not in use, the tool should be stored in a dry place which is high enough to be out of children's reach or under lock. • NEVER TOUCH MOVING PARTS when the tool is operating. Never start a tool when one of its moving parts is in contact with the work place. • GUARD AGAINST ELECTRIC SHOCK BY AVOIDING BODY CONTACT WITH GROUNDED SURFACES. E.g.: pipes, radiators, cookers or refrigerators. • ALWAYS PUT THE TOOL IN THE "OFF" POSITION before disconnecting it, to avoid accidental starting when you plug the tool back in. • SAVE THESE INSTRUCTIONS. Refer to them frequently and use them to instruct others who may use this tool. If you lend this tool to someone, lend them these instructions as well. SPECIFIC SAFETY INSTRUCTIONS FOR SANDERS • ALWAYS WEAR SAFETY GOGGLES AND A DUST MASK when sanding, especially sanding over-head. • NEVER USE YOUR SANDER ON DAMP SURFACES. • DO NOT USE SANDPAPER LARGER THAN NEEDED. Extra sandpaper extending beyond the sanding pad can cause serious injury. • THE DUST BAG MUST BE ATTACHED TO THE TOOL and emptied frequently. To attach the dust bag, put the dust bag connector on the dust collection outlet at the rear of the sander. Then slot in the connector by turning it clockwise until it is properly fitted. Carry out the reverse procedure to remove the bag. • WARNING! DO NOT THROW SANDING DUST ON AN OPEN FIRE because materials in fine particle form may be explosive. • WARNING! WEAR A SUITABLE RESPIRATOR when sanding lead-painted surfaces as well as certain woods and metals to avoid breathing the harmful/toxic dust or vapours. Due to Ryobi's ongoing product improvement policy, tool features and specifications are likely to change without notice. Check current features and specifications with your Ryobi retailer. SAVE THESE INSTRUCTIONS. 3. OPERATION Fig. 1 1. "ON/OFF" TRIGGER SWITCH 2. "LOCK-ON" BUTTON 3. POWER CORD 4. DUST BAG 3.1 5. 6. 7. 8. SANDING PAD PAPER CLAMP PUNCHER SANDPAPER SANDPAPER The sander uses sheets of sandpaper that can be conveniently cut from large-size commercially available standard sheets (227 x 93 mm). Aluminium oxide, silicon carbide, or other synthetic abrasives are recommended for power sanding. For rough sanding, use coarse sandpaper. For smoothing or finish sanding, use fine or extra-fine sandpaper. 3.2 "ON/OFF" TRIGGER SWITCH To turn the tool "ON", squeeze the trigger switch. To turn the tool "OFF", release the trigger switch which is spring-loaded and will return to the "OFF" position automatically. Wait till the sander has reached its full speed before placing it in contact with the workpiece. Remove it from the workpiece before releasing the trigger switch. 9 GB 3.3 ATTACHING THE SANDPAPER 1. Release the clamp grip then insert the sandpaper with the grit side facing out, as shown in fig. 2. 2. After inserting and stretching the sheet, lift up the clamp lever making sure the teeth of the clamp grip the paper correctly. 3. Wrap the sheet around the length of the pad and attach the free end of sheet under the clamp on the opposite side and repeat the procedure stated above. For efficient sanding, the sandpaper must be drawn as tightly as possible, as a loose sheet can slip on the work surface. 3.4 USING THE PUNCHER If the sheet of sandpaper has not been punched, you can use the puncher supplied with the tool to punch dust collection holes in the sandpaper. Align the sanding pad with the puncher and push down on the sander until the puncher pierces the sandpaper. Then remove the puncher from the sander. See Fig. 3. 3.5 SANDING Do not apply excessive pressure on the sander when sanding. Excessive pressure may result in uneven sanding and cause overheating which could damage the motor. Do not sand in the same spot for too long. Otherwise uneven sanding will result. 4. MAINTENANCE 4.1 CARBON BRUSHES The tool's brushes and commutator must be checked regularly (once every few months) at an Authorised Ryobi Service Centre. Good contact between the brushes and commutator is required for the tool to operate properly. The carbon brushes must be replaced when an abnormally big spark is produced around the commutator. 4.2 CLEANING Before cleaning or carrying out any maintenance, disconnect the tool from the power supply. The best cleaning method consists in using dry compressed air. Always wear safety goggles when cleaning tools with compressed air. Ventilation slots and switches must be kept clean at all times. Do not insert pointed objects through the slots to try to clean them. Never use any chemical products to clean the tool. 5. ACCESSORIES See Fig. 4. 6. • SANDPAPER 9 pcs (A) • DUST BAG 1 pc (B) • PUNCHER 1 pc (C) • DUST NOZZLE 1 pc (D) WARRANTY All Ryobi products are guaranteed against manufacturing defects and defective parts for a period of twenty four (24) months from the date stated on the original invoice drawn up by the retailer and given to the end user. Deterioration caused by normal wear and tear, unauthorised or improper use or maintenance, or overload are excluded from this guarantee as are accessories such as battery packs, light bulbs, blades, fittings, bags, etc. In the event of malfunction during the warranty period, please take the NON-DISMANTLED product, along with the proof of purchase, to your retailer or nearest Authorised Ryobi Service Centre. This warranty in no way affects your legal rights concerning defective products. 7. SPECIFICATIONS Voltage : 230 V - 240 V No load speed : 12,000 min-1 Wattage : 220 W Orbit diameter : 1.6 mm (~0.063”) Pad size : 185 mm x 90 mm (~7.3” x 3.5”) Sandpaper size : 227 x 93 mm (~8.9” x 3.66”) Noise : 82 dB Vibration :5g 10 F CE DÉCLARATION DE CONFORMITÉ Nous déclarons sous notre propre responsabilité que ce produit est en conformité avec les normes ou documents normalisés suivants : 98/37/EC, 73/23/EEC, 89/336/EEC, EN292-1:1991, EN292-2:1991, EN50144-1:1998, EN50144-2-4:1999, EN55014-1:1997, EN55014-2:1997, EN61000-3-2:1995, EN61000-3-3:1995 GB CE DECLARATION OF CONFORMITY We declare under our sole responsibility that this product is in conformity with the following standards or standardized documents. 98/37/EC, 73/23/EEC, 89/336/EEC, EN292-1:1991, EN292-2:1991, EN50144-1:1998, EN50144-2-4:1999, EN55014-1:1997, EN55014-2:1997, EN61000-3-2:1995, EN61000-3-3:1995 D E I CE KONFORMITÄTSERKLÄRUNG Wir erklären in alleiniger Verantwortung, dass dieses Produkt mit den folgenden Normen oder normativen Dokumenten übereinstimmt: “EN292-1:1991, EN292-2:1991, EN50144-1:1998, EN50144-2-4:1999, EN55014-1:1997, EN55014-2:1997, EN61000-3-2:1995, EN61000-3-3:1995” Gemäß den Bestimmungen der Richtlinien "98/37/EWG, 73/23/EWG, 89/336/EWG" CE DECLARACIÓN DE CONFORMIDAD Declaramos bajo nuestra exclusiva responsabilidad que este producto es conforme a las siguientes normas o documentos normalizados: 98/37/EC, 73/23/EEC, 89/336/EEC, EN292-1:1991, EN292-2:1991, EN50144-1:1998, EN50144-2-4:1999, EN55014-1:1997, EN55014-2:1997, EN61000-3-2:1995, EN61000-3-3:1995 CE DICHIARAZIONE DI CONFORMITÀ Dichiariamo, assumendo la piena responsabilitá di tale dichiarazione, che il prodotto é conforme alla seguenti normative e ai relativi documenti. 98/37/EC, 73/23/EEC, 89/336/EEC, EN292-1:1991, EN292-2:1991, EN50144-1:1998, EN50144-2-4:1999, EN55014-1:1997, EN55014-2:1997, EN61000-3-2:1995, EN61000-3-3:1995 P CE DECLARAÇÃO DE CONFORMIDADE Declaramos, sob nossa exclusiva responsabilidade, que este produto cumpre as seguintes normas ou documentos normativos. 98/37/EC, 73/23/EEC, 89/336/EEC, EN292-1:1991, EN292-2:1991, EN50144-1:1998, EN50144-2-4:1999, EN55014-1:1997, EN55014-2:1997, EN61000-3-2:1995, EN61000-3-3:1995 HU SZABVÁNY RENDELKEZÉSEK FelelŒsségünk teljes tudatában kijelentjük, hogy a jelen termék megfelel a következŒ szabványoknak és elŒírásoknak : 98/37/EC, 73/23/EEC, 89/336/EEC, EN292-1:1991, EN292-2:1991, EN50144-1:1998, EN50144-2-4:1999, EN55014-1:1997, EN55014-2:1997, EN61000-3-2:1995, EN61000-3-3:1995 CZ PROHLÁ·ENÍ O SHODù Prohla‰ujeme na svou zodpovûdnost, Ïe tento v˘robek splÀuje poÏadavky níÏe uveden˘ch norem a závazn˘ch pfiedpisÛ: 98/37/EC, 73/23/EEC, 89/336/EEC, EN292-1:1991, EN292-2:1991, EN50144-1:1998, EN50144-2-4:1999, EN55014-1:1997, EN55014-2:1997, EN61000-3-2:1995, EN61000-3-3:1995 NL CE CONFORMITEITSVERKLARING Wij verklaren op onze eigen verantwoordelijkheid dat dit product voldoet aan de volgende normen of normatieve documenten. 98/37/EC, 73/23/EEC, 89/336/EEC, EN292-1:1991, EN292-2:1991, EN50144-1:1998, EN50144-2-4:1999, EN55014-1:1997, EN55014-2:1997, EN61000-3-2:1995, EN61000-3-3:1995 S EG FÖRSÄKRAN Vi intygar och ansvarar för, att denna produkt överensstämmer med följande normer och dokument. 98/37/EC, 73/23/EEC, 89/336/EEC, EN292-1:1991, EN292-2:1991, EN50144-1:1998, EN50144-2-4:1999, EN55014-1:1997, EN55014-2:1997, EN61000-3-2:1995, EN61000-3-3:1995 DK CE KONFORMITETSERKÆRING Vi erklærer på eget ansvar, at dette produkt er i overensstemmelse med følgende standarder eller standardiseringsdokumenter: 98/37/EC, 73/23/EEC, 89/336/EEC, EN292-1:1991, EN292-2:1991, EN50144-1:1998, EN50144-2-4:1999, EN55014-1:1997, EN55014-2:1997, EN61000-3-2:1995, EN61000-3-3:1995 N CE SAMSVARSERKLÆRING Vi erklærer på eget ansvar at dette produktet er i samsvar med følgende standarder og normative dokumenter: 98/37/EC, 73/23/EEC, 89/336/EEC, EN292-1:1991, EN292-2:1991, EN50144-1:1998, EN50144-2-4:1999, EN55014-1:1997, EN55014-2:1997, EN61000-3-2:1995, EN61000-3-3:1995 FIN CE TODISTUS STANDARDIN-MUKAISUUDESTA Todistamme täten ja vastaamme yksin siitä, että tämä tuote on alla lueteltujen standardien ja standardoimis-asiakirjojen vaatimusten mukainen. 98/37/EC, 73/23/EEC, 89/336/EEC, EN292-1:1991, EN292-2:1991, EN50144-1:1998, EN50144-2-4:1999, EN55014-1:1997, EN55014-2:1997, EN61000-3-2:1995, EN61000-3-3:1995 GR ∆HΛΩΣH ΣΥMMΟΡΦΩΣΗΣ ∆ηλώνουµε υπευθύνως τι το προϊν αυτ συµµορφούται προς τα ακλουθα πρτυπα ή τυποποιηµένα έγγραφα: 98/37/EC, 73/23/EEC, 89/336/EEC, EN292-1:1991, EN292-2:1991, EN50144-1:1998, EN50144-2-4:1999, EN55014-1:1997, EN55014-2:1997, EN61000-3-2:1995, EN61000-3-3:1995 RU á‡fl‚ÎÂÌËÂ Ó ÒÓÓÚ‚ÂÚÒÚ‚ËË Òڇ̉‡Ú‡Ï å˚ ÒÓ ‚ÒÂÈ ÓÚ‚ÂÚÒÚ‚ÂÌÌÓÒÚ¸˛ Á‡fl‚ÎflÂÏ, ˜ÚÓ Ì‡ÒÚÓfl˘‡fl ÔÓ‰Û͈Ëfl ÒÓÓÚ‚ÂÚÒÚ‚ÛÂÚ ÌËÊ ÒÎÂ‰Û˛˘ËÏ ÌÓÏ‡Ï Ë ‰ÓÍÛÏÂÌÚ‡Ï: 98/37/EC, 73/23/EEC, 89/336/EEC, EN292-1:1991, EN292-2:1991, EN50144-1:1998, EN50144-2-4:1999, EN55014-1:1997, EN55014-2:1997, EN61000-3-2:1995, EN61000-3-3:1995 RO DECLARA‰IE DE CONFORMITATE Declarãm, cu toatã responsabilitatea cã acest produs este conform cu normele sau documentele urmãtoare : 98/37/EC, 73/23/EEC, 89/336/EEC, EN292-1:1991, EN292-2:1991, EN50144-1:1998, EN50144-2-4:1999, EN55014-1:1997, EN55014-2:1997, EN61000-3-2:1995, EN61000-3-3:1995 PL DEKLARACJA ZGODNOÂCI Z ca∏à odpowiedzialnoÊcià oÊwiadczamy, ˝e niniejszy produkt jest zgodny z normami czy te˝ znormalizowanymi dokumentami wymienionymi poni˝ej: 98/37/EC, 73/23/EEC, 89/336/EEC, EN292-1:1991, EN292-2:1991, EN50144-1:1998, EN50144-2-4:1999, EN55014-1:1997, EN55014-2:1997, EN61000-3-2:1995, EN61000-3-3:1995 Machine: SHEET SANDER / Type: S33K Name of company: Address: Name of company: Address: Name of company: Address: RYOBI TECHNOLOGIES S.A. Z.I. PARIS NORD II 209, RUE DE LA BELLE ÉTOILE 95700 ROISSY EN FRANCE FRANCE Name/Title: Ryobi Technologies (UK) Ltd. Anvil House, Tuns Lane, Henley-on-Thames, Oxfordshire, RG9 1SA United Kingdom Name/Title: Ryobi Technologies GmbH Itterpark 9 D-40724 Hilden Germany Name/Title: Michel Violleau Président/Directeur Général Signature: Derrick Marshall General Manager Signature: Signature: Walter Martin Eichinger General Manager