1
Elixir Ambience
Release 2.5.0
Elixir Technology Pte Ltd
Elixir Ambience: Release 2.5.0
Elixir Technology Pte Ltd
Published 2013
Copyright © 2013 Elixir Technology Pte Ltd
All rights reserved.
Solaris, Java and all Java-based trademarks and logos are trademarks or registered trademarks of Sun Microsystems, Inc. Microsoft and Windows
are trademarks of Microsoft Corporation.
Table of Contents
1. About Elixir Ambience ................................................................................................ 1
Sign in ................................................................................................................. 1
Anonymous mode .......................................................................................... 1
Desktop redirect .................................................................................................... 2
2. Using Elixir Ambience ................................................................................................. 3
Overview .............................................................................................................. 3
Ambience ..................................................................................................... 3
News ........................................................................................................... 3
Settings ........................................................................................................ 3
Create .................................................................................................................. 3
Create an Ad-hoc Dashboard ............................................................................ 3
Create an Ad-hoc Report ................................................................................. 3
Repository ............................................................................................................ 3
Actions for a folder ........................................................................................ 4
Actions for a file ............................................................................................ 4
Search .................................................................................................................. 9
Search by name ............................................................................................. 9
Search by tags ............................................................................................. 10
Advanced Search .......................................................................................... 10
Save a search ............................................................................................... 11
Schedule ............................................................................................................. 11
Overview .................................................................................................... 11
Running ..................................................................................................... 11
Disabled ..................................................................................................... 12
Create ........................................................................................................ 12
Logs .................................................................................................................. 14
Saved Searches .................................................................................................... 14
Recent Files ........................................................................................................ 14
iii
List of Tables
2.1. Parameters .............................................................................................................. 6
2.2. Mime Types ............................................................................................................ 7
2.3. Keywords and Results ............................................................................................. 10
2.4. Advanced Search Filters ........................................................................................... 11
iv
Chapter 1
About Elixir Ambience
Sign in
Elixir Ambience is a Cloud-Scale Business Analytics/Intelligence Platform, with a complete set of
services that collaborate behind the scenes to ensure each request is fulfilled:
ZooKeeper: This service is a centralized service for maintaining configuration information, naming,
providing distributed synchronization, and providing group services.
DaCapo: This multi-tenant repository provides file services for the rest of the Ambience architecture.
Identity: This service contains the default Elixir authentication module, which never stores passwords.
Therefore even domain administrators cannot access passwords, which ensures password security and
prevent hackers.
Scheduler: This service enables the user to define tasks, which will run based on triggers and calendars.
Universe: The Universe is the interface to data in Ambience. There are two categories of Universe –
JDBC Universe and Repository Universe.
Eikon: This service is for Ad-hoc Dashboard and is a Web application that enables the building and
navigation of BI dashboards. The data for the dashboard is provided by Universe, and Eikon is a
Universe consumer. DASHBOARD is the file extension of an Ad-hod Dashboard.
ProcMan: The Process Manager is the controller of dynamic processes, such as Job and ETL engines.
It monitors ZooKeeper configuration, as well as starts and stops engines on demand.
PML Engine: This service assembles a set of views, contents and actions together into a dashboard.
PML is the file extension of a dashboard, which stands for “Perspective Markup Language”.
Web Jetty: This service provides an HTTP server, HTTP client and javax.servlet container. Visit
http://<machine-name>:8080/elx/ to view the Web console of Elixir Ambience. Enter the domain
name, user name and password to sign in.
Audit: Auditing records domain-level events, such as creating a transaction, performing an action and
more, which may be legally obligated to record in certain types of application, i.e. banking.
Visit http://<host>:8080/elx/ to view the Elixir Ambience Web Console. Type the domain name (for
example, “eno”, “foxx”, etc), user name and password to sign in.
Anonymous mode
If you skip the sign in and directly go to http://<host>:8080/elx/do/<domain>/po/index.html, the
anonymous page will display. The anonymous page provides limited features only, which enables the
anonymous user to access files that the administrator has allowed to display. For more details on
showing files in anonymous mode, refer to Elixir Administration Tools User Manual.
1
About Elixir Ambience
Desktop redirect
Instead of visiting the default Ambience Web Interface, you have the option to redirect the Ambience
desktop page to a customized HTML page.
Before you can successfully redirect the Ambience desktop page, complete the following steps:
1.
Open the Repository GUI. Create a new folder /Public/desktop/. Place Desktop.html and Desktop.js
inside this folder. Please note that you can use other file names or locations, which should be
consistent with those written in the desktop-redirect.txt file.
2.
Copy the desktop-redirect.txt file into the /User/test/ folder. Please note that the file name and
location are important. In this example, the desktop redirect functionality is available when you
login as test.
3.
Log into the Ambience Web Interface as test. The new desktop page will display. To disable the
desktop redirect functionality, delete or rename the desktop-redirect.txt file.
When you visit http://<host>:8080/elx/do/<domain>/po/index.html, Ambience will check for a file
named desktop-redirect.txt in the user home directory and redirect to the contents of that file. Inside
desktop-redirect.txt, there is information about the Repository path (dc/content) to the Desktop.html
file:
/dc/content/Public/desktop/Desktop.html
The desktop redirect functionality enables many users to share the same Desktop.html with all the
CSS, PNG and JS files, without requiring the administrator to copy Desktop.html into each user's home
directory. To share desktop with many users, only the desktop-redirect.txt file is needed. Different
users can also have different desktops by using a different redirect.
Here is a sample of Desktop.html, which works without Cascading Style Sheets. You have the option
to append your own CSS.
<html>
<head>
<script src="/elx/lib/jquery-1.8.3.min.js" type="text/javascript">
</script>
<script src="Desktop.js" type="text/javascript"></script>
</head>
<body>
This is the new desktop
<hr>
<div id="info"></div>
<hr>
<div id="rml"></div>
<hr>
<a href="/elx/do/eno/po/portal.html">Back to Portal</a>
<hr>
<form method="POST" action="/elx/go/eno">
<input type="submit" value="Sign Out"></input>
</form>
</body>
</html>
2
Chapter 2
Using Elixir Ambience
Overview
Ambience
Watched Files
This enables you to view the watched files such as Daily Performance Report and Sales Report, as
well as the files' last modification time. For more details on how to start watching a file, refer to the
section called “Watch”.
System
This enables you to view the summary of system statistics, including how many users are currently
online, how many jobs are running, how many job engines are online, and the quantity of your scheduled
tasks.
News
From here you can obtain the latest news of Elixir products, including recent releases, future product
forecast and more.
Settings
You can view the user name, domain name and associated email account here. To change password,
click the Change password... button, enter the current password, set the new password, and repeat
the new password. To change email, click the Change email... button, enter the current password, and
enter the new email address.
Create
Create an Ad-hoc Dashboard
For more details, refer to Elixir Ad-hoc Dashboard User Manual.
Create an Ad-hoc Report
For more details, refer to Elixir Ad-hoc Report User Manual.
Repository
File information: Size, Last Modified,Access, Tags
3
Using Elixir Ambience
Actions for a folder
When a folder is selected, the following actions are available for your option:
Add Folder
This enables you to add a sub-folder under the current folder.
Copy
This enables you to copy the current folder and its contents into another folder.
Rename
This enables you to rename the current folder.
Upload
This enables you to choose a file from the designated location and upload it to the current folder.
Alternatively, you can upload any type of file using the curl command following the syntax below:
curl --user <username>:<password> --upload-file <source-file-path>
<target-file-path>
The following shows an example of uploading a JDBC driver JAR file to /Public/lib:
curl --user admin:sa --upload-file ~/JDBC/mysql-connector-java5.1.21-bin.jar http://knockshinnie:8080/elx/do/eno/dc/content/
Public/lib/mysql-connector-java-5.1.21-bin.jar
Drop files here
If you are using an HTML5 browser, Drop files here will appear in a text field. Drag and drop a file
into the text field to upload.
Delete
This enables you to delete the current folder and its contents.
Actions for a file
When a file is selected, the following actions are available for your option:
Open
This action opens the current file in a new tab. The supported file types include datasources, image
files, PDF and more.
Parameters in datasources are supported, including two new types, #timestamp and #time. You can
also sort parameters using the dependency notation, eg ${A<B,C>#password#sa}, which indicates A
should come lower than B and C in the parameter list.
Watch
Watch provides a quick way to keep track of files that are frequently used, which saves you from the
trouble of repeatedly navigating to these files or searching for them.
4
Using Elixir Ambience
After selecting a file, enable Watch by clicking the star in the top right hand corner of the File
Information panel. Upon clicking, the file will be watched, and a tag <user>#watch will be added.
Open the Overview panel and click the Refresh icon next to the watched files, and the file list will
be updated.
Generate a datasource
After opening a datasource in the Ambience Web Console, you can generate it by clicking the Generate
button. Data fields will be shown in the browser.
Render a report
After opening a report in the Ambience Web Console, you can render the report by selecting from the
Target dropdown list and the Render Type dropdown list. Target options include browser, mail,
printer and userhome, which can be configured in Repertoire GUI > Administration Tools. Render
type options include HTML and Simple HTML.
Besides using the Ambience Web Console, you can also use HTTP requests to render a report, which
supports all output types provided in Render Wizard. You can send an HTTP request with a parameter
list with ?mode=render and other options, or send an HTTP request with an XML body describing
the options. In all cases, it is assumed that authentication has been completed as a cookie is required
to be sent with each request. All requests must use POST not GET. For a complete list of parameters
used in HTTP requests, refer to Table 2.1, “Parameters”.
Yo u c a n s p e c i f y t h e p a r a m e t e r s a s p a r t o f t h e U R L , s u c h a s
“?elx.start.timeout=30&elx.end.timeout=120”, which works for all jobs. One example is in the following:
curl -X POST -u admin:sa --data "mime-type=application/x-glint
&elx.target=output1&elx.start.timeout=30&elx.end.timetout=120
&elx.job.retry=5"
http://MachineName:8080/elx/do/eno/re/ElixirSamples/Feature/Report/
Form.rml?mode=render
The order of parameters is unimportant. Report parameters are distinguished from target parameters
by not having the elx.target. prefix.
The response from the parameter string version is the same as the XML version, with the same headers.
Note
Different browsers and web servers impose different limits on the length of URL strings, so
a very long request URL, perhaps 1024 characters or greater, should be sent using the XML
approach, where there is no such limit.
5
Using Elixir Ambience
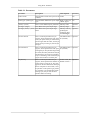
Table 2.1. Parameters
Parameter
Description
Value Options
mode=render
This parameter means the report will be render
rendered.
mime-type={mime-type}
This parameter defines the report output Refer to Table 2.2, Yes
type.
“Mime Types”
{name}={value}
This is a user-defined report parameter. Add any value.
Optional
elx.target={target}
This defines the report output target.
Add any target.
Yes
Add any value by
prefixing the
parameter name
with elx.target.
Optional
elx.target.{name}={value} This defines the report output target
name.
Necessary
Yes
elx.start.timeout
This is a timeout parameter for job
The default value is Optional
engines, which specifies the time spent 60 (seconds).
in the job queue. If the job stands in the
queue longer than this value, and no job
engine starts processing it, then the job
will quit.
elx.end.timeout
This is a timeout parameter for job
The default value is Optional
engines, which specifies the time spent 60 (seconds).
running the job. If a job takes longer than
this value, then the system aborts the job,
and assumes it was stuck in an endless
loop or is thrashing. This ensures the job
engine will be able to run other jobs.
elx.job.retry
This is a timeout parameter for job
In most cases, the Optional
engines, which specifies the number of default value is 3.
retries before a job gives up. This only
applies for the elx.end.timeout. If the job
doesn't complete in 60 seconds, it will
be put back on the queue to get picked
up. Therefore, if a machine fails while
running a job, the job will still have
another chance at running.
6
Using Elixir Ambience
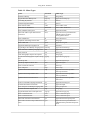
Table 2.2. Mime Types
Name
Extension
Mime Type
Windows Bitmap
bmp
image/bmp
Zipped Windows Bitmap File
bmp.zip
application/x-bmp-zip
Cascading Stylesheets
css
text/css
Comma Separated Values
csv
text/csv
Elixir Ad-hoc Cube
cube
text/x-adhoc-cube
Elixir Ad-hoc Dashboard
dashboard
text/x-adhoc-dashboard
Elixir Database Filesystem
dbf
application/x-dbf
Microsoft Office Open XML Format
Document
docx
application/vnd.openxmlformatsofficedocument.wordprocessingml.document
Elixir DataSource
ds
text/x-datasource
Graphical Interchange Format File
gif
image/gif
Elixir Glint File
glint
application/x-glint
HyperText Markup Language File
html
text/html
Zipped HyperText Markup Language File html.zip
application/x-html-zip
Elixir Interactive Markup Language File
iml
application/x-rml-interactive
Elixir Job File
job
text/x-job
Joint Photographic Experts Group File
jpg
image/jpeg
Zipped Joint Photographic Experts Group jpg.zip
File
application/x-jpeg-zip
JavaScript File
js
application/javascript
JavaScript Object Notation File
json
application/json
Elixir Line Print Text File
lpt
text/x-lpt
Elixir Map File
map
text/x-map
OpenDocument Presentation File
odp
application/vnd.oasis.opendocument.presentation
OpenDocument Spreadsheet File
ods
application/vnd.oasis.opendocument.spreadsheet
OpenDocument Text Document
odt
application/vnd.oasis.opendocument.text
Printer Command Language Document
pcl
application/vnd.hp-pcl
Portable Document Format File
pdf
application/pdf
Elixir Perspective Markup Language File pml
text/x-perspective
Portable Network Graphic File
png
image/png
Zipped Portable Network Graphic File
png.zip
application/x-png-zip
Elixir Connection Pool
pool
text/x-connection-pool
Elixir Connection Pool
pool
text/x-connection-pool
Microsoft PowerPoint Presentation
ppt
application/vnd.ms-powerpoint
Microsoft PowerPoint Open XML Present- pptx
ation
7
application/vnd.openxmlformatsofficedocument.presentationml.presentation
Using Elixir Ambience
Name
Extension
Mime Type
Elixir Print
Print the file on
the specified
printer.
application/x-print
Adobe PostScript File
ps
application/postscript
Elixir Ad-hoc Report
report
text/x-adhoc-report
Elixir Report Markup Language File
rml
text/x-report-template
Rich Text Format File
rtf
application/rtf
Elixir Safe File
safe
application/x-safe
Elixir Shape File
shp
application/x-esri-shapefile
Scalable Vector Graphics File
svg
image/svg+xml
Zipped Scalable Vector Graphic File
svg.zip
application/x-svg-zip
Elixir Shockwave Flash File
swf
application/x-shockwave-flash
Tagged Image File Format
tiff
image/tiff
Zipped Tagged Image File Format File
tiff.zip
application/x-tiff-zip
Plain Text File
txt
text/plain
Wireless Bitmap File
wbmp
image/vnd.wap.wbmp
Zipped Wireless Bitmap File
wbmp.zip
application/x-wbmp-zip
Extensible Hypertext Markup Language
File
xhtml
application/xhtml+xml
Zipped Extensible Hypertext Markup
Language File
xhtml.zip
application/x-xhtml-zip
Extensible Markup Language File
xml
text/xml
Microsoft Excel Spreadsheet File
xls
application/vnd.ms-excel
Microsoft Excel Open XML Spreadsheet
File
xlsx
application/vnd.openxmlformatsofficedocument.spreadsheetml.sheet
Zipped File
zip
application/zip
Print a PDF, Glint or PCL file
You can print a PDF file by navigating to the file in the Repository and clicking the Open button. The
PDF file will open in browser. Choosing Print from the browser will print the file to the client default
printer.
If you want to print a Glint file, navigate to the file in the Repository and click the Print button directly.
The Glint file will be printed to the server default printer. Similarly, you can print a PDF file to the
server default printer in this way.
You also have the option to print a PCL file. Note that it is subject to printer capabilities to get a PDF
or PCL file printed.
You can also explicitly name your printer in Administration Tools > System > Targets > printer.
This is necessary for Windows 7, but optional for other operating systems. The printer name must be
a constant value, and substitutions such as “${Value}” will not work but get replaced by empty strings
“”. A “” printer name means using the default OS printer as mentioned above.
8
Using Elixir Ambience
Run a job
You can run a job by navigating to the job file in the Repository and click the Run button. A new tab
will open and display a message “Request Submitted”. It will prompt for parameters (if any), run the
job and show the job log when finished.
View a log
Some events may open the log viewer. For example, when you are rendering a report to mail, printer,
userhome or any other target except the browser, there will be a log file link which appears in the status
box at the end of the rendering. Click the log file to view the details. Alternatively, Logs are available
in the /User/{User_Name}/logs/ directory in Repository. Logs are stored in JSON files, which are
excluded from the indexing and hence unsearchable. Select a JSON file and click the Open button.
The log viewer will show actions on the right hand side for follow-up purpose. The actions include
Open, View and Follow, allowing you to look at job results, view more details of exceptions or follow
handovers to other jobs. For example, the Follow action helps you navigate through a potential tree
of logs produced by multiple engines working together to solve a problem. The parent log will show
the status and elapsed time of each child processing log, saving you from the trouble of following
irrelevant logs.
Edit Tags
This enables you to edit the tag keywords for the current file.
Copy
This enables you to copy the current file into another folder.
Rename
This enables you to rename the current file.
Download
This enables you to download the current file into the default folder on the machine.
Delete
This enables you to delete the current file. After deletion, the file will be temporarily placed in
/User/admin/deleted/ folder.
Search
The Search page allows you to search for files by name, content or tags. Click the Name, Tags or
Advanced button, type the keyword, and click the Search button. Results will display, which can be
sorted by name, path, file type and last modification time.
The Dashboards, Datasources, Documents, Images and Reports items are shortcuts for commonlyused file extensions. For example, select the Images item and start a search. GIF, PNG and JPEG files
matching the keywords will display.
Search by name
This enables you to type keywords and search for file names and paths. There are two shortcuts for
file name search, “ext:xxx” and “fs:xxx”. The ext:xxx shortcut enables you to specify the file extension,
9
Using Elixir Ambience
while the fs:xxx enables you to restrict the search to a specific filesystem. For example, “order
fs:ElixirSamples” will search for all file names and paths containing the keyword “order” within the
ElixirSamples filesystem.
By default, if the fs:xxx shortcut is not used, all filesystems except the Temp filesystem will be scanned.
To involve the Temp filesystem in the search, add “fs:Temp” behind the keywords.
The “ext:xxx” and “fs:xxx” shortcuts can be used in conjunction for multiple times in one search. For
example, add “fs:Temp fs:ElixirSamples ext:pml” behind your keywords, and the search will match
all PML files in both the Temp and ElixirSamples filesystems.
The “ext:xxx” and “fs:xxx” must be used with some keywords instead of being used alone, because
it means searching for all files in that type or filesystem, and there might be a huge number of files to
process.
Another filter is “mode:xxx”. There are two modes available, “glob” and “regexp”. The default mode
is “glob”, in which wildcard characters are supported. An asterisk (*) represents zero or more characters,
and a question mark (?) represents a single character. Please note that wildcard characters cannot be
used to represent file extensions. For example, “sales.*” should be avoided; to specify a certain file
extension, use “ext:xxx” instead.
You can also explicitly select the “regexp” mode, in which regular expressions are used. The dot (.)
means any character, which can be escaped by a backslash (\). For example, “\.” means the dot will
be interpreted literally. For more details about the regular expression syntax, visit the following link:
http://www.regular-expressions.info/reference.html
Search by tags
For detailed information on searching by tags, refer to Elixir Repository User Manual > Tags.
Advanced Search
The Advanced Search follows Lucene syntax. The following are keyword and search result examples.
Table 2.3. Keywords and Results
Keywords
Description
Sales
This will exactly match all files containing “Sales” in the path.
Sales Resources
This will match all files containing “Sales” or “Resources” in the path, in which
OR is the default operator.
Sales ext:ds
This will match files either with “Sales” in the path, or files with the extension
“.ds”.
Sales AND ext:ds This will match only those files with “Sales” in the path and the extension “.ds”.
For more details on Lucene syntax, visit the following link:
http://lucene.apache.org/java/3_5_0/queryparsersyntax.html
In Advanced Search, you can use the following filters alone or with keywords in front:
10
Using Elixir Ambience
Table 2.4. Advanced Search Filters
Filter
Description
fs:XXX
This restricts the search within a specified filesystem.
name:XXX
This restricts the search within files with a specified name.
path:XXX
This restricts the search within files located in paths containing a specified keyword.
modified:XXX This restricts the search within files with a certain modification date.
ext:XXX
This restricts the search within files with a specified extension.
mimetype:XXX This restricts the search within files with a specified MIME type.
tags:XXX
This restricts the search within files with a specified tag.
contents:XXX
This restricts the search within files containing a specified keyword in the contents.
Save a search
Upon clicking Save, you can archive the search keyword. Saved searches will display on the right
pane.
Schedule
Overview
Resided in the Ambience Web interface, the Scheduler provides control over triggers and calendars.
Through the Scheduler Web interface, triggers may be created, tested and modified, while calendars
can be specified to exclude some dates such as public holidays from firing the job. Time zone can also
be selected to ensure every trigger will be fired at a proper time, no matter where you are around the
globe or which season you are in. These will help you schedule jobs and fire triggers with ease.
After the installation of Ambience, you will be able to use the Scheduler by logging into the Ambience
Web interface:
http://<host>:8080/elx/
For information about another Scheduler resided in Ambience > Administration Tools, refer to the
Elixir Scheduler User Manual.
Running
This tab page shows the jobs that are currently running in the Ambience system. It provides information
including trigger name, job file path, previous running time, next running time and the calendar to
base upon.
Hourly
The Hourly trigger starts at every hour sharp, and invokes a command task to clean inactive sessions.
Daily
The Daily trigger starts at 00:15 every day, and invokes a command task to clean the unused temporary
files and log files.
Weekly
The Weekly trigger starts at 03:15 am on every Sunday.
11
Using Elixir Ambience
Note
The Hourly, Daily and Weekly triggers start at different time to avoid conflict.
Disabled
This tab page shows the triggers that are currently disabled in the Ambience system. It provides
information including trigger name, job file path and the calendar to base upon.
Create
This page allows you to create a trigger to schedule a job. A trigger is a mechanism for deciding when
to invoke a job. Most commonly, triggers are time-based - for example invoke the job every Tuesday
at 6am. All triggers have a name, an enabled/disabled flag and some specialized fields for identifying
when to run.
All triggers have a Start and Stop time and can only fire between those times. It is possible to set the
Stop to be Never, so that the trigger is always operational.
Alternatively, you can perform the following operations in Ambience > Administration Tools >
Scheduler > Triggers.
Basic
This page defines the trigger name, the job location, the calendar and the time zone.
Basic Information Panel
On this page, you need to enter the name of the trigger and the location of the job, select the exclusion
calendar, and select the time zone where you are currently located.
With the correct time zone selected, job firing will be accurate, which follows the rules below:
•
The time should always follow the changes of daylight saving time. Therefore 01:00 is the same
whether Summer or Winter.
•
When a time doesn't exist (a gap due to the clocks moving forwards), job firing will choose the
first valid time after the gap.
•
When the time exists twice, job firing will choose the first item and ignore the second.
Job
This page allows you to configure the schedule of the trigger, as well as the start and stop time of the
trigger.
Job Schedule
On the Job Schedule page, you can schedule a job to run once only, daily, weekly, monthly, at regular
intervals or controlled by a CRON expression.
For weekly events, you need to choose the day(s) of the week when the job should run.
For monthly events, you need to choose the day(s) and month(s) to run the job. You can also choose
specific day(s) within each month.
For jobs that run daily, weekly or monthly, the job will fire at the same time on the scheduled days.
12
Using Elixir Ambience
Active Period
This page of the wizard lets you configure the absolute time range in which a trigger can fire. The
actual firing time itself is governed by the values entered on the previous page - this page only indicates
the earliest and latest times that it could possibly fire.
Note
By default, a trigger becomes active upon completion of the wizard and never stops. Also,
when the trigger has completed the job run, it will be set to disabled automatically. If you
would like to run the job again, the trigger will need to be enabled and make adjustment in
the Active Period page.
Misfire
This page allows you to override the default job timeouts by setting start/end timeout intervals, and
choose the action to be taken when a trigger fails to work the way it was supposed to.
Misfire Configuration
•
Timeout for Start: Set the start timeout value for the job. If the job does not get started within
the start timeout value, the trigger will be considered misfired.
•
Timeout after Start: Set the end timeout value for the job. If the job does not complete within
the end timeout value, the trigger will be considered misfired.
Should the trigger be fired immediately when misfire is detected?
•
Fire the trigger immediately upon detection: This option enables the trigger to fire soon after
the misfire is discovered.
•
Do not fire. Wait until the next scheduled time: This option enables the trigger to fire in the
next round.
Parameter
This page allows you to add, edit and delete trigger parameters, as well as view existing parameter
information.
Trigger Parameters
If the job requires parameters, you should enter them here. Parameters can be used by all the tasks
within the job and it is useful to have a single point of maintenance. Parameters can either be hardcoded, for example User = Bill, or can be dynamic, for example, User = ${User Name##Bill}. This
indicates that the triggering code should supply a value for User, which may be by prompting for "User
Name", and that the default value is Bill. Refer to the Elixir Repertoire User Manual for details of how
dynamic parameters can be used throughout the Elixir Repertoire suite.
Adding a trigger parameter
Complete the following steps to add a trigger parameter:
•
On the Schedule > Create > Parameter page, click Add. The Edit Entry panel displays.
•
Fill in the parameter name and value. Select the Enabled checkbox upon your needs.
•
Click OK. The trigger parameter is successfully added.
13
Using Elixir Ambience
Editing a trigger parameter
Complete the following steps to edit a trigger parameter:
•
On the Schedule > Create > Parameter page, select an existing trigger. The line of the trigger
information becomes gray.
•
Click Edit. The Edit Entry Panel displays.
•
Change the parameter name or value. Select or deselect the Enabled checkbox upon your needs.
•
Click OK. The trigger parameter is successfully edited.
Deleting a trigger parameter
Complete the following steps to delete a trigger parameter:
•
On the Schedule > Create > Parameter page, select an existing trigger. The line of the trigger
information becomes gray.
•
Click Delete. The parameter is successfully removed.
Logs
On the Ambience home page, you can view log details. Select an appropriate time interval from Today,
Yesterday, This Week and All. Click a log that was generated during that time interval. A log viewer
will open in browser, allowing you to inspect the event details.
Saved Searches
Here you can view the archived search titles. Upon clicking a saved search title, a search will start,
with the saved keyword automatically filled in.
Recent Files
Here you can view the recently accessed files. Click a file and it will open in a new tab of your browser.
14