1
Conex
CONcept EXtraction client for PCN networks
User's Manual
University of Nottingham
2009
Conex. User’s manual.
Table of Contents
1 Installation and running...........................................................................................................................4
1.1 Prerequisites....................................................................................................................................4
1.2 Conex installation.............................................................................................................................4
1.2.1 MS Windows............................................................................................................................4
1.2.2 Cross-platform install................................................................................................................4
1.3 Plugins installation............................................................................................................................5
1.4 Uninstall Conex................................................................................................................................5
1.4.1 MS Windows............................................................................................................................5
1.4.2 Cross-platform install................................................................................................................5
1.4.3 Delete the repository and data files..........................................................................................5
2 Repository Management.........................................................................................................................7
2.1 Adding a location to the repository...................................................................................................7
2.1.1 Adding a directory location.......................................................................................................8
2.2 Common location options.................................................................................................................8
2.2.1 Language.................................................................................................................................8
2.2.2 URI filter...................................................................................................................................9
2.2.3 Custom update interval............................................................................................................9
2.2.4 Autotagging............................................................................................................................10
2.3 Manage locations...........................................................................................................................10
2.3.1 Edit location properties...........................................................................................................10
2.3.2 Remove a location..................................................................................................................10
2.4 Update the repository.....................................................................................................................10
2.4.1 Updating a single location manually.......................................................................................11
2.4.2 Rescanning a single location..................................................................................................11
2.4.3 Updating the whole repository................................................................................................11
2.4.4 Setting up update automation................................................................................................11
2.5 Indexing options.............................................................................................................................11
3 Working with documents.......................................................................................................................13
3.1 The documents list.........................................................................................................................13
3.1.1 Customize the detailed view...................................................................................................13
3.1.2 Sort the list.............................................................................................................................13
3.1.3 Filter the list............................................................................................................................13
3.2 Open a document...........................................................................................................................14
3.2.1 Open a document with specific external application..............................................................14
3.3 Edit document properties...............................................................................................................15
3.3.1 Quick edit in the detailed view mode......................................................................................15
3.3.2 Document properties dialog box.............................................................................................15
3.4 Edit document notes.......................................................................................................................16
3.5 Edit document tags.........................................................................................................................16
3.6 Documents autotagging.................................................................................................................17
3.6.1 Global autotagging preferences.............................................................................................17
4 Navigation and search...........................................................................................................................19
4.1 Faceted browsing...........................................................................................................................19
4.1.1 Path widget............................................................................................................................19
4.1.2 Author widget.........................................................................................................................19
4.1.3 Date widget............................................................................................................................20
4.1.4 Language widget....................................................................................................................20
4.2 Tag navigation................................................................................................................................20
4.2.1 Populate tags.........................................................................................................................21
4.2.2 Delete a tag............................................................................................................................21
4.3 Search............................................................................................................................................21
4.3.1 Quick search..........................................................................................................................21
4.3.2 Advanced search....................................................................................................................22
4.3.3 Saved searches......................................................................................................................22
2
Conex. User’s manual.
4.3.4 Associative search.................................................................................................................23
4.3.5 Finding similar documents......................................................................................................23
Appendix A.
Search query special syntax......................................................................................................................24
Document properties...........................................................................................................................24
Phrase search.....................................................................................................................................24
Wildcards............................................................................................................................................25
Date search.........................................................................................................................................25
Fuzzy and proximity search ................................................................................................................25
Boosting a term...................................................................................................................................25
Boolean operators...............................................................................................................................26
AND operator.................................................................................................................................26
+ operator.......................................................................................................................................26
- operator........................................................................................................................................26
NOT operator.................................................................................................................................26
Grouping.............................................................................................................................................26
Escaping Special Characters..............................................................................................................27
Appendix B.
Troubleshooting.........................................................................................................................................28
Logging...............................................................................................................................................28
Log window....................................................................................................................................28
Console output...............................................................................................................................28
Logging to a file..............................................................................................................................28
Common issues...................................................................................................................................28
Backup and restore the repository and settings..................................................................................29
Appendix C.
Keyboard shortcuts ..................................................................................................................................30
3
Conex. User’s manual.
1
Installation and running
1.1
Prerequisites
You need Sun Java 2 Runtime Environment (JRE) version 5.0 (or higher) installed in your system before
you can use Conex. You can download a free copy of JRE for your platform from
http://java.sun.com/javase/downloads/.
Conex is a cross-platform software, independent from specific computer platform and operating system.
At the moment, the following platforms are tested and fully supported:
•
MS Windows 2000/XP/Vista
•
GNU Linux
1.2
Conex installation
1.2.1 MS Windows
To install Conex in MS Windows operating system, execute Conex-*.exe automated installer and follow
instructions on the screen.
After installation is completed, you can run Conex via the Start menu (new Conex section will be created)
or using a shortcut on your desktop.
1.2.2 Cross-platform install
To install Conex on other platforms (or if you cannot use the Windows installer by some reasons), use the
cross-platform distribution (a compressed ZIP archive file). Use any unzip utility to unpack the distribution archive into a directory of your choice.
After unpacking the archive, you should see the following directory structure:
conex-**
conf
lib
plugins
conex.bat
launcher.jar
conex.sh
The start-up scripts for Windows (conex.bat) and UNIX systems (conex.sh) are provided for running
Conex.
Note: On a UNIX-based system, you may have to set executable permissions for the shell script:
$ cd conex-**
$ chmod 755 ./conex.sh
It is possible also to run Conex using executable launcher.jar file. Generally, it is enough to doubleclick this file in your file manager to get Conex started. If it doesn’t work, check your system file associations or execute Conex launcher from a console:
$ cd conex-**
$ java -jar launcher.jar
4
Conex. User’s manual.
1.3
Plugins installation
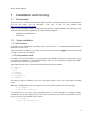
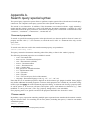
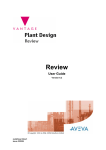
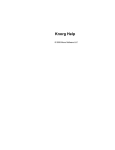
Conex is provided with the plugins management framework for easy download, installation, upgrading
and removing additional components within the application.
Illu
stration 1: Plugins Manager dialog
To open the Plugins Manager window, proceed to the Tools → Manage plugins… menu.
The Plugins manager shows all plugins available to download and install. The plugins are grouped into
categories, represented by dialog tabs.
•
To download and install a selected plugin, click on Install button.
•
If newer version of an installed plugin is available, click on Upgrade button.
•
To remove a plugin, click on Uninstall button
•
To update plugins information, click on Check for updates button.
1.4
Uninstall Conex
1.4.1 MS Windows
To remove Conex from your MS Windows system, select Uninstall in Conex section of the Start menu and
follows instructions on the screen.
1.4.2 Cross-platform install
To remove Conex, installed from a cross-platform ZIP file distribution, delete the folder where you have
unpacked the file.
1.4.3 Delete the repository and data files
The uninstall procedure preserves repository files, configurations, cache and other data files, used by
Conex. This allows to restore the program environment in next Conex installation (e.g. after version upgrade).
5
Conex. User’s manual.
To remove the Conex data, delete the directory where it is located. You can find the actual path of this directory in the Repository path field of Conex configuration dialog (Tools→Configure...).
6
Conex. User’s manual.
2
Repository Management
The cornerstone of the Conex architecture is the documents repository. The repository is a centralized
collection to keep records on the documents independently from their physical locations. A user can
browse or search the documents in the repository and open them from their original locations with the
suitable external applications.
The repository aggregates content from different sources. The folders in the local or network filesystems
are used as the document sources by default. A number of other types of sources are available with the installed plugins: web syndication feeds, mailboxes, del.icio.us bookmarks and others.
Adding documents to the repository is automated. A user only need to point Conex to a location she
wants to add and the application will find and add every document from there. Added locations are monitored for changes (new, modified or deleted documents) to keep the repository up-to-date.
The repository keeps records on user’s documents with rich set of metadata properties: title, description,
original location, author, creation date etc. The metadata properties associated with the documents are set
automatically on a document adding and can be quickly edited by a user. Their values can be used in
search queries to find the documents matching the specified criteria.
A full-text search engine is integrated with the repository. When new documents are added to the repository, their content is extracted and indexed for search.
The repository is independent of the specific document formats. The number of popular document formats is supported either natively or via the plugins, including HTML, PDF, OpenOffice ODF, MS Office
documents, plain text files and email messages.
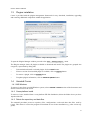
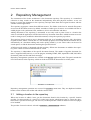
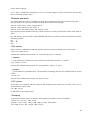
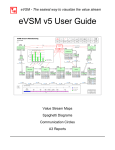
Repository management operations are available in the Browse application panel. The panel contains the
list of all locations in the repository which can be browsed with the documents list of this panel.
Illustration 2: Locations list
Repository management operations are accessed via Collection menu items. They are duplicated with the
buttons on the locations list toolbar and with the context menu.
2.1
Adding a location to the repository
When new location is added, Conex gets the documents found in this location by a specific location
provider. Location provider is a part of a Location type plugin, which knows how to extract the documents from a specific location type. The Directory location provider is built-in and does not need a plugin
to be installed.
The provider for new location is selected in Collection → Add documents submenu.
7
Conex. User’s manual.
Content and metadata of the documents are extracted using an appropriate parser which depends on a
document format. A format of an each document is generally determined by a filename (URL) pattern.
Adding the documents to the repository is a time- and resource-consuming operation, and it is thus performed in background mode.
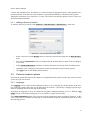
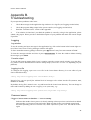
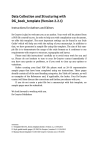
2.1.1 Adding a directory location
To add new directory location, select Collection → Add documents → Add directory… menu item.
Illustration 3: "Add new directory location" dialog
•
Select a directory with the Browse button or enter the valid directory path into the Base directory
field.
•
The value of Location title will be set automatically to the base directory name. You can change it
as you wish.
•
Select Include subdirectories checkbox to add the documents recursively from all subdirectories.
•
Optionally select a language of documents in this location and set other location options.
•
Click Add button to start adding the documents.
2.2
Common location options
The location options described in this chapter are independent from specific location provider and can be
set for any type of a location.
2.2.1 Language
The Language selector of the location dialog box allows to set a language for the documents in the location. Language settings affect the way the documents are indexed – specifically a language-specific algorithm of stemming the words and stop-word filtering.
By default, the language is set to one defined in the global configuration dialog (see 2.5). With the Language selector of the location dialog box you can redefine it on per-location basis.
Select Mixed (autodetect) option if the location contains documents written in multiply languages. In this
case, Conex will try to identify the language of each individual document automatically (may slow down
the indexing process).
8
Conex. User’s manual.
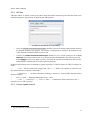
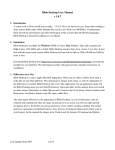
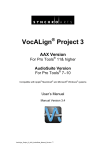
2.2.2 URI filter
URI filter allows to define custom rules about which documents should be processed and which ones
should be skipped in this location, by defining two URI patterns:
Illustration 4: URI Filter tab of Location dialog
•
Leave the Include all known document types checkbox selected to include all documents allowed
by installed document type plugins. For instance, if PDF plugin is installed, all documents with
“.pdf” filename extension will be processed, etc.
•
Unselect the Include all known document types checkbox to set a custom inclusion rule in or include only field. If the inclusion rule is set, only documents matching this rule will be processed.
•
In the Exclude field you can define a rule for exclusion the specific documents from the location.
All documents matching this rule will be ignored (skipped).
Inclusion and exclusion rules are defined as regular expressions1 of the file names or URLs. Examples include:
.*\.doc - All files with names ending with “.doc” (“.*” denotes any number of characters, the
dot symbol must be escaped by a backslash).
•
•
.*\\Desktop\\.*
- All files with names containing “\Desktop\” in the middle (the backslashes
must be escaped).
•
•
http:\/\/www.* - All URLs starting with “http://www”.
.*\.doc | .*\\Desktop\\.* | http:\/\/www.* - Combination
of these three rules (the “|”
character acts as “OR” operator).
2.2.3 Custom update interval
1
http://www.javaworld.com/javaworld/jw-07-2001/jw-0713-regex.html
9
Conex. User’s manual.
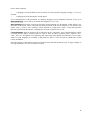
Illustration 5: Settings tab of Location dialog
By default, all locations are checked for updates in a time interval defined in global application preferences. On the Settings tab of a location dialog you can define a custom update period for specific location. To enable it, select Use a custom update interval checkbox and set the interval (in minutes or hours).
Zero value will disable automatic update for this location.
2.2.4 Autotagging
If Apply autotagging for new documents options is set, all new documents of this location will be automatically tagged after adding to the repository. By clicking Autotagging options button, you can call the dialog to change default tagging options for this location.
2.3
Manage locations
2.3.1 Edit location properties
To edit the properties of a specific location, select in the locations list and select Collection → Edit location
menu item.
Note that some basic properties (such as a base directory etc.) are not editable. To change these properties
you have to re-create the location.
2.3.2 Remove a location
To remove a location from the repository, select it in the locations list and select Collection → Remove location menu item.
The documents will be removed from the repository only. The operation does not affect any original files.
2.4
Update the repository
Updating is an operation of synchronizing the repository with actual state of the documents. It checks the
locations for new, modified or deleted documents:
•
New documents will be added to the repository
•
Modified documents will be re-indexed and updated in the repository
•
Deleted documents (which are no longer exist in their original locations) will be removed from
the repository
Updating is started in background mode either manually, or automatically (after a specified time interval
is passed).
10
Conex. User’s manual.
2.4.1 Updating a single location manually
To check a single location for new, modified or deleted documents and update it in the repository, select
the location in the locations list and select Collection → Update location menu item.
2.4.2 Rescanning a single location
While usual updating performs an incremental check of a location (ignoring unmodified documents), rescanning do full re-indexing of the location by removing all location documents from the repository and
adding them as new. It’s generally has the same effect as re-creating a location and may be used, e.g. after
changing the global indexing options.
To rescan a location, select it in the locations list and select Collection → Rescan location menu item.
2.4.3 Updating the whole repository
To update all locations in the repository, select Collection → Update all menu item.
2.4.4 Setting up update automation
Updating the collection can be performed manually (2.4.1, 2.4.3) or automatically, ۛin a specified time interval. To configure automated update, open the system Configuration dialog (Tools → Configure...).
Illustration 6: Configuration dialog: Update collection
•
To set the global update interval, select Use interval updating checkbox and enter an interval in
minutes or hours. To disable automatic updates, unselect this checkbox. Update interval can also
be set for a specific location individually (see 2.2.3).
•
If Update on start checkbox is selected, the collection will be updated every time when Conex is
started.
2.5
Indexing options
To configure document indexing, open the system Configuration dialog (Tools → Configure...).
Illustration 7: Configuration dialog: Indexing options
Default language
selector defines a default language of the repository. The default language has two pur-
poses:
11
Conex. User’s manual.
A language used by default for new locations. Location-specific language settings (2.2.1) override this.
•
•
A language used for parsing the search queries
It is recommended to set this parameter to a primary language of your document collection. If it is set to
Mixed (autodetect), Conex will try to identify the language in every case.
option turns on the lexical analysis when indexing new documents. If this option is set,
the stems of the words will be extracted and indexed instead of the words themselves. For instance, the
words “work”, “worker” and “working” will be indexed as a single term “work”, so that the search for
this term would return documents containing all variations of the lexeme “work”.
Apply stemming
If Filter stopwords option is turned on, the words listed as the “stopwords” for a selected language will be
excluded from the index. Stopword lists are used to filter so-called “common words” (such as “the”,
“and”, “this” etc. in English) out of indexing, thus improving search quality and efficiency. Lists of stopwords for each language are available as the plain-text files in /conf/stopwords subdirectory of the
Conex installation.
Note that changes of the indexing options will affect newly indexed documents only. To apply changes to
existing documents, rescan or re-create a location.
12
Conex. User’s manual.
3
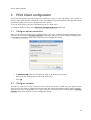
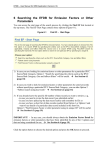
PCN Client configuration
PCN Client functionality provides connectivity with a PCN server to create and update a user’s profile of
interests. After PCN Client is configured, Conex will submit the tags and metadata of the documents from
specified locations to the server to populate the user’s profile.
To use the PCN Client, you need a registered account on a PCN server.
To configure the PCN Client, select PCN Client→Configure PCN Client menu item.
3.1
Configure server connection
If the server connection has not been configured before, the server configuration dialog will appear automatically after selection of Configure PCN Client menu item. Otherwise, you can call this dialog by pressing Configure connection button in the main PCN Client configuration dialog.
Illustration 8: PCN Server connection dialog
•
In PCN Server URL field enter full absolute URL of the PCN Server instance.
•
Enter your user name and password on the PCN Server
•
Press Ok
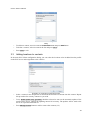
3.2
Configure contexts
You have to create one or more contexts for the locations you want to include into your profile on the
PCN Server. If the client is configured at the first time, the context management dialog appears automatically after the server configuration (3.1) is done. Otherwise, the dialog can be called by pressing Manage
contexts button in the main PCN Client configuration dialog.
13
Conex. User’s manual.
Illustration 9: Context management
dialog
its name in Context name field and
•
To add new context, enter
•
To delete a context, select its name in the list and press Delete
•
Press Close to exit
3.3
press Add button
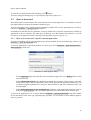
Adding locations to contexts
In the main PCN Client configuration dialog you can select the locations to be included into the profile
on the PCN server and assign them to the contexts.
Illustration 10: PCN Client configuration dialog
•
Select a context in the drop-down list and mark the locations to include into this context. Repeat
this procedure for as many contexts as you wish.
•
Leave Update profile every [] minutes checkbox selected to turn on the automatic update of the
profile on the server. Change the updating interval if necessary. The updates will be send to the
server in a specified time interval.
•
Press Manage contexts button to add or remove the contexts (3.2)
14
Conex. User’s manual.
•
Press Configure connection button to change the server connection configuration (3.1)
•
Press Ok after the configuration is done.
The changes will be submitted to the server immediately after closing this dialog box.
15
Conex. User’s manual.
4
Working with documents
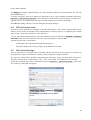
4.1
The documents list
The documents list contains all documents of a selected location, or results of navigational and search actions. The list is located at right (wide) column of Conex tabs (or opened in a separate window).
The list is represented in two view modes:
Detailed view (default)
Displays the list as a table with document metadata properties as the columns
•
List view
Displays a single-column list with brief document info.
•
To switch between the view modes, use View → View mode menu or
buttons on the list toolbar.
The documents are selected by clicking an item in the list. To select multiple documents, click them in the
list while holding the Ctrl key. To select multiple documents in a continuous range, select the first item
and then the last item while holding the Shift key. To select all documents of the list, choose Select → Select all menu item or press Ctrl+A. To clear the selection, choose Select → Select none menu item (Ctrl+D).
All operations with individual documents or selections are performed in the Document menu. These
menu items are duplicated with buttons on the documents list toolbar and also in the documents list context menu.
4.1.1 Customize the detailed view
The detailed view can be customized by choosing the document properties to display as the table columns
in View → Columns menu. This menu can be called also by right-clicking a column header.
To re-order the columns of the detailed view, drag the column headers. Change the columns width by
dragging the header edges.
4.1.2 Sort the list
To sort the documents list, select a document property in View → Sort by menu. The documents will be ordered by values of the selected property. Alternatively, in the Detailed view mode, you can click on a
property column header to get the list sorted by that property.
To sort the list in ascending order, select View → Sort by → Ascending order option.
option means that the documents are ordered by relevancy to the query (in
the case of a search result) or listed in no specific order (in all other cases).
View → Sort by →No sorting
4.1.3 Filter the list
Filter search panel on the right side of the documents list toolbar allow to restrict the list content by documents that match a specified search query:
Illustration 11: Filter search panel
To filter the documents list, enter a query string into the text field and press
To specify the document properties which the filtering will be applied to, press
properties in a pop-up menu box.
button.
button and select the
16
Conex. User’s manual.
To clear the text field and cancel the filtering, press
button.
The query string for filtering may use special query expression syntax (see ).
4.2
Open a document
Documents from Conex documents list can be opened in an external application. It is possible to set multiple applications for opening documents of different types.
To open a document with a default external application, double-click it in the documents list or select it
and choose Document → Open document menu item.
On Windows™ and Mac OS X™ platforms, Conex by default uses system file associations to identify an
application to open a document. On other types of desktops (or if this method fails otherwise), you will
be asked to set an application before opening a first document of a given type (4.2.1).
4.2.1 Open a document with specific external application
To open a document with an external application, already defined for this document type, choose it in
Document → Open document with menu.
To set new application to open the documents of a given type, select Document → Open document with →
Select program… menu item.
Illustration 12: "Select program" dialog
•
In the Program file field enter full path to the executable program file or use Browse button to find
and select the file.
•
In the Command line options enter additional command line arguments of the program, if needed.
If this field is empty, only document path (URL) will be passed to the program. Alternatively, you
can define program arguments line, using two dollar characters ( $$) to be substituted with a real
document path.
•
Select Default application for this documents type checkbox if this application should be used by
default for Open document action (if multiple applications are defined for this document type).
As soon as the application is set, it will be added to Document → Open document with menu and available
for all documents of the same type. Repeating this operation, you can define as many different applications as you wish.
17
Conex. User’s manual.
4.3
Edit document properties
4.3.1 Quick edit in the detailed view mode
To edit a property value of a document in the detailed view mode, select a document and click on a table
cell of the property to edit the value. Select another document or press Enter when editing is done.
Press Esc to cancel editing and discard the changes.
Note that some properties are not editable.
4.3.2 Document properties dialog box
To edit the document properties in the dialog box, choose Document → Edit document properties menu
item.
Illustration 13: Document properties dialog box
The General tab of the dialog box contains some most common metadata properties to view and edit:
•
Title
The document title
•
Description
A description of what the document is about
•
Tags
A space-separated list of the document tags. You can edit the tags in the text field, or press Select to call
the Edit tags dialog (see Error: Reference source not found)
•
Author
A document author. Enter the author name or select an existing author in the combobox.
On the Notes tab of the dialog box you can edit the document notes (see Error: Reference source not
found)
18
Conex. User’s manual.
The Details tab contains a detailed table view of all metadata properties of this document. You can edit
those marked with “*”.
To assign a property value for a number of documents at once, select multiple documents and choose
Document → Edit document properties. In the dialog box, fill the fields for the properties you want to assign the values to. For empty fields, the original values will be preserved in the documents.
Press Ok after editing is done to close the dialog box and apply changes.
4.4
Edit document notes
A text note can be attached to a document to describe and annotate it. The “Notes” property differs from
others as Conex makes no attempt to fill it automatically at indexing stage (it is completely user-edited)
and provides a special user interface to view and edit it.
To view and edit the document notes, select the document in the list and choose Document → Edit document notes menu item. Then, edit the text note in a pop-up dialog box and press Ok.
Alternatively, the notes can be edited:
•
On the Notes tab of the document properties dialog box.
•
By quick editing of the “Notes” property in the Detailed view mode.
4.5
Edit document tags
Tags are keywords or text labels freely associated with the documents in the repository to provide tag
navigation facet. There is no limits on a number of tags assigned to a single document.
The tags can contain letters, numbers and punctuation characters, except for quote marks and spaces.
Tags are case-insensitive, so that the tags “cats”, “Cats” and “CATS” are interpreted as the same tag.
To edit the document tags, select a document and choose Document → Edit document tags... menu item.
The “Edit tags” dialog box will appear:
Illustration 14: Edit tags dialog box
19
Conex. User’s manual.
Enter the tags into the Tags text field, separating individual tags with spaces, or select the tags from the
lists below the field:
Existing tags list contains the tags already assigned to other documents. An item size indicates a
number of documents a given tag is assigned to.
•
Suggested tags list contains the words, recommended by a tag suggestion algorithm. If a word is
an existing tag, it’s marked with a bold font. An item size indicates relevancy of a given term to the document. You can adjust the length of the list with the Less terms ↔ More terms slider.
•
Alternatively, the document tags can be edited:
•
Via the Document properties dialog box
•
By quick editing of the “Tags” property in the Detailed view mode.
To edit tags of multiple documents at once, select the documents and choose Document → Edit document
tags... menu. Select Preserve existing tags checkbox to add tags from the dialog box to existing tags of
the selected documents. Otherwise, tags from the dialog box will replace tags of those documents.
4.6
Documents autotagging
Autotagging is a process of automated assigning the relevant tags to documents. Autotagging can be applied to all documents of a specific location or to individual documents selected in the document list.
To autotag the selected documents, choose Document → Autotagging... menu item and set autotagging options in a dialog box:
Illustration 15: Autotagging options
•
Set a desired number of tags to be assigned for each document with the Tags per document slider.
Select Preserve existing tags checkbox to add new tags to existing ones. If this option is not set,
new tags will replace all tags assigned to the documents before.
•
Selected Do not create new tags checkbox will cause selection of tags from the existing tag set
(new tag creation is disabled). Use this option if you want to control your taxonomy manually.
•
Note that if Do not create new tags option is set, an actual number of tags assigned to some documents may be lesser than specified, or no tags may be assigned at all. It indicates that there are no
existing tags relevant to those documents.
4.6.1 Global autotagging preferences
Depending on size and semantic nature of your document collection, you may want to adjust global parameters to fine-tune the autotagging process and to achieve the best results. These parameters also affect
the tag suggestion algorithm.
To set up the autotagging parameters, select the Autotagging tab of the global Configuration dialog (Tools
→ Configure...):
20
Conex. User’s manual.
Tags specificity is an autotagging parameter which defines whether the terms extracted from a
document directly must have higher priority than ones picked from a document context (a cluster of similar documents). High specificity leads to large and granulated taxonomies with small numbers of documents sharing the same tags, while low specificity increases the value of “general” terms, thus producing
lesser tags number but with more documents per single tag.
•
parameter controls a tendency of autotagging to invent new tags instead of re-using
existing ones. When set to maximum, existing tags takes no priority of new candidates. Otherwise, if everything else is equal, existing tags have more chances to be selected for new documents. Minimal novelty means absolute priority of existing tags.
•
Tags novelty
Tags autopopulation relevancy threshold defines a minimal value of document relevancy required
by Tag autopopulation algorithm (see ) to assign the tag.
•
21
Conex. User’s manual.
5
Navigation and search
5.1
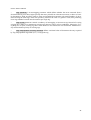
Faceted browsing
“Browse” tab provides the widgets to navigate the documents collection by selecting the values of specific metadata properties (facets). Facet value selection causes navigating to a subset of the documents
matching the specified value.
5.1.1 Path widget
Illustration 16: Path navigation
The path widget provides browsing the documents by paths of the original files or URLs represented as
tree-like structures. Selection of a tree item causes navigation to a subset of documents in the selected
path (including all descendant items).
5.1.2 Author widget
Illustration 17: Authors navigation
The authors widget contains an alphabetically sorted list of all author names found in the “Author” metadata properties of the documents. Selection of an author in the list causes navigation to a subset of documents matching the selected value.
To find a specific author, start typing the name in the text field below the list. The list will be filtered by
an entered value. To clear the text field, press
button.
22
Conex. User’s manual.
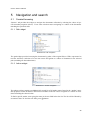
5.1.3 Date widget
Illustration 18: Dates navigation
The dates navigation widget contains a calendar to navigate the document repository by dates of document creation. Selection of an year, a month or a day in the calendar causes navigation to a subset of documents created at the selected period of time.
5.1.4 Language widget
Illustration 19: Languages navigation
The language widget contains a list of all languages of the documents in the repository. To navigate to a
subset of documents with a specific language, select it in the list.
5.2
Tag navigation
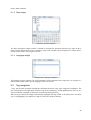
“Tags” tab provides navigation through the document repository using tags, assigned to documents. The
tags cloud widget in the right panel contains a list of all existing tags, sorted alphabetically. The size of a
list item indicates a number of documents associated with the given tag.
When a tag is selected, the widget automatically highlights the tags related to the selected one. An intensity of a highlighting color indicates a degree of relevancy between the tags.
23
Conex. User’s manual.
Illustration 20: Tag navigation
Selection of a tag causes navigating to the subset of documents, matching the selected tag. To select multiple tags, hold down the Ctrl key. For quick finding and selection of a tag, click inside the tags widget
and start typing.
Tag management operations are accessed via Tag menu items. They are duplicated with the buttons on the
tags widget toolbar and with the context menu.
5.2.1 Populate tags
Tag autopopulation is a process of assigning a given tag to the documents relevant to it. A minimal
threshold for document relevancy is set in the application preferences.
To populate a tag, select it and choose Tag → Populate tag menu item.
To populate all tags, choose Tag → Populate all tags menu item.
5.2.2 Delete a tag
To delete a tag from all documents associated with it, select a tag and choose Tag → Delete tag menu item.
5.3
Search
“Search” tab provides an interface to the full-text and structured property search functions of Conex. The
search results are displayed in the tab’s document list, sorted by relevancy by default.
5.3.1 Quick search
To perform a quick search, enter a query string into the text field on the “Search” tab and press
or hit Enter key.
button
The quick search queries can use special query syntax.
24
Conex. User’s manual.
If no document property is declared with the special syntax, the search is performed over document properties, defined in the “Search in” menu. To change the searchable property set, open this menu by pressing
button and select the properties in a pop-up menu box.
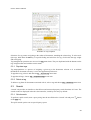
5.3.2 Advanced search
To perform complex, structured search queries, click on Advanced search or
visual query constructor:
button. It calls the special
Illustration 21: Advanced search dialog
A query contains of one or more search rules, grouped and connected with boolean operators (”And”/
“Or”). “And” connector means that the search results must be relevant to all rules in a group. “Or” connector — that they must be relevant to at least one rule in a group.
Each rule consists of a document property, condition and a test value. Available conditions (predicates)
and their negations are:
Contains (Does not contain)
Searches for any listed term (space-separated). Wildcard characters (? and *) are allowed in the terms.
•
Contains phrase (Does not contain phrase)
Searches for an exact phrase (including space characters)
•
(Does not equal to)
Searches for an exact value of a given data property. Wildcard characters are allowed.
•
Equals to
After / Before
For date properties, searches for values of dates after or before the given date.
•
To add new rule to the query, click on And... or Or... button for an existing rule. To delete a rule, click on
Delete button.
To save a query for repeating use, enter a name for this query in Save search as field.
5.3.3 Saved searches
Advanced search queries, saved for repeatable use, are available in the list on the “Search” tab panel. To
execute a query, double-click it in the list or select it and press
button on the list toolbar.
To edit a saved query before execution, select it in the list and press
To delete a query, select it and press
button.
button.
25
Conex. User’s manual.
5.3.4 Associative search
On each search query, the results are analyzed to identify valuable terms related to the subject of the
query. These words may give you some hints about what to search also on a subject and are suggested for
the next query.
To add a suggested term into the quick search field, press More ‣ button on the search panel and select a
term in the pop-up list.
5.3.5 Finding similar documents
A special type of search is finding a set of documents, conceptually similar to a given one. This allows to
identify a set of documents on a specific subject, taking a known document as a pattern.
This function is available from the documents list. To find the similar documents, select a pattern document in the list and choose Document → Find similar documents... menu item.
The search results are displayed in new window as a document list, sorted by relevancy to the pattern
document. Moving Less documents ↔ More documents slider, you can adjust the relevancy threshold to
populate the list.
To close the documents list window, press Close button.
26
Appendix A.
Search query special syntax
The special query expression syntax allows to perform complex queries like with Advanced search query
constructor. For complete search query syntax refer to the Apache Lucene guide2.
The search is case-insensitive. In addition, if the documents were indexed with the “Apply stemming”
option and this option is turned on, a query will match any document containing a variation of a word
with a same stem as the query term have. For instance, the query term “constructor” will match the words
“construct”, “constructor”, “construction”, “constructed” etc.
Document properties
To search on specific document properties in the Quick search, use the term prefix in form of a name of a
property and the colon (”:”). For instance, to search the word “wiki” in document titles only, use the
query term:
title:wiki
To search more than one word in the same document property, use parentheses:
author:(John Mary Jane)
This query returns the documents containing either John, Mary or Jane in the “author” property.
The following document properties are available for search:
•
•
•
•
•
•
•
•
•
•
•
•
title - Document title
description - Document description
text - Document text (default)
author - Document author
notes – Document notes
date - Creation date
date_modified - Modification date
url - Full document URL
file - File name
path - File path
size - File size in bytes (for local documents)
language - Document language code (e.g. “en”, “fr”, “de”,
etc)
Note that the set of metadata properties depends on the document type plugins installed. Some plugins
may define additional document properties. To know which properties are available in your actual configuration, open the Details tab of the Document properties dialog. A common rule of using a property name
in search queries is to lowercase all letters and replace spaces with underscore characters (e.g. “Date
modified” ⇒ “date_modified”). The “Tag” property, though exists, is not searchable.
If no property prefix is set, Quick search uses the properties defined in the “Search in” menu.
Phrase search
By default, a query expression containing multiple space-separated terms matches the documents containing any of those terms. For searching for an exact phrase (including the spaces), it must be surrounded
with double quotes:
"Hello, world"
2
http://lucene.apache.org/java/docs/queryparsersyntax.html
Conex. User’s manual.
title:"New York"
author:"John Doe"
Wildcards
Wildcards are used to replace one or more characters in a query.
“?” symbol is a single character wildcard. For example, “ h?t” matches any of words “hat”, “hit”, “hot”,
but not “heart”.
“*” symbol is a multiple characters wildcard. For example, “ list*” matches any of words “list”,
“listing”, “listen”, “listener”, etc.
Note: You cannot use a * or ? symbol as the first character of a search.
Date search
The values of the date properties (date and date_modified) has the following format:
yyyyMMddHHmmssSSS
Where
•
•
•
•
•
•
•
yyyy - Year (4 digits)
MM - Month (2 digits)
dd - Day (2 digits)
HH - Hours (2 digits)
mm - Minutes (2 digits)
ss - Seconds (2 digits)
SSS - Milliseconds (3 digits)
To search on the date properties the wildcards can be used. For example:
date:20090820* (all documents, created at August, 20 2009)
date_modified:200707* (all documents modified during July, 2007)
It is also possible to search the documents in a range between two dates:
date:[20070715* TO 20070815*] (all documents, created between July, 15 and August, 15 2007)
date:[0 TO 2007*] (all documents, created before 01/01/2008)
Fuzzy and proximity search
Fuzzy queries are used to find the terms similar in spelling to a given word. For a fuzzy search, add the
tilde, "~", symbol at the end of a single term expression:
roam~
(will find documents containing words “roam”, “roams”, “foam”, “road” and alike)
For finding words which are within a specific distance away (proximity search) use the tilde, " ~", symbol
at the end of a phrase. For example to search for an "oil" and "import" within 10 words of each other in a
document use the search:
“oil import”~10
Boosting a term
In multi-term queries, it’s possible to specify a boost factor of a specific term. A boost factor indicates an
importance of a term in the query, so that the documents matching the boosted terms will have higher relevancy in the search results. To boost a term use the caret, "^", symbol with a boost factor (a number) at
the end of the term you are searching:
28
Conex. User’s manual.
(documents containing an “oil” (or “oil” and “import”) will be 4 times more relevant than
those, containing “import” only).
oil^4 import
Boolean operators
Few term expressions can be combined in a single query through boolean (logic) operators (OR, AND, +, -,
NOT). By default, if no operator is defined, boolean OR is assumed. For instance:
author:(John Mary Jane) is equivalent to
author:(John OR Mary OR Jane) or
author:John OR author:Mary OR author:Jane
conjunction means that the result may contain at least one of the specified terms (either John, Mary or
Jane).
OR
and NOT operators must contain UPPERCASE letters only. They can also be substituted with the
following symbols:
OR, AND
OR : ||
AND : &&
NOT : !
AND operator
If the terms are combined with AND (&&) operator, all terms must be presented in the search result:
title:oil AND price
Searches the documents that contain “oil” in the title and “price” in the text.
+ operator
“+” prefix indicates a required term. The result must contain the term after “+” symbol:
+oil import price
Searches the documents that contain “oil” and optionally, “import” or “price”.
- operator
“-” prefix indicates a prohibited term. The documents containing this term are excluded from the search
results:
-olive oil
Searches the documents that contain “oil” but not “olive”.
NOT operator
If two terms are combined with NOT operator, the documents that contain the term after “ NOT” are excluded from the search result:
oil NOT olive
Is equivalent to the example above.
Grouping
To group the boolean clauses in complex search queries, parentheses are used. Examples:
(title:oil OR oil) AND price
(author:(John Mary Jane) AND import) NOT date:2007*
(oil AND price) OR (brent AND urals)
29
Conex. User’s manual.
Escaping Special Characters
Some characters are reserved by query syntax and must not be used unescaped:
+ - && || ! ( ) { } [ ] ^ " ~ * ? : \
To escape these character use the backslash, “\” before the character. Examples:
“Washington \(city\)”
“\”Exactly\!\”, he said.”
30
Conex. User’s manual.
Appendix B.
Troubleshooting
If you experience problems with Conex:
1.
Check the messages in the application log window or in a log file (see Logging section below)
2.
Check the program debug output in the system console (see Logging section below)
3.
Read the “Common issues” section of this appendix
4.
If no solution is found and you think the problem is caused by a bug in the application, please
submit a bug report. Please provide a detailed description of your problem and attach the console output
if possible.
Logging
Log window
To see the warning and error messages in the application log, click on the button in the bottom right corner of the Conex screen. The log messages window will appear.
To force immediate memory garbage collection, press GC button. It may free some amount of RAM.
To clear the messages window and close it press Clear and close. To close the window without clearing
the messages, press Close.
Console output
To see the full program output while Conex is running, open the system console window, go to the directory where Conex is installed and execute the startup script (conex.bat or conex.sh, depending on your
platform).
Logging to a file
To configure file logging, open scan.conf file in the Conex home directory in a text editor of your
choice and add an entry:
<entry key="scan.logging.file.level">ALL</entry>
Instead of ALL you can specify the minimal level of messages to be written into the file (CONFIG, INFO,
WARNING or SEVERE).
By default, the log file is named conex.log and located in the Conex home directory. You can change its
name and location by adding an scan.logging.file.path entry, e.g.:
<entry key="scan.logging.file.path">/var/log/Conex.log</entry>
Common issues
“Tagger: Cannot connect to database ...” error at startup
Indicates that another Conex process is already running or that a previous session has been halted
unexpectedly (e.g because of a power break). Make sure that Conex is not already started with
the same repository path. If it is not the case, delete repository/db/.lck file and run Conex
again.
31
Conex. User’s manual.
“Out of memory” error
Conex may run out of memory limits when parsing very large documents. If it happens, try to increase an amount of RAM available for Java Virtual machine by editing a line in the startup
script, e.g.:
java -Xms256M -Xmx256M
-jar launcher.jar
In the example above, RAM limit is increased up to 256Mb. You can replace it with another reasonable value.
Encrypted PDF files are skipped
The feature is unsupported at the moment.
Duplicate document entries
Tags without documents
May be caused by an unexpected break of the application. Run Index maintenance function
(Tools → Configure... → Index Maintenance → Start) to check and fix the repository index.
Backup and restore the repository and settings
It is recommended to backup the repository and configuration files before upgrading the Conex version.
To make a repository backup, copy the contents of the Conex home directory. To identify the path to this
directory, look at the Repository path field of Conex Configuration dialog (Tools → Configure...).
To restore the repository, copy the archived contents back to this directory (check if Conex is not started
during copying).
32
Conex. User’s manual.
Appendix C.
Keyboard shortcuts
Shortcut
Action
Enter
Open a document
Ctrl+Enter
Select a program to open a document
Alt+Enter
Edit document properties
F2
Edit a property in a selected cell
F4
Edit document tags
Shift+F4
Edit document notes
F5
Update a selected location
Ctrl+F5
Update all locations
Up / Down
Navigate the document list
Ctrl+Home / Ctrl+End
Go to the top / bottom of the list
Shift+Up / Shift+Down
Select the list items
Ctrl+A
Select all
Ctrl+D
Unselect all
33