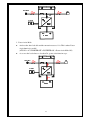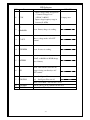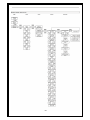
1
PURE SINE WAVE INVERTER /
ATS / BATTERY CHARGER
Models: 12-1850IC IP, 12-3550IC IP,
24-3550IC IP, 24-3550IC IPF
TECHNICAL MANUAL
M-Inverter IP
As of April 09
CONTENTS
Introduction ……………………………………………………………………………………..IV
Specification ............................................................................................................................
Dimension ...............................................................................................................................
Ⅵ
Ⅷ
Chapter 1 Installation ........................................................................................................... 1-1
1.1 Box Contents .................................................................................................. 1-1
1.2 Location .......................................................................................................... 1-1
1.3 Requirements ................................................................................................. 1-1
1.4 Connection of Battery Cables ........................................................................ 1-1
1.5 Connection of AC Cabling ............................................................................. 1-1
1.6 Optional Connections..................................................................................... 1-3
1.7 Grounding ...................................................................................................... 1-3
1.8 Remote Control Panel (RCP-3) ..................................................................... 1-3
Chapter 2 Control Modes ..................................................................................................... 2-1
2.1 Four Control Modes Application .................................................................. 2-1
Auto 1: AC Power as Priority Support ......................................................... 2-1
Auto 2: AC Generator Support with Dynamic Power Shifting ........................................... 2-4
Inverter Only Mode ....................................................................................... 2-6
Charger Only Mode ....................................................................................... 2-8
Chapter 3 Wiring .................................................................................................................. 3-1
3.1 Front Panel Display ....................................................................................... 3-1
3.2 Panel Connection ........................................................................................... 3-4
3.3 Battery Connection ........................................................................................ 3-5
Capter 4 User Constants ....................................................................................................... 4-1
4.1 Structure of User Constants .......................................................................... 4-2
4.2 Operation Flow .............................................................................................. 4-6
II
Chapter 5 Constants List ...................................................................................................... 5-1
U Group: Monitor................................................................................................ 5-1
A Group: Initialize ............................................................................................... 5-2
B Group: General ................................................................................................ 5-2
C Group: Inverter................................................................................................ 5-3
D Group: Charger ............................................................................................... 5-3
E Group: Aux-Relay ............................................................................................ 5-3
O Group: Operator .............................................................................................. 5-8
Chapter 6 Programming Constants ..................................................................................... 6-1
A Group: Initialize ............................................................................................... 6-1
B Group: General ................................................................................................ 6-3
C Group: Inverter................................................................................................ 6-8
D Group: Charger ..............................................................................................6-10
E Group: Aux-Relay ...........................................................................................6-13
O Group: Operator.............................................................................................6-19
U Group: Monitor...............................................................................................6-21
Chapter 7 Trouble Shooting Table ....................................................................................... 7-1
Factory Contact Info……………………………………………………………….7-4
III
Introduction
General
Multi-functional Feature
The “Intelligence Plus” is a powerful true sine wave inverter, a sophisticated battery charger
that features adaptive charge technology and a high-speed AC Auto Transfer Switch (ATS) in
a single compact enclosure. Besides these primary functions, however, the Intelligence Plus
has several advanced features that provide a range of new applications as outlined below:
Uninterrupted AC Power
In the event of a grid failure, or shore or generator power being disconnected, the inverter
within the Intelligence Plus is automatically activated and takes over supply to the connected
loads. This happens so fast (less than 10 milliseconds) that computers and other electronic
equipment will continue to operate without disruption.
Power Control-Dealing with limited generator or shore side power
The “Intelligence Plus” is a very powerful battery charger. It will therefore draw a lot of
current from the generator or shore side power. A maximum generator or shore current can be
set (B2-05). The “Intelligence Plus” will then take account of other AC loads and use
whatever is extra for charging thus preventing the generator or shore supply from overload.
Power Assist-Boosting the capacity of shore or generator power
This feature takes the principle of Power Control to a farther dimension allowing the
“Intelligence Plus” to supplement the capacity of the alternative source. Where peak power is
so often required only for a limited period; it is possible to reduce the size of generator
needed or conversely enable more to be achieved from typically limited shore connection.
When the load reduces, the spare power is used to recharge the battery.
Battery Charger
4-stage charge characteristic: Bulk-Absorption-Float-Equalize
The “Intelligence Plus” features a microprocessor controlled battery management system that
can be preset to suit different types of batteries.
Preventing damage due to excessive gassing: The Battery Safe Mode
If, in order to quickly charge a battery, a high charge current in combination with a high
absorption voltage has been chosen. The “Intelligence Plus” will prevent damage due to
excessive gassing by automatically limiting the rate of voltage increase once the gassing
voltage has been reached.
Less maintenance and aging when the battery is not in use: The Equalize Mode
The equalize mode kicks in whenever the battery has not been subjected to discharge during
IV
24 hours. In the equalize mode, float voltage is reduced to 2.2V/cell (13.2V for 12V battery)
to minimize gassing and corrosion of the positive plate. One a week, the voltage is raised
back to absorption level to “equalize” the battery. This feature prevents stratification of the
electrolyte and sulphation, a major cause of early battery failure.
2 outputs to charge 2 battery banks
The “Intelligence Plus” features 2 outputs, of which 1 can carry the full output current. The
second output, limited to approximately 4A and with a slightly lower output voltage, is
intended to top up a starter battery.
To increase battery life: Temperature Compensation
Every “Intelligence Plus” can come with an optional battery temperature sensor (BTS-3)
when connected, charge voltage will automatically decrease with increasing battery
temperature. This feature is especially recommended for sealed batteries and/or when
important fluctuation of battery temperature is expected.
Battery Voltage Sense
In order to compensate for voltage loss due to cable resistance, the “Intelligence Plus” is
provided with a voltage sense facility so that the battery always receives the correct charge
voltage.
Product Registration
Newmar warrants that this Inverter-Charger be free from defects in material and workmanship for
two years from date of purchase. If you wish to register our product with us and provide
comments or questions, please log onto www.newmarpower.com/product_registration.html or for
immediate response to your questions or comments, please call tech service at 1-800-241-3897 or
E-mail: [email protected].
V
Specification
12 Volt System
MODEL
12-1850 ICIP
12-3550 ICIP
24 Volt System
24-3550 ICIP
GENERAL
Ventilation
Temperature
–
Operation
–
Storage
Forced cooling
Forced cooling
-20
-20
℃~ +70℃
-25℃~ +80℃
℃~ +70℃
-25℃~ +80℃
Protection
a. Output short circuit
Yes
Yes
b. Over load
Yes
Yes
c. Battery voltage too high
Yes
Yes
d. Battery voltage too low
Yes
Yes
e. DC voltage ripple too high
Yes
Yes
(105℃)
(70℃)
(50℃)
(105℃)
(70℃)
(50℃)
0~95% (non condensing)
0~95% (non condensing)
Power control Function
Yes
Yes
Power assist Function
Yes
Yes
Uninterrupted AC power
(less than 10 msec)
(less than 10 msec)
Adaptive 4-stage charge
Yes
Yes
Two output to charge 2 battery banks
Yes
Yes
Auxiliary Relay
X3
X3
Battery voltage sensor
Yes
Yes
Battery Temperature sensor (BTS-3)
Yes
Yes
Remote control port
Yes
Yes
f. Temperature Sensor
Transformer
Electronic & Powerstage
BTS-3
Humidity
INVERTER
Input Voltage Range (VDC)
9.5 -16V / 19-32V
Output Voltage (VAC)
185~240 VAC / 90~120 VAC
Output Frequency
50Hz /60Hz ± 0.1%
Output Waveform
Pure sinewave
< 5%
Output Voltage THD
Yes
Power Factor (All Loads)
No linger load, crest factor
3: 1
VI
Output Wattage (Models)
1500 W
3000 W
Continuous
1500 W
3000 W
30 Minutes
1800 W
3500 W
5 Minutes
2000 W
4000 W
5 Seconds
3000 W
6000 W
3000W
6000W
82/84/85
84/86/89
12W
18W
Maximum Power (W)
Maximum Efficiency (%)
Zero-load Power (W)
CHARGER
Input Voltage Range (VAC)
200~250 VAC / 100~125 VAC
Input Frequency
45-55Hz /55-65 Hz
Power Factor
1
Charge Characteristic
4-stage / Bulk-Absorption-Float-Equalize
< 1.25 V
Maximum DC Voltage Ripple (Vrms)
Charge Current House Battery (A)
70A/40A
140A/70A
Charge Current Starter Battery (A)
4A
Absorption Voltage Default (VDC)
14.2V / 28.4V
Float voltage Default (VDC)
13.4V / 26.8V
Output Charge Voltage (min ~ max)
8V~16V / 11V~32V
Battery Temperature sensor
BTS-3
AC INPUT SWITCH
AC IN Terminal Circuit Breaker
30A (110V) /15A (220V)
60A (110V) /30A (220V)
Switch-over Time
a. inverter to AC input
0 msec.
b. AC input to inverter
0 msec.
Detection Time AC Input Fault
4 ~10 msec.
Trip Level AC Input to Inverter
90 VAC / 180 VAC
Trip Level Inverter to AC Input
94 VAC / 187 VAC
Min.~ Max. Frequency Range
45-55 Hz / 55-65 Hz
MECHANICAL
Cabinet / Protecting Class
Dimension (HXWXD)
Aluminum / IP20
12 x 12 x 14.4 inches
12 x 17.1 x 14.4 inches
66 lbs
77 lbs
Weight (lbs)
VII
Dimension for Intelligence Plus 1850W 12/24
Unit: Inches
VIII
Dimension for Intelligence Plus 3550W Series 12 VDC
Unit: Inches
IX
Dimension for Intelligence Plus 3550W Series 24 VDC
Units = Inches
X
Chapter 1: Installation
1-1
This product should be installed by a qualified electrician.
1) IMPORTANT SAFETY CAUTIONS AND WARNINGS
CAUTION: Inverters produce hazardous voltages. To avoid risk of harm or fire, the unit must be
properly installed. There are no user-serviceable parts inside. Do not remove the inverter
housing.
CAUTION: The inverter should not be mounted in a location that may be exposed to rain or
spray.
CAUTION: The inverter should not be installed in zero-clearance enclosure.
CAUTION: Damage to the inverter will occur if correct polarity is not observed when installing
the DC input cables.
CAUTION: Damage to the inverter will occur if an external AC source is applied to the inverter’s
AC output.
CAUTION: The inverter contains a circuit breaker and capacitor that may produce a spark. Do
not mount in a confined battery or gas compartment.
CAUTION: Working in the vicinity of lead-acid batteries is dangerous. Batteries generate
explosive gasses during operation. There is a risk of acid exposure. There is also a risk of high
current discharge from shorting the battery that can cause fire and explosion.
CAUTION: UL and ABCY specify that the DC input shall be fused no further than 18” from the
battery. This is the responsibility of the installer.
CAUTION: Be sure both the inverter and, if used, the external AC input circuit breaker or fuse
are turned “OFF” during installation.
WARNING: The inverter/charger is not ignition protected, so it must not be located in an
area where ignition protected equipment is required.
EXTERNAL CONNECTIONS TO THE INVERTER/CHARGER SHALL COMPLY
WITH UL RECOMMENDATIONS AND/OR UNITED STATES COAST GUARD
ELECTRICAL REGULATIONS (33CFR183, SUB-PART I)
THE INSTALLATION AND PROTECTION OF VESSEL WIRING ASSOCIATED WITH
INVERTER/CHARGERS SHALL COMPLY WITH ABYC STANDARDS, E-11 AC & DC
1-2
ELECTRICAL SYSTEMS ON BOATS AND A-31 BATTERY CHARGING DEVICES
AND INVERTERS.
1.1 Box Contents
Intelligence Plus Inverter-Charger
USER MANUAL
Bag Containing connection items, ie:
Four (4) terminals and casing
One (1) Black & One (1) Red Input Cover
Four (4) screws with washer attached
BTS-3 Temp Sensor
Two (2) mounting brackets
Six (6) flat Phillips head screws
1.2 Location
The product must be installed in a dry and well-ventilated area, as close as possible to
batteries. There should be a clear space of at least 8 inches around the appliance for cooling.
Excessively high ambient temperature will result in the following
Reduced service life
Reduced charge current
Reduced peak capacity or shutdown of the inverter
Never position the appliance directly above the batteries.
Intelligence Plus is suitable for wall mounting. The back and the bottom of the enclosure has
holes for wall mounting purposes. For horizontal mounting, attach the two mounting brackets
provided to the bottom of the Intelligence Plus with the six flat Phillips head screws. The
bottom of the mounting brackets has holes for horizontal mounting.
The interior of the product must remain accessible after installation. Ensure the AC
and DC input cables are fitted with fuses and circuit breakers. Try and keep the
distance between the product and battery to a minimum in order to minimize cable
voltage losses.
For safety purpose, this product should be installed in a heat-resistant environment if
it is used with equipment where a substantial amount of power is to be converted. You
should prevent the presence of e.g. chemicals, synthetic components, curtains or
textiles, etc. in the immediate vicinity.
1.3 Requirements
Philips screwdriver for removing the lower-front panel and connecting AC loads.
2 battery cables (maximum length 20 feet)
Including battery terminals and cable ends.
Insulated socket wrench or nut driver (13 mm) for securing the DC terminal nuts.
Three-wire cable for AC cabling.
1-3
Mounting screws or bolts
1.4 Connection of Battery Cables
In order to fully utilize the full capacity of the product, batteries with sufficient capacity and
battery cables with sufficient cross section should be used, please see table:
Wire Size Chart
Model
Length of Wire from Charger to Batteries (in feet)
10'
15'
20'
Over 20'
Minimum Wire Gauge (AWG)
12-1850IC IP
12-3550IC IP
24-3550IC IP
#1/0
#2/0
#1/0
#1/0
#4/0
#2/0
#2/0
#4/0
#2/0
Not recommended
Not recommended
Not recommended
*Meets minimum requirements of ABYC 10% voltage drop table for inverter maximum input
current, 3% voltage drop table for charger maximum output, and allowable amperage for 105⁰ C
rated insulation conductors <50 VDC inside engine space. Consult ABYC E-11 for lower
temperature rated insulated conductors.
CAUTION: Ensure that leads are properly fused at the battery. (Refer to ABYC
recommendations regarding fuse type and location.) Refer to the chart following chart for proper
battery fuse value for each model:
DC Fuse Chart
Model
Fuse Value
12-1850IC IP
12-3550IC IP
250 Amp
500 Amp
24-3550IC IP
250 Amp
Procedure:
Proceed as follows to connect the battery cables:
Use an insulated socket wrench or nut driver in order to avoid shorting the battery.
Avoid shorting the battery cables:
Undo the four screws at the lower-front panel of the enclosure and remove the panel.
Connect the battery cable: the + (red) on the right and the – (black) on the left. Please
see page 3-4 and 3-5.
Don’t reverse the (+) and (-) of the battery. This may cause internal damage.
Tighten the connections after positioning the fastening items supplied with product.
Secure the nuts tightly in order to reduce the contact resistance as much as possible.
1-4
1.5 Connection of AC Cabling
The enclosure must be grounded for safety purpose. An earth screw has been fitted at
the bottom side of the enclosure.
The terminal block can be found at lower-front panel of the enclosure: The shore or mains
(AC IN) cable must be connected to AC IN terminals. This wire should be at least 10 AWG
for 30 amp service and 6 AWG for 50 amp service
Procedure:
Proceed as follows to connect the AC cables.
The AC output cable can be connected directly to terminal block containing the word
“AC OUT”. The terminal points are indicated clearly. From left to right: “G” (earth),
“N” (neutral), and “L” (Line).
The AC input cable can be connected to the terminal block containing the word “AC
IN”, the terminal points are indicated clearly from left to right “L” (Line), “N”
(neutral), and “G” (earth).
The current which is switched through to the output (AC OUT) is not fused.
External fuses or current limiters have to be installed.
1.6 Optional Connections
A number of operational connections are possible:
1.6.1 Second Battery
The “Intelligence Plus” has a connection for trickle charging (up to 4 amps) a starter
battery. For connection, see page 3-4 and 3-5.
1.6.2 Voltage Sense
Two sense wires may be connected to compensate possible battery cable losses during
charging. Use wires of at least 16 gauge. For connection, see page 3-4 and 3-5.
1.6.3 Battery Temperature Sensor (BTS-3)
The battery temperature sensor supplied with the product may be used for temperature
compensated charging, see page 3-4 and 3-5.
The sensor is insulated and must be mounted on the batteries minus post.
1.6.4 3 Sets of Auxiliary Relay (RY1, RY2, RY3) Output
The “Intelligence Plus” provides 3 sets of Auxiliary Relays for users to connect to
other appliances or to output the alarm signals. 3 sets of relays can be programmed for
respective function (E Group Constants) and can be practically applied which is one of
the greatest features.
1.7 Grounding
When the input voltage of the Intelligence Plus is not switched through, the neutral of “AC
OUT” is automatically connected to ground by means of a relay. There is a DC case ground
connection going out the lower front of the wiring compartment, see 3-4 and 3-5.
1.8 Remote Panel: P/N 430-4000-0
1-5
The product can be operated remotely from the remote jack with the aid of a remote control
panel. For connection of a remote control panel, see page 3-1.
Note: The display panel and operation flow of the remote control panel is exactly the same as
the upper-front display panel. For panel dimensions, dimensional drawing found on next
page.
Dimensions for Intelligence Plus Remote Control Panel
Units = mm
Panel Installation
Cut-out Dimensions:
209mm(W) X 94mm(H)
1-6
Chapter 2 Control Modes
2.1 Four Control Modes Applications
(examples shown is 230 VAC/12 VDC model)
AUTO 1: AC Power as Priority Support
When Intelligence Plus enters to AUTO 1, B2-09 (AC IN DynaCur Limit)=0 (Disable) and
the value of B2-18 (AUTO 1: ACINCurrent Lmt) will be loaded to B2-05.
1. INVERTER Mode:
When AC IN=0 A, AC OUT load is completely supplied by INVERTER. It goes to the
inverter mode.
Grid,Shore,Generator
Power
0A
AC IN
5A
ATS OFF
5A
75A
Battery
2-1
AC OUT
Load
2. Power Control Mode (a)
In this example:
All AC loads are off, with the “Intelligence Plus” constant B2-05=5A (AC IN Current
Limit), the AC CHARGER will not take more than 5A with limits to battery charge current to
75A.
Shore Power
Max 5A
5A
AC IN
ATS ON
5A
0A
AC OUT
Load
B2-05=5A
5A
75A
Battery
3. Power Control Mode (b)
Now some small loads are switched on and load increase to 3A. Only 5-3=2A is left to
charge the batteries and charge current is reduced to about 30A.
※ Note: Shore current is automatically limited to 5A and the AC input circuit
breaker will not trip!
Shore Power
Max 5A
3A
5A
AC IN
ATS ON
2A
B2-05=5A
5A
30A
Battery
2-2
AC OUT
Load
4. Power Control Mode (c)
The load is switched on and current consumption increase to 5A. Nothing is left to charge
the battery.
The charge current is automatically reduced to 0A, and the AC input circuit breaker does
not trip!
Shore Power
Max 5A
5A
AC IN
5A
ATS ON
0A
Load
AC OUT
B2-05=5A
5A
Battery
5. Power Assist Mode
And now the other load adds and switches on and the current increases to 11A. This is
where Power Assist is needed.
The bidirectional converter starts operating as inverter to add 6A to the 5A that is
available from the shore-side: Total 6+5=11A, and no overload on the AC supply.
As soon as the load reduces to less than 5A, any current that is left over will be used to
recharge the battery.
Shore Power
Max 5A
11A
5A
AC IN
ATS ON
6A
B2-05=5A
5A
90A
Battery
2-3
AC OUT
Load
AUTO 2: AC Generator Support with Dynamic Power Shifting
When Intelligence Plus enters to AUTO 2, B2-09(AC IN DynaCur Limit)=1 (Enable) and the
value of B2-19 (AUTO 2: ACINCurrent Lmt) will be loaded to B2-05.
1. INVERTER Mode:
When AC IN=0 A, AC OUT load is completely supplied by INVERTER. It goes to the
inverter mode.
Grid,Shore,Generator
Power
0A
AC IN
ATS OFF
5A
5A
AC OUT
Load
75A
Battery
2. Power Control Mode (a)
In this example:
All AC loads are off, with the “Intelligence Plus” constant B2-05=5A (AC IN Current
Limit), the AC CHARGER will not take more than 5A with limits to battery charge current to
75A.
Shore Power
Max 5A
5A
AC IN
ATS ON
5A
B2-05=5A
5A
75A
Battery
2-4
0A
AC OUT
Load
3. Power Control Mode (b)
Now some small loads are switched on and load increase to 3A. Only 5-3=2A is left to
charge the batteries and charge current is reduced to about 30A.
※ Note: Shore current is automatically limited to 5A and the AC input circuit
breaker will not trip!
Shore Power
Max 5A
3A
5A
AC IN
ATS ON
2A
Load
AC OUT
B2-05=5A
5A
30A
Battery
4. Power Control Mode (c)
The load is switched on and current consumption increase to 5A. Nothing is left to charge
the battery.
The charge current is automatically reduced to 0A, and the AC input circuit breaker does
not trip!
Shore Power
Max 5A
5A
AC IN
5A
ATS ON
0A
B2-05=5A
5A
Battery
2-5
AC OUT
Load
INVERTER ONLY
When Intelligence Plus enters to INVERTER ONLY, B2-09(AC IN DynaCur Limit)=0
(Disable) and the value of B2-20 (INV M: ACINCurrent Lmt) will be loaded to B2-05.
1.
INVERTER Mode:
When the battery voltage is not lower than (B2-14) voltage value, inverter mode takes
priority to supply voltage to AC OUT for load consumption.
(INVERTER ON+ ATS OFF + AC CHARGER OFF)
Shore Power
Ready
3A
AC IN
ATS OFF
3A
Load
AC OUT
B2-05=5A
5A
45A
Battery
2. Power Control Mode
When AC IN power is ready, INVERTER is active and battery voltage is lower than
B2-14 voltage value and longer than the second time set in B2-15, ATS will be switched
on to ensure AC OUT to continuously supply the load. At the moment, AC OUT will be
supplied by AC IN power.
When AC IN power is ready, it is only used to supply to the load, not to charge the
battery.
(INVERTER OFF+ ATS ON + AC CHARGER OFF)
2-6
Shore Power
3A
AC IN
3A
ATS ON
AC Charger
OFF
Load
AC OUT
B2-05=5A
5A
Battery
3. Power Assist Mode
And now the other load adds and the current increases to 11A. This is where Power
Assist function is needed!
(ATS ON + AC CHARGER OFF + INVERTER ON + Power Assist Mode ON)
As soon as the load reduces to less than 5A, power assist function stops.
Shore Power
11A
5A
AC IN
ATS ON
6A
B2-05=5A
5A
90A
Battery
2-7
AC OUT
Load
CHARGER ONLY
When Intelligence Plus enters to CHARGER ONLY, B2-09 (AC IN DynaCur Limit)=0
(Disable) and the value of B2-21 (CHG M: ACINCurrent Lmt) will be loaded to B2-05.
1. NO AC IN Power:
When AC IN=0 A, AC OUT load is not supplied and the AC Charger is not working.
Grid,Shore,Generator
Power
0A
AC IN
0A
ATS OFF
Load
AC OUT
0A
Battery
2. Power Control Mode (a)
In this example:
All AC loads are off, with the “Intelligence Plus” constant B2-05=5A (AC IN Current
Limit), the AC CHARGER will not take more than 5A with limits to battery charge current to
75A.
Shore Power
Max 5A
5A
AC IN
ATS ON
5A
B2-05=5A
5A
75A
Battery
2-8
0A
AC OUT
Load
3. Power Control Mode (b)
Now some small loads are switched on and load increase to 3A. Only 5-3=2A is left to
charge the batteries and charge current is reduced to about 30A.
※ Note: Shore current is automatically limited to 5A and the AC input circuit
breaker will not trip!
Shore Power
Max 5A
3A
5A
AC IN
ATS ON
2A
Load
AC OUT
B2-05=5A
5A
30A
Battery
4. Power Control Mode (c)
The load is switched on and current consumption increase to 5A. Nothing is left to charge
the battery.
The charge current is automatically reduced to 0A, and the AC input circuit breaker does
not trip!
Shore Power
Max 5A
5A
AC IN
5A
ATS ON
0A
B2-05=5A
5A
Battery
2-9
AC OUT
Load
Chapter 3 Wiring
3.1 Front Panel Display
2
1
5
PB9
PB8
7 4
PB7
PB6
PB5
PB4
PB3
PB2
3
9
8
6
PB 1
Push Buttons
Push buttons
PB1
Name
RUN/STOP Intelligence Plus RUN/STOP key
PB2
DSPL
PB3
ENTER
PB4
DOWN
PB5
UP
PB6
PB7
PB8
PB9
Description
Multi-display select key
Data write-in key
()
()
Decrement key
Increment key
AC Input power to charge the battery.
Function Key to move Cursor to the right digit at
Parameter Edit.
Before
changing
DC power from battery to supply to AC loads.
from one
Function Key to move Cursor to the left digit at
mode to
Parameter Edit.
another, it
AC Generator Support with Dynamic Power Shifting. has to stop
Function Key to return to Main Menu “Programming” running and
be in STOP
mode.
AC Power as Priority Support.
Function Key to return to Main Menu “Operation”.
3-1
Note:
1. When pressing RUN/STOP key, the holding time to remain on the key has to be at least 2
seconds (initial setting) to activate the RUN or STOP function in order to avoid any
accidental pressing on the RUN/STOP key. The second time can be adjusted in RUN/STOP
KeyHoldTime (O2-07).
2. When changing any of four modes to another mode, Intelligence Plus has to STOP and then
press the desired mode key. When pressing AUTO 1 key or AUTO 2 key or INV only key or
CHG only key, the holding time remaining on the key has to be at least 5 seconds (initial
setting) to activate the mode change in order to avoid any accidental pressing on the mode
keys. The second time can be adjusted in MODE Key Hold Time (O2-06).
3. The beep sound of key pressing can be selected to be enabled or disabled in Key Pressed
Beep Sel (O2-01)
4. When all the keys are not pressed at all for a certain time (O1-02), it goes to idle mode. Once
any key is pressed, the display will return to the LCD monitor selection value set in constant
O1-01.
5. When all the keys are not pressed at all for a certain time (O2-09), all the LCD Display and
LED Indicators are not active but RUN/STOP indicator remains active. The display idle
function can save the display power.
6. When users are programming under any level of Groups or Function or Parameters or
Parameters Edit, press
key for 1 second to return to Main Menu “Operation”
immediately.
7. When users are programming under any level of Groups or Function or Parameters or
Parameters Edit, press
key for 1 second to return to Main Menu “Programming”
immediately.
8. When adjusting the parameters values, press
key to key to enable cursor to move
left for one digit and press
key to enable cursor to move right for one digit.
Model No.
Display Software
12-1850IC IP
IP-1850-121
12-3500IC IP
IP-3550-121
24-3550IC IP
IP-3550-241
24-3550IC IPF
IP-3550-242
3-2
LED Indicators
LED
Name
L ED ON
LED OFF
1. Input voltage normal, and position
1
AC IN
> ”transfer Voltage Level”
(150VAC~240VAC)
No input power
2. Input voltage frequency range in
between(45~65Hz)
2
AC
CHARGER
Green : Battery charger is working.
3
AC OUT
There is voltage at the “AC OUT”
terminal.
4
INVERTER
Green : Inverter is working.
5
BATTERY
FLOAT or ABSOR. Or BULK charge
state of battery.
ATS
Green : ATS switch is active AC IN
voltage is being sent directly to AC
OUT terminal
6
7
RUN/STOP
Green : Intelligence Plus turn on.
Red : Intelligence Plus turn off.
NOTE: Green Blink : Auto-Restart is in use
8
COM./ERR.
Remote control port in communication/in error
9
REMOTE
Remote Control Panel Jack
3-3
3.2 Panel Connection
3.2.1 Lower-Front Panel Connection for Intelligence Plus
C
B
A
D
E
F
N
M
L
Ref. Letter
A
B
C
D
E
F
G
H
I
J
K
L
M
N
K
J
I
H G
Connections / Lower Front
Description
CHARGE +/BTS +/Vsens +/-
Terminals for starting battery of 4A
Terminals for battery temperature sensor
Terminals for Remote Battery Voltage Sensing
RY1 contacts
RY2 contacts
RY3 contacts
AC OUT L
AC OUT N
AC OUT G
AC IN G
AC IN N
AC IN L
Battery POS+/ NEGDC Case Ground
Terminals for auxiliary relay contact 1
Terminals for auxiliary relay contact 2
Terminals for auxiliary relay contact 3
Terminals for AC output: Line
Terminals for AC output: Neutral
Terminals for AC output: Ground
Terminals for AC input: Ground
Terminals for AC input: Neutral
Terminals for AC input: Line
Terminals for battery cables
Terminals for DC Case Ground
3-4
3.3 Battery & AC Connections
3.3.1 Connection
Schematic
3-5
Chapter 5 Constants List
Factory
Menu
Group
Function
Constant
LCD Display
Range
Unit
Remark
Page
Setting
Operation
U
Monitor
U1
U2
U3
Monitor
U1-01
AC IN Voltage
U1-02
AC IN Current
U1-03
AC OUT Voltage
U1-04
AC OUT Current
U1-05
Battery Voltage
U1-06
Battery Ripple Volt
U1-07
Battery Current
U1-08
Control Mode
U1-09
Operation Status
U1-10
Aux-Relay Status
U1-11
Elapsed Time
U1-12
Bat.Temp.Sensor
U1-13
CPU ID 1
U1-14
CPU ID 2
Fault
U2-01
Current Fault
Trace
U2-02
Last Fault
U2-03
AC IN Voltage
U2-04
AC IN Current
U2-05
AC OUT Voltage
U2-06
AC OUT Current
U2-07
Battery Voltage
U2-08
Battery Ripple Volt
U2-09
Battery Current
U2-10
Control Mode
U2-11
Operation Status
U2-12
Aux-Relay Status
U2-13
Elapsed Time
U2-26
Bat.Temp. Sensor
Fault
U3-01
Last Fault
History
U3-02
Fault Message 2
U3-03
Fault Message 3
U3-04
Fault Message 4
U3-05
Elapsed Time 1
-
-
-
-
-
-
-
-
-
-
-
-
-
-
-
-
-
-
-
-
-
-
-
-
-
-
-
-
-
-
-
-
-
0.1V
0.1A
0.1V
0.1A
0.1V
0.1V
0.1A
-
-
-
1hour
1°C
-
-
-
-
0.1V
0.1A
0.1V
0.1A
0.1V
0.1V
0.1A
-
-
-
1hour
1°C
-
-
-
-
1hour
-
-
-
-
-
-
-
-
-
-
-
-
-
-
-
-
-
-
-
-
-
-
-
-
-
-
-
-
-
-
-
-
-
6-21
6-21
6-21
6-21
6-21
6-21
6-21
6-21
NOTE 1
6-22
NOTE 2
6-22
6-22
6-22
6-22
6-22
6-23
6-23
6-23
6-23
6-23
6-23
6-23
6-23
6-24
6-24
NOTE 1
6-24
NOTE 2
6-24
6-24
6-24
6-25
6-25
6-25
6-25
6-25
Factory
Menu
Group
Function
Constant
LCD Display
Range
Unit
Remark
Setting
5-1
Page
Operation
Initialize
U
A
Monitor
Initialize
U3
A1
Fault
U3-06
Elapsed Time 2
History
U3-07
Elapsed Time 3
U3-08
Elapsed Time 4
A1-01
Access Level
-
-
-
1hour
1hour
1hour
-
-
-
Initialize
6-25
6-25
6-25
0: Operation Only
0~1
1
1
6-1
1: Constant Set
A1-02
Select Language
-
-
0
A1-03
Init Parameters
0~1
1
0
0:English
6-1
0: No Initialize
6-1
1:Default Setting
Programm-
B
General
B1
ing
A1-04
Password 1
B1-01
Output Frequency
0~999
1
0
0~1
1
0
Output
0: 50 Hz
Frequency
B2
6-2
6-3
1:60 Hz
Auto
B2-01
AC IN Low Disconnect
NOTE 3
1V
NOTE 3
6-3
Transfer
B2-02
AC IN Low Connect
NOTE 3
1V
NOTE 3
6-3
Switch
B2-03
AC IN High Connect
NOTE 3
1V
NOTE 3
6-4
B2-04
AC IN High Disconnect
NOTE 3
1V
NOTE 3
6-4
B2-05
AC IN Current Limit
NOTE 3
0.1A
NOTE 3
6-4
0~1
1
1
AC IN Waveform
0: Ignore
B2-06
Check
6-4
1: Active
0: Disconnect
B2-07
Ground Relay
0~1
1
1
6-5
1: Connect
0:50/60Hz+-5Hz
B2-08
ACIN Frequency Range
0~1
1
1
6-5
1:45Hz~65Hz
0: Normal
B2-09
AC IN DynaCur Limit
0~1
1
0
6-5
1:Dynamic
INV M: BatLo?V ATS
0~32.0
B2-14
23.5V
0.01V
ON
0~16.0
INV M: BatLo?S
6-6
11.75V
ATS
B2-15
0~255
1 sec
10 sec
6-6
ON
INV M: BatHi?V
0~32.0
B2-16
28.8V
0.01V
ATSOFF
0~16.0
6-6
14.4V
INV M: BatHi?S
B2-17
0~255
1 sec
60 sec
6-6
NOTE 3
0.1A
NOTE 3
6-7
NOTE 3
0.1A
NOTE 3
6-7
ATSOFF
AUTO1:ACINCurrent
B2-18
Lmt
AUTO2:ACINCurrent
B2-19
Lmt
5-2
Factory
Menu
Group
Function
Constant
LCD Display
Range
Unit
Remark
Page
Setting
Programm-
B
General
B2
Auto
INV M:ACINCurrent
B2-20
ing
Transfer
NOTE 3
0.1A
NOTE 3
6-7
NOTE 3
0.1A
NOTE 3
6-7
Lmt
Switch
CHG M:ACINCurrent
B2-21
Lmt
C
Inverter
C1
Inverter
C1-01
Inverter Out Voltage
NOTE 3
1V
NOTE 3
6-8
C1-02
Bat Low ? V Shut-down
NOTE 3
0.01V
NOTE 3
6-8
C1-03
Bat Low ? V Restart
NOTE 3
0.01V
NOTE 3
6-8
C1-04
Auto Power Saving
0~1
1
1
0: Disable
6-8
1: Enable
0: Disable
C1-05
Power Assist Select
0~1
1
1
6-8
1: Enable
C1-06
D
Charger
D1
Power Assist Level
1.0~3.5
0.1
2.0
Charger
6-9
1: Fixed
D1-02
Charge Curve
1~3
1
3
2: Adaptive
6-10
3: Adaptive+safe
D1-03
Absorption Voltage
D1-04
Rep-Absorption Time
NOTE 3
0.01V
NOTE 3
0.25
1~72
6-11
4x0.25=1 hour
4
6-11
hour
0.25
D1-05
Rep-Abs Interval
1~180
28x0.25=7day
28
6-11
day
D1-06
Max. Absorption Time
1~8
1hour
4hour
6-11
D1-07
Float Voltage
NOTE 3
0.01V
NOTE 3
6-11
D1-08
Charge Current
NOTE 3
1A
NOTE 3
6-11
D1-09
Stop After 10Hr Bulk
0~1
1
1
0:Disable
6-11
1:Enable
0:Disable
D1-10
Equalize Mode Select
0~1
1
1
6-12
1:Enable
1:Flooded/AGM1
2:AGM 2
D1-11
Battery Type Select
0-3
1
1
6-12
3:Gel
4:User
E
Aux-Relay
E1
Set Aux-
E1-01
LOAD Higher than ? A
NOTE 3
0.01A
NOTE 3
6-13
Relay 1
E1-02
LOAD Higher for ? sec
0~255
1sec
0sec
6-13
ON
E1-03
Udc Lower than ? V
NOTE 3
0.01V
NOTE 3
6-13
E1-04
Udc Lower for ? sec
0~255
1sec
0sec
6-13
E1-05
Udc Higher than ? V
NOTE 3
0.01V
NOTE 3
6-13
E1-06
Udc Higher for ? sec
0~255
1sec
0sec
6-13
5-3
E1-07
Not Charge for ? sec
0~255
1sec
0sec
6-13
E1-08
Fan On for ? sec
0~255
1sec
0sec
6-13
Range
Unit
Factory
Menu
Group
Function
Constant
LCD Display
Remark
Page
Setting
Programm-
E
Aux-Relay
E1
Set Aux-
0:Disable
E1-09
ing
When bulk Protection
0~1
1
0
Relay 1
6-14
1:Enable
ON
0:Disable
E1-10
System Fault Occurs
0~1
1
0
6-14
1:Enable
0:Alarm
E1-11
Temp. Alarm Sel
0~1
1
0
6-14
1:Pre-alarm
E1-12
Temp. Alarm for ?sec
0~255
1sec
0sec
E1-13
Low Batt. Alarm Sel
0~1
1
0
6-14
0:Alarm
6-14
1:Pre-alarm
E1-14
Low Batt. for ? sec
0~255
1sec
0sec
E1-15
Overload Alarm Sel
0~1
1
0
6-14
0:Alarm
6-14
1:Pre-alarm
E1-16
OL Alarm for ? sec
E1-17
Udc Ripple Alarm Sel
0~255
1sec
0sec
0~1
1
0
6-14
0:Alarm
6-14
1:Pre-alarm
E2
E1-18
UdcRipAlarm for ? sec
0~255
1sec
0sec
6-14
Set Aux-
E2-01
Load Lower than ? A
NOTE 3
0.01A
NOTE 3
6-15
Relay 1
E2-02
Load Lower for ? sec
0~255
1sec
0sec
6-15
OFF
E2-03
Udc Lower than ? V
NOTE 3
0.01V
NOTE 3
6-15
E2-04
Udc Lower for ? sec
0~255
1sec
0sec
6-15
E2-05
Udc Higher than ? V
NOTE 3
0.01V
NOTE 3
6-15
E2-06
Udc Higher for ? sec
0~255
1sec
0sec
6-15
E2-07
Charging for ? sec
0~255
1sec
0sec
6-15
E2-08
Fan Off for ? sec
0~255
1sec
0sec
6-16
E2-09
Charge Finished ? Min
0~1000
1min
0
6-16
E2-10
RY1 not ON for ? mins
0~1000
1min
0
6-16
E2-11
AC IN Loss for ? sec
0~255
1sec
0sec
6-16
E2-12
No Temp. Alarm Sel
0~1
1
0
0:Alarm
6-16
1:Pre-alarm
E2-13
No Temp. Alarm ? sec
0~255
1sec
0sec
E2-14
No Low Bat. Alarm Sel
0~1
1
0
6-16
0:Alarm
6-17
1:Pre-alarm
E2-15
No Low Bat for ? sec
5-4
0~255
1sec
0sec
6-17
Factory
Menu
Group
Function
Constant
LCD Display
Range
Unit
Remark
Page
Setting
Programm-
E
Aux-Relay
E2
Set Aux-
0:Alarm
E2-16
ing
No OL Alarm Sel
0~1
1
0
Relay 1
OFF
6-17
1:Pre-alarm
E2-17
No OL Alarm for ? sec
0~255
1sec
0sec
0~1
1
0
No UdcRipple Alarm
E2-18
6-17
0:Alarm
Sel
6-17
1:Pre-alarm
No UdcRipple
E2-19
0~255
1sec
0sec
6-17
Alarm ?sec
E3
Set Aux-
E3-01
Load Higher than ? A
NOTE 3
0.01A
NOTE 3
6-17
Relay 2
E3-02
Load Higher for ?sec
0~255
1sec
0sec
6-17
ON
E3-03
Udc Lower than ? V
NOTE 3
0.01V
NOTE 3
6-17
E3-04
Udc Lower for ? sec
0~255
1sec
0sec
6-17
E3-05
Udc Higher than ? V
NOTE 3
0.01V
NOTE 3
6-17
E3-06
Udc Higher for ? sec
0~255
1sec
0sec
6-17
E3-07
Not Charge for ? sec
0~255
1sec
0sec
6-17
E3-08
Fan On for ? sec
0~255
1sec
0sec
6-17
E3-09
When bulk Protection
0~1
1
0
0:Disable
6-17
1:Enable
0:Disable
E3-10
System Fault Occurs
0~1
1
0
6-17
1:Enable
0:Alarm
E3-11
Temp. Alarm Sel
0~1
1
0
6-17
1:Pre-alarm
E3-12
Temp. Alarm for ?sec
0~255
1sec
0sec
E3-13
Low Batt. Alarm Sel
0~1
1
0
6-17
0:Alarm
6-17
1:Pre-alarm
E3-14
Low Batt. for ? sec
0~255
1sec
0sec
E3-15
Overload Alarm Sel
0~1
1
0
6-17
0:Alarm
6-17
1:Pre-alarm
E3-16
OL Alarm for ? sec
E3-17
Udc Ripple Alarm Sel
0~255
1sec
0sec
0~1
1
0
6-17
0:Alarm
6-17
1:Pre-alarm
E4
E3-18
UdcRipAlarm for ?sec
0~255
1sec
0sec
6-17
Set Aux-
E4-01
Load Lower than ? A
NOTE 3
0.01A
NOTE 3
6-17
Relay 2
E4-02
Load Lower for ? sec
0~255
1sec
0sec
6-17
OFF
E4-03
Udc Lower than ? V
NOTE 3
0.01V
NOTE 3
6-17
5-5
Factory
Menu
Group
Function
Constant
LCD Display
Range
Unit
Remark
Page
Setting
Programm-
E
Aux-Relay
E4
ing
Set Aux-
E4-04
Udc Lower for ? sec
0~255
1sec
0sec
6-17
Relay 2
E4-05
Udc Higher than ? V
NOTE 3
0.01V
NOTE 3
6-17
OFF
E4-06
Udc Higher for ? sec
0~255
1sec
0sec
6-17
E4-07
Charging for ? sec
0~255
1sec
0sec
6-17
E4-08
Fan OFF for ? sec
0~255
1sec
0sec
6-17
E4-09
Charge Finished ?Min
0~1000
1min
0
6-17
E4-10
RY2 not ON for ?mins
0~1000
1min
0
6-17
E4-11
AC IN Loss for ?sec
0~255
1sec
0sec
6-17
E4-12
No Temp. Alarm Sel
0~1
1
0
0:Alarm
6-17
1:Pre-alarm
E4-13
No Temp. Alarm ? sec
0~255
1sec
0sec
E4-14
No Low Bat. Alarm Sel
0~1
1
0
6-17
0:Alarm
6-17
1:Pre-alarm
E4-15
No Low Bat for ? sec
E4-16
No OL Alarm Sel
0~255
1sec
0sec
0~1
1
0
6-17
0:Alarm
6-17
1:Pre-alarm
E4-17
No OL Alarm for ? sec
0~255
1sec
0sec
0~1
1
0
No UdcRipple Alarm
E4-18
6-17
0:Alarm
Sel
6-17
1:Pre-alarm
No UdcRipple
E4-19
0~255
1sec
0sec
6-17
Alarm ?sec
E5
Set Aux-
E5-01
Load Higher than ? A
NOTE 3
0.01A
NOTE 3
6-17
Relay 3
E5-02
Load Higher for ?sec
0~255
1sec
0sec
6-17
ON
E5-03
Udc Lower than ? V
NOTE 3
0.01V
NOTE 3
6-17
E5-04
Udc Lower for
0~255
1sec
0sec
6-17
E5-05
Udc Higher than ? V
NOTE 3
0.01V
NOTE 3
6-17
E5-06
Udc Higher for ? sec
0~255
1sec
0sec
6-17
E5-07
Not Charge for ? sec
0~255
1sec
0sec
6-17
E5-08
Fan ON for ? sec
0~255
1sec
0sec
6-17
E5-09
When bulk Protection
0~1
1
0
? sec
0:Disable
6-17
1:Enable
0:Disable
E5-10
System Fault Occurs
0~1
1
0
6-17
1:Enable
5-6
Factory
Menu
Group
Function
Constant
LCD Display
Range
Unit
Remark
Page
Setting
Programm-
E
Aux-Relay
E5
Set Aux-
0:Alarm
E5-11
ing
Temp. Alarm Sel
0~1
1
0
Relay 3
ON
6-17
1:Pre-alarm
E5-12
Temp. Alarm for ?sec
0~255
1sec
0sec
E5-13
Low Batt. Alarm Sel
0~1
1
0
6-17
0:Alarm
6-17
1:Pre-alarm
E5-14
Low Batt. for ? sec
0~255
1sec
0sec
E5-15
Overload Alarm Sel
0~1
1
0
6-17
0:Alarm
6-17
1:Pre-alarm
E5-16
OL Alarm for ? sec
E5-17
Udc Ripple Alarm Sel
0~255
1sec
0sec
0~1
1
0
6-17
0:Alarm
6-17
1:Pre-alarm
E6
E5-18
UdcRipAlarm for ?sec
0~255
1sec
0sec
6-17
Set Aux-
E6-01
Load Lower than ? A
NOTE 3
0.01A
NOTE 3
6-17
Relay 3
E6-02
Load Lower for ? sec
0~255
1sec
0sec
6-17
OFF
E6-03
Udc Lower than ? V
NOTE 3
0.01V
NOTE 3
6-17
E6-04
Udc Lower for ? sec
0~255
1sec
0sec
6-17
E6-05
Udc Higher than ? V
NOTE 3
0.01V
NOTE 3
6-17
E6-06
Udc Higher for ? sec
0~255
1sec
0sec
6-17
E6-07
Charging for ? sec
0~255
1sec
0sec
6-17
E6-08
Fan OFF for ? sec
0~255
1sec
0sec
6-17
E6-09
Charge Finished ?Min
0~1000
1min
0
6-17
E6-10
RY3 not ON for ?mins
0~1000
1min
0
6-17
E6-11
AC IN Loss for ?sec
0~255
1sec
0sec
6-17
0:Alarm
E6-12
No Temp. Alarm Sel
0~1
1
0
E6-13
No Temp. Alarm ? sec
0~255
1sec
0sec
E6-14
No Low Bat. Alarm Sel
0~1
1
0
1:Pre-alarm
6-17
6-17
0:Alarm
6-17
1:Pre-alarm
E6-15
No Low Bat for ? sec
E6-16
No OL Alarm Sel
0~255
1sec
0sec
0~1
1
0
6-17
0:Alarm
6-17
1:Pre-alarm
E6-17
No OL Alarm for ? sec
5-7
0~255
1sec
0sec
6-17
Factory
Menu
Group
Function
Constant
LCD Display
Range
Unit
Remark
Page
Setting
Programm-
E
Aux-Relay
E6
Set Aux-
No UdcRipple Alarm
E6-18
ing
Relay 3
0:Alarm
0~1
1
0
Sel
OFF
6-17
1:Pre-alarm
No UdcRipple
E6-19
0~255
1sec
0sec
0~1
1
0
6-17
Alarm ?sec
E7
Aux-
0:Do not use Aux
E7-01
Aux1 Usage Select
Relay 1
6-18
1: Use Aux
Option
0: Normal
E7-02
Aux1 Invert Select
0~1
1
0
6-18
1: Invert switch
E8
E7-03
Aux1 notSwitchOff T
E8-01
Aux2 Usage Select
0~1000
1 min
0
0~1
1
0
Aux-
6-18
0:Do not use Aux
Relay 2
6-18
1: Use Aux
Option
0: Normal
E8-02
Aux2 Invert Select
0~1
1
0
6-18
1: Invert switch
E9
E8-03
Aux2 notSwitchOff T
E9-01
Aux3 Usage Select
0~1000
1 min
0
0~1
1
0
Aux-
6-18
0:Do not use Aux
Relay 3
6-18
1: Use Aux
Option
0: Normal
E9-02
Aux3 Invert Select
0~1
1
0
6-18
1: Invert switch
O
Operator
O1
O2
E9-03
Aux3 notSwitchOff T
0~1000
1 min
0
Monitor
O1-01
Power-ON Monitor Sel
0~13
1
4
Select
O1-02
Key Idle Detect Time
10~600
1sec
180 sec
O2-01
Key Pressed Beep Sel
0~1
1
1
Key
6-18
NOTE 4
6-19
6-19
0:Disable
Selections
6-19
1:Enable
O2-02
Elapsed Time Reset
0~60000
1hour
0
O2-03
Elapsed Time Select
0~1
1
0
6-19
0:Power ON
6-19
1: Run Time
O2-04
Intelligence Plus Model
-
-
-
6-19
O2-06
MODE Key Hold Time
2~10
1sec
5 sec
6-20
2~10
1sec
2 sec
6-20
0~1
1
1
RUN/STOP
O2-07
KeyHoldTime
0: Manual
O2-08
Auto Run Select
6-20
1: Auto
O2-09
Display IdleTime Set
5-8
0~60
1min
10 min
6-20
NOTE 1:
Operation Status
U1-09 =
X
X
X
X
X
X
X
X
X
X
X
X
Fault:
RUN/STOP:
0=OK
Udc ripple:
1=Fault
0=OK
0=STOP
Inverter: 1=RUN
1=Udc-ripple
0=OFF
Pre-alarm
1=ON
AC CHARGER:
0=OFF
ATS: 1=ON
0=OFF
1=ON
AC IN:
0=AC IN disconnect
1=AC IN connect
AC OUT:
0=No output
1=output
Remoter:
0=Remoter disconnect
1=Remoter connect
OH:
0=OK
1=OH Pre-alarm
Battery Low:
0=OK
1=Battery low pre-alarm
OL:
0=OK
1=Over load pre-alarm
5-9
NOTE 2:
U1-10 = X
X
X
Aux-Relay1:
0=OFF
1=ON
Aux-Relay2:
0=OFF
1=ON
Aux-Relay3:
0=OFF
1=ON
NOTE 3:
Constants
B2-01
B2-02
Factory
Range
B2-04
Factory
Unit
Model
B2-03
Range
Unit
Setting
Factory
Range
Factory
Unit
Range
Setting
Unit
Setting
Setting
24-3550 IC IPF
180~230
1V
180V
181~260
1V
187V
240~269
1V
265V
230~270
1V
270V
12-1850 IC IP
94~120
1V
94V
95~135
1V
101V
128~142
1V
138V
120~143
1V
143V
12-3550 IC IP
94~120
1V
94V
95~135
1V
101V
128~142
1V
138V
120~143
1V
143V
24-1850 IC IP
94~120
1V
94V
95~135
1V
101V
128~142
1V
138V
120~143
1V
143V
24-3550 IC IP
94~120
1V
94V
95~135
1V
101V
128~142
1V
138V
120~143
1V
143V
Constant
B2-05
C1-01
Factory
Range
Un
Unit
Model
C1-02
Factory
Range
it
Setting
Factory
Factory
Range
Setting
C1-03
Unit
Range
Unit
Setting
Setting
24-3550 IC IPF
1.0~16.0
0.1A
16.0A
210~245
1V
230V
18.6~23.0
0.01V
18.6V
21.8~34.0
0.01V
21.8V
12-1850 IC IP
2.0~30.0
0.1A
30.0A
94~128
1V
120V
9.3~13.0
0.01V
9.3V
10.9~17.0
0.01V
10.9V
12-3550 IC IP
2.0~30.0
0.1A
30.0A
94~128
1V
120V
9.3~13.0
0.01V
9.3V
10.9~17.0
0.01V
10.9V
24-1850 IC IP
2.0~30.0
0.1A
30.0A
94~128
1V
120V
18.6~26.0
0.01V
18.6V
21.8~34.0
0.01V
21.8V
24-3550 IC IP
2.0~30.0
0.1A
30.0A
94~128
1V
120V
18.6~23.0
0.01V
18.6V
21.8~34.0
0.01V
21.8V
Constant
D1-03
D1-07
Factory
Range
Unit
Model
D1-08
Factory
Range
Unit
Setting
E1-01,E3-01,E5-01
Factory
Range
Unit
Setting
Factory
Range
Unit
Setting
Setting
24-3550 IC IPF
24.0~32.0
0.01V
28.4V
24.0~32.0
0.01V
26.8
0~70
1A
70A
0~42.6
0.01A
13.30A
12-1850 IC IP
12.0~16.0
0.01V
14.2V
12.0~16.0
0.01V
13.4V
0~70
1A
70A
0~44.7
0.01A
12.75A
12-3550 IC IP
12.0~16.0
0.01V
14.2V
12.0~16.0
0.01V
13.4V
0~140
1A
140A
0~83.0
0.01A
25.5A
24-1850 IC IP
24.0~32.0
0.01V
28.4V
24.0~32.0
0.01V
26.8V
0~35
1A
35A
0~44.7
0.01A
12.75A
5-10
24.0~32.0
24-3550 IC IP
Constant
0.01V
28.80V
E1-03,E3-03,E5-03
24.0~32.0
E1-05,E3-05,E5-05
Factory
Range
27.60V
0~70
Range
Unit
Setting
1A
35A
E2-01,E4-01,E6-01
Factory
Unit
Model
0.01V
0~83.0
0.01A
E2-03,E4-03,E6-03
Factory
Range
Unit
Setting
25.5A
Factory
Range
Unit
Setting
Setting
24-3550 ICIP
0~35.0
0.01V
23.5V
0~35.0
0.01V
32.0V
0~42.6
0.01A
3.32A
0~35.0
0.01V
23.5V
12-1850 ICIP
0~17.5
0.01V
11.75V
0~17.5
0.01V
16.0V
0~44.75
0.01A
3.18A
0~17.5
0.01V
11.75V
12-3550 ICIP
0~17.5
0.01V
11.75V
0~17.5
0.01V
16.0V
0~83.0
0.01A
6.37A
0~17.5
0.01V
11.75V
24-1850 ICIP
0~35.0
0.01V
23.5V
0~35.0
0.01V
32.0V
0~44.75
0.01A
3.18A
0~35.0
0.01V
23.5V
24-3550 ICIP
0~35.0
0.01V
23.5V
0~35.0
0.01V
32.0V
0~83.0
0.01A
6.37A
0~35.0
0.01V
23.5V
Constant
E2-05,E4-05,E6-05
Factory
Range
Unit
Model
Setting
24-3550 IC IPF
0~35.0
0.01V
32.0V
12-1850 IC IP
0~17.5
0.01V
16.0V
12-3550 IC IP
0~17.5
0.01V
16.0V
24-1850 IC IP
0~35.0
0.01V
32.0V
24-3550 IC IP
0~35.0
0.01V
32.0V
NOTE 4:
Parameter
Setting
LCD Display
O1-01=
0
AC IN Voltage
1
AC IN Current
2
AC OUT Voltage
3
AC OUT Current
4
Battery Voltage
5
Battery Ripple Volt
6
Battery Current
7
Control Mode
8
Operation Status
9
Aux-Relay Status
10
Elapsed Time
11
Bat.Temp.Sensor
12
CPU ID 1
13
CPU ID 2
A1-04=Password 1
Lock the constants setting (A1-01=1)
1. Finish setting all the programmable parameters to desired values.
5-11
2. Change A1-01=0 (Operation only), factory setting is A1-01=1 (Constants set).
3. Go to A1-04 and press RUN/STOP key and UP key at the same time till A1-05 parameter
occurs.
4. Enter the desired password (max. 4 digits)
5. Press UP key to leave A1-05
Above procedure completes locking the constants setting and no more programming
selection would appear. A1-01 would only display 0 (Operation only) and would not display
1 (Constants set).
Unlock the constants setting
1. Enter the password in A1-04 to be exactly the same as the one earlier set in A1-05
2. When the password in A1-04 matches the one earlier set in A1-05, the unlocking is
completed. A1-01=1 (Constants set) would appear again for programming.
5-12
Chapter 6 Programming Constants
A Group (Initialize):
A1 Group (Initialize)
A1-01: Access level
Use constant A1-01 to select the user constant access level.
This level determines which user constants can be changed and displayed.
Setting
Function
This setting allows the “operation” and “initialize” to be
A1-01=0
A1-01=1
(Initial setting)
changed or displayed.
Use this setting to prevent user constant settings from being
changed.
This setting allows all user constants to be changed or displayed.
A1-02: Select Language
Use constant A1-02 to select the language displayed by the Intelligence Plus. A
value of 0 set English and values of others set other language.
This user constant is not returned to factory setting when constants are initialized.
It must be manually reset to factory setting.
Setting
A1-02=0
(Initial setting)
Function
English language
A1-02=1
Reserved, under development
A1-02=2
Reserved, under development
A1-02=3
Reserved, under development
A1-02=4
Reserved, under development
A1-02=5
Reserved, under development
A1-02=6
Reserved, under development
A1-03: Init Parameters
Use constant A1-03 to initialize the user constants.
When initialized, the user constants will return to their factory preset values. You
should normally record the setting of any constants that are changed from factory
presets.
6-1
Setting
A1-03=0
(Initial setting)
A1-03=1
Function
Returns to initialize Display without initializing any user
constants.
Initializes the user constants to factory settings.
A1-04: Init Password 1
This constant is reserved for the factory to test and set the functions.
Users are not allowed to set this constant.
Lock the constants setting (A1-01=1)
1. Finish setting all the programmable parameters to desired values.
2. Change A1-01=0 (Operation only), factory setting is A1-01=1 (Constants set).
3. Go to A1-04 and press RUN/STOP key and UP key at the same time till A1-05
parameter occurs.
4. Enter the desired password (max. 4 digits)
5. Press UP key to leave A1-05
Above procedure completes locking the constants setting and no more
programming selection would appear. A1-01 would only display 0 (Operation
only) and would not display 1 (Constants set).
Unlock the constants setting
1. Enter the password in A1-04 to be exactly the same as the one earlier set in A1-05
2. When the password in A1-04 matches the one earlier set in A1-05, the unlocking
is completed. A1-01=1 (Constants set) would appear again for programming.
6-2
B Group (General):
B1 Group (Output Frequency)
B1-01: Output frequency
B1-01 is used to set the output frequency at INVERTER AC output
Setting
Function
B1-01=0
(Initial setting)
50Hz at INVERTER AC output
B1-01=1
60Hz at INVERTER AC output
B2-08: AC IN Frequency Range
Setting
Function
When B1-01=0: Acceptable AC input frequency is 50Hz ±5Hz
B2-08=0
(45~55Hz)
When B1-01=1: Acceptable AC input frequency is 60Hz ±5Hz
(55~65Hz)
B2-08=1
(Initial setting)
Accept wide AC input frequency range between 45~65Hz
B2 Group (Auto Transfer Switch)
B2-01: AC IN Low Disconnect
Use constant B2-01 to determine the AC IN voltage below which level the ATS
(Auto Transfer Switch) will switch off.
This voltage level will always lie below the AC IN Low Connect (B2-02) level.
In fact, changing this level will also change the AC IN Low Connect (B2-02)
level.
B2-02: AC IN Low Connect
This setting forms a pair with AC IN Low Disconnect (B2-01). With this setting,
one determines the AC IN low voltage at which level the ATS will switch on.
This should lie above AC IN Low Disconnect (B2-01) level to prevent
continuous switching off the ATS when the voltage is fluctuating around the
level.
In fact, the parameter which is changed is the difference between AC IN Low
Disconnect (B2-01) and AC IN Low Connect (B2-02).
The result of this is that when changing B2-01 level, this level (B2-02) also
6-3
changes.
※ Note: B2-02 can be ignored for a short time when AC IN Waveform Check
(B2-06) is
disabled (B2-06=0)
When the AC IN voltage drops due to the increasing charge current, the AC
CHARGER will take care that the voltage does not drop below this level.
B2-02=B2-01+offset voltage
For example: C3-1500-122, when B2-01=180V, B2-02=187V, offset
voltage=7V (187-180), B2-02 will automatically go to 197V(190+7) after
B2-01 is changed to 190V.
B2-03: AC IN High Connect
This setting forms a pair with AC IN High Disconnect (B2-04). With this setting,
one determines the AC IN high voltage at which level the ATS will switch on.
This should lie below the AC IN High Disconnect (B2-04) level to prevent
continuous switching of the ATS when the voltage is fluctuating around that
level.
In fact, the parameter which is changed is the difference between AC IN High
Disconnect (B2-04) and AC IN High Connect (B2-03).
The result of this is that when changing B2-04 level, this level (B2-03) also
changes.
B2-03=B2-04–offset voltage
For example: C3-1500-122, when B2-03=265V, B2-04=270V, offset voltage=5V
(270-265), B2-03 will automatically go to 255V(260–5) after B2-04 is changed
to 260V.
B2-04: AC IN High Disconnect
Use constant B2-04 to determine the AC IN voltage above which level the ATS
will switch off.
This voltage level will always lie above the AC IN High Connect (B2-03) level.
In fact, changing this level will also change the AC IN High Connect (B2-03)
level.
B2-05: AC IN Current Limit
Use constant B2-05 to set the set the specific maximum AC input current. This
value is very important for both battery charger and inverter output power assist.
6-4
When using constant B2-05, the values determine the actual AC current limit.
※Note: With Power Support enabled, there is a minimum value for the AC input
current limit. Please see the note at Power Support (page 6-9).
B2-06: AC IN Waveform Check
Use constant B2-06 to enable/disable the fast detection of input voltage wave
shape.
Setting
Function
By disabling AC IN waveform check, AC IN Low
Disconnect (B2-01) is ignored. When the load current is
higher 1.5 times than AC In Current Limit (B2-05), this is
used to prevent unnecessary switching to INVERTER due
B2-06=0
(Ignore)
to voltage drop when a high load is connected.
B2-06=1
(Initial setting)
(Active)
This detection checks the wave shape, if it is not sinusoidal
within certain limits, the AC input voltage is rejected.
However, certain generator or very weak mains supply
have an ill shaped sinusoidal output especially when the
load suddenly changes. The fast detection will detect a
failure in such a case.
This will result in a slightly longer transfer time.
B2-07: Ground Relay
Used to enable/disable the internal ground relay functionality. The ground relay
is useful when an earth-leakage circuit-breaker is part of the installation.
When ATS (Auto Transfer Switch) is open (INVERTER mode), the Neutral of
the inverter is connected to “G” terminal.
When ATS closes (AC IN is transferred to AC OUT), the Neutral is first
disconnected from “G” terminal.
Setting
B2-07=0
B2-07=1
(Initial setting)
Function
The internal ground relay is open with “G” terminal.
The internal ground relay is closed with “G” terminal.
B2-08: AC IN Frequency Range
Refer to page 6-3 (B1-01)
6-5
B2-09: AC IN Dynamic Current Limit
This setting is an expansion of the AC IN Current Limit (B2-05) mechanism.
Setting
B2-09=0
(Initial setting)
Function
The AC current limit is specified by the AC IN Current
Limit (B2-05) setting
6-6
The effective AC input current limit depends on the load
history. When the load is lower than the AC IN Current
Limit (B2-05), the effective AC input current limit is also
lower but slightly above the load.
B2-09=1
When the load increase, the effective current limit also
increases with a delay. The thought behind this is that when
a generator is running at a low load, it can’t switch to full
load immediately and it needs some time to increase the
power.
※ An example:
We have a 2KVA generator.
We adjust the AC IN Current Limit (B2-05) setting to 8A and we enable Power
Assist (C1-05=1). We have no load connected and the batteries are fully charged.
Therefore, no
current from generator is drawn.
At this moment, we connect a load of 7A to the Intelligence Plus with this setting
(B2-09) disabled, the Intelligence Plus would not react because the load is below
the AC IN Current Limit (B2-05) setting. The result is that the full load is
connected to generator which will drop in voltage because it can’t deliver that
current instantly which could result in switching to INVERTER.
If however we had this setting (Dynamic Current Limit) enabled, the effective
AC input current limit would be far lower than 8A because the load was zero. So
connecting a load of 7A will result in Intelligence Plus starting to power assist
and no voltage drop is being examined on the AC OUT. The generator starts to
supply the load and the effective AC input current limit will increase to 8A
slowly. At the moment, the Intelligence Plus will stop Power Assist and the full
load is on the generator.
This is powerful option in combination with Power Assist but even without
Power Assist, it can prevent unnecessary switching to INVERTER because the
charge current will reduce when AC input current becomes higher than the
effective AC input current limit.
B2-14: INV only: Bat Lo?V ATS ON
B2-15: INV only: Bat Lo?S ATS ON
B2-16: INV only: Bat Hi?V ATSOFF
B2-17: INV only: Bat Lo?S ATSOFF
B2-14~B2-17 are used to set the condition of ATS to be ON/OFF in INVERTER
Only mode.
When Intelligence Plus is in INVERTER Only mode, INVERTER mode takes
6-7
priority to supply voltage to AC OUT for load consumption. When AC IN power
is ready, INVERTER is active and battery is about to be exhausted, ATS will be
switched on to ensure AC OUT to continuously supply the load. At the moment,
AC OUT will be supplied by AC IN power.
B2-14 and B2-15 are used to set ATS to be “ON” to supply AC IN power to the
AC OUT load when the battery voltage is lower than B2-14 voltage value and
longer than the second time set in B2-15 in INVERTER Only mode.
(ATS ON+INVERTER OFF+AC CHARGER OFF)
B2-16 and B2-17 are used to set ATS to be “OFF” when the battery voltage is
higher than B2-16 voltage value and longer than the second time set in B2-17 in
INVERTER Only mode.
(INVERTER ON+ATS OFF+ AC CHARGER OFF)
B2-18: AUTO1: ACIN Current Lmt
Use constant B2-18 to set the specific maximum AC input current in AUTO 1.
This value is very important for both battery charger and inverter output power
assist.
When using constant B2-18, the values will be loaded to B2-05 to determine the
actual AC current limit in Auto 1 mode.
B2-19: AUTO2: ACIN Current Lmt
Use constant B2-19 to set the specific maximum AC input current in AUTO 2.
This value is very important for both battery charger and inverter output power
assist.
When using constant B2-19, the values will be loaded to B2-05 to determine the
actual AC current limit in Auto 2 mode.
B2-20: INV only: ACIN Current Lmt
Use constant B2-20 to set the set the specific maximum AC input current in
INVERTER ONLY. This value is very important for both battery charger and
inverter output power assist.
When using constant B2-20, the values will be loaded to B2-05 to determine the
actual AC current limit in Inverter Only mode.
B2-21: CHG only: ACIN Current Lmt
Use constant B2-21 to set the set the specific maximum AC input current in
CHARGER ONLY. This value is very important for both battery charger and
6-8
inverter output power assist.
When using constant B2-21, the values will be loaded to B2-05 to determine the
actual AC current limit in Charger Only mode.
C Group (INVERTER):
C1 Group (INVERTER)
C1-01: INVERTER Output Voltage
Use constant C1-01 to change the RMS output voltage of the INVERTER.
C1-02: Bat Low ?V Shut-down
With this setting, one can determine the battery voltage at which level the
INVERTER will switch off. This can be useful to prevent drawing too much
current from an exhausted battery.
This voltage level will always lie below the Bat Low ? V Restart (C1-03) level.
In fact, changing this level will also change the Bat Low ? V Restart (C1-03)
level.
C1-03=C1-02+offset voltage
For example: C3-1500-122, when C1-02=9.3V, C1-03=10.9V, offset
voltage=1.6V (10.9-9.3), C1-03 will automatically go to 11.6V(10.0+1.6) after
C1-02 is changed to 10.0V.
C1-03: Battery Low ? V Restart
This setting forms a pair with Bat Low ? V Shut-down (C1-02). With this setting,
one determines the battery voltage at which level the INVERTER will switch on.
In fact, the parameter which is changed is the difference between Bat Low ? V
Shut-down (C1-02) and Bat Low ? V Restart (C1-03). The result of this is that
when changing the Bat Low ? V Shut-down (C1-02) level, this level also
changes.
C1-04: Auto Power Saving
When there is no load connected, set C1-04=1 (Initial setting) to active the
power saving function by reducing the output voltage to be 144V for 220V
model and to be 72 for 110V model.
Setting C1-04=0 can disable the auto power saving and the output voltage would
be continuously supplied as the same default voltage even when there is no load
connected.
6-9
C1-05: Power Assist Select
Using this constant C1-05, the Power Assist feature can be enabled or disabled.
Use Power Assist to prevent an external circuit breaker to trip when the load on
the Intelligence Plus is too high.
If the load exceeds the AC IN Current Limit (B2-05), the Intelligence Plus will
start inverting and will provide the extra current needed.
※ Note: When Power Assist is enabled. C1-05=1 (Initial setting), there is a minimum
AC input current limit of approximate 2-3 Amps. Setting a lower limit (B2-05)
than this minimum value will result in the minimum limit.
Setting
Function
C1-05=0
Power Assist Function is disabled.
C1-05=1
(Initial setting)
Power Assist Function is enabled.
C1-06: Power Assist Level
This setting is a special setting for power assist mode when the Intelligence Plus
is charging and due to a sudden load, the AC IN current exceeds the AC IN
Current Limit (B2-05), the Intelligence Plus will switch to power assist mode
(when C1-05=1)
At that moment, the current need is unknown. The Intelligence Plus makes an
assumption of the magnitude of this current. This assumption is equal to AC IN
Current Limit (B2-05) multiplied by this Power Assist Level (C1-06). The
default factor is two.
This will prevent the circuit breaker from tripping because current provided by
the INVERTER minus the current drawn by the load is always lower than the
rating of the circuit breaker. This happens, of course, when the AC IN Current
Limit (B2-05) is correctly adjusted to the circuit breaker.
If for instance in a generator application, the circuit breaker has a higher value
than the AC IN Current Limit (B2-05)(Normal load of generator is lower than
maximum peak load) and one knows that the load which is switched on always
draws a certain current, one can consider to increase this factor (C1-06) to
achieve better results with sudden load changes.
Example: When during the peak power consumption time in the evening, the
loads such as microwave, oven and air conditioning…etc. are switched on at the
same time, the total load consumption might be for example be 4500W. At this
time, Intelligence Plus and 3000W and the generator is also 3000W so the AC IN
can only support 3000W and for the rest of 1500W, it would be supplied by the
DC to AC inverter. If AC IN Current Limit (B2-05) is set at 10A, and the default
6-10
setting of C1-06 is 2. Then the max. output can supply 20A (B2-05 multiplies
C1-06) to the load without any tripping and because the load is unknown so users
assume such load consumption. As B2-05 is 10A only so the rest of 10A will be
power supplied from DC/AC inverter.
6-11
D Group (AC CHARGER):
D1 Group (Charger)
D1-02: Charge Curve
Setting
D1-02=1
Fixed
D1-02=2
Adaptive
D1-02=3
(Initial setting)
Function
Adaptive + Battery safe
The Fixed (D1-02=1) charge curve will have a faxed Absorption Time (D1-06).
The Adaptive (D1-02=2) and Adaptive +Battery safe (D1-02=3) curve derive the
Absorption time from the Bulk time. The maximum Absorption time of these
charge curves is determined by Absorption Time (D1-06) setting.
The Adaptive + Battery safe (D1-02=3) curve has a special regulation in the
absorption phase. The absorption phase will start when the battery voltage
reaches 14.4V( for 12V batteries) regardless of the specified Absorption Voltage
(D1-03). During the absorption phase, the voltage will increase with a fixed ramp
until the voltage reaches the absorption voltage or the calculated absorption time
is over in the latter case, the absorption phase will end before the absorption
voltage is reached.
Amps
64 32
Charge current
120%
100%
80%
60%
40%
20%
0%
Time
Volts
Charge voltage
16
60 30
15
56 28
14
52 26
13
48 24
12
44 22
11
40 20
10
Battery Safe mode
20 x Bulk-hours or
Max.Absorption time
Time
Bulk hours
Absorption 1 day 7 days reduced
float
float
7 days
reduced
1 hour Repeat ed Absor pt i on
6-12
D1-03: Absorption Voltage
Use this setting to specify the absorption voltage.
D1-04: Repeated Absorption Time
Use this setting to specify the duration of the repeated absorption “pulses”.
D1-05: Repeated Absorption Interval
Use this setting to specify the interval between repeated absorptions.
D1-06: Maximum Absorption Time
If the Charge Curve is fixed (D1-02=1), then this setting is used to determine the
absorption time.
In all other cases, this setting determines the maximum absorption time.
D1-07: Float Voltage
Use this setting to specify the float voltage.
D1-08: Charge Current
Use this setting to specify the current with which the battery is charged in the
bulk phase.
※ Note: The actual charge current depends on other conditions also. Therefore,
under certain circumstances, it is possible that the actual charge current is lower
than this setting. This can, among others, be due to:
A low AC IN Current Limit (B2-05) in combination with a high load.
A high environmental temperature
A too high ripple voltage due to improper cabling.
D1-09: Stop After 10Hr Bulk
This is a safety setting. When the bulk phase lasts more than 10 hours, this can
be indication that a battery cell is damaged.
The absorption voltage (or the 14.4V for battery when Battery Safe (D1-02=3)
mode is used) will never be reached in that case and the other cells will be
over-charged resulting in the production of an explosive gas.
Therefore, the charger is disabled if the bulk phase lasts more than 10 hours.
6-13
This setting can be disabled because it does not always indicate a problem when
the bulk phase lasts very long. The charge current can be very low due to limited
AC input current and/or AC loads. Also, DC loads can “steal away” part of the
charge current. In that case, the bulk phase will need more time to complete and
this setting must be disabled.
※ Note: When this setting is disabled, there is no safety check against over-charging.
Setting
D1-09=0
D1-09=1
(Initial setting)
Function
Stop After 10Hr Bulk setting is disabled
Stop After 10Hr Bulk setting is enabled
D1-10: Equalize Mode Select (Storage Mode Select)
This setting is used for enabling/disabling the Equalize Mode.
In this mode, the voltage setpoint is 13.2V (for 12V battery). If Equalize mode is
disabled, then the normal float voltage will be used.
Setting
Function
D1-10=0
Equalize mode is disabled
D1-10=1
(Initial setting)
Equalize mode is enabled
D1-11: Battery Type Selector
Setting
Function
D1-11=1
Default Setting
Flooded AGM 1, 14.2 Bulk, 13.4 Float, 4 Hr Absorption
D1-11=0
User Defined
D1-11=2
AGM 2, 14.7 Bulk, 13.6 Float, 8 Hr Absorption
D1-11=3
Gel, 14.0 Bulk, 13.6 Float, 2 Hr Absorption
6-14
E Group (Auxiliary Relay):
E1 Group (Setting Aux-Relay 1 ON Condition)
E1-01: LOAD Higher than ? Amps
E1-02: LOAD Higher for ? sec
Use these settings to switch the Aux-Relay 1 ON. When the actual AC OUT load
is above a certain value (E1-01) for a certain time (E1-02).
The corresponding Aux-Relay 1 OFF condition is
E2-01: Load Lower than ? Amps and
E2-02: Load Lower for ? sec.
※ Note: If setting E1-02=0 sec (Initial setting). Then the E1-01 is ignored.
※ Note: If setting E2-02=0 sec (Initial setting). Then the E2-01 is ignored.
E1-03: Udc Lower than ? Voltage
E1-04: Udc Lower for ? sec
Use these settings to switch the Aux-Relay 1 ON. When battery voltage becomes
lower than a certain limit (E1-03) for a certain time (E1-04).
※ Note: If E1-04=0 sec (Initial setting), then E1-03 is ignored.
E1-05: Udc Higher than ? Voltage
E1-06: Udc Higher for ? sec
Use these settings to switch the Aux-Relay 1 ON when battery voltage becomes
higher than a certain limit (E1-05) for a certain time (E1-06).
※ Note: If E1-06=0 sec (Initial setting), then E1-05 is ignored.
E1-07: Not Charge for ? sec
Use this setting to switch on the Aux-Relay 1 when the AC CHARGER is not
charging for a certain time (E1-07).
Normally used for generating an alarm situation.
E1-08: Fan ON for ? sec
This will switch the Aux-Relay 1 ON when the internal fan switches on. This can
be used together with the E2-08: Fan OFF for ? sec setting to drive an external
fan.
6-15
E1-09: When bulk protection is activated.
This will set the Aux-Relay1 ON when the “bulk protection” (D1-09=1) is
activated. This condition will remain valid as long as the AC CHARGER is
disabled due to that safety mechanism. One can use this setting to generate an
alarm.
E1-10: System Fault Occurs
This will switch on the Aux-Relay 1 when the Intelligence Plus switches off due
to an internal alarm situation.
E1-11: Temp. Alarm Select (When E1-12=0, ignore this setting)
E1-12: Temp. Alarm for ? sec
If you want to switch on the Aux-Relay 1 when there is a over temperature alarm,
this setting (E1-11) can be used to choose between pre-alarm or normal alarm.
As with other Aux-Relay 1 settings, a delay value (E1-12) must be specified also.
This can be done with Delay value for set Aux-Relay 1 ON when over
temperature alarm (E1-12) setting.
E1-13: Low Batt. Alarm Select (When E1-14=0, ignore this setting)
E1-14: Low Batt. Alarm for ? sec
If you want to switch on the Aux-Relay 1 when there is a low battery alarm, this
setting (E1-13) can be used to choose between pre-alarm or normal alarm.
As with other Aux-Relay 1 settings, a delay value (E1-14) must be specified also.
This can be done with Delay value for set Aux-relay 1 ON when low battery
alarm (E1-14) setting.
E1-15: OverLoad Alarm Select (When E1-16=0, ignore this setting)
E1-16: OverLoad Alarm for ? sec
If you want to switch on the Aux-Relay 1 when there is a overLoad alarm, this
setting (E1-15) can be used to choose between pre-alarm or normal alarm.
As with other Aux-Relay 1 setting, a delay value (E1-16) must be specified also.
This can be done with Delay value for set Aux-Relay 1 ON when overload alarm
(E1-16) setting.
E1-17: Udc Ripple Alarm Select (When E1-18=0, ignore this setting)
E1-18: Udc Ripple Alarm for ? sec
6-16
If you want to switch on the Aux-Relay 1 when there is a battery voltage ripple
alarm. This setting (E1-17) can be used to choose between pre-alarm or normal
alarm.
As with other Aux-Relay 2, setting a delay value (E1-18) must be specified also.
This can be done with Delay value for set Aux-Relay 1 ON when battery voltage
ripple alarm (E1-18) setting.
E2 Group (Setting Aux-Relay 1 OFF Condition)
E2-01: Load Lower than ? Amps
E2-02: Load Lower for ? sec
Use these settings to switch Aux-Relay 1 OFF. When the actual AC OUT Load is
below a certain value (E2-01) for a certain time (E2-02).
The corresponding Aux-Relay ON condition is
E1-01: Load Higher than ? Amps and
E1-02: Load Higher for ? sec.
※ Note: If setting E2-02 (E1-02)=0 sec (Initial setting), then the E2-01 (E1-01) is
ignored.
E2-03: Udc Lower than ? Voltage
E2-04: Udc Lower for ? sec
Use these settings to switch off the Aux-Relay 1 when battery voltage becomes
lower than a certain limit (E2-03) for a certain time (E2-04)
※ Note: If E2-04=0 sec (Initial Setting), then E2-03 is ignored.
E2-05: Udc Higher than ? Voltage
E2-06: Udc Higher for ? sec
Use these settings to switch off the Aux-Relay 1 when battery voltage becomes
higher than a certain limit (E2-05) for a certain time (E2-06)
※ Note: If E2-06=0 sec (Initial setting), then E2-05 is ignored.
E2-07: Charging for ? sec
This setting switches the Aux-Relay 1 OFF when the AC CHARGER started for
a certain time (E2-07). This can be useful when the Aux-Relay 1 is for instance
used a low battery alarm.
Use the Set Udc Lower than ? Voltage (E1-03) setting to start the alarm and use
this setting (E2-07) to stop it.
6-17
※ Note: As along as the battery voltage is lower than the specified limit (E1-03), the
alarm will be active.
E2-08: Fan OFF for ? sec
This will switch the Aux-Relay 1 OFF when the internal fan switches off. This
can be used together with the E1-08: Fan ON for ? sec setting to drive an
external fan.
E2-09: Charge finished for ? Min (When E2-09=0, ignore this setting)
This condition becomes active when the charge bulk phase is finished for a
certain time (E2-09).
For the charge curve, take a look at for instance the Charge Current (D1-08)
setting.
This is useful when the Aux-Relay 1 is used to start a generator. Once started,
one might want to keep the generator on until the batteries are more or less
charged.
E2-10: Aux-Relay 1 not ON for ? minutes (When E2-10=0, ignore this setting)
If one does not need special off condition, one can use this setting and the
Aux-Relay 1 will switch off automatically when there has been no ON condition
for a certain time (E2-10).
E2-11: AC IN loss for ? sec (When E2-11=0, ignore this setting)
This setting will switch off Aux-Relay1 if the RMS value of AC IN voltage is
too low for a certain time (E2-11).
This AC level is determined by the AC IN Low Disconnect (B2-01) setting.
Use this setting (E2-11) to disable re-starting of a generator which is switched off
by hand when the Aux-Relay 1 is used to generate a start signal for that
generator.
E2-12: No Temp. Alarm Select (When E2-13=0, ignore this setting)
E2-13: No Temp. Alarm for ? sec
If you want to switch off the Aux-Relay 1 when there is no over temperature
alarm, this setting (E2-12) can be used to choose between pre-alarm or normal
alarm.
As with other Aux-Relay 1 setting, a delay value must be specified also. This can
6-18
be done with the Delay value for set Aux-Relay 1 OFF when No
Overtemperature Alarm (E2-13) setting.
E2-14: No Low Batt. Alarm Select (When E2-15=0, ignore this setting)
E2-15: No Low Batt Alarm for ? sec
If you want to switch off the Aux-Relay 1 when there is no low battery alarm,
this setting (E2-14) can be used to choose between pre-alarm or normal alarm.
As with other Aux-Relay 1 setting, a delay must be specified also. This can be
done with the Delay value for set Aux-Relay 1 OFF when No Low Battery Alarm
(E2-15) setting.
E2-16: No OverLoad Alarm Select (When E2-17=0, ignore this setting)
E2-17: No OverLoad Alarm for ? sec
If you want to switch off the Aux-Relay 1 when there is no OverLoad alarm, this
setting (E2-16) can be used to choose between pre-alarm or normal alarm.
As with other Aux-Relay 1 setting, a delay must be specified also. This can be
done with the Delay value for set Aux-Relay 1 OFF when No OverLoad Alarm
(E2-17) setting.
E2-18: No Udc Ripple Alarm Select (When E2-19=0, ignore this setting)
E2-19: No Udc Ripple Alarm for ? sec
If you want to switch off the Aux-Relay 1 when there is no battery voltage ripple
alarm, this setting (E2-18) can be used to choose between pre-alarm or normal
alarm.
As with other Aux-Relay 1 setting, a delay must be specified also. This can be
done with the Delay value for set Aux-Relay 1 OFF when No Battery voltage
Ripple Alarm (E2-19) setting.
E3 Group (Setting Aux-Relay 2 ON Condition)
E4 Group (Setting Aux-Relay 2 OFF Condition)
E5 Group (Setting Aux-Relay 3 ON Condition)
E6 Group (Setting Aux-Relay 3 OFF Condition)
※ Note: The functions and the settings of E3, E4, E5 and E6 Groups are
exactly the same as those of E1 and E2 Group so please refer to above
E1 and E2 Group description and setting for E3, E4, E5 and E6
Groups.
6-19
6-20
E7 Group (Aux-Relay 1 Option)
E7-01: Aux-Relay 1 Usage Select
Setting
E7-01=0
(Initial setting)
E7-01=1
Function
Auxiliary Relay 1 is not allowed to be active (Idle).
Auxiliary Relay 1 is allowed to be active.
E7-02: Aux-Relay 1 Invert Select
Setting
E7-02=0
(Initial setting)
E7-02=1
Function
Auxiliary Relay 1 is normal.
Auxiliary Relay 1 is Invert switch and that is ON becomes off
and OFF becomes ON.
This is used to invert the Aux-Relay 1 So ON becomes OFF and OFF becomes
ON. In the program, the labels are adapted to reflect this inversion.
E7-03: Aux1 not Switch Off Time (Aux-Relay 1 do not switch off with certain
period)
Use constant E7-03 to determine the minimum ON time.
The Aux-Relay 1 will not be switched off within the time specified here
measured from the moment that all on condition are inactive.
※ Note: OFF conditions with a delay of 0 minute, ignore this setting.
E8 Group (Aux-Relay 2 Option)
E9 Group (Aux-Relay 3 Option)
※ The functions and the settings of E8 and E9 Groups are exactly the
same as those of E7 Group so please refer to above E7 Group
description and setting for E8 and E9 Groups.
6-21
O Group (Operator):
O1 Group (Monitor Select)
O1-01: Power ON LCD Monitor Select
After power of the Intelligence Plus is on, the monitor selections will be showed
on LCD Display, U1-05 Battery Voltage is the initial display shown.
All the constants in U1 Group (U1-01~U1-14) can be monitored.
O1-02: Key Idle Detect Time
Use constant O1-02 to set the idle time when the keyboard is not operated and
once any key is pressed, the display will return to the LCD monitor selection
value set in constant O1-01.
Initial Setting=180 sec, setting range: 10~600 sec.
O2 Group (Key Selections)
O2-01: Key Pressed Beep Select
Setting
O2-01=0
O2-01=1
(Initial setting)
Function
When keys are pressed, beep sound will not be heard.
When keys are pressed, beep sound will be heard.
O2-02: Elapsed Time Reset
Use constant O2-02 to reset elapsed time.
O2-03: Elapsed Time Select
Setting
O2-03=0
(Initial setting)
O2-03=1
Function
The elapsed time started to be counted after power is on.
The elapsed time started to be counted after RUN.
O2-04: Intelligence Plus Model
This is the model number to be displayed.
6-22
O2-06: MODE Key Hold Time
Use constant O2-06 to set the time it takes to press MODE key to transfer from
one of four modes to another mode. (This has to be done in STOP mode)
Initial setting=5 sec, setting range: 2~10 sec.
O2-07: RUN/STOP Key Hold Time
Use constant O2-07 to set the time it takes to press RUN/STOP key to activate its
function.
Initial setting=2 sec, setting range: 2~10 sec.
O2-08: Power ON Auto Run Select
Use constant O2-08 to select to auto run manually or automatically.
Setting
O2-08=0
O2-08=1
(Initial setting)
Function
Auto Run is active when pressing Run/STOP key
Auto Run is active when the power is on.
O2-09: LCD Display Idle Time Set
When O2-09=0, Display Idle Function is disabled.
Use constant O2-09 to set the idle time when the keypad is not operated and all
the LCD Display and LED Indicators of the Intelligence Plus entering the idle
mode which only RUN/STOP indicator is active.
Once any key on the panel is pressed, it will return to the display before Idle
status.
Initial setting=10 min, setting range: 0~60 min.
6-23
U Group (Monitor):
U1 Group (Monitor)
U1-01: AC IN Voltage
Use U1-01 to monitor the current voltage value of AC IN power in unit of 0.1V.
U1-02: AC IN Current
Use U1-02 to monitor the current value of AC IN power in unit of 0.1A.
U1-03: AC OUT Voltage
Use constant U1-03 to monitor AC OUT voltage value in unit of 0.1V.
U1-04: AC OUT Current
Use constant U1-04 to monitor AC OUT current value in unit of 0.1A.
U1-05: Battery Voltage
Use constant U1-05 to monitor the battery voltage in unit of 0.1V.
U1-06: Battery Ripple Voltage
Use constant U1-06 to monitor the battery ripple voltage in unit of 0.1V.
U1-07: Battery Current
Use constant U1-07 to monitor battery current value in unit of 0.1A.
U1-08: Control Mode
Use constant U1-08 to monitor the current control mode (AUTO 1, AUTO 2,
Inverter Only or Charger Only)
6-24
U1-09: Operation Status
There are 12 digits to account for each operation status. Please see NOTE 1 in
Chapter 5.
U1-10: Aux-Relay Status
Use constant U1-10 to monitor the ON/OFF status of 3 sets of Aux-Relay (RY1,
RY2, RY3). Please see NOTE 2 in Chapter 5.
U1-11: Elapsed Time
Use constant U1-11 to monitor the elapsed time after power ON (O2-03=0) or
after RUN (O2-03=1) in unit of 1 hour.
U1-12: Battery Temperature Sensor
Use constant U1-12 to monitor the temperature that has been detected by
Battery Temperature Sensor (BTS-3) in unit of 1℃.
U1-13: CPU ID1
Use constant U1-13 to check the software version 1.
U1-14: CPU ID2
Use constant U1-14 to check the software version 2.
6-25
U2 Group (Fault Trace)
U2-01: Current Fault
Use constant U2-01 to monitor the current fault that results in “Intelligence
Plus” stopping operating.
U2-02: Last Fault
Use constant U2-02 to monitor the last fault that has been recorded.
U2-03: AC IN Voltage
Use constant U2-03 to monitor the AC input voltage value in unit of 0.1V when
the current fault occurs.
U2-04: AC IN Current
Use constant U2-04 to monitor the AC input current value in unit of 0.1A when
the current fault occurs.
U2-05: AC OUT Voltage
Use constant U2-05 to monitor the AC output voltage value in unit of 0.1V
when the current fault occurs.
U2-06: AC OUT Current
Use constant U2-06 to monitor the AC output current value in unit of 0.1A when
the current fault occurs.
U2-07: Battery Voltage
Use constant U2-07 to monitor the battery voltage value in unit of 0.1V when
the current fault occurs.
U2-08: Battery Ripple Volt
Use constant U2-08 to monitor the battery ripple voltage in unit of 0.1V when
the current fault occurs.
6-26
U2-09: Battery Current
Use constant U2-09 to monitor the battery current value in unit of 0.1A when the
current fault occurs.
U2-10: Control Mode
Use constant U2-10 to monitor what the control mode (AUTO 1, AUTO 2,
Inverter Only or Charger Only) is when the current fault occurs.
U2-11: Operation Status
Use constant U2-11 to monitor 12 digits which account for each operation status
when the current fault occurs. Please see NOTE 1 in Chapter 5.
U2-12: Aux-Relay Status
Use constant U2-12 to monitor the ON/OFF status of 3 sets of Aux-Relay (RY1,
RY2, RY3) when the current fault occurs. Please see NOTE 2 in Chapter 5.
U2-13: Elapsed Time
Use constant U2-13 to monitor the elapsed time after power ON (O2-03=0) or
after RUN (O2-03=1) in unit of 1 hour when the current fault occurs.
U2-26: Battery Temperature Sensor
Use constant U2-26 to monitor the current temperature that has been detected by
Battery Temperature Sensor (BTS-3) in unit of 1℃ when the current fault
occurs.
6-27
U3 Group (Fault History)
U3-01: Last Fault
Use constant U3-01 to monitor the latest fault stored in the software.
U3-02: Fault Message 2
Use constant U3-02 to monitor the most recent second fault stored in the
software.
U3-03: Fault Message 3
Use constant U3-03 to monitor the most recent third fault stored in the software.
U3-04: Fault Message 4
Use constant U3-04 to monitor the most recent fourth fault stored in the
software.
U3-05: Elapsed Time 1
Use constant U3-05 to monitor the elapsed time before the latest fault occurs.
U3-06: Elapsed Time 2
Use constant U3-06 to monitor the elapsed time before the most recent second
fault occurs.
U3-07: Elapsed Time 3
Use constant U3-07 to monitor the elapsed time before the most recent third
fault occurs.
U3-08: Elapsed Time 4
Use constant U3-08 to monitor the elapsed time before the most recent fourth
fault occurs.
6-28
Chapter 7 Trouble Shooting Table
Proceed as follows for a quick detection of common faults.
DC loads must be disconnected from the batteries and the AC loads must be disconnected
from the INVERTER before the INVERTER and/or battery charger (AC CHARGER) is
tested.
Consult your Newmar dealer if the fault cannot be resolved.
Problem or Error message
Cause
The “Intelligence Plus” fails
to operate when power on.
The battery voltage is too
high or too low.
Cooling fan runs after AC
power is removed
Intelligence Plus has high
load and high ambient
temperature
‘Udc-UV’
Battery under volt
Udc-UV
Battery under volt
‘OL’
Inverter OverLoad
OL
Inverter OverLoad
‘OH’
Heatsink Max Temp.
Solution
Ensure that the battery
voltage is within the correct
value range.
Normal for fan to run for up
30 minutes after removal of
AC power for circuitry to
cool to 55⁰C
The battery voltage is low.
Charge the battery or check
the battery connections.
The “Intelligence Plus” cuts
out because the battery
voltage is too low.
Charge the battery or check
the battery connections.
The load on the inverter of
“Intelligence Plus” is higher
than the normal load.
Reduce the load.
The INVERTER of
“Intelligence Plus” cuts out
due to excessive load.
Reduce the load.
The ambient temperature is
too high, or the load is
excessive.
Place the “Intelligence Plus”
in a cool and well-ventilated
room, or reduce the load.
7-1
OH
Heatsink Max Temp.
‘Udc-ripple’
Volt Ripple Exceeds
Udc-ripple
Volt Ripple Exceeds
‘Udc-OV’
Battery over voltage.
Udc-OV
Battery over voltage.
‘Idc-OC’
Over current.
Idc-OC
Over current.
The ambient temperature is
Place the “Intelligence Plus” in a
too high, or the load is
cool and well-ventilated room, or
excessive.
reduce the load.
Voltage ripple on the DC
Check the battery cables and
terminals.
input exceeds 1.25Vrms
Check the battery capacity;
increase it if necessary.
The INVERTER of
“Intelligence Plus” cuts out
Install batteries with a higher
capacity.
as a result of excessive
voltage ripple on the DC
input
Use shorter and/or thicker battery
cables and reset the Intelligence
Plus (Power OFF and ON again).
Battery charger is not in
normal charging status to
cause battery voltage too
high.
Replace the “Intelligence Plus”.
Incorrect battery voltage
connection (12V system but
connected to 24V battery)
Recheck if the Intelligence Plus
and the battery voltage is
matched.
Stop the Charge mode of the
The actual charge current is
“Intelligence Plus”.
1.5 times larger than the set
current value (D1-08) when
Repair or replace the
AC CHARGER is operating.
“Intelligence Plus”.
7-2
‘Bat-NG’
Battery Fault
Bat-NG
Battery Fault
The charger is not
functioning
The charging time of AC
CHARGER has been over
10 hours and remains in
Bulk Charge mode.
(D1-09=1) shows the battery
is at fault.
Replace the battery banks.
The AC IN voltage or
frequency is out of range.
Ensure that the AC IN voltage is
within the range
220V system: 180VAC~260VAC
110V system:
90VAC~130VAC
And that the frequency matches the
setting.
“Intelligence Plus” internal
circuit breaker has tripped.
Reset the internal circuit breaker.
Set the charging current at between
Incorrect charging current.
The battery is not being
charged fully.
The battery is overcharged.
(0.1~0.2) × battery capacity.
A defective battery
connection.
Check the battery terminals.
The absorption voltage has
Adjust the absorption voltage to the
been set an incorrect value.
correct value.
The float voltage has been
set to an incorrect value.
Adjust the float voltage to the correct
value.
The internal DC fuse is
defective
“Intelligence Plus” is damaged.
The absorption voltage has
been set to an incorrect
value.
Adjust the absorption voltage to the
correct value.
The float voltage has been
set to an incorrect value.
Adjust the float voltage to the correct
value.
7-3
The battery is too small.
The battery is overcharged.
Reduce the charging current or use a
battery with a higher capacity.
A defective battery.
Replace the battery.
The battery is too hot.
Connect a Battery Temperature Sensor
(BTS-3)
1. Allow battery to cool
Battery overtemperature
(> 50℃)
down.
2. Place battery in a cool
environment.
3. Check for shorted cells.
Battery charge current drop
to 0 A when the absorption
voltage is reached.
Battery Temperature Sensor
(BTS-3) is faulty
1. Unplug Battery
Temperature Sensor
(BTS-3) from
“Intelligence Plus” and power
off the “Intelligence Plus”
then wait 5 seconds and
power on again.
2. If the “Intelligence Plus” AC
CHARGE normally, the
BTS-3 is faulty and
needs to be replaced.
Factory Contact Information
If a problem with your Inverter-Charger persists after you have applied the above outlined
solutions, or if you have any questions about the installation and proper operation of your
Inverter-Charger, please contact NEWMAR’s Technical Service:
Phone: 714-751-0488 – From the hours of 7:00 A.M. to 4:30 P.M. weekdays (PST)
Fax: 714-957-1621 – Anytime
E-mail: [email protected] – Anytime
We will be happy to consult with you to resolve any problem you may have. If it appears the
Inverter-Charger must be returned to the factory for repair, we will issue a Return Materials
Authorization (RMA) at that time.
7-4